Contents
Legal Statement...4
Active@ UNDELETE Overview... 5
Getting Started with Active@ UNDELETE... 6
Active@ UNDELETE Views And Windows...6
Recovery Explorer View... 7
Logical Drive Scan Result View... 7
Physical Device Scan View... 8
Search Results View...10
Application Log...11
Welcome View...11
Using Active@ UNDELETE Overview... 13
Recover deleted Files and Folders... 14
Scan a Volume (Logical Drive) for deleted files...15
Scan for files by their signatures...17
Recover files and folders... 19
Virtual RAID Assembly... 20
Decrypt recovered files... 21
Restore Partition...23
Scan Disk (Physical Device)... 23
Scan for Deleted Partitions... 23
Edit or Clone Detected Partitions...24
Restore detected partition... 25
Using Scan Results... 26
Stop and Resume a scan...27
Filter detected partitions by certainty... 28
Work with scan results... 29
File Preview... 30
Search for deleted Files and Folders...31
File Filter Toolbar...33
Supported File Signatures... 34
Custom (user defined) file signature templates... 35
Custom Signatures Size Script... 38
How to Use Wildcards...43
Application Preferences...44
Active@ UNDELETE Tools Overview...48
Hardware Diagnostic File...48
Partition Manager Overview...48
Initialize Disk (Physical Device)...49
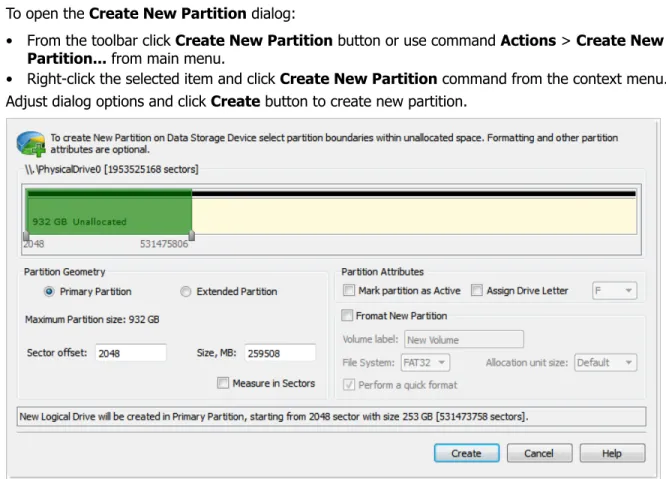
Create New Partition...50
Change Partition Attributes...51
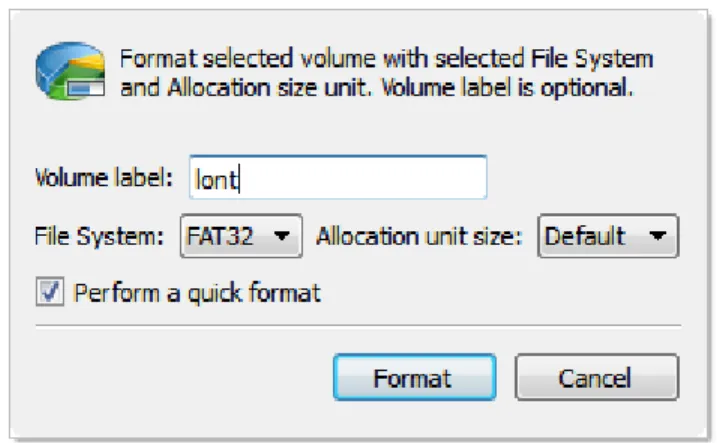
Format Partition...51
Edit Boot Sectors...52
Edit Partition Table...53
Create Virtual Partition...54
Disk Editor Tool... 54
Open objects in Disk Editor... 55
Subject Navigation and Information... 56
Data Inspector... 57
Using Bookmarks...58
Editing with Disk Editor... 60
Rollback Partition Changes... 66
Disk Image Overview...66
Create a Disk Image... 67
Open Disk Image...69
Virtual Partition (Logical drive clone)...71
Working with a corrupted RAID system... 72
Active@ UNDELETE Wizards Overview... 75
Active@ UNDELETE Recovery Wizards Overview... 75
Recover Deleted Files Wizard...75
Recover Files by Signature Wizard... 77
Recover files from a deleted partitions wizard... 80
File Recovery Expert Wizard... 82
Restore a Deleted Partition Wizard...82
Create a New Partition Wizard... 84
Create a virtual RAID Array Wizard... 85
Active@ UNDELETE Disk Image Wizards Overview...87
Create a Disk Image Wizard... 87
Open a Disk Image Wizard...88
Verify a Disk Image Wizard... 90
Data Recovery Concept Overview... 93
Hardware and Disk Architecture... 94
Hardware and Disk Organization...94
Hard Disk Drive Basics... 94
Master Boot Record (MBR)... 96
Partition Table... 97
Disk Arrays (RAID's)... 102
Logical Disk Manager (LDM) Overview...104
File Systems...106
Windows NT File System (NTFS)...106
NTFS Partition Boot Sector... 107
NTFS Master File Table (MFT)... 109
NTFS File Types... 110
Data Integrity and Recoverability with NTFS... 116
Extended File System (exFAT)...117
Volume Layout...117
exFAT Directory Structure...122
exFAT Defined Directory Entries...124
exFAT Cluster Heap...131
File System (FAT)...133
FAT Partition Boot Sector...133
FAT File Allocation Table... 137
FAT Root Folder... 138
FAT Folder Structure... 138
FAT32 Features...139
File Recovery Process... 148
Disk scan for deleted entries...148
Define clusters chain for the deleted entry...151
Clusters chain recovery for the deleted entry... 153
Partition Recovery Process...155
Damaged MBR...156
Partition is deleted or Partition Table is damaged... 158
Partition Boot Sector is damaged... 160
Legal Statement
Copyright © 2013, LSOFT TECHNOLOGIES INC. All rights reserved. No part of this documentation may be reproduced in any form or by any means or used to make any derivative work (such as translation, transformation, or adaptation) without written permission from LSOFT TECHNOLOGIES INC.
LSOFT TECHNOLOGIES INC. reserves the right to revise this documentation and to make changes in content from time to time without obligation on the part of LSOFT TECHNOLOGIES INC. to provide notification of such revision or change.
LSOFT TECHNOLOGIES INC. provides this documentation without warranty of any kind, either implied or expressed, including, but not limited to, the implied warranties of merchantability and fitness for a particular purpose. LSOFT may make improvements or changes in the product(s) and/or the program(s) described in this documentation at any time.
All technical data and computer software is commercial in nature and developed solely at private expense. As the User, or Installer/Administrator of this software, you agree not to remove or deface any portion of any legend provided on any licensed program or documentation contained in, or delivered to you in conjunction with, this User Guide.
Active@ UNDELETE Overview
Active @ UNDELETE is a software application designed to help you restore your lost data from deleted files, folders or even partitions.
Main Features short list
• Recover deleted files and folders.
• Detect deleted partitions and restore them or recover data from them. • Create a Disk Image for safe data restoration.
• Perform an Advanced Scan and organize the result using Scan Result View. • Restore data from damaged RAID-system drives.
• Work and recover data form dynamic RAID.
• Manage existing partitions or create new once using Partition Manager tool. • Edit disk content with the advanced Disk Editor tool.
• Preview files before restoring. • Supports HDDs larger then 2TB.
List of supported File Systems • NTFS • FAT • FAT32 • exFAT • HFS+ • Ext2/Ext3/Ext4 • UFS
• Windows 8, Windows 7, Windows 2000, Windows 2003, Windows Server 2008, Windows XP, WinPE • Administrators privileges required to install and run software
• Pentium processor or compatible • 30 MB available on hard disk • 64 MB of RAM or more
• Internet Explorer 8 or later, Mozilla Firefox 1.0 or later • Mouse or other pointing device
Getting Started with Active@ UNDELETE
Active@ UNDELETE is designed to explore and browse all data storage devices on your computer in different ways to find and recover lost data. All information in the application is organized in tabbed views that provide easy access to information for different purposes.
New to Active@ UNDELETE?
To familiarize you with the Active@ UNDELETE workspace, read the following topics in this guide: • Active@ UNDELETE Views And Windows on page 6
• Search for deleted Files and Folders on page 31 • File Filter Toolbar on page 33
Ready to Use?
• Recover deleted Files and Folders on page 14 • Restore Partition on page 23
• Virtual RAID Assembly on page 20 • Decrypt recovered files on page 21
Step-by-step guided tasks
• Active@ UNDELETE Recovery Wizards Overview on page 75 • Restore a Deleted Partition Wizard on page 82
• Create a New Partition Wizard on page 84
• Active@ UNDELETE Disk Image Wizards Overview on page 87
Advanced Tools
• Partition Manager Overview on page 48 • Disk Editor Tool on page 54
• Virtual RAID Assembly on page 20
Active@ UNDELETE Views And Windows
All information in the application is organized in tabbed views. Four of the main views are:
Recovery Explorer View on page 7 The main (default) view of Active@ UNDELETE. In this view you can see all available Data Storage Devices and Logical Drives, Assembled RAIDs and opened Disk Images.
Logical Drive Scan Result View on page 7 The Drive Scan Result View displays all files detected after a logical drive scan.
Physical Device Scan View on page 8 Shows scan results made in context of Data Storage Device.
Search Results View on page 10 This view is used to display search results after the search in corresponded context.
Application Log on page 11 This log screen monitors each action taken by the application and displays messages, notifications and other service information.
Welcome View on page 11 Summary view with main tools, wizards and recent activity shortcuts.
To browse through each of these views, click on each tab in turn. You may also open a view from the View menu.
To close the current view at any time, press CTRL+F4. To open any closed view, select it from the View menu.
The status bar, at the bottom of the workspace shows the current status of the application or status of the activity in progress. When Active@ UNDELETE is idle and ready to perform an operation, the status displays "Ready".
To toggle the status bar click View > Status Bar.
Note: When you run Active@ UNDELETE, the application gathers information about disks and partitions available to the system. During this preliminary operation, the status bar displays "Initializing..." and application prevents most other operations from starting. Application Log View shows detailed information about the initialization stage.
To modify the information displayed in columns in a table list, right-click any column header and select or clear columns from context menu.
Recovery Explorer View
The main view in Active@ UNDELETE is Recovery Explorer View. The view tab label displays “My Computer”.
This is the default view that you see after the application starts. It displays the hierarchical structure of all devices and drives, Virtual RAIDs and opened Disk Image. Scan Results appear here if you scan a device. To collapse or expand an item in this tree, click the arrow sign next to the item name.
Recovery Explorer shows its content in to modes:
Expert Device View (default) At this mode, all available Data Storage Devices with hierarchy of partitions and Logical Drives are present; Use this mode for advanced features, such as Advanced Device Scan or Virtual Partition Management;
Simple Drive view At this mode, only accessible Logical Drives are present;
Toggle between Simple Drive view and Expert Device view can be done by toolbar button.
To perform an action on any item (Data Storage Device, Drive etc.) select this and choose a command from:
• Toolbar at the top of the view; • Menu Action;
• or from the right-click context menu.
To add an item to the Recovery Toolbox, select the check box next to the item.
The Properties Panel displays default properties for each selected item. Updates to these properties appear dynamically along with commands and activities performed in the workspace. To toggle the Properties Pane click View > Properties pane.
Logical Drive Scan Result View
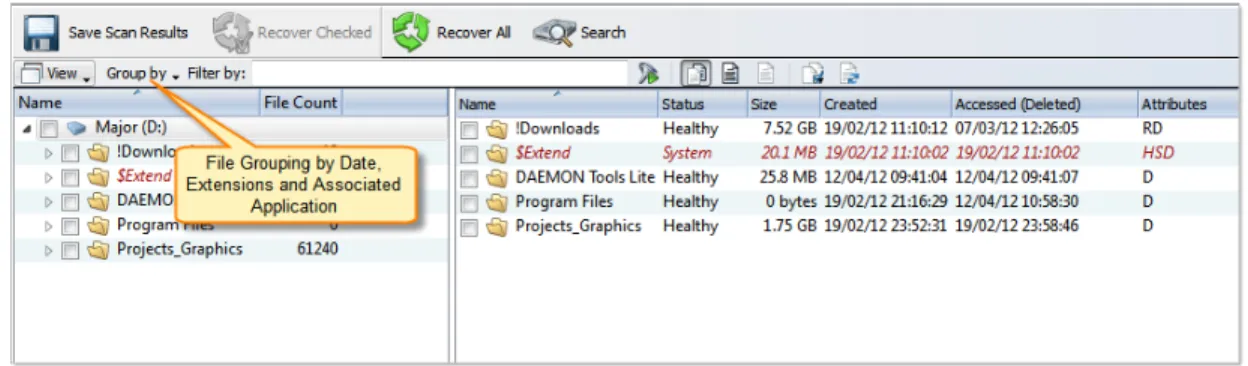
Logical Drive (Partition) scan results view displays all files detected after a logical drive scan. To make the result easier to read, you may group detected files by:
• Extension; • Application;
• Date (Created, Accessed and Modified);
Figure 1: File grouping in Volume Scan Result
To make scan results easier to read, you may do the following:
• To sort the list by a column in ascending order, click the column header.
• To sort the list by the same column in descending order, click the column header a second time. • To show a list that is reduced in size by a filter, select one of the preset options in the File Filter toolbar. • To add an item to the Recovery Toolbox, select the check box next to the item.
File Filter Toolbar can be used to narrow down scan results. For more information see: File Filter Toolbar
on page 33.
Advanced File Search can be used to enhance simple File Filtering with more searching criteria, such as File Attributes, File Size etc. See Search for deleted Files and Folders on page 31 for details.
Tip: It is recommended to save scan results for later use.
When you have found all files you looking for - proceed to Recover files and folders on page 19.
Physical Device Scan View
Physical Device scan view is used to review scan results, such as Partitions and Files Detected by Signature, made on Data Storage Device.
Figure 2: Interrupted Physical Device Scan
Tip: It is highly recommended to save scan results for later use: Work with scan results on page 29
Device View Control
In Device Scan view, scanned devices represented by Device View Control. For each selected scan, Device View control shows scan progress indicator: blue stripe means scan is incomplete and solid green stripe - scan is complete for selected range. All interrupted (incomplete) scans can be resumed by clicking Resume button in view's toolbar or by command Resume Scan in item context menu.
If detected partition is selected, its relative position and scanned size is also displayed on Device View Control indicating is this partition is recoverable or not.
Figure 3: Complete Physical Device Scan Working with detected partitions
Detected partitions displayed with their status to be recovered and overall partition integrity. When
partition Recover Status is "Can be recovered" then this partition can be restored as part of disk partitioning. To restore detected partition select it in view and click Restore button in view's toolbar or use Restore command from item's context menu.
If partition cannot be restored by any reason, data from this partition still can be recovered. To do so, partition must be scanned (as regular Logic Drive) and files needs to be selected individually and recovered to safe location.
Figure 4: Detected partition indicator Working with Files detected by signatures
Files detected by signatures are shown under related Disk Scan item and combined in groups by signature.
Figure 5: File Detected by signatures
Search Results View
The Search Results view appears after you perform a Search for deleted Files and Folders on page 31. The top panel displays the results of the search in a list.
To make this list easier to read, you may do the following:
• To sort the list by a column in ascending order, click the column header.
• To sort the list by the same column in descending order, click the column header a second time. • To show a list that is reduced in size by a filter, select one of the preset options in the File Filter toolbar.
To recover an item in this list, right-click the item and choose Recover from the context menu or click Recover button in toolbar.
To preview an item, select it and click File Preview.
To change search criteria and repeat the search at the same location, click Search Again.
Note: You can create a custom filter for this list. For more information see File Filter Toolbar on page 33.
Note: For information about how to start a search, see Search for deleted Files and Folders on page 31
Application Log
This log view monitors each action taken by the application and displays messages, notifications and other service information. Use the messages in this screen to observe and further understand the flow of the recovery process.
We recommend that you attach a copy of the log file to all requests made to our technical support group. The entries in this file will help us resolve certain issues.
To prepare a log file, turn on Display Trace Events and Write Log on Disk options in the Preferences dialog box.
It is best to save the log file to a physical disk that is different from the disk that holds the deleted data. By doing this, you reduce the risk of writing over the data that you are trying to recover.
Welcome View
Using Active@ UNDELETE Overview
File recovery
Recover deleted Files and Folders on page 14 This is one of the essential features of Active@ UNDLETE. To recover accidentally deleted files, simply scan the drive where they were deleted, then browse scan results in familiar Windows-explorer like browser, search and filter results, select required files and recover them to safe location. You can preview scan results first to confirm that the detected files are exactly the once you need.
Note: For DEMO version recovered file size is limited to 64kb.
Scan Disk (Physical Device) on page 23 In some cases, you seek files from drives are not existing anymore - those partitions either deleted or overwritten by new one. It is still chance to recover some files in such condition! You have to located deleted partitions first and scan them as they are existing partitions and recover all detected files you need;
Scan for files by their signatures on page 17 Active@ UNDELETE can find files by their unique format specification (signature) even if file can not be found in Partition File Table. For now, we can recognise various file formats:
• Microsoft Office Documents. • Formatted Text files.
• Compressed Archives.
• Images and Camera Raw files. • Music and Videos.
• QuickTime Multimedia files.
See Supported File Signatures on page 34 for complete list of default file signatures. User can create custom, user defined File Signature Templates to be used to detect files during low level disk scan by customized file signatures. See Custom (user defined) file signature templates on page 35 for details.
Virtual RAID Assembly on page 20 Disassembled RAID array can be virtually recreated by Active@ UNDELETE and some of the files located on these array can be recovered;
Partition Management
Restore detected partition on page 25 You partition is gone? Accidentally deleted by user or by malicious software it is still chance it can be restored if not overwritten yet. Scan hard disk for deleted partition and use Restore command to get
your partition back! We recommend you to restore your important data first;
Partition Manager Overview on page 48 By using small Partition Manager module in
Active@ UNDELETE you can execute basic partition manipulation such as creation, formatting and delete. It can be useful during partition recovery operations;
Disk Images
Disk Image Overview on page 66 We advice to create Disk Image of a drive you work with before any actual recovery or partition restoration. It may prevent loosing data in accidental writing of cumulative hardware malfunction;
Advanced Tools
Edit Boot Sectors on page 52 For advanced operations, you can manipulate partition table and boot sector attributes by using template dialogs;
Disk Editor Tool on page 54 Advanced and integrated in Active@ UNDELETE
environment disk editor - read and write data on low level.
Rollback Partition Changes on page 66 If all your manipulation with hard disk partitioning was made by using Active@ UNDELETE you can rollback (e.g. undo) all changes you have made in few clicks.
File Preview on page 30 To confirm that the file you have detected is exactly the file you seek, you can use File Preview feature before the actual recovery. It also helps to confirm file integrity first. Some restriction applies for DEMO version;
Recover deleted Files and Folders
After you can see partitions on a device, the file recovery process consists of three stages. 1. Scan Disk
Select Volume (Logical Drive) scan in Recovery Explorer and scan the chosen drive for deleted files.
See: Scan a Volume (Logical Drive) for deleted files on page 15 2. Analyze Scan Results
A Logical Drive scan result appears in the Logical Drive Scan Result View on page 7 where results can be reviewed and files selected for recovery.
File Grouping - detected files can be grouped for better analyzing by using the Group By drop-down menu in the toolbar. Detected files can be grouped by:
• File Extensions;
• By Associated Applications;
• By Date (Created Date, Modified Date and Accessed or Deleted Date);
Search and Filtering - detected files can be filtered by name, extension or deleted status by using the File Filter Toolbar on page 33. For more narrow results Search for deleted Files and Folders on page 31 can be used.
3. Recover Detected Files
You may recover damaged or deleted files and folders directly from the Logical Drive Scan Result View on page 7 or the Search Results View on page 10. See: Recover files and folders on page 19
Scan a Volume (Logical Drive) for deleted files
Scanning logical drives is a required step for recovering files and folders. During the scan all deleted (and existing) file and folders are detected. The results of a logical drive scan are displayed in a separate tabbed views: Logical Drive Scan Result View on page 7. To initiate a scan of a logical drive:
1. Select volume (logical drive)
In the Recovery Explorer view select a volume (logical drive). 2. Open the Scan Volume dialog box:
• From the Recovery Explorer toolbar, click Scan.
Dialog parameters Multiple drive selection
Additional drives can be selected to scan on the Logical Drives list to be scanned simultaneously. At least one logical drive (volume) must be selected.
Ignore errors
Ignore Read and Write errors during the scan process. Save scan results
If this option is on, a path must be specified where scan results with a unique name will be saved for each scanned drive. Provide valid path if you have this option selected.
Use Advanced Scan Algorithm
Select this option to apply advanced scan algorithm. However, event if scan results may contain more entries then with scan without this option overall scan process may take much more time.
Detect files by their signatures
Select this option to specify exact file types to be detected during the scan. With this option, device scan reads each disk sector trying to reconstruct any possible data related to unique file format.
Apply the same settings to all selected drives
All scan options above, can be selected for each drive individually or, when this check box is selected, to be the same for all selected logical drives.
Click Scan to initiate scan of selected logical drives (volumes) scan. 3. Scan selected volumes.
During the scan:
• To display or hide scanning events and progress details toggle More\Less Info button at any time. • To terminate the scan process, click Stop at any time. Results may be not accurate or complete.
After the scan completes you will see scan results in the Logical Drive Scan Result View on page 7. 4. Review scan results
A Logical Drive scan result appears in the Logical Drive Scan Result View on page 7 where results can be reviewed and files selected for recovery.
Note: We recommend you to save scan results to designated location for later use - you can use saved scan results to save time on repeated scanning of same volume.
Scan for files by their signatures
Files on hard drive can be detected by their unique file signatures. Active@ UNDELETE can detect these files (see Supported File Signatures on page 34 for exact list of file types) during Scan a Volume (Logical Drive) for deleted files on page 15 or Scan Disk (Physical Device) on page 23. In first case, scanning will be limited by volume boundaries when by scanning physical disk, you can specify custom boundaries of disk surface to scan.
Volume (logical drive) Scan
During volume of scan you have to select file signatures on scan dialog and they will be detected (if any) among other deleted or live files on selected volume(s) only.
Note: See Scan a Volume (Logical Drive) for deleted files on page 15 for more information.
Physical Disk Scan
Files by signatures can be also detected during scan of disk surface not limited by volume boundaries.
Note: See Scan Disk (Physical Device) on page 23 for more information.
Evaluate scan results
Detected files (if any) grouped in special virtual folder - Files by Signatures. Due to particular qualities of this algorithm, it is impossible to recover original file names, date and other attributes. To evaluate integrity of some of the detected files you can use File Preview on page 30 feature.
Note: Amount of selected files signatures directly impacts on total scan time.
Recover files and folders
You may recover damaged or deleted files and folders directly from the Recovery Explorer View on page 7, Logical Drive Scan Result View on page 7, Physical Device Scan View on page 8 and Search Results View on page 10. Recovering deleted files and folders is one of the essential features of Active@ UNDELETE. To recover detected files:
1. Select files
Select files in any view mentioned above using cursor selection (Use Shift or Ctrl keys for mutli-selection) or by setting check boxes for each individual file o folder.
Tip: You can set check boxes for all selected files or folders by pressing Space key. 2. Click Recover or Recover Checked.
Depending on you selection in view's toolbar or use context menu commands. 3. Enter destination path where recover detected path and other options as necessary.
Naming options
Use original file names
Names of detected files will be preserved only if no file with the same name already exists in the destination directory.
Rename files
All files will be renamed by their given specified file root name and added enumeration ID. File extensions remain intact.
Existing files conflict resolution Unique file name
If a file with the same name exists in the destination folder, a file with a unique name will be generated to avoid overwriting.
Ask before overwrite
If a file with the same name already exists in the destination folder, the application will ask the user for a specific action to take.
Overwrite without prompt
All files will be overwritten in the event if they already exist in the destination folder. Skip existing files
If a file with the same name exists in the destination folder, recovery of a new file will be skipped.
Additional Options Create Folder Structure
When this option is selected files will be recovered with their original folder structures e.g. original folder hierarchy as it was on the storage source. In case files were organized in groups (date, file extensions, or by an associated application) then such groupings will be created by the folder structure in the location where the files will be recovered to.
Recover Name Streams
With this option on, files will be recovered with their original name streams. Browse destination folder
Opens the destination folder in the default OS file browser. Detailed Log
With this option on, the log file contains more detailed information about recovered files. Use Disk Lock
The source disk will be locked during the file recovery process. It will be unlocked as soon as the process is completed.
Ignore Disk Lock Errors
With this option on, the file recovery process will continue even if locking of the source device fails.
Ignore Write Errors
No error messages will appear and all write errors will be ignored during the recovery process.
Ignore Read Errors
No error messages will appear and all read errors will be ignored during the recovery process.
4. Observe recovery process and verify recovered files in destination folder. Repeat recovery process if necessary.
Virtual RAID Assembly
To open the Virtual Disk Array Assembly dialog, do one of the following: • From the Tools menu, choose Create Virtual RAID (RAID) command. • From the Tools tab in Command Bar, choose Create Virtual RAID command.
To assemble virtual RAID follow the steps:
1. Select Disks from list of Available Data Storage Devices by double-click or by using check mark. 2. Specify the virtual array type.
3. To add disks, do one of the following:
• Double-click a disk in the Available disks list to move it to the Selected disks list.
• Click a disk in the Available disks list to select it. To move it to the Selected disks list, click Add. 4. To change the order of a disk in the Selected disks list, select it and click Move Up or Move Down 5. To remove a disk from the Selected disks list, do one of the following:
• Double-click a disk in the Selected disks list.
• Click a disk in the Selected disks list. To remove it, click Remove. 6. To remove all disks from the Selected disks list, click Remove All.
7. In Stripe block size, specify the stripe block size in kilobytes (Stripe and RAID-5 arrays only)
Decrypt recovered files
During the recovery of encrypted files to any destination that doesn’t support encryption, Active@
UNDELETE creates temporary (*.EFS) files. These files can be decrypted later at any time by using the File Decryption Tool.
1. Open the Decrypt Files dialog:
• Use the command tools and select Decrypt Files from the main menu. • From the Tools tab in the command bar, choose the Decrypt Files command.
2. Add temporary recovered encrypted files (*.efs) or open the Decrypted Files log (*.txt) created during recovery by using the Add button.
Figure 6: Decrypt files dialog box Options
Delete temporary files
All temporary recovered encrypted source files will be deleted after decryption. Browse Destination
The folder where files will be decrypted will be opened by the default OS files browser. Create Detailed Log
The log files will contain more detailed information about the forthcoming process. Use Disk Lock
The source disk will be locked during the file recovery process. The disk will be unlocked as soon as the process is completed.
Ignore Disk Lock Errors
With this option on, the file recovery process will continue even if locking of the source device fails.
Ignore Write Errors
No error messages will appear and all write errors will be ignored during the recovery process.
Ignore Read Errors
No error messages will appear and all read errors will be ignored during the recovery process.
Existing files conflict resolution Generate unique file name
If a file with the same name exists in the destination folder, then a file with a unique name will be generated to avoid overwriting.
Ask before overwrite
If a file with a certain name already exists in the destination folder, the application will ask the user for a specific action to take.
Overwrite without prompt
All files will be overwritten even if they already exist in the destination folder. Skip existing files
If a file with the same name already exists in the destination folder, recovery of that file will be skipped.
3. Set other options if necessary and then click the Decrypt button to complete the task.
Restore Partition
If you cannot see partitions on your device, or if you know that partitions are missing, you may first scan a device to find partitions. Restoring a deleted or damaged partition can be done in three stages:
1. Scan a physical device for a deleted or damaged partition. 2. Evaluate the scan results and choose the partition to restore. 3. Restore the partition.
Scan Disk (Physical Device)
A physical device is an installed hard disk, Flash card, external USB disk or any device that holds data. You may scan a device two ways:
Scan for Deleted Partitions on page 23 Scan unallocated space on disk to detect deleted or damaged partition.
Detect Files by their signatures Besides detecting partitions, Device Scan can detect files by their unique file signature. To let files by signature to be detected, select Detect files by their signatures options when performing Scan Disk (Physical Device) on page 23.
Note: Scanning time directly correlated with number of file signatures selected.
Scan for Deleted Partitions
Detected partition can be scanned as any other Logical Drive for Files and Folder. You can scan detected partition to verify partition content before partition restoration or to be able to recover (copy) files to safe location if partition was deleted or damaged. To scan a physical device for deleted partitions:
1. In the Recovery Explorer select a disk (physical device) node. Open Scan Disks dialog box: • Click Scan button in view's toolbar
• Click Scan command from context menu • Double-click and disk (physical device) node 2. Define scan range and other scan options if necessary
Dialog options
Multiple drive selection
Additional disks can be selected to scan on the Physical Disks list to be scanned simultaneously. At least one disk must be selected.
Scan area
Select scan area using predefined options: Entire Disk, Unallocated Only or Specific Range - use arrow markers to mark scan area;
Note: Scan area markers shown first and last sectors of scanning area. To enter exact start and end sectors to scan click on sector label and enter exact value in text field;
File System lookup
Select desired File System of a partitions to be detected; Ignore Errors
Ignore disk Read/Write Errors; Save Scan results
Enter path, where scan results will be saved as soon as scan completed; Detect files by their signatures
Select this option to specify exact file types to be detected during the scan. With this option, device scan reads each disk sector trying to reconstruct any possible data related to unique file format.
Important: Turn this option off when you only want to detect and restore partition - it will significantly save your scanning time.
Apply the same settings to all selected devices
All scan options above, can be selected for each drive individually or, when this check box is selected, to be the same for all selected logical drives.
3. Click Scan to begin scan process
Edit or Clone Detected Partitions
It may be necessary for you to edit detected partition attributes directly when some attributes are detected incorrectly or need adjustments.
Any detected partition can be cloned (virtually copied) before manually altering partition attributes and properties. We recommend that you edit the clone rather than directly edit the original partition. Any detected partition can be cloned as any times as you want.
Clone detected partition
1. Select a detected partition in the Recovery Explorer tree. 2. To clone the selected partition, do one of the following:
• From the Recovery Explorer toolbar, click Clone Partition.
• Right-click the selected partition and click Clone from the context menu.
Edit the boot sector template in detected partition 1. Select a detected partition in the Recovery Explorer tree.
2. To open the Edit Boot Sector Template dialog box, do one of the following: • From the Recovery Explorer toolbar, click Edit Partition.
• Right-click the selected partition and click Edit Partition from the context menu.
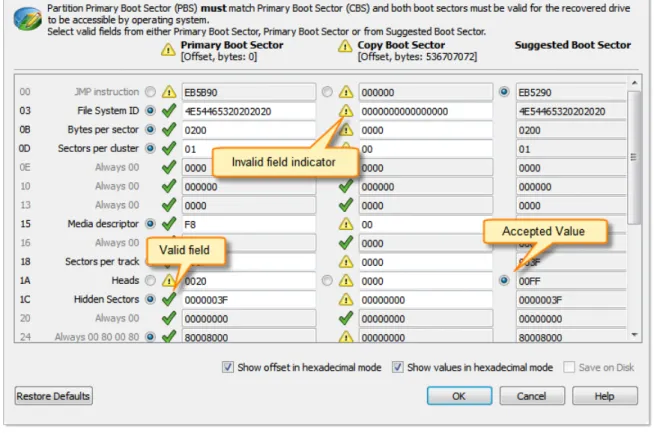
3. In the Edit Boot Sector Template dialog box, edit the Primary or Copy Boot sectors separately or simultaneously by entering values in designated fields.
Restore detected partition
We recommend that you restore a partition with a certainty status of “Acceptable” or higher. Before you restore a partition, you may clone or edit the partition directly to adjust its properties. Here are some rules to follow when restoring a partition:
Assigning a drive letter
• Be aware of the location of executable files or files required by the operating system. Many MS-DOS and Windows programs refer to a specific drive letter when describing a path to executable files. • Drives A: and B: are usually reserved for floppy disk drives, but you can assign these letters to
removable drives if the computer does not have a floppy disk drive.
• Hard disk drives in the computer receive letters C through Z, while mapped network drives are assigned drive letters in reverse order (Z through B).
Setting the partition as active
• You may set only a primary partition as active. You cannot set a logical drive (an extended partition) as active.
• To set a partition as active, the partition must have an MBR (Master Boot Record) as the first sector. • A computer can only have one active partition per disk.
• The name commonly used for the partition that contains the start-up files is the boot partition. The name commonly used for the partition that contains the operating system files is the system partition. • The system partition can never be part of a striped volume, spanned volume, or RAID-5 volume. • The system partition must be a primary partition that has been marked as active for start-up purposes.
It must be located on the disk that the computer accesses when starting up the system. • There can be only one active system partition on a disk at a time.
• You may have multiple basic disks and each disk can have one active partition. However, the computer will only start from one specific disk. If you want to use another operating system, you must first mark its system partition as active before restarting the computer.
• You cannot mark an existing dynamic volume as active. However, you can convert a basic disk containing the active partition to a dynamic disk. After the disk is converted, the partition becomes
a simple volume that is active. If the active partition is not the current system or boot partition it becomes a simple volume and loses its entry in the partition table. Therefore it can no longer be active.
Extended partition
• A computer can only have one extended partition per physical disk device.
• You cannot create an extended partition on a disk if it already has four primary partitions.
Restore Partition
1. Select a detected partition in the Physical Device Scan View on page 8. 2. To open the Restore Partition dialog, do one of the following:
• From the toolbar click the Restore Partition button or use the command action Restore Partition from the main menu.
• Right-click the selected item and click the Restore Partition command from the context menu.
Dialog Options Assign Drive Letter
To assign a drive letter to the recovered partition, select a letter from the drop-down list. Make restored partition Active
To set this partition as active, check the Make restored partition Active check box. Create Extended Partition
Before a partition is restored, unallocated space can be set as an extended partition by checking the Create Extended Partition check box.
Using Scan Results
After you have completed a device scan, a Scan Results branch appears in the Recovery Explorer tree. Detected partitions are listed in order of their certainty of recovery.
There are 12 attributes that define a partition. In some cases, the application cannot be certain that the found item actually is a partition. The rating in the order of certainty depends on how many attributes
are found and what condition they are in. You may perform the following actions on partitions in the Scan Results branch:
• Stop and Resume a scan on page 27
• Filter detected partitions by certainty on page 28 • Save and Load scan results
Stop and Resume a scan
To stop a physical device scan at any time, press Stop. After you stop a scan, a Scan Results branch appears in the Recovery Explorer tree.
The example above shows how incomplete scan results are indicated. An icon appears next to each node in the Scan Results branch.
Uncompleted Device Scan
An uncompleted (aborted) device scan can be resumed at any time.
To resume a terminated scan:
1. Select a device scan result under the Scan Results branch. 2. To resume the scan, do one of the following:
• From the toolbar, click the Resume Scan button.
• Right-click the selected device scan and click Resume Scan from the context menu.
Completed Device Scan
Filter detected partitions by certainty
After you complete a scan, detected partitions are listed in order of their certainty status based on attributes and validation level. To make a long list of partitions easier to read, remove partitions with a status of Bad and lower using a filter. To filter detected partitions:
1. In the Physical Device Scan View on page 8 select a scan result node with detected partitions. 2. Open the Filter Detected Partition dialog:
• From the toolbar, click Partition Filter.
• Right-click the partition and click Partition Filter from the context menu.
3. Set filter values in General or Advanced tabs and click Filter to apply selected filter criteria.
General Options
Filter by Partition File System
Select the file system that will remain in the filtered partition list. Filter by Status
Select the partition integrity statuses that will remain in the filtered partition list. Filter by Size
To restrict the size of a partition to display, click the Filter by Partition Size check box and enter the lowest and highest partition size in MB.
Advanced tab filtering will let you filter a partition with specific NTFS or FAT attributes. Press Reset in the Filter Detected Partition dialog to cancel partition filtering.
Work with scan results
It can take a long time to run a default disk scan or a low level disk scan. Because you are dealing with a large volume of information, you might not be able to review all the data in one session.
So that you do not have to scan a partition again, you can save and re-use valuable scan results. You can save an entire Scan Results branch or make a separate save for each disk scan or save all scans set for a particular device.
Scan results are saved with the file extension .scaninfo.
Warning: Save a scan results file to a physical drive that is different from the drive that contains the original files.
Save Scan Results
1. To save the entire Scan Results branch, select the branch. 2. To save a device node, select it under Scan Results.
3. Right-click the selected node and click Save Scan Result from the context menu. The Save Scan Result dialog appears with the default path and a suggested file name.
4. To change the file path, browse to a different folder.
5. To change the file name, enter a name in the file name field. 6. Click Save.
Load Scan Results
1. To open the Load Scan Results dialog, do one of the following: • From the File menu, click Open > Scan Result…
• Right-click the logical drive node and click Load Scan Result from the context menu.
• If there is a Scan Results branch in the Recovery Explorer tree, right-click the Scan Results branch or right-click a Scan Results node and click Load Scan Result from the context menu. 2. Browse to the folder that contains the scan result file and select the file.
3. Click Open.
The data from the scan results file appears in a Scan Results node in the Recovery Explorer tree. Note: Loading scan results feature is not available in Active@ UNDELETE Lite edition. Please visit http://www.active-undelete.com to read more about Active@ UNDELETE Professional and Enterprise editions
Remove Scan Results
Data in the Scan Results branch is copied from the original physical device. You may remove any node – including detected partitions - from the Scan Results branch without harming the data on the original physical device.
To remove scan results:
1. To remove the entire Scan Results branch, select the branch. 2. To remove a device node, select it under Scan Results.
3. Right-click the selected node and click Remove Scan Result from the context menu. The selected node is removed from the Recovery Explorer tree.
File Preview
File Preview allows you to view the contents of an image file (jpg, bmp, gif, png etc.) before you recover the file.
To open the File Preview panel from any view, do one of the following: • Double-click an image file.
• Right-click an image file and click File Preview from the context menu. • Select an image file and click File Preview from the main toolbar.
Search for deleted Files and Folders
To help you find deleted files in a long list of files from a scanned drive, you may search the list with specific search criteria and review results in a Search Results View on page 10.
1. Select a scanned logical drive or scanned detected partition
2. To open the Search for Files and Folders dialog box, do one of the following: • From the main toolbar, click Search.
• Right-click the selected item and click Search from the context menu.
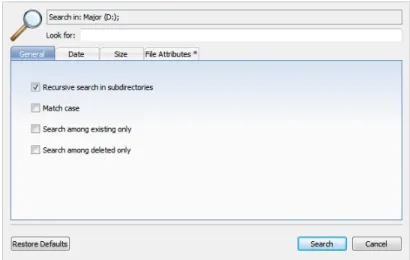
3. Inter search criteria in Look for and other search options (if required) and click Search button to start searching in selected location.
Figure 7: General Search Options General Search Options
Recursive search in subdirectories
Use this option to search the root level of the drive and all sub folders. To search only the root folder, clear this check box.
Match case
To display files that match upper and lower case letters in the Look for field, select the Match case check box.
Search among existing only
To display only files that are not deleted, select the Search among existing only check box. Search among deleted only
To display only files that are deleted or damaged, select the Search among deleted only check box.
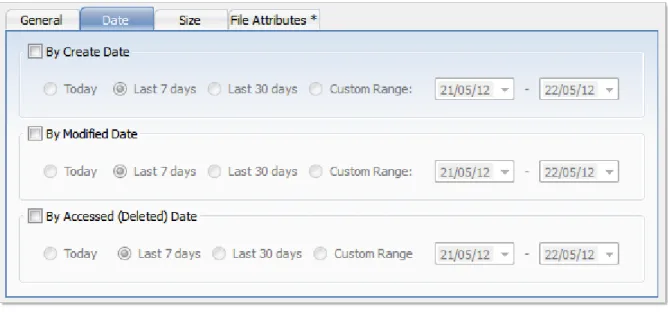
To display files by a specified date, in the Date Criteria tab, in the Date Type drop-down list, choose a type and select a date range.
Figure 8: Date Criteria
To display files by a specified file size, in the Size tab, select Small, Medium or Large, or specify the size range in KB.
Figure 9: File Size Criteria
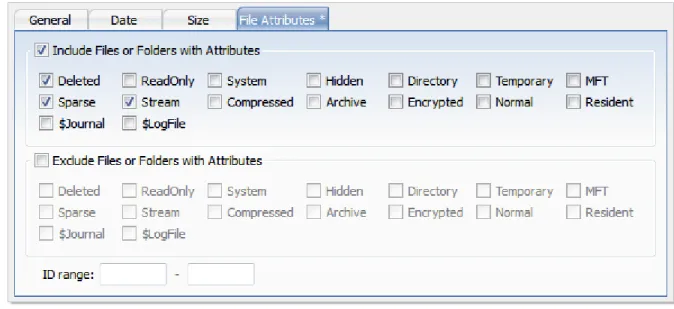
To display files based on file attributes in, the File Attributes tab select file attributes that should be present (Include Files and Folders Attributes) or otherwise exempt (Exclude Files or Folders with Attributes) in search result.
Figure 10: File Attributes Criteria
To change all settings back to defaults, click Restore Defaults. 4. Click Search to start searching process.
To display disk image events and progress details, click Details. To terminate the searching process, click Stop at any time. In this case search results may be not accurate or complete. After the search is done, a Search Results view appears.
Note: You may repeat a search many times and refine the search criteria for better results.
Note: See How to Use Wildcards on page 43 for details how to set search criteria. You may use File Filter Toolbar on page 33 to improve search results.
After search complete, Search Results View on page 10 must appear with search results (if any for provided criteria). You can repeat steps form 1 to 4 for desired effect.
File Filter Toolbar
The File Filter toolbar contains commands that can help you organize files in a list.
By default, the results of a scan contain all files and folders. Use commands in the File Filter toolbar to make a large list of files smaller and easier to read.
You may use the File Filter toolbar in the following views: • Recovery Explorer View
• Document View • Search Result Views
The filtered result may be applicable over an entire list (for example, in Search Result View) of within a selected folder (for example in Recovery Explorer view and Document View).
Using File Filter Toolbar
• To display an unfiltered list, click Show All Files and Folders.
• To display only deleted files and folders, click Show only deleted Files and Folders.
• To further reduce the size of a list, enter a pattern in File Filter field and press ENTER. The list displays only those files that match the pattern.
Supported File Signatures
List of supported File Signatures by file types Microsoft Office Documents
• Access Databases [*.mdb] • PowerPoint Presentations
[*.ppt]
• Excel Spreadsheets [*.xls] • Word Documents [*.doc] • Visio Documents [*.vsd] • Crystal Reports [*.rpt] • Outlook Data Archives
[*.pst] • PowerPoint 2007 Presentations [*.pptx] • Excel 2007 Spreadsheets [*.xlsx] • Word 2007 Documents [*.docx]
Music and Videos • MIDI Files [*.mid] • MP3 Files [*.mp3] • MPEG Files [*.mpeg] • Red Digital Cinema Camera
[*.r3d]
• AVI Files [*.avi] • WAV Files [*.wav] • ANI Files [*.ani] • MPG Files [*.mpg] • Shockwave Flash Files
[*.swf]
• Windows ASF Container [*.asf]
• Windows Media Video [*.wmv]
• Windows Media Audio [*.wma]
Compressed Archives • RAR Archives [*.rar] • ZIP Archives [*.zip] • LZH Archives [*.lzh] • ARJ Archives [*.arj] • CAB Archives [*.cab]
Formatted Text files
• Adobe Acrobat Documents [*.pdf]
• Rich Text Format Files [*.rtf] • XML Files [*.xml]
• HTML Files [*.htm] Images and Camera Raw files • Bitmap Images [*.bmp] • Canon CRW Raw Images
[*.crw]
• Canon CR2 Raw Images [*.cr2]
• Icon Files [*.ico] • JPEG Images [*.jpg] • Portable Network Graphics
[*.png]
• Konica Minolta Raw Images [*.mrw]
• Fuji FinePix Raw Images [*.raf]
• TIFF Images [*.tif] • Sony Alpha Raw Images
[*.arw]
• Adobe Digital Negative [*.dng]
• Nikon Raw Images [*.nef] • Olympus Raw Images [*.orf] • Pentax Raw Images [*.pef] • Leica Raw Images [*.raw] • Sony SRF Raw Images
[*.srf]
• Sony SR2 Raw Images [*.sr2]
• Sigma Raw Images [*.x3f] • Multiple-image Network
Graphics [*.mng] Miscellaneous
• DJVU Files [*.djvu] • QuickBooks Files [*.qbw] • Corel Draw Files [*.cdr]
QuickTime Multimedia files
• QuickTime multimedia 3G2 Files [*.3g2]
• QuickTime multimedia 3GP Files [*.3gp]
• QuickTime multimedia CDC Files [*.cdc]
• QuickTime multimedia DCF Files [*.dcf]
• QuickTime multimedia JP2 Files [*.jp2]
• QuickTime multimedia JPA Files [*.jpa]
• QuickTime multimedia JPM Files [*.jpm]
• QuickTime multimedia JPX Files [*.jpx]
• QuickTime multimedia M4A Files [*.m4a]
• QuickTime multimedia M4B Files [*.m4b]
• QuickTime multimedia M4P Files [*.m4p]
• QuickTime multimedia M4V Files [*.m4v]
• QuickTime multimedia MAF Files [*.maf]
• QuickTime multimedia MOV Files [*.mov]
• QuickTime multimedia MP4 Files [*.mp4]
• QuickTime multimedia MPG Files [*.mpg]
• QuickTime multimedia MQV Files [*.mqv]
• QuickTime multimedia SDV Files [*.sdv]
• Compiled HTML Help [*.chm]
Custom (user defined) file signature templates
Active@ UNDELETE comes with more than fifty predefined (internally programmed, very fast) file signatures to be used to detect particular files (MS Office Documents, many Image formats, ZIP archives, MP3, etc..See complete list of supported file signatures) during disk scan. However sometimes advanced users need to detect more specific file formats, not being defined in default signatures set.
Active@ UNDELETE offers advanced tools to define user's templates for signatures to be analyzed. Signatures can be defined using extended definition language RegExp (Regular Expressions).
To create custom file signature
1. Click Tools > Preferences command to open Preferences dialog.
2. Open File Signatures group and use Add button to define new custom file signature or
3. Click Import button to load (import) custom file signature from script file (*.ini format). See Custom Signatures Size Script on page 38 for details.
Note: You can edit your custom file signature template at any time by selecting your template in list and clicking Edit button or simply double-clicking on template's name.
Custom file signature template
Provide template name and brief description - for future references. Specify file extension of a file type you defining (optional). To completely define custom file signature template you need to enter Header (beginning of the file) and Footer (end of the file) criteria using RegExp syntax. Header criteria could be more then one and all of them must be met to consider beginning of the file. Footer's criteria could more then one too, but at least one of them must be met to consider end of file.
Dialog Options Template name
Unique template name. Template description
Brief template description (optional) File extension
File extension for this template (optional) Beginning of File Criteria
List of RegEx criteria, considered as beginning of file combined as AND statements. Not earlier then and Not later then specifies limits of defined criteria in the beginning of a file template.
End of File Criteria
End of files can be determined in two ways:
• By list of RegEx criteria, considered as end of file combined as OR statements. In case of missing file footer criteria, end of file will be taken by defined Maximum file size. Append after attribute specifies size of end of a file. File
size is used in case of missing file end criteria. By default its 65535 bytes.
• By using simple script to calculate end of file. See
Custom Signatures Size Script on page 38 for reference.
Defined custom file signatures templates are stored in INI files in user's selected locations and will be loaded at every consequent application starts. You can also import such custom signature template files created by other users by clicking Import button and specifying full path to custom file signatures template file in opened dialog. See Custom Signatures Size Script on page 38 for details.
Note: Also you can specify Custom File signature template from Volume (logical Drive) Scan dialog or Disk Scan dialog by clicking Add button near file signatures list.
Important: Regular Expressions can be used while defining signature headers and footers. Please check RegExp syntax on a web for examples .
Custom Signatures Size Script
Custom (User Defined) File Signatures are saved in text file and can be edited by using simple text editor (like notepad) or by using Active@ UNDELETE tool: Custom (user defined) file signature templates on page 35.
User defined template reference
• Empty lines and lines starting with semicolon are ignored • Sections order and lines order in sections are not important • Letter case is not important (except RegExp fields)
Section TEMPLATES - required and contains fields numbering from one;
TEMPLATE### - points to the section where signature template is described (numbered from one). Section Template Header - required and contains fields:
BEGIN
required. Points to the section describing begin of the signature file FOOTER
non required. Points to the section describing end of the signature file MAX_SIZE
non required. Maximum file size to force file-end, if no file-end signature is detected. By default it is 64Kb
GROUP
non required. If missed - template goes to User Defined templates group by default DESCRIPTION
non required. This is a descriptive name of user template being displayed on a screen EXTENSION
non required. This is a file extension to be assigned and displayed SCRIPT
non required. Refers to the section where size of the file being calculated
Note: If field SCRIPT is present, then field FOOTER is ignored in template header section.
Beginning of the file section
Section describing file beginning (required), contains fields of the same type:
<signature> = <offset_start> | <offset_end>
signature
expression (regular or RegExp-compatible). Expression max length is 1024 bytes offset_start
acceptable minimal signature offset from the beginning of the file offset_end
acceptable maximum signature offset from the beginning of the file
Note: If there are several fields listed in signature beginning, logical AND operation applied to confirm file start.
End of file section
Section describing file end (not required), contains fields of the same type:
<signature> [= <bytes_to_append>]
signature
expression (regular or RegExp-compatible). Expression max length is 1024 bytes bytes_to_append
not required. How many bytes to append to the file after the signature is found
Note: If there are several fields listed in signature, logical OR operation applied to define file end.
File size calculation script
Section calculating file size (not required), contains operators of four types:
<result> = <command> (<argument>, <argument>) <result> = <argument>
IF (<argument> <condition> <argument>) GOTO <label> GOTO <label>
commands
READ, ENDIAN, SUM, SUB, MUL, DIV, SHR, SHL, AND, OR and XOR
Most of commands are the same as in assembler programming language, except:
READ - first argument - data type (size) to be read, second - offset from the beginning of the file
ENDIAN - first argument - data type (size), second - expression, which byte order will be swapped
First argument for commands READ and ENDIAN must be one of reserved data types: BYTE, WORD, DWORD, QWORD
argument
can be either a named variable or a constant result
can be the only named variable condition
can be one of : < <= == >= > != (meaning is the same as in C++) label
consists of label name followed by colon and it can precede any operator Note:
• Label named EXIT has been reserved and instructs to complete the calculations • Named variable SIZE has been reserved and keeps the file size
• Constants can be in Decimal form, Binary (followed by 'b'), Octal ('o'), and Hexadecimal ('h') or can be a text string
[TEMPLATES]
TEMPLATE1 = PRIMITIVE_HTML TEMPLATE2 = PRIMITIVE_JPG TEMPLATE3 = QBW_HEADER TEMPLATE4 = CHM_HEADER
TEMPLATE5 = SWF_HEADER TEMPLATE6 = PST_HEADER TEMPLATE7 = MRW_HEADER TEMPLATE8 = MID_HEADER TEMPLATE9 = CAB_HEADER TEMPLATE10 = BMP_HEADER TEMPLATE11 = DJV_HEADER [PRIMITIVE_HTML]
DESCRIPTION = Primitive HTML Signature EXTENSION = html BEGIN=HTML_BEGIN FOOTER=HTML_FOOTER MAX_SIZE = 655360 [HTML_BEGIN] <html = 0 | 512 <head = 0 | 1024 [HTML_FOOTER] </html> = 2 [PRIMITIVE_JPG] BEGIN=BEGIN.TEST.JPG
GROUP = Images and Camera RAW files DESCRIPTION = Primitive JPG files FOOTER=FOOTER-.TEST.JPG EXTENSION = test.jpg MAX_SIZE = 3221225472 [BEGIN.TEST.JPG] \xFF\xD8\xFF = 0 | 0 [FOOTER-.TEST.JPG] \xFF\xD9 [DJV_HEADER] DESCRIPTION=DjVu Document EXTENSION=djvu BEGIN=DJV_BEGIN SCRIPT=DJV_SCRIPT [DJV_BEGIN] AT&TFORM=0|0 [DJV_SCRIPT] size = read(dword, 8) size = endian(dword, size) size = sum(size, 12) [QBW_HEADER] DESCRIPTION=QuickBooks Document EXTENSION=qbw BEGIN=QBW_BEGIN SCRIPT=QBW_SCRIPT [QBW_BEGIN] MAUI=96|96 [QBW_SCRIPT] data = read(dword, 36) temp = read(dword, 52) if (temp <= data) goto exit size = sum(temp, 1)
size = shl(size, 10)
[CHM_HEADER]
EXTENSION=chm BEGIN=CHM_BEGIN SCRIPT=CHM_SCRIPT [CHM_BEGIN] ITSF=0|0 [CHM_SCRIPT] version = read(dword, 4) if (version == 0) goto exit header = read(dword, 8) if (header <= 1Ch) goto exit temp = read(qword, header) if (temp != 1FEh) goto exit temp = sum(header, 8)
size = read(qword, temp) temp = sum(header, 10h) if (size > temp) goto exit size = 0 [SWF_HEADER] DESCRIPTION=Adobe Flash SWF EXTENSION=swf BEGIN=SWF_BEGIN SCRIPT=SWF_SCRIPT [SWF_BEGIN] FWS=0|0 [SWF_SCRIPT] data = read(byte, 3)
if (data <= 10h) goto exit size = read(dword, 4) if (size <= 8) goto exit size = 0
[PST_HEADER]
DESCRIPTION = Outlook Archive EXTENSION = pst BEGIN = PST_BEGIN SCRIPT = PST_SCRIPT [PST_BEGIN] !BDN=0|0 [PST_SCRIPT] data = read(byte, 10)
if (data == 0Eh) goto valid if (data != 17h) goto exit size = read(dword, 184) goto exit valid: size = read(dword, 168) [MRW_HEADER]
DESCRIPTION = Minolta Camera Images EXTENSION = mrw BEGIN = MRW_BEGIN SCRIPT = MRW_SCRIPT [MRW_BEGIN] \x00MRM=0|0 [MRW_SCRIPT]
data = read(dword, 4) if (data == 0) goto exit width = read(word, 24) if (width == 0) goto exit width = endian(word, width) height = read(word, 26) if (height == 0) goto exit height = endian(word, height) pixel = read(byte, 32)
if (pixel == 0) goto exit pixel = mul(pixel, width) pixel = mul(pixel, height) pixel = div(pixel, 8) size = endian(dword, data) size = sum(size, pixel) size = sum(size, 8)
[MID_HEADER]
DESCRIPTION = MIDI Audio EXTENSION = mid BEGIN = MID_BEGIN SCRIPT=MID_SCRIPT [MID_BEGIN] MThd=0|0 [MID_SCRIPT] next:
temp = read(dword, size)
if (temp == "MThd") goto valid if (temp != "MTrk") goto exit valid:
size = sum(size, 4) temp = read(dword, size) size = sum(size, 4)
temp = endian(dword, temp) size = sum(size, temp) goto next
[CAB_HEADER]
DESCRIPTION=Microsoft Compressed Archive CAB EXTENSION=cab BEGIN=CAB_BEGIN SCRIPT=CAB_SCRIPT [CAB_BEGIN] MSCF=0|0 [CAB_SCRIPT] version = read(word, 24) if (version != 103h) goto exit folders = read(word, 26) folders = mul(folders, 8) folders = sum(folders, 36) files = read(word, 28) files = mul(files, 16) files = sum(files, folders) temp = read(dword, 16)
if (temp < folders) goto exit temp = read(dword, 8)
if (temp <= files) goto exit flags = read(word, 30)
flags = and(flags, 4) if (flags == 0) goto skip flags = read(dword, 36)
if (flags != 20) goto skip flags = read(dword, 44) if (flags < temp) goto skip size = flags
temp = read(dword, 48) skip:
size = sum(temp, size)
[BMP_HEADER]
DESCRIPTION = Bitmap Images BMP EXTENSION = bmp BEGIN=BMP_BEGIN SCRIPT=BMP_SCRIPT [BMP_BEGIN] BM=0|0 [BMP_SCRIPT] width = read(dword, 12h) if (width == 0) goto exit height = read(dword, 16h) if (height == 0) goto exit pixel = read(word, 1ch) if (pixel == 1) goto valid if (pixel == 4) goto valid if (pixel == 8) goto valid if (pixel == 16) goto valid if (pixel == 24) goto valid if (pixel != 32) goto exit valid:
pixel = mul(pixel, width) pixel = mul(pixel, height) pixel = div(pixel, 1000b) rastr_size = read(dword, 22h) if (rastr_size < pixel) goto exit rastr_offset = read(dword, 0Ah) if (rastr_offset < 38) goto exit
rastr_offset = sum(rastr_offset, rastr_size) size = read(dword, 2)
if (size >= rastr_offset) goto exit size = 0
How to Use Wildcards
A wildcard is a character that can be used as a substitute for any of a class of characters in a search. Wildcard characters are often used in place of one or more characters when you do not know what the real character is or you do not want to enter the entire name. In Active@ UNDELETE three types of wildcard are used: star or asterisk(*), question mark (?) and number sign (#).
Wildcard characters are used in the File Filter Toolbar on page 33 and Search for deleted Files and Folders
on page 31.
Examples of using wildcards:
Wildcard character Example Description
Asterisk (*) docum* Use the asterisk as a substitute for zero or more characters if you are looking for a file that you know what it starts with and you cannot remember the rest
Wildcard character Example Description
of the file name. The example locates all files of any file type that begin with "docum" including documents.txt, document_01.doc and documentum.doc.
docum*.doc To narrow the search to a specific type of file, include the file extension. The example locates all files that begin with "docum" and have the file name extension .doc, such as document_01.doc and documentum.doc.
Question mark (?) doc?.doc Use the question mark as a substitute for a single character in a file name. In the example, you will locate the file docs.doc or doc1.doc but not documents.doc. Number sign (#) doc_###.doc Use the number sign (also
known as the pound or hash sign) as a substitute for a single number in a name. In the example, you will locate the file doc_012.doc or doc_211.doc but not doc_ABS.doc.
Application Preferences
You can change many of the settings that affect the application's behavior in the Preferences dialog. To open the Preferences dialog, do one of the following:
• From the Tools menu, select Preferences.
• In the Application Command bar select Support tab, click Preferences. See description of each tabbed preferences page below
General Settings Options Show Welcome page
Show\Hide welcome dialog at application start. Check for available updates at application start
Each time when Active@ UNDELETE starts it will request for available update\upgrade and prompt for download if newer version is available for download.
Show splash screen
Enable\Disable splash screen at application start. Auto load last saved session
When this option is on, at application start Active@ UNDELETE will load latest saved session state, such as environment configuration, opened Disk Images and Scan Results. See
Using Scan Results on page 26 Reset wizards to default
Restores original wizard settings and page sequence to default state.
Environment Options Context help panel
Show\Hide left side context help panel. Context help will automatically changed when active view (tab) is changed to show related hints and brief description of every view.
Show command bar
Show\Hide right side command bar that contains shortcuts to most usable commands and actions.
Use sound
Enable\Disable application sound notifications. Hexadecimal file preview
When this option is on, file preview by default will be always shown in hexadecimal mode without any attempt to load it as an image or a document.
Recovery Explorer Options Show system files
Show\Hide system files in Recovery explorer. In most of the cases these files are not recoverable.
Show no ready device
Show\Hide devices that has not read state and can not be scanned. Show Logical Drive scan dialog by default
When this option is OFF, double click logical drive (volume) node in Recover Explorer view will initiate scan with default (most usable) options. Only when CTRL button is pressed down at the same time or this option is off, Scan Volume dialog will appear and let you to change scan options.
Show system events
Show\Hide system events in application log. Save log file to disk