For users and administrators of Guvnor
Version 5.4.0.Final
1.1.1. When to use Guvnor ... 1
1.1.2. Who uses Guvnor ... 2
1.2. Features outline ... 2
I. User Guide ... 5
2. Quick Start Guide ... 7
2.1. Quick start guide ... 7
2.1.1. Supported browser platforms ... 9
2.1.2. Initial configuration ... 9
2.1.3. Writing a rule ... 10
2.1.4. Finding stuff ... 11
2.1.5. Deployment ... 11
3. Concepts ... 13
3.1. Rules are assets ... 13
3.2. Packages are assets ... 13
3.3. The business user perspective ... 13
3.3.1. Creating a business user view ... 13
4. Authoring Assets ... 15
4.1. Version management ... 15
4.2. The Asset Editor ... 15
4.3. Creating a package ... 18
4.3.1. Empty package ... 19
4.3.2. Importing DRL packages ... 19
4.4. Spring Contexts ... 20
4.5. Working Sets ... 21
4.5.1. Activating and Using Working Sets ... 24
4.6. Business rules with the guided editor ... 26
4.6.1. Parts of the Guided Rule Editor ... 27
4.6.2. The "WHEN" (left-hand side) of a Rule ... 27
4.6.3. The "THEN" (right-hand side) of a Rule ... 31
4.6.4. Optional attributes ... 34
4.6.5. Pattern/Action toolbar ... 34
4.6.6. User driven drop down lists ... 34
4.6.7. Augmenting with DSL sentences ... 35
4.6.8. A more complex example: ... 36
4.7. DSL rules ... 37
4.8. Technical rules (DRL) ... 38
4.9. Spreadsheet decision tables ... 39
4.10. Guided decision tables (web based) ... 39
4.10.1. Types of decision table ... 39
4.10.2. Main components\concepts ... 41
4.10.3. Defining a web based decision table ... 44
4.11. Templates of assets/rules ... 60
4.11.1. Creating a rule template ... 60
4.11.2. Define the template ... 62
4.11.3. Defining the template data ... 63
4.11.4. Generated DRL ... 67
4.12. The Fact Model ... 68
4.12.1. Ways to define a Fact Model ... 68
4.12.2. Creating a JAR Model ... 69
4.12.3. Declarative model ... 71
4.13. Functions ... 77
4.14. DSL editor ... 77
4.15. Rule flows ... 78
4.16. BPMN2 Process ... 78
4.17. Work Item Definition ... 78
4.18. Data enumerations (drop down list configurations) ... 79
4.18.1. Advanced enumeration concepts ... 80
4.19. Test Scenario ... 81
4.19.1. Given Section ... 83
4.19.2. Expect Section ... 84
4.19.3. Global Section ... 84
4.19.4. New Input Section ... 85
4.19.5. Audit Log ... 85
4.20. File ... 85
4.21. Change-Set ... 88
4.21.1. Change-Set Editor UI ... 89
4.21.2. Adding Packages using a Wizard ... 89
4.21.3. Adding Assets using a Wizard ... 90
4.22. Services ... 91
4.22.1. Configuring Multiple Knowledge Bases ... 92
4.22.2. Knowledge Base Configuration Panel ... 93
4.22.3. Downloading War & Managing Dependencies ... 98
5. Managing Assets ... 103
5.1. Navigating and finding rules ... 103
5.1.1. Package explorer ... 103
5.1.2. Category view ... 106
5.1.3. Inbox and comments ... 107
5.2. Feed ... 108
6. Quality Assurance ... 109
6.1. Test scenarios ... 109
6.2. Package analysis ... 110
6.2.1. Items that the analyser is searching for ... 110
7. Packaging ... 113
7.1. Packaging ... 113
7.3. Category rules ... 117 7.4. Building ... 119 7.5. Selectors ... 120 7.5.1. Built-in Selector ... 120 7.5.2. Custom Selector ... 120 7.6. Snapshots ... 121 7.7. Advanced configuration ... 122 8. Administrative Functions ... 123 8.1. Categories ... 123 8.2. Status management ... 125 8.3. Archived items ... 126 8.4. Event Log ... 126 8.5. User permissions ... 127
8.6. Import and Export ... 128
8.7. Repository Configuration ... 129
II. Developer Guide ... 131
9. Integrating rules with your applications ... 133
9.1. The Knowledge Agent ... 133
9.2. REST API ... 135
9.2.1. REST ... 135
9.2.2. Guvnor REST API ... 136
9.2.3. Source code Example ... 146
9.3. WebDAV and HTTP ... 160
9.3.1. WebDAV ... 160
9.3.2. URLs ... 160
9.4. Eclipse Guvnor integration ... 161
9.4.1. Source Code and Plug-in Details ... 161
9.4.2. Functionality Overview ... 161
9.4.3. Guvnor Connection Wizard ... 163
9.4.4. Guvnor Repository Explorer ... 166
9.4.5. Local Copies of Guvnor Files ... 168
9.4.6. Actions for Local Guvnor Resources ... 170
9.4.7. Importing Guvnor Repository Resources ... 175
9.4.8. Guvnor plugin Preferences ... 179
10. Embedding Guvnor In Your Application ... 181
10.1. Getting Started ... 181
10.2. Embedded Editor Entry-Point: StandaloneEditorServlet ... 181
10.3. Edition Modes ... 182
10.3.1. BRL Edition Mode ... 182
10.3.2. Edition of Existing Assets Mode ... 184
10.3.3. New Asset Mode ... 186
10.4.1. Rule’s Sections Visibility Parameters ... 187
10.4.2. Constraining Fact Types ... 188
10.4.3. Use existing Working-Sets ... 188
10.5. Interacting with the Editor ... 189
III. Administration Guide ... 191
11. Installation ... 193
11.1. Installation step by step ... 193
11.2. Supported and recommended platforms ... 193
12. Database configuration ... 195
12.1. Changing the location of the data store ... 195
12.2. Configuring Guvnor to use an external RDBMS ... 196
12.3. Searching and indexing, Version storage ... 198
13. Switch from JackRabbit to ModeShape ... 199
14. Security - Authentication and basic access ... 203
14.1. Using your containers security and LDAP ... 204
15. Fine grained permissions and security ... 207
15.1. Enabling fine grained authorization ... 209
16. Data management ... 211
16.1. Backups ... 211
16.2. Repository Data Migration ... 211
16.3. Adding your own logos or styles to Guvnor web GUI ... 212
16.4. Import and Export ... 213
17. Architecture ... 215
17.1. Building from source ... 216
17.1.1. Modules ... 216
17.1.2. Working with Maven 2 ... 216
17.1.3. Working with GWT ... 216
17.1.4. Debugging, Editing and running with Eclipse ... 216
17.2. Re-usable components ... 217
17.3. Versioning and Storage ... 217
Chapter 1. Introduction
This section introduces the Guvnor. See the other relevant sections for installation, usage and administration.
Figure 1.1. The Guvnor main screen
1.1. What is a Business Rules Manager?
A business rules manager allows people to manage rules in a multi user environment, it is a single point of truth for your business rules, allowing change in a controlled fashion, with user friendly interfaces.
Guvnor is the name of the web and network related components for managing rules with drools. This combined with the core drools engine and other tools forms the business rules manager.
1.1.1. When to use Guvnor
You should consider Guvnor if any of the following apply to you: You need to manage versions/ deployment of rules, you need to let multiple users of different skill levels access and edit rules, you don't have any existing infrastructure to manage rules, you have lots of "business" rules (as opposed to technical rules as part of an application).
Guvnor can be used on its own, or with the IDE tooling (often both together).
Guvnor can be "branded" and made part of your application, or it can be a central rule repository.
1.1.1.1. When to not use Guvnor
In some situations applications may exist which have the rules in a database (for instance as part of an existing application), and no new application is needed to manage the rules.
In this case, the drools-template library is worth a look - you can define templates for rules to be generated from any tabular data source.
Otherwise, perhaps an existing rule management system and user interface already exists (and is tailored to your environment already) - in this case migrating to Guvnor may not be necessary.
If you are using rules to solve complex algorithmic problems, and the rules are essentially an integral part of the application (and don't need to be managed separately to the code).
1.1.2. Who uses Guvnor
The main roles of people who would use Guvnor are: Business Analyst, Rule expert, Developer, Administrators (rule administrators etc).
Guvnor is designed in such a way as these different roles can be accommodated, it can be controlled how much is exposed to different users in a safe fashion.
1.2. Features outline
• Multiple types of rule editors (GUI, text)
including:-• Guided Rule Editor
• Rule Templates
• Decision Tables
• Store multiple rule "assets" together as a package
• Domain Specific Language support
• Complex Event Processing support
• Version control (historical assets)
• Testing of rules
• Validation and verification of rules
• Categorization
including:-• Assembly of assets into a binary package for use with a ChangeSet or KnowledgeBuilder.
• Assembly of a self-contained camel-server.
• REST API to manipulate assets.
Chapter 2. Quick Start Guide
2.1. Quick start guide
If you are reading this, you must be the impatient type who wants to kick the tires (and light the fires) and have a look around as soon as possible. This section will provide a quick end to end tour of the steps involved (but does not go through the concepts in detail). This assumes you have installed the repository correctly, and are able to access the main login screen.
You can also consult the wiki [http://wiki.jboss.org/wiki/Wiki.jsp?page=RulesRepository] for some tutorials and user tips (it IS a wiki, so you can even contribute your own tips and examples and even upload files if you desire !).
The above picture shows the main feature areas of Guvnor.
• Info: This is the initial screen, with links to resources.
• Rules: This is the category and business user perspective.
• Package: This is where packages are configured and managed.
• Deployment: this is where deployment snapshots are managed.
• Admin: Administrative functions (categories, statuses, import and export)
2.1.1. Supported browser platforms
The supported server side platforms are mentioned in the installation guide. For browsers - the major ones are supported, this includes Firefox (1.5 and up), IE7 and up, Opera, Safari, Google Chrome etc. The preferred browser for most platforms is Firefox, it is widely available and free, if you have any choice at all, Firefox is the preferred platform, followed by safari on mac. IE6 users can experience some poor performance, and as this is a dangerously insecure browser IE7 or a superior browser (such as Google Chrome, Firefox, Safari) is recommended.
2.1.2. Initial configuration
Some initial setup is required the first time. The first time the server starts up, it will create an empty repository, then take the following steps:
• Once deployed, go to http://localhost:8080/guvnor-webapp/ This will show the initial info screen or login screen depending on the configuration.
• If it is a brand new repository, you will want to go to "Admin", and choose "Manage Categories"
(Add a few categories of your choosing, categories are only for classification, not for execution or anything else and are optional, but recommended).
• Rules and other assets belong to a Package, a container for related artifacts.
• Select the "Knowledge Bases" section of the menu-bar on the left-hand side of the Guvnor main window.
• Click on "Create New" to show the types of asset that can be created and select "New Package". Click on "Create new package" and enter a suitable name.
• Click "Create package".
• Rules need a fact model (object model) to work. The model defines your domain artifacts representing the knowledge you wish to manage.
• Select the "Knowledge Bases" section of the menu-bar on the left-hand side of the Guvnor main window.
• Click on "Create New" and select "Upload POJO model JAR" (if you have a JAR containing your Java model).
• Enter a suitable name and ensure the package you defined above is selected in the "Create in package" dropdown.
• Click OK
• The POJO Upload screen is displayed.
• Click on "Browse" and select your JAR file.
• Click on "Upload".
• At this point, the package is configured and ready to go (you generally won't have to go through that step very often).
(Note that you can also import an existing DRL package - it will store the rules in the repository as individual assets).
2.1.3. Writing a rule
• Select the "Knowledge Bases" section of the menu-bar on the left-hand side of the Guvnor main window.
• Click on "Create New" and select the type of rule you want to create.
(There are different types of rule that can be authored but for simplicity we will demonstrate a new "Guided Rule").
• Chose "New Rule".
• • Enter a suitable name and ensure the package you defined above is selected in the "Create in package" dropdown.
(You can optionally assign the default "Category" to the rule at this stage too).
• Select "Business Rule (guided editor)" in the "Type (format) or rule" dropdown.
• Click "OK".
• The Guided Rule Editor will open. It represents a single DRL rule. You can add and edit Conditions and Actions using the model, or models, that are available in the package.
• When you are done with rule editing, you can check in the changes (save), or you can validate or "view source" (for the effective source).
• You can also add/remove categories from the rule editor, and other attributes such as documentation (if you aren't sure what to do, write a document in natural language describing the rule, and check it in, that can also serve as a template later)
2.1.4. Finding stuff
In terms of navigating, you can either use the Rules feature, which shows things grouped by categories, or you can use the Package feature, and view by package (and rule type). If you know the name or part of the name of an asset, you can also use the "Quick find", start typing a rule name and it will return a list of matches as you type (so if you have a sensible naming scheme, it will make it very quick to find stuff).
2.1.5. Deployment
• After you have edited some rules in a package, you can click on the package feature, open the package that you wish, and build the whole package.
• If that succeeds, then you will be able to download a binary package file which can be deployed into a runtime system.
• You can also take a "snapshot" of a package for deployment. This freezes the package at that point in time, so any concurrent changes to not effect the package. It also makes the package available on a URL of the form: "http://<your server>/guvnor-webapp/org.drools.guvnor.Guvnor/ packages/<packageName>/<snapshotName>" (where you can use that URL and downloads will be covered in the section on deployment).
Chapter 3. Concepts
3.1. Rules are assets
As the Guvnor can manage many different types of rules (and more), they are all classed as "assets". An asset is anything that can be stored as a version in the repository. This includes decision tables, models, DSLs and more. Sometimes the word "rule" will be used to really mean "asset" (i.e. the things you can do also apply to the other asset types). You can think of asset as a lot like a file in a folder. Assets are grouped together for viewing, or to make a package for deployment etc.
3.2. Packages are assets
A package is a logical container for assets.
Packages form a deployable unit containing assets and once a package has been built it itself becomes an asset.
The Global Area is a special type of package that contains assets that can be shared in other packages. Shared assets are linked to those in the Global Area.
3.3. The business user perspective
You can see from this manual, that some expertise and practice is required to use Guvnor. In fact any software system in some sense requires that people be "technical" even if it has a nice looking GUI. Having said that, in the right hands Guvnor can be setup to provide a suitable environment for non technical users.
The most appropriate rule formats for this use are using the Guided editor, Decision tables and DSL rules. You can use some DSL expressions also in the guided editor (so it provides "forms" for people to enter values).
You can use categories to isolate rules and assets from non technical users. Only assets which have a category assigned will appear in the "categories" view.
The initial setup of Guvnor will need to be done by a developer/technical person who will set the foundations for all the rules. They may also create "templates" which are rules which may be copied (they would typically live in a "dummy" package, and have a category of "template" - this can also help ease the way).
Deployment should also not be done by non technical users (as mentioned previously this happens from the "Package" feature).
3.3.1. Creating a business user view
In most cases not all users will want to see all the functionality described here. You could have a subset of users who you only want to let view or edit certain sets of rules, without getting confused
by all the other stuff. In this case you can use fine grained authorization (see the Admin Guide on how to initialize this). By setting permissions on a per category basis, users that only have category permissions will see a limited subset of functionality, and only items that are tagged with those categories.
Chapter 4. Authoring Assets
4.1. Version management
Both assets and whole packages of assets are "versioned" in the Guvnor, but the mechanism is slightly different. Individual assets are saved a bit like a version of a file in a source control system. However, packages of assets are versioned "on demand" by taking a snapshot (typically which is used for deployment). The next section talks about deployment management and snapshots.
Figure 4.1. Asset versions
Each time you make a change to an asset, it creates a new item in the version history. This is a bit like having an unlimited undo. You can look back through the history of an individual asset like the list above, and view it (and restore it) from that point in time.
4.2. The Asset Editor
The Asset Editor is the principle component of Guvnor's User-Interface. It consists of two
tabs:-• Attributes
• A : Meta data (from the "Dublin Core"
standard):-"Last modified:" The last modified date.
"By:" Who made the last change.
"Note:" A comment made when the Asset was last updated (i.e. why a change was made)
"Created on:" The date and time the Asset was created.
"Created by:" Who initially authored the Asset.
"Package:" The package to which the Asset belongs.
"Is Disabled:" Whether the Asset has been disabled from inclusion in a binary package.
"UUID:" A unique identifier for the Asset version.
• B : Other miscellaneous meta data for the Asset.
• C : Version history of the Asset.
• D : Free-format documentation\description for the Asset. It is encouraged, but not mandatory, to record a description of the Asset before editing.
• E : Discussions regarding development of the Asset can be recorded here.
Figure 4.3. The Asset Editor - Other meta data
Figure 4.4. The Asset Editor - Version history
Figure 4.5. The Asset Editor - Description
Figure 4.6. The Asset Editor - Discussion
• Edit
• A : The Asset editor is where the "editor widget" lives - exactly what form the editor takes depends on the Asset type.
• C : The current status of the Asset.
Figure 4.7. The Asset Editor - Edit tab
4.3. Creating a package
Configuring packages is generally something that is done once, and by someone with some experience with rules/models. Generally speaking, very few people will need to configure packages, and once they are setup, they can be copied over and over if needed. Package configuration is most definitely a technical task that requires the appropriate expertise.
All assets live in "packages" in the Guvnor - a package is like a folder (it also serves as a "namespace"). A home folder for rule assets to live in. Rules in particular need to know what the fact model is, what the namespace is etc.
So while rules (and assets in general) can appear in any number of categories, they only live in one package. If you think of the Guvnor as a file system, then each package is a folder, and the assets live in that folder - as one big happy list of files. When you create a deployment snapshot of a package, you are effectively copying all the assets in that "folder" into another special "folder".
Figure 4.8. New Package
4.3.1. Empty package
An empty package can be created by simply specifying a name and optional description.
Figure 4.9. New empty Package
4.3.2. Importing DRL packages
It is also possible to create a package by importing an existing DRL file. When you choose to create a new package, you can choose an option to upload a .drl file. The Guvnor will then attempt to understand that DRL, break create a package for you. The rules in it will be stored as individual assets (but still as DRL text content). Note that to actually build the package, you will need to upload an appropriate model (as a JAR) to validate against, as a separate step.
4.4. Spring Contexts
This textual editor allows you to define Drools (and potentially any) Spring context file. These files are later accessible through HTTP.
Figure 4.11. Spring Context - Editor
The editor comes with a basic pallete that you can use to paste predefined Spring Beans templates like kbases, ksessions and so on.
The pallete also has a Package tree that can be used to add resources to the Spring Context file being edited.
The Beans are inserted in the caret position of the editor
The elements in the pallete can be customized editing the file $GUVNOR_HOME/WEB-INF/ Clases/springContextElements.properties
Figure 4.12. Spring Context - Pallete Configuration
Each Spring Context has its own URL that applications can use to access it. These URLs are shown in the Package Edit Screen
Figure 4.13. Spring Context - Public URLs
4.5. Working Sets
Working Sets are a mean for grouping Facts and then defining constraints on them. You can create groups of Facts and only those Facts will be visible when authoring rules using the Guided Editor.
Right now, Working Sets must be activated manually from the Guided Editor window (using the "Select Working Set" button placed in the toolbar). In the future, different Working Sets could be assigned to different users to reduce the scope and complexity when authoring rules.
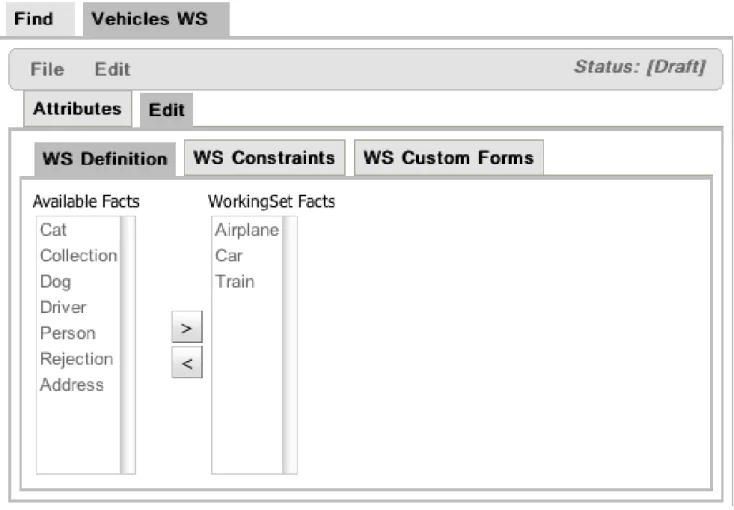
Figure 4.14. Creating a new Working Set
The figure above shows the window used to create or modify Working Sets. In this window you will find 2 lists. The list on the left side contains the possible Fact Types that can be added to the Working Set. These facts are those defined/imported in the package's model. The list on the right side contains the allowed Fact Types of this Working Set. When this Working Sets is active, only those Fact Types could be used while authoring rules using the Guided BRL Editor
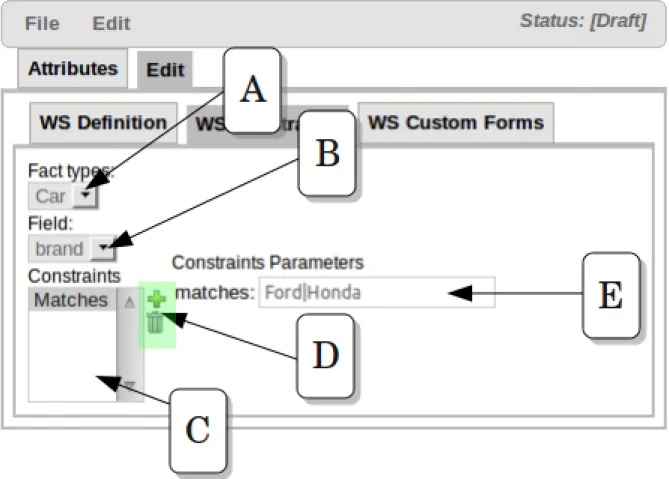
Figure 4.15. Defining Field Constraints inside a Working Set
Once you have selected the valid Fact Types for a Working Set, you can add Constraints to the fields of those Facts Types. The image above shows how the Field Constraint tab looks like. In this configuration screen you will find:
A.- Fact Types dropdown: Here you will find a list containing the Working Set's Fact Types
B.- Field dropdown: Once you have selected a Fact Type, this dropdown will contain its fields.
C.- Constraints List: This lists shows all the Constraints applied to the selected Field
D.- Action Buttons: Using these buttons you will be able to add or remove Constraints to the selected Field. Right now, Guvnor provides a built-in collection of Constraints. The idea for next releases is to let users to plug their custom Constraints too.
E.- Constraint's Attributes: In this section you will find all the attributes of the current Constraint that could be parametrized by the user.
In the example above, a Matches Constraint is created for Car.brand field. This means that when rule authors use this field in a Rule condition, they should use a value valid according to this constraint, otherwise they will receive an error or warning.
4.5.1. Activating and Using Working Sets
Working Sets are no active by default in Guvnor. Because this is an experimental feature, you must enable them manually in the Guided Editor panel if you want to use them. In the future, Working Sets will be associated to each user's profile.
A new button was added in Guided Editor's Toolbar: "Select Working Sets". This button will open a popup with the list of the package's Working Sets. Using this popup you can activate one or more Working Sets.
When Working Sets are activated, only the Fact Types allowed by them could be used when inserting new Patterns or Actions. The Patterns and Actions already present in the rule that contain prohibited Fact Types are marked as read only. Take a look at the next screen shots comparing the Guided Editor panel with and without Working Sets
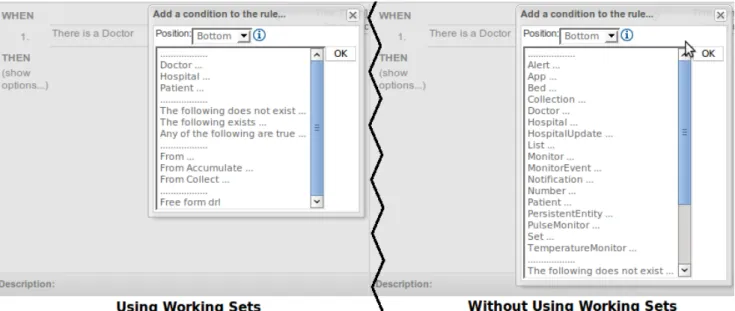
Figure 4.16. Comparison of "Add new Pattern" window using Working Set
and without using them
In the image you can see how Working Sets could help rule's authors by reducing the amount of available Fact Types
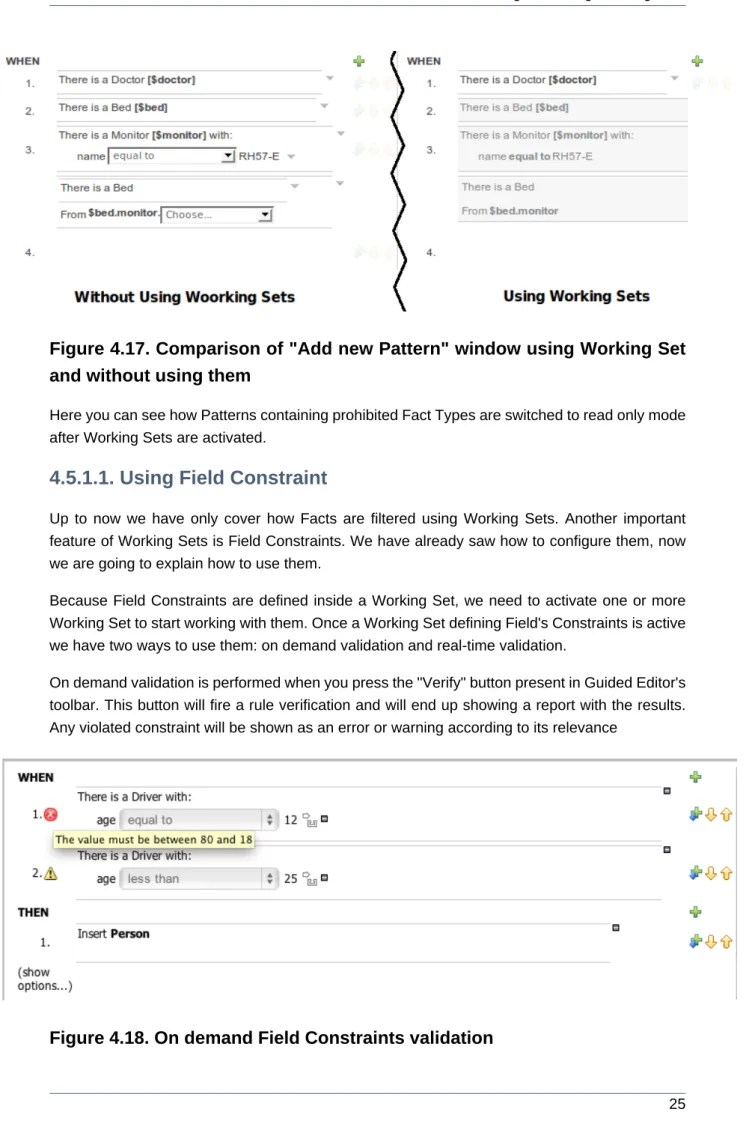
Figure 4.17. Comparison of "Add new Pattern" window using Working Set
and without using them
Here you can see how Patterns containing prohibited Fact Types are switched to read only mode after Working Sets are activated.
4.5.1.1. Using Field Constraint
Up to now we have only cover how Facts are filtered using Working Sets. Another important feature of Working Sets is Field Constraints. We have already saw how to configure them, now we are going to explain how to use them.
Because Field Constraints are defined inside a Working Set, we need to activate one or more Working Set to start working with them. Once a Working Set defining Field's Constraints is active we have two ways to use them: on demand validation and real-time validation.
On demand validation is performed when you press the "Verify" button present in Guided Editor's toolbar. This button will fire a rule verification and will end up showing a report with the results. Any violated constraint will be shown as an error or warning according to its relevance
The image above shows the report that appears when a Working Set defines a Range Constraint on Driver.age. The age should be between 18 and 80.
Real-Time validation is an experimental feature (yes, inside another experimental feature like Working Sets) that checks for Field's Constraints violations in real time and mark the lines where the violations are using error or warning icons. This feature is disabled by default because sometimes it could be expensive. If you want to try it out, you should enable it in Administration -> Rules Verification. This configuration is not yet persisted, so you need to enable it every time you start Guvnor.
Figure 4.19. Real-Time Field Constraints validation
This Image shows the result of real-time validation. There you can see the same result as on demand validation, but you don't need to click any button, and the errors/warnings are shown in a more fashionable way!
Warning
The problem with real-time validation is that right now only support "top level" Patterns.
4.6. Business rules with the guided editor
Business Rules authored with the Guided Editor are more commonly known as "BRL Rules".
These rules use the guided GUI which controls and prompts user input based on knowledge of the object model.
Note
To use the Guided Rule Editor, someone will need to have you package configured before hand.
4.6.1. Parts of the Guided Rule Editor
The Guided Rule Editor is composed of three main sections.
The following diagram shows the editor in action. The following descriptions apply to the lettered boxes in the
diagram:-Figure 4.20. The guided BRL editor
A : The different parts of a
rule:-• The "WHEN" part, or conditions, of the rule.
• The "THEN" action part of the rule.
• Optional attributes that may effect the operation of the rule.
4.6.2. The "WHEN" (left-hand side) of a Rule
B : This shows a pattern which is declaring that the rule is looking for a "LoanApplication" fact (the fields are listed below, in this case none). Another pattern, "Applicant", is listed below "LoanApplication". Fields "creditRating" and "applicationDate" are listed. Clicking on the fact name ("LoanApplication") will pop-up a list of options to add to the fact
declaration:-• Add more fields (e.g. their "location").
• Assign a variable name to the fact (which you can use later on if needs be)
• Add "multiple field" constraints - i.e. constraints that span across fields (e.g. age > 42 or risk > 2).
C : The "minus" icon ("[-]") indicates you can remove something. In this case it would remove the whole "LoanApplication" fact declaration. Depending upon the placement of the icon different components of the rule declaration can be removed, for example a Fact Pattern, Field Constraint, other Conditional Element ("exists", "not exists", "from" etc) or an Action.
D : The "plus" icon ("+") allows you to add more patterns to the condition or the action part of the rule, or more attributes. In all cases, a popup option box is provided. For the "WHEN" part of the rule, you can choose from a list of Conditional Elements to add:
• A Constraint on a Fact: it will give you a list of facts.
• "The following does not exist": the fact plus constraints must not exist.
• "The following exists": at least one match should exist (but there only needs to be one - it will not trigger for each match).
• "Any of the following are true": any of the patterns can match (you then add patterns to these higher level patterns).
• "From": this will insert a new From Conditional Element to the rule.
• "From Accumulate": this will insert a new Accumulate Conditional Element to the rule.
• "From Collect": this will insert a new Collect Conditional Element to the rule.
• "From Entry-point": this allows you to define an Entry Point for the pattern.
• "Free Form DRL": this will let you insert a free chunk of DRL.
If you just put a fact (like is shown above) then all the patterns are combined together so they are all true ("and").
E : This shows the constraint for the "creditRating" field. Looking from left to right you
find:-• The field name: "creditRating". Clicking on it you can assign a variable name to it, or access nested properties of it.
• A list of constraint operations ("equal to" being selected): The content of this list changes depending on the field's data type.
• The value field: It could be one of the
following:-1. A literal value: depending on the field's data type different components will be displayed:
• String -> Textbox
• Any numerical value -> Textbox restricting entry to values valid for the numerical sub-type (e.g. a byte can hold values from -128 to 127). BigDecimal and BigInteger data-types are
also supported. Please ensure the appropriate Class has been imported in the Package configuration. The import will be added automatically if a POJO model has been uploaded that exposes an accessor or mutator for a BigDecimal or BigInteger field. BigDecimal values are automatically suffixed with "B" indicating to the underlying Engine that the literal value should be interpreted as a BigDecimal. BigIntegers are suffixed with "I". The user does not need to enter the suffix.
• Date -> Calendar
• Enumeration -> Listbox
• Boolean -> Checkbox
2. A "formula": this is an expression which is calculated (this is for advanced users only)
3. An Expression - this will let you use an Expression Builder to build up a full mvel expression. (At the moment only basic expressions are supported)
F : This shows the constraint for the "applicationDate" field. Looking from left to right you find:
• The field name: "applicationDate".
• A list of constraint operations: "after" being selected.
• A "clock" icon. Since the "applicationDate" is a Date data-type the list of available operators includes those relating to Complex Event Processing (CEP). When a CEP operator is used this additional icon is displayed to allow you to enter additional CEP operator parameters. Clicking the "clock" will cycle the available combinations of CEP operator parameters.
Note
Complex Event Processing operators are also available when the Fact has been declared as an event. Refer to the "Fact Model" chapter of this user-guide for details on how to add annotations to your Fact model. Events have access to the full range of CEP operators; Date field-types are restricted to "after", "before" and "coincides".
Note
Facts annotated as Events can also have CEP sliding windows defined.
4.6.2.1. Adding Patterns
When clicking on the + button of the WHEN section, a new popup will appear letting you to add a new Pattern to the Rule. The popup will looks similar to the image below. In this popup you could select the type of Pattern to add by selecting one of the list items. In the list you will have an entry for each defined Fact Type, in addition to the already mentioned Conditional Elements like
"exists", "doesn't exist", "from", "collect", "accumulate", "from entry-point" and "free form DRL". Once you have selected one of this elements, you can add a new Pattern by clicking on the "Ok" button. The new pattern will be added at the bottom of the rule's left hand side. If you want to choose a different position, you can use the combobox placed at the top of the popup.
You can also open this popup by clicking in the [+] button from a Pattern's action toolbar. If that is the case, the pop-up that appears wouldn't constraint the position combobox, because the new Pattern will be added just after the Pattern where you clicked.
Figure 4.21. Adding Patterns
4.6.2.2. Adding constraints
The below dialog is what you will get when you want to add constraints to a fact. In the top half are the simple options: you can either add a field constraint straight away (a list of fields of the applicable fact will be shown), or you can add a "Multiple field constraint" using AND or OR operands. In the bottom half of the window you have the Advanced options: you can add a formula (which resolves to True or False - this is like in the example above: "... salary > (2500 * 4.1)". You can also assign a Variable name to the fact (which means you can then access that variable on the action part of the rule, to set a value etc).
Figure 4.22. Adding constraints
4.6.3. The "THEN" (right-hand side) of a Rule
H : This shows an "action" of the rule, the Right Hand Side of a rule consists in a list of actions. In this case, we are updating the "explanation" field of the "LoanApplication" fact. There are quite a few other types of actions you can
use:-• Insert a completely new Fact and optionally set a field on the Fact.
The value field can be one of the
following:-1. A literal value: depending on the field's data type different components will be displayed:
• String -> Textbox
• Any numerical value -> Textbox restricting entry to values valid for the numerical sub-type (e.g. a byte can hold values from -128 to 127). BigDecimal and BigInteger data-types are also supported. Please ensure the appropriate Class has been imported in the Package configuration. The import will be added automatically if a POJO model has been uploaded that exposes an accessor or mutator for a BigDecimal or BigInteger field. BigDecimal values are automatically suffixed with "B" indicating to the underlying Engine that the literal value should be interpreted as a BigDecimal. BigIntegers are suffixed with "I". The user does not need to enter the suffix.
• Date -> Calendar
• Enumeration -> Listbox
• Boolean -> Checkbox
2. A variable bound to a Fact or Field in the left-hand side. The data-type of the field being set must match the data-type of the variable.
3. A "formula": this is an expression which is calculated (this is for advanced users only)
• Logically insert a completely new Fact (see "Truth Maintenance" in the Expert documentation) and optionally set a field on the Fact.
1. A literal value: depending on the field's data type different components will be displayed:
The value field can be one of the
following:-a. A literal value: depending on the field's data type different components will be displayed:
• String -> Textbox
• Any numerical value -> Textbox restricting entry to values valid for the numerical sub-type (e.g. a byte can hold values from -128 to 127). BigDecimal and BigInteger data-types are also supported. Please ensure the appropriate Class has been imported in the Package configuration. The import will be added automatically if a POJO model has been uploaded that exposes an accessor or mutator for a BigDecimal or BigInteger field. BigDecimal values are automatically suffixed with "B" indicating to the underlying Engine that the literal value should be interpreted as a BigDecimal. BigIntegers are suffixed with "I". The user does not need to enter the suffix.
• Date -> Calendar
• Enumeration -> Listbox
• Boolean -> Checkbox
b. A variable bound to a Fact or Field in the left-hand side. The data-type of the field being set must match the data-type of the variable.
c. A "formula": this is an expression which is calculated (this is for advanced users only)
2. A variable bound to a Fact or Field in the left-hand side. The data-type of the field being set must match the data-type of the variable.
3. A "formula": this is an expression which is calculated (this is for advanced users only)
• Modify a field of an existing fact (which tells the engine the fact has changed).
The value field can be one of the
following:-1. A literal value: depending on the field's data type different components will be displayed:
• String -> Textbox
• Any numerical value -> Textbox restricting entry to values valid for the numerical sub-type (e.g. a byte can hold values from -128 to 127). BigDecimal and BigInteger data-types are also supported. Please ensure the appropriate Class has been imported in the Package configuration. The import will be added automatically if a POJO model has been uploaded
that exposes an accessor or mutator for a BigDecimal or BigInteger field. BigDecimal values are automatically suffixed with "B" indicating to the underlying Engine that the literal value should be interpreted as a BigDecimal. BigIntegers are suffixed with "I". The user does not need to enter the suffix.
• Date -> Calendar
• Enumeration -> Listbox
• Boolean -> Checkbox
2. A variable bound to a Fact or Field in the left-hand side. The data-type of the field being set must match the data-type of the variable.
3. A "formula": this is an expression which is calculated (this is for advanced users only)
• Set a field on a fact (in which case the engine doesn't know about the change - normally because you are setting a result).
The value field can be one of the
following:-1. A literal value: depending on the field's data type different components will be displayed:
• String -> Textbox
• Any numerical value -> Textbox restricting entry to values valid for the numerical sub-type (e.g. a byte can hold values from -128 to 127). BigDecimal and BigInteger data-types are also supported. Please ensure the appropriate Class has been imported in the Package configuration. The import will be added automatically if a POJO model has been uploaded that exposes an accessor or mutator for a BigDecimal or BigInteger field. BigDecimal values are automatically suffixed with "B" indicating to the underlying Engine that the literal value should be interpreted as a BigDecimal. BigIntegers are suffixed with "I". The user does not need to enter the suffix.
• Date -> Calendar
• Enumeration -> Listbox
• Boolean -> Checkbox
2. A variable bound to a Fact or Field in the left-hand side. The data-type of the field being set must match the data-type of the variable.
3. A "formula": this is an expression which is calculated (this is for advanced users only)
• Retract a fact from the Engine's Working Memory.
• Write a chunk of free form code.
4.6.4. Optional attributes
The attributes section of a rule provides the means to define metadata and attributes (such as "salience", "no-loop" etc).
Click on the "+" icon to add a new metadata or attribute definition. Each defined will appear listed in this section.
Click on the "-" icon beside each metadata or attribute to remove it.
4.6.5. Pattern/Action toolbar
G : Next to each Pattern or Action you will find a toolbar containing 3 buttons.
The first "+" icon lets you insert a new Pattern/Action at an arbitrary location. The other "+" icons allow you to insert a new Pattern/Action below that you have selected.
The remaining arrow icons allow you to move the current Pattern/Action up or down.
4.6.6. User driven drop down lists
Figure 4.23. Data enumeration showing as a drop down list
Note that is it possible to limit field values to items in a pre-configured list. This list is either defined by a Java enumeration or configured as part of the package (using a data enumeration to provide values for the drop down list). These values can be a fixed list, or (for example) loaded from a database. This is useful for codes, and other fields where there are set values. It is also possible to have what is displayed on screen, in a drop down, be different to the value (or code) used in a rule. See the section on data enumerations for how these are configured.
It is possible to define a list of values for one field that are dependent upon the value of one or more other fields, on the same Fact (e.g. a list of "Cities" depending on the selected "Country region"). Please refer to the section on "Enumerations" for more information.
4.6.7. Augmenting with DSL sentences
If the package the rule is part of has a DSL configuration, when when you add conditions or actions, then it will provide a list of "DSL Sentences" which you can choose from - when you choose one, it will add a row to the rule - where the DSL specifies values come from a user, then a edit box (text) will be shown (so it ends up looking a bit like a form). This is optional, and there is another DSL editor. Please note that the DSL capabilities in this editor are slightly less then the full set of DSL features (basically you can do [when] and [then] sections of the DSL only - which is no different to drools 3 in effect).
The following diagram shows the DSL sentences in action in the guided editor:
4.6.8. A more complex example:
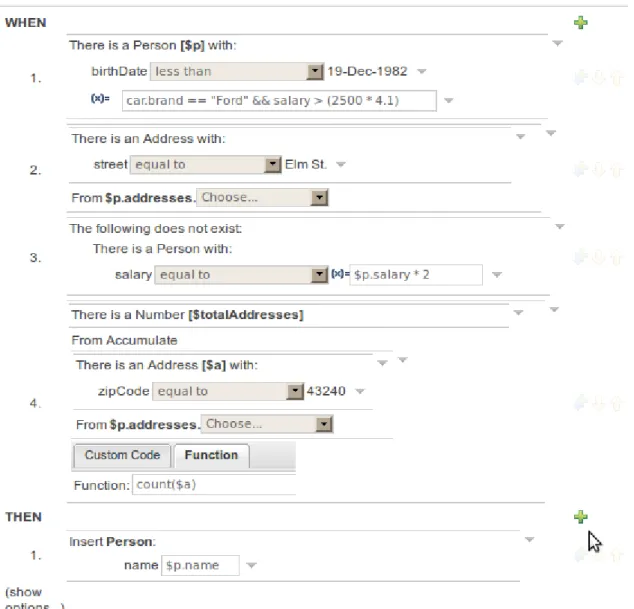
Figure 4.25. A more complex BRL example
In the above example, you can see how to use a mixture of Conditional Elements, literal values, and formulas. The rule has 4 "top level" Patterns and 1 Action. The "top level" Patterns are:
1. A Fact Pattern on Person. This Pattern contains two field constraints: one for birthDate field and the other one is a formula. Note that the value of the birthDate restriction is selected from a calendar. Another thing to note is that you can make calculations and use nested fields in the formula restriction (i.e. car.brand). Finally, we are setting a variable name ($p) to the Person Fact Type. You can then use this variable in other Patterns.
Note
$p : Person( birthDate < "19-Dec-1982" , eval( car.brand == "Ford" && salary > (2500 * 4.1) ))
2. A From Pattern. This condition will create a match for every Address whose street name is "Elm St." from the Person's list of addresses. The left side of the from is a regular Fact Pattern and the right side is an Expression Builder that let us inspect variable's fields.
Note
The generated DRL from this Pattern will be: Address( street == "Elm St." ) from $p.addresses
3. A "Not Exist" Conditional Element. This condition will match when its content doesn't create a match. In this case, its content is a regular Fact Pattern (on Person). In this Fact Pattern you can see how variables ($p) could be used inside a formula value.
Note
The generated DRL from this Pattern will be: not Person( salary == ( $p.salary * 2 ) )
4. A "From Accumulate" Conditional Element. This is maybe one of the most complex Patterns you can use. It consist in a Left Pattern (It must be a Fact Pattern. In this case is a Number Pattern. The Number is named $totalAddresses), a Source Pattern (Which could be a Fact Pattern, From, Collect or Accumulate conditional elements. In this case is an Address Pattern Restriction with a field restriction in its zip field) and a Formula Section where you can use any built-in or custom Accumulate Function (in this example a count() function is used). Basically, this Conditional Element will count the addresses having a zip code of 43240 from the Person's list of addresses.
Note
The generated DRL from this Pattern will be: $totalAddresses : Number() from accumulate ($a : Address( zipCode == " 43240") from $p.addresses, count($a))
4.7. DSL rules
Figure 4.26. DSL rule
A dsl rule is a single rule. Referring to the picture above, you can a text editor. You can use the icons to the right to provide lists of conditions and actions to choose from (or else press Control + Space at the same time to pop up a list).
4.8. Technical rules (DRL)
Technical (DRL) rules are stored as text - they can be managed in the Guvnor. A DRL can either be a whole chunk of rules, or an individual rule. if its an individual rule, no package statement or imports are required (in fact, you can skip the "rule" statement altogether, just use "when" and "then" to mark the condition and action sections respectively). Normally you would use the IDE to edit raw DRL files, since it has all the advanced tooling and content assistance and debugging. However, there are times when a rule may have to deal with something fairly technical in a package in Guvnor. In any typical package of rules, you generally have a need for some "technical rules" - you can mix and match all the rule types together of course.
4.9. Spreadsheet decision tables
Multiple rules can be stored in a spreadsheet (each row is a rule). The details of the spreadsheet are not covered in this chapter (as there is a separate chapter for them).
Figure 4.28. Spreadsheet decision table
To use a spreadsheet, you upload an XLS file (and can download the current version, as per the picture above). To create a new decision table, when you launch the rule wizard, you will get an option to create one (after that point, you can upload the XLS file).
4.10. Guided decision tables (web based)
The guided decision table feature allows decision tables to be edited in place on the web. This works similar to the guided editor by introspecting what facts and fields are available to guide the creation of a decision table. Rule attributes, meta-data, conditions and actions can be defined in a tabular format thus facilitating rapid entry of large sets of related rules. Web-based decision table rules are compiled into DRL like all other rule assets.
4.10.1. Types of decision table
There are broadly two different types of decision table, both of which are supported in
Guvnor:-• Extended Entry
• Limited Entry
4.10.1.1. Extended Entry
An Extended Entry decision table is one for which the column definitions, or stubs, specify Pattern, Field and operator but not value. The values, or states, are themselves held in the body of the decision table. It is normal, but not essential, for the range of possible values to be
restricted by limiting entry to values from a list. Guvnor supports use of Java enumerations, Guvnor enumerations or decision table "optional value lists" to restrict value entry.
Figure 4.29. Extended Entry Decision table
4.10.1.2. Limited Entry
A Limited Entry decision table is one for which the column definitions specify value in addition to Pattern, Field and operator. The decision table states, held in the body of the table, are boolean where a positive value (a checked tick-box) has the effect of meaning the column should apply, or be matched. A negative value (a cleared tick-box) means the column does not apply.
4.10.2. Main components\concepts
The guided decision table is split into two main
sections:-• The upper section allows table columns to be defined representing rule attributes, meta-data, conditions and actions.
• The lower section contains the actual table itself; where individual rows define separate rules.
Figure 4.31. Main components
4.10.2.1. Navigation
Cells can be selected in a variety of
ways:-• Firstly individual cells can be double-clicked and a pop-up editor corresponding to the underlying data-type will appear. Groups of cells in the same column can be selected by either clicking in the first and dragging the mouse pointer or clicking in the first and clicking the extent of the required range with the shift key pressed.
• Secondly the keyboard cursor keys can be used to navigate around the table. Pressing the enter key will pop-up the corresponding editor. Ranges can be selected by pressing the shift key whilst extending the range with the cursor keys.
Columns can be resized by hovering over the corresponding divider in the table header. The mouse cursor will change and then the column width dragged either narrower or wider.
4.10.2.2. Cell merging
The icon in the top left of the decision table toggles cell merging on and off. When cells are merged those in the same column with identical values are merged into a single cell. This simplifies changing the value of multiple cells that shared the same original value. When cells are merged they also gain an icon in the top-left of the cell that allows rows spanning the merged cell to be grouped.
Figure 4.32. Cell merging
4.10.2.3. Cell grouping
Cells that have been merged can be further collapsed into a single row. Clicking the [+\-] icon in the top left of a merged cell collapses the corresponding rows into a single entry. Cells in other columns spanning the collapsed rows that have identical values are shown unchanged. Cells in other columns spanning the collapsed rows that have different values are highlighted and the first value displayed.
Figure 4.33. Cell grouping
When the value of a grouped cell is altered all cells that have been collapsed also have their values updated.
4.10.2.4. Operation of "otherwise"
Condition columns defined with literal values that use either the equality (==) or inequality (!=) operators can take advantage of a special decision table cell value of "otherwise". This special value allows a rule to be defined that matches on all values not explicitly defined in all other rules defined in the table. This is best illustrated with an
example:-when
Cheese( name not in ("Cheddar", "Edam", "Brie") ) ...
then ... end
when
Cheese( name in ("Cheddar", "Edam", "Brie") ) ...
then ... end
4.10.2.5. Re-arranging columns
Whole patterns and individual conditions can be re-arranged by dragging and dropping them in the configuration section of the screen. This allows constraints to be re-ordered to maximise performance of the resulting rules, by placing generalised constraints before more specific. Action columns can also be re-arranged by dragging and dropping them.
Figure 4.35. Re-arranging columns
4.10.3. Defining a web based decision table
4.10.3.1. Manual creation
When a new empty decision table has been created you need to define columns for Facts, their constraints and corresponding actions.
4.10.3.1.1. Column configuration
Expand the "Decision table" element and you will see three further sections for "Conditions", "Actions" and "Options". Expanding either the "Conditions" or "Actions" sections reveals the "New column" icon. This can be used to add new column definitions to the corresponding section. Existing columns can be removed by clicking the "-" icon beside each column name, or edited by clicking the "pencil" icon also beside each column name. The "Options" section functions slightly differently however the principle is the same: clicking the "Add Attribute/Metadata" icon allows columns for table attributes to be defined (such as "salience", "no-loop" etc) or metadata added.
4.10.3.1.1.1. Utility columns
All decision table contain two utility columns containing rule number and rule description.
4.10.3.1.1.2. Adding columns
To add a column click on the "New column" icon.
You are presented with the following column type selection popup.
Figure 4.37. Column type popup
By default the column type popup only shows the following simple
types:-• Add a new Metadata\Attribute column
• Add a simple Condition
• Set the value of a field
• Set the value of a field on a new fact
• Retract an existing fact
Clicking on "Include advanced options" adds the following additional "advanced" column types for more advanced use
cases:-• Add a Condition BRL fragment
• Execute a Work Item
• Set the value of a field on a new Fact with a Work Item parameter
• Add an Action BRL fragment
4.10.3.1.1.3. Simple column types
4.10.3.1.1.3.1. Metadata
Zero or more meta-data columns can be defined, each represents the normal meta-data annotation on DRL rules.
4.10.3.1.1.3.2. Attributes
Zero or more attribute columns representing any of the DRL rule attributes (e.g. salience, timer, enabled etc) can be added. An additional pseudo attribute is provide in the guided decision table editor to "negate" a rule. Use of this attribute allows complete rules to be negated. For example the following simple rule can be negated as also shown.
when
$c : Cheese( name == "Cheddar" ) then
... end
when
not Cheese( name == "Cheddar" ) then
... end
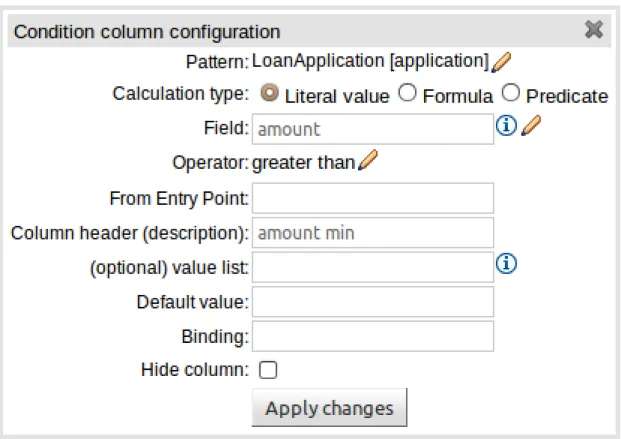
4.10.3.1.1.3.3. Simple Condition
Conditions represent constraints on Fact Patterns defined in the left-hand side, or "when" portion, of a rule. To define a condition column you must first select or define a Fact Pattern bound to a model class. You can choose to negate the pattern. Once this has been completed you can define field constraints. If two or more columns are defined using the same fact pattern binding the field constraints become composite field constraints on the same pattern. If you define multiple bindings for a single model class each binding becomes a separate model class in the left-hand side of the rule.
When you edit or create a new column, you will be given a choice of the type of
constraint:-• Literal : The value in the cell will be compared with the field using the operator.
• Predicate : No field is needed, the expression will be evaluated to true or false.
Figure 4.38. Simple Condition popup
4.10.3.1.1.3.4. Set the value of a fieldAn Action to set the value of a field on previously bound fact. You have the option to notify the Rule Engine of the modified values which could lead to other rules being re-activated.
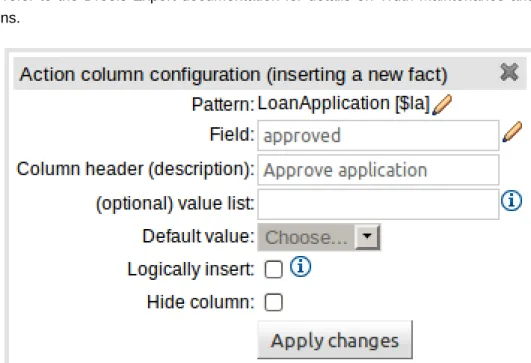
4.10.3.1.1.3.5. Set the value of a field on a new fact
An Action to insert a new Fact into the Rule Engine Working Memory and set the a value of one of the new Facts' fields. You can choose to have the new Fact "logically inserted" meaning it will be automatically retracted should the conditions leading to the action being invoked cease to be true. Please refer to the Drools Expert documentation for details on Truth Maintenance and Logical insertions.
Figure 4.40. Set the value of a field on a new fact popup
4.10.3.1.1.3.6. Retract an existing factAn Action to retract a bound Fact.
Figure 4.41. Retract an existing fact popup
4.10.3.1.1.4. Advanced column types
4.10.3.1.1.4.1. Condition BRL fragments
A construct that allows a BRL fragment to be used in the left-hand side of a rule. A BRL fragment is authored using the Guided Rule Editor and hence all features available in that editor can be used to define a decision table column; such as "from", "collect" and "accumulate" etc. When using
the embedded Guided Rule Editor field values defined as "Template Keys" will form columns in the decision table. Facts and Fact's fields bound in the BRL fragment can be referenced by the simpler column types and vice-versa.
In the following example two Template Keys have been defined and hence two columns appear in the decision table.
Figure 4.42. Defining a Condition with BRL
Figure 4.43. The resulting decision table
4.10.3.1.1.4.2. Execute a Work ItemAn Action invoking a jBPM Work Item Handler setting it's input parameters to bound Facts\Facts fields values.
4.10.3.1.1.4.3. Set the value of a field with a Work Item parameter
An Action setting the value of a Fact's field to that of a jBPM Work Item Handlers result parameter.
4.10.3.1.1.4.4. Set the value of a field on a new Fact with a Work Item parameter
An Action setting the value of a new Fact's field to that of a jBOM Work Item Handlers result parameter.
4.10.3.1.1.4.5. Action BRL fragment
A construct that allows a BRL fragment to be used in the right-hand side of a rule. A BRL fragment is authored using the Guided Rule Editor and hence all features available in that editor can be used to define a decision table column. When using the embedded Guided Rule Editor field values defined as "Template Keys" will form columns in the decision table. Facts bound in the BRL fragment can be referenced by the simpler column types and vice-versa.
In the following example two Template Keys have been defined and hence two columns appear in the decision table.
Figure 4.45. The resulting decision table
4.10.3.2. Using a Wizard
A Wizard can also be used to assist with defining the decision table columns.
The wizard can be chosen when first electing to create a new rule. The wizard provides a number of pages to define the
table:-• Summary
• Add Fact Patterns
• Add Constraints
• Add Actions to update facts
• Add Actions to insert facts
• Columns to expand
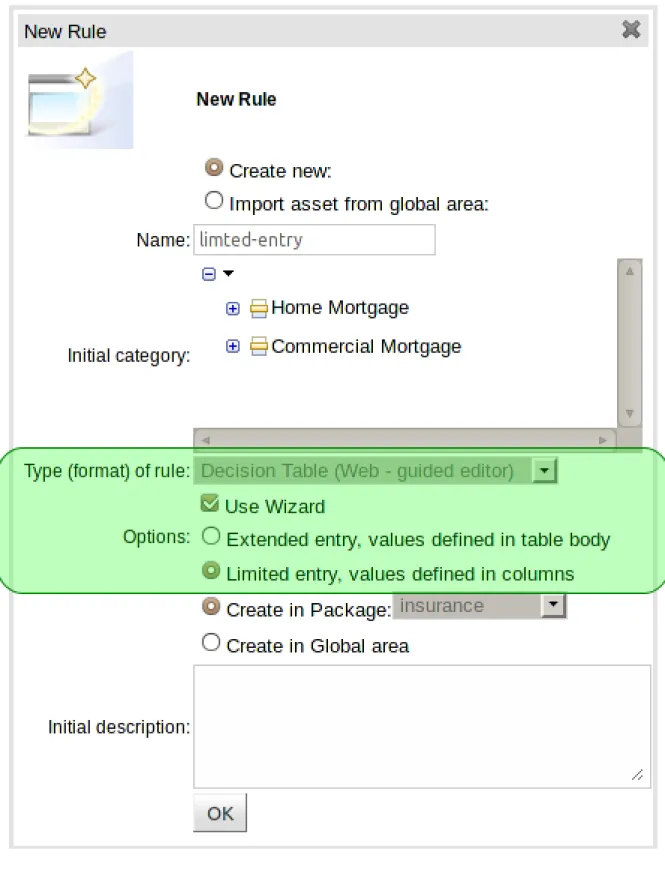
4.10.3.2.1. Selecting the wizard
The "New Wizard" dialog shows a "Use wizard" checkbox when the asset type is set to "Decision Table (Web - guided editor)".
Figure 4.46. Selecting the wizard
4.10.3.2.2. Summary page
the summary page shows a few basic details about the decision table and allows the asset name to be changed.
Figure 4.47. Summary page
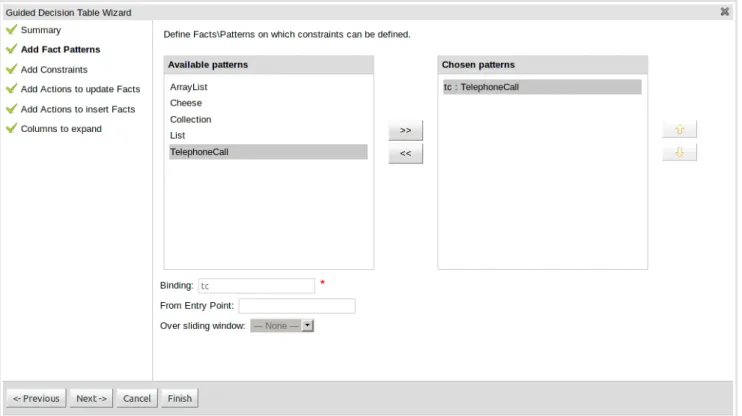
4.10.3.2.3. Add Fact Patterns page
This page allows Fact types to be defined that will form the "When" columns of the rules. Fact types that are available in your model will be shown in the left-hand listbox. Select a Fact type and use the ">>" button to add it to your list of chosen facts on the right-hand listbox. Removal is a similar process: the Fact that is no longer required can be selected in the right-hand listbox and the "<<" button used to remove it. All Fact types need to be bound to a variable. Incomplete Fact types will be highlighted and a warning message displayed. You will be unable to finish your definition until all warnings have been resolved.
Figure 4.48. Add Fact Patterns page
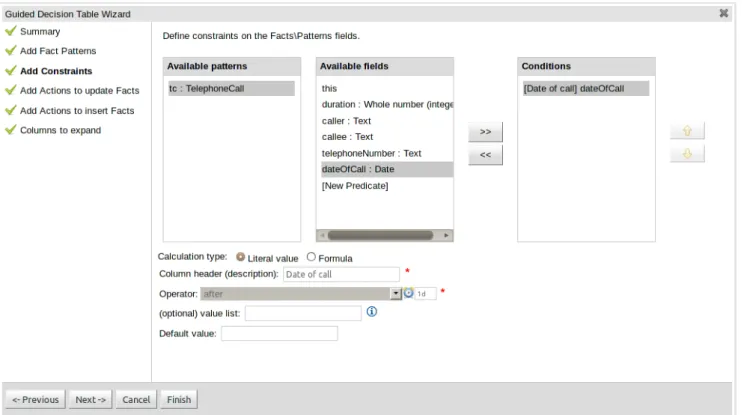
4.10.3.2.4. Add Constraints page
This page allows field constraints on the Fact types you have chosen to use in the decision table to be defined. Fact types chosen on the previous Wizard page are listed in the right-hand listbox. Selecting a Fact type by clicking on it will result in a list of available fields being shown in the middle listbox together with an option to create a predicate that do not require a specific field. Fields can be added to the pattern's constraints by clicking on the field and then the ">>" button. Fields can be removed from the pattern definition by clicking on the Condition in the right-hand listbox and then the "<<" button. All fields need to have a column header and operator. Incomplete fields will be highlighted and a warning message displayed. You will be unable to finish your definition until all warnings have been resolved.
Figure 4.50. Add Constraints page
4.10.3.2.5. Add Actions to update facts page
Fact types that have been defined can be updated in the consequence, or action, part of a rule. This page allows such actions to be defined. Fact types added to the decision table definition are listed in the left-hand listbox. Selecting a Fact type by clicking on it will result in a list of available fields being shown in the middle listbox. Fields that need to be updated by the rule can be added by selecting an available field and pressing the ">>" button. Fields can be removed similarly by clicking on a chosen field and then the "<<" button. All actions require a column header. Any incomplete actions will be highlighted and a warning message displayed. You will be unable to finish your definition until all warnings have been resolved.
Figure 4.51. Add Actions to update facts page
4.10.3.2.6. Add Actions to insert facts page
Actions can also be defined to insert new Facts into the Rule Engine. A list of Fact types available in your model are listed in the left-hand listbox. Select those you wish to include in your decision table definition by clicking on them and pressing the ">>" button between the left most listbox and that titled "Chosen patterns". Removal is a similar process whereby a chosen pattern can be selected and removed by pressing the "<<" button. Selection of a chosen pattern presents the user with a list of available fields. Fields that need to have values set by the action can be added by selecting them and pressing the ">>" button between the "Available fields" and "Chosen fields" listbox. Removal is a similar process as already described. New Facts need to be bound to a variable and have a column heading specified. Incomplete Facts and\or fields will be highlighted and a warning message displayed. You will be unable to finish your definition until all warnings have been resolved.
Figure 4.52. Add Actions to insert facts page
4.10.3.2.7. Columns to expand page
This page controls how the decision table, based upon Conditions defined on the prior pages, will be created. Condition columns defined with an optional list of permitted values can be used to create rows in the decision table. Where a number of Condition columns have been defined with lists of permitted values the resulting table will contain a row for every combination of values; i.e. the decision table will be in expanded form. By default all Condition columns defined with value lists will be included in the expansion however you are able to select a sub-set of columns if so required. This can be accomplished by unticking the "Fully expand" checkbox and adding columns to the right-hand listbox. If no expansion is required untick the "Fully expand" checkbox and ensure zero columns are added to the right-hand listbox.
Figure 4.53. Columns to expand page
Figure 4.55. Example of a decision table generated with expanded columns
4.10.4. Rule definition
This section allows individual rules to be defined using the columns defined earlier.
Rows can be appended to the end of the table by selecting the "Add Row" button. Rows can also be inserted by clicking the "+" icon beside an existing row. The "-" icon can be used to delete rows.
Figure 4.56. Rule definition
4.11. Templates of assets/rules
The guided rule editor is great when you need to define a single rule, however if you need to define multiple rules following the same structure but with different values in field constraints or action sections a "Rule Template" is a valuable asset. Rule templates allow the user to define a rule structure with place-holders for values that are to be interpolated from a table of data. Literal values, formulae and expressions can also continue to be used.
Rule Templates can often be used as an alternative for Decision Tables in Drools Guvnor.
4.11.1. Creating a rule template
To create a template for a rule simply select the "New Rule Template" from the Knowledge Bases "Create New" popup menu. The create "New Rule Template" asset popup window will appear from which the normal asset attributes can be defined; such as name, category and description.