Microsoft Dynamics
®AX
Developing secure mobile
apps for Microsoft Dynamics
AX 2012
White Paper
This document describes how to develop mobile client apps to
communicate with Microsoft Dynamics AX from phone or tablet
platforms.
Authors: Jagruti Pandya and Rob Drollinger, Software Engineers
May 2013
Table of Contents
Introduction ... 4
Technical overview ... 4
An Application Integration Framework custom service ... 5
Active federation for claims-based authentication to the Windows Azure Service Bus by using ACS and ADFS on the client ... 6
Outline of the walkthroughs... 6
Design and create the AIF service in Microsoft Dynamics AX 2012 ... 7
Overview ... 7
Development requirements ... 7
Create the data contract ... 8
Create the data members for the data contract... 8
Create the service class ... 9
Create the service operations ... 9
Create the service contract ...10
Create a privilege to secure the service operation ...11
Create a basic inbound integration port ...11
Verify that the service has been correctly deployed ...12
Establish a listener to the Windows Azure Service Bus ... 12
A middle-tier WCF service ...13
AIF Windows Azure Service Bus Adapter ...14
Comparing the Middle-tier WCF Service and the AIF Windows Service Bus Adapter ...14
Create the middle-tier WCF service ...15
Prerequisites ... 15
Overview ... 16
Development requirements ... 16
Create the service contract and operation contract ... 16
Add a service reference of the AIF service ... 18
Call the AIF service operations ... 20
Set up the Service Bus relay and deploy the listening endpoint for the middle-tier WCF service .. 22
Validate and extract contents from incoming messages ... 27
Build and deploy the middle-tier WCF Windows service ... 30
Deploy the AIF service using the AIF Windows Azure Service Bus Adapter. ...30
Prerequisites ... 30
Overview ... 31
Authentication Overview ... 31
Create Custom Authentication Classes ... 31
Registering the authentication component ... 33
Encryption Key Containers ... 34
Develop the client to communicate data to the middle-tier WCF service ... 38
Development requirements ...38
Overview ...38
Create a Windows Phone application ...38
Add the middle-tier WCF service reference ... 38
Lay out and set up the UI controls for required user input ... 40
Implement active federation and claims-based authorization for the mobile
client ... 42
Prerequisites (configuring the trusts) ...42
Overview ...43
Development requirements ...44
Implementation ...44
Setup ... 44
Get user input ... 46
Create and send the request for security token ... 48
Create the ACS payload ... 52
Additional notes and guidelines ... 56
Authenticate the user and send the data to the service ... 56
Developing RESTful JavaScript mobile apps for Microsoft Dynamics AX
2012 ... 60
Design and create the AIF service in Microsoft Dynamics AX 2012...61
Create the middle-tier RESTful service ...61
Prerequisites ... 62
Development requirements ... 62
Create the data contract, service contract, and operation contract ... 62
Add a service reference of the AIF service ... 65
Call the AIF service operations ... 65
Configure the RESTful service bindings and deploy the listening endpoint on Service Bus... 65
Validate and extract contents from incoming JSON messages ... 68
Create an HTML5/JavaScript app to communicate data to the WCF middle-tier RESTful service ...71
Implement active federation and claims-based authorization for the mobile client by using JavaScript ...71
Send the request payload to the REST service ...74
Introduction
This document describes how to create mobile client applications (apps) that enable Microsoft Dynamics AX users to communicate information with Microsoft Dynamics AX 2012.
Microsoft offers applications for key mobile scenarios on certain platforms and devices that are compatible with Microsoft Dynamics AX 2012. Microsoft Dynamics customers and partners have a rich ecosystem and powerful story for customizing and extending Microsoft Dynamics AX for the needs of individual organizations and industries. One important goal of this document is to empower our customers and partners to use Microsoft Dynamics AX to create delightful user experiences from any device that works with their customizations.
This document provides walkthroughs of a solution that addresses the simple user scenario of an employee capturing information about expenses that the employee incurred while traveling. The document is only meant to teach you the fundamentals of getting devices anywhere in the world talking to Microsoft Dynamics AX. The scenarios you can choose to implement with these lessons are up to your business requirements and your imagination. You can easily envision several exciting scenarios, such as time management, access to customer information while traveling to a customer site, creating sales orders, managing your projects on the road, or just checking up on the factory from across town on your phone or tablet.
Technical overview
The solution architecture described in this document lets users receive information and send
transactions to Microsoft Dynamics AX 2012, even if they are not in the same domain or network as the on-premises instance of Microsoft Dynamics AX. For example, the solution lets clients access a Microsoft Dynamics AX service that is running behind a firewall. The solution has the following requirements:
An Application Integration Framework (AIF) service communicates data to and from Microsoft Dynamics AX 2012.
Users provide their corporate credentials in the mobile client to interact with Microsoft Dynamics AX 2012 services created for their scenarios.
Only authenticated and authorized users can communicate with Microsoft Dynamics AX services by using client applications.
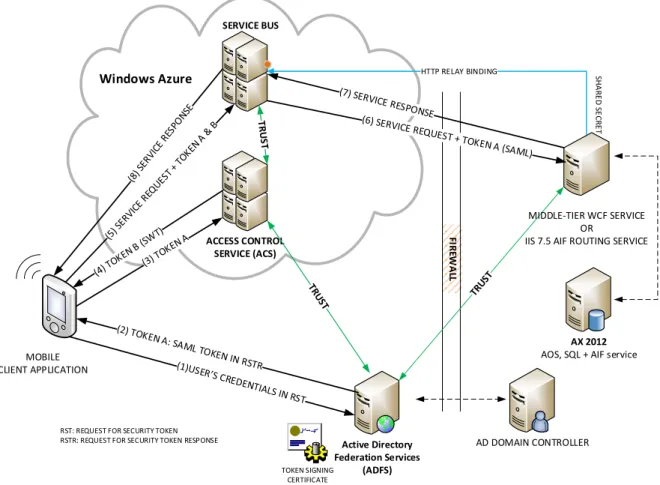
The following diagram illustrates how different components interact to enable the mobile app to communicate with Microsoft Dynamics AX.
FI RE W A LL MOBILE CLIENT APPLICATION Active Directory Federation Services (ADFS) AD DOMAIN CONTROLLER AX 2012 AOS, SQL + AIF service
Windows Azure SERVICE BUS ACCESS CONTROL SERVICE (ACS) TOKEN SIGNING CERTIFICATE HTTP RELAY BINDING SH A R E D SE C R E T MIDDLE-TIER WCF SERVICE OR
IIS 7.5 AIF ROUTING SERVICE
RST: REQUEST FOR SECURITY TOKEN RSTR: REQUEST FOR SECURITY TOKEN RESPONSE
Figure 1 Architectural overview of the entire mobile solution
An Application Integration Framework custom service
Design an AIF service that can be consumed for the necessary business scenario. To do this, you will need to do the following:
Create AIF service and data contracts, and deploy a basic inbound port to expose the service operations for consumption.
Implement the service methods in an X++ classes to perform data operations with Microsoft Dynamics AX 2012.
The AIF service alone works well for clients who want to consume the service when they are in the same network or domain. However, for mobile scenarios, this would not be useful, because the mobile client will need to communicate with the AIF service hosted on an Application Object Server (AOS) instance that is deployed behind a corporate firewall. Instead of configuring changes in the firewall, such as exposing an Internet Information Services (IIS) server externally to expose the on-premises service, we make use of a secured Service Bus relay.
The Microsoft Windows Azure Service Bus and its relayed messaging capability enable applications on other networks to communicate with a system or application that reside on-premises on another network or behind a firewall.
We provide two development patterns that leverage the Service Bus’s relayed message capability:
A custom-built middle-tier WCF service
This pattern involves building a middle-tier WCF service that establishes a listener for the Service Bus and routes messages to Microsoft Dynamics AX services according to the routing behavior that the developer chooses.
Publishing a service using the AIF Windows Azure Service Bus Adapter
This pattern leverages the AIF Windows Azure Service Bus Adapter, which provides a Service Bus listener, hosts the listener in IIS, and routes messages to the AIF service that was deployed using the adapter.
You have the flexibility to decide which pattern best fits your application and business requirements. The development patterns are described in Establish a listener to the Windows Azure Service Bus. A
table comparing their features is included.
Note: The example mobile application described in this document uses the middle-tier WCF service. A service deployed with the AIF Windows Azure Service Bus Adapter can be consumed by following the same guidance.
Active federation for claims-based authentication to the Windows
Azure Service Bus by using ACS and ADFS on the client
The Service Bus’s dedicated Access Control Service (ACS) plays a very important role in this solution, controlling the authorization to call a service registered on the Service Bus. It enforces authorization by requiring that the client provide a security token that is issued by a trusted identity provider that authenticates the user.
We use active federation to authenticate the user and acquire the user’s identity claims. This involves the mobile client actively requesting a security token (containing a set of claims identifying the user) from the corporate Active Directory Federation Services (AD FS) 2.0 by using the WS-Trust protocol. The client will then present this security token containing the claims to the ACS, which will then grant a simple web token (SWT) as a form of authorization for the client to securely send messages via the Service Bus.
For the mobile solution, you will need to use an existing corporate AD FS as an identity provider (IdP) to authenticate the user credentials originating from the app. The AD FS will also be used as the security token service (STS) to provide identity claims about the user that will eventually be consumed by the Microsoft Dynamics AX 2012.
We will walk you through implementing the described solution in detail. We will also provide sample code and configuration guidance to help you develop mobile applications for Microsoft Dynamics AX 2012 by using services.
Outline of the walkthroughs
The rest of the document will walk you through the components that you need to implement to create secure mobile applications for Microsoft Dynamics AX 2012.
In these walkthroughs, we will be using a simple unreconciled expense capture scenario to illustrate a sample mobile application. In this scenario, an employee of a company that uses the Microsoft
Dynamics AX 2012 Time and expense management feature will use the mobile application to capture details of an expense that the employee incurs when on the move.
We will use this scenario in all our services, and also in client code samples. You will need to do the following walkthroughs in this document:
3. Develop the client to communicate data to the middle-tier WCF service
4. Implement active federation and claims-based authorization for the mobile client
5. Authenticate the user and send the data to the service
Design and create the AIF service in Microsoft Dynamics
AX 2012
Overview
As mentioned in earlier, our example illustrates how a Microsoft Dynamics AX user employee can submit expenses from a mobile client when the user is on the move. When the expense makes it into Microsoft Dynamics AX, the expense shows up in the system as an unreconciled expense, which the employee can then add to an expense report.
We need to implement an AIF service that accepts this expense data coming from the middle-tier WCF Service, processes it, and then pushes it into the Microsoft Dynamics AX 2012 database.
In this walkthrough, we will guide you through the implementation and deployment of the custom AIF service for our mobile example. We will be using some of the existing expense data types and also the existing TrvUnreconciledExpenseTransaction table (which comes with the Travel and expense
module in Microsoft Dynamics AX 2012).
We will create a service contract for the AIF service that will be exposed to the clients consuming this service. In our expense capture example, the middle-tier WCF service will consume the AIF service that we create (named UnreconciledExpenseService).
For more guidance about creating custom AIF services, see Walkthrough: Exposing an X++ Class as a
Data Contract [AX 2012].
Note: The following example uses a standard implementation of custom AIF service functionality. If you are already familiar with this, you can skip this section.
Note: Although this example walks you through exposing a custom AIF service, you can apply the same principles to utilize Microsoft Dynamics AX document services or system services, such as the query service.
The following points summarize the walkthrough article mentioned earlier:
1. Create the data contract. This is the data object that is passed into the service call. 2. Create the data members that will be exposed as part of the data contract.
3. Define the service class.
4. Implement the service operations offered by the service contract. 5. Add the service class to the Application Object Tree (AOT). 6. Create a basic inbound port for the service to deploy the service. 7. Activate the port to make it consumable by external clients.
Development requirements
To complete this walkthrough, you will need the following:
Microsoft Dynamics AX 2012 installed and configured, together with the Active Directory server A development license for Microsoft Dynamics AX 2012
For our sample code, which covers an expense capture scenario:
The Travel and expense management module in Microsoft Dynamics AX 2012
The Human resources module in Microsoft Dynamics AX 2012
Microsoft Dynamics AX users added and mapped to workers, with the Employee role
Create the data contract
1. In the Developer Workspace, create a class in the AOT named UnreconciledExpenseRecord. Set the RunOn property to Called from.
2. In the class declaration, define the data members. For our expense capture scenario, we want the user to send the expense amount, currency, expense date, and some notes.
3. Apply the DataContractAttribute attribute to the class.
X++
[DataContractAttribute]
public class UnreconciledExpenseRecord { TransDate transactionDate; TrvFreeText notes; AmountCur transactionCurrencyAmount; CurrencyCode transactionCurrencyCode; }
Create the data members for the data contract
Add new methods in the class, and apply the DataMemberAttribute attribute to these methods.
X++
[DataMemberAttribute]
public TrvFreeText parmNotes(TrvFreeText _notes = notes) { notes = _notes; return notes; } [DataMemberAttribute]
public AmountCur parmTransactionCurrencyAmount(
AmountCur _transactionCurrencyAmount = transactionCurrencyAmount) { transactionCurrencyAmount = _transactionCurrencyAmount; return transactionCurrencyAmount; } [DataMemberAttribute]
public CurrencyCode parmTransactionCurrencyCode(
CurrencyCode _transactionCurrencyCode = transactionCurrencyCode) {
X++
[DataMemberAttribute]
public TransDate parmTransactionDate(TransDate _transactionDate = transactionDate) {
transactionDate = _transactionDate; return transactionDate;
}
Create the service class
Create a class in the AOT named UnreconciledExpenseService, and set the RunOn property to Server.
The class declaration is as follows.
X++
/// <summary>
/// The <c>TrvUnreconciledExpenseService</c> is the unreconciled /// expense transaction Web service class.
/// </summary>
public class UnreconciledExpenseService {
// These macros are used to specify the SubCode on AifFaults. // Their values will not be translated allowing the consumer // of the service to identify the cause
// of the fault and take appropriate action.
#DEFINE.ParameterValidationError('ParameterValidationError')
#DEFINE.UnreconciledExpenseCreationFailed('UnreconciledExpenseCreationFailed') }
Create the service operations
In the UnreconciledExpenseService class, create a public method named createRecord, which will take a reference of an unreconciled expense transaction that the user submitted and insert the data into the TrvUnreconciledExpenseTransaction table.
X++
[SysEntryPointAttribute(true)]
public recId createRecord(UnreconciledExpenseRecord _unreconciledExpenseRecord) {
TrvUnreconciledExpenseTransaction unreconciledExpenseTrans; recId createdRecId;
recId workerId;
if (!_unreconciledExpenseRecord) // An instance of data contract class is required {
throw error(Error::wrongUseOfFunction(funcname())); }
X++
workerId = DirPersonUser::findUserWorkerReference(curUserId());
//Validates if user is related to a worker in AX if (workerId == 0)
{
throw AifFault::faultList("@SYS335749", #ParameterValidationError); } ttsbegin; unreconciledExpenseTrans.TransDate = _unreconciledExpenseRecord.parmTransactionDate(); unreconciledExpenseTrans.Worker = workerId; unreconciledExpenseTrans.Notes = _unreconciledExpenseRecord.parmNotes(); unreconciledExpenseTrans.TransactionCurrencyAmount = _unreconciledExpenseRecord.parmTransactionCurrencyAmount(); unreconciledExpenseTrans.TransactionCurrencyCode = _unreconciledExpenseRecord.parmTransactionCurrencyCode(); if (unreconciledExpenseTrans.validateWrite()) { unreconciledExpenseTrans.insert(); } ttscommit; createdRecId = unreconciledExpenseTrans.RecId; if (!createdRecId) {
//Creation of record failed
throw AifFault::faultList("@SYS335750, #UnreconciledExpenseCreationFailed); }
return createdRecId; }
As you can see in the preceding code, we are fetching the worker who is associated with the expense based on a current user ID. As you will see in the Create the middle-tier WCF service section, the call to the service operation is made under the context of the mobile Microsoft Dynamics AX user
submitting the request by setting the CallContext property. Therefore, the curUserId value will be the Microsoft Dynamics AX user ID of the original user submitting the request.
Create the service contract
To create the service contract that is made available to clients consuming the service, create a new service in the Services node of the AOT that implements the service class we created
(UnreconciledExpenseService). You must also add the operation exposed by the class
(createRecord). For guidance, see Walkthrough: Exposing an X++ Class as a Data Contract [AX 2012].
Create a privilege to secure the service operation
At this point, we want to create a special privilege to help provide secure access when the
createRecord method is called. We require that this privilege be added to the Employee role (AOT name: HCMEmployee), so that only those users who have this privilege call the createRecord service method.
Create a privilege and add the operation to the Entry Points object of the Privilege.
1. In the Development workspace go to AOT > Security > Privileges > Right click and New Privilege. 2. Add a privilege and name it UnreconciledExpenseServiceCreate.
3. Go to the Entry Point node and right click and add a New Entry point and set:
Property Value Name UnreconciledExpenseServiceCreate ObjectType ServiceOperation ObjectName UnreconciledExpenseService ObjectChildName createRecord AccessLevel Invoke
4. You can now add this Privilege to the Duty TrvTravelAndExpenseServiceOperations. (AOT> Security>Duties>New Privilege)
Note: This duty is already incorporated in the HCMEmployee role’s list of duties.
Note: If you have Dynamics AX 2012 R2 installed, you will also need to add two more privileges
(LogisticsAddressCountryRegionView and LogisticsPostalAddressView) to the
TrvTravelAndExpenseServiceOperations duty for the above implemented createRecord
operation to work correctly.
Create a basic inbound integration port
The following instructions pertain to the middle-tier WCF service only. When using the AIF Windows Azure Service Bus Adapter, do not create a “basic” inbound integration port. Instead, go to Deploy the AIF service using the AIF Windows Azure Service Bus Adapter.
In order to deploy the service we must create a basic inbound integration port. First, we need to register the service in the AOT:
Right-click > Add-Ins > Register service. The AIF services window will open. Verify if the service that you created is in the list of AIF services. Close the form.
Next, we need to activate the port in order to make it available to external clients:
Click System Administration > Setup > Services and Application Integration Framework > Inbound ports.
Click New to create a new inbound port for this service. Specify a Port name for example: UnreconciledExpense
Click on Service operations to add a required service operation. In our example, add operation UnreconciledExpenseService.createRecord from the list of remaining service operations and then close.
Click Activate to activate the port.
Verify that the service has been correctly deployed
1. In the Inbound ports form, copy the WSDL URI.
2. Open the WSDL URI in a browser to view the WSDL file. To consume the service, clients need to add the WSDL URI address as the service reference to generate the service proxy.
Establish a listener to the Windows Azure Service Bus
Both the AIF service that is published using the Service Bus adapter and a middle-tier WCF service will establish a listener to the Windows Azure Service Bus. This listener is an out-bound connection to the Service Bus on which incoming messages from clients are relayed. A message relayed in this manner is then routed to Microsoft Dynamics AX by a routing service hosted in IIS 7.5 (if using the Service Bus adapter) or by the routing service in the middle-tier WCF service.
A middle-tier WCF service
Creating a WCF service that deploys its listening endpoint on a Windows Azure Service Bus namespace involves the following tasks:
Define a service contract that is in line with the requirements of the AIF service contract (that is, clients pass data that is required by the AIF service per the business scenario).
Define a URI that is used to listen on the Service Bus—for example, https://<AzureNamespace>.servicebus.windows.net/Expense/. Set up a secure channel (HTTP relay binding) with the Service Bus.
Extract information from the incoming message sent by the client. (The client application creates its request by using the service proxy generated from the WCF service, and sends the request to this endpoint URI. The Service Bus will relay the message to the middle-tier WCF service). The WCF service then calls the AIF service and passes all the data the AIF service needs.
It is very important that only authorized users be allowed to send and receive messages through the Service Bus. In addition, we require that only authorized users be able to make calls to the WCF service. These users exist in an enterprise’s Active Directory Domain Services and can be authenticated by a deployed Active Directory Federation Service (AD FS).
Furthermore, we need to call the AIF service in the context of the authorized user, and therefore need information about the user in the data that is passed from the client to the WCF service.
AIF Windows Azure Service Bus Adapter
The AIF Windows Azure Service Bus Adapter extends the existing AIF functionality and uses IIS 7.5 to provide a method to deploy services by using cloud computing. The following infrastructure helps accomplish this:
IIS 7.5
The Service Bus adapter leverages IIS to host Microsoft Dynamics AX services published with an HTTP adapter, or by using the new Service Bus adapter. IIS hosts the Service Bus listener and a routing service (both of which are WCF services) that work in tandem to pass messages from the Service Bus to Microsoft Dynamics AX.
Authentication Classes
Each call to Microsoft Dynamics AX services through the Service Bus must be authenticated. With the Service Bus adapter hotfix, the AIF now allows registering authentication classes to authenticate inbound Service Bus messages and extract the user’s Microsoft Dynamics AX credentials. Registering authentication classes is a one-time configuration step, and the authentication classes can be used across multiple Service Bus namespaces and published services after they are registered.
AIF Service Bus Namespace Registration
Registering a Service Bus namespace is a one-time step for each namespace you wish to use. Registration includes supplying the namespace name, access key credentials, authentication classes, and X.506 signing certificate that is used to sign the ADFS SAML token. The AIF uses all of these in order to establish trust with the Service Bus before opening a connection. AIF Windows Azure Service Bus Adapter
After you have registered a Service Bus namespace with AIF, you can begin publishing Microsoft Dynamics AX services by using the AIF Windows Azure Service Bus Adapter. The process of publishing Microsoft Dynamics AX AIF services has not changed. Create a new port (using the form AifInboundPorts form), select the AIF Windows Azure Service Bus Adapter, and then select the service operations to expose on the port. After you activate the port, your service will be accessible from the cloud. For more information about adapters, see
http://msdn.microsoft.com/EN-US/library/gg751348.aspx.
All of these items are described in detail in Deploy the AIF service to the Azure Service Bus.
Comparing the Middle-tier WCF Service and the AIF Windows Service
Bus Adapter
Use the following table to compare the capabilities and requirements of the Middle-tier WCF service and the AIF Windows Azure Service Bus Adapter. Both options provide solutions for mobile application development, but they differ in implementation, infrastructure, and technical capabilities. The
following table highlights the differences.
Middle-tier WCF Service
AIF Windows Azure Service Bus Adapter
Configuration
and Setup
Requires developing the Middle-tier WCF
service. Can be configured by an administrator. Configuring custom authentication may require a developer.
IIS
Does not require IIS Requires IIS 7.5 to host the Service Bus listener.Failover
Support
Failover is handled by installing multiple middle-tier WCF services on separate machines.
Failover is handled through available IIS failover strategies.
Multiplicity
Can listen to multiple Service Bus namespaces simultaneously from one middle-tier WCF service instance.Each Service Bus namespace must be registered with exactly one IIS website.
Routing to
multiple AX
instances
Each middle-tier WCF service can serve multiple AX instances. The WCF service developer creates this routing behavior.
An IIS instance can host multiple websites. Each IIS website can serve a different Microsoft Dynamics AX instance. Each website is tied to exactly one Service Bus namespace within a Microsoft Dynamics AX instance. We recommend that you do not share a website across Microsoft Dynamics AX instances.
REST support
Can be configured to expose a RESTful endpoint, or any other service contract type and binding that is possible in WCF as a façade for the backing AIF service.Not currently supported. The SOAP service contract exposed to the client on Service Bus is always identical to the service contract as defined in Microsoft Dynamics AX.
Protocol
support
Endpoints hosted on Service Bus can support any transport (such as HTTP andNet.Tcp) or messaging (such as SOAP and JSON) protocols available for a WCF service, including custom message encoders or other service behaviors (enabling compression or other message manipulation or inspection, for example).
Supports only HTTPS for service calls.
Logging and
eventing
As part of configuring the Middle-tier WCF service, a developer must write a logging service.
Logs connection status in IIS event log.
Authentication
Endpoints can be either authenticated or unauthenticated (to allow clientbootstrapping traffic, for example).
Endpoints must always be authenticated, so it is the client’s responsibility to know which identity provider to authenticate against.
Choosing between the two approaches is primarily a matter of balancing customizability with
development costs. The middle-tier WCF service has higher development costs because it requires you to manually create and install a WCF service that listens to the Service Bus and routes service calls to Microsoft Dynamics AX. However, with the middle-tier WCF service you can use the messaging protocols of your choice, expose different contracts to your clients, provide custom message routing behavior, and serve multiple installations of Microsoft Dynamics AX or other back-end systems. The Service Bus adapter has a lower development cost because automatically creates a WCF service and hosts it in IIS. By using the Service Bus adapter, your only development costs are in
configuration: providing Service Bus information (namespace, access key), AD FS information (certificate thumbprint), and registering authentication classes. However using the Service Bus
adapter does not allow customization of the WCF service that is hosted in IIS. The WCF service hosted in IIS can perform only the action of authenticating and routing service calls. The routing behavior only supports routing relayed messages to the installation of Microsoft Dynamics AX that the service was published from.
Next, we will walk through the steps that are necessary to build the middle-tier WCF service, followed by the steps that are necessary to publish a service using the AIF Windows Azure Service Bus Adapter.
Create the middle-tier WCF service
Prerequisites
An X.509 token signing certificate is installed on the AD FS 2.0 server and on the machine running the WCF service, in the Trusted Root Certification Authorities store. For guidance, see Microsoft
Dynamics AX Connector for Mobile Applications.
A Windows Azure Service Bus namespace has been created, and the shared secret and issuer name for the namespace are available. For guidance, see Microsoft Dynamics AX Connector for
Mobile Applications.
The machine that the middle-tier WCF service runs on should be in the same domain or on the same network as the Microsoft Dynamics AX 2012 AOS machine (which can be the same machine or a different one).
Overview
The following steps are required to create the WCF SOAP-based service that will receive service requests from the mobile client, relayed by the Service Bus.
For the following example, we will create the WCF service as a Windows service.
Development requirements
Microsoft Visual Studio 2010 and the Microsoft .NET Framework version 4.
The Service Bus component (Microsoft.ServiceBus.dll), which is included with the Windows Azure Libraries for .NET. To install it, visit the Windows Azure SDK download page.
The Windows Identity Foundation runtime, which can be downloaded from Windows Identity
Foundation (WIF) SDK. Download the 4.0 version for Visual Studio 2010 and the .NET Framework
version 4.0.
For more information about the WIF SDK, see Windows Identity Foundation SDK.
Create the service contract and operation contract
1. Open Visual Studio, and create a new Windows Service .NET Framework version 4 project named ExpenseConnectorService.
2. Rename the Service1.cs class ConnectorService.cs. This class contains the OnStart and OnStop methods for the Windows service, which we will use to open a listening endpoint.
C#
using System.ServiceModel; using System.ServiceProcess; namespace ExpenseConnectorService {
public partial class ConnectorService : ServiceBase {
private ServiceHost host; public ConnectorService() {
InitializeComponent(); }
protected override void OnStart(string[] args) {
// Deploy the endpoint }
protected override void OnStop() {
// Close the endpoint connection }
} }
3. Add the System.ServiceModel reference to the project, and include the System.ServiceModel namespace in all the following classes.
4. Add a new C# interface for the service contract, named IExpenseService, to the project, and create the service contract and operation contract as shown here.
C#
[ServiceContract(Name = "ExpenseServiceContract",
Namespace = "http://samples.microsoft.com/DynamicsAx/")] public interface IExpenseServiceContract
{
[OperationContract]
long CreateExpense(DateTime dateTime, decimal amount, string currency, string comments); }
5. Create another C# class for the service operation implementation.
Per the contract we created, create a class named ExpenseService, which implements the IExpenseServiceContract interface.
C#
[ServiceBehavior(Name = "ExpenseService")]
public class ExpenseService : IExpenseServiceContract {
public long CreateExpense(DateTime dateTime, decimal amount, string currency, string comments)
{
// Implementation }
}
Any client consuming this service will make a call to the service’s CreateExpense operation and will be required to pass information as stated in the method parameters.
Later, we will add code to this method that will process the incoming SOAP message in the following way:
Extract the Security Assertion Markup Language (SAML) token from the header of the message. The token is issued by the identity provider (the corporation’s Active Directory Federation Service).
Perform token validation.
Extract the claim assertion that was requested (the windowsaccountname claim). Use the expense data embedded in the SOAP message body, and make a call to the AIF
service operation.
All the processing, validating, and extracting of claims from the token is facilitated by the Windows Identity Foundation libraries.
Add a service reference of the AIF service
We need to generate a client proxy of the AIF service to gather the service contract, bindings, and address for the AIF endpoint. To add the service reference, we use the WSDL exposed by the inbound port that was activated in the Design and create the AIF service in Microsoft Dynamics AX 2012
1. Go to Solution Explorer, right-click References, and then select Add service reference. In the Add Service Reference form, enter the WSDL address
http://AOSMachine:8101/DynamicsAx/Services/UnreconciledExpense.
You will see the createRecord operation exposed by the service. Edit the namespace, naming it AXExpenseServiceReference, and then click OK to add the reference to the project.
The reference shows up in the Service References node in Solution Explorer. Also observe that the client proxy file named Reference.cs is generated within the project in a folder (\Service References).
2. Observe that several changes have automatically been made to the app.config file in the project with regard to the bindings, security protocols, and so on, and also the URI of the endpoint deployed to enable the middle-tier service to communicate with the AIF endpoint on Microsoft Dynamics AX. Verify that the following configuration values are created in the app.config file.
NetTcpBinding specification for connecting to the AIF endpoint exposed on the AOS server APP.CONFIG <system.serviceModel> <bindings> <netTcpBinding>
<binding name="NetTcpBinding_UnreconciledExpenseService" closeTimeout="00:01:00" openTimeout="00:01:00" receiveTimeout="00:10:00" sendTimeout="00:01:00"
transactionFlow="false"
transferMode="Buffered" transactionProtocol="OleTransactions"
hostNameComparisonMode="StrongWildcard" listenBacklog="10" maxBufferPoolSize="524288" maxBufferSize="65536" maxConnections="10" maxReceivedMessageSize="65536">
<readerQuotas maxDepth="32" maxStringContentLength="8192" maxArrayLength="16384" maxBytesPerRead="4096" maxNameTableCharCount="16384"/>
<reliableSession ordered="true" inactivityTimeout="00:10:00" enabled="false"/> <security mode="Transport">
<transport clientCredentialType="Windows" protectionLevel="EncryptAndSign"/> <message clientCredentialType="Windows"/> </security> </binding> </netTcpBinding> </bindings> </system.serviceModel>
Definition of the endpoint address, binding configuration, and contract of the AIF service
APP.CONFIG
<client>
<!-- This address should be set to the URI of the endpoint deployed on AX. It should be of the form:
"net.tcp://<AOS_MACHINE_NAME>:8201/DynamicsAx/Services/<INBOUND_PORT_NAME>" --> <endpoint address="net.tcp://AOSMachine:8201/DynamicsAx/Services/UnreconciledExpense" binding="netTcpBinding" bindingConfiguration="NetTcpBinding_UnreconciledExpenseService" contract="AXExpenseServiceReference.UnreconciledExpenseService" name="NetTcpBinding_UnreconciledExpenseService"> </endpoint> </client>
As shown in the <client> element, the endpoint address can be configured to point to a machine that hosts the AOS machine on which the AIF service is deployed and activated. In this way, the middle-tier service can be run on any machine, provided that it is on the same network as the AOS machine, to make the service call by using the NetTcp binding.
Call the AIF service operations
After you have added the service reference, the next step is to use its operation contract and make the necessary method call.
1. Include the AIF service namespace ExpenseConnectorService.AXExpenseServiceReference in the ExpenseService class.
C#
using ExpenseConnectorService.AXExpenseServiceReference;
2. Create a new private method named SubmitExpenseToAX, which will do the following: 1. Populate the values of the UnreconciledExpenseRecord data member of the
UnreconciledExpenseService AIF service
2. Call UnreconciledExpenseService’s createRecord operation
3. Return the result (the RecID value returned by the AIF service operation) Later, we will call this method in the exposed service operation (CreateExpense).
C#
private long SubmitExpenseToAX(DateTime dateTime, decimal amount, string currency, string comments, string windowsAccountName)
{
UnreconciledExpenseRecord record = new UnreconciledExpenseRecord() { parmNotes = comments, parmTransactionCurrencyAmount = amount, parmTransactionDate = dateTime, parmTransactionCurrencyCode = currency };
using (UnreconciledExpenseServiceClient client = new AXExpenseServiceReference.UnreconciledExpenseServiceClient()) {
UnreconciledExpenseRecord expenseRecord = record;
CallContext callContext = new CallContext() { LogonAsUser = windowsAccountName }; return client.createRecord(callContext, expenseRecord);
} }
The preceding method creates an instance of the service’s client, sets the data member values, and then makes the final call to the createRecord operation. Also notice the CallContext object that is passed into the service call. In Microsoft Dynamics AX, values such as the user, company, and so on can be used when the service call is executed and are sent in the message header from the service client by using the CallContext object.
In our example, we want to pass the mobile user’s information when making the createRecord call, so that the unreconciled expense is created in the context of the user.
LogonAsUser has been set to windowsAccountName. This is the value of the claim that was requested from the AD FS (in the form domain\userAlias) and identifies the user who submitted the request from the client. Remember that this user must exist in the Microsoft Dynamics AX system, and because Microsoft Dynamics AX uses the same Active Directory service as the identity provider, it will recognize and then be able to authorize this user.
Set up the Service Bus relay and deploy the listening endpoint for the middle-tier WCF service
To configure the middle-tier service’s endpoint to listen on the Service Bus, we need to update the app.config file as follows:
Add a BasicHttpRelayBinding binding for communicating with the Service Bus. Provide the service contract name and the service endpoint address.
Set up the required binding configuration by specifying Service Bus credentials.
1. Define the BasicHttpRelayBinding configuration by adding the following under the <bindings> element in the <system.serviceModel> section.
APP.CONFIG
<basicHttpRelayBinding>
<binding name="BasicHttpRelayBinding_ServiceBus">
<security mode="Transport" relayClientAuthenticationType="RelayAccessToken"/> </binding>
</basicHttpRelayBinding>
The preceding configuration sets the binding to have end-to-end transport security. We also set the value of the relayClientAuthenticationType parameter to RelayAccessToken, which forces clients of the service to authenticate to the Service Bus before sending across any messages. As shown in Figure 1, to connect to the Service Bus, the client presents the Service Bus with the security token (SWT) issued by the ACS.
2. Define configuration values for the endpoint behavior. APP.CONFIG <behaviors> <endpointBehaviors> <behavior name="sharedSecretClientCredentials"> <transportClientEndpointBehavior credentialType="SharedSecret"> <clientCredentials>
<!-- The issuerName & issuerSecret here should be set to the values for the service account on Service Bus you wish to use to listen. By default, the namespace will come with an admin user (issuerName) of "owner" with a 256-bit secret key (issuerSecret) available in the Windows Azure management portal.-->
<sharedSecret issuerName="owner" issuerSecret="xxxxxxxxx/xxxxxxxxxxxxxxxxxxxxxxxxxx/xxxxx="/> </clientCredentials> </transportClientEndpointBehavior> </behavior> </endpointBehaviors> </behaviors>
As shown in the preceding configuration, transportClientEndpointBehavior is used to specify the Service Bus credentials for the endpoint that will be deployed on the Service Bus.
The shared secret values of issuerName and issuerSecret are values of Default Issuer and Default Key of your namespace that was set up in Windows Azure Management Portal. Note: If you want to collect the necessary information from the user at run time via a UI, System.ServiceModel and Microsoft.ServiceBus provide APIs to set all these configuration values programmatically.
3. Deploy the listening endpoint.
To specify the service contract for the middle-tier service, the binding, and the behavior
configuration (all of which were defined in the preceding points), add the following code snippet in the app.config file, under the <services> element.
APP.CONFIG
<services>
<service name="ExpenseConnectorService.ExpenseService">
<endpoint address="" behaviorConfiguration="sharedSecretClientCredentials" binding="basicHttpRelayBinding"
contract="ExpenseConnectorService.IExpenseServiceContract"/> <host>
<baseAddresses>
<!-- This baseAddress should be set to the URI you intend to listen to on the Service Bus. It should be of the form:
"https://<APPFABRIC_NAMESPACE>.servicebus.windows.net/Expense/" --> <add baseAddress="https://contosomobile.servicebus.windows.net/Expense/"/> </baseAddresses> </host> </service> </services>
4. Deploy the metadata endpoint for the service.
To generate a client proxy for our mobile client, we will need to expose a metadata endpoint address.
Under the <behaviors>/<serviceBehaviors> node, add the following. Make sure that you enable the serviceMetadata node.
APP.CONFIG
<serviceBehaviors>
<behavior name="serviceMetadata">
<!-- To receive exception details in faults for debugging purposes, set the value below to true. Set to false before deployment to avoid disclosing exception information -->
<serviceDebug includeExceptionDetailInFaults="False"/> <!--Enable this element when publishing metadata--> <serviceMetadata />
</behavior> </serviceBehaviors>
We now need to update the <services> section that we used to specify the service contract, binding, and behavior configurations. Set behaviorConfiguration to serviceMetadata, and then add a local MEX endpoint.
APP.CONFIG
<services>
<service name="ExpenseConnectorService.ExpenseService" behaviorConfiguration="serviceMetadata">
<endpoint address="" behaviorConfiguration="sharedSecretClientCredentials" binding="basicHttpRelayBinding"
contract="ExpenseConnectorService.IExpenseServiceContract"/> <endpoint contract="IMetadataExchange" binding="mexHttpBinding" address="http://localhost/mex" />
<host>
<baseAddresses>
<!-- This baseAddress should be set to the URI you intend to listen on the Service Bus
It should be of the form:
"https://<APPFABRIC_NAMESPACE>.servicebus.windows.net/Expense/" --> <add baseAddress="https://contosomobile.servicebus.windows.net/Expense/"/> </baseAddresses> </host> </service> </services>
The client proxy that consumes this service can then be generated by using the http://<MiddleTierServiceMachineName>/mex metadata URI.
5. We also need to update the app.config file to register the preceding Service Bus behavior and binding extensions. APP.CONFIG <extensions> <behaviorExtensions> <add name="transportClientEndpointBehavior" type="Microsoft.ServiceBus.Configuration.TransportClientEndpointBehaviorElement, Microsoft.ServiceBus, Version=1.7.0.0, Culture=neutral,
PublicKeyToken=31bf3856ad364e35"/> </behaviorExtensions>
<bindingExtensions>
<add name="basicHttpRelayBinding"
type="Microsoft.ServiceBus.Configuration.BasicHttpRelayBindingCollectionElement, Microsoft.ServiceBus, Version=1.7.0.0, Culture=neutral,
PublicKeyToken=31bf3856ad364e35"/> </bindingExtensions>
</extensions>
6. Finally, open the Service Bus connection, and start listening on the endpoint.
Note: The on-premises service connects to the relay service over ports 9350–9354; however, if these are unavailable, the service will try to call back to port 80 (HTTP) or 443 (HTTPS).
Add the following code snippets to the OnStart method in the ConnectorService class.
C#
protected override void OnStart(string[] args) {
// Note that all binding, endpoint, service, behavior configuration // for this ServiceHost is located in the app.config
host = new ServiceHost(typeof(ExpenseConnectorService.ExpenseService)); WriteToEventViewer("Opening the Service endpoint connection " + host.BaseAddresses[0].ToString()); try { host.Open(); WriteToEventViewer(string.Format("Listening on: {0}", host.Description.Endpoints.Find( typeof(ExpenseConnectorService.IExpenseService)).Address)); } catch (Exception e) { WriteToEventViewer(e.Message); } }
C#
private void WriteToEventViewer(string eventMessage) {
string source = "Expense WCF Service"; if (!EventLog.SourceExists(source))
EventLog.CreateEventSource(source, "Application");
EventLog.WriteEntry(source, eventMessage, EventLogEntryType.Information); }
C#
protected override void OnStop() {
host.Close(); }
You can also close the connection in the OnStop method. There are several events you may want to hook into and log, so that you can monitor the status of the relay binding and other such events. You can log events in the event viewer by using System.Diagnostics.
Validate and extract contents from incoming messages
The next step is to inspect the message coming from the client. The incoming SAML message contains a header that holds the windowsaccountname claim in the security token. This claim is issued by the AD FS 2.0. For more information about requesting claims, see the Implement active federation
and claims-based authorization for the mobile client section. Windows Identity Foundation is used to
validate the security token and the issuer, after which we extract the claim that we need to make the AIF service call.
1. Update the app.config file, adding configuration values for handling the SAML security token issued by the AD FS. APP.CONFIG <microsoft.identityModel> <service> <securityTokenHandlers> <securityTokenHandlerConfiguration> <audienceUris mode="Never"/> <issuerNameRegistry type="Microsoft.IdentityModel.Tokens.ConfigurationBasedIssuerNameRegistry, Microsoft.IdentityModel, Version=3.5.0.0, Culture=neutral,
PublicKeyToken=31bf3856ad364e35"> <trustedIssuers>
<!-- The STS that issues the SAML token exchanged at ACS must be added as a trusted issuer here.
The thumbprint & name values should be obtainable from the
public signing certificate exposed on the STS' federation metadata --> <add thumbprint="XXXXXXXXXXXXXXXXXXXXXXXXXXXXXXXXXXXXXXXX" name=""/> </trustedIssuers> </issuerNameRegistry> </securityTokenHandlerConfiguration> </securityTokenHandlers> </service> </microsoft.identityModel> APP.CONFIG <configSections> <section name="microsoft.identityModel" type="Microsoft.IdentityModel.Configuration.MicrosoftIdentityModelSection, Microsoft.IdentityModel, Version=3.5.0.0, Culture=neutral,
PublicKeyToken=31bf3856ad364e35"/> </configSections>
The issuer (also known as the identity provider—in our case, the corporate AD FS) uses a token signing certificate to digitally sign the SAML token. Therefore, the thumbprint of the token signing certificate must be specified in the service’s configuration as shown in the first code snippet, in the <trustedIssuers> section. This will be used to validate the digital signature when the token is validated.
2. Add Microsoft.IdentityModel and System.IdentityModel references to the project, and add the following namespaces to the ExpenseService.cs file.
C#
using System.IdentityModel.Tokens; using Microsoft.IdentityModel.Claims; using Microsoft.IdentityModel.Configuration;
3. Add an implementation to the CreateExpense service operation to do the following:
2. Inspect the SAML token.
3. Use WIF to validate the token by using the thumbprint and other configuration values from the service configuration.
4. Extract the required claim (windowsaccountname) from the token.
5. Make the call to the SubmitExpenseToAX method, which will make the AIF service call.
C#
public long CreateExpense(DateTime dateTime, decimal amount, string currency, string comments) { string samlTokenHeader = (string)OperationContext.Current.IncomingMessageHeaders[OperationContext.Current.Incoming MessageHeaders.FindHeader("PassthroughBinarySecurityToken", "")].ToString();
string encodedSamlToken = samlTokenHeader.Split('<', '>')[2]; byte[] binToken = Convert.FromBase64String(encodedSamlToken); string samlToken = new string(Encoding.UTF8.GetChars(binToken));
// Load the app.config settings where we specify the audience & issuer that we'll // accept in a token
var config = new ServiceConfiguration(); var handler =
config.SecurityTokenHandlers[
Microsoft.IdentityModel.Tokens.SecurityTokenTypes.Saml11TokenProfile11];
ClaimsIdentityCollection claimsIdentity = null;
// Convert the raw token into something that can be inspected
using (XmlReader reader = XmlReader.Create(new StringReader(samlTokenString))) {
SecurityToken token = handler.ReadToken(reader);
// This is the primary WIF call that // 1) Performs all the token validation
// a. Format, token type, key type, version, etc. // b. Expiration
// c. Audience/AppliesTo/Relying party // d. Issuer
// e. Signature
// 2) generates a ClaimsIdentityCollection that contains what the app actually // cares about
claimsIdentity = handler.ValidateToken(token); }
IPrincipal principal = new ClaimsPrincipal(claimsIdentity); IClaimsIdentity identity = (IClaimsIdentity)principal.Identity;
windowsAccountName = identity.Claims.Single(claim => claim.ClaimType ==
"http://schemas.microsoft.com/ws/2008/06/identity/claims/windowsaccountname").Value;
C#
return SubmitExpenseToAX(expenseData, windowsAccountName); }
Build and deploy the middle-tier WCF Windows service
1. Build the entire project.
2. Add the ProjectInstaller.cs file, and create an installer (Setup project) for the Windows service by following the guidance at Walkthrough: Creating a Windows Service Application in the Component
Designer.
3. Make sure that you add the primary output from the ExpenseConnectorService project to the installer and all its dependencies (Microsoft.ServiceBus.dll, Microsoft.IdentityModel.dll, and the .NET Framework dependencies).
The user account that the service is deployed and run should be the .NET Business Connector proxy account. By using a proxy, you guarantee that .NET Business Connector can connect on behalf of Microsoft Dynamics AX users when it authenticates with an AOS instance. For more information about how to create and set up the .NET Business Connector proxy account, see
Specify the .NET Business Connector proxy account [AX 2012].
Also, note the following requirements for the .NET Business Connector proxy account: It must be a Windows domain account.
It must be a dedicated account (used only by .NET Business Connector). It must have a password that does not expire.
It must not have interactive logon rights. It must not be a Microsoft Dynamics AX user.
In addition, it is important that the .NET Business Connector proxy user account be added as an Administrator on the machine running the service (so that it has access to the ports required to deploy listening endpoints on the Service Bus).
4. Run the installer, and provide the .NET Business Connector proxy user’s user name and password, which will run the WCF Windows service.
Deploy the AIF service using the AIF Windows Azure Service Bus
Adapter
Prerequisites
The Service Bus component (Microsoft.ServiceBus.dll v1.8), which is included with the Windows Azure Libraries for .NET. To install it, visit the Windows Azure SDK download page. (The
Microsoft.ServiceBus.dll must be placed in the “Bin” folder of the website that the service is
deployed to)
You have installed the AIF Windows Azure Service Bus Adapter Hotfix:
http://support.microsoft.com/kb/2845539
You have installed the AX Web Services on IIS 7.5.
An X.509 token signing certificate is installed on the AD FS 2.0 server and on the machine that is running the WCF service, in the Trusted Root Certification Authorities store. For more information,
see Microsoft Dynamics AX Connector for Mobile Applications.
A Windows Azure Service Bus namespace has been created, and the shared secret and issuer name for the namespace are available. For more information, see Microsoft Dynamics AX
Connector for Mobile Applications.
Overview
The following steps enable publishing an AIF service that listens to messages incoming from the Azure Service Bus, without a middle-tier WCF service.
You must register your Windows Azure Service Bus namespace with the AIF before you can publish services to the Service Bus. Registration requires that you supply the X++ and WCF authentication classes that will authenticate incoming Service Bus messages. Go to Create the authentication classes,
and then go to Register your Service Bus namespace with the AIF. Next, see Publish your AIF service.
Authentication overview
The Service Bus requires each on-premises service to be authenticated and authorized to “listen” on a particular address before establishing a new relay connection. Clients must also be authenticated and authorized before the Service Bus will relay messages on their behalf. The Service Bus relies on ACS for authenticating services and clients.
Service authentication
Microsoft Dynamics AX services use a “shared secret” token provider to authenticate with the Service Bus. The shared secret is provided to the AIF when you Register your Service Bus Namespace.
Client authentication
The following two types of client authentication are required:
Service Bus authenticationClients are required to provide a “send” claim in order to be able to send messages to a service on the Service Bus. The ACS must trust the identity provider used by the client. This must be set up as described in Microsoft Dynamics AX Connector for Mobile Applications.
Microsoft Dynamics AX authenticationWhen the Service Bus relays a message to the on-premises service, the caller identity is used to log on to Microsoft Dynamics AX. This caller identity is determined by calling a custom authentication component to parse the incoming message token and to provide a valid claims identity. The user specified by the claims identity must be a valid Microsoft Dynamics AX user.
Sample authentication component
A sample ADFS authentication component is provided here:
http://blogs.msdn.com/b/aif/archive/2013/04/29/aif-windows-azure-service-bus-adapter.aspx.
You can use it as it is or modify it to suit your needs. This component searches for an ADFS token in a custom message header titled PassthroughBinarySecurityToken. If this token is found, the token is validated by using the trusted issuer thumbprint of the ADFS STS and the claims that are extracted. A Windows Account Name claim type identifies the user account. For more information, see
http://blogs.msdn.com/b/willpe/archive/2010/10/25/windows-authentication-adfs-and-the-access-control-service.aspx.
Create custom authentication classes
A custom authentication component has two parts:
An X++ class that implements the AifAuthenticationManager interface and provides configuration information.
A .NET class that implements the System.ServiceModel.ServiceAuthenticationManager interface to provide runtime authentication.
AifAuthenticationManager interface
This X++ interface must be implemented by an X++ authentication manager class. This interface is used by the services framework to get information that is used to configure and deploy the custom authentication runtime component.
X++ interface AifAuthenticationManager { AifAuthenticationManagerName getName(); str getAuthenticationManagerType(); str getAuthorizationPolicyType(); AifAssemblyName getAuthenticationManagerAssemblyName(); Map getAppSettings(); MenuItemNameDisplay getConfigurationDisplayMenuItem; } Interface methods:
AifAuthenticationManagerName getName()
Returns the friendly name of the component. This is displayed for selection in the ServiceBus configuration form.
str getAuthenticationManagerType()
Returns the .NET type of the WCF custom authentication class in the runtime assembly.
str getAuthorizationPolicyType()
Returns the .NET type of the WCF authorization policy class in the runtime assembly.
AifAssemblyName getAuthenticationManagerAssemblyName()
Returns the name of the authentication assembly that contains the WCF custom authentication class.
Map getAppSettings()
Returns custom settings that are required by the .net authentication component at
authentication time. These settings are available in the AppSettings section of the web.config file, which is located in the IIS website directory. Returns null if app settings are not required.
MenuItemNameDisplay getConfigurationDisplayMenuItem
Returns the name of the display menu item for the configuration form of this component. Returns the empty string if no configuration form is available.
Custom authentication component
A class that implements the following interfaces can perform custom authentication: System.ServiceModel.ServiceAuthenticationManager
System.IdentityModel.Policy.IAuthorizationPolicy
The System.ServiceModel.ServiceAuthenticationManager interface contains the ReadOnlyCollection method.
C#
ReadOnlyCollection<IAuthorizationPolicy> Authenticate( ReadOnlyCollection<IAuthorizationPolicy> authPolicy, Uri listenUri,
ref Message message)
The implementation of this method can inspect the request message and headers, perform the custom authentication, and set the authenticated principal on the message as a property.
The System.IdentityModel.Policy.IAuthorizationPolicy interface has a the properties and the Evaluate method shown in the following example:
C#
bool Evaluate(
EvaluationContext evaluationContext, ref Object state
)
The implementation of the Evaluate method sets the authenticated principal and identity on the security context of the message.
Registering the authentication component
Before an authentication component can be used, it must be registered with the Services framework. The registerAuthenticationManager and unregisterAuthenticationManager methods on the
AifAuthenticationHelper class must be used to register and unregister the authentication component. Create an X++ job that calls these X++ methods to register/unregister the authentication
components. When a component is registered, the .NET assembly is uploaded to the database so that it is accessible to all AOS instances. The file path that you use must grant read permissions to the AOS service account. For more information about the AOS service account, see
us/library/ee355089.aspx and
http://technet.microsoft.com/en-us/library/ee355089.aspx and http://technet.microsoft.com/en-us/library/jj585430.aspx.
The following code shows the methods and describes the parameters:
X++
static public void registerAuthenticationManager(
AifAuthenticationManagerClass authenticationManagerClass, FilePath assemblyFolder,
AuthenticationManagerClass is class ID of the X++ authentication manager class AssemblyFolder is the path of the folder that contains the .net authentication manager
assembly.
UpdateExisting is the flag indicating that any existing assembly in the database should updated with the assembly in the folder.
X++
static public void unregisterAuthenticationManager(
AifAuthenticationManagerClass authenticationManagerClass)
authenticationManagerClass is the class ID of the X++ authentication manager class
Encryption key containers
Encryption is used to protect confidential data in the web.config file. This requires a machine-level key container to be created and configured on all the involved machines. We have provided scripts for this process. Download the scripts here:
http://blogs.msdn.com/b/aif/archive/2013/04/29/aif-windows-azure-service-bus-adapter.aspx.
These scripts use the IIS configuration utility aspnet_regiis.exe to manage the key containers. 1. Create an exportable machine-level key container on the IIS computer. Go to the directory
where you want to export the container before running this script. In this example we use the root of the C drive.
Windows Command Prompt
C:\> CreateKeyContainer “MyKey”
2. Export the key container to an XML file. The following script will export the key container to MyKey.xml.
Windows Command Prompt
C:\> ExportKeyContainer “MyKey”
3. Import the key container into each machine (machine running IIS and machine running the AOS).
Windows Command Prompt
C:\> ImportKeyContainer “MyKey” “MyKey.xml”
4. On each machine, grant the appropriate users access to the key containers.
For the IIS Machine, this user is the AppPool identity (which is the same as the BC proxy account). For the AOS machine, this is the AOS account (Network Service or domain account).
For a Domain account:
For a Network account:
Windows Command Prompt
C:\> GrantAccessToKeyContainer “MyKey”
5. Delete the exported MyKey.xml files. In this example, we exported the MyKey file to the root of the C drive. This is important to prevent unauthorized access to the key container.
Publish AIF Service using the Service Bus Adapter
We are now going to publish the UnreconciledExpense service operation that we created in
Create the service operation.
Register your Service Bus namespace
1. Open the Microsoft Dynamics AX Client.
Click System administration > Setup > Services and Application Integration Framework > Azure Service Bus Configuration .
2. Provide Service Bus details in the Azure Service Bus Configuration form:
a. Supply your Azure Service Bus namespace, which was created when you registered the namespace by following instructions in Microsoft Dynamics AX Connector for
Mobile Applications.
b. Supply your Azure Service Bus issuer name and issuer secret.
c. For Deployment website, select the IIS website to deploy the service on. d. For Class name, specify the authentication class that you registered.
e. Click Configure. The Mobile Authentication Configuration form is shown. i. Enter the certificate thumbprint (from your ADFS).
ii. Click Close.
f. For the RSA key container name, type the name of the key container that you created previously in the Encryption key containers section.
g. For a description, provide a description for the Service Bus namespace, as shown in the following illustration:
h. Click Close.
Deploy your AIF service to the Azure Service Bus
To create a new port to publish your service on:
1. Click System Administration > Services and Application Integration Framework > Inbound Ports.
2. Click New to create a new port.
3. Type the name of the port. It is a best practice to incorporate the name that you used for the Azure Service Bus namespace on the Azure Service Bus Configuration form (2-a).
4. Type a description of the port to provide a description of the services that this port hosts.
5. Select Azure Service Bus for Adapter.
6. Click the button beside the URI field to open the Select Azure Service Bus Namespace form, and select the namespace that you created.