Appeon® for PowerBuilder® 2015 (on J2EE)
Copyright © 2000-2015 by Appeon Corporation. All rights reserved.
This publication pertains to Appeon software and to any subsequent release until otherwise indicated in new editions or technical notes. Information in this document is subject to change without notice. The software described herein is furnished under a license agreement, and it may be used or copied only in accordance with the terms of that agreement.
No part of this publication may be reproduced, transmitted, or translated in any form or by any means, electronic, mechanical, manual, optical, or otherwise, without the prior written permission of Appeon Corporation.
Appeon, the Appeon logo, Appeon Developer, Appeon Enterprise Manager, AEM, Appeon Server and Appeon Server Web Component are registered trademarks of Appeon Corporation.
Sybase, Adaptive Server Anywhere/SQL Anywhere, Adaptive Server Enterprise, iAnywhere, PowerBuilder, Sybase Central, and Sybase jConnect for JDBC are trademarks or registered trademarks of Sybase, Inc.
Java and JDBC are trademarks or registered trademarks of Sun Microsystems, Inc. All other company and product names used herein may be trademarks or registered trademarks of their respective companies.
Use, duplication, or disclosure by the government is subject to the restrictions set forth in subparagraph (c)(1)(ii) of DFARS 52.227-7013 for the DOD and as set forth in FAR 52.227-19(a)-(d) for civilian agencies.
Appeon Corporation, 1/F, Shell Industrial Building, 12 Lee Chung Street, Chai Wan District, Hong Kong.
1 About This Book ... 1
1.1 Audience ... 1
1.2 How to use this book ... 1
1.3 Related documents ... 1
1.4 If you need help ... 3
2 Server Configuration Tasks ... 4
2.1 Scope of configurations discussed in this book ... 4
2.2 Configuration stages and tasks ... 4
2.2.1 Configuration during application deployment ... 5
2.2.2 Configuration during debugging ... 6
2.2.3 Configuration during security management ... 6
2.2.4 Configuration during performance management ... 6
2.2.5 Configuration during server information management ... 7
2.2.6 Configuration for emergency control ... 7
3 Appeon Server Status Monitor ... 9
3.1 Overview ... 9
3.2 Configuring Status Monitor ... 9
3.2.1 Configuring appeonmonitor.bat ... 9
3.2.2 Configuring appeonserver.bat ... 12
3.2.2.1 Configuring appeonserver.bat (Windows) ... 12
3.2.2.2 Configuring appeonserver.sh (Unix\Linux) ... 13
3.2.3 Configuring monitor.props ... 14
3.2.4 Additional configuration for Status Monitor in Appeon Server cluster ... 17
3.3 Information backed up by Status Monitor ... 17
3.3.1 What is backed up? ... 18
3.4 Using Status Monitor ... 18
3.4.1 Starting Status Monitor ... 18
3.4.2 Understanding the information in Status Monitor Window ... 18
4 Database Connection Setup ... 20
4.1 Overview ... 20
4.2 What is Appeon Server data source? ... 20
4.2.1 Why Appeon Server data source? ... 20
4.2.2 Why JDBC driver only? ... 20
4.2.3 Supported JDBC driver type ... 21
4.2.4 JDBC driver preparation ... 21
4.2.4.1 Preparing PowerBuilder component support files (for EAServer only) ... 21
4.2.4.2 Checklist for JDBC driver preparation ... 22
4.2.4.3 Copying drivers to Appeon Server ... 25
4.3 Setting up Appeon Server data sources ... 25
4.3.1 Setting up data source for WebLogic ... 26
4.3.1.1 Setting up data source for WebLogic 8.1 ... 26
4.3.1.2 Setting up data source for WebLogic 11g ... 34
4.3.2 Setting up data source for WebSphere ... 40
CE ... 54
4.3.2.4 Required configurations when global security is on ... 58
4.3.3 Setting up data source for JBoss ... 59
4.3.3.1 Setting up data source for JBoss 7 ... 59
4.3.3.2 Setting up data source for JBoss 5 ... 72
4.3.4 Setting up data source for NetWeaver ... 74
4.3.5 Setting up data source for JEUS ... 77
4.3.6 Setting up data source for EAServer 6.x ... 81
4.3.7 Data source parameters ... 88
4.3.7.1 Data source parameters for SAP Sybase ASA/SQL Anywhere ... 88
4.3.7.2 Data source parameters for ASE ... 90
4.3.7.3 Data source parameters for Sybase IQ ... 90
4.3.7.4 Data source parameters for SAP HANA ... 91
4.3.7.5 Data source parameters for Microsoft SQL Server ... 91
4.3.7.6 Data source parameters for Oracle ... 92
4.3.7.7 Data source parameters for IBM DB2 ... 92
4.3.7.8 Data source parameters for Informix ... 93
4.3.7.9 Data source parameters for MySQL ... 93
4.3.7.10 Data source parameters for Teradata ... 94
4.4 Setting up transaction object to data source mapping ... 95
4.4.1 Dynamic transaction object to data source mapping ... 96
4.4.2 Static transaction object to data source mapping ... 97
4.5 Advanced configurations related with database connection ... 97
4.5.1 Application Security ... 97
4.5.1.1 Database security ... 97
4.5.1.2 Using INI files for connection security ... 99
4.5.2 Appeon security ... 100
4.5.2.1 Incorporate Appeon security in PowerBuilder code ... 100
4.5.2.2 Database auditing ... 100
5 AEM User Guide ... 102
5.1 Introduction ... 102
5.1.1 Overview ... 102
5.1.2 AEM Tools ... 102
5.1.3 Supported Web browsers ... 103
5.2 Getting started ... 103
5.2.1 Running Appeon Server ... 103
5.2.2 Starting AEM ... 103
5.2.2.1 AEM URL ... 103
5.2.2.2 Three ways to launch AEM ... 104
5.2.2.3 AEM user name and password ... 104
5.2.2.4 Installing Appeon Workspace ... 104
5.2.2.5 AEM language ... 105
5.2.3 AEM Help ... 105
5.3 Server ... 106
5.3.1.3 Deployment Sessions ... 109
5.3.2 Logging ... 110
5.3.2.1 Viewing logs ... 110
5.3.2.2 Log mode ... 111
5.3.2.3 Replace log files ... 112
5.3.3 Resources ... 113 5.3.3.1 Cluster ... 113 5.3.3.2 Maintenance ... 117 5.3.4 Product Activation ... 120 5.3.4.1 Licensing ... 120 5.3.4.2 Support ... 129 5.3.5 Server Security ... 130 5.3.5.1 AEM login ... 131 5.3.5.2 User Management ... 132 5.3.5.3 Group Management ... 137
5.3.5.4 User and Group Management at LDAP server side ... 141
5.3.5.5 System Security ... 141 5.3.5.6 Deployment Security ... 144 5.4 Application ... 145 5.4.1 Configuration Summary ... 145 5.4.2 Transactions ... 146 5.4.2.1 Transaction Objects ... 147 5.4.2.2 Timeout ... 149 5.4.3 Local Database ... 151 5.4.4 PB Features ... 152 5.4.4.1 Registry Mode ... 152 5.4.4.2 INI Files ... 153 5.4.4.3 DLL/OCX Files ... 156 5.4.4.4 Decimal Precision ... 158
5.4.4.5 Web service DataWindow ... 159
5.4.5 Web Browser ... 160
5.4.5.1 IE Compatibility ... 160
5.4.5.2 IE Browser Interface ... 162
5.4.6 Client Features ... 162
5.4.6.1 Application Title ... 163
5.4.6.2 Web Application Theme ... 163
5.4.6.3 Web Application Auto Update ... 163
5.4.6.4 Run Mode ... 164
5.4.6.5 Error Message Mode ... 165
5.4.6.6 Start & Exit ... 166
5.4.6.7 Client Storage Location ... 167
5.4.6.8 Client Logs ... 168
5.4.6.9 Retina Display ... 170
5.4.7 Data Transfer ... 170
5.4.7.1 Charset ... 170
5.4.8.2 Application Server Cache ... 178
5.4.8.3 DataWindow Data Cache ... 180
5.4.9 Client Security ... 183 5.4.9.1 User Authentication ... 184 5.4.9.2 Appeon Workspace ... 186 5.5 Mobile UI Resizing ... 187 5.5.1 Screen Size ... 188 5.5.1.1 Adding a device ... 188 5.5.1.2 Editing a device ... 189 5.5.1.3 Deleting a device ... 190 5.5.2 Window Size ... 190
5.5.2.1 Configuring size for all windows ... 190
5.5.2.2 Configuring size for an individual window ... 192
1 About This Book
1.1 Audience
This book is intended for users and system administrators that are responsible for the configuration of servers used in the Appeon for PowerBuilder architecture.
1.2 How to use this book
There are five chapters in this book. Chapter 1: About This BookA general description of this book Chapter 2: Server Configuration Tasks
Describes configuration stages and tasks related to Appeon Server. Chapter 3: Appeon Server Status Monitor
Describes how to configure and use Appeon Server Status Monitor. Chapter 4: Database Connection Setup
Describes how to set up connection between Appeon Server and Database Server. Chapter 5: AEM User Guide
Describes how to configure Appeon Enterprise Manager.
1.3 Related documents
Appeon provides the following user documents to assist you in understanding Appeon for PowerBuilder and its capabilities:
• Introduction to Appeon:
Gives general introduction to Appeon for PowerBuilder and its editions. • Getting Started (for Appeon Mobile):
Guides you though installing PowerBuilder and Appeon for PowerBuilder, and developing and deploying a mobile application.
• New Features Guide:
Introduces new features and changes in Appeon for PowerBuilder. • Appeon Mobile Tutorials:
Gives instructions on deploying, running, and debugging the mobile application, distributing native mobile apps, and configuring the Appeon Server cluster. • Appeon Mobile (Offline) Tutorials:
Gives instructions on setting up the Appeon Mobile (Offline) environment, and configuring, deploying, running, updating, and debugging the offline application.
• Appeon Installation Guide:
Provides instructions on how to install Appeon for PowerBuilder successfully. • Installation Guide on Cloud Platform:
Provides instructions on how to install Appeon for PowerBuilder on the cloud-based platform such as Windows Azure and AWS EC2 and S3.
• Mobile UI Design & Development Guide:
Introduces general guidelines on designing and developing the mobile app and UI. • Migration Guidelines for Appeon Web:
A process-oriented guide that illustrates the complete diagram of the Appeon Web migration procedure and various topics related to steps in the procedure, and includes a tutorial that walks you through the entire process of deploying a small PowerBuilder application to the Web.
• Supported PB Features:
Provides a detailed list of supported PowerBuilder features which can be converted to the Web/Mobile with Appeon as well as which features are unsupported.
• Appeon Developer User Guide:
Provides instructions on how to use the Appeon Developer toolbar in Appeon for PowerBuilder.
• Workarounds & API Guide:
Provides resolutions for unsupported features and various APIs to facilitate you to implement the features (including Web and mobile) that are not easy or impossible to implement in the PowerBuilder IDE.
• Appeon Workspace User Guide:
Gives a general introduction on Appeon Workspace and provides detailed instructions on how to use it.
• Appeon Server Configuration Guide:
Provides instructions on how to configure Appeon Server Monitor, establish connections between Appeon Servers and database servers, and configure AEM for maintaining Appeon Server and the deployed applications.
• Web Server Configuration Guide:
Describes configuration instructions for different types of Web servers to work with the Appeon Server.
• Troubleshooting Guide:
Provides information on troubleshooting issues; covering topics, such as product installation, application deployment, AEM, and Appeon application runtime issues.
• Appeon Performance Tuning Guide:
Provides instructions on how to modify a PowerBuilder application to achieve better performance from its corresponding Web/mobile application.
• Testing Appeon Web Applications with QTP:
Provides instructions on how to test Appeon Web applications with QTP.
1.4 If you need help
If you have any questions about this product or need assistance during the installation process, access the Technical Support Web site at http://www.appeon.com/support.
2 Server Configuration Tasks
Server configuration for n-tier architecture is usually a daunting task that requires a wide range of server knowledge. The same rule applies to Appeon architecture. Appeon architecture resides in at least three types of servers: Web server, application server, and database server. Each server involves a third-party server product: for example, Appeon Server can be installed to EAServer, WebLogic, WebSphere, JBoss, SAP NetWeaver Application Server, or JEUS. A number of configuration tasks must be performed before an Appeon application can work on the Web or Mobile, and still there is more involved in the maintenance and management of the server.
This chapter will help you understand the configurations in this guide and will assist you to quickly locate the correct configuration information.
2.1 Scope of configurations discussed in this book
Appeon architecture is a typical n-tier architecture that can provide development and runtime environments for both Appeon and non-Appeon applications. This book focuses on the configurations for supporting Appeon applications in the architecture, and does not provide: (1) configurations for setting up the architecture, (2) configurations specific to the functioning and performance of third-party servers within the architecture.
The configurations needed for setting up the architecture are discussed in Installation Guide for .NET and the Web Server Configuration Guide, and therefore, will not be addressed in this guide.
Configurations specific to the functioning and performance of third-party servers in Appeon architecture may still impact the architecture. For example, indexing database tables has nothing to do with Appeon knowledge but can greatly improve the performance of an
Appeon application. Although such configurations are not provided in this book, it is strongly recommended that you refer to the configuration documents of any third-party servers used and perform necessary configurations to achieve the best possible performance of Appeon architecture.
2.2 Configuration stages and tasks
Server configuration is divided into several stages as shown in the following table. Understanding which stage of the configuration, allows one to simply focus on the configurations recommended for that particular stage. This helps save time and effort of searching through the complete document for information.
Table 2.1: Server configuration stages
Configuration During... For the Purpose of ...
Application Deployment Ensuring that the application data displays correctly and that all functions in the application work correctly. Debugging Process Efficient debugging.
Security Management Managing the security of applications and servers within the architecture.
Configuration During... For the Purpose of ...
Performance Management Improving server performance. Server Information Management Managing server-related information.
Emergency Control Restarting Appeon Server automatically when it shuts down.
After reading the introduction in this section, you will find that most of the configurations can be performed in Appeon Enterprise Manager (AEM). AEM is a Web tool designed for managing Appeon Server and the deployed Web or mobile applications over the Internet or an intranet and can greatly simplify configuration.
2.2.1 Configuration during application deployment
The following table lists the server configuration tasks for ensuring that application data displays correctly and that all functions within the application work. Tasks marked as "in AEM" are performed in AEM.
Table 2.2: Configuration tasks during application deployment
Task Description See section
Database Connection
Establish the database connection between the application server and the database server by configuring data sources.
Database Connection Setup (In AEM) Transaction Object
Set up static mapping between application transaction objects and data sources.
Transaction Objects (In AEM)
Decimal Precision
Select a proper decimal precision for the Appeon application. Decimal Precision (In AEM)
DLL/OCX Files
Configure the mode for installing and downloading DLL and OCX files used in an application.
DLL/OCX Files (In AEM)
Registry Mode
Enable the Appeon Web or Appeon mobile applications to directly access the client machine Windows registry or use Appeon registry emulation, so that PowerBuilder registry functions will work properly.
Registry Mode
(In AEM) INI File Mode
Make the Appeon Web or Appeon mobile applications
manipulate the INI files at the client or by Appeon emulation, so that INI file function will work properly.
INI File Mode (In AEM) Error Message Mode
Specify the display mode for errors in different levels. They can be displayed in the status bar or in popup messages.
Error Message Mode (In AEM)
Charset
Specify the input charset and database charset to ensure characters in applications display correctly.
2.2.2 Configuration during debugging
The following table lists the server configuration tasks for efficient debugging in case of abnormal behavior of the Appeon Web or Appeon mobile applications.
Table 2.3: Configuration tasks during debugging process
Task Description See section
(In AEM) Log Mode
Set the log file generation mode. Log Mode
(In AEM) Logging
View the log files generated by Appeon Server or the application server.
Viewing Logs (In AEM)
Run Mode
Set the run mode for Web or mobile applications. Run Mode
2.2.3 Configuration during security management
The following table lists the server configuration tasks for managing the security of applications and servers in Appeon architecture.
Table 2.4: Configuration tasks during security management
Task Description See section
Database security
Implement script-coded and database security for applications Database security (In AEM)
AEM Login
Modify the AEM user name and password. AEM Login
(In AEM) System Security
Set the system security mode and type. System
Security (In AEM)
Client Security
Limit the accessibility of an Appeon Web or Appeon mobile application to the selected groups.
Client Security (In AEM)
Group Management
Create groups and grant access rights. Group
Management (In AEM)
User
Management
Create user profiles and grant access rights. User
Management (In AEM)
Deployment Security
Limit the number of users permitted to deploy applications to Appeon Server.
Deployment Security
2.2.4 Configuration during performance management
The following table lists the server configuration tasks for improving server performance. Note: In order to maximize the performance of Appeon architecture, besides the tasks in the table, you must also follow instructions from the documents of all the related third-party servers.
Table 2.5: Configuration tasks during performance management
Task Description See section
(In AEM) Active Sessions
Monitor all active sessions in the system. Some sessions can be killed if necessary. Active Sessions (In AEM) Active Transactions
Monitor all active transactions in the system. Some active transactions can be killed if necessary.
Active Transactions (In AEM)
Maintenance
Set the schedule for automatically clearing temporary files, or manually deleting temporary files, and the backing up configurations.
Maintenance
(In AEM) Deployment Sessions
Monitor all active deployment sessions in the system. Some active deployment sessions can be killed if necessary.
Deployment Sessions (In AEM) Application Server Cache
Allocate server cache between deployed applications. Ensures that important applications are cached.
Appeon Server Cache (In AEM) DataWindow Data Cache
Cache DataWindow data on the server and/or client to improve data-reading performance. DataWindow Data Cache (In AEM) Multi-Thread Download
Download static resources with multi-threads to boost performance. Multi-Thread Download (In AEM) Encoding
Choose the proper encoding mode to reduce network traffic. Encoding
2.2.5 Configuration during server information management
The following table lists the server configuration tasks for managing server-related information.
Table 2.6: Configuration tasks during server information management
Task Description See section
(In AEM) Timeout
Set session timeout, transaction timeout, download timeout, and request timeout.
Timeout (In AEM)
Licensing
View license information, and activate or de-activate an Appeon Server.
Licensing (In AEM)
Support
view the valid product support period and renew the support. Support
2.2.6 Configuration for emergency control
The following table lists the server configuration task with which Appeon Server can be started automatically when it shuts down.
Table 2.7: Configuration for emergency control
Task Description See section
Status Monitor
Configure the Appeon Server Status Monitor so it can be used for restarting Appeon Server automatically.
Status Monitor
3 Appeon Server Status Monitor
3.1 Overview
Note: Appeon Server Status Monitor does not work with JEUS.
Appeon Server Status Monitor (hereinafter referred to as "Status Monitor") is a small
program installed along with Appeon Server. It backs up Appeon Server session information, monitors if Appeon Server is in "started" status, and in the event that the Server shuts down it automatically restarts Appeon Server and recovers the runtime information.
3.2 Configuring Status Monitor
Verify the presence of the following files according to the Appeon Server type. Each will need to be configured, with the exception of appeonserver.jar, before Status Monitor can be run successfully.
Table 3.1: Files for status monitor
Appeon Server Windows Unix\Linux
EAServer <Appeon Home>\bin
\appeonmonitor.bat <Appeon Home>\bin \appeonserver.bat <Appeon Home>\config \monitor.props <Appeon Home>/bin/ appeonmonitor.sh <Appeon Home>/bin/ appeonserver.sh <Appeon Home>/config/ monitor.props WebLogic/WebSphere/JBoss/ NetWeaver Application Server <Appeon Home>\bin \appeonmonitor.bat <Appeon Home>\lib \appeonserver.jar <Appeon Home>\bin \appeonserver.bat <Appeon Home>\config \monitor.props <Appeon Home>/bin/ appeonmonitor.sh <Appeon Home>/lib/ appeonserver.jar <Appeon Home>/bin/ appeonserver.sh <Appeon Home>/config/ monitor.props Notes:
1. <Appeon Home> indicates the installation path of Appeon Server. 2. Changes to the files will take effect after the Status Monitor is restarted.
3.2.1 Configuring appeonmonitor.bat
The appeonmonitor.bat file (Windows) or appeonmonitor.sh file (Unix\Linux) is the batch program run by Status Monitor.
Make the following changes to the settings in appeonmonitor.bat file (Windows) or appeonmonitor.sh file (Unix\Linux).
For appeonmonitor.bat and appeonmonitor.sh files, the settings and modification are almost the same. The only difference is that forward slash ("/") is used as the path separator in Unix \Linux while back slash ("\") is used in Windows.
Table 3.2: Configure appeonmonitor.bat Settings Description
EASERVER_ HOME
Specifies the path of EAServer.
For example, EASERVER_HOME=C:\Program Files\Sybase\EAServer6 JAVA_HOME Specifies the JDK location, which must be the same one used by Appeon
Server.
For example, for EAServer running on Windows, the value of JAVA_HOME is:
JAVA_HOME=C:\Program Files\Sybase\Shared\jdk1.6.0_18. Note: 1) If Appeon Server works on WebLogic, verify that the WLS_USER and WLS_PW variables in the startWebLogic.cmd (Windows) or startWebLogic.sh (Unix\Linux) file contain the correct login credentials.
2) If Appeon Server works on WebSphere, only when the IBM JDK is used can Status Monitor function properly.
APPEON_HOME Specifies the Appeon Server home directory. EAServer: <JAGUAR>\appeon
WebSphere: <WAS_HOME>\appeon WebLogic: <WL_HOME>\appeon
NetWeaver Application Server: <NAS_HOME>\appeon JBoss: <JB_HOME>\appeon
Note: <JAGUAR> indicates the EAServer installation directory; <WAS_HOME> indicates the home directory of WebSphere server; <WL_HOME> indicates the home directory of WebLogic; <NAS_HOME> indicates the home directory of NetWeaver Application Server; and <JB_HOME> indicates the home directory of JBoss.
For example, if Appeon Server works on EAServer, the Appeon
Server home directory is: APPEON_HOME= C:\Program Files\Sybase \EAServer\appeon.
If Appeon Server works on WebLogic 9.2, the Appeon Server home directory is: APPEON_HOME= C:\bea\weblogic92\appeon.
J2EE_JAR Changes the default setting according to the Appeon Server in use: EAServer: <JAGUAR>\lib\eas-server-16.jar
Settings Description
WebSphere: <WAS_HOME>\lib\j2ee.jar
JBoss 5: <JB_HOME>\common\lib\mail.jar, <JB_HOME>\client\jboss-javaee.jar
JBoss 7: <JB_HOME>\common\lib\mail.jar, <JB_HOME>\modules \javax\ejb\api\main\jboss-ejb-api_3.1_spec-1.0.1.Final.jar
Note: In different JBoss 7 builds, the name of jboss-ejb-api_3.1_spec-1.0.1.Final.jar may be slightly different.
For example, if Appeon Server works on EAServer, the home directory is: J2EE_JAR=C:\Program Files\Sybase\EAServer\lib\eas-server-16.jar. CLASS_PATH Default setting:
CLASS_PATH=%EASERVER_HOME%\lib\ext\appeon_server.jar; %J2EE_JAR%
You do not need to make any changes to the default setting. NeedToEncrypted
EASPWD
Specify the administrator password of EAServer 6.x. For example, NeedToEncryptedEASPWD=appeon123
After you set the password, comment out the following script in
appeonmonitor.bat, then run appeonmonitor.bat to encrypt the password, and after you get the encrypted password, make sure to clean the
password here and then input the encrypted password to EASPWD below.
"%JAVA_HOME%/bin/java.exe" -cp "%CLASS_PATH %" -Dappeon.home="%APPEON_HOME%"
com.appeon.server.monitor.StatusMonitor -e "%NeedToEncryptedEASPWD%"
EASUSER Specify the administrator user name of EAServer 6.x. For example, EASUSER=admin@system
Note that the user name must be in this format "admin@system". EASPWD Input the encrypted password of EAServer 6.x. The encrypted password
is generated after you set NeedToEncryptedEASPWD. Please see "NeedToEncryptedEASPWD" for details.
For example, EASPWD=YXBwZW9uMTIz
After you input the encrypted password here, make sure to clean the password in NeedToEncryptedEASPWD.
After you properly configure the above settings, make sure to uncomment the following scripts, so Status Monitor can start normally.
"%JAVA_HOME%/bin/java.exe" -cp "%CLASS_PATH%" -Dappeon.home="%APPEON_HOME%" com.appeon.server.monitor.StatusMonitor -e "%NeedToEncryptedEASPWD%"
"%JAVA_HOME%/bin/java.exe" -cp "%CLASS_PATH%" -Dappeon.home="%APPEON_HOME%"
Here is a sample of a configured appeonmonitor.bat file:
@echo off cls
SETLOCAL
title Appeon Server Status Monitor
REM Please replace <EASERVER_HOME> with the real path of EAServer6 set EASERVER_HOME=C:\Program Files\Sybase\EAServer6
set JAVA_HOME=C:\Program Files\Sybase\Shared\jdk1.6.0_18 set APPEON_HOME=C:\Program Files\Sybase\EAServer6\appeon
set J2EE_JAR=C:\Program Files\Sybase\EAServer6\lib\eas-server-16.jar set CLASS_PATH=%EASERVER_HOME%/lib/ext/appeonserver.jar;%J2EE_JAR%
REM Please replace <NeedToEncryptedEASPWD> with the administrator password of EAServer 6.x. Make sure to clean the password after you have encrypted it. set NeedToEncryptedEASPWD=
REM Please replace <EASUSER> with the administrator user name of EAServer 6.x set EASUSER=admin@system
REM Please replace <EASPWD> with the administrator password of EAServer 6.x that is encrypted
set EASPWD=YXBwZW9uMTIz
REM If you want to encrypt the administrator password of EAServer 6.x, please uncomment the line below
"%JAVA_HOME%/bin/java.exe" -cp "%CLASS_PATH%" -Dappeon.home="%APPEON_HOME%" com.appeon.server.monitor.StatusMonitor -e "%NeedToEncryptedEASPWD%"
REM If you want to start status monitor, please uncomment the line below "%JAVA_HOME%/bin/java.exe" -cp "%CLASS_PATH%" -Dappeon.home="%APPEON_HOME%" -Deas.user="%EASUSER%" -Deas.pwd="%EASPWD%"
com.appeon.server.monitor.StatusMonitor echo Appeon Server Status Monitor terminated. PAUSE
ENDLOCAL
3.2.2 Configuring appeonserver.bat
The appeonserver.bat file (Windows) or appeonserver.sh file (Unix\Linux) is the batch program run by Status Monitor when it detects that Appeon Server has shut down. 3.2.2.1 Configuring appeonserver.bat (Windows)
The appeonserver.bat file contains the following code:
REM if use EAServer6, please replace <EAServer6> with real path and uncomment the line below.
start cmd /c "<EAServer6>\bin\start-server.bat" -jdk15
REM if use WebLogic, please replace <Domain> with real path and uncomment the line below.
REM if use WebSphere, please replace <WebSphere> with real path and uncomment the line below.
REM @start call "<WebSphere>\AppServer\bin\startServer.bat" server1
REM if use JBoss, please replace <JBoss> with real path uncomment and the line below.
REM @start call "<JBoss>\bin\run.bat"
Make the following changes to the file:
1. Remove the notation "REM" before the command line that starts the application server/ Appeon Server.
2. Replace the wildcard character string, which stands for the application server, with the home directory of the application server.
For example, if Appeon Server works on EAServer 6.x, the following script should be modified.
Original script:
REM start cmd /c "<EAServer6>\bin\start-server.bat" -jdk15
Modified script:
start cmd /c "C:\Program Files\Sybase\EAServer6\bin\start-server.bat" -jdk15
3.2.2.2 Configuring appeonserver.sh (Unix\Linux) The appeonserver.sh file contains the following script:
#If use EAServer6, please uncomment the line below. #"<EAServer6>/bin/start-server.sh" -jdk15
#If use WebLogic, please uncomment the line below. #"<Domain>/startWebLogic.sh"
#If use WebSphere, please uncomment the line below. #"<WebSphere>/AppServer/bin/startServer.sh" server1 #If use JBoss, please uncomment the line below. # "<Jboss>/bin/run.sh"
Make the following changes to the file:
1. Remove the notation "#" before the command line that starts the application server/ Appeon Server.
2. Replace the wildcard character string that stands for the application server, with the home directory of the application server.
For example, if Appeon Server is installed to EAServer 6.x, the following script should be modified.
Original script:
#"<EAServer6>/bin/start-server.sh" -jdk15
Modified script:
3.2.3 Configuring monitor.props
The monitor.props file contains the property settings of Status Monitor. These property settings work for EAServer, WebLogic, WebSphere, JBoss, and NetWeaver Application Server, except for
• Memory settings, which work for EAServer on Windows only.
• Scheduled task settings, which are unsupported by WebLogic, WebSphere, JBoss, or NetWeaver Application Server.
Make the following changes to the property settings in monitor.props, as shown in the following table.
Note: If you have made changes to the instance names and instance ports, you will need to restart Appeon Server to make the settings effective.
Table 3.3: Configure monitor.props
Settings Descriptions
com.appeon.server.monitor.instance.names The names of server instances that need to be monitored.
Separate multiple instance names with comma (",").
Note that changes to this setting will not take effect until Appeon Server is restarted. com.appeon.server.monitor.instance.cpus The information for CPU(s) of the server
instances.
The value ranges from CPU0 to CPU31. The value can also be an asterisk ("*"), which stands for all CPUs of the local machine. If there are more than one server, their names should be separated by comma (",") and ranked in the same order with com.appeon.server.monitor.instance.names. If one server has multiple CPUs, they can be connected by the plus sign ("+").
com.appeon.server.monitor.instance.ports The port via which Status Monitor monitors Appeon Server.
Separate multiple server instances with comma (",") and range them in the same order with
com.appeon.server.monitor.instance.names. Make sure the port number you specify is not occupied. Note that changes to this setting will not take effect until Appeon Server is restarted.
Settings Descriptions
com.appeon.server.monitor.instance.files The files that Status Monitor will check when the server shuts down, for example, C: \Program Files\Sybase\EAServer6\appeon \repository\LAJ\config\aem-config.xml. If there are more than one server instance, separate them with comma (",") and range them in the same order with
com.appeon.server.monitor.instance.names. com.appeon.server.monitor.instance.comman
dlines
The command line for starting Appeon Server.
Default setting:
com.appeon.server.monitor.instance.comman dlines=appeonserver.bat
If there are more than one server instance, separate them with comma (",") and range them in the same order with
com.appeon.server.monitor.instance.names. com.appeon.server.monitor.mail.smtp.server The mail server that Status Monitor uses for
sending notification emails.
Contact your network administrator to get the valid mail server that can be accessed from the machine.
com.appeon.server.monitor.mail.smtp.reciev ers
The email address(es) of the recipient(s) to who Status Monitor will send the notification emails. It can contain one or multiple email addresses.
Use the comma (",") as the email address separator if you want to specify multiple email receivers.
The auto-mail functionality will not work unless being specified.
com.appeon.server.monitor.mail.smtp.port The port number that is specified for the mail server.
Contact your network administrator to get the valid port number of the mail server specified. The default port number is "25" com.appeon.server.monitor.mail.smtp.sender.
account
The account for sending mails.
If the mail server uses SMTP to validate, an account for sending mails must be specified. Otherwise anonymous mails will be sent.
Settings Descriptions com.appeon.server.monitor.mail.smtp.sender.
password
The password for sending mails.
If the mail server uses SMTP to validate, a password must be specified.
com.appeon.server.monitor.session.checkcy cle
The cycle for automatic backup. The unit is second.
com.appeon.server.monitor.session.backup The switch for turning on/off session auto-backup.
Specify the value to true or false. com.appeon.server.monitor.memory.checkcy
cle
The cycle for checking memory information. The memory usage detected by Status
Monitor may not be necessarily the same as the memory usage shown in the Windows task manager.
The unit is second.
Note this setting works for EAServer on Windows only.
com.appeon.server.monitor.memory.maxva lue
The maximum value (in percentage) for memory usage.
The value ranges from 0 to 100.
If the memory usage reaches the peak, the Status Monitor will check the existence of active sessions. If there is none, the monitor will immediately restart the server instance(s). If there is one or more active sessions, the monitor will determine whether to restart the server instance(s) according to the restart flag. Before the restart, the monitor will determine whether the sessions will be backed up according the backup settings.
Note this setting works for EAServer on Windows only.
com.appeon.server.monitor.memory.minvalue The minimum value (in percentage) for memory usage.
The value ranges from 0 to 100.
If the memory usage reaches the bottom, the Status Monitor will check the existence of active sessions. If there is none, the monitor will immediately restart the server instance(s). If there is one or more, the
Settings Descriptions
monitor will continue checking until the memory usage reaches the peak.
Note this setting works for EAServer on Windows only.
com.appeons.erver.monitor.memory.restart The switch to restart server instance by force when the memory usage reaches the peak. The value can be true or false.
Note this setting works for EAServer on Windows only.
com.appeon.server.monitor.scheduled.task.cy cle
The cycle for scheduled tasks.
The value can be daily, weekly or monthly, among which only the daily mode is supported at present.
Note this setting is unsupported by WebLogic, WebSphere or JBoss. com.appeon.server.monitor.scheduled.task.w
hen
The moment to start carrying out scheduled tasks.
The value ranges from 00:00:00 to 23:59:59. Note this setting is unsupported by
WebLogic, WebSphere or JBoss. com.appeon.server.monitor.scheduled.task.re
start
The switch to restart server instance(s) if active sessions still exist when starting to carry out scheduled tasks.
The value can be true or false. Note this setting is unsupported by WebLogic, WebSphere or JBoss.
3.2.4 Additional configuration for Status Monitor in Appeon Server cluster
If an Appeon Server works in a cluster, the Appeon Server will not only back up the "active" sessions but also the "passive" sessions. The "passive" sessions are remote sessions created by another Appeon Server in the cluster and backed up in the current Appeon Server. The "active" sessions for an Appeon Server will always be restored if that Appeon Server shuts down abnormally and then is restarted by its Status Monitor, while the "passive" sessions will be restored only if you select the "Enable Logical Restore with Status Monitor" option in the AEM Cluster tool. If this option is not selected, Status Monitor will only restore the "active" sessions and will not restore the "passive" sessions on an Appeon Server.
3.3 Information backed up by Status Monitor
Status Monitor detects Appeon Server status, backs up and restores session information, and automatically restarts Appeon Server every time Appeon Server is detected
"shut-down". This is very helpful, because Status Monitor detects if Appeon Server shuts down abnormally, and will automatically restart Appeon Server while restoring the most recent state of Appeon Server based on the last backup.
3.3.1 What is backed up?
Status Monitor periodically backs up Appeon Server session information that includes: • User authentication information
• References to Appeon Server transaction components • References to NVO components (for EAServer only) Status Monitor does not back up:
• Information being processed in active transactions • States of stateful NVOs.
3.4 Using Status Monitor
3.4.1 Starting Status Monitor
Step 1: Locate the bin subdirectory under <Appeon Home>/bin where appeonmonitor.bat (Windows) or appeonmonitor.sh (Unix\Linux) is stored. For example: C:\Program Files \Sybase\EAServer\appeon\bin.
Step 2: Run the appeonmonitor.bat file (Windows) or appeonmonitor.sh (Unix\Linux) to start Status Monitor.
Note: In Unix\Linux, be sure to run Status Monitor in the background by executing the command "nohup statusmonitor.sh &". If Status Monitor runs in the foreground, executing a ctrl-c command for Status Monitor will stop both the Status Monitor and the Appeon Server process started by Status Monitor.
Once Status Monitor is successfully started, the Status Monitor window displays, indicating that Status Monitor is functioning. To keep the Status Monitor running you must keep the window open or minimized. If you close the Status Monitor window, Status Monitor stops working, and loses the information that has been backed up.
3.4.2 Understanding the information in Status Monitor Window
Once Status Monitor and Appeon Server are simultaneously running, the Status Monitor window as well as the configuration information will display as illustrated in the following figure.
Figure 3.1: Information in Status Monitor Window
Appeon Server Status Monitor can monitor one or multiple server instances at the same time. You can tell how many server instances are configured for being monitored from the signs at the bottom left of the window. As shown in the above figure, there is only one server instance configured for being monitored. If the sign is shown as "[S]", the server instance is shut down.
4 Database Connection Setup
4.1 Overview
The steps for configuring the database for an Appeon-deployed application are the same as the steps for configuring the database for a PowerBuilder application. However, the way the database server is accessed is different: a PowerBuilder application directly accesses the database server via transaction object(s), while an Appeon-deployed application accesses the database server via Appeon Server data sources.
This chapter describes how to enable a deployed application to access its database. Two key tasks are involved:
• Setting up communication between the database server and Appeon Server. This refers to setting up Appeon Server data sources.
• Setting up communication between the deployed application and Appeon Server. This refers to setting up the mapping between the application transaction objects and Appeon Server data sources.
Some advanced configurations are also related to database connection setup (for
example, database auditing). This chapter outlines common techniques for handling such configurations in the Appeon environment.
4.2 What is Appeon Server data source?
Appeon Server data source is actually the same terminology as data source in the following mainstream application servers: EAServer 6.x, WebLogic, WebSphere, JBoss, NetWeaver, and JEUS.
Appeon Server data source (for EAServer 6.x, WebLogic, WebSphere, JBoss, NetWeaver Application Server, and JEUS) can only be configured in their corresponding application server management console.
For detailed instructions, please refer to the corresponding documents of EAServer, WebLogic, WebSphere, JBoss, NetWeaver Application Server, or JEUS.
4.2.1 Why Appeon Server data source?
The data source for a Web or Mobile application is the counterpart to the transaction object in the target PowerBuilder application. The transaction properties in the target PowerBuilder application contain database connection parameters, which should be correspondingly configured in data sources.
Appeon Web applications and Appeon Mobile applications rely on Appeon Server data sources to interact with the database servers. When creating a data source, you can use
different JDBC drivers. However, Appeon has some recommendations on which JDBC driver is to be used for certain types of databases.
4.2.2 Why JDBC driver only?
In Appeon Web applications and Appeon mobile applications, data-related operations are managed by Appeon Server. The data related operations are built with J2EE technology and
they require the JDBC interface. Regardless of the interface (ODBC, JDBC, or native driver) target PowerBuilder application uses for its database connection, the Web application and the mobile application must use JDBC.
One issue with the JDBC interface is that most PowerBuilder applications use a native database driver, and there may be differences between the behavior of the native/ODBC database interface and the JDBC interface. Before you configure a JDBC data source, you should test your PowerBuilder applications with the JDBC driver to make sure it does not cause any issues.
4.2.3 Supported JDBC driver type
The JDBC data sources can use any of the four types of JDBC drivers: Type 1: JDBC-ODBC Bridge
Type 2: Native-API/partly Java driver Type 3: Net-protocol/all-Java driver Type 4: Native-protocol/all-Java driver
Each type has advantages and disadvantages. You should run tests to decide which type of JDBC driver works the best for the specific application and database. Generally, Type 3 and Type 4 drivers show better performance than Type 2 drivers, so it is recommended that you evaluate Type 3 or Type 4 for both intranet and Internet deployments. Because of performance considerations, Type 2 drivers should only be used in an intranet environment where response times are generally faster.
4.2.4 JDBC driver preparation
4.2.4.1 Preparing PowerBuilder component support files (for EAServer only)
If Appeon Server is installed to EAServer, whichever database and JDBC driver you use for the deployed application, you must add the following PowerBuilder component support files to the %JAGUAR%\lib\ext directory in the Appeon Server computer. %JAGUAR% indicates the installation path of the EAServer that hosts Appeon Server:
Table 4.1: PowerBuilder component support files
PB Version File Name
8 pbjdbc12.jar 9 pbjdbc1290.jar 10 pbjdbc12100.jar 10.5 pbjdbc12105.jar 11.1 pbjdbc12110.jar 11.5 pbjdbc12115.jar 12.0 pbjdbc12120.jar 12.5 pbjdbc12125.jar 12.6 pbjdbc12126.jar
Retrieve the file from the %Sybase%\Shared\PowerBuilder folder. Make sure the version of the file is the same as the version of PowerBuilder that Appeon supports.
4.2.4.2 Checklist for JDBC driver preparation
Before you configure a JDBC data source for your application database, the following JDBC driver file(s) must be copied to the Appeon Server computer. Following is the checklist of the JDBC driver file(s) that should be copied to the directory.
Table 4.2: Checklist of JDBC driver files
Database Driver Type Driver Files Availability of the Driver Files jConnect JDBC driver (Recommended) jconn2.jar for jConnect 5.5, or jconn3.jar for jConnect 6 Available at %Sybase% \Shared\jConnect-5_5\classes or at %Sybase%\Shared \jConnect-6_0\classes. Note: Install sql_asa.sql provided at %Sybase%\Shared \jConnect-5_5\sp for jConnect to function properly.
iAnywhere JDBC-ODBC driver
For Appeon Servers on Windows: dbjodbc8.dll, dbjodbc9.dll, or dbjodbc10.dll jodbc.jar
For Appeon Servers on Unix\Linux: dbjodbc8.so jodbc.jar
Available in SAP Sybase ASA 8.0.2 Build 4361 or above. For earlier versions, you can obtain the files from http:// www.sybase.com/downloads. Note: dbjodbc8.dll or
dbjodbc9.dll must be copied to %Sybase%\Shared\jdkversion \ire\bin\. Jdkversion indicates which version of JDK is used, for example, jdk1.4.1_03. SAP Sybase ASA/SQL Anywhere 8.0.2, 9.0, 10.0.1, 11.0, or 12.0 Sun JDBC-ODBC driver
- Bundled with the Java 2 SDK,
Standard Edition, so there is no need to download it separately. ASE 12.5.x or 15.x jConnect JDBC driver jconn2.jar for jConnect 5.5 jconn3.jar for jConnect 6.0 Note: ASE 15 supports jConnect 6.0 only. Available at %Sybase% \Shared\jConnect-5_5\classes or at %Sybase%\Shared \jConnect-6_0\classes.
Note: Install sql_server12.5.sql for ASE 12.5 or
sql_server15.0.sql for ASE 15 for jConnect to function properly. Sybase IQ 12.7.x or 15.x jConnect JDBC driver jconn2.jar for jConnect 5.5 jconn3.jar for jConnect 6.0 Available at %Sybase% \Shared\jConnect-5_5\classes or %Sybase%\Shared \jConnect-6_0\classes.
Database Driver Type Driver Files Availability of the Driver Files Sun JDBC-ODBC
driver
- Bundled with the Java 2 SDK,
Standard Edition, so there is no need to download it separately. SAP HANA 1.00.36 SAP In-Memory Database JDBC driver
Ngdbc.jar Available at %SAP HANA%
\hdbclient\ngdbc.jar. Oracle 8i Oracle JDBC driver classes12.zip
Oracle8i 8.1.7.1 Patch nls_charset12.zip
Available at the Oracle Web site (http://www.oracle.com/ technetwork/database/features/ jdbc/index-091264.html). Oracle 9i Oracle JDBC driver For use with JDK 1.3:
classes12.zip nls_charset12.zip For use with JDK 1.4: Ojdbc14.jar
Available at the Oracle Web site (http://www.oracle.com/ technetwork/database/features/ jdbc/index-091264.html). Note: Classes12.zip and
ojdbc14.jar cannot be placed in the same location and used at the same time.
Oracle 10g or 11g
Oracle JDBC driver For use with JDK 1.4: Ojdbc14.jar
For use with JDK 1.5: Ojdbc15.jar
Available at the Oracle Web site (http://www.oracle.com/ technetwork/database/features/ jdbc/index-091264.html). Note: Ojdbc14.jar and
ojdbc15.jar cannot be placed in the same location and used at the same time.
jTDS JDBC driver (Recommended)
jtds-1.2.jar Available at SourceForge Web site (http://sourceforge.net/ projects/jtds/).
Note: You need to download the jtds-1.2-dist.zip file, which contains the jtds-1.2.jar file. According to our tests, jTDS JDBC driver is better than Microsoft SQL Server JDBC driver in the way that it can prevent memory leak and boost performance. SQL Server 2000 Microsoft SQL Server JDBC driver msbase.jar mssqlserver.jar msutil.jar
Available at the Microsoft Web site (http://www.microsoft.com/ downloads/en/details.aspx?
FamilyID=99b21b65-e98f-4a61-Database Driver Type Driver Files Availability of the Driver Files b811-19912601fdc9&displaylang =en).
Note: The files have different versions. Make sure the file sizes are equal or close to the following. msbase.jar: 281KB mssqlserver.jar: 66KB msutil.jar: 58KB jTDS JDBC driver (Recommended)
jtds-1.2.jar Available at SourceForge Web site (http://sourceforge.net/ projects/jtds/).
Note: You need to download the jtds-1.2-dist.zip file, which contains the jtds-1.2.jar file. SQL Server 2005, 2008 or 2012 Microsoft SQL Server JDBC driver
sqljdbc.jar Available at the Microsoft Web site (http://www.microsoft.com/ downloads/en/details.aspx? FamilyID=99b21b65-e98f-4a61-b811-19912601fdc9&displaylang =en). DB2 UDB 8.1, 8.2, 9.5 or 10.x
IBM JDBC driver db2java.zip and/or db2jcc.jar
Available in the java or java12 folder of the DB2 Server installation directory.
The JDBC driver must be exactly the same version as DB2.
Informix 7.x, 8.x, 9.x, 10.x or 11.x IBM Informix JDBC driver ifxjdbc.jar and/or ifxjdbcx.jar
Available at the IBM Web site (http://www14.software.ibm.com/ webapp/download/search.jsp? go=y&rs=ifxjdbc).
MySQL 5.5.x
MySQL Connector/J mysql-connector-java-5.1.19-bin.jar Available at %MySQL%\MySQL Connector J\mysql-connector-java-5.x.jar Teradata 13.0
Teradata JDBC driver terajdbc4.jar tdgssconfig.jar
Available at the Teradata Web site (http://
downloads.teradata.com/ download/connectivity/jdbc-driver).
4.2.4.3 Copying drivers to Appeon Server
Copy the JDBC driver files to the proper directory in Appeon Server. The directory varies with the type of application server that Appeon Server is installed to, as shown in the table below.
Note: Configuring JDBC driver files in NetWeaver Application Server is different from those listed. For details on deploying JDBC driver files in NetWeaver Application Server, refer to Setting up data source for NetWeaver.
Table 4.3: Copy drivers to Appeon Server
Server Type Directory for Storing JDBC Files
EAServer For Windows: %JAGUAR%\lib\ext directory For Unix\Linux: $JAGUAR/lib/ext
WebLogic It can be any directory, but the directory path and name must be added in the ClassPath variable of the startWebLogic.cmd (Windows) or startWebLogic.sh (Unix\Linux) file.
If the directory is %WL_HOME%\server\lib folder (Windows) or $WL_HOME/server/lib (Unix\Linux), where %WL_HOME% is the installation folder of the WebLogic server (for example, C:\bea \weblogic81\), it is unnecessary to update the ClassPath variable.
WebSphere For Windows: %WAS_HOME%\lib (%WAS_HOME% is the installation folder of the WebSphere server)
For Unix\Linux: $WAS_HOME/lib
JBoss For Windows: %JBOSS_HOME%\server\instance\lib (%JBOSS_HOME % indicates the JBoss installation path)
For Unix\Linux: $JBOSS_HOME/server/instance/lib
JEUS For Windows: %JEUS_HOME%\lib\datasource (%JEUS_HOME% indicates the JEUS installation path)
For Unix\Linux: $JEUS_HOME/lib/datasource
Important Note: Remember to restart Appeon Server after copying files.
If EAServer is running as service, you need to re-install EAServer service, or stop the EAServer service and start EAServer from the Windows start menu, otherwise, you will encounter the "Exception was:javax.management.MBeanException" error when creating the data source. For details, refer to Section 6.2.12, “Failed to create new data sources” in
Troubleshooting.
4.3 Setting up Appeon Server data sources
The data source for the Web application and the mobile application is the counterpart to the transaction object in the target PowerBuilder application. The transaction properties in the target PowerBuilder application contain database connection parameters, which should be correspondingly configured in data sources.
Appeon Web applications and Appeon mobile applications rely on Appeon Server JDBC data sources to interact with the database servers. When creating a JDBC data source, you can use different JDBC drivers. However, Appeon has some recommendations on which JDBC driver is to be used for certain types of databases.
This section gives detailed instructions on configuring data sources in EAServer 6.x, WebLogic, WebSphere, JBoss, NetWeaver Application Server, and JEUS. If you have problems creating JDBC data sources, refer to the documentations from the database/ JDBC driver vendor or SAP Sybase EAServer, SAP NetWeaver, Oracle WebLogic, IBM WebSphere, JBoss and TmaxSoft JEUS.
4.3.1 Setting up data source for WebLogic
4.3.1.1 Setting up data source for WebLogic 8.1
The following section will take one database type (ASA/SQL Anywhere database with
jConnect JDBC driver) as an example to show you how to create a data source for WebLogic, you can later create data sources for other database types by taking the same steps below but specifying different parameters according to Data source parameters.
You can create a connection pool and a data source using either the WebLogic server console or the configuration wizard.
Note: the JNDI name specified for the data source will be regarded as the data source name by Appeon Server and AEM.
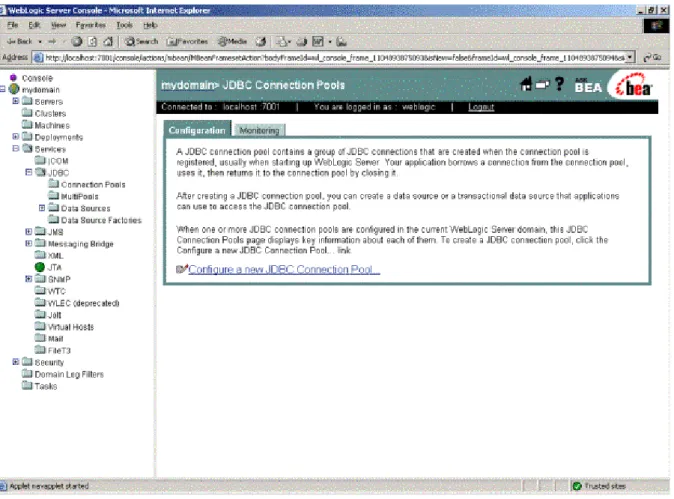
4.3.1.1.1 Creating a JDBC connection pool 1. Start the WebLogic Server for your domain. 2. Log on to the WebLogic Server Console. 3. Go to Services > JDBC > Connection Pools.
Figure 4.1: Configure a JDBC connection pool
4. Click the Configure a new JDBC Connection Pool link.
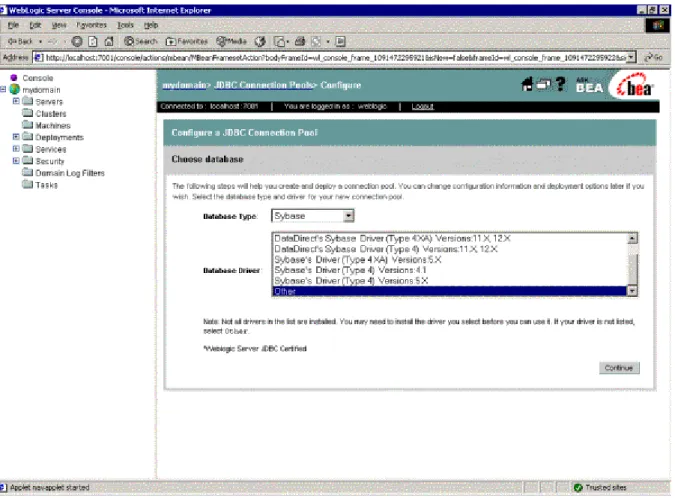
Figure 4.2: Choose database
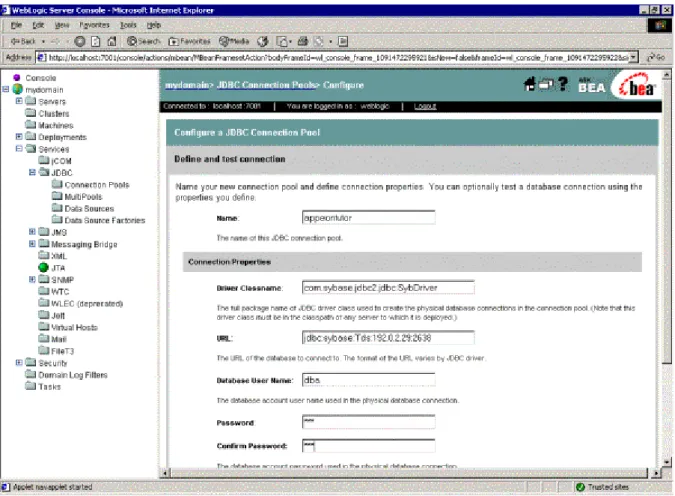
6. Choose a name for the new connection pool (for example, appeontutor) and fill in the blanks for the ASA/SQL Anywhere database. Click Continue.
Table 4.4: Connection pool properties
Name Input the name of the new connection pool Driver
classname
com.sybase.jdbc2.jdbc.SybDriver
URL jdbc:sybase:Tds:hostname:2638/dbname (The default port of the ASA/SQL Anywhere database is 2638)
Database User name
Type the database login username. The username is set at the database server.
Password Type the database login password. The password is set at the database server.
Figure 4.3: Data source properties
7. Test your connection to verify that you can connect to your database. 8. Create and deploy the new connection pool.
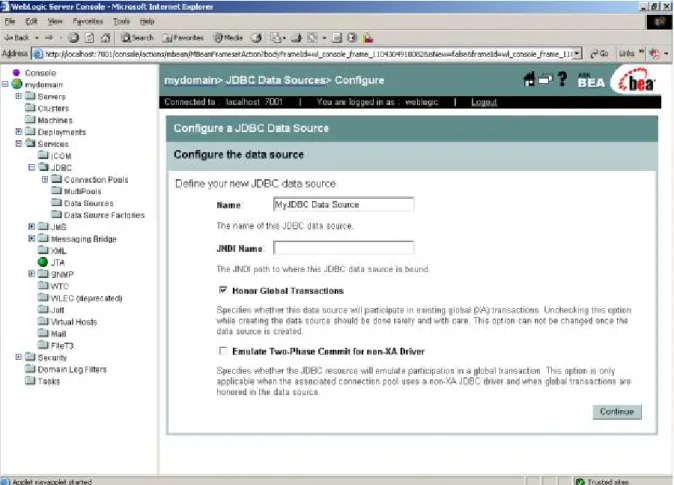
4.3.1.1.2 Configuring a JDBC data source 1. Go to Services > JDBC > Data Sources.
Figure 4.4: Configure a JDBC data source
2. Click the Configure a new JDBC Data Source link.
3. Specify the new data source name and JNDI name and click Continue. You can use default values for the other options.
Figure 4.5: Data source properties
Figure 4.6: Select the connection pool
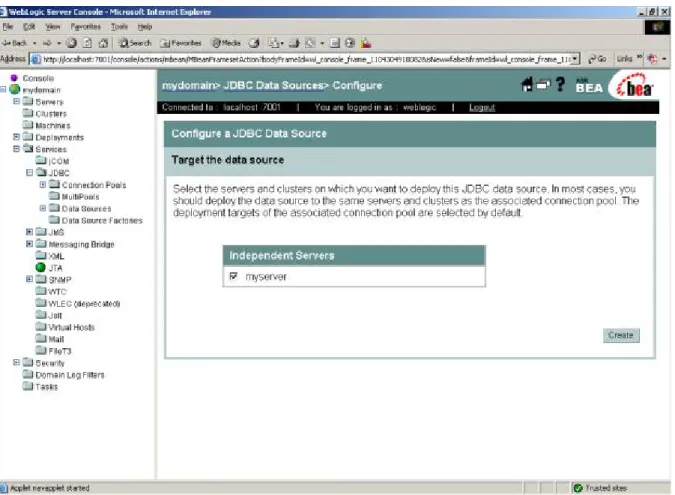
Figure 4.7: Target the data source
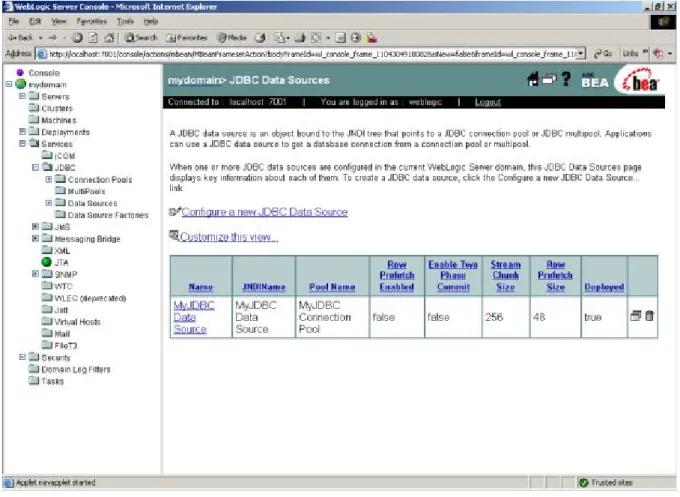
6. Confirm the Deployed status of the data source is "true" in the JDBC Data Sources window.
Figure 4.8: Deployed status
4.3.1.2 Setting up data source for WebLogic 11g
The following section will take one database type (ASA/SQL Anywhere database with jConnect 6.0 JDBC driver) as an example to show you how to create a data source for
WebLogic, you can later create data sources for other database types by taking the same steps below but specifying different parameters according to Data source parameters.
You can create a data source using either the WebLogic server console or the configuration wizard.
Detailed steps are as below:
Step 1: Start the Admin Server for WebLogic Server Domain. Step 2: Log on to the WebLogic Server Administration Console.
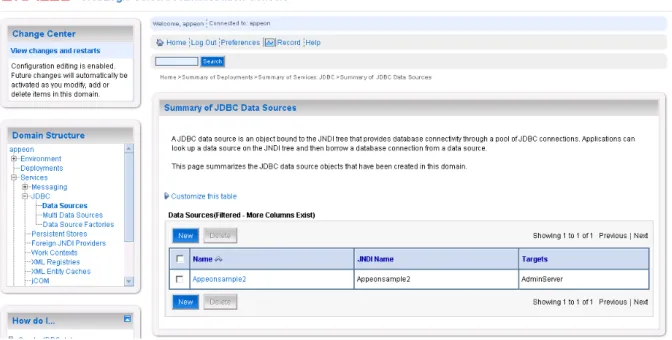
Step 3: In the Domain Structure section, select Services > JDBC > Data Sources. Step 4: On the summary of Summary of JDBC Data Sources page, click New.
Figure 4.9: The Summary of JDBC Data sources page
Step 5: On the JDBC Data Source Properties page, enter or select the following information and then click Next.
Figure 4.10: JDBC Data Source Properties page
Table 4.5: JDBC Data Source Properties
Field Description Value
Name Enter a desired new JDBC data source name. Appeonsample JNDI Name Enter a JNDI name that you like to assign to
your new JDBC Data Source.
Note: The JNDI name will be used as the data source name in AEM.
Appeonsample
Database Type Select the database type from the dropdown list box.
Sybase Database Driver Select the database drive from the dropdown list
box.
Sybase's Driver (Type 4) Versions:6.X
Step 6: On the Transactions Options page, check the Supports Global Transactions checkbox and select the One-Phase Commit radio button, and then click Next.
Figure 4.11: Transaction options
Step 7: On the Connection Properties page, enter the following information, and then click
Figure 4.12: Connection Properties page
Fill in details as required in the table below. Table 4.6: Connection Properties page
Field Description Value
Database Name Enter a database name that you would like to connect.
Appeonsample Host Name Enter a host name or IP address of
the database server.
192.0.3.142 Port Enter a database port on the
database server used to connect to the database.
2638
Database User Name
Enter the database account user name that you want to use to create the database connections.
dba
Password Enter the database account password that you want to use to create the database connections.
sql
Confirm Password
Enter the same password for confirmation.
sql
Step 8: On the Test Database Connection page, specify the Driver Class Name and the
URL, and then click Test Configuration. If the test is successful, A "Connection test
succeeded" message appears at the top of the page. If the test is unsuccessful, you should correct any configuration errors and retry the test. And then click Next.
Figure 4.13: Test Database Connection page
Fill in details as required in the table below.
Table 4.7: Specify the Driver Class Name and the URL
Field Description Value
Driver Class Name
Enter the driver name of the database specified.
com.sybase.jdbc3.jdbc.SybDriver URL Enter the server name of the
database specified. jdbc:sybase:Tds:Hostname:Port/ ServiceName For example: jdbc:sybase:Tds:192.0.3.142:2638/ Appeonsample.
Step 9: On the Select Targets page, select the AdminServer check box, and then click
Figure 4.14: Select Targets Page
Step 10: On the Summary of JDBC Data Sources page, the Data Source that you created appears in the list, and then click the link to the name of the new data source in the Data
Sources window.
Figure 4.15: Summary of JDBC Data Sources page
Step 11: (Important) On the Settings for the base_domain page, click appeon in the
Domain Structure section and then select Security tab page. Select Anonymous Admin Lookup Enabled check box and click Save. This will allow AEM to read the JNDI Names.
Step 12: Choose All Programs > Oracle WebLogic > User Projects > appeon from the
Windows Start menu to restart your WebLogic server for configuration changes to take
effect.
Step 13: In order to test the connection, please log on to Appeon AEM to configure a Transaction Object and then test it.
4.3.2 Setting up data source for WebSphere
4.3.2.1 Setting up data source for WebSphere 6.1
The following section will take one database type (Oracle database with Oracle JDBC driver) as an example to show you how to create a data source for WebSphere, you can later create data sources for other database types by taking the same steps below but specifying different parameters according to Data source parameters.
Note:
1. The JNDI name specified for the data source will be regarded as the data source name by Appeon Server and AEM.
2. If the global security mode is turned on in WebSphere, AEM will not be able to access the WebSphere data sources. Please refer to Section 4.3.2.4, “Required configurations when global security is on” for solutions.
4.3.2.1.1 Updating JDBC driver path in master configuration
1. Start the WebSphere Server and log on to the WebSphere Server Console. 2. Click Environment > Manage WebSphere Variable in the console. 3. Set the path of the Oracle JDBC driver to the value of the
ORACLE_JDBC_DRIVER_PATH variable.
As required in JDBC driver preparation, the path of the Oracle JDBC driver is
%WAS_HOME%\lib\ (Windows) or $WAS_HOME/lib/ (Unix\Linux). WAS_HOME is the installation folder of the WebSphere platform.
4. Save changes to the ORACLE_JDBC_DRIVER_PATH variable in the master configuration.
4.3.2.1.2 Creating a new J2C authentication data entry
1. Click Security > JAAS Configuration in the WebSphere administrative console, then click J2C Authentication Data.
Figure 4.17: New J2C authentication data entry
Fill in details as required in the table below.
Table 4.8: Details for the new authentication data entry
Alias Enter a suitable (short) name, such as "UDDIAlias"
Userid Enter the database user ID used to read and write to the UDDI registry database. Password Enter the password associated with the user ID specified above.
DescriptionEnter a suitable description of the chosen user ID or leave it blank.
3. Click Apply and save changes to the master configuration. 4.3.2.1.3 Creating and configuring a JDBC provider
1. Click Resources | JDBC Providers in the WebSphere administrative console. 2. Click New. The JDBC Providers configuration window opens.
3. Select the correct JDBC provider type. For example, Oracle JDBC Driver.
Figure 4.19: Select JDBC Provider type
4. Select the driver provider and driver file.
Figure 4.20: JDBC driver provider and driver file
The Classpath field displays the path to the JDBC file that is configured in the WebSphere variable, for example, the ORACLE_JDBC_DRIVER_PATH driver.
5. Click OK to return to the JDBC providers page, where the new JDBC driver appears in the list.
6. Save the settings.
4.3.2.1.4 Creating a data source
1. Click Resources > JDBC Providers in the administrative console.
3. Click the Data Sources link under Additional Properties. The Data sources page is displayed.
Figure 4.21: Data source page
4. Click New to display the Data source settings page.
5. Specify the data source name and JNDI name of the data source.
Note:
• The JNDI name specified for the data source will be regarded as the data source name by Appeon Server and AEM.
• If the global security mode is turned on in WebSphere, AEM will not be able to access the WebSphere data sources. Please refer to Section 4.3.2.4, “Required configurations when global security is on” for solutions.
Figure 4.22: Data source properties
6. Select the J2C authentication data entry configured in Creating a new J2C authentication data entry in the Container-managed Authentication Alias list box.
7. Click Apply and OK to return to the Data Sources window. The name of the new data source displays in the window.
8. Click the name of the new data source in the Data Sources window.
9. Click the link to Custom Properties in the Additional Properties of the data source configuration window.
10. Configure all the required fields according to the instructions in the window. For example, set the URL property to jdbc:oracle:thin:@192.0.0.51:1521:testing.
Figure 4.24: Data source URL property
11. Click OK to return to the data source configuration window.
12. Click the Test Connection for the new data source. Make sure the connection is successful before continuing.
13. Save the master configuration.
4.3.2.2 Setting up data source for WebSphere 8.0
The following section will take one database type (Teradata database with Teradata JDBC driver) as an example to show you how to create a data source for WebSphere, you can later create data sources for other database types by taking the same steps below but specifying different parameters according to Data source parameters.
Note:
1. The JNDI name specified for the data source will be regarded as the data source name by Appeon Server and AEM.
2. If the global security mode is turned on in WebSphere, AEM will not be able to access the WebSphere data sources. Please refer to Section 4.3.2.4, “Required configurations when global security is on” for solutions.
4.3.2.2.1 Creating and configuring a JDBC provider
Step 1: Start the WebSphere Server and log on to the WebSphere Server Console. Step 2: Click Resources > JDBC > JDBC providers. In the right pane, select the appropriate scope for the JDBC provider. (This scope becomes the scope of your data source.) You can choose a cell, node, cluster, or server. And then click New.
Figure 4.25: JDBC providers page
Step 3: On the Create new JDBC provider page, enter or select the following information, and then click Next.
Figure 4.26: Create new JDBC provider page
Fill in details as required in the table below. Table 4.9: Create new JDBC provider
Field Description Value
Database type Select the database type of the JDBC provider you need to create from the drop-down list.
Field Description Value Note: If the list of database types does not
include the database type that you want to use, select "User-defined".
Implementation classname
Enter the name of the connection pool driver of the database specified.
com.teradata.jdbc.TeraC onnectionPoolDataSource Name Enter a desired new JDBC provider name. Teradata Driver
Description Enter the description that you like to describe your new JDBC provider.
Teradata Driver
Step 4: On the Enter database class path information page, enter the database class path, and then click Next.
Figure 4.27: Enter database class path information page
Fill in details as required in the table below. Table 4.10: Database class path information
Field Description Value
Class path The full name of the jar files that make up the Teradata JDBC Driver. The example assumes that you have copied these files to the C:\teradatajdbc directory on your system. A path on a Unix machine would use forward slashes to separate its components.
C:\teradatajdbc\terajdbc4.jar C:\teradatajdbc\tdgssconfig.jar
Figure 4.28: Summary page
Step 6: On the JDBC providers page, click Save to commit these changes to the master configuration and have them go live inside of the server.
Figure 4.29: JDBC providers page
Figure 4.30: The newly created JDBC providers page
4.3.2.2.2 Creating the Data Source
Step 1: Start the WebSphere Server and log on to the WebSphere Server Console.
Step 2: Click Resources > JDBC > Data sources. In the right pane, select appropriate scope for the data source. (This scope becomes the scope of your data source.) You can choose a cell, node, cluster, or server. And then click New.
Figure 4.31: Create the Data Source page
Step 3: On the Enter basic data source information page, enter the following information. And then click Next.