The
OS X Mavericks
Guide
Ginormous knowledge, pocket sized.
Peachpit Press
Find us on the web at www.peachpit.com
To report errors, please send a note to [email protected] Peachpit Press is a division of Pearson Education. Copyright © 2014 by Jeff Carlson
Project editor: Clifford Colby Copyeditor: Scout Festa
Production editor: Katerina Malone Compositor: Jeff Carlson
Indexer: Valerie Haynes Perry Cover design: Peachpit Press Interior design: Peachpit Press
Notice of Rights
All rights reserved. No part of this book may be reproduced or transmitted in any form by any means, electronic, mechanical, photocopying, recording, or otherwise, without the prior written permission of the publisher. For information on getting permission for reprints and excerpts, contact [email protected].
Notice of Liability
The information in this book is distributed on an “As Is” basis without warranty. While every precaution has been taken in the preparation of the book, neither the author nor Peachpit shall have any liability to any person or entity with respect to any loss or damage caused or alleged to be caused directly or indirectly by the instructions con-tained in this book or by the computer software and hardware products described in it.
Trademarks
AirDrop, AirPort, Aperture, Apple, Apple TV, FaceTime, Finder, Font/DA Mover, iLife, iMac, iPad, iPhone, iPhoto, iPod, iPod touch, iTunes, iWork, Mac, Macintosh, Mac OS, Mission Control, OS X, Retina, Safari, and Spotlight are trademarks of Apple Inc. Many of the designations used by manufacturers and sellers to distinguish their prod-ucts are claimed as trademarks. Where those designations appear in this book, and Peachpit was aware of a trademark claim, the designations appear as requested by the owner of the trademark. All other product names and services identified throughout this book are used in editorial fashion only and for the benefit of such companies with no intention of infringement of the trademark. No such use, or the use of any trade name, is intended to convey endorsement or other affiliation with this book. ISBN-13: 9780321961136
ISBN-10: 0321961137 9 8 7 6 5 4 3 2 1
You probably have an image in your head of a book writer: holed up in an attic office space, alone, sleep-deprived, heading downstairs occasionally for coffee and sugar and the stray bit of protein. Well, yeah, that’s pretty much true. However, I wasn’t alone. Physically alone at times, but always connected to a fantastic group of people who helped make it possible and who have my thanks:
My editorial team provided every resource I needed: Cliff Colby at Peachpit Press; my copyeditor Scout Festa; my production editor Katerina Malone; and my indexer Valerie Perry.
Several people at Apple have been helpful over this book’s life cycle. Teresa Brewer, Janette Barrios, Colin Smith, Monica Sarkar, Jennie Syme, and Keri Walker answered my questions and provided review equipment for my Seattle Times column, which indirectly aided the creation of this book.
My friends Glenn Fleishman, Andrew Laurence, and Agen G. N. Schmitz let me bounce around ideas at all hours and helped with some technical questions.
Kim Carlson and Eliana Carlson brought me joy (and candy!) as I juggled the roles of husband, father, and author on a tight timeline.
About Jeff Carlson
Jeff Carlson gave up an opportunity to intern at a design firm during college because they really just wanted someone tall to play on their volleyball team. In the intervening years, he’s been a designer and writer, authoring best-selling books on the Macintosh, Web design, video editing, and photography. He’s currently a columnist for the
Seattle Times and a senior editor of the respected electronic newslet-ter TidBITS (www.tidbits.com), and he consumes almost too much coffee. Almost.
Find more information about him at jeffcarlson.com, and follow him on Twitter and App.net at @jeffcarlson.
Introduction
. . . .xv
How to Get Mavericks. . . .xvi
How Big Is Your Pocket?. . . .xvi
Conventions Used in This Book . . . .xvii
Chapter 1: Meet Mavericks
. . . .1
The Pocket Guide Overview of OS X Mavericks. . . .2
I’ve just bought a Mac. What exactly is Mavericks?. . . .2
Why is it called “Mavericks?” . . . .2
What is a user account and why am I creating one?. . . .2
I don’t have Mavericks yet, and I’ve heard that I can’t buy it on disc. How do I upgrade my current Mac? . . . .3
Do I need a trackpad to use Mavericks?. . . .3
Will I be able to run all my old software in Mavericks?. . . .3
What is OS X Mavericks Server?. . . .3
I’m new to the Mac, and the computer is on. Just what am I looking at? . . . .4
The menu bar . . . .4
The Finder and the Desktop. . . .5
Windows . . . .5
The toolbar. . . .8
Scroll bars . . . .8
Be a Finder Neat Freak . . . . 9
The sidebar. . . .9
Helpful Window Shortcuts . . . . 10
Get information about your system . . . .10
Chapter 2: Set Up Mavericks
. . . .11
Before You Upgrade. . . .12
Repairing the Startup Disk . . . .13
Upgrade to Mavericks. . . .14
Installing onto a Clean Slate . . . . 16
Migrate Your Information . . . .16
Migrate from another Mac or from a Windows PC . . . .17
Migrate from a Time Machine backup or other disk. . . .18
Perform the migration. . . .18
Manage User Accounts. . . .20
Set up the first user during installation. . . .20
Manage user settings. . . .21
Password pane. . . .21
Administrator and regular accounts . . . .23
Manage login items. . . .23
Add a login item. . . . 24
Create a new user account. . . .24
Create a “Bare” Account for Testing . . . . 26
Create a Guest User account . . . .27
Set login options. . . .28
Switch between multiple user accounts . . . .29
Log out of a user account . . . .29
Fast user switching . . . .30
Delete an account. . . .31
Run Windows Using Boot Camp . . . .31
Switch between OS X and Windows. . . .32
Chapter 3: Apps, the Dock, and Mission Control
. . . .33
Launch Applications . . . 34
Use Launchpad. . . .34
Organize applications in Launchpad. . . .35
Remove an application from Launchpad. . . .36
Use the Finder . . . .37
Open files using a different application . . . .37
Change a file’s default application . . . .38
Use the Dock . . . .39
Open applications from the Dock. . . .39
Choose which applications appear in the Dock. . . .39
Add an item . . . 39
Contents vii
Access folder contents using Stacks. . . .40
Control how Stacks appears. . . .41
Customize the Dock. . . .43
Dock Shortcut Commands . . . . 44
Minimize windows to the Dock. . . .44
Minimize into application icon . . . .44
Switch Between Applications. . . 45
Show and hide applications . . . .45
Closing Documents vs . Quitting an Application . . . . 46
View Notifications . . . .46
Choose notification styles. . . .48
Share social updates from the Notification Center . . . .48
Use Mission Control. . . .49
Activate Mission Control. . . .49
Configure Mission Control keyboard and mouse shortcuts. . . .50
Expand Your Desktop with Spaces. . . .51
Switch between spaces . . . .51
Run applications full screen . . . .52
Create new desktops. . . .53
Delete a desktop. . . .53
Assign windows and applications to spaces. . . .54
Make an application appear in every space . . . .54
Assign an application to a specific space . . . .55
Place windows in a space . . . .55
Customize space behavior . . . .56
Mavericks Multiple Monitor Improvements . . . . 57
View or hide applications using Exposé . . . .57
Application windows . . . .57
Show Desktop. . . .58
Install Applications. . . .59
Buy from the Mac App Store. . . .59
Download from the Internet. . . .60
Install from a disc. . . .61
Automatically install on other Macs. . . .62
After the installation . . . .62
Stay Safe with Gatekeeper . . . . 63
Update Applications . . . .64
Mac App Store . . . .64
Updaters within applications. . . .65
Chapter 4: Master Your Files
. . . .67
Your Home Folder. . . .68
Move and Copy Files . . . .69
Share Files. . . .70
Delete Files. . . .71
Recover trashed items . . . .71
Empty the Trash . . . .72
Securely empty the Trash . . . .72
Finder Essentials. . . .73
Finder tabs. . . .73
Quick Look . . . 74
Finder tags. . . .76
Add tags in the Finder . . . .76
Add tags when saving files. . . .77
Spring-loaded folders. . . .77
Create an archive . . . .77
Find Files with Spotlight. . . .78
Perform a Spotlight search. . . 78
Search from the Spotlight menu . . . .78
Search within a Finder window . . . .79
Advanced Spotlight Searches . . . . 81
Hide data from Spotlight . . . .81
Smart Folders . . . .82
Chapter 5: Manage Important Information
. . . .83
Synchronize Important Data. . . .84
Sync data using iCloud. . . .84
Contents ix
Edit Internet accounts . . . .87
Contacts. . . .88
Create a new contact. . . .88
Import Contacts . . . .90
Edit a contact . . . .90
Add a new field. . . .90
Data Detectors . . . . 91
Specify your card . . . .92
Organize contacts into groups . . . .92
Smart Groups. . . .93
Delete contacts. . . .94
Calendar . . . .94
Create a new calendar . . . .94
Create a new event . . . .95
Edit an event. . . .96
Invite people to events. . . .96
Review an invitation. . . .97
Share calendars. . . .98
Notes. . . .99
Reminders . . . .100
Create a reminder. . . .100
Create a new reminders list. . . .102
Maps . . . .102 Find yourself. . . .102 Map views . . . .104 Find locations. . . .105 Drop a pin. . . .106 Get directions. . . .107
Send a location to an iOS device . . . .107
Work with Text. . . .108
Disable the Caps Lock Key . . . . 111
Print. . . .111
Add a printer. . . .111
Set print options. . . .113
The Print Queue . . . .114
Print as a PDF . . . .115
Save Documents . . . .116
Duplicate a file. . . .116
Documents in the Cloud . . . .117
Move a document to iCloud. . . .117
Open a document stored in iCloud. . . .118
Chapter 6: Stay in Touch
. . . .119
Connect to the Internet . . . .120
Join a wireless network. . . .121
Mail . . . .122
Create a new Mail account. . . .123
Read messages. . . .124
Compose and send a message . . . .126
Add an attachment. . . .126
Reply to a message. . . .127
File messages in mailboxes. . . .128
Create a new mailbox. . . .128
File a message . . . .128
Smart Mailboxes. . . .129
VIPs . . . .130
Deal with junk mail . . . .130
My Approach to Organizing Email . . . .131
Browse the Web with Safari . . . .132
Access Web sites . . . .132
Tabs and windows . . . .133
iCloud Tabs. . . .134
Bookmarks . . . .134
Shared Links. . . .135
Read without distraction . . . .136
Contents xi
Reading List . . . .137
Download files. . . .138
Messages. . . .139
Set up a Messages account. . . .139
Add buddies . . . 140
Chat via text message . . . .140
Change your status. . . .142
Audio and video chat . . . .142
Control someone else’s screen . . . .143
FaceTime. . . .144
Set up your FaceTime identity . . . .144
Make a FaceTime call . . . .145
Twitter and Facebook. . . .146
Chapter 7: Enjoy Media
. . . .147
Music. . . .148
Import into iTunes. . . .148
Buy from the iTunes Store . . . .149
Play music . . . .149
Play iTunes Radio . . . .150
Share iTunes libraries using Home Sharing . . . .151
iTunes Match . . . .152
Choose a Different iTunes Library Location . . . .153
Digital Photos. . . .154
Import into iPhoto . . . .154
Books. . . .155
Add books to your library. . . .156
Digital Video. . . .158
iMovie . . . .158
QuickTime Player . . . .159
Trim videos. . . .161
Chapter 8: Disks and Networking
. . . .163
Connect a Storage Device . . . .164
External disk drives . . . .164
Memory drives. . . .164
USB Hubbub . . . . 165
Connect a drive . . . .165
Work with a mounted volume. . . .166
Unmount a volume . . . 166
Connect to a Networked Computer . . . .168
Mount a networked volume . . . .168
Unmount a network volume. . . .170
View and Control a Network Computer’s Screen . . . .170
Back to My Mac . . . .171
Share Files from Your Mac . . . .172
Send files using AirDrop . . . .172
Enable file sharing. . . .173
Choose one or more file sharing methods . . . .174
Specify what to share. . . .174
Set who gets access . . . .175
Guest Access . . . . 176
Add users. . . .176
Choose what actions users and groups may perform. . . .177
Dropbox for File Synchronization . . . . 179
Burn a CD or DVD . . . .180
Chapter 9: Back Up Your Data
. . . .181
The Pieces of a Good Backup System. . . .182
My backup system. . . .183
Time Machine. . . .185
Set up Time Machine . . . .185
How Much Storage for Time Machine? . . . . 186
Exclude items from the backup . . . .187
Perform a backup manually . . . .188
Contents xiii
Restore files from a backup . . . .188
Restore an entire drive. . . .190
Make a Duplicate . . . .191
Make a duplicate using SuperDuper. . . .192
The Amazing Hard Disk Toaster . . . . 193
Back Up Files Online . . . 193
Automated backups . . . .194
Back up essential files . . . .194
Access Previous Versions of Files. . . .195
Restore a version. . . .195
Lock a document. . . .196
Chapter 10: Keep Your Mac Secure
. . . .197
Passwords. . . .198
Choose a strong password . . . .198
iCloud Keychain . . . .198
Create a password using Password Assistant . . . .200
Store Secure Data in Your Keychain. . . .201
Save Web site passwords. . . .201
Look up passwords in your keychain . . . .203
Create secure notes . . . .203
Essential Mavericks Utility: 1Password . . . . 205
Encrypt Your Data with FileVault. . . .206
Enable FileVault. . . .206
General Security Precautions . . . .208
Enable the Firewall . . . .208
Activate the firewall . . . .209
Control access to applications . . . .209
Surf Safely. . . .211
Use a modern Web browser and keep it up to date . . . .211
Don’t install unfamiliar software. . . .211
Don’t install custom video-player software . . . .212
Disable the “Open ‘safe’ files” option in Safari . . . .212
Network Safely with Wi-Fi. . . .213
Use a VPN at hot spots. . . .214
Use Wi-Fi encryption . . . .214
Anti-Virus Software . . . . 215
Chapter 11: Troubleshooting
. . . .217
General Troubleshooting . . . .218
Troubleshoot Disk-Related Issues. . . .219
Verify disk structure . . . .219
Repair permissions . . . .220
If an Application Crashes . . . .221
Force quit . . . .221
Delete preferences. . . .222
If You Can’t Connect to the Internet . . . .223
Troubleshoot at Startup. . . .224
Start up from the Recovery OS. . . .224
Other startup modes. . . .225
Support Resources . . . .226
Introduction
A lot has happened since Apple introduced OS X more than a decade ago (then called “Mac OS X”). What started as an incomplete replacement for an established operating system has become not only the backbone of today’s powerful Mac computers, but also the foundation for the iPhone, iPad, iPod touch, and Apple TV. At one point, that was just a novel bit of technology trivia, but OS X Mavericks continues the practice—started with OS X Mountain Lion—of bringing some of the capabilities found in those handheld devices to the desktop.
For example, the Maps and iBooks applications are now available on your Mac and link with their iOS counterparts. iCloud Keychain stores your Web passwords and credit card info to make it easy to access that secure information on any device you’re using. Apple also tweaked
some existing features, adding tabs to Finder windows (at last), keyword tags to files, and—my favorite new feature—the ability for multiple connected displays to act independently.
I’ll admit, that doesn’t sound like a lot, so here’s the best part: Mavericks is akin to OS X Snow Leopard in that it incorporates new under-the-hood technologies that improve overall performance and battery life on portable Macs.
How to Get Mavericks
If you’ve just purchased a new Mac, congratulations! Mavericks is already installed. If you’re currently running Mac OS X 10.6 Snow Leopard or later, you can download Mavericks for free from the Mac App Store; Mavericks is not available on disc (see Chapter 2 for more details).
note Snow Leopard users may get an uncomfortable surprise when
upgrad-ing to Mavericks. Applications that were originally written for PowerPC-based processors will not run at all. With OS X Lion, Apple removed Rosetta, a technology for translating instructions from PowerPC to Intel code. That means any older software you rely on may not make the leap to the new operating system and will require that you purchase new versions or find alter-native programs.
How Big Is Your Pocket?
I don’t cover absolutely every aspect of Mavericks in this book; there’s just too much information for a Pocket Guide (and none of my pockets are large enough to carry a 500-page book). Therefore, I’ve focused on what I believe are the most important—or just plain cool—elements of Mavericks.
Introduction xvii
I’m also making some assumptions: You know how to turn on your computer, operate the mouse or trackpad, and take precautions such as not resting open beverages directly on the keyboard (I mean, balancing a martini on the top edge of your iMac is one thing, but keep it away from the keyboard for heaven’s sake!).
As this isn’t a basic-level guide, I’ll also assume that you know some of the core actions of using a computer in the twenty-first century, such as starting up and shutting down your Mac, accessing menu items (single-click a menu name that appears at the top of the screen to reveal its list of options), and double-clicking an application to launch it.
note Actually, I often see people, even experienced users, confused about
the difference between clicking and double-clicking items, so here’s the deal: Click once to select something (such as a document file); double-click the item to open it.
Conventions Used in This Book
n When I talk about accessing a command from the menus that appear in every program, I separate each component using an angle bracket (>) character. For example, “choose File > Open” means “Click the File menu item, then choose Open from the list that appears.” A succession of commands indicate submenus: “choose View > Arrange By > Name” translates to “click the View menu, then the Arrange By item, and then the Name item in the submenu that appears.”
n When I refer to a “preference pane,” I’m talking about the options found in System Preferences. Choose System Preferences from the Apple () menu, or click its icon in the Dock. To access the “Network preference pane,” for example, open System Preferences and click the Network icon.
n Keyboard shortcuts are expressed with the name of a modifier key and another key that must be pressed at the same time, such as, “Press Command-S to save the file.” However, the Command key has always been a source of confusion: the key often appears with a or symbol. n When I refer to a “gesture,” I’m talking about using finger motions on a
laptop trackpad or Apple’s Magic Trackpad. For example, the gesture to open the Mission Control interface is to swipe upward with three fingers. n In a few places, I refer to more information found in the Mac Help files.
In my years of using and teaching about the Mac, I’ve run across people who are quite adept in some areas, like using a particular program, but lack some core knowledge about how the computer works. It’s as if they missed the first day of a “How to Use Your Mac” class and never caught up with their homework. Ask them to build a spreadsheet in Excel and it’s no problem; ask them to locate that Excel file and they’re utterly lost. It’s not their fault. No one ever said, “Go learn how a hierarchical file-system works.” Instead, they learned how to accomplish a specific task— build a spreadsheet, enhance a photo, read email. And in most cases, those tasks involve files. Files are the foundation of working within OS X, and you can make them work to your advantage.
Master Your Files
The OS X Mavericks Pocket Guide
68
Your Home Folder
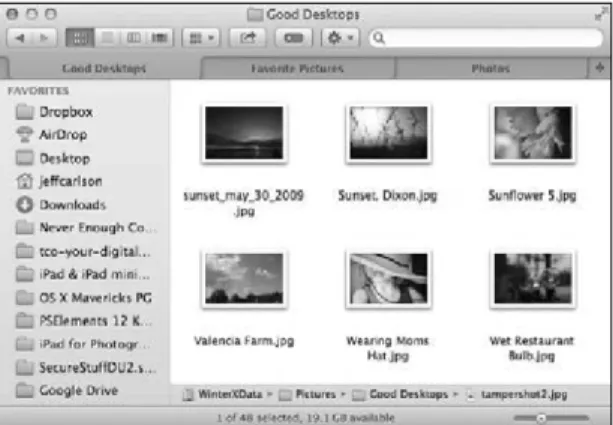
OS X is filled with files and folders, but you can ignore most of them. In fact, Apple recommends you not explore the System folder and other areas that contain crucial system files. Instead, OS X gives every user account a Home folder for storing personal files (Figure 4.1).
Figure 4.1 Your Home folder in the Finder
Access the Home folder in the Finder by creating a new window (choose File > New Finder Window, or press Command-N) or by choosing Go > Home (Command-Shift-H). You can also click your account name in the sidebar of any Finder window.
tip The Arrangement button (enables you to arrange the files by criteria such as date modified or ) in the toolbar of every Finder window size, or to group by application.
tip Longtime OS X users may notice something missing in Figure 4.1: the Library folder. Apple chose to hide the Library folder, presumably to prevent people from accidentally editing or deleting important files used by the operating system. The folder isn’t gone, though. To access it, hold Option and click the Go menu in the Finder—Library shows up in the list.
Aside from that exception, the Home folder is yours to use. Feel free to create new folders (choose File > New Folder, or press Command-Shift-N) or stash other files here; it all depends on your level of organizational tolerance. (I like to stick to the basics and avoid clutter—a huge surprise considering the disheveled state of the physical desk in my office.)
tip Don’t rename or move the folders in your Home folder. Many applica-tions (especially Apple’s) store files there. For example, iTunes keeps your music library in a subfolder within the Music folder; if you move it, you could lose track of your songs and videos. (However, you can choose to relocate the iTunes library; see Chapter 7 for details.)
Move and Copy Files
Although the Home folder offers locations for common file types, you can store files and folders nearly anywhere. Getting them there is easy.
1. Open two new windows: one containing the item you want to move or copy, and one for the location where you want the file to end up.
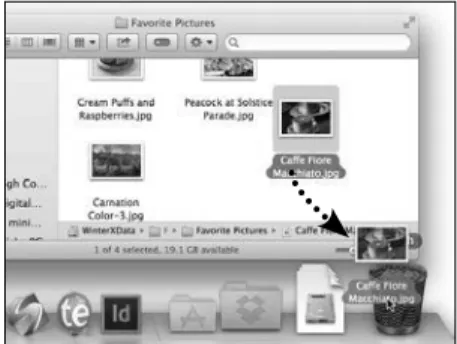
2. To move a file, click and hold the mouse button, then drag the file to a new destination.
To copy a file to the destination, hold the Option key as you drag; a plus sign (+) icon appears on the cursor to indicate a copy is being made (Figure 4.2, on the next page).
3. Release the mouse button to complete the move.
tip If you drag a file between two volumes (such as between two hard disks, or to a hard disk from a networked computer), the file is auto-matically copied. You can move the file instead, deleting the original copy, by holding Command as you drag.
The OS X Mavericks Pocket Guide
70
Copy icon
Figure 4.2 Copying a file
tip Another way to copy a file is to select it and choose Edit > Copy. Switch to the destination and then choose Edit > Paste Item.
Share Files
In Mavericks, the Share button in every Finder window gives you the opportunity to act on one or more files without leaving the window. With a file selected, click the Share button to reveal a menu of options (Figure 4.3).
Figure 4.3 The Share menu
The options change depending on the file; for example, the Twitter and Flickr options do not appear if you choose to share a spreadsheet.
Delete Files
Discarded files go to the Trash, which, unlike other folders in the Finder, exists on the Dock. Here’s how to delete something.
1. Select the offending item.
2. Drag it to the Trash icon in the Dock (Figure 4.4).
tip That said, I almost never drag anything to the Trash. It’s much easier to select an item and press Command-Delete to send it to the bin. Figure 4.4
Dragging a file to the Trash
Recover trashed items
If you need to pull something out of the Trash, simply click the Trash icon to display its contents in a new window, and then move the file out. Or, you can select the item in the Trash window and choose Put Back from the File menu or the contextual menu.
The OS X Mavericks Pocket Guide
72
Empty the Trash
Although you may have thrown something in the Trash, the item still takes up space on your hard disk. If you’re certain you don’t need the bits in the bin, empty the Trash in one of the following ways.
n Choose Finder > Empty Trash. OS X will ask you to verify that you really want to do it; click the Empty Trash button.
n Open the Trash and click the Empty button in the upper-right corner of the window.
n Control-click or right-click the Trash icon and choose Empty Trash from the contextual menu that appears.
n Press Command-Shift-Delete in the Finder.
tip If you’re using Time Machine to back up your data, you can easily recover items you’ve accidentally deleted. See Chapter 9.
Securely empty the Trash
Even after you’ve emptied the Trash, the files you deleted are still read-able to file-recovery software. (On the disk, files are only marked as deleted, freeing up their space to be overwritten later.) To ensure that no one can recover the files, securely empty the Trash by choosing Finder > Secure Empty Trash. OS X replaces the files on disk by writing random data to their locations.
tip To empty the Trash without being asked to confirm your action, hold Option when you choose Finder > Empty Trash, or press Command-Option-Shift-Delete.
Finder Essentials
The following features have one thing in common: When they were first introduced, I thought they were just eye candy or of limited real use. Boy was I wrong—I now use them all the time.
Finder tabs
Instead of switching between lots of overlapping windows, I now view most of my Finder windows the same way I view Web pages in Safari: in tabs (Figure 4.5). I typically open a window for each active project and create tabs in them for the folders I need to access. In addition to reduc-ing clutter, Finder tabs let you sensibly run the Finder full-screen if you just don’t want to see the Desktop. To create a new Finder tab, do any of the following:
n In a Finder window, press Command-T or choose File > New Tab. n Hold Command and double-click a folder.
n With a folder selected, right-click or Control-click it and choose Open in New Tab from the contextual menu.
Figure 4.5 Finder tabs
The OS X Mavericks Pocket Guide
74
To close a tab, click the Close (x) button that appears when you move your pointer over the tab. You can also drag a tab out of the window to turn it into its own window.
Aside from their placement, Finder tabs act just like regular windows. One small difference is in moving or copying items between tabs: Drag the item to the tab’s title.
tip Switch between open Finder tabs using the keyboard by pressing Control-Tab (or Shift-Control-Tab to go to the previous tab).
Quick Look
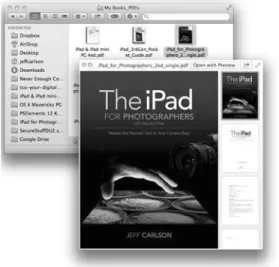
Select a file in the Finder and press the spacebar. A new window appears with a preview of the file’s contents, so you don’t need to open the file to tell what it is (Figure 4.6). You can view photos, video, audio clips, PDF files, Microsoft Word documents, Keynote presentations, and more. The Quick Look preview floats above your other windows—you can select other items to preview them without closing the Quick Look window.
Figure 4.6 A Quick Look view of a PDF file
tip Download Quick Look plug-ins that extend the feature to viewing the contents of folders, archives, and file formats not included in OS X at www.quicklookplugins.com.
A Quick Look window also offers more options (Figure 4.7).
Figure 4.7 Quick Look options
Previous/Next Index Sheet Open with… Share Full Screen
n When multiple files are selected, use the arrows (or arrow keys) to move between them.
n Click the Index Sheet button to view all the files in a grid.
n Click the “Open with” button to launch the suggested application. Or, right-click the button to view a list of other compatible programs; the list can also include actions, such as “Add to iPhoto” for images. n Click the Share button to share the current image via email, Messages,
AirDrop, or photo sites.
n Click the diagonal arrow icon to present the content full-screen. In Full Screen mode, a few other options appear (Figure 4.8).
Figure 4.8 Quick Look full-screen options
Previous Index Close
Sheet Next Add to
iPhoto
Play Exit Full
Screen
n When more than one item is selected for Quick Look, click the Play button to start playing a slideshow of the items.
The OS X Mavericks Pocket Guide
76
n If you’re viewing an image, click the Add to iPhoto button to add the photo to your iPhoto library.
n Click the Exit Full Screen button or press the Esc key to go back to the Quick Look window.
tip Note that the Quick Look full-screen mode doesn’t put the content into its own space, as when you take an application full screen.
Finder tags
Mavericks introduces Finder tags, a new way to organize and locate files. If you’re accustomed to adding hashtags to Twitter posts or to blog posts, Finder tags will be instantly familiar. A tag is just a word or phrase describing something, in this case files and folders. Tags make it easier to find items in searches, and also co-opt the former Finder labels feature of older versions of OS X.
Add tags in the Finder
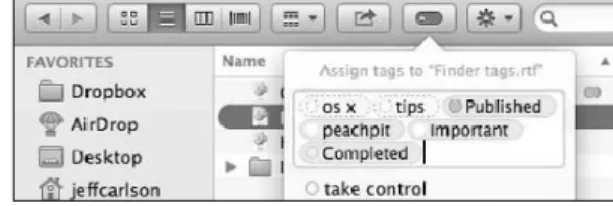
Select one or more files or folders in the Finder, and click the Edit Tags button in the toolbar. In the popover that appears, type the tags you want to assign, or choose from the list that appears (Figure 4.9). Any terms you type that aren’t already defined appear with dotted outlines and get added to the system after you assign them.
Figure 4.9 Add tags in the Finder.
When you use a colored tag, it’s indicated by a colored circle to the left of the filename in the Finder’s icon view or to the right of the filename
in list view. You can apply colors to only seven terms (red, orange, yellow, green, blue, purple, and gray), which can be configured in the Finder’s settings (choose Finder > Preferences).
Add tags when saving files
When you save a file in any application, Mavericks includes a Tags field. Type terms into the field, or choose from the list that appears, to assign them to the file.
Spring-loaded folders
When you’re copying or moving a file or folder, you must do a little bit of prep work by making sure the source and the target are both in visible windows or tabs. Spring-loaded folders enable you to grab an item and move it to a folder that may not be visible.
Drag the item onto the top of a folder (or the title of a Finder tab), wait a moment, and that folder opens automatically. You can keep exploring in this way until you find the intended destination folder. If you opened the wrong folder, move the item (all the while keeping the mouse button pressed) out of the window that sprang open.
A similar effect works with open windows, too. If just a corner of a window is peeking out among dozens of open windows on your screen, that’s fine: Drag the file or folder to that window corner to bring the window forward, where you can drop the item to move it.
Create an archive
When you need to send several files to someone over the Internet, it’s best to wrap them up into a single package that gets transmitted. Select the files and choose File > Compress (number of items) (or right-click and choose the same item from a contextual menu). OS X makes copies and stores them in a .zip archive file.
The OS X Mavericks Pocket Guide
78
Find Files with Spotlight
Spotlight is wired deep into OS X and is used by applications such as Mail and the built-in Help system. Whenever you save a change to a document, Spotlight updates its index in the background. You don’t need to do anything to activate Spotlight; it’s just there. Occasionally you may notice the Spotlight icon (in the right corner of the menu bar) displaying a pulsating dot, which indicates that Spotlight is indexing new material.
Perform a Spotlight search
There are two entry points for Spotlight in the Finder: the Spotlight icon on the menu bar (which is available in all applications) and the Search field in a window’s toolbar.
Search from the Spotlight menu
The idea behind Spotlight is that it’s quick and unobtrusive. The Spotlight icon in the menu bar is my first stop for searching.
1. Click the Spotlight icon or press Command-spacebar.
2. Start typing what you’re looking for. Spotlight begins to display results as you type.
3. If you see what you’re looking for, click its name to open it (or use the arrow keys to select it and press Return). The Top Hit is always auto-matically selected, so you can often just start typing and press Return to jump to the item.
If you don’t spot a match, click or select Show All in Finder to view the results in a Finder window (see the next section).
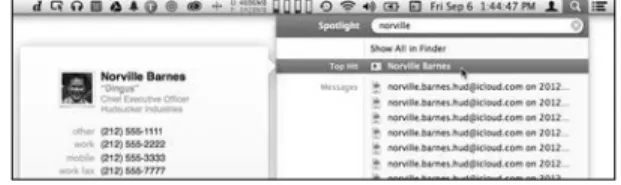
tip Hover the pointer over an item in the Spotlight results list to view a Quick Look preview of the item (Figure 4.10). You can even watch videos by clicking the Play button that appears in the middle of the preview. Figure 4.10
A Spotlight search from the menu bar
tip Need to make a quick calculation? Enter it in the Spotlight menu, using an asterisk ( * ) to multiply and a forward-slash ( / ) for division. So typing “52*45” reveals the answer (2340) within the search results—you don’t even need to launch the Calculator application.
tip At the bottom of the Spotlight menu, you’ll find Search Web and Search Wikipedia items; select one to expand the search beyond your computer.
Search within a Finder window
Performing a search within a Finder window gives you more options— and more results—than the menu bar.
1. In any Finder window, enter your search term in the Search field. Or, choose File > Find to activate the Search field in the active window (or to open a new window if one wasn’t already open). As with the menu bar, results begin to appear as soon as you start typing.
2. Narrow your search, if necessary, by specifying additional search criteria (Figure 4.11, on the next page. Click This Mac to search the entire computer; click “folder name” to limit the search to just the active folder; or click Shared to scan shared disks and connected network volumes.
The OS X Mavericks Pocket Guide 80 Figure 4.11 A Spotlight search in a Finder window
Normally a search looks through the contents of all indexable files on your computer, but you can limit the query to just file and folder names by choosing the “Filename contains” item from the menu that appears as you type.
3. To further narrow the search, click the plus sign (+) icon on the search bar to apply additional criteria (Figure 4.12).
Figure 4.12 Use search criteria to narrow the list.
tip The criteria pop-up menu includes a tantalizing Other item that’s worth exploring. Choosing it brings up a window with all sorts of criteria, such as fonts used in a document, specific camera settings for images, and much more. Enable the In Menu checkbox for any item you use frequently. tip If you find yourself frequently changing the search location, you can set a different default. Choose Finder > Preferences and click the Advanced button in the Finder Preferences window. Select an option from the pop-up menu labeled “When performing a search”: Search This Mac, Search the Current Folder, or Use the Previous Search Scope.
Hide data from Spotlight
Spotlight builds its index from everything on your hard disk, but you may want to exclude data such as personal correspondence or financial documents from casual searches. Or, you may have a secondary hard disk being used as a scratch disk to shuttle temporary files for an application like Photoshop or Final Cut Pro.
1. Open the Spotlight preference pane in System Preferences.
2. Click the Privacy button.
3. Drag the folder or hard disk to the list area. Or, click the Add (+) button below the list and locate the item to exclude.
tip Too many results? In the Spotlight preference pane, click the Search Results button and deselect any categories you want to hide when you perform searches. For example, you may not want to include Fonts or Web pages.
Advanced Spotlight Searches
Spotlight is capable of performing advanced searches, if you know what to enter. Here’s a taste of some possibilities; more information can be found in Apple’s Mac Help on your computer.
n Include exact phrases in quotation marks (“jeff carlson”). n Use Boolean operators to combine search terms. Spotlight
recog-nizes AND, OR, NOT, and a minus sign (–), which means AND NOT (Jeff NOT Geoff).
n Specify metadata (such as “kind:images”); Mac Help includes a list
The OS X Mavericks Pocket Guide
82
Smart Folders
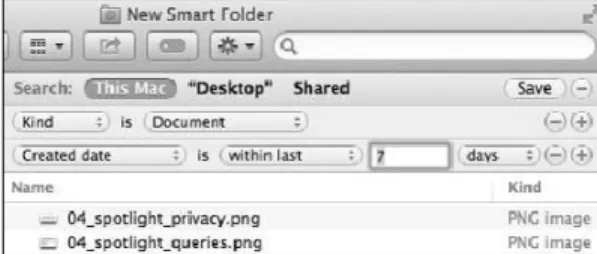
Here’s where you can really get productive. Not only can you perform searches using multiple criteria, but that search can be saved as a Smart Folder whose contents are updated depending on the search. For exam-ple, here’s how to set up a Smart Folder that displays documents created in the last week (Figure 4.13).
Figure 4.13 Creating a Smart Folder
1. Choose File > New Smart Folder to open a new Finder window with the search criteria enabled.
2. Click the plus sign (+) to add a new attribute.
3. Set the Kind attribute to Document.
4. Click the plus sign (+) again.
5. Set that attribute’s first pop-up menu to “Created date,” and specify that it is within the last 7 days.
6. Click the Save button to save the Smart Folder. Give it a name (and, optionally, a location if you want it somewhere other than Mavericks’ Saved Searches folder). Make sure the Add To Sidebar checkbox is selected if you want it to appear in the sidebar.
No documents are actually stored in a Smart Folder. Instead, it acts as a portal that filters just the files you want to see, updated live.
Index
1Password utility, features of, 205
A
AAC (Advanced Audio Coding) format, 148
About This Mac option, choosing, 10 accounts. See administrator
account; Guest User accounts; user accounts
administrator account, converting to user account, 26
Administrators option, choosing for sharing, 175
Adobe’s Flash software, 136 AFP (Apple Filing Protocol) file
sharing, 174
AirDrop, using to send files, 172–173 AirPlay
in iTunes, 162 mirroring enabled, 162 alerts, turning off, 48 anti-static protective cases,
buying, 193
anti-virus software, using, 215 App Store
buying from, 59–60 updating applications, 64–65 upgrades, 14
Apple Consultants Network Web site, 226
Apple retail stores Web site, 226 Apple Support Web sites, 226 AppleCare, considering, 227 application crashes, Force Quit
option, 221–222
applications. See also files; Mission Control; programs
assigning to spaces, 54–55 buying from App Store, 59–60 changing defaults, 38 displaying in spaces, 54 downloading from Internet, 60–61 finding, 37 hiding, 45–46
launching with Finder, 37 launching with Launchpad, 34–38 opening files from, 37–38 opening from Dock, 39 quitting, 46
running full screen, 52–53 showing, 45–46
archives, creating, 77 attachments, adding, 126–127 audio chat, starting in
Messages, 142–143 audio clips, viewing, 74–75 authentication, using with
email, 123
B
Back to My Mac, 171 backing up
data prior to synchronizing, 84 Macs, 12
backup systems. See also online backups; Time Machine backups automatic backups, 182 bootable duplicate, 183–184 example, 183–184 offsite backup, 183 on-the-spot backups, 183 Time Machine, 182–183 versioned backups, 183 bandwidth, checking prior to
upgrades, 13 banners, turning off, 48 BBEdit, using, 55–56 books
adding to libraries, 156–157 reading, 155–157
Boolean operators, using in Spotlight, 81
Boot Camp
Assistant software, 31–32 using to run Windows, 31–32 browsers, keeping up to date, 211 burning
CDs, 180 DVDs, 180
C
calculation, making quickly, 79 calendars
changing colors of, 95 creating, 94–95 events, 95–96 sharing, 98–99 view controls, 95 Caps Lock key, disabling, 111 Carbon Copy Cloner Web site, 191 CDs
burning, 180 starting up from, 225
Index 231
chatting via text messages, 140–142 ClickToFlash Safari extension, 136 Cloak VPN connection, “renting,” 214 closing
documents, 46 Finder tabs, 74 Cloud, documents in, 117 Cobook, 94
Colors window, accessing, 108 Command key. See keyboard
shortcuts
Compress option, accessing, 77 computer, restarting, 218 connecting to networked computers, 168 storage devices, 164–167 contacts adding fields, 90–91 applying changes, 89 changing field labels, 89 creating, 88–90 creating groups, 92–94 data detection, 91 deleting, 94 deleting fields, 89 editing, 90–92
entering phone numbers, 90 importing, 90
printing options, 91 selecting images, 89 Smart Groups, 93–94 specifying cards, 92
support for social networks, 91 “user name” field, 89
Control key. See keyboard shortcuts copying files, 69–70
crashing applications, Force Quit option, 221–222
CrashPlan online backup service, 194
D data backing up prior to synchronizing, 84 encrypting with FileVault, 206–208 synchronizing, 84–87 deleting
applications from Launchpad, 36 contacts, 94
desktops, 53 files, 71–72
items from Dock, 40 preferences, 222–223 Desktop. See also spaces
described, 5 identifying, 4 desktops creating, 53 deleting, 53 dictation, starting, 110 dictionary, using, 109 digital photos
importing into iPhoto, 154–155 viewing, 74–75 digital video editing, 158–159 iMovie, 158–159 QuickTime Player, 159–161 viewing, 74–75
directory corruption issues, checking for, 12–13
disk drives, external, 164. See also hard disks
disk failures, occurrence of, 182 disk image, mounting, 61 disk structure, verifying, 219–220 Disk Utility
attempting ejection, 167 encrypted disk images, 208 repair process, 13
using with storage devices, 167 verifying disk structure, 219 disks, ejecting at startup, 225 division, performing in Spotlight, 79 .dmg file extension, 60
Dock
accessing items in, 40 adding items to, 39–40 choosing applications, 39–40 customizing, 43
described, 39 dragging folders to, 41 hiding option, 43 locating, 4, 39
magnification option, 43 minimizing windows, 44 moving project files to, 40 opening applications, 39 position options, 43 removing items, 40 resizing, 43
shortcut commands, 44 documents. See also files
closing, 46 in Cloud, 117 locking, 196 moving to iCloud, 117 opening stored in iCloud, 118
printing, 113–114 saving, 116–118 viewing, 49
DoorStop X Firewall Web site, 209 drives. See also hard drives
connecting, 164 restoring, 190–191 DriveSavers Web site, 182 Dropbox, using for file
synchronization, 179 duplication programs
Carbon Copy Cloner, 191–192 SuperDuper, 191–192 DVDs burning, 180 starting up from, 225 E ebooks, reading, 155–157 Eject option, accessing, 62 email. See Mail email application email messages. See messages encrypted disk image, creating, 208 encrypting data with
FileVault, 206–208
encryption, using with Wi-Fi, 214–215 Engst, Adam, 218
EV (Extended Validation)
certificates, looking for, 212–213 events
creating in calendars, 95–96 describing in calendars, 96 displaying details of, 96 editing, 96
inviting people to, 96–98 reviewing invitations, 97–98
Index 233
Everyone option, choosing for sharing, 175 Exposé application windows, 57–58 show desktop, 58 extended warranties, considering, 227 external disk drives
connecting, 164, 186
using with Time Machine, 186
F
Facebook, support for, 146 FaceTime
controls, 145 identity setup, 144 making calls, 145 rotating window, 145 fast user switching, 30 file extensions
.dmg, 60 .hqx, 60 .zip, 60
file sharing. See also sharing AFP (Apple Filing Protocol), 174 enabling, 173–174
SMB (Samba), 174 file synchronization, using
Dropbox for, 179 files. See also applications;
documents; project files accessing versions of, 195–196 backing up online, 193–194 changing default applications, 38 deleting, 71–72
dragging between volumes, 69 duplicating, 116
finding with Spotlight, 78–82 moving, 69–70
opening, 38
opening from applications, 37–38 opening in iCloud, 118
organizing and locating, 76–77 sending using AirDrop, 172–173 sharing, 70
sharing from Macs, 172–178 FileVault
administrator password, 207 enabling, 206–207
encrypting data with, 206–208 recovery key, 207
turning off, 12
Finder, launching applications, 37. See also Spotlight
Finder tabs closing, 74 creating, 73–74 switching between, 74 Finder tags, using, 76–77 Finder window
Arrangement button, 68 features, 5
following folder structure, 7 locating, 4
Preferences options, 7 searching in, 79–80 firewalls
activating, 209 allow signed option, 210 applications, 210 blocking incoming
connections, 210 controlling application
firewalls, continued DoorStop X Firewall, 209 explained, 208 Little Snitch, 209 service settings, 210 stealth mode, 210 Flash software, 136
folder contents, accessing with Stacks, 40–43
folder structure, following in Finder, 7
folders. See also Home folder; Smart Folders creating, 69 dragging to Dock, 41 navigating hierarchies, 10 opening, 10 spring-loaded, 77 Fonts window, accessing, 108 Force Quit option, using with
applications, 221–222 forwarding messages, 128 full-screen mode accessing, 52–53 exiting, 52–53 G Gatekeeper sentry Anywhere option, 63 features, 63
Mac App Store options, 63 gestures, support for, 3
Gmail accounts, using Mail with, 124 Google Chrome, using, 133, 136 grammar, checking in
documents, 109
Guest option
choosing for sharing, 176 using with networked
volumes, 169 Guest User accounts
creating, 27 parental controls, 27
H
hard disks. See also disk drives anti-static protective cases, 193 making duplicates, 191 “toasters,” 193 verifying, 12–13 wiping out, 16 hard drives. See also drives
connecting, 164 mounting, 166 hiding applications, 45–46 Home folder. See also folders
accessing, 68
managing folders in, 69 Home Sharing iTunes
libraries, 151–152 .hqx file extension, 60 I iBooks creating citations, 157 customizing appearance, 156–157 downloading books from, 156 highlighting text, 157 Show Notes button, 157 iCloud
moving documents to, 117 opening documents stored in, 118 Photo Stream, 155
Index 235
preference pane, 85 storage management, 85 synchronizing data, 84–85 iCloud Keychain, using with
passwords, 198–199 icon size slider, locating, 5 icons
aligning to grid, 9 positioning, 9 resizing, 7
Image Capture, importing photos with, 155
IMAP (Internet Message Access Protocol), 123 iMessage service, 139–140 iMovie editing video, 158–159 importing clips, 159 importing contacts, 90 into iTunes, 148
photos into iPhoto, 154–155 photos with Image Capture, 155 installation, ejection after, 62 installation methods
drag and drop, 62 installer program, 62 installer copying, 14–15 locating, 14 installing applications, 59–62 from discs, 61–62 on Macs automatically, 62 Internet connecting to, 120–122 location-based profiles, 121
Network preference pane, 120 viewing network information, 122 wireless networks, 121–122 Internet accounts editing, 87 setting up, 86–87 Internet connection, troubleshooting, 223–224 invitations, reviewing, 97–98 iPhoto, importing photos into,
154–155
ISPs (Internet Service Providers), 120 iTunes importing into, 148 media library, 153 iTunes libraries relocating, 153 sharing, 151–152
working with multiple, 153 iTunes Match service
cost, 152
improving music quality, 153 subscribing, 152
iTunes Radio, playing, 150–151 iTunes Store, buying music from, 149
J
junk mail, dealing with, 130–131
K
keyboard shortcuts
Add Bookmark Folder, 135 Attach Files, 126–127 Dock, 44
duplicating files, 116 Exposé windows, 57 filing messages, 129
keyboard shortcuts, continued Finder tabs, 74
Forward message, 128 Get Info in Calendar, 95 Home folder, 68 Mark as Junk Mail, 130 networked volumes, 168 New Event in Calendar, 95 New Message, 126 opening files in iCloud, 118 Print Queue, 114
Reply All button, 127 Show All Tabs, 133 show desktop in Exposé, 58 tabs in Safari, 133
window rotation in FaceTime, 145 Keychain Access application
launching, 200 secure notes, 203–204 using with passwords, 198–199 keychains
looking up passwords in, 203 storing secure data in, 201–205 Kissell, Joe, 124, 184 Klieme, Stefan, 171 L Launchpad creating folders, 35–36 exiting, 35 moving icons, 35 organizing applications, 35–36 removing applications, 36 switching screens, 35 using, 34 Web site, 38 Library folder accessing, 68 hiding, 68
Little Snitch Web site, 209 locking documents, 196 logging out of user accounts, 29 login items adding, 24 disabling at startup, 226 managing, 23–24 removing, 24 login options automatic, 28 password hints, 29 Restart button, 28 setting, 28–29 Shut Down button, 28 Sleep button, 28 login window
displaying items in, 28 input menu, 28 installed languages, 28
M
Mac App Store buying from, 59–60 updating applications, 64–65 upgrades, 14
Macs, backing up, 12 Mail email application
creating accounts, 123–124 IMAP (Internet Message Access
Protocol), 123
POP (Post Office Protocol), 123 reading messages, 124–125 Use Authentication option, 123 using with Gmail accounts, 124
Index 237
mailboxes creating, 128
filing messages in, 128–129 Smart Mailboxes, 129 Maps application
3D button, 104
Current Location button, 102 dropping pins, 106
finding locations, 105–106 Flyover mode, 104–105 getting directions, 107 locations to iOS devices, 107 navigating, 103
pins for search results, 105 repositioning, 103 rotating, 103 views, 104–105 zooming, 103
math, performing in Spotlight, 79 Mavericks. See OS X Mavericks Mavericks, online-only
distribution, 16
media library, locating in iTunes, 153 memory drives, connecting, 164 menu bar features, 4 locating, 4 messages adding attachments, 126–127 composing, 126–127 filing in mailboxes, 128–130 forwarding, 128 junk mail, 130–131 organizing, 131 prioritizing, 130 reading in Mail, 124–125 replying to, 127–128 sending, 124–125
VIPs (very important persons), 130 Messages application
account setup, 139–140 adding buddies, 140 audio chat, 142–143 changing status, 142 chatting via text
messages, 140–142 controlling others’
screens, 143–144 using to text friends, 139 video chat, 142–143
metadata, specifying in Spotlight, 81 Microsoft Word documents,
viewing, 74–75 migration
after completion of, 19 choosing data for, 19 performing, 18–19 Migration Assistant
downloading for Windows, 17 features, 17
launching, 17 from Macs, 17–18
from Time Machine backup, 18 from Windows PCs, 17–18 mirroring, 162
Mission Control. See also applications activating, 49–50 displaying spaces in, 52 exiting, 49
keyboard configuration, 50–51 mouse shortcuts, 50–51 Quick Look view, 49–50 monitors, using multiple, 57
mounted volumes, using, 166 mounting networked volumes, 168–170 moving files, 69–70 multiplication, performing in Spotlight, 79 music
AAC (Advanced Audio Coding) format, 148
adding to Up Next, 150 buying from iTunes Store, 149 changing formats, 148 importing into iTunes, 148 playing, 149–150
music quality, improving, 153
N
network computer screens. See also screen controlling, 170–171 viewing, 170–171
network information, viewing, 122 Network preference pane,
accessing, 120 network volumes
amount of storage, 186 using with Time Machine, 186 networked volumes mounting, 168–170 unmounting, 170 networking terms DHCP (Dynamic Host Configuration Protocol), 121 NAT (Network Address
Translation), 121 NewerTech Voyager toaster, 193
No Access option, using for sharing, 178
Notes application. See also secure notes
creating folders, 100 using, 99–100
Notification Center, sharing social updates from, 48
notifications, viewing, 46–48
O
online backups. See also backup systems; Time Machine backups automated, 194 CrashPlan service, 194 essential files, 194 services, 194 opening
applications from Dock, 39 files, 38
files in iCloud, 118
Option key. See keyboard shortcuts OS X interface
Desktop, 4 dock, 4
Finder window, 4 menu bar, 4
OS X Mavericks. See also upgrading to Mavericks
explained, 2 naming, 2
switching between Windows, 32 user account, 2–3
Index 239
P
Parallels Desktop Web site, 32 parental controls, applying to Guest
User account, 27
Password Assistant, using, 200–201 password hints, showing at login, 29 Password pane
Change Password button, 21 changing name, 22 changing pictures, 22 entering Apple ID, 22 picture field, 22 password requirements
after screen saver begins, 208 after sleep, 208 passwords 1Password utility, 205 changing, 201 choosing strong, 198 iCloud Keychain, 198–199 looking up, 199 looking up in keychains, 203 saving for Web sites, 202 path bar, displaying, 7 PDF files
printing as, 115 viewing, 74–75 permissions, repairing, 220 Photo Stream, features of, 155 photos
importing into iPhoto, 154–155 viewing, 74–75
phrases, searching in Spotlight, 81 pins
removing, 106 using with maps, 106
POP (Post Office Protocol), 123 preferences, deleting, 222–223 print options Layout, 114 Paper Feed, 114 setting, 113–114 Print Queue
adding print jobs to, 114 showing completed jobs, 114 printer
adding, 111–112
connecting via SMB/CIFS, 112 driver software, 112
IP button, 112 printing
documents, 113–114 as PDFs, 115
programs, accessing quickly, 40. See also applications project files, moving to Dock, 40.
See also files
Q
Quick Look view
downloading plug-ins, 75 Index Sheet button, 75 options, 75
using, 74–76 QuickTime Player
adding silent portions, 161 extended capability, 161 playback controls, 160–161 playing video files, 160 trimming videos, 161 quitting applications, 46
R
Read & Write option, using for sharing, 178
Read Only option, using for sharing, 178
Reading List feature, using in Safari, 137–138
Recovery OS, starting up from, 224–225 reminders
creating, 100–101 editing details, 101 natural language input, 101 reminders list, creating, 102 removing
applications from Launchpad, 36 contacts, 94
desktops, 53 files, 71–72
items from Dock, 40 preferences, 222–223 resizing Dock, 43
Restart button, showing at login, 28 restarting computer, 218
restoring drives, 190–191
files from backups, 188–190 versions of files, 195–196
S
Safari. See also Web sites Back/Next button, 132 bookmarks, 134–135 Bookmarks bar, 132 ClickToFlash extension, 136 disabling “Open ‘safe’ files,” 212 downloading files, 138 extending functionality, 138 Google search, 132 iCloud Keychain, 198–199 iCloud tabs, 134 looking up passwords, 199 Merge All Windows option, 133 navigating, 132–133
pages in tabs, 132 Reader button, 136
Reading List feature, 137–138 Reload Page button, 132 reopening windows, 134 Share button, 132 Shared Links feature, 135 Show All Tabs option, 133 Smart Search, 132 tabs, 133–134 Top Sites page, 133 windows, 133–134
“safe downloads list,” consulting, 212 Save Password option, using, 202 saving documents, 116–118 screen. See also network computer
screens
extending using AirPlay, 162 sharing, 171
ScreenSharingMenulet, 171 scroll bars, displaying, 8–9 scroll direction, changing, 8 searching
in Finder window, 79–80 from Spotlight menu, 78–79 secure data, storing in
keychains, 201–205 secure notes. See also Notes
application creating, 203–204
Index 241
retrieving contents of, 204 secure sites EV (Extended Validation) certificates, 212–213 identifying, 212–213 security anti-virus software, 215 disabling “Open ‘safe’ files,” 212 FileVault data
encryption, 206–207 firewall, 208–210
networking with Wi-Fi, 213–215 passwords, 198–201
“safe downloads list,” 212 software installation, 211–212 Web surfing, 211–213 security updates, applying, 208 sharing. See also file sharing
access permissions, 177–178 adding users, 176–177 Administrators option, 175 calendars, 98–99 Everyone option, 175 files, 70
files from Macs, 172–178 Guest option, 176 iTunes libraries, 151–152 No Access, 178
Read & Write option, 178 Read Only option, 178 screens, 171
setting access, 175–176 specifying items for, 174–175 Wake for network access, 178 Write Only option (Drop Box), 178 Sharing preference pane,
opening, 173–174
shortcut keys
Add Bookmark Folder, 135 Attach Files, 126–127 Dock, 44 duplicating files, 116 Exposé windows, 57 filing messages, 129 Finder tabs, 74 Forward message, 128 Get Info in Calendar, 95 Home folder, 68 Mark as Junk Mail, 130 networked volumes, 168 New Event in Calendar, 95 New Message, 126 opening files in iCloud, 118 Print Queue, 114
Reply All button, 127 Show All Tabs, 133 show desktop in Exposé, 58 tabs in Safari, 133
window rotation in FaceTime, 145 Shut Down button, showing at
login, 28 sidebar
adding items to, 9 locating, 5
removing items from, 9 shortcuts in, 9
single-user mode, starting up in, 226 Sleep button, showing at login, 28 Smart Folders, creating, 82. See also
folders Smart Mailboxes
creating, 129 referencing, 129 using, 131
Smart Mailboxes, continued for VIPs (very important
persons), 130 SMB (Samba) file sharing, 174 software, running in Mavericks, 3 software installation, security
concerns, 211–212 Software Update feature
controlling, 65 using, 12
spaces. See also Desktop
assigning applications to, 54–55 assigning windows to, 54–55 creating desktops, 53 displaying applications in, 54 displaying in Mission Control, 52 grouping windows, 56
rearranging, 56 separating displays, 56 switching between, 51–52 SpamSieve utility, downloading, 131 spell-checking documents, 109 Spotlight. See also Finder
advanced searches, 81 Boolean operators, 81 exact phrases, 81 finding files with, 78–82 hiding data from, 81 Search Results button, 81 Smart Folders, 82 specifying metadata, 81 Spotlight menu
making calculations in, 79 searching from, 78–79 Stacks
automatic view, 42
controlling appearance of, 41–42
fan view, 41 grid view, 42 list view, 42 opening folders, 43 startup disk choosing, 225
choosing for upgrade, 15 repairing, 13
Startup Disk preference pane, using, 32
startup modes, 225–226 storage devices
connecting, 164–167 Disk Utility, 167 external disk drives, 164 memory drives, 164 mounted volumes, 166 unmounting volumes, 166 USB hubs, 165
strong passwords, choosing, 198– 199, 201
SuperDuper
making duplicates, 192 Web site, 191
support resources, 226
switching between applications, 45–46
synchronizing data setting up
Internet accounts, 86–87 using iCloud, 84–85
synchronizing file, using Dropbox for, 179
Index 243
T
tags
adding in Finder, 76–77 adding when saving files, 77 Target Disk mode, starting up in, 225 TextEdit word processor
automatic correction, 108–109 Colors window, 108
Fonts window, 108
spell-checking documents, 109 text-editing tools, dictionary, 109 texting to friends, 139–141 Time Machine backups. See also
backup systems; online backups
alternatives, 182–183 excluding items, 187 external drives, 186 length of time, 186 locating deleted files, 190 migrating from, 18 network volumes, 186 pausing backups, 188 restoring drives, 190–191 restoring files, 188–190 setting up, 185 specifying disk for, 185
triggering backups manually, 188 TimeMachineScheduler, features
of, 188
“toasters,” using with hard disks, 193 toolbar
buttons, 8 locating, 5 Trash
dragging files to, 71 emptying, 72
trashed items, recovering, 71 troubleshooting
accessing Recovery OS, 224–225 application crashes, 221–222 checking cables, 218 checking connections, 218 deleting preferences, 222–223 disk-related issues, 219–220 Internet connection, 223–224 logging in as different user, 218 repairing permissions, 220 restarting computer, 218 support forums, 218 support resources, 226 Twitter, support for, 146
U
updaters, using in applications, 65 updating applications
controlling Software Update, 65 Mac App Store, 64–65
upgrade preparation backing up Mac, 12 bandwidth, 13
directory corruption issues, 12–13 Disk Utility, 12
software updates, 12 turning off FileVault, 12 verifying hard disk, 12–13 upgrading Macs, 3
upgrading to Mavericks. See also OS X Mavericks
choosing startup disk, 15 entering Apple ID, 14 USB hard drives, connecting, 164 USB hub, buying, 165
user accounts
“bare” account for testing, 26 converting to administrator, 26 Create User button, 25 creating, 24–25 deleting, 31 explained, 2–3 fast user switching, 30 guest type, 27 logging in to, 30 logging out of, 29–30 naming, 25
passwords, 25 security, 26
setup during installation, 20–21 standard type, 26 switching between, 29–30 user settings administrator accounts, 23 managing, 21–23 Password pane, 21–22 regular accounts, 23
users, adding to file sharing, 176–177 Users & Groups preference pane,
accessing, 21
V
versioned backups, explained, 183 versions of files accessing, 195–196 comparing, 196 locking documents, 196 restoring, 195–196 video editing, 158–159 iMovie, 158–159 QuickTime Player, 159–161 viewing, 74–75 video chat, starting in
Messages, 142–143 video-player software, warning
about, 212
View Options window, features of, 9 views
Column, 6–7 Cover Flow, 6–7 Icon, 6–7 List, 6–7
VIPs (very important persons), prioritizing in email, 130 VMware Fusion Web site, 32 volumes
mounted, 166 unmounting, 166–167 VPNs (virtual private networks),
using at hot spots, 214
W
“Wake for network access” option, using, 178
warranties, considering, 227 Web browsers, keeping up to
date, 211
Web pages, improving readability, 133
Web site passwords, saving, 201–202 Web sites. See also Safari
accessing, 132–133
anti-static protective cases, 193 Apple Support, 226
calendars, 99
ClickToFlash Safari extension, 136 Cloak VPN connection, 214
Index 245
CrashPlan online backup service, 194 DriveSavers, 182 Flash, 136
Gmail and Mail, 124 Google Chrome, 133 LaunchBar, 38 NewerTech Voyager, 193 Parallels Desktop, 32 ScreenSharingMenulet, 171 SpamSieve utility, 131 support resources, 226 TimeMachineScheduler, 188 VMware Fusion, 32 WiTopia VPN for Wi-Fi, 214 Wi-Fi networking Cloak VPN connection, 214 precautions, 213–214 using encryption, 214–215 VPNs at hot spots, 214 window features Column view, 6 Cover Flow view, 6 icon size slider, 5 Icon view, 7 List view, 6 sidebar, 5 toolbar, 5, 8 viewing options, 6 window shortcuts, 10 windows assigning to spaces, 54–55 configuring appearance, 7 resizing, 7
Windows operating system running using Boot Camp, 31–32 switching between OS X and, 32
wireless networks, joining, 121–122 WiTopia VPN for Wi-Fi, 214 word definitions, viewing, 109 Word documents, viewing, 74–75 Write Only option, using for
sharing, 178
Z
.zip
archive file, 77 file extension, 60