Pump School Manual
Table of contents
Chapter 1 Characteristics of Water ……… Page 3 Pressures, Atmospheric, Static, Residual, Head ……….Page 7 Chapter 2 Pump Construction and Gauges ……… Page 10 Chapter 3 Frictio n Loss ………...Page 19 Chapter 4 Operational Practices ……… Page 33 Booster Tank Operation ………. Page 33 Operating From Fire Hydrants ……….. Page 34 Drafting Operations……… Page 36 Pumping To Sprinkler Systems ………. Page 38 Pumping To Standpipe Systems ……… Page 39 Buildings with Fire Pumps ……… Page 41 Foam Operation with Inline Eductor……….. Page 42 Sample Pump Chart ………... Page 45 Definitions ………. Page 46 Practice Questions ………. Page 49
Chapter 1
The Characteristics of Water
Water is our most frequently used extinguishing agent because it is very abundant and relatively inexpensive compared to other types of fire extinguishing medium. In order for us to use water as our primary ammunition in our firefighting arsenal we must now some important basics about water.
1. Water freezes at 32 degrees (F) 2. Water boils at 212 degrees (F)
a. This makes water a good extinguishing agent. We use water to absorb the heat release from a fire. The energy from the fire is imparted into the water and the water changes to stream. A great amount of energy is required to turn water from a liquid state to a vapor state.
3. Water weighs 8.3 pounds per gallon.
a. This is important because our fire apparatus have the ability to pump on average up to 1,000 gallons per minute at a large fire. This means that every minute we are adding four tons of water into a structure and therefore building collapse is a real potential.
Water is Non-Compressible. This is the primary reason that you are told to open and close nozzles and gate valves slowly. Water moving through hose has a lot of inertia and energy. If we are supplying a 2 ½” hose line flowing 200 GPM. We are moving over 1,600 pounds of water every minute. If the nozzle is slammed shut the water in the hose will still be moving. This water, being non-compressible, has the possibility to cause severe damage and injury.
This damage normally will result in a broken hose line since this is usually the weakest point in the system. This can mean the loss of water to firefighters who are on hand lines inside the fire building.
When using a fire department pump we can also impart a lot of heat into the water if our pump is left to run at Churn. This means that we are in pump gear with the pump impeller turning but we are not flowing water. If a line were to burst or someone removed a cap and opened a valve they could be burned our scalded by the hot water. We must always
remember to circulate water when in pump gear. This can be done by tank to pump and tank fill or by discharging a small trickle of water onto the ground.
We can also damage the pump by trying to pump more water out then what we have coming in. The impeller or impellers are made of cast bronze. Inside the impeller casting there are microscopic air pockets from the casting process. If we spin the impeller too fast, usually when we try to pump more water then what we have we create low pressure areas around the impeller. These low pressure areas can cause the air pockets in the casting to expand and flake off tiny pieces of the bronze impeller. This condition is also known as cavitation.
Pounds Per Square Inch ( PSI )
When we look at or read a pressure gauge we usually give the reading in pounds per square inch or psi. This term comes from the weight of water in one cubic foot of water. The laws of hydraulics states that the weight of water one foot high will exert a weight of .434 pounds at its base. Since we want to deal with rule of thumb numbers for this course we can round the .434 up to .5 or ½ pound per foot of a column of water.
Figure 1: Figure 1 above illustrates that using the rule of thumb formula that the weight of a column of water at its base is half the height. In the picture above. A 2 foot high column of water exerts a pressure of one pound or 1 psi. at the base. Elevation equals ½ pound per foot.
One cubic foot of water 2 feet high One square inch column of water 2 foot high
One pound per square inch of weight
pressing down or 1 psi.
Six Principles of Fluid Pressure
Before we talk about the different kinds of pressure it is important that we are aware of the six principles of fluid pressure. They are:
1. Liquid pressure is exerted in a perpendicular direction to any surface on which it acts. 2. At any given point beneath the surface of a liquid, the pressure is the same in all directions;
downward, upward and sidewise.
3. Pressure applied to a confined liquid from without is transmitted in all directions without a reduction in intensity.
4. The pressure of a liquid in an open vessel is proportional to the depth of the liquid. 5. The pressure of a liquid in an open vessel is proportional to the density of the liquid 6. Liquid pressure on the bottom of a vessel is unaffected by the size and shape of the vessel.
Figure 2: In the illustration above, #1 represents principle 1 where pressure is exerted in a perpendicular. #4 represents principle 4 where the pressures increase as the depth increases. #6 Size and shape of the vessel does not matter.
1 4 30 psi 60 psi 50 psi 100 feet 6
Atmospheric Pressure
Atmospheric pressure is the air pressure that is on everything on the earth. At this very instant there is a force of 14.7 psi pressing against our bodies and all other objects. This atmospheric pressure is important when it comes to understanding how we draft water. Pressures that are less than atmospheric are call Vacuum. Atmospheric pressure is also known ambient pressure.
14.7 psi
14.7 psi 14.7 psi
Head Pressure
Head pressure can be called the height of a supply of water above a discharge opening. The best example of this is an above ground water storage tank. Let’s assume that our water tank is 100 foot high. We have a pressure gauge at the very base of the tank. We already know that water exerts a force of ½ psi for every foot of height measured to the top of the water. In this example the pressure at the base of the tank is 50 psi.
Static Pressure
The word static means stationary or no movement. The reading of 50 psi on the water gauge at the base of the water tank is called a static pressure reading because there is no water flowing in the system.
Figure 3: Hydrant showing static pressure.
Residual Pressure
Residual or residue means what is left over. Residual pressure is the pressure on a gauge when water is in motion. If we opened the hydrant to let water flow from the system our pressure gauge would drop. The pressure reading when water is flowing is known as residual pressure.
Chapter 2
Pump Construction and Gauges
Now that we know a little something about water, we can learn about the equipment needed to move that water. Although there are several classifications of fire service pumps, we will concern ourselves with one speicific type- mobile fire pumps.
For our purpose mobile fire pumps are mounted on fire apparatus. They receive there power from the truck’s engine which is transmitted through the transmission. These pumps come in several capacities: 500 gpm, 750 gpm, 1,000 gpm, 1,250 gpm, 1,500 gpm, and 2,000 gpm. The most common type of fire pump found today is the centrifugal pump. This pump is the work horse of the fire service. Its biggest advantage is that it takes advantage of
positive pressure. A disadvantage of this centrifugal pump is that it cannot pump air. Therefore we provide a smaller pump called a primer pump to help our centrifugal pump. This primer pump will be discussed later. The two most common centrifugal fire pumps that we will deal with are the Two-stage centrifugal fire pump and the Single-stage centrifugal fire pump.
Centrifugal Fire Pump
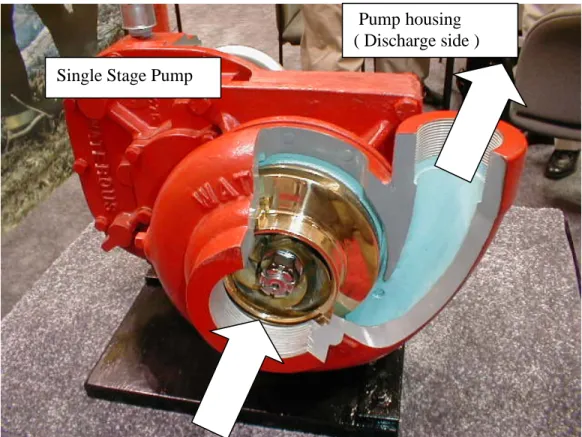
The centrifugal fire pump consists of an impeller which is usually made of bronze. The impeller is mounted on a shaft at the center of the pump. The impeller’s job is to take incoming water, at low pressure, and shoot it out at a higher, more usable pressure for firefighting. Each impeller is situated in its own pump housing. The single stage fire pump only has one impeller which is usually larger then impellers in a two-stage pump.
Single Stage Pump
Figure 5: Single stage fire pump in housing. Water enters pump through the eye of the impeller and is discharged through the volute.
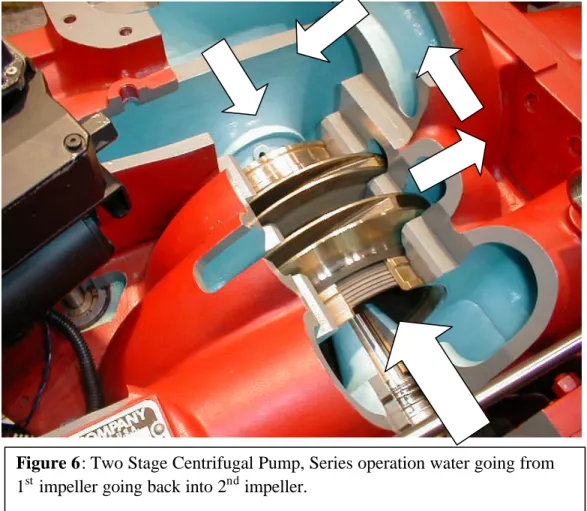
Two Stage Centrifugal Fire Pump
The two stage centrifugal fire pump uses two impellers mounted side by side in a pump housing. The two impellers both have an intake side and a discharge side. They are connected with a transfer valve. This transfer valve is used to determine how the stages of the pump will operate.
The two stage centrifugal pump can work in what is called the pressure mode or the volume mode. When the pump is put in the pressure mode the water supply is entering into
Figure 5: Impeller Eye ( Intake side ) Pump housing ( Discharge side ) Single Stage Pump
the only one impeller. The water is then discharged out to the intake of the second impeller. Where the pressure and velocity is greatly increased. The water then leaves the second impeller and is discharged out to the discharge side of the pump. This mode is also known as “Series Operation” because the water movement is linear from impeller to impeller. The one draw back to this mode of operation is that the pump can create a high pressure but the
volume that is available is limited to half the capacity of the pump. A 1,000 gpm pump would be limited to approximately 500 gpm. This is a rule of thumb formula for volume vs. pressure operating modes.
Figure 6: Two Stage Centrifugal Pump, Series operation water going from 1st impeller going back into 2nd impeller.
When working in volume the water enters the pump and is directed by the transfer valve to enter both impellers at the same time. The water is then discharged out of both impellers at the same time to the discharge side of the pump. Working in this mode the pump will put out its rated volume at 150 psi.
Priming Systems
As mentioned before, the centrifugal fire pump cannot pump air. This is becomes an important factor when it comes to drafting and even during tank to pump operations. When drafting air must be expelled from the centrifugal pump. I have seen times when an air pocket inside a centrifugal pump has created havoc in a tank to pump operation supplying a single 1 ¾” pre-connected hose line. To solve this problem we use a priming device. The priming device used is called a primer pump. Primer pumps are positive displacement pumps. The two most common types of positive displacement pumps are rotary gear and rotary vane. The rotary vane pump is driven by an electric motor and has been in use with centrifugal fire pumps since 1912. It is by far the most common type of priming pumps. The priming pump can pump air. An oil tank is connected to the priming pump. This oil is used to for sealing and lubricating during the priming process. The primer pump is used to expel air from the centrifugal pump.
Figure 9: Oil tank reservoir connected to priming pump
Figure 10: Motor for priming pump and attached priming pump. Black tube connects to centrifugal pump housing. This is how the air is draw out of the pump.
Motor
Rotary Vane Pump
Relief Valve and Pressure Governors
Relief valves and pressure governors are used to prevent excess water pressure to be transferred to hand lines and other hose lines. The relief valve and pressure governors are primarily used when more then one hose line is in operation. If one nozzle is shut down then the excess pressure will be redirected to the hose line still operating if the relief valve is not set. The relief valve is a spring operated device that reacts to a differential in pressure between the intake and discharge side of the pump. The spring tension is set using a pilot valve. When the pressure exceeds the set pressure the relief valve opens up and the excessive pressure is redirected to the suction side of the pump.
The pressure governor works differently but the result is still the same. The pressure governor is set based on engine speed. Once the pressure governor is set the engine will speed up or slow down to match the highest pump pressure setting.
Figure 11: Picture of relief valve attached to suction side of pump. Water pressure enters from the bottom and excess pressure goes back into the suction side.
Pump Pressure Gages
We monitor the pump operation by using pressure gages. The two types of gages we use are the compound gage and the discharge pressure gage. The compound gage is
connected to the intake or the suction side of the pump and measures intake pressures in psi if the water supply is from a hydrant or other apparatus. The compound gage also measures pressures below zero which are called vacuums. This measurement is in inches of mercury (Hg). There is only one compound on the pump panel. However, some pump panels use gages that all have the same face that might look like compound gages.
The discharge gage measures discharge pressures on the discharge side of the pump. The main discharge gage measures the discharge pressure at the center of the pump. The compound gage and the main discharge gage are the two largest gages on the pump panel. Each discharge usually has its own discharge gage which is smaller in diameter then the main pressure gage. These smaller discharge gages measure the pressure at the discharge outlet between the ball valve and the pump panel cover.
Figure 13: Outlet pressure gage with Figure 14: Main pressure gage. Note Flow gage for discharge outlet. the gage face that shows inches of
Mercury.
Figure 15: Pump panel with only one Figure 16: Under writers gages attached Compound gage. Only gage with for pump test. Note that the pump is set Inches of mercury on gage face. Up to draft. Pumps are usually tested From draft at ten (10) feet of lift.
Chapter 3
Friction Loss
The pump operator’s main goal is to deliver the proper flow of water in gallons per minute at the proper pressure to the desired location such as the nozzle on a hand line or to the intake side of another apparatus. The basic concept of pump operation is to take water from a source that is at a low pressure head and transport it to a nozzle or to another apparatus at a higher or required pressure via a hose. An example of this is an engine pumping water from its booster tank through a 200 ft. pre-connected hose line.
To solve the friction loss problem above there are three questions that need to be answered, but we need to understand a few more terms.
Friction Loss (FL): As water moves through a hose the water molecules rub against each other and the side of the hose. When two materials rub together as in this case the water
molecules rubbing against each other or the inside of the hose friction is created. Since we are moving water through a conduit the friction causes a loss of energy. So friction loss can best be described as the loss of energy as water moves through a hose. The more water that we try to pump through a hose the greater the friction loss.
Nozzle Pressure (NP): As water exits a nozzle, right at the tip there is a pressure that can be measured with a pitot gage. This pressure is known as nozzle pressure. All nozzles are designed to work at specific nozzle pressures. Example, a fog nozzle may be designed to deliver 100 gallons per minute (gpm) at a nozzle pressure of 100 psi. If the nozzle pressure is less then 100 psi then the flow will be less then 100 gpm. The three basic nozzle pressures used in the fire service are:
Straight tip hand line = 50 psi
Master stream with a smooth bore nozzle or stacked tips = 80 psi Fog nozzles (All) = 100 psi
The nozzles pressures listed above must be committed to memory.
Fog nozzle, 100 psi nozzle pressure Adjustable gallonage nozzle
Engine Pressure (EP): Engine pressure is the holy grail of pump operators. This is the number in psi that we need to see on our gages at the pump panel. Engine pressure is the sum of the nozzle pressure + the friction loss + any elevation or devices. Based on the engine pressure formula EP = NP + FL if we need a nozzle pressure of 100 psi to flow 100 gpm then the engine pressure needs to be greater then 100 psi. We have to add extra pressure to
overcome the loss of energy as the water moves through the hose. The bulk of this class will be structured to determine the friction loss requirement based on the types of hose and hose layouts. In order to determine friction loss we need to know three things:
1. What is the flow, how much water in gpm is needed. 2. Hose size (Diameter)
3. Length of the hose line or hose lay.
To find the gallons per minute we need to look at the nozzles. Nozzles are designed to flow specific amounts of water at certain nozzle pressures. A one inch tip nozzle will flow 210 gpm at a nozzle pressure of 50 psi.
The following tables show the various flows based on tip size and nozzle pressure.
Master streams/ Straight Streams
Tip Size GPM @ NP 1 ¼” 400 80 1 3/8” 500 80 1 ½” 600 80 1 ¾” 800 80 2” 1,000 80 1 3/8” 1 1/2” 1 3/4” 2”
Straight Stream/ Hand Line Tip Size GPM @ NP 15/ 16” 185 50 1” 210 50 1 1/8” 265 50 1 ¼” 325 50
2 ½” playpipe nozzle with stacked tips
15/16” nozzle with added ½” tip
Figure 18: Stacked tip for 2 ½” hand line . 1”, 1 1/8”, 1 ¼”
Warning: Engine Pressure can not exceed the
test pressure of the hose. For this course the
test pressures for all hose except 5-inch is
250 psi. 5-inch is 185.
Friction Loss Calculation for 2 ½” Hose
In order to figure friction we know that we need to know the size of the hose tha t we’re using, the flow in gallons per minute and the length of the hose line. We use different friction loss formulas for the different size hose that we have. The formulas that we will use in class are called rule of thumb formulas. They are not exact but they will provide you with enough accuracy for fireground operations. The first rule of thumb formula we will go over is for 2 ½” hose. The name of the formula is “The Drop Ten Method”. In the illustration below we want to find the engine pressure or EP that is required to provide the proper flow to the nozzle.
The illustration above gives us all the information that we need. The tip size tells us the flow. In this case it is 265 gpm. We know the hose size and the length. To use the drop ten method we take the flow of 265 gpm and remove the last digit. That leaves us with 26, now we subtract 10 from 26 (Hence the term drop ten) which leaves us with 16. This 16 represents
the friction loss of 16 psi for each 100 feet of 2 ½” hose. In this problem the friction loss is 48 psi. This means that we must add the 48 psi friction loss to the required nozzle pressure of 50 psi and end up with an engine pressure (EP) of 98 psi. If we pump the engine at 98 psi we will have 50 psi at the nozzle and we will be flowing approximately 265 gpm. This is a rule of thumb and it has its limitations. The limit on this rule of thumb for 2 ½” hose is 400 gpm. Example of above calculations:
To find Friction loss: To find engine pressure:
265 gpm
ð
26 add-10 NP = 50 psi
16 psi per 100 feet of hose FL = 16 x 3 = 48 psi EP = 98 psi
This may seem difficult at first but after a little practice it will be much easier. Just remember the three things that you always need to know:
1. Hose size in diameter so you choose the correct rule of thumb. IE: 3”, 2 ½”, 1 ¾”, 5”
2. Know the flow in gallons per minute. The nozzle will tell you the flow 3. What is the length of hose or how many 100 foot sections are there.
Friction Loss Calculation for 3” Hose
Just like with 2 ½” hose we have a rule of thumb calculation for 3- inch hose. The name of this rule of thumb is called the Q-squared (Q2) method. And as with all rule of thumb methods it has a limitation of 700 gpm. In order to use the Q-squared method we need to know the flow and the length of hose or how many 100 foot sections are there.
Example: a deck gun with a 1 3/8” tip flows 500 gpm. We take the 500 gpm and drop the last two digits which leaves us with 5. We now take that 5 and square it which means multiply it by itself. So 5 x 5 = 25 or in this case it is 25 psi of friction loss for every 100 feet of hose.
In the example above: NP = 80 psi
FL = 25 x 5 = 125 psi Dev = 10 psi
Friction Loss Calculation for 1 ¾” Hose
1 ¾” or 1.75” hose has become our most used fire attack hose line. This is due largely in part to the flow rate and maneuverability of this hose. The recommended fire flow for residential structure fires involving room and contents is 150 gpm. With the 1 ¾” we can flow up to 200 gpm. The majority of fires in suburban departments are usually residential fires with multiple room and contents. The majority of 1 ¾” hose lines are pre-connected to the apparatus. This means that a set length of hose such as 150 feet or 200 feet is connected to a discharge on the apparatus. The pre-connected line is the standard hose arrangement for this area. This can make things easier for the pump operator because based on the nozzles and hose lengths a set engine pressure can be established without the need for any
calculations. However, if the pre-connected line is not long enough then it has to be extended and now we have to calculate more friction loss. The rule of thumb method we use for 1 ¾” hose is called the hand method.
To use the hand method first we need to know the flow in gpm. The flow is shown in the illustration and has a corresponding thumb or finger. The thumb and each finger also has an assigned number; the thumb being #1 and the pinky being #5. The method works like this.
Example: We want to flow 150 gpm. We can see that the middle finger is assigned 150 gpm and also has the number 3 assigned to it. All we need to due is take that number 3 and multiply it by 10, 3 x 10 = 30 This gives us a friction loss of 30 psi for every 100 feet of 1 ¾” hose when we are flowing or want to flow 150 gpm.
Friction Loss Comparison Table
The table to the left shows the friction loss comparisons between the three hose sizes that we have been talking about. You can see as the larger the hose the smaller the friction loss. You can also see that as the flow increases the friction loss also increases. As an illustration you can see using the 2 ½” column that if we double the flow from 150 gpm to 300 gpm we do not double the friction loss we quadruple it. This is used to show that friction loss increase is exponential not linear.
The table to the left shows the actual friction loss formula used by NFPA. Each hose or pip diameter has an assigned coefficient. HD: Hose Diameter HC: Hose Coefficient PD: Pipe Diameter C: Coefficient Q2: GPM/ 100
L: Length of hose per 100 feet. Example: Friction loss for 500 feet of 3” flowing 500 gpm .8 x 25 x 5 = 100 psi total FL C x Q2 x L
Table 1
Friction Loss Comparisons
Based on 100 Ft. of Hose Gpm FL 1 ¾” FL 2 ½” FL 3” 100 10 psi 125 20 psi 150 30 psi 5 psi 175 40 psi 7 psi
200 50 psi 10 psi 4 psi
250 na 15 psi 6 psi
300 na 20 psi 9 psi
Table 2
Actual Friction Loss Formula NFPA FL = C x Q2 x L HD HC HD HC Pipe Coefficients 1” Booster 150 3” .8 PD PC 1 ½” 24 4” .02 4” .37 1 ¾” 15.5 5” .08 5” .12 2 ½” 2 6” .05 6” .05
Parallel Lines
When flowing large quantities of water through a single hose, friction loss becomes a major factor. This is because we are restricted when it comes to engine pressure. The maximum engine pressure allowed is not to exceed the test pressure of our hose. The test pressure for fire hose is stamped on the hose, however, for the purpose of this course we use 250 psi as the test pressure except for 5-inch which is 185 psi.
The best way to reduce friction loss is to increase the size of the hose. This may not always be possible in this case we can add a second line of the same size. This is known as using parallel lines. We use parallel lines in most cases where we are using 2 ½” or 3” lines when we are supplying a deck gun, a fire department connection and other apparatus. Parallel lines can reduce friction loss by almost 75%. If we attempted to flow 600 gpm through one 3-inch line the frictio n loss would be 6 x 6 or 36 psi per 100 feet of hose. If add a second 3” line the friction loss is now 9 psi per 100 feet of hose. This is possible because if we are pumping 600 gpm out of the pump and the water is coming out of the deck gun at 600 gpm it stands to reason that 300 gpm is going through one line and 300 gpm is going through the other line. When we use parallel lines we only have to calculate friction loss for one line and the flow that is going through that line.
In the illustration to the left if we tried to pump 600 gpm through one line the FL would be 180 psi and an engine pressure of 280 psi. This puts us over the test pressure of the hose. If we us parallel lines the FL is 45 psi and the EP is 135. We can see that 45 is 25% of 180 therefore we reduced the FL by 75%.
Devices and Elevation
Devices are appliances such as a siamese and wyes. These appliances are usually found on deck guns, fire department connections, gated wyes etc. These devices create turbulence and therefore there is some friction loss involved. As a rule of thumb we add 10 psi for each device.
Elevation is the height of the nozzle above the pump. When the nozzle is above the pump we are creating a head pressure situation in the hose and we have to cancel out the head pressure or the back pressure caused by the weight of water. Usually every story of a building is considered to be 12 feet. This can be very subjective sometimes it may be easier to use ten (10) feet per story. The best way to approach this is to take the fire floor and cut it in half. If the fire was on the 5th floor then we can say that the elevation is approximately 50 feet. We can now take that 50 feet and cut it in half. So for our elevation we just have to add 25 psi to our engine pressure equation. ( EP = FL + NP + DEV + Elev.)
Friction Loss Calculation for 5” Hose
5-inch hose has been a big leap in technology for the fire service. Five inch hose was almost unheard of in the 1970’s and only started coming into this area in the early 1980’s. Currently most engine companies in Toms River are equipped with 5 inch supply hose. Five inch hose has many advantages some of which are:
• Takes advantage of a good water main system.
• The friction loss is 90% less then the friction loss in 3 inch supply hose.
• The water carrying capacity is equal to four (4) 3- inch hose lines
• Allows for inline pumping which reduces the need for an engine to pressurize a hydrant.
Five inch hose has been referred to as an above ground water main. If the public water system is adequate then this is indeed true. However, if the water main system in your town is poor and inadequate then the five inch hose will have a limited advantage. The primary advantage of five inch hose is the reduction of friction loss. The friction loss of five inch hose is at least ten (10) times less then that of three inch hose. The carrying capacity of five inch hose is also a great advantage. You would need almost four 3- inch supply lines to carry the same quantity of water that can be carried in one five inch hose line. Because of the reduced friction loss and the amount of water carried by five inch hose, fire department’s can perform more inline pumping. Inline pumping is the process by which a pumper will stop at the fire hydrant and lay a supply line from the hydrant to the fire. The water supply to the pumper will be the single five inch supply line that is unsupported by another pumping apparatus. Prior to the advent of five inch hose, inline pumping using 3-inch or 2 ½” hose was a critical situation or fireground factor.
Rule of Thumb for 5-inch supply hose
1. The maximum pump pressure for 5 inch supply hose shall not exceed 185 psi. (NFPA 1962).
2. Use the rule of thumb for 3- inch hose then divide by ten (10) Example: What is the friction loss for 800 gpm.
1. 800 = 8
100
2. 8 x 8 = 64 3. 64 = 6.4
10
Answer: Friction loss for 800 gpm flowing through the 5- inch is 6.4 psi per 100 feet of hose. You can round up to 7 psi.
For flows of 1,000 gpm, up to and including 1,500 gpm just drop the last two digits and that will give you the friction loss per 100 feet of hose.
Table 3
Table of Friction Loss for 5-Inch Hose
Gallons Per Minute PSI
1,000 10 1,100 11 1,200 12 1,300 13 1,400 14 1,500 15
For flows greater then 1500 use formula: FL = .08 x Q2 x L
Table 3
Table of Friction Loss for 5-Inch Hose
Gallons Per Minute PSI
500 3
600 4
700 5
800 7
Supplying Other Apparatus
Many times as a pump operator you will have to supply another engine or ladder with water. The same principles are involved to determine your engine pressure. We still need to know the size of the hose that we are pumping through, the length of the hose lay and the gallons per minute that is required. The pump operator of the engine that you are supplying should provide you with the gpm information via radio. When supplying another engine you are only pumping from your pump to the intake side of the other apparatus. The friction loss is still based on the gpm flowing at the fire scene, however, we do not add in nozzle pressure when we are the supply engine. We only add an extra 50 psi for the intake side of the other apparatus.
In the scenario above Engine Co. 1 is supplying Engine Co. 2. Engine 2 is flowing 300 gpm at the scene we are pumping Engine 1. We need to know three things; the size of the hose, the length of the hose lay and the gpm. Once we have this information we can calculate the friction loss, add 50 psi for the intake side of the pump and come up with an Engine Pressure. Remember, in this case we are not worried about any nozzle pressures or any thing going on
past the intake side of Engine 2. To determine the engine pressure for the above illustration we use the rule of thumb method for 3- inch hose. We take the required 300 gpm and drop the last two digits and square the 3. This gives us a friction loss of 9 psi per 100 feet of hose. We have a 500 foot hose lay so our required friction loss is 45 psi. If we add 10 psi for a device at the intake side of Engine 2 and add the 50 psi for Engine 2’s compound gauge we have a required engine pressure of 105 psi.
Engine 82 is pumping to the intake side of Ladder 31 only. What is the required engine pressure for Engine 82 ??
Chapter 4
Operational Practices
Booster Tank Operations
The majority of fire department pumping operations are handled with the use of the booster tank. These fires include vehicle fires, brush fires and initial fire attack on structural fires. When working from the booster tank the pump operator should follow the steps listed below.
1. Park the apparatus in a position that assumes the best tactical advantage for the scenario. Example: Car fire, park up hill and up wind if possible.
(Don’t Forget To Set The Parking Brake)
2. Put the apparatus in pump gear and check for okay to pump indication.
3. Check to see what line has been actually taken off the apparatus and make sure that the hose bed is all flaked out.
4. Pull the tank to pump lever and activate the primer for a few seconds. Open the desired gate valve and throttle up to the desired engine pressure.
5. When in pump gear the pump should not be allowed to operate in chur n for any length of time. Water must be circulated, this can be done via the tank to pump and tank fill valves or by using a circulating valve.
Operating From Fire Hydrants
At times the pump operator may find himself using a fire hydrant for water supply. Such situations might encompass hooking directly to a hydrant near the fire area and pumping to attack hose lines. The pump operator might also have to hook up to a hydrant remote from the fire and supply another apparatus at the fire scene. Whatever the case there are a few important things we need to know, starting with the hydrant.
Basically there are two types of fire hydrants. They are wet barrel and dry barrel. Because of freezing temperatures we use dry barrel hydrants in this region of the country. The reason the hydrant is dry is because the plunger, which opens and closes when the stem is turned, is located underground at the main level. When the hydrant is closed the water in the barrel drains out of the hydrant into the ground. When the hydrant is open the drain is closed off and the water fills the barrel. It is important when using the hydrant to open it all the way. If the hydrant is not fully open the drain is not closed off. This allows water, under pressure, to escape through the drain which will wash out the ground around the hydrant. In cold weather after closing the hydrant, leave the cap off until the water in the barrel drains.
Strategic Considerations
Depending on the size of the fire, the hydrant selected to supply the firefighting operation, should be of sufficient volume. This means if the fire requires a 1,000 gpm fire flow, hooking up to a hydrant that only flows 500 gpm will be of little use for extinguishment. Again attempt to hook up to a hydrant that will give and adequate flow. This may not always be possible depending on the water system in the area of the fire. A quick, but inadequate water supply may be used by the first due engine to cover a primary search or to protect exposures while an additional water supply is established. There are many variables to take into account when fighting fire. A poor or inadequate water supply will keep firefighters playing catch-up until the building burns down. When working from a hydrant always take the extra minute to hook up for maximum supply. This means hook up with the 5- inch soft suction hose and if possible put a gate valve on the hydrant to attach an additional supply line.
Two things to watch for when working from a hydrant. (1) Always note the static pressure on the compound gauge before flowing any water. (2) Try not to let the intake pressure on the compound gauge drop below 20 psi. This is your safety zone, if the intake pressure dips below this it is an indication that you are running out of your water supply.
By taking note of the static pressure before flowing any water we can use this number to get an idea of how many gallons per minute are available. We determine this by using a percentage drop between the static pressure and the percentage drop of the residual pressure after we put the first hose line into operation.
Example: After hooking up to a hydrant the static pressure reading on the compound gauge is 60 psi. The pump operator initially flows 250 gpm, most likely a 2 ½” hose line with a
1 1/8” tip. After getting the 250 gpm flow established the pump operator takes a residual pressure reading from the compound gauge. The residual pressure is now 54 psi. This is a ten percent drop. This tells us that the hydrant is capable of supplying the initial 250 gpm plus three times that amount or an additional 750 gpm. The total capacity of the hydrant is approximately 1,000 gpm. This is know as the 10, 15, 25 percent drop method. The table below outlines the percentage drop method
Table 4
Percentage Drop Method
Percentage 0% to 10% Water available from hydrant 3 Times Initial Flow Percentage 11% to 15% Water available from hydrant 2 Times Initial Flow Percentage 16% to 25% Water available from hydrant 1 Times Initial Flow Percentage > than 25% Water available from hydrant Less then Initial Flow
Drafting Operations
Drafting is the term used when we take our water supply from a static water source such as a lake, pond, river, bays etc. To understand how drafting works we need to have a basic understanding of atmospheric pressure from chapter one and priming devices and gauges from chapter two. Simply put when we draft water from a static source we are using a priming pump to create a vacuum in the main fire pump. Once the vacuum is created the atmospheric pressure acting on the surface of the water is greater than the pressure inside the pump. Therefore, the atmospheric pressure pushes the water up the suction hose and into the pump.
pumper. Second remove the required lengths of hard suction hose and put them together. Most apparatus in this area only carry two-ten foot lengths of hard suction. If you need more then twenty (20) feet you will have to get an additional length from another apparatus making sure that it is the same diameter. Third, attach the hard suction hose to the steamer connection on the pump and put the hose into the water. Attempt to tie off the strainer with a rope. It is important to keep the strainer at least eighteen (18) inches off of the bottom. This should prevent the strainer from getting jammed in the mud and clogging. Attempt to keep the strainer twenty-four (24) inches under the surface of the water. This should prevent
whirlpools. Whirlpools allow air to enter the pump and the prime may be lost. The greater the flow the greater the whirl pooling.
After the hose is hooked up and in the water we are ready to start pumping. With the apparatus in pump gear and an okay to pump signal is established increase the engine rpm’s to approximately 1,000. Activate the primer and watch the compound gauge. The primer
should be operated for 30 seconds for 1,000 gpm pumps and for 45 seconds for larger pumps. If the pump does not take a draft in this allotted time check for the following problems.
1. Pump not in pump gear. 2. Pump not in volume position.
3. Air leak from fittings not being tight. 4. Primer oil low.
5. Clogged strainer. (If compound gauge reads 30 hg but not water into pump)
After the draft has been established and water is in the pump the pump operator keeps one hand on the primer and the other hand on the discharge lever. Slowly open the discharge and use the primer if need to maintain the prime. Once the discharge is open, throttle up to the required engine pressure.
It is important to understand that there is a limit to the height of lift when drafting. A fire pump in good condition can only be expected to lift water no more then 25 feet. There is also a trade off between lift, flow and size of suction hose:
Table 5
Discharge that can be expected when drafting at various lifts. Numbers will vary for individual apparatus.
Rated pump Capacity 1,000 gpm Pump 1,500 gpm Pump Suction Hose Size (Dia.) 5” 6” 6” Lift in feet 4 1160 1345 1735 6 1110 1290 1660 8 1055 1230 1575 10 1000 1170 1500 12 935 1105 1410 14 870 1045 1325 16 20’ of Suction Hose Two- sections 790 960 1225 18 670 835 1085 20 590 725 955 22 485 590 800 24 30’ of Suction Hose Three- sections 340 400 590
Pumping To Sprinkler Systems
With the changing of building codes, the fire department is more apt to utilize sprinkler systems more then ever. Buildings with sprinkler systems receive their water from three basic sources. These sources are public water mains, gravity tanks, or pressure tanks. All three may not be present at the same time. The most common water supply is the public water main. The basic concept behind the fire department hooking up to or supplying a sprinkler system is to boost the pressure of the public water system. The residual pressure at
of sprinkler heads are open. By putting a fire department pumper inline we can get the maximum use out of the sprinkler system.
When supplying a sprinkler system there are a few rules to follow. First, position the apparatus so that it ends up at the hydrant. This will maximize the water supply and should keep the apparatus out of the collapse zone. Second, get the first line into the fire department connection (FDC) and supplied with water before hooking up the second line. When
pumping into the sprinkler system maintain a 100 psi to 150 psi engine pressure. This is the rule of thumb engine pressure for pumping to sprinkler systems. Information regarding sprinkler systems can be found in NFPA 13.
Pumping To Standpipe Systems
Standpipes are not as common as sprinkler systems. They are usually not required in buildings under 3 stories. For our purposes there are two types of standpipe systems; wet and dry. Dry systems are just that, dry. There is no water in a dry standpipe because they are most likely subject to freezing. These dry standpipes are usually found in parking garages. The picture below illustrates a fire department connection (FDC) for a dry standpipe system at a parking garage.
At left is a dry standpipe to a parking garage and just like when supplying a sprinkler system; get one line into the standpipe FDC and get it operational first before
hooking up the second line. The rule of thumb for pumping to standpipe systems is 150 to 200 psi
The other type of standpipe system is a wet system. In a wet system the standpipe is supplied with the same water pressure as the sprinkler system or whatever the water main system is at the current time. Remember, pressure on the city water main system fluctuates based on time of day and time of year due to usage. A key point to remember is that older standpipe
systems were designed on having 65 psi at the most remote standpipe riser. This was based on the fire department operating a 2 ½” hose line 100 feet long using a smooth bore 1 1/8” tip nozzle. The 65 psi would allow for the 50 psi nozzle pressure and 15 psi for friction loss. Newer designs require 100 psi at the most remote riser. This is still too little pressure if you decide to use 1 ¾” hose and a fog nozzle. This pretty much mandates that we supply the FDC if we are going to use the standpipe system.
The picture to the left shows a wet standpipe system as part of a combination sprinkler/ standpipe system connected to the same riser. When pumping to a combination system that uses only one FDC for both the sprinkler and the standpipe use the
pressure necessary to supply the hose layout for the standpipe system.
More information for standpipe systems can be found in NFPA 14. Question: How high can we pump water. Answer: One pound of pressure can lift a column of water 2.31 feet.
Buildings With Fire Pumps
Many building are required to install fire pumps. Fire pumps boost the pressure of the city water supply and are actually termed booster pumps. (True fire pumps take water from a static source.) When a building is built that requires a sprinkler system there are hydraulic calculations that need to be met. If the city water pressure is too low then the building owner will have to install a fire pump. Again, very important information, the fire pump is used to only increase the pressure and flow to meet the hydraulic requirements for the sprinkler system. The fire pump can supply enough water for the sprinkler system but will not supply the pressure needed if your company uses 1 ¾” hose and a fog nozzle for standpipe
operations. If a building has a fire pump and the fire department needs to operate the standpipe system then the FDC needs to be supplied and the fire pump shut down.
At left is a 1500 gpm fire pump rated at 40 psi using an electric driver motor. The 40 psi pump rating is combined with the psi of the city water main to meet the water supply curve for the sprinkler system.
Foam Operation With Inline Eductors
As a pump operator, a common foam operation practice involves pumping through an inline foam eductor. Inline foam eductors work on a venturi principle. When water at higher pressure flows through the eductor a low pressure area or partial vacuum is created in the pick-up tube. The foam concentrate is forced up the pick-up tube in very much the same manner that water is forced into the fire pump when drafting. Because of the shape of the eductor there will be a 30% drop in pressure after the eductor. Akron Brass Company
recommends that the standard engine pressure be 200 psi when pumping to any inline eductor. Another very important thing to remember when using an eductor is to match the gpm rating of the eductor with a comparable nozzle flowing the same gpm. A mismatch can cause the foam blanket to be very watery and ineffective or the foam concentrate may not be picked up through the eductor. Nozzle men should also operate the nozzle at the full open position. A partially closed nozzle will also cause a problem with the foam pick- up.
Pressure on the outlet side of the eductor should not exceed 70 percent of the inlet pressure. Going above the 70 percent will cause a problem with foam eduction. The 70 percent figure is the sum of the nozzle pressure, friction loss and any elevation. Example: If the discharge pressure is 200 psi at the inlet side of the eductor, the pressure at the outlet side should not exceed 140 psi.
Inline foam eductors are only one method of foam delivery systems. Apparatus can be purchased with foam pumps and on board foam tanks that allow foam concentrate to be injected into various hose lines. These new foam systems are very sophisticated and are fairly user friendly with a little training. There are also other foam delivery systems such as around the pump proportioners and balanced foam pump systems that are found on airport crash
trucks. The buzz word in foam seems to be CAFS which stands for Compressed Air Foam System. CAFS was designed for structure exposure protection in an urban interface environment. Compressed air foam is a class A foam designed to be used on Class A fires and is not effective on hydrocarbons. The key to using foam is to select the proper foam for the flammable product involved.
Another type of foam system is a (Hi- Ex) High Expansion foam. High expansion foam is used for total flooding systems. Portable hi-ex systems were developed in the 1970’s but are not that common anymore. High expansion foam systems are usually found in fixed fire protection systems such as total flooding systems for certain types of occupancies such as aircraft hangers.
SAMPLE PUMP CHART
1 ¾” Hose with a 15/15” Straight Bore Nozzle
GPM NP F.L. Hose Length/ Engine Pressure
50 ft 100 ft 150 ft 200 ft 250 ft 300 ft 400 ft 185 50 psi 75 psi 100 psi 125 psi 150 psi 175 psi 200 psi 250 psi
2 ½” Hose Line with T.F.T. Fog Nozzle
GPM NP F.L. Hose Length/ Engine Pressure
100 ft 150 ft 200 ft 250 ft 300 ft 350 ft 400 ft 200 100 psi 10 psi 110 psi 115 psi 120 psi 125 psi 130 psi 135 psi 140 psi 250 100 psi 15 psi 115 psi 125 psi 130 psi 140 psi 145 psi 150 psi 155 psi 300 100 psi 20 psi 120 psi 130 psi 140 psi 150 psi 160 psi 170 psi 180 psi
2 ½” Hose Line with a Straight Bore Nozzle with Stacked Tips
TIP GPM NP Hose Length/ Engine Pressure
50 ft 100 ft 150 ft 200 ft 250 ft 300 ft 350 ft 1” 210 50 psi 55 psi 60 psi 65 psi 70 psi 75 psi 80 psi 85 psi 1 1/8” 265 50 psi 60 psi 65 psi 70 psi 80 psi 90 psi 95 psi 100 psi
1 ¼” 325 50 psi 65 psi 70 psi 75 psi 90 psi 100 psi 110 psi 120 psi Bresnan Distributor Nozzle, 2 ½” Hose Line 9-Port
GPM NP Hose Length/ Engine Pressure
100 ft 200 ft 300 ft 400 ft 250 30 psi 45 psi 65 psi 85 psi 95 psi
300 40 psi 60 psi 80 psi 100 psi 120 psi 350 60 psi 85 psi 110 psi 135 psi 160 psi
Friction Loss for Single 3 inch Hose Line
GPM FL 100 ft 200 ft 300 ft 400 ft 500 ft 600 ft 700 ft 800 ft 100 1 1 2 3 4 5 6 7 8 150 2 2 4 6 8 10 12 14 16 200 4 4 8 12 16 20 24 28 32 250 5 5 10 15 20 25 30 35 40 300 10 10 20 30 40 50 60 70 80 400 15 15 30 45 60 75 90 105 120 500 25 25 50 75 100 125 150 175 200 600 35 35 70 105 140 175 210 245 Na 700 50 50 100 150 200 250 Na Na Na
Friction Loss for Single 5 inch Hose Line
GPM FL 100 ft 200 ft 300 ft 400 ft 500 ft 800 ft 1000 ft 1500 ft 500 2 2 4 6 8 10 16 20 30 800 5 5 10 15 20 25 40 50 75 1000 8 8 16 24 32 40 64 80 120 1200 12 12 24 36 48 60 96 120 Na 1500 18 18 36 54 72 90 144 Na Na
Definitions
AMBIENT PRESSSURE
The air pressure that is around us at all times. Also called atmospheric pressure (14.7 psi).
BACK PRESSURE
Also known as head pressure. Rule of thumb is ½ pound per foot of elevation. CAPACITY
Operation of a pump at or near it’s rated capacity. Also know as pumping in parallel or volume.
CAVITATION
A condition in which microscopic air pockets that are cast into the pump explosively expand when the inside of the pump is subject to lower then atmospheric pressures. This is usually caused by trying to pump more water then is available.
CLAPPER
A hinged valve which permits the flow of water in only one direction. CLASS “A” PUMPER
A fire apparatus where the pump is rated at a minimum of 750 gpm and carries hose, water and ladders.
COMPOUND GAGE
A pressure gage capable of recording pressures both above and below atmospheric. This gage is found on the intake side of the pump.
HEAD, HEAD PRESSURE
Pressure formed by a vertical column of water. Rule of thumb is ½ psi per foot of elevation. Actual pressure is .434 psi.
FRICTION LOSS
The loss of energy in psi as water moves through a hose. IMPELLER
The rotating part of a pump that is made of brass or bronze which pressurizes the water.
KINETIC ENERGY
LIFT
The vertical distance from the center of the pump to the surface of a static water source measured in feet.
NET PUMP PRESSURE
The amount of pressure actually developed by the pump. This is determined by subtracting the intake pressure from the discharge pressure.
PSIA
Pounds per square inch ambient. Pump pressure plus atmospheric pressure added. PSIG
Pounds per square inch gage. This is the pressure that we read on the pressure gage. The gage has been calibrated to remove the 14.7 psi atmospheric pressure.
PRESSURE
Force per unit area expressed in psi. RESIDUAL PRESSURE
The pressure reading when water is flowing. SERIES OPERATION
Water entering the pump is pumped from one impeller to the second impeller to increase pressure. Also known as pumping in pressure. Pumping capacity is limited to 70 percent of the rated capacity.
STATIC PRESSURE
The pressure reading with no water flowing. VACUUM
Pressures that are below atmospheric. VOLUME OPERATION
Water entering the pump is pumped through both impellers at the same time. This will give the pump its rated capacity. Also know as pumping in parallel.
SIAMESE
Device that has two female fitting that brings two hose lines into one. A fire department connection is a Siamese.
TRANSFER VALVE
A valve which switches the incoming water so the pump is pumping in pressure or volume.
WYE
A device that has one female fitting to two male fittings. Usually used to branch off a 2 ½” or a 3” supply into two 1 ¾” attack lines.
Formulas
1. Determine equivalent lengths
C
1/ C
2X
L
C = coefficient in table 2 C1 = Smaller Line C2 = Larger Line2. Change hose other then 2 ½” to equivalent length of 2 ½”
E 2 ½” = L/C
Hose Diameter (in.)
Coefficient
1 ½”
0.08
1 ¾”
0.13
2”
0.25
3” (2 ½” couplings) 2.5
3” (3” couplings)
2.95
3 ½”
5.88
4”
10.0
4 ½”
20.0
5”
25.0
6”
40.0
Example: 200 ft of 1 ¾” changed to an equivalent length of 2 ½” 200 ft/ 0.13 = 1,538 ft.
Practice Questions
Grade formula: H = G x L