Linux boot loader and boot in Raspberry Pi
Jonne Soininen
Aalto University - School of Electrical Engineering Otakaari 5
02150 Espoo, Finland
[email protected]
ABSTRACT
This paper documents an assignment in the Aalto University Seminar on ”Linux based Embedded Systems”. The aim of the paper is to experience hands on the Linux kernel boot between the low-level hardware setup and the startup of the Linux user space. The experiment consists of debugging the Linux kernel boot. The Raspberry Pi boot sequence is then described used the information obtained in the experiment.
Keywords
linux, kernel, boot sequence, bootloader, raspberry pi
1.
INTRODUCTION
There has been a range of computer development boards available in the market for some time. Many of the boards are based on a System on a Chip (SoC), which includes a processor based on the ARM processor architecture[1]. Of-ten the boards are aimed to allow developers access to a vendor’s technology and to develop on the platform before actual end-user products are available in the market. The supported operating systems for these platforms vary, but most of the development platforms run a version of Linux. In general, as the processing power and the memory capacity of the embedded systems have significantly increased, Linux has gained a lot of momentum as an embedded device op-erating system. Today Linux is being used in a wide range of devices including smartphones, television sets and even wrist watches.
Lately, the Raspberry Pi development platform [7] has emerged as a significant development board for educational purposes and especially, among the hobbyists. Over two million of these little boards have been sold today. The Raspberry Pi is a low-cost, single chip development platform originally de-signed to be used as an educational device to teach and learn computer science topics such as computer programming. The platform is developed by the Raspberry Pi Foundation based in the UK. The heart of the platform is the Broadcom
BCM 2835 SoC, which includes an ARM1176JZF-S proces-sor and Broadcom VideoCore IV Graphics Processing Unit (GPU).
The aim of this paper is to study and to document the Linux boot process on the Raspberry Pi. The Linux boot process can be divided into two separate parts; the hardware boot, which prepares the hardware for the Linux to start, and the Linux boot sequence itself. We will study and document both of these in this paper. The study consists of a litera-ture study of the Raspberry Pi boot process examining the available documentation of the Raspberry Pi hardware boot and the Linux boot sequence. In addition, a practical exper-iment has been conducted to examine parts of the hardware boot and debugging the Linux boot process itself.
1.1
Related work
The Raspberry Pi hardware boot process overview is de-scribed in a few forum messages and in other posts in the Internet. [8, 18, 4]. All of these posts describe the Raspberry Pi hardware boot process and do it very similar manner. We will describe this process later in the document. The boot process of the BCM2835 is proprietary to the SoC manufac-turer and therefore, only the externals of the process have been published. However, the information is adequate for developers to use the Raspberry Pi and understand in which state the board is after the hardware boot.
There are few articles describing parts of the early Linux boot process. These articles describe the very beginning of the platform dependent part of the boot process. This information is available on a few Internet websites. As of-ten in the web articles, the focus, quality and depth of the articles vary greatly as do the publishing dates. Prescott Linux article lists the functions called during the boot pro-cess well, but does not explain the propro-cess itself[12]. VEDA-Solutions has a nice article about bootloader boot process and the very beginning of the Linux boot[19]. A blogpost titled ”Work notes to self” has a good listing of the Linux kernel boot process[21]. However, this is rather just a listing of the steps of the boot process rather than explaining what the boot actually does. Even though, the early parts of the boot process can be found with relatively good quality. Though, some data can be found in the Internet we believe there is value in practically experimenting with the Linux boot process and documenting the experiment and provid-ing an explanation on the sequence itself. Especially, the
Raspberry Pi Host computer USB to Seria
Raspberry Pi GPIO
Figure 1: Raspberry Pi connected to a host com-puter via console port
Linux boot sequence between the hardware dependent boot and the start of the user space process benefits from bet-ter description. Therefore, this article will attempt to cover especially that part.
1.2
Experiment setup
Exploring the state before the Linux kernel startup and the information the platform provides to the Linux kernel has been done by writing a ”bare metal” program to output the kernel parameters and the status of the Central Processing Unit (CPU) registers. A bare metal program is a program that is run directly on the SoC without an operating system - hence, directly on the metal. The test setup is shown in figure 1.
Figure 1 shows the Raspberry Pi connected to a host com-puter via the Raspberry Pi GPIO pins that function as a console port (PINs 6,8, 10). These pins are marked on the picture. The PIN 6 is the ground, the PIN 8 the Rx, and PIN 10 is the Tx. The contents of the kernel parameters and the relevant registers is printed by the the bare metal program on the Raspberry Pi via the console port. The host computer is connected to the test setup via a USB-to-serial converter. A terminal emulator program is used at the host computer to visualize the Raspberry Pi output.
The kernel startup is similar in all platforms. There is little machine dependent code that sets the hardware and provides adaptation of the kernel to the hardware platform. However, there seems to be very little literature explaining what Linux does in which order. Therefore, the goal of this study is to document the kernel boot process before the user space is started. There are two alternative approaches to study the sequence the kernel goes in startup. First alternative would be to go through the kernel code manually and see what is done in what order. The second alternative is to debug through the sequence. The later is selected in this case. The test setup is shown in figure 2.
Figure 2 shows the Raspberry Pi being connected to the host computer via the Joint Test Action Group (JTAG) adapter. The host computer is running Open On Chip Debugger (OpenOCD)[14] software, which runs the JTAG hardware connected to the host computer’s USB port. The debugging of the kernel is done by using the Gnu Project Debugger (GDB). GDB is loaded with the Linux kernel image
(vm-Raspberry Pi Host computer
USB-to-serial
JTAG adapter
Figure 2: Raspberry Pi connected with JTAG and console port
linux) and connected to the OpenOCD for single stepping through the boot process. The actual configuration is out-side of the scope of this paper. However, an interested reader can find the configuration description on the seminar wiki page[16]. The tools used in this experiment are commonly used to debug Linux kernel code and they are relatively good for this purpose. The console port is used to visualize the Linux kernel printouts during this process to understand what the kernel is doing while we step through it.
The Linux kernel is compiled with optimizations. This is required by the kernel and the kernel will not run properly without the optimizations. The optimizations make the de-bugging process somewhat less straight forward and there-fore, simply single stepping though the boot process is not possible - a bit more effort has to be put into the process. Despite of this, the task can be performed and the Linux kernel boot sequence can be followed with this setup. These two setups are used to obtain the needed information for studying the hardware preparation for Linux kernel start, and the Linux kernel startup process. The following sections explain the theory and then the outcome of these practical studies.
2.
PREPARING FOR THE BOOT
Linux has been designed to be as hardware independent as possible. Therefore, the hardware has to be set up in a certain way for the Linux kernel to boot. We will go through the setup later in this section.
In Intel processor based Personal Computers (PCs), the hardware setup is done by the Basic Input/Output System (BIOS). BIOS sets the hardware and loads the kernel or a bootloader. However, embedded systems do not have BIOS. Therefore, they rely on a combination of firmware and/or a bootloader to set up the hardware before the kernel start. The boot is often started from a Read Only Memory (ROM) embedded in the System on a Chip (SoC) or similar persis-tent storage such as NOR Flash. The ROM code then reads a firmware image or directly the bootloader from a persistent
storage such as Flash memory.
An embedded ARM processor-based system can have a se-ries of different bootloaders performing these tasks. Some of the tasks may be performed by proprietary software pro-vided by the SoC vendor and some by a general purpose bootloader such as Barebox[3].
In an embedded Linux environment, the purpose of the firmware and the bootloader is to initialize the hardware to be ready for Linux to boot. The Linux kernel expects at minimum that the following has been initialized before the kernel boot:
1. Initialize base hardware
2. Load the kernel image at the right memory address 3. Initialize boot parameters
4. Set the Linux machine type (MACH_TYPE)
5. enter the kernel with the appropriate register values
In addition, usually the bootloader initializes at least the serial console. In modern systems, the boot process may in-clude additional functionality - setting up additional hard-ware and peripherals, setting up a secure environment such as ARM TrustZone[2] and verifying the loaded software im-ages as a part of a secure boot.
The base hardware initialization includes setting up the CPU speed, memory timings, detecting or setting up the location and the size of the Random Access Memory (RAM), and detecting the machine type. This information is passed to the kernel by both CPU registers and by kernel parameters. The machine type is
The Linux kernel expects to get the following information via the CPU registers:
• CPU register 0 (r0) must be 0
• CPU register 1 (r1) must contain the ARM Linux ma-chine type
• CPU register 2 (r2) must contain the physical address of the Linux parameter list
The CPU register information is not sufficient for the Linux kernel. Additional information needs to be given to the ker-nel via the kerker-nel parameters.
2.1
Kernel parameters
The Linux kernel requires certain information to start prop-erly. Some basic information is provided by the CPU reg-isters, but this is not adequate for the kernel to start. There-fore, Linux kernel supports kernel parameters that are passed in the kernel tagged list. These are also known as ”ATAGs”. ATAGs are binary encoded key-value data structures de-fined inlinux/include/asm/setup.h. At the minimum, the ATAGs provide the size and location of the system memory
ATAG_CORE
ATAG_MEM
ATAG_NONE
Figure 3: Minimum ATAG configuration
and the root filesystem location. In addition, other infor-mation such as the kernel command line parameters can be passed via the ATAGs.
The ATAGs are not strictly ordered, but they have to start with an ATAG CORE and end with ATAG NONE. Some of the relevant ATAGs are listed in the table below.
ATAG Value Description
ATAG CORE 0x54410001 Starts the ATAG list ATAG NONE 0x00000000 Ends the ATAG list ATAG MEM 0x54410002 Describes the
physi-cal area of memory ATAG RAMDISK 0x54410004 Describes how the
ramdisk will be used by the kernel ATAG INITRD2 0x54420005 Describes the
phys-ical location of the compressed ramdisk image
ATAG CMDLINE 0x54410009 Passes the command-line to the kernel
Most of the ATAGs are optional. At the minimum, ATAG MEM has to be present. Therefore, the minimum set of ATAGs is the ATAG CORE, ATAG MEM and ATAG NONE. This minimum setup is shown in figure 3.
2.2
Bootloaders
As described before, the bootloader can be proprietary soft-ware specific to the hardsoft-ware and SoC, a general purpose bootloader, or a combination of those two. This section concentrates on describing the general purpose bootload-ers. Bootloaders come in many shapes and forms. Some of them are relatively simple and some have more functional-ity. Some of the bootloaders only support certain processors or platforms, and some have support for different platforms. Perhaps, the most well known bootloaders from the Linux desktop world are the GRand Unified Bootloader (GRUB)[9] and Linux Loader (LILO) [5]. These, however, are specific to Intel x86 based PC platforms and are therefore, not used in ARM based systems.
The best known bootloaders for ARM are Das UBoot -the Universal Boot Loader[6] and Barebox[3]. Both U-Boot
and Barebox originate from the same code. Barebox was originally separated from U-Boot to be the second version of U-Boot (U-Boot-v2), but the name was changed when the two projects separated. Barebox is based on the Linux kernel structure and ideology including drivers and the use of POSIX[11] whereas U-Boot is simpler in structure, but needs more effort to be ported. Both projects are still active and used in different platforms. However, Barebox has gained more traction in last couple of years.
As stated before, together with the platform ROM code and firmware, the bootloader is responsible for setting up the hardware environment for Linux kernel to start. In addi-tion, bootloaders have additional features including network boot, boot scripting, selecting the operating system image to boot, supporting additional operating systems besides Linux and advanced debugging functionality. These features are useful especially at the platform development phase. In ad-dition, using a general purpose bootloader instead of writ-ing a proprietary one reduces development cost and risk as the functionality is already available and tested on previous platforms.
3.
BOOT SEQUENCE IN RASPBERRY PI
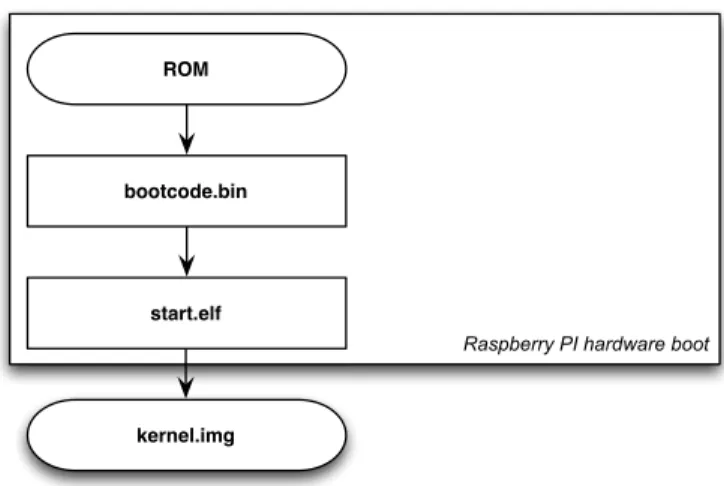
As many other ARM-based SoCs the boot starts from a ROM code. At the beginning in Raspberry Pi, the ARM processor and the SDRAM are off, and the VideoCore GPU is on. The GPU starts executing the ROM code, which reads the SD card and loads the second stage bootloader (bootcode.bin) into the GPU Layer 2 cache and runs it.
The bootcode.bin enables SDRAM and loads the GPU
firmware (start.elf). Thestart.elfreads the Raspberry Pi configuration file (config.txt), the kernel commandline configuration file (cmdline.txt), and the Linux kernel image (kernel.img). This boot sequence is described in figure 4. Before starting the kernel, the Raspberry Pi proprietary boot process initializes the memory, sets the ATAGs, and the CPU registers. The ATAGs are stored in the memory location 0x100, which is passed through the CPU register r2. The machine type is set to 3138 (BCM2708). The kernel ex-ecution starts from thekernel.imgat the address 0x8000 by default. The kernel memory address can also be configured to be something else in the Raspberry Pi boot configuration fileconfig.txt.
As seen above, the Raspberry Pi does not use a general pur-pose bootloader. The boot process is proprietary and can only be controlled by the options set at config.txt and
cmdline.txt. However, this setup allows running any code at the start address fromkernel.img. Thus, also a general purpose bootloader could be loaded at boot instead of di-rectly loading the Linux kernel. Currently, at least U-Boot and Barebox support Raspberry Pi. Generally, a general purpose bootloader is not needed to boot Linux. However, they may give additional benefits - for instance, ability to select between multiple different boot images (multiple ker-nel.imgfiles) at boot time rather than changing the SD card to boot a different image.
In addition, to Linux and general purpose bootloaders the Raspberry Pi supports also other operating systems and one can even write so called bare metal code. Code that runs
Raspberry PI hardware boot
ROM bootcode.bin
start.elf kernel.img
Figure 4: Raspberry Pi hardware boot sequence
directly on the hardware without an operating system is called bare metal as it runs directly on the hardware - on the bare metal.
For Linux, the Raspberry Pi bootloader sets the ATAGs. The Raspberry Pi set ATAGs are ATAG CORE, ATAG MEM and ATAG CMDLINE based on the command line config-uration file cmdline.txt. The sequence is ended with the ATAG NONE to mark the end of ATAGs.
After the Raspberry Pi boot sequence loads thekernel.img
and jumps to the address 0x8000, the Raspberry Pi boot-loader has served its purpose and the control is given to the Linux kernel.
4.
LINUX BOOT SEQUENCE
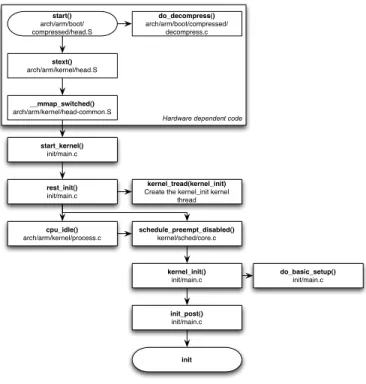
The goal of this section is to describe Linux boot sequence from the entrance to the Linux code to the point where the Linux user space starts (init). In the given space, we can only provide an overview of the boot sequence. The file names and function call names, however, hopefully help an interested reader to more detailed information. We will walk through the different stages of the Linux boot and attempt to give an overview of what is happening in each step. It is important to notice that the boot sequence is Linux kernel version dependent. The version used for the purpose of this paper was 3.6.11, which was the current kernel version for Raspberry Pi at the time of writing this paper. Figure 5 provides an illustration of the boot sequence, which will help the reader to follow the text.
4.1
Hardware dependent startup
The Linux kernel is stored in the permanent storage in the compressed form. Therefore, the Linux kernel image has to be decompressed before running the actual kernel code can be run. The entrance to this process starts from the
func-tion start defined in arch/arm/boot/compressed/head.S.
The purpose of this module is to set the hardware for the decompression of the kernel. Thehead.Srecognizes the pro-cessor, turns on the caches and the Memory Management Unit (MMU), and makes sure the decompression process does not overwrite the kernel image during the decompres-sion. The actual decompression is done bydo_decompress
Hardware dependent code start() arch/arm/boot/ compressed/head.S do_decompress() arch/arm/boot/compressed/ decompress.c stext() arch/arm/kernel/head.S __mmap_switched() arch/arm/kernel/head-common.S start_kernel() init/main.c rest_init() init/main.c kernel_tread(kernel_init)
Create the kernel_init kernel thread cpu_idle() arch/arm/kernel/process.c schedule_preempt_disabled() kernel/sched/core.c kernel_init() init/main.c do_basic_setup() init/main.c init_post() init/main.c init
Figure 5: The Linux kernel boot sequence
inarch/arm/boot/compressed/decompress.c, which
actu-ally calls the correct decompression function. Multiple com-pression algorithms are supported including GZIP [10] and LZA [20].
After the decompression, the caches are turned off again to set the hardware to the initial state the kernel code expects it to be in. The next stage is started from stext in the
arch/arm/kernel/head.S.
The code inarch/arm/kernel/head.Ssets the hardware for the architecture independent code to run. Thehead.Ssets both the processor and the board by setting the caches, the final MMU tables and then runs
arch/arm/kernel/head-common.S. head-common.S copies the data segment to the
RAM and branches to the architecture independent code by callingstart_kernel.
4.2
Machine independent kernel startup
The first steps of the boot are performed mostly in code written in processor architecture dependent assembler code. In the case of Raspberry Pi, this is ARM assembler. Clearly, this code is different for every processor architecture. How-ever, the purpose of Linux is to run on multiple processor architectures. Therefore, the architecture independent code is written in C. The architecture independent code is en-tered atstart_kernel. Though, the Linux kernel is written to be architecture and platform dependent, the kernel does call also architecture and platform dependent initialization routines at start up, and even during runtime.
The start_kernel is responsible for low-level initializing the hardware and the kernel environment before moving to higher level initialization. This includes, loosely in the call order of thestart_kernel, setting up symmetric
multi-core processing (SMP) for systems where this is applicable (not in Raspberry PI), setting up Linux cgroups[13], pars-ing the Linux kernel command line parameters, settpars-ing up the number of CPUs, setting up architecture specific items including Direct Memory Access (DMA), setting up ker-nel memory management, setting up data structures and caches, initializing the scheduler, initializing Read-Copy Up-date (RCU)[15], setting up the interrupts, timers, the con-sole, and initializing the /proc filesystem. All this initial-ization happens in sequence in the start_kernel. After this the start_kernel calls a function innocently named ”rest_init”.
4.3
Kernel initialization
rest_init creates the Linux kernel initialization function,
kernel_init, as the first kernel thread with the Process Identification (PID) 1. In addition,rest_initsets the ker-nel task scheduler as PID 2. After this, therest_initruns the kernel scheduler one time. When the scheduler returns from its first run, therest_initenters the CPU idle loop
-cpu_idle.cpu_idleis an infinite loop where the kernel uses its time if there is nothing else to do. If there is something better to do than the CPU just stand idle, the scheduler has the control of running the different processes until the CPU is idle again. The kernel does not exit this loop as long as the kernel - and therefore, Linux - is running.
The scheduler runs as the first process the kernel_init.
kernel_initis the Linux kernel initialization sequence, which is responsible for performing the basic setup and then call-ing the user-space init. Most of the setup is done within a function calleddo_basic_setup. In textttdo basic setup, the Raspberry Pi Linux kernel initializes virtual memory, drivers, some special files in the /proc filesystem and ini-tializes all the built-in modules. The Built-in modules in-clude, for instance, the networking stack, file system sup-port, video, usb and many more. These are loaded in certain order indicated by the module code itself and the linker at the kernel built phase. In the kernel version used in writing this paper, the following order defined ininclude/linux/init.h.
1. ”early” 2. ”core” 3. ”postcore” 4. ”arch” 5. ”subsys” 6. ”fs” 7. ”device” 8. ”late” 9. ”security”
Generally, more architecture orientated modules are initial-ized earlier in the process to enable more general modules be initialized later. For instance, in the ”device” section, most of the built-in device drivers are loaded. Just to note,
the built-in kernel module initialization is different from dy-namic kernel module initialization that can be done from the Linux command line. The modules initialized in this phase are statically linked with the kernel and they cannot be unloaded.
In the Linux kernel configuration used in this test setup, the kernel initialized over 260 modules. Obviously, listing all of these here is not practical. Therefore, an interested reader can find the built-in modules and their order from the course wiki[17].
After these kernel services are initialized, thedo_basic_setup
returns and thekernel_initcallsinit_post, which starts the Linux user-space by executing the first user-space pro-graminit. Theinitreplaces thekernel_initas the pro-cess running with PID 1. This concludes the kernel boot sequence and starts the Linux user space.
5.
SUMMARY
The purpose of this paper has been to describe the Linux kernel boot sequence. In order the author to understand the boot process adequately to describe it and experiment on the Linux boot had to be done. The experiment consisted of debugging the Linux kernel using a JTAG-programmer and the
6.
ACKNOWLEDGMENTS
Arseny Kurnikov for enabling JTAG for the Linux kernel with Raspberry Pi.
7.
REFERENCES
[1] ARM. Arm architecture.
http://www.arm.com/products/processors/
instruction-set-architectures/index.php,
November 2013. [2] ARM. Arm trustzone.
http://www.arm.com/products/processors/
technologies/trustzone/index.php, November 2013.
[3] Barebox. The barebox bootloader.
http://barebox.org/, November 2013.
[4] T. K. Code. How the raspberry pi boots up.
http://thekandyancode.wordpress.com/2013/09/
21/how-the-raspberry-pi-boots-up/, November
2013.
[5] Debian. Linux loader (lilo).
http://lilo.alioth.debian.org/, November 2013.
[6] DENX. Das u-boot – the universal boot loader.
http://www.denx.de/wiki/U-Boot, November 2013.
[7] R. P. Foundation. Raspberry pi.
http://www.raspberrypi.org/, November 2013.
[8] R. P. Foundation. Raspberry pi boot process.
http://www.raspberrypi.org/phpBB3/viewtopic. php?f=63&t=6685, November 2013.
[9] GNU. Grand unified bootloader (grub).
http://www.gnu.org/software/grub/, November
2013.
[10] gzip.org. The gzip homepage.http://www.gzip.org/, December 2013.
[11] IEEE. Posix - austin joint working group.http:
//standards.ieee.org/develop/wg/POSIX.html,
November 2013.
[12] P. Linux. Arm linux booting process.
http://www.prescottlinux.com/2011/
prescott-linux/arm-linux-booting-process/,
October 2011.
[13] P. Menage. Cgroups.https://www.kernel.org/doc/
Documentation/cgroups/cgroups.txt, December
2013.
[14] OpenOCD. Open on-chip debugger.
http://openocd.sourceforge.net/, November 2013.
[15] J. W. Paul E. McKenney. Arm linux booting process.
http://lwn.net/Articles/262464/, October 2011.
[16] J. Soininen. Debugging raspberry pi linux kernel with jtag and gdb.https://wiki.aalto.fi/display/ EmbeddedLinux/Debugging+Raspberry+Pi+Linux+
kernel+with+JTAG+and+GDB, December 2013.
[17] J. Soininen. kernel init initialized kernel services.
https://wiki.aalto.fi/display/EmbeddedLinux/
kernel_init+initialized+kernel+services,
December 2013.
[18] Stackexchange. What happens during the boot process.http:
//raspberrypi.stackexchange.com/questions/
1200/what-happens-during-the-boot-process,
November 2013.
[19] VEDASolutions. Arm linux booting process.http:
//blog.techveda.org/arm-linux-booting-process/,
March 2012.
[20] www.7 zip.org. 7zip.http://www.7-zip.org/, December 2013.
[21] Yeg239. Work: Linux boot process on arm cpu.
http://yeg239.blogspot.com/2012/05/
work-linux-boot-process-on-arm-cpu.html,