133
T
U
T
O
R
I
A
L
7
Wage
Calculator
Application
Introducing Algorithms, Pseudocode
and Program Control
O b j e c t i v e s
In this tutorial, you will learn to: ■ Understand basic
problem-solving techniques.
■ Understand control structures. ■ Understand and create
pseudocode.
■ Use the If…Then and If…Then…Else selection statements to choose among alternative actions.
■ Use the assignment operators. ■ Use the debugger’s Watch
window.
O u t l i n e
7.1 Test-Driving the Wage Calculator Application 7.2 Algorithms 7.3 Pseudocode 7.4 Control Structures 7.5 If…Then Selection Statement
7.6 If…Then…Else Selection Statement
7.7 Constructing the Wage Calculator Application 7.8 Assignment Operators 7.9 Formatting Text
7.10 Using the Debugger: The Watch Window
7.11 Wrap-Up
efore writing an application, it is essential to have a thorough understand-ing of the problem you need to solve. This will allow you to design a care-fully planned approach to solving the problem. When writing an application, it is equally important to recognize the types of building blocks that are available and to use proven application-construction principles. In this tuto-rial, you will learn the theory and principles of structured programming. Struc-tured programming is a technique for organizing program control that will help you develop applications that are clear and easier to debug and modify. The tech-niques presented are applicable to most high-level languages, including Visual Basic .NET.
7.1 Test-Driving the
Wage
Calculator
Application
In this section, we preview this tutorial’s Wage Calculator application. This application must meet the following requirements:
This application calculates wages from hourly salary and hours worked per week. Normally, if an employee has worked 40 or fewer hours, the employee is paid regular wages. The calculation differs if the employee has worked more than the standard 40-hour work week. In this tutorial, we introduce a programming
Application Requirements
A payroll company calculates the gross earnings per week of employees. Employees’ weekly salaries are based on the number of hours they worked and their hourly wages. Create an application that accepts this information and calculates the employee’s total (gross) earnings. The application assumes a standard work week of 40 hours. The wages for forty or fewer hours are cal-culated by multiplying the employee’s hourly salary by the number of hours worked. Any time worked over 40 hours in a week is considered ”overtime“ and earns time and a half. Salary for time and a half is calculated by multiply-ing the employee’s hourly wage by 1.5 and multiplymultiply-ing the result of that calcu-lation by the number of overtime hours worked. The total overtime earned is added to the user’s gross earnings for the regular 40 hours of work to calculate the total earnings for that week.
tool known as a control structure that allows us to make this distinction and per-form different calculations based on different user inputs. You begin by test-driving the completed application. Then, you will learn the additional Visual Basic .NET technologies that you will need to create you own version of this application.
Test-Driving the
Wage
Calculator
Application
7.2 Algorithms
Computing problems can be solved by executing a series of actions in a specific order. A procedure for solving a problem, in terms of:
1. the actions to be executed and
2. the order in which these actions are to be executed
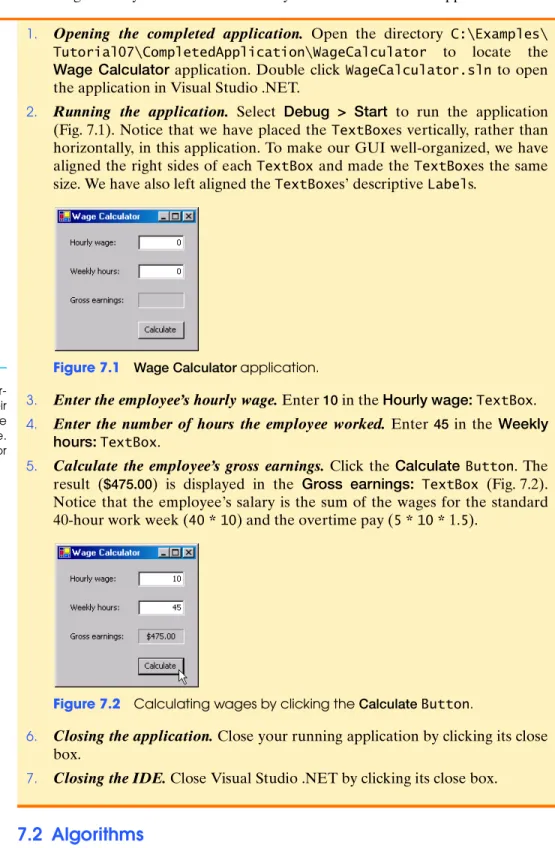
1. Opening the completed application. Open the directory C:\Examples\ Tutorial07\CompletedApplication\WageCalculator to locate the Wage Calculator application. Double click WageCalculator.sln to open the application in Visual Studio .NET.
2. Running the application. Select Debug > Start to run the application (Fig. 7.1). Notice that we have placed the TextBoxes vertically, rather than horizontally, in this application. To make our GUI well-organized, we have aligned the right sides of each TextBox and made the TextBoxes the same size. We have also left aligned the TextBoxes’ descriptive Labels.
Figure 7.1 WageCalculator application.
3. Enter the employee’s hourly wage. Enter 10 in the Hourlywage:TextBox. 4. Enter the number of hours the employee worked. Enter 45 in the Weekly
hours:TextBox.
5. Calculate the employee’s gross earnings. Click the CalculateButton. The result ($475.00) is displayed in the Gross earnings: TextBox (Fig. 7.2). Notice that the employee’s salary is the sum of the wages for the standard 40-hour work week (40*10) and the overtime pay (5*10* 1.5).
Figure 7.2 Calculating wages by clicking the CalculateButton.
6. Closing the application. Close your running application by clicking its close box.
7. Closing the IDE. Close Visual Studio .NET by clicking its close box.
GUI Design Tip
When using multiple TextBoxes ver-tically, align the TextBoxes on their right sides, and where possible make the TextBoxes the same size. Left-align the descriptive Labels for such TextBoxes.
is called an algorithm. The following example demonstrates the importance of cor-rectly specifying the order in which the actions are to be executed. Consider the “rise-and-shine algorithm” followed by one junior executive for getting out of bed and going to work: (1) get out of bed, (2) take off pajamas, (3) take a shower, (4) get dressed, (5) eat breakfast and (6) carpool to work. This routine prepares the execu-tive for a producexecu-tive day at the office.
However, suppose that the same steps are performed in a slightly different order: (1) get out of bed, (2) take off pajamas, (3) get dressed, (4) take a shower, (5) eat breakfast, (6) carpool to work. In this case, our junior executive shows up for work soaking wet.
Indicating the appropriate sequence in which to execute actions is equally cru-cial in computer programs. Program control refers to the task of ordering an appli-cation’s statements correctly. In this tutorial, you will begin to investigate the program-control capabilities of Visual Basic .NET.
SELF-REVIEW
1. refer(s) to the task of ordering an application’s statements correctly.2. A(n) is a plan for solving a problem in terms of the actions to be executed and the order in which these actions are to be executed.
Answers: 1) b. 2) c.
7.3 Pseudocode
Pseudocode is an informal language that helps programmers develop algorithms. The pseudocode we present is particularly useful in the development of algorithms that will be converted to structured portions of Visual Basic .NET applications. Pseudocode resembles everyday English; it is convenient and user-friendly, but it is not an actual computer-programming language.
Pseudocode statements are not executed on computers. Rather, pseudocode helps you “think out” an application before attempting to write it in a programming language, such as Visual Basic .NET. In this tutorial, we provide several examples of pseudocode.
The style of pseudocode that we present consists solely of characters, so that you can create and modify pseudocode by using editor programs, such as the Visual Studio .NET code editor or Notepad. A carefully prepared pseudocode program can be converted easily to a corresponding Visual Basic .NET application. Much of this conversion is as simple as replacing pseudocode statements with their Visual Basic .NET equivalents. Let us look at an example of a pseudocode statement:
Assign 0 to the counter
This pseudocode statement provides an easy-to-understand task. You can put several such statements together to form an algorithm that can be used to meet application requirements. When the pseudocode algorithm has been completed, the programmer can then convert pseudocode statements to their equivalent Visual Basic .NET statements. The pseudocode statement above, for instance, can be con-verted to the following Visual Basic .NET statement:
intCounter = 0
Pseudocode normally describes only executable statements, which are the actions that are performed when the corresponding Visual Basic .NET application
a) Actions b) Program control
c) Control structures d) Visual programming
a) chart b) control structure
c) algorithm d) ordered list
Software Design Tip
Pseudocode helps the programmer conceptualize an application dur-ing the application-design process. The pseudocode statements can be converted to Visual Basic .NET at a later point.
is run. An example of a programming statement that is not executed is a declara-tion. The declaration
Dim intNumber As Integer
informs the compiler of intNumber’s type and instructs the compiler to reserve space in memory for this variable. The declaration does not cause any action, such as input, output or a calculation, to occur when the application executes, so we would not include this information in the pseudocode.
SELF-REVIEW
1. is an artificial and informal language that helps programmers develop algorithms.2. Pseudocode .
Answers: 1) a. 2) c.
7.4 Control Structures
Normally, statements in an application are executed one after another in the order in which they are written. This is called sequential execution. However, Visual Basic .NET allows you to specify that the next statement to be executed might not be the next one in sequence. A transfer of control occurs when an executed state-ment does not directly follow the previously executed statestate-ment in the written application. This is common in computer programs.
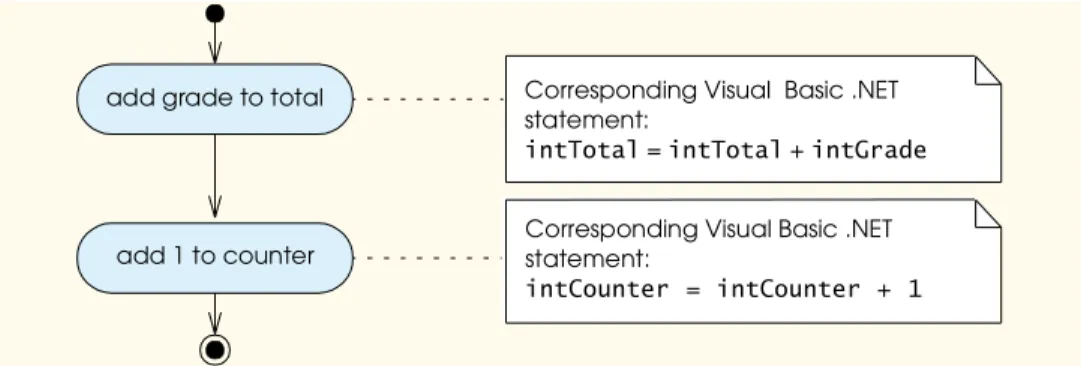
All programs can be written in terms of only three control structures: the sequence structure, the selection structure and the repetition structure. The sequence structure is built into Visual Basic .NET—unless directed to act other-wise, the computer executes Visual Basic .NET statements sequentially—that is, one after the other in the order in which they appear in the application. The activity diagram in Fig. 7.3 illustrates a typical sequence structure, in which two calculations are performed in order. We discuss activity diagrams in detail following Fig. 7.3.
Figure 7.3 Sequence structure activity diagram.
Activity diagrams are part of the Unified Modeling Language (UML)—an industry standard for modeling software systems. An activity diagram models the activity (also called the workflow) of a portion of a software system. Such activities may include a portion of an algorithm, such as the sequence structure in Fig. 7.3. Activity diagrams are composed of special-purpose symbols, such as action-state symbols (a rectangle with its left and right sides replaced with arcs curving out-ward), diamonds and small circles; these symbols are connected by transition
a) Pseudocode b) VB-Speak
c) Notation d) None of the above.
a) usually describes only declarations b) is executed on computers c) usually describes only executable lines of code
d) usually describes declarations and executable lines of code
add grade to total
add 1 to counter
Corresponding Visual Basic .NET statement:
intTotal=intTotal+intGrade
Corresponding Visual Basic .NET statement:
arrows, which represent the flow of the activity. Figure 7.3 does not include any dia-mond symbols—these will be used in later activity diagrams, beginning with Fig. 7.6. Like pseudocode, activity diagrams help programmers develop and represent algorithms, although many programmers prefer pseudocode. Activity diagrams clearly show how control structures operate.
Consider the activity diagram for the sequence structure in Fig. 7.3. The activity diagram contains two action states that represent actions to perform. Each action state contains an action expression—for example, “add grade to total” or “add 1 to counter”—that specifies a particular action to perform. Other actions might include calculations or input/output operations. The arrows in the activity diagram are called transition arrows. These arrows represent transitions, which indicate the orderin which the actions represented by the action states occur—the application that implements the activities illustrated by the activity diagram in Fig. 7.3 first adds intGrade to intTotal, then adds 1 to intCounter.
The solid circle located at the top of the activity diagram represents the activ-ity’s initial state—the beginning of the workflow before the application performs the modeled activities. The solid circle surrounded by a hollow circle that appears at the bottom of the activity diagram represents the final state—the end of the work-flow after the application performs its activities.
Notice, in Fig. 7.3, the rectangles with the upper-right corners folded over. These look like sheets of paper and are called notes in the UML. Notes are like comments in Visual Basic .NET applications—they are explanatory remarks that describe the purpose of symbols in the diagram. Figure 7.3 uses UML notes to show the Visual Basic .NET code that the programmer might associate with each action state in the activity diagram. A dotted line connects each note with the element that the note describes. Activity diagrams normally do not show the Visual Basic .NET code that implements the activity, but we use notes here to show you how the dia-gram relates to Visual Basic .NET code.
Visual Basic .NET provides three types of selection structures, which we dis-cuss in this tutorial and in Tutorial 11. The If…Then selection structure performs (selects) an action (or sequence of actions) based on a condition. A condition is an expression with a true or false value that is used to make a decision. Conditions are evaluated (that is, tested) to determine whether their value is true or false. These values are of data type Boolean and are specified in Visual Basic .NET code by using the keywords True and False. Sometimes we refer to a condition as a Bool-ean expression.
If the condition evaluates to true, the actions specified by the If…Then struc-ture will execute. If the condition evaluates to false, the actions specified by the If…Then structure will be skipped. The If…Then…Else selection structure per-forms an action (or sequence of actions) if a condition is true and perper-forms a differ-ent action (or sequence of actions) if the condition is false. The Select Case structure, discussed in Tutorial 11, performs one of many actions (or sequences of actions), depending on the value of an expression.
The If…Then structure is called a single-selection structure because it selects or ignores a single action (or a sequence of actions). The If…Then…Else structure is called a double-selection structure because it selects between two different actions (or sequences of actions). The SelectCase structure is called a multiple-selection structure because it selects among many different actions or sequences of actions.
Visual Basic .NET provides seven types of repetition structures—While…End While, Do While…Loop, Do…Loop While, Do Until…Loop, Do…Loop Until, For…Next and For Each…Next. Repetition structures Do While…Loop and Do Until…Loop are covered in Tutorial 8; Do…Loop While and Do…LoopUntil are covered in Tutorial 9; For…Next is covered in Tutorial 10; and ForEach…Next is covered in Tutorial 20.1 The words If, Then, Else, End, Select, Case, While, Do, Until, Loop, For, Next and Each are all Visual Basic .NET keywords—Appendix F
includes a complete list of Visual Basic .NET keywords. We discuss many of Visual Basic .NET’s keywords and their respective purposes throughout this book. Visual Basic .NET has a much larger set of keywords than most other popular program-ming languages.
Visual Basic .NET has 11 control structures—the sequence structure, three types of selection structures and seven types of repetition structures. Each Visual Basic .NET application is formed by combining as many of each type of control structure as is necessary. As with the sequence structure in Fig. 7.3, each control structure is drawn with two small circle symbols—a solid black one to represent the entry point to the control structure, and a solid black one surrounded by a hollow circle to represent the exit point.
All Visual Basic .NET control structures are single-entry/single-exit control structures—each has exactly one entry point and one exit point. Such control struc-tures make it easy to build applications—the control strucstruc-tures are attached to one another by connecting the exit point of one control structure to the entry point of the next. This is similar to stacking building blocks, so, we call it control-structure stacking. The only other way to connect control structures is through control-struc-ture nesting, whereby one control struccontrol-struc-ture can be placed inside another. Thus, algorithms in Visual Basic .NET applications are constructed from only 11 different types of control structures combined in only two ways—this is a model of simplicity. Control structures in Visual Basic .NET are implemented as statements, so, from this point forward (after the following exercises), we use the term “statement” in preference to the term “structure.”
SELF-REVIEW
1. All Visual Basic .NET applications can be written in terms of types of control structures.2. The process of application statements executing one after another in the order in which they are written is called .
Answers: 1) c. 2) b.
7.5
If
…
Then
Selection Statement
A selection statement chooses among alternative courses of action in an applica-tion. For example, suppose that the passing grade on a test is 60 (out of 100). The pseudocode statement
If student’s grade is greater than or equal to 60 Display “Passed”
determines whether the condition “student’s grade is greater than or equal to 60” is true or false. If the condition is true, then “Passed” is displayed, and the next pseudocode statement in order is “performed.” (Remember that pseudocode is not a real programming language.) If the condition is false, the display statement is ignored, and the next pseudocode statement in order is performed.
1. We do not discuss the While…End While loop in this book. This repetition structure be-haves identically to the Do While…Loop and is provided for programmers familiar with previous versions of Visual Basic.
a) one b) two
c) three d) four
a) transfer of control b) sequential execution c) workflow d) None of the above.
Common
Programming Error Omission of the Then keyword in an
If…Then statement is a syntax error.
The preceding pseudocode If statement may be written in Visual Basic .NET as If intStudentGrade >= 60 Then
lblGradeDisplay.Text = "Passed" End If
Notice that the Visual Basic .NET code corresponds closely to the pseudocode, demonstrating the usefulness of pseudocode as an application-development tool. The body (sometimes called a block) of the If…Then statement displays the string "Passed" in a Label. The keywords EndIf close an If…Then statement.
Notice the indentation in the If…Then statement. Such indentation enhances application readability. The Visual Basic .NET compiler ignores whitespace charac-ters, such as spaces, tabs and newlines used for indentation and vertical spacing, unless the whitespace characters are contained in strings.
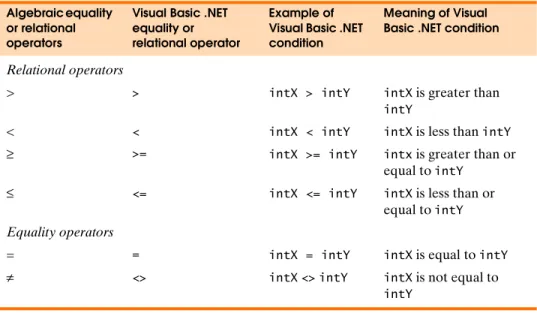
The condition between keywords If and Then determines whether the state-ment(s) within the If…Then statement will execute. If the condition is true, the body of the If…Then statement executes. If the condition is false, the body is not executed. Conditions in If…Then statements can be formed by using the equality operators and relational operators (also called comparison operators), which are summarized in Fig. 7.4. The relational and equality operators all have the same level of precedence.
Figure 7.5 shows the syntax of the If…Then statement. A statement’s syntax specifies how the statement must be formed to execute without syntax errors. Let’s look closely at the syntax of an If…Then statement. The first line of Fig. 7.5 speci-fies that the statement must begin with the keyword If and be followed by a condi-tion and the keyword Then. Notice that we have italicized condition. This indicates that, when creating your own If…Then statement, you should replace the text
con-dition with the actual concon-dition that you would like evaluated. The second line
indi-cates that you should replace statements with the actual statements that you want to be included in the body of the If…Then statement. These statements make up the body of the If…Then statement. Notice that the text statements is placed within square brackets. These brackets do not appear in the actual If…Then statement. Instead, the square brackets indicate that certain portions of the statement are optional. In this example, the square brackets indicate that all statements in the If…Then statement’s body are optional. Of course, if there are no statements in the body of the If…Then statement, then no actions will occur as part of that
state-Good Programming Practice
Indent the statements inside
If…Then statements to improve readability.
Common
Programming Error It is a syntax error to add spaces between the symbols in the opera-tors <>, >= and <= (as in < >, > =,
< =).
Common
Programming Error Reversal of the operators <>, >=
and <= (as in ><, =>, =<) is a syntax error.
Algebraic equality or relational operators
Visual Basic .NET equality or relational operator
Example of Visual Basic .NET condition
Meaning of Visual Basic .NET condition
Relational operators
> > intX > intY intX is greater than
intY
< < intX < intY intX is less than intY ≥ >= intX >= intY intx is greater than or
equal to intY
≤ <= intX <= intY intX is less than or
equal to intY Equality operators
= = intX = intY intX is equal to intY
≠ <> intX <> intY intX is not equal to intY
ment, regardless of the condition’s value. The final line indicates that the statement ends with the EndIf keywords.
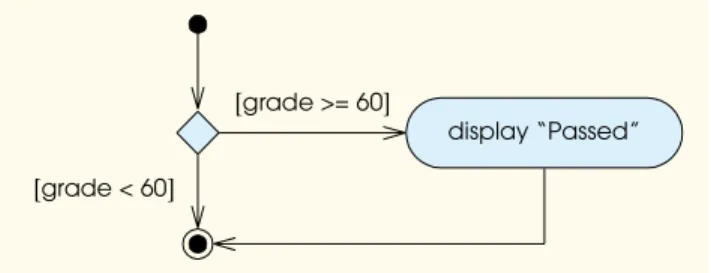
Figure 7.6 illustrates the single-selection If…Then statement. This activity dia-gram contains what is perhaps the most important symbol in an activity diadia-gram— the diamond, or decision symbol, which indicates that a decision is to be made. Note the two sets of square brackets above or next to the arrows leading from the decision symbol; these are called guard conditions. A decision symbol indicates that the workflow will continue along a path determined by the symbol’s associated guard conditions, which can be true or false. Each transition arrow emerging from a decision symbol has a guard condition (specified in square brackets above or next to the transition arrow). If a particular guard condition is true, the workflow enters the action state to which that transition arrow points. For example, in Fig. 7.6, if the grade is greater than or equal to 60, the application displays “Passed,” then transi-tions to the final state of this activity. If the grade is less than 60, the application immediately transitions to the final state without displaying a message. Only one guard condition associated with a particular decision symbol can be true at once.
Figure 7.6 If…Then single-selection statement activity diagram.
Note that the If…Then statement (Fig. 7.6), is a single-entry/single-exit state-ment. The activity diagrams for the remaining control structures also contain (aside from small circle symbols and flowlines called transitions) only action-state sym-bols, indicating actions to be performed, and diamond symsym-bols, indicating decisions to be made. Representing control structures in this way emphasizes the action/deci-sion model of programming. To understand the process of structured programming better, we can envision 11 bins, each containing a different type of the 11 possible control structures. The control structures in each bin are empty, meaning that noth-ing is written in the action-state symbols and no guard conditions are written next to the decision symbols. The programmer’s task is to assemble an application, using as many control structures as the algorithm demands, combining those control statements in only two possible ways (stacking or nesting) and filling in the actions and decisions (with the decisions’ guard conditions) in a manner appropriate to the algorithm. Again, each of these control structures is implemented in Visual Basic .NET as a statement.
Syntax
If condition Then
[ statements ] End If
Figure 7.5 If…Then statement syntax.
[grade >= 60]
[grade < 60]
SELF-REVIEW
1. Which of the following If…Then statements correctly displays that a student received an A on an exam if the score was 90 or above?2. The symbol is not a Visual Basic .NET operator.
Answers: 1) d. 2) c.
7.6
If
…
Then
…
Else
Selection Statement
As you have learned, the If…Then selection statement performs an indicated action (or sequence of actions) only when the condition evaluates to true; other-wise, the action (or sequence of actions) is skipped. The If…Then…Else selection statement allows the programmer to specify that a different action (or sequence of actions) be performed when the condition is true from when the condition is false. For example, the pseudocode statement
If student’s grade is greater than or equal to 60 Display “Passed”
Else
Display “Failed”
displays “Passed” if the student’s grade is greater than or equal to 60, but displays “Failed” if the student’s grade is less than 60. In either case, after output occurs, the next pseudocode statement in sequence is “performed.”
The preceding pseudocode If…Else statement may be written in Visual Basic .NET as If intStudentGrade >= 60 Then lblDisplay.Text = "Passed" Else lblDisplay.Text = "Failed" End If
Note that the body of the Else clause is indented so that it lines up with the indented body of the If clause. A standard indentation convention should be applied consistently throughout your applications. It is difficult to read programs that do not use uniform spacing conventions. The If…Then…Else selection state-ment follows the same general syntax as the If…Then statement. The Else key-word and any related statements are placed between the If…Then and closing End If statements as in Fig. 7.7.
a) If intStudentGrade <> 90 Then
lblDisplay.Text = "Student received an A" End If
b)If intStudentGrade > 90 Then
lblDisplay.Text = "Student received an A" End If
c) If intStudentGrade = 90 Then
lblDisplay.Text = "Student received an A" End If
d)If intStudentGrade >= 90 Then
lblDisplay.Text = "Student received an A" End If
a) * b) ^
c) % d) <>
Good Programming Practice
Apply a standard indentation con-vention consistently throughout your applications to enhance readabil-ity.
Figure 7.8 illustrates the flow of control in the If…Then…Else double-selec-tion statement. Once again, note that (besides the initial state, transidouble-selec-tion arrows and final state) the only other symbols in the activity diagram represent action states and decisions. In this example, the grade is either less than 60 or greater than or equal to 60. If the grade is less than 60, the application displays "Failed". If the grade is equal to or greater than 60, the application displays "Passed". We con-tinue to emphasize this action/decision model of computing. Imagine again a deep bin containing as many empty double-selection statements as might be needed to build any Visual Basic .NET application. Your job as a programmer is to assemble these selection statements (by stacking and nesting) with any other control state-ments required by the algorithm. You fill in the action states and decision symbols with action expressions and guard conditions appropriate to the algorithm.
Figure 7.8 If…Then…Else double-selection statement activity diagram.
Nested If…Then…Else statements test for multiple conditions by placing
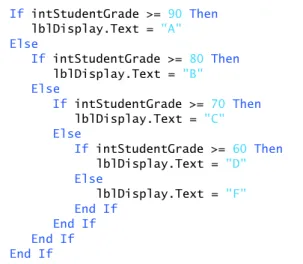
If…Then…Else statements inside other If…Then…Else statements. For exam-ple, the following pseudocode (Fig. 7.9) will display “A” for exam grades greater than or equal to 90, “B” for grades in the range 80–89, “C” for grades in the range 70–79, “D” for grades in the range 60–69 and “F” for all other grades:
If student’s grade is greater than or equal to 90 Display “A”
Else
If student’s grade is greater than or equal to 80 Display “B”
Else
If student’s grade is greater than or equal to 70 Display “C”
Else
If student’s grade is greater than or equal to 60 Display “D”
Else
Display “F”
Figure 7.9 Pseudocode for an application that displays a student’s grades. Syntax Ifcondition Then [ statements ] Else [ statements ] End If
Figure 7.7 If…Then…Else statement syntax.
Good Programming Practice
Indent both body statements of an
If…Then…Else statement to improve readability.
[grade >= 60] [grade < 60]
The pseudocode in Fig. 7.9 may be written in Visual Basic .NET as shown in Fig. 7.10. If intStudentGrade >= 90 Then lblDisplay.Text = "A" Else If intStudentGrade >= 80 Then lblDisplay.Text = "B" Else If intStudentGrade >= 70 Then lblDisplay.Text = "C" Else If intStudentGrade >= 60 Then lblDisplay.Text = "D" Else lblDisplay.Text = "F" End If End If End If End If
Figure 7.10 Visual Basic .NET code converted from the pseudocode in Fig. 7.9. If intStudentGrade is greater than or equal to 90, the first condition evaluates to True and the statement lblDisplay.Text="A" is executed. Notice that, with a value for intStudentGrade greater than or equal to 90, the remaining three condi-tions will evaluate to True. These conditions, however, are never evaluated, because they are placed within the Else portion of the outer If…Then…Else statement. Because the first condition is True, all statements within the Else clause are skipped. Let’s now assume intStudentGrade contains the value 75. The first condition is False, so the application will execute the statements within the Else clause of this statement. This Else clause also contains an If…Then…Else state-ment, with the condition intStudentGrade >= 80. This condition evaluates to False, causing the statements in this If…Then…Else statement’s Else clause to execute. This Else clause contains yet another If…Then…Else statement, with the condition intStudentGrade>=70. This condition is True, causing the state-ment lblDisplay.Text="C" to execute. The Else clause of this If…Then…Else statement is then skipped.
Most Visual Basic .NET programmers prefer to write the preceding If…Then…Else statement, using the ElseIf keyword, as
If intStudentGrade >= 90 Then lblDisplay.Text = "A"
ElseIf intStudentGrade >= 80 Then lblDisplay.Text = "B"
ElseIf intStudentGrade >= 70 Then lblDisplay.Text = "C"
ElseIf intStudentGrade >= 60 Then lblDisplay.Text = "D"
Else
lblDisplay.Text = "F" End If
Figure 7.11 If…Then…Else statement using the ElseIf keyword.
The two statements are equivalent, but the latter statement is popular because it avoids deep indentation of the code. Such deep indentation often leaves little room on a line, forcing lines to be split and decreasing code readability. Notice that the final portion of the If…Then…Else statement uses the Else keyword to han-dle all remaining possibilities. The Else clause must always be last in an If…Then…Else statement—following an Else clause with another Else or ElseIf clause is a syntax error. You should also note that the latter statement requires only one EndIf.
Good Programming Practice
If there are several levels of indenta-tion, each level should be indented further to the right by the same amount of space.
SELF-REVIEW
1. If…Then…Else is a -selection statement.2. Placing an If…Then…Else statement inside another If…Then…Else statement is an example of .
Answers: 1) b. 2) a.
7.7 Constructing the
Wage
Calculator
Application
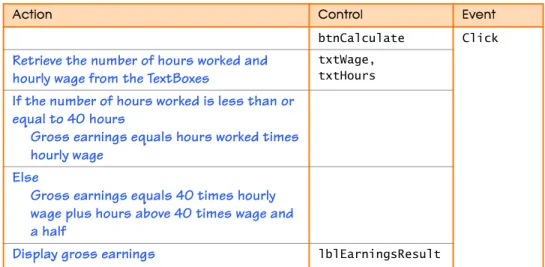
The following section teaches you how to build the WageCalculator by using the If…Then…Else statement. The If…Then…Else statement allows you to select between calculating regular wages and including overtime pay based on the number of hours worked. The following pseudocode describes the basic operation of the WageCalculator application, which runs when the user clicks Calculate:
When the user clicks the Calculate Button
Retrieve the number of hours worked and hourly wage from the TextBoxes If the number of hours worked is less than or equal to 40 hours
Gross earnings equals hours worked times hourly wage Else
Gross earnings equals 40 times hourly wage plus hours above 40 times wage and a half
Display gross earnings
Visual Studio .NET provides many programming tools to aid you in creating powerful and effective applications. Because there are so many tools available, it is often helpful to create a table to organize and choose the best GUI elements. Like pseudocode, these tables simplify the task of creating the application by outlining the application’s actions. In addition to listing the application’s actions, the table assigns controls and events to the actions described in the pseudocode.
Now that you have test-driven the WageCalculator application and studied its pseudocode representation, you will use an Action/Control/Event (ACE) table to help you convert the pseudocode to Visual Basic .NET. Figure 7.12 lists the actions, controls and events that will help you complete your own version of this application.
The Labels in the first row display information about the application to the user. These Labels help guide the user through the application. The Button con-trol, btnCalculate, is used to calculate the employee’s wages. Notice that the third column of the table specifies that we will be using this control’s Click event to per-form any calculations. The TextBoxes will contain input from the user. The final control, lblEarningsResult, is a Label that displays the application’s output.
Action/Control/Event
(ACE) Table for the
Wage
Calculator
Application
a) single b) double
c) triple d) nested
a) nesting If…Then…Else statements b) stacking If…Then…Else statements c) creating sequential If…Then…Else
statements
d) None of the above.
Action Control Event
Label the application’s controls lblWage,
lblHours, lblEarnings
Application is run
Figure 7.12 Action/Control/Event table for the WageCalculator application. (Part 1 of 2.)
We now apply our pseudocode and the ACE table to complete the Wage Cal-culator application. The following box will guide you through the process of adding a Click event to the CalculateButton and declaring the variables you’ll need to calculate the employee’s wages. If you forget to add code to this Click event, the application will not respond when the user clicks the CalculateButton.
Declaring Variables in
the
Calculate
Button
’s
Click
Event Handler
Action Control Event
btnCalculate Click Retrieve the number of hours worked and
hourly wage from the TextBoxes
txtWage, txtHours If the number of hours worked is less than or
equal to 40 hours
Gross earnings equals hours worked times hourly wage
Else
Gross earnings equals 40 times hourly wage plus hours above 40 times wage and a half
Display gross earnings lblEarningsResult
Figure 7.12 Action/Control/Event table for the WageCalculator application. (Part 2 of 2.)
1. Copying the template to your working directory. Copy the C:\Examples\ Tutorial07\TemplateApplication\WageCalculator directory to your C:\SimplyVB directory.
2. Opening the Wage Calculator application’s template file. Double click WageCalculator.sln in the WageCalculator directory to open the appli-cation in Visual Studio .NET. If the appliappli-cation does not open in design view, double click the WageCalculator.vb file in the Solution Explorer. If the SolutionExplorer is not open, select View>SolutionExplorer.
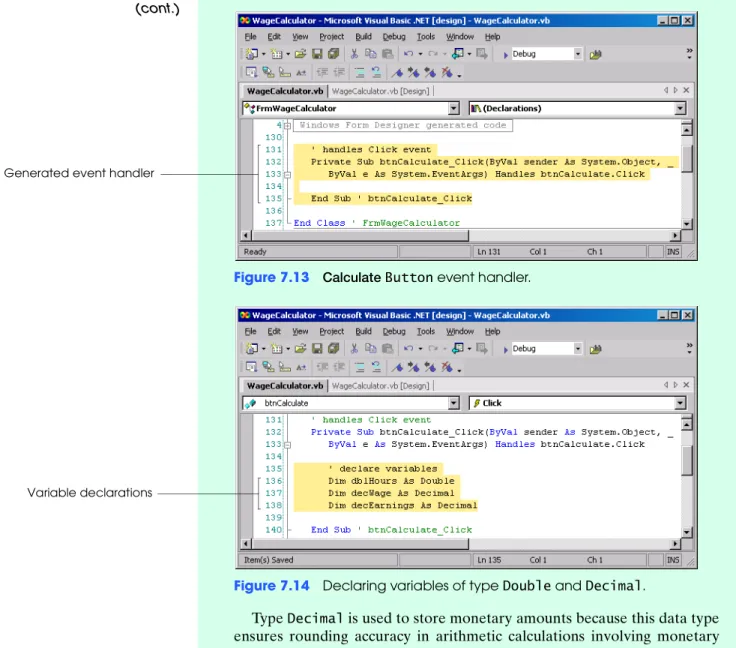
3. Adding the Calculate Button Click event handler. In this example, the event handler calculates the gross wages when the Calculate Button’s Click event occurs. Double click the CalculateButton. An event handler will be generated, and you will be switched to code view. Lines 132–135 of Fig. 7.13 display the generated event handler. Be sure to add the comments and line-continuation characters as shown in Fig. 7.13 so that the line num-bers in your code match those presented in this tutorial.
On line 135, the End Sub keywords indicate the end of event handler btnCalculate_Click. On line 137, the End Class keywords indicate the end of class FrmWageCalculator. We often add such comments so that the reader can easily determine which event handler or class is being closed without having to search for the beginning of that event handler or class in the file.
4. Declaring variables. This application uses the primitive data types Double and Decimal. A Double holds numbers with decimal points. Because hours and wages are often fractional numbers, Integers are not appropriate for this application. Add lines 135–138 of Fig. 7.14 into the body of event han-dler btnCalculate_Click. Line 136 contains a variable declaration for Double dblHours, which holds the number of hours input by the user. Notice that the variable names for Doubles are prefixed with dbl.
Good Programming Practice
Prefix Double variable names with
Figure 7.13 CalculateButton event handler.
Figure 7.14 Declaring variables of type Double and Decimal.
Type Decimal is used to store monetary amounts because this data type ensures rounding accuracy in arithmetic calculations involving monetary amounts. Lines 137–138 declare decWage, which stores the hourly wage input by the user, and decEarnings, which stores the total amount of earn-ings for the week. Notice that Decimal variable names are prefixed with dec.
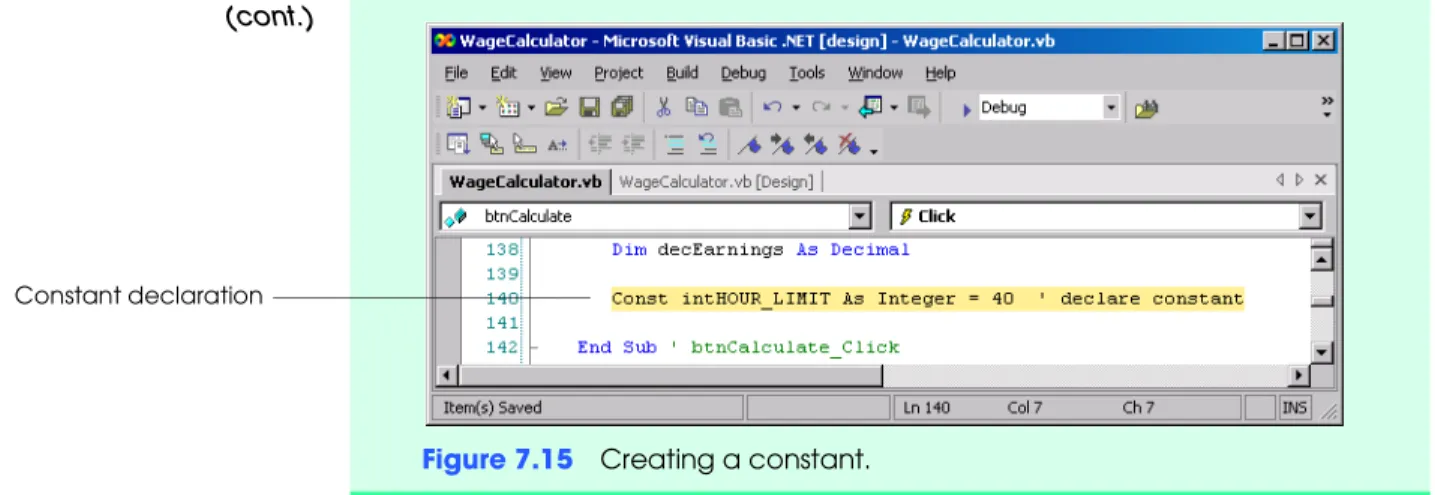
5. Declaring a constant. Add line 140 of Fig. 7.15 to the end of event handler btnCalculate_Click. Line 140 contains a constant, a variable whose value cannot be changed after its initial declaration. Constants are declared with keyword Const. In this case, we assign to the constant intHOUR_LIMIT the maximum number of hours worked before mandatory overtime pay (40). Notice that we prefix this Integer constant with int and capitalize the rest of the constant’s name to emphasize that it is a constant.
6. Saving the project. Select File>SaveAll to save your modified code. (cont.)
Generated event handler
Variable declarations
Good Programming Practice
Prefix Decimal variable names with
dec.
Good Programming Practice
Capitalize the name of a constant, leaving the prefix indicating the constant’s type in lowercase. Sepa-rate each word in the name of a constant with an underscore.
Now that you have declared variables, you can use them to receive input from the user, then use that input to compute and display the user’s wages. The following box walks you through using the If…Then…Else statement to determine the user’s wages.
Determining the User’s
Wages
Figure 7.15 Creating a constant.
(cont.)
Constant declaration
1. Obtaining inputs from the TextBoxes. Add lines 142–144 of Fig. 7.16 to the end of event handler btnCalculate_Click. Lines 143–144 assign values to dblHours and decWage from the TextBoxes into which the user enters data. The Val function returns the user input as Doubles (lines 143–144). Visual Basic .NET implicitly converts the Double result of Val to data type Deci-mal to assign the result to decWage (line 144).
Figure 7.16 Assigning data to variables.
2. Determining wages based on hours worked. Begin to add the If…Then…Else statement shown in lines 146–159 of Fig. 7.17 to the end of event handler btnCalculate_Click. First type lines 146–147, then press
Enter. Notice that the keywords End If are added for you by Visual Studio .NET. Continue by adding lines 149–158 to the If…Then…Else statement. You might need to indent as you go. This If…Then…Else state-ment determines whether employees earn overtime in addition to their usual wages. Line 147 determines whether the value stored in dblHours is less than or equal to intHOUR_LIMIT. If it is, then line 150 assigns the value of the product of hours and wage to decEarnings. When you multiply a variable of data type Double by a variable of data type Decimal, Visual Basic .NET implicitly converts the Decimal variable to a Double. The Double result is implicitly converted to a Decimal when it is assigned to decEarnings.
Variable assignment
Error-Prevention Tip
To reduce errors, the IDE sometimes adds keywords for you. One exam-ple is the adding of the keywords
End If when an If…Then or an
If…Then…Else statement is cre-ated. This eliminates the possibility that such keywords will be forgotten or misspelled.
Figure 7.17 If…Then…Else statement to determine wages.
If, on the other hand, dblHours is not less than or equal to intHOUR_LIMIT, then the application proceeds to the Else keyword on line 151. Line 154 computes the wage for the hours worked up to the limit set by intHOUR_LIMIT and assigns it to decEarnings. Lines 157–158 deter-mine how many hours over intHOUR_LIMIT there are (by using the expres-sion dblHours-intHOUR_LIMIT) and then multiplies that by 1.5 and the user’s hourly wages. This calculation results in the user’s time-and-a-half pay for overtime hours. The value of this statement is then added to the value of decEarnings, and the result is assigned to decEarnings.
3. Displaying the result. Add lines 161–162 of Fig. 7.18 to the end of event handler btnCalculate_Click. Line 162 assigns the value in decEarnings to the Text property of the LabellblEarningsResult, implicitly convert-ing decEarnings from a Decimal to a string.
Figure 7.18 Assigning the result to lblEarningsResult.
4. Running the application. Select Debug> Start to run your application. Notice that the output is not yet formatted as it should be in the completed application. Your will learn how to add this functionality in Section 7.9. 5. Closing the application. Close your running application by clicking its
close box. Added If…Then…Else statement (cont.) Displaying output
SELF-REVIEW
1. The Decimal data type is used to store .2. Constants are declared with keyword .
Answers: 1) d. 2) d.
7.8 Assignment Operators
Visual Basic .NET provides several assignment operators for abbreviating assign-ment stateassign-ments. For example, the stateassign-ment
intValue = intValue + 3
which adds 3 to the value in intValue, can be abbreviated with the addition assign-ment operator += as
intValue += 3
The += operator adds the value of the right operand to the value of the left operand and stores the result in the left operand. Visual Basic .NET provides assignment operators for several binary operators, including +, -, *, ^, / or \. When an assign-ment stateassign-ment is evaluated, the expression to the right of the operator is always evaluated first, then assigned to the variable on the left. Figure 7.19 includes the assignment operators, sample expressions using these operators and explanations.
The following box demonstrates abbreviating our time-and-a-half calculation with the += operator. When you run the application again, you will notice that the application runs the same as before—all that has changed is that one of the longer statements was made shorter.
a) letters and digits b) integers
c) strings d) monetary amounts
a) Fixed b) Constant c) Final d) Const Assignment operators Sample expression Explanation Assigns Assume: intC = 4
+= intC += 7 intC = intC + 7 11 to intC
-= intC -= 3 intC = intC - 3 1 to intC
*= intC *= 4 intC = intC * 4 16 to intC
/= intC /= 2 intC = intC / 2 2 to intC
\= intC \= 3 intC = intC \ 3 1 to intC
^= intC ^= 2 intC = intC ^ 2 16 to intC
Using the Addition
Assignment Operator
SELF-REVIEW
1. The *= operator .2. If intX is initialized with the value 5, what value will intX contain after the expression intX -= 3 is executed?
Answers: 1) d. 2) d.
7.9 Formatting Text
There are several ways to format output in Visual Basic .NET. In this section, we introduce method String.Format to control how text displays. Modifying the appearance of text for display purposes is known as text formatting. This method takes as an argument a format control string, followed by arguments that indicate the values to be formatted. The format control string argument specifies how the remaining arguments are to be formatted.
Recall that your WageCalculator does not display the result of its calculation with the appropriate decimal and dollar sign that you saw when test-driving the application. Next, you learn how to apply currency formatting to the value in the Grossearnings:TextBox.
1. Adding the addition assignment operator. Replace lines 157–158 of Fig. 7.17 with line 157 of Fig. 7.20.
Figure 7.20 Using the addition assignment operator in a calculation. In this step, we have used the addition assignment operator to make our statement shorter. Notice that the statement still performs the same action— the time-and-a-half pay for the user is calculated and added to the regular wages earned.
2. Running the application. Select Debug > Start to run your application. Notice that the application still does not format the output properly. The functionality of the application is the same as it was in the last box—we are now only using the += operator to abbreviate a statement.
3. Closing the application. Close your running application by clicking its close box.
Addition assignment operator shortens statement
a) squares the value of the right operand and stores the result in the left operand b) adds the value of the right operand to the value of the left operand and stores the
result in the left operand
c) creates a new variable and assigns the value of the right operand to that variable d) multiplies the value of the left operand by the value of the right operand and stores
the result in the left operand
a) 3 b) 5
Formatting the Gross
Earnings
Figure 7.22 shows several format specifiers. All format specifiers are case insen-sitive, so the uppercase letters may be used interchangeably with their lowercase equivalents. Note that format code D must be used only with Integers.
1. Modifying the CalculateButton’s Click event. If Visual Studio .NET is not already in code view, select View>Code. Replace line 162 of Fig. 7.18 with line 161 of Fig. 7.21. Line 161 sends the format control string, “{0:C}”, and the value to be formatted, decEarnings, to the String.Format method. The number zero indicates that argument 0 (decEarnings—the first argu-ment after the format control string) should take the format specified by the letter after the colon; this letter is called the format specifier. In this case, we use the format defined by the uppercase letter C, which represents the cur-rency format, used to display values as monetary amounts. The effect of the C format specifier varies, depending on the locale setting of your computer. In our case, the result is preceded with a dollar sign ($) and displayed with two decimal places (representing cents) because we are in the United States.
Figure 7.21 Using the Format method to display the result as currency.
2. Running the application. Select Debug>Start to run your application. The application should now output gross earnings as currency.
3. Closing the application. Close your running application by clicking its close box.
4. Closing the IDE. Close Visual Studio .NET by clicking its close box.
Format Specifier
Description
C Currency. Formats the currency based on the computer’s locale setting. For U.S. currency, precedes the number with $, separates every three dig-its with commas and sets the number of decimal places to two.
E Scientific notation. Displays one digit to the left of the decimal point and six digits to the right of the decimal point, followed by the character E and a three-digit integer representing the exponent of a power of 10. For example, 956.2 is formatted as 9.562000E+002.
F Fixed point. Sets the number of decimal places to two.
G General. Visual Basic .NET chooses either E or F for you, depending on which representation generates a shorter string.
D Decimal integer. Displays an integer as a whole number in standard base-10 format.
N Number. Separates every three digits with a comma and sets the number of decimal places to two.
Figure 7.22 Format specifiers for strings.
GUI Design Tip
Format all monetary amounts using the C (currency) format specifier.
Figure 7.23 presents the source code for the WageCalculator application. The lines of code that contain new programming concepts that you learned in this tuto-rial are highlighted.
SELF-REVIEW
1. Method String.Format is used to .2. The format displays values as monetary amounts.
Answers: 1) b. 2) c.
1 Public Class FrmWageCalculator
2 Inherits System.Windows.Forms.Form 3
4 ' Windows Form Designer generated code 5
6 ' handles Click event
7 Private Sub btnCalculate_Click( ByVal sender As System.Object, _ 8 ByVal e As System.EventArgs) Handles btnCalculate.Click 9
10 ' declare variables 11 Dim dblHours As Double 12 Dim decWage As Decimal 13 Dim decEarnings As Decimal 14
15 16
17 ' assign values from user input 18 dblHours = Val(txtHours.Text) 19 decWage = Val(txtWage.Text) 20
21 ' determine wage amount 22
23
24 ' if under or equal to 40 hours, regular wages 25 decEarnings = dblHours * decWage
26 27
28 ' if over 40 hours, regular wages for first 40 29 decEarnings = intHOUR_LIMIT * decWage 30
31 ' time and a half for the additional hours 32
33 34
35 ' assign result to its corresponding Label 36
37 End Sub ' btnCalculate_Click 38
39 End Class ' FrmWageCalculator
Figure 7.23 WageCalculator application code.
Const intHOUR_LIMIT As Integer = 40 ' declare constant
Keyword Const
specifies constant
If dblHours <= intHOUR_LIMIT Then
Condition between keywords If and Then
Else Else body executes when
condition evaluates to
False
decEarnings += (dblHours - intHOUR_LIMIT) * (1.5 * decWage)
Assignment operator assigns left operand result of adding left
and right operands End If
lblEarningsResult.Text = String.Format(“{0:C}”, decEarnings)
Format result as currency
a) create constant variables b) control how text is formatted c) format Visual Basic .NET statements d) All of the above.
a) monetary b) cash
7.10 Using the Debugger: The
Watch
Window
Visual Studio .NET includes several debugging windows that are accessible from the Debug > Windows submenu. The Watch window, which is available only in break mode, allows the programmer to examine the value of a variable or expres-sion. You can use the Watch window to view changes in a variable’s value as the application executes, or you can change a variable’s value yourself by entering the new value directly into the Watch window. Each expression or variable that is added to the Watch window is called a watch. In the following box, we demonstrate how to add, remove and manipulate watches by using the Watch window.
Using the Debugger:
The
Watch
Window
1. Starting debugging. If the IDE is not in code view, switch to code view now. Set breakpoints on lines 144 and 150 (Fig. 7.24). Select Debug>Start to run the application. The Wage Calculator Form appears. Enter 12 into the Hourlywage:TextBox and 40 into the Weeklyhours:TextBox (Fig. 7.25). Click the CalculateButton.
Figure 7.24 Breakpoints added to WageCalculator application.
Figure 7.25 Wage Calculator application.
2. Suspending application execution. Clicking the CalculateButton will cause event handler btnCalculate_Click to execute until the breakpoint is reached. When the breakpoint is reached, application execution is paused, and the IDE switches into break mode. Notice that the active window has been changed from the running application to the IDE. The active window is the window that is currently being used and is sometimes referred to as the window that has the focus. The WageCalculator application is still running, but it is hidden behind the IDE.
3. Examining data. Once the application has entered break mode, you are free to explore the values of various variables, using the debugger’s Watch win-dow. To display the Watch window, select Debug> Windows> Watch > Watch1. Notice that there are actually four options in the Debug> Win-dows>Watch menu—Watch1, Watch2, Watch3 and Watch4. Each win-dow provides the same functionality. The four options simply allow you to have several Watch windows open at once. This enables you to display data side by side or to set the different Watch windows to display data in different formats. The Watch window (Fig. 7.26) is initially empty. To add a watch, you can type an expression into the Name column. Single click in the first field of the Name column. Type dblHours, then press Enter. The value and type will be added by the IDE (Fig. 7.26). Notice that this value is 40.0—the value assigned to dblHours on line 143. Type decWage in the next row, then press Enter. The value displayed for decWage is 0D. The D indicates that the number stored in decWage is of type Decimal.
Figure 7.26 Watch window.
4. Examining different expressions. Add the expression (decWage + 3) * 5 into the Watch1 window. Notice that the Watch window can evaluate arith-metic expressions, returning the value 15D. Add the expression decWage=3 into the Watch1 window. Expressions containing the = symbol are treated as Boolean expressions instead of assignment statements. The value returned is False, because decWage does not currently contain the value 3. Add the expression intVariableThatDoesNotExist into the Watch1 win-dow. This identifier does not exist in the current application, and therefore cannot be evaluated. An appropriate message is displayed in the Value field. Your Watch window should look similar to Fig. 7.27.
Figure 7.27 Examiningexpressions.
5. Removing an expression from the Watch window. At this point, we would like to clear the final expressions from the Watch window. To remove an expression, simply right click the expression in the Watch window and select Delete Watch (Fig. 7.28). Remove all the expressions that you added in
Step 4. (cont.) Variable types Variable values Variable names Boolean expression Complex expression Invalid expression
Figure 7.28 Deleting a watch.
6. Viewing modified values in a Watch window. Continue debugging by selecting Debug>Continue. The application will continue to execute until the next breakpoint, on line 150. Line 144 executes, assigning the wage value entered (12) to decWage. The If…Then continuation condition eval-uates to True on line 147, and the application is once again suspended on line 150. Notice that the value of decWage has changed not only in the application, but in the Watch 1 window as well. Because the value has changed since the last time the application was suspended, the modified value is displayed in red (Fig. 7.29).
Figure 7.29 Modified values in Watch window.
7. Modifying values directly in a Watch window. The Watch window can be used to change the value of a variable by simply entering the new value in the Value column. Click in the Value field for dblHours, replace 40.0 with 10.0, then press Enter. The modified value appears in red (Fig. 7.30). This option enables you to test various values to confirm the behavior of your application. If you repeat this exercise multiple times in the same applica-tion, a dialog (Fig. 7.31) might appear. Simply disregard this dialog by click-ing the ContinueButton.
Figure 7.30 Modifying values in a Watch window.
Figure 7.31 Dialog to continue running application after changing values in the Watch window.
DeleteWatch option
(cont.)
Modified value appears in red
SELF-REVIEW
1. An application enters break mode when .2. The Watch window allows you to .
Answers: 1) b. 2) d.
7.11 Wrap-Up
In this tutorial, we discussed techniques of solving programming problems. We introduced algorithms, pseudocode, the UML and control structures. We discussed different types of control structures and when each might be used.
You began by test-driving an application that used the If…Then…Else ment to determine an employee’s weekly pay. You studied different control state-ments and used the UML to diagram the decision-making processes of the If…Then and the If…Then…Else statements.
You learned how to format text by using the method String.Format and how to abbreviate mathematical statements by using the assignment operators.
In the Using the Debugger section, you learned how to use the Watch window to view an application’s data. You learned how to add watches, remove watches and change variable values.
In the next tutorial you will learn how to display message dialogs based on user input. You will study the logical operators, which give you more expressive power for forming the conditions in your control statements. You will use the CheckBox control to allow the user to select from various options in an application.
8. Viewing the application result. Select Debug>Continue to continue appli-cation execution. Event handler btnCalculate_Click finishes execution and displays the result in a Label. Notice that the result is $120.00, because we changed dblHours to 10.0 in the last step. The TextBox to the right of Weeklyhours: still displays the value 40, because we changed the value of dblHours, but not the Text property of either TextBoxes. Once the applica-tion has finished running, the focus is returned to the WageCalculator win-dow, and the final results are displayed (Fig. 7.32).
Figure 7.32 Output displayed after the debugging process.
9. Closing the application. To close your application, either click the running application’s close box or select Debug>StopDebugging.
10. Saving the project. Select File>SaveAll to save your modified code. 11. Closing the IDE. Close Visual Studio .NET by clicking its close box.
(cont.)
Earnings result based on altered input
a) Debug>Start is selected b) a breakpoint is reached c) the Watch window is used d) there is a syntax error
a) change variable values b) view variable type information c) evaluate expressions d) All of the above.
SKILLS SUMMARY
Choosing Among Alternate Courses of Action■ Use the If…Then or If…Then…Else control statements.
Conceptualizing the Application Before Using Visual Studio .NET
■ Use pseudocode.
■ Create an Action/Control/Event (ACE) table.
Understanding Control Statements
■ View the control statement’s corresponding UML diagram.
Performing Comparisons
■ Use the equality and relational operators.
Creating a Constant
■ Use the Const keyword.
■ Assign a value to the constant in the declaration.
Abbreviating Assignment Expressions
■ Use the assignment operators.
Formatting a Value As a Monetary Amount
■ Use the format code C in method String.Format.
Examining Data During Application Execution
■ Use the debugger to set a breakpoint, and examine the Watch window.
KEY TERMS
action/decision model of programming—Representing control statements as UML activity diagrams with rounded rectangles indicating actions to be performed and diamond symbols indicating decisions to be made.action expression (in the UML)—Used in an action state within a UML activity diagram to specify a particular action to perform.
action state—An action to perform in a UML activity diagram that is represented by an action-state symbol.
action-state symbol—A rectangle with its left and right sides replaced with arcs curving outward that represents an action to perform in a UML activity diagram.
active window—The window that is currently being used—sometimes referred to as the window that has the focus.
activity diagram—A UML diagram that models the activity (also called the workflow) of a portion of a software system.
algorithm—A procedure for solving a problem, specifying the actions to be executed and the order in which these actions are to be executed.
block—A group of code statements.
Boolean data type—A data type that has the value True or False.
condition— An expression with a true or false value that is used to make a decision.
control structure (control statement)—An application component that specifies the order in which statements execute (also known as the flow of control).
control structure (statement) nesting—Placing one control statement in the body of another control statement.
control structure (statement) stacking—A set of control statements in sequence. The exit point of one control statement is connected to the entry point of the next control statement in sequence.
constant—A variable whose value cannot be changed after its initial declaration. currency format—Used to display values as monetary amounts.
Decimal data type—Used to store monetary amounts.
decision symbol—The diamond-shaped symbol in a UML activity diagram that indicates that a decision is to be made.
diamond—A symbol (also known as the decision symbol) in a UML activity diagram; this symbol indicates that a decision is to be made.
dotted line—A UML activity diagram symbol that connects each UML-style note with the element that the note describes.
double-selection statement—A statement, such as If…Then…Else, that selects between two different actions or sequences of actions.
ElseIf keyword—Keyword used for the nested conditions in nested If…Then…Else
state-ments.
equality operators—Operators = (is equal to) and <> (is not equal to) that compare two values. executable statement—Actions that are performed when the corresponding Visual
Basic .NET application is run.
fatal logic error—An error that causes an application to fail and terminate prematurely. focus—Designates the window currently in use.
format control string—A string that specifies how data should be formatted.
format specifier—Code that specifies the type of format that should be applied to a string for output.
formatting—Modifying the appearance of text for display purposes.
final state—Represented by a solid circle surrounded by a hollow circle in a UML activity diagram; the end of the workflow after an application performs its activities.
guard condition—An expression contained in square brackets above or next to the arrows leading from a decision symbol in a UML activity diagram that determines whether workflow continues along a path.
If…Then—Selection statement that performs an action (or sequence of actions) based on a
condition. This is also called the single-selection statement.
If…Then…Else—Selection statement that performs an action (or sequence of actions) if a
condition is true and performs a different action (or sequence of actions) if the condition is false. This is also called the double-selection statement.
initial state—The beginning of the workflow in a UML activity diagram before the application performs the modeled activities.
multiple-selection statement—A statement that selects from among many different actions or sequences of actions.
nested statement—A statement that is placed inside another control statement.
nonfatal logic error—An error that does not terminate an application’s execution but causes an application to produce incorrect results.
note—An explanatory remark (represented by a rectangle with a folded upper-right corner) describing the purpose of a symbol in a UML activity diagram.
program control—The task of ordering an application’s statements in the correct order. pseudocode—An informal language that helps programmers develop algorithms.
relational operators—Operators < (less than), > (greater than), <= (less than or equal to) and >= (greater than or eqaul to) that compare two values.
repetition structure (or repetition statement)—Allows the programmer to specify that an action or actions should be repeated, depending on the value of a condition.
selection structure (or selection statement)—Selects among alternative courses of action. sequential execution—Statements in an application are executed one after another in the
order in which they are written.
sequence structure (or sequence statement)—Built into Visual Basic .NET—unless directed to act otherwise, the computer executes Visual Basic .NET statements sequentially. single-entry/single-exit control structure (or statement)—A control statement that has one
entry point and one exit point. All Visual Basic .NET control statements are single-entry/ single-exit control statements.
single-selection statement—The If…Then statement, which selects or ignores a single action or sequence of actions.
small circles (in the UML)—The solid circle in an activity diagram represents the activity’s initial state and the solid circle surrounded by a hollow circle represents the activity’s final state.
solid circle (in the UML)—A UML activity diagram symbol that represents the activity’s initial state.
String.Format method—Formats a string.
structured programming—A technique for organizing program control to help you develop applications that are easy to understand, debug and modify.
transfer of control—Occurs when an executed statement does not directly follow the previ-ously executed statement in the written application.
transition—A change from one action state to another that is represented by transition arrows in a UML activity diagram.
UML (Unified Modeling Language)—An industry standard for modeling software systems graphically.
Watch window—A Visual Studio .NET window that allows you to view variable values as an application is being debugged.
workflow—The activity of a portion of a software system.
GUI DESIGN
GUIDELINES
Overall Design
■ Format all monetary amounts using the C (currency) format specifier. TextBox
■ When using multiple TextBoxes vertically, align the TextBoxes on their right sides, and where possible make the TextBoxes the same size. Left-align the descriptive Labels for such TextBoxes.
CONTROLS, EVENTS,
PROPERTIES &
METHODS
String This control allows the user to input data from the keyboard.
■ Methods
Format—Arranges the String in a specified format.
MULTIPLE-CHOICE
QUESTIONS
7.1 The operator returns False if the left operand is larger than the right oper-and.
7.2 A occurs when an executed statement does not directly follow the previously executed statement in the written application.
7.3 A variable or an expression that is added to the Watch window is known as a .
7.4 The If…Then statement is called a statement because it selects or ignores one action.
7.5 The three types of control statements are the sequence statement, the selection state-ment and the statement.
7.6 In an activity diagram, a rectangle with curved sides represents .
a) = b) <
c) <= d) All of the above.
a) transition b) flow
c) logical error d) transfer of control
a) watched variable b) watched expression
c) watch d) watched value
a) single-selection b) multiple-selection c) double-selection d) repetition
a) repeat b) looping
c) redo d) repetition
a) a complete algorithm b) a comment
7.7 The If…Then…Else selection statement ends with the keywords .
7.8 A variable of data type Boolean can be assigned keyword or keyword .
7.9 A variable whose value cannot be changed after its initial declaration is called a .
7.10 The operator assigns the result of adding the left and right operands to the left operand.
EXERCISES
7.11 (Currency Converter Application) Develop an application that functions as a cur-rency converter as shown in Fig. 7.33. Users must provide a number in the Dollars: TextBox and a currency name (as text) in the ConvertfromDollarsto: TextBox. Clicking the Convert Button will convert the specified amount into the indicated currency and display it in a Label. Limit yourself to the following currencies as user input: Dollars, Euros, Yen and Pesos. Use the following exchange rates: 1 Dollar = 1.02 Euros, 120 Yen and 10 Pesos.Figure 7.33 CurrencyConverter GUI.
a) Copying the te