Copyright © 1984 – 2010 Richmond Systems Ltd
Getting Started with Richmond SupportDesk
Richmond SupportDesk is a Help Desk, Service Management and Asset
Management software solution designed for internal support (IT support,
facilities management & finance) and external customer service management.
The product is designed to streamline the process of providing support and
increase management visibility through easily accessible reporting.
The Return on Investment (ROI) is increased uptime, improved resource
allocation and utilisation, and customer satisfaction.
Copyright © 1984 – 2010 Richmond Systems Ltd Page 2 of 147
Richmond Systems
Phone:
01428 641616
Email:
[email protected]
Copyright © 1984 – 2010 Richmond Systems Ltd Page 3 of 147
Contents at a Glance
1
Start Here ... 9
2
Terminology Used in this Guide... 11
3
Logging-In ... 12
4
Familiarisation with SupportDesk using the Demo Database ... 14
5
Configuration Tools: The Setup Console ... 26
6
The Configuration Management Database (CMDB) ... 27
7
Useful Information to Put in the CMDB ... 38
8
Users, Groups, Rights and Skills ... 39
9
The Search Console ... 43
10
Incident Management (Call Logging) Configuration ... 44
11
Actions (Completed Tasks) and Activities (Future Tasks) ... 56
12
Quick Incidents/Incident Templates ... 63
13
The Incident List ... 65
14
Incident Queues and Call Routing ... 68
15
The Activity List ... 71
16
Using Recurring Tasks (Activities) ... 72
17
View Restrictions ... 73
18
Processing Emails as Incidents ... 75
19
Advanced Email Usage: Creating Multiple Email Profiles ... 82
20
Advanced (Extended) Incident Options ... 87
21
Asset Discovery: PC Inventory ... 88
22
Asset Tracking (Loans, Repairs and Disposals) ... 93
23
Asset and Supplier Maintenance (Contract Management) ... 99
24
Asset History ... 101
25
Customer Surveys ... 103
26
Resource Management (Calendars) ... 105
27
The Self Service Portal (SSP) ... 106
28
Reporting ... 116
29
Service Level Management and SLAs ... 136
30
Changing SupportDesk Terminology ... 144
31
Menu and Toolbar Customisation ... 145
Copyright © 1984 – 2010 Richmond Systems Ltd Page 4 of 147
Contents
1
Start Here ... 9
1.1 Pre-Requisites for Implementing SupportDesk ... 10
1.2 Further Assistance for Implementing SupportDesk ... 10
2
Terminology Used in this Guide... 11
3
Logging-In ... 12
4
Familiarisation with SupportDesk using the Demo Database ... 14
4.1 Main SupportDesk Interface... 14
4.2 The SupportDesk Navigator Pane ... 15
4.3 Logging Calls and Incidents in SupportDesk: A Quick Overview ... 16
4.4 Incident Management Information (MI): A Quick Overview ... 23
5
Configuration Tools: The Setup Console ... 26
6
The Configuration Management Database (CMDB) ... 27
6.1 About the CMDB ... 27
6.2 Adding and Changing Configuration Item Styles ... 28
6.3 Manually Adding Items to the CMDB/Navigator ... 29
6.4 Adding Users and Computers from Active Directory ... 30
6.5 Adding Items to the CMDB using the Data Import Wizard ... 36
6.6 Printing from the CMDB ... 37
6.7 Exporting from the CMDB ... 37
7
Useful Information to Put in the CMDB ... 38
7.1 Helping Supported Schools... 38
8
Users, Groups, Rights and Skills ... 39
8.1 Configuring Groups ... 39
8.2 Configuring Rights Groups ... 40
8.3 Configuring Users ... 40
8.4 Configuring the Skills Matrix ... 41
8.5 Setting up a User Profile (Defaults) ... 42
9
The Search Console ... 43
10
Incident Management (Call Logging) Configuration ... 44
10.1 Statuses ... 45
10.2 Priorities ... 46
10.3 Categories ... 47
10.4 Category User Defined Fields (UDFs)... 49
10.5 Resolution and Resolution Codes ... 50
10.6 Logging Incidents Manually (Specialist Adds Incident) ... 53
10.7 Adding a New Incident ... 54
10.8 Adding Associations to Incidents ... 55
11
Actions (Completed Tasks) and Activities (Future Tasks) ... 56
11.1 Configuring Actions ... 57
11.2 Adding Actions (Completed Tasks) to Incident Records ... 60
Copyright © 1984 – 2010 Richmond Systems Ltd Page 5 of 147
11.4 Using Activities ... 61
11.5 Action Settings Checklist ... 62
12
Quick Incidents/Incident Templates ... 63
12.1 Configuring Quick Incident Templates ... 63
12.2 Using Quick Incidents ... 64
12.3 Editing/Removing Quick Incident Templates ... 64
13
The Incident List ... 65
13.1 The Incident/Activity Concept ... 65
13.2 The Incident List ... 65
13.3 Incident List Column Selection ... 66
13.4 Printing from the Incident List ... 67
13.5 Printing from Incidents ... 67
14
Incident Queues and Call Routing ... 68
14.1 How to Create an Unassigned Call Queue ... 68
15
The Activity List ... 71
16
Using Recurring Tasks (Activities) ... 72
17
View Restrictions ... 73
17.1 Configuring View Restrictions ... 73
17.2 View Restrictions Rights ... 74
17.3 Controlling Specialist Use of Views ... 74
18
Processing Emails as Incidents ... 75
18.1 Configuring the Look & Feel of Emails ... 76
18.2 Configuring Emails to End Users ... 76
18.3 Branding Emails within SupportDesk ... 78
18.4 Emails to Specialists (Specialist Alerts) ... 80
18.5 Email Service Controller ... 81
19
Advanced Email Usage: Creating Multiple Email Profiles ... 82
19.1 Handling Emails from Different User Communities ... 82
19.2 Handling Email Alerts from System and Network Monitoring Software ... 85
19.3 Email Alerts from Different Support Groups (IT, Facilities, Finance) ... 86
20
Advanced (Extended) Incident Options ... 87
20.1 Incident Locking ... 87
20.2 Custom Classification ... 87
21
Asset Discovery: PC Inventory ... 88
21.1 Configuring PC Inventory ... 88
21.2 Setting Up a Principal Software List ... 90
21.3 Viewing PC Inventory Data ... 91
21.4 Setting up Scheduled PC Inventory Scans ... 92
22
Asset Tracking (Loans, Repairs and Disposals) ... 93
22.1 Configuring Asset Tracking ... 93
22.2 Adding (Setting) a Tracking for an Asset/Item ... 94
22.3 Viewing a Tracked Asset/Item in the CMDB/Navigator ... 96
Copyright © 1984 – 2010 Richmond Systems Ltd Page 6 of 147
22.5 Asset Disposal ... 98
23
Asset and Supplier Maintenance (Contract Management) ... 99
23.1 Configuring Maintenance ... 99
23.2 Applying Maintenance/Contract information for an Item ... 100
24
Asset History ... 101
24.1 Configuring History ... 101
24.2 Viewing an Item’s History ... 102
25
Customer Surveys ... 103
25.1 Configuring Customer Surveys ... 103
25.2 Sending Customer Surveys ... 104
26
Resource Management (Calendars) ... 105
27
The Self Service Portal (SSP) ... 106
27.1 Configuring the SSP ... 107
27.2 Configuring the Self Service Portal Web Administration Settings ... 107
27.3 Configure an SSP Settings Group ... 109
28
Reporting ... 116
28.1 Overview ... 116
28.2 Print Screen Reporting ... 117
28.3 Call Statistics ... 118
28.4 Web Reporting... 118
28.5 Running Reports from SupportDesk ... 120
28.6 Adding a New User-Defined Report ... 125
28.7 Viewing/Running Reports ... 127
28.8 Exporting Reports ... 128
28.9 Printing Reports ... 129
28.10 Scheduling Reports ... 130
28.11 Scheduling Reports (from the Setup Console) ... 135
29
Service Level Management and SLAs ... 136
29.1 Publishing SLAs to the Business ... 136
29.2 Automated SLA Application ... 136
29.3 Manual SLA Application ... 136
29.4 Configuring SLAs ... 137
29.5 Assigning SLAs to Categories ... 141
29.6 Assigning SLAs to Configuration Items ... 142
29.7 The Escalation Service ... 143
30
Changing SupportDesk Terminology ... 144
31
Menu and Toolbar Customisation ... 145
31.1 Locating Customisation Settings ... 145
31.2 Customising the Toolbar ... 146
Copyright © 1984 – 2010 Richmond Systems Ltd Page 7 of 147
Illustrations
Figure 1: Main SupportDesk Interface (the toolbar is customisable, see page 138) ... 14
Figure 2: Keyboard Shortcuts ... 14
Figure 3: The SupportDesk Interface Navigator Panes ... 15
Figure 4: Searching for a Contact to Log an Incident ... 17
Figure 5: Adding an Incident ... 18
Figure 6: Adding Incident Actions ... 19
Figure 7: Adding Incident Activities ... 20
Figure 8: Specialist User Configuration Settings... 39
Figure 9: The Skills Matrix... 41
Figure 10: Setting up a User Profile ... 42
Figure 11: The Search Console ... 43
Figure 12: Category Matrix with Examples ... 48
Figure 13: Category User Defined Fields Matrix with Examples ... 49
Figure 14: Resolution Code Checklist ... 51
Figure 15: Resolution Code Samples ... 51
Figure 16: Category by Resolution Code Report Example ... 52
Figure 17: The Add New Incident Screen ... 54
Figure 18: Adding Associations to Incidents from the Search Console ... 55
Figure 19: Action Settings Checklist ... 62
Figure 20: Sample Quick Incident and Service Request CMDB Structure ... 63
Figure 21: Adding a Quick Incident Template ... 64
Figure 22: The Incident List Filtered by Drag n’ Drop from the CMDB ... 66
Figure 23: The Activity List ... 71
Figure 24: Management Console showing Activities (work to be done) by Specialist... 71
Figure 25: Recurring Task Tree with Recurring Activities ... 72
Figure 26: View Restrictions Setup Dialog ... 73
Figure 27: Applying View Restrictions ... 73
Figure 28: Specifying Email server and Service Desk Email Address ... 76
Figure 29: Selecting default settings for Incidents logged via Email ... 77
Figure 30: Changing Email Formatting Options ... 78
Figure 31: Simple Email Signature Settings ... 78
Figure 32: Sample HTML Auto Signature ... 79
Figure 33: Sample HTML for use in HTML Emails ... 79
Figure 34: Email Signature Settings using HTML Tags ... 79
Figure 35: Configuring Tracking Options in the Setup Console ... 93
Figure 36: Configuring Maintenance Options in the Setup Console ... 99
Figure 37: Applying Maintenance Settings to an Item/Asset ... 100
Figure 38: Sample Maintenance Report ... 100
Figure 39: Configuring History Options in the Setup Console ... 101
Figure 40: Viewing an Asset’s History ... 102
Figure 41: Sample History Report ... 102
Figure 42: Self Service Portal Administration ... 107
Figure 43: Web Reporting Administration ... 108
Copyright © 1984 – 2010 Richmond Systems Ltd Page 8 of 147
Figure 45: Logging in to Web Reporting via Web Browser... 120
Figure 46: Quick Reports Tab View ... 121
Figure 47: User-Defined Reports Tab View ... 122
Figure 48: Report Templates Tab View ... 123
Figure 49: Report Scheduling Tab View ... 124
Figure 50: User Defined Reports – Selecting Category ... 125
Figure 51: User Defined Reports – Selecting Status ... 126
Figure 52: Exporting a Report ... 128
Figure 53: Printing a Report... 129
Figure 54: Configuring the Report Scheduler Service Controller ... 131
Copyright © 1984 – 2010 Richmond Systems Ltd Page 9 of 147
1
Start Here
Richmond SupportDesk is a feature-rich product that is flexible to fit
around your objectives and preferred way of working.
This
Getting Started Guide
is designed to illustrate key features and help you
configure SupportDesk to manage your service, support and asset
management processes.
SupportDesk is supplied in a
semi-configured state
i.e. a standard installation will
install a
Blank Database
called
rsupdesk
with pre-set configuration item styles,
incident categories, statuses, priorities, resolution codes, action types, email text &
signatures, Self Service Portal and reports. Whilst this allows out-of-the-box
operation,
you will need to make configuration changes to mould SupportDesk to
your exact requirements
.
Throughout this guide you will find a combination of “How to Use” and “How to
Configure”
instructions.
Much of the instruction is
based
around
a
Demonstration
Database
,
which we recommend you
install to familiarise yourself
with the various SupportDesk
screens and functions (when
you install SupportDesk there
is an option to install the
education
demonstration
database (
Demo_Education)
,
which is pre-populated with
sample data about people,
assets and incidents).
This guide also provides instructions on how to use the
Setup Console
, which is
installed as part of the main installation and is the
main administrative tool
that you
use to configure SupportDesk.
Copyright © 1984 – 2010 Richmond Systems Ltd Page 10 of 147
1.1
Pre-Requisites for Implementing SupportDesk
For the initial implementation you will need to know how to connect to a SQL
database, Active Directory and your email system (e.g. Exchange). To configure the
system you will need an understanding of SupportDesk and service management
practises. As well as the installation and getting started guides, there are
help files
within the product and
Knowledgebase Articles
on the Customer Zone (also
available from Tech Support).
This guide
assumes that SupportDesk is already installed
. If not, please do so using
the Installation Guides, which cover how to:
Install SupportDesk components and blank/demo databases
Connect to exchange to process incoming and outgoing emails
Configure IIS to use web-based reporting and Self Service Portal
Configure escalation services for sending/receiving emails & notifications
1.2
Further Assistance for Implementing SupportDesk
This guide doesn’t replace the help files i.e. doesn’t cover every feature, but it does
include the features used by the majority of our customers. If you would like
someone to give you a
quick overview
of
SupportDesk’s capabilities then please call
us on 01428 641616 or email
[email protected]
and we can setup a remote
demonstration.
If you require
technical support
then please contact us on 01428 647333 or email
[email protected]
.
Many of our Customers use our
professional services
for help with planning,
implementation or training. Using external consultants has the advantage of
providing valuable experience from hundreds of other Customer installations and
also quickens the process of implementation and skills transfer. If you would like to
know more about our services then please contact us on 01428 641616 or email
[email protected]
.
Thank you
for choosing Richmond
SupportDesk. We pride ourselves on
providing well thought out technology,
high quality support, expert consultancy
and professional account management.
Copyright © 1984 – 2010 Richmond Systems Ltd Page 11 of 147
2
Terminology Used in this Guide
We try to avoid unfriendly terminology and TLAs (Three Letter Acronyms), however the following definitions might be useful:
Terminology
Throughout this document the ITIL term ‘Incident’ is used to refer to requests, calls, logs, tickets, etc. This terminology can be changed in the Setup Console.
The term used to refer to service desk staff, technicians, analysts, etc is ‘Specialists’.
The term used to refer to teams e.g. 1st line support, 2nd line support, facilities support etc. is ‘Groups’.
CMDB is the Configuration Management Database, which provides a navigable structure containing information about everything you are supporting. We also refer to the CMDB as the Navigator (because it allows you to navigate around your users and assets).
The ITIL/FITS terminology for any item in the CMDB is Configuration Item (CI). People, places, departments, IT equipment, attachments etc. are all configuration items. Essentially a configuration items is an asset. In this guide configuration items are referred to as items.
Copyright © 1984 – 2010 Richmond Systems Ltd Page 12 of 147
3
Logging-In
To login to the Main SupportDesk Windows Client:
Programs Richmond Systems SupportDesk SupportDesk
Both the Blank (rsupdesk) and Demonstration (Demo_Education) databases have a user (User ID) called RICHMOND, whose password is richmond (lowercase):
User ID: richmond
Password: richmond
SQL Server: Your SQL Server Name
Database: rsupdesk OR Demo_Education
The blank database is a canvas for configuring your live system.
The demo database is a test area for seeing how things work.
You can switch between databases by logging out of one (EXIT) and logging into another.
Switching databases is easy but you just need to be mindful that SupportDesk’s web modules have their own, separate database connection settings. So if you switch from
rsupdesk to education_demoand you want to view the web reports or use the Self Service Portal then you need to tell SupportDesk which database you are using. If you don’t, the system will still work, but you probably won’t get the results you expected!
The Self Service Portal & Web Reports Administration Module provides a handy interface to change the respect configuration files. Instructions over page...
Copyright © 1984 – 2010 Richmond Systems Ltd Page 13 of 147 If you are switching between databases and want to look at reports or login to the Portal then change the database name in the Self Service Portal & Web Reports Administration module as follows:
Programs Richmond Systems SupportDesk Web Interfaces Self Service Portal Self Service Portal & Web Reports Administration
FOR the Self Service Portal:
1. Select “Edit SSP Config File” 2. Select the Database
3. Click “Test” to make sure that SupportDesk is connected to the database 4. Make sure you Save!
FOR the Web Reporting Module:
Copyright © 1984 – 2010 Richmond Systems Ltd Page 14 of 147
4
Familiarisation with SupportDesk using the Demo Database
The demonstration database is a good start point as it allows you to familiarise yourself with the main SupportDesk screens with pre-populated information about users and incidents.
4.1
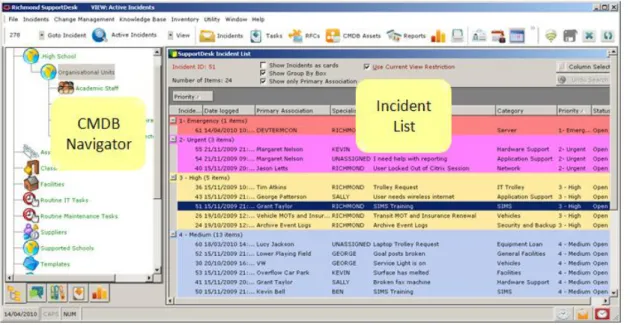
Main SupportDesk Interface
On the left hand side is the SupportDesk Configuration database (CMDB) or Navigator, which has a number of functions (see page 15). The CMDB is populated with user data, which is typically synchronised from Active Directory (page 30). The CMDB also holds asset data, which can be imported from a variety of sources, including Active Directory, Richmond PC inventory (page 88), external databases (page 30), CSV files and data can also be added manually (page 29).
Figure 1: Main SupportDesk Interface (the toolbar is customisable, see page 146)
The Incident list (page 39) is the main method for accessing and viewing incidents and call queues (page 68). The list can be sorted, grouped, filtered, colour-coded and the columns selected and arranged to Specialist’s preferences (settings are retained). You can drag any item from the CMDB onto the Incident list to filter the view for that part of the CMDB. The Incident List can be further filtered using View
Restrictions (page 72) to show, for example, “My Incidents” or “Unassigned Incidents”. View Restriction Rights (page 74) control which Specialists can see which Incidents.
Incidents can have future tasks set for Specialists, these tasks are called Activities (page 56) and can be viewed through the ActivityList (page 71).The Web Reporting (page 116) module is accessible from this interface or can be opened in a web browser.
Copyright © 1984 – 2010 Richmond Systems Ltd Page 15 of 147
4.2
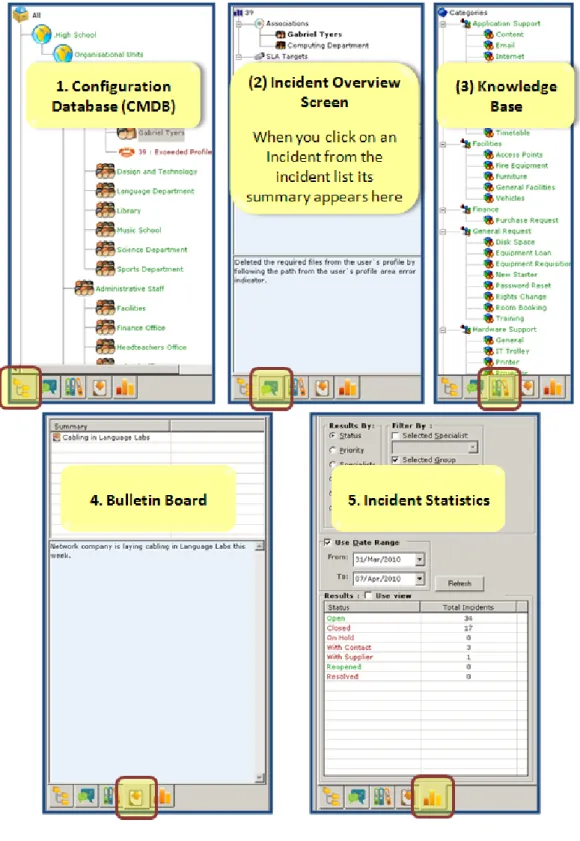
The SupportDesk Navigator Pane
The SupportDesk Navigator Pane is located on left of the main interface and provides
(1) configuration item information, (2) overview of the currently selected incident
record, (3) quick access to Knowledge articles, (4) the current bulletin articles and (5)
Incident Statistics.
Copyright © 1984 – 2010 Richmond Systems Ltd Page 16 of 147
4.3
Logging Calls and Incidents in SupportDesk: A Quick Overview
This section provides a brief overview of some of the techniques for logging incidents in SupportDesk using the demonstration database.
If you are already familiar with SupportDesk’s operation and want to get into the Incident Management configuration then see page 39.
We recommend that you login to the demo database (see page 12) to get the most out of this section.
If you would like a short demonstration of SupportDesk then please call 01428 641616 or email [email protected] and we can setup a remote demonstration.
The first example (over page) shows adding an Incident in the standard way - Classic Add Incident:
Copyright © 1984 – 2010 Richmond Systems Ltd Page 17 of 147 4.3.1 Example 1: Classic Add Incident
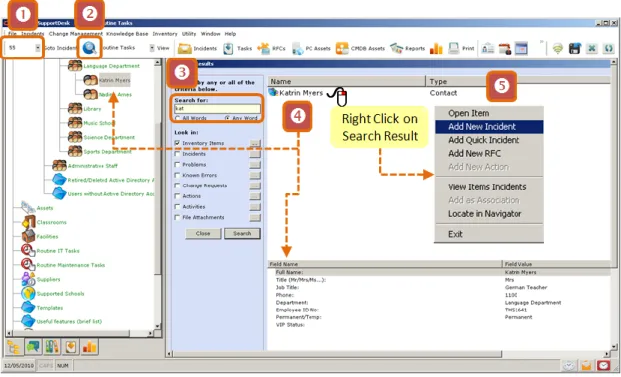
If the Incident ID is known (i.e. an existing incident) then it can be typed into the Goto Incident box , which will open the incident record. Otherwise:
Open the Search console to find the user: or
Type user’s name (or any other details you are using) and press Search or Enter on the keyboard
Right-click on the appropriate search result to open a menu of options
- The right-click also displays the user’s details in a pane below
- If you select “Locate In Navigator” the found item is also highlighted in the CMDB - Note the other options here, such as “Open Item” & “View items Incidents”
To add an incident select “Add New Incident” from the right-click menu.
If you have the user selected in the Navigator, you can use to add a new incident
You can also put an Add Incident button on the Toolbar, if there isn’t one there already
Figure 4: Searching for a Contact to Log an Incident
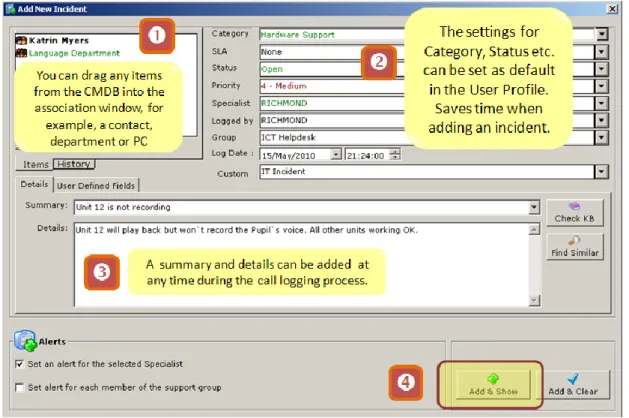
Copyright © 1984 – 2010 Richmond Systems Ltd Page 18 of 147 When you select Add Incident the next screen is the one below. By default, the contact selected above (Katrin Myers) will be in the associations box, which shows who or what is associated with an Incident.
You can have as many associations as you want (e.g. user, department, equipment) although there can only be one primary association. Associations can be added by dragging from the CMDB, and changed/removed using the right-click menu.
The settings for Category, Status, Priority, Specialist, Group, Logged by and Custom Field are pre-populated because they have been set in the user profile for the logged-on user, Richmond.
A summary and/or detail can be added at this stage , depending upon how much information you have gleaned from the caller.
Click the Add & Show button
Figure 5: Adding an Incident
For info, the “Add & Clear” button adds the Incident and clears the screen below so you can add another Incident.
Copyright © 1984 – 2010 Richmond Systems Ltd Page 19 of 147 When you click Add and Show the Incident Details window is shown:
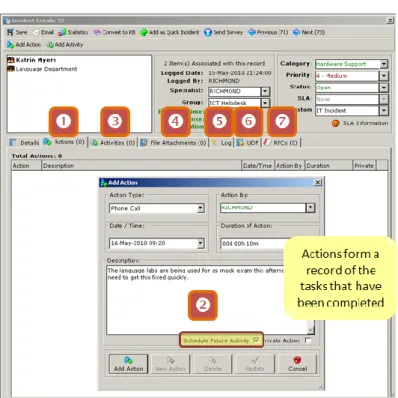
Figure 6: Adding Incident Actions
Select the Add Action Tab , select an Action Type and enter a description and duration (if required), then click the Schedule Future Activity box .
Now the Action (task) has been recorded in SupportDesk and an Add Activity (future task) window will be presented (next page).
The Incident Details Screen (above) has the following tabs:
Actions are tasks that have been completed; multiple action types can be configured and actions can be sued to record the amount of time spent on task. When you add an Action you can Schedule a Future Activity, i.e. a task that is due to be completed at another time. Actions can also be marked as private, which means they are not visible in the Self Service Portal (for end users).
Activities are future tasks, which can be set for any Specialist. Tasks can be added to a Specialists Availability Calendar.
File Attachments can be dragged onto the Incident record.
The Log file is a non-editable log of the Incident’s history.
UDF = User Defined Fields and is used to capture additional information linked to the Category. E.g. Category = Software, UDF = Application Name, version, etc. RFC = Request For Change. RFCs can be raised from any Incident record and if an Incident is associated with an RFC then it can also be accessed from here.
Copyright © 1984 – 2010 Richmond Systems Ltd Page 20 of 147 With the Add Activity window showing:
Select a task type
Block out a period of time when that task is due to be undertaken (NB you need to select “Flag User as Busy” (highlighted)
Type in a description and click Add Activity
Figure 7: Adding Incident Activities
You can add additional associations . In the above example the room and the IT asset has been added. This information helps the Specialist
working on the Incident and also assists in reporting about e.g. how many times an asset/user has caused an incident.
Additional item associations can be added via drag n’ drop or by finding the asset in the search console and right-click “Add as Association”.
The image to the left is a sample report produced when you select the print button from within an incident record. This can also be used as a job sheet an either printed or mailed to the Specialist.
Copyright © 1984 – 2010 Richmond Systems Ltd Page 21 of 147 When an Activity has been completed it can be converted into an Action using the right-click menu . This also opens the Activity so that it can be annotated.
Now there are two actions, the original phone call and a summary of the on-site works that was carried out. You can select any of the Actions and Right-click on them to copy the text to the resolution area .
Copyright © 1984 – 2010 Richmond Systems Ltd Page 22 of 147 4.3.2 Example 2: Add Quick Incident (Template)
In SupportDesk you create Incident/request records and save them as templates (page 63). Quick Incidents can be used to log commonly occurring Incidents without having to type the details into SupportDesk.
1. To initiate a template simply select an item from the CMDB (either directly or through the search console) and then right-click on the item to locate the Quick Incident List or use the F8 key.
2. Double-click on the Quick Incident (or select Add Incident)
3. The Incident record will then be created and the selected item will be associated with that incident.
That’s just a couple of de facto examples of adding incident records. Later sections cover incident management process configuration (page 44) and viewing incidents through the incident list (page 65).
Copyright © 1984 – 2010 Richmond Systems Ltd Page 23 of 147
4.4
Incident Management Information (MI): A Quick Overview
This section provides a sample of SupportDesk’s extensive reporting capability. Full details can be found in section 28 (Reporting) on page 116.
The reporting module can be launched in the Specialist Interface or in a stand-alone web browser. From a licensing perspective we allow free unlimited distribution and usage of the reporting module through a web browser.
The following example shows running an Incident Statistics report on an ad hoc basis then creating and running that same reports as a user defined report.
1. Launch the reporting module by clicking the reports button.
2. Select the Report Templates tab, select the Incident Statistics report and click on the Load Adhoc button.
Browse through the various parameters. SupportDesk reports access different parameter sets depending upon the report being run. Typical parameters include date, status, priority, category, specialist, group and Date Selection.
3. Select the Date Selection tab Tick the Ignore Date Criteria tick box and select Run Report.
Copyright © 1984 – 2010 Richmond Systems Ltd Page 24 of 147 The actual data you see will depend upon the database you are using and what incidents have been logged and the date. Below is an example using the demonstration database:
Reports that you want to use frequently can be saved as User Defined Reports with the parameters pre-defined. When you run the report it simply prompts for the date range. User defined reports can also be scheduled (because the parameters are known).
To create a user defined report from the Reports Module:
1. Select the Report Templates tab and type a name in the Report title box. 2. Click on Add New Report
3. The parameters (except date range) will be displayed. This time we will make the report for all active calls – click “Field for Status Description” and select active statuses such as Open, with Customer, with Supplier etc. (CTRL + Click to select individual items)
Copyright © 1984 – 2010 Richmond Systems Ltd Page 25 of 147 5. Select the User Defined Reports tab and click the Refresh button (as this is a web
module you will need to refresh the page to view the newly created report) 6. Select Load Report.
7. As this is a user-defined report you will just be prompted for the date. 8. Select a range and run the report.
Some reports have a parameter called CIID (that’s ITIL speak for Configuration Item ID), which allow you to specify which parts of the organisation the report should be based upon.
Where the CIID parameter is available you will be able to select from item (and it’s sub-items) from the Navigator structure using a selection control similar to that on the right.
Copyright © 1984 – 2010 Richmond Systems Ltd Page 26 of 147
5
Configuration Tools: The Setup Console
Most of SupportDesk’s configuration settings are located in the Setup Console, which can be located from the program menu:
Programs Richmond Systems SupportDesk Setup Console
The Setup Console provides administrator access to most of SupportDesk’s features and functions and is integral to SupportDesk’s configuration. The console is sectioned into logical areas as shown below.
To open a section click on the function header; this will open up a series of icons that control various aspects of the function. For example, in the screen below the Incident Management function is open with the sub-function “Statuses” visible.
The Setup Console should only be accessible to system administrators.
The rest of this guide will make extensive reference to the Setup Console to show how SupportDesk’s features are configured.
Copyright © 1984 – 2010 Richmond Systems Ltd Page 27 of 147
6
The Configuration Management Database (CMDB)
The previous section covered importing data using Active Directory and in the majority of cases you will use Active Directory to build the list of users you support. This section covers setting up item styles importing data from other data sources and adding data manually.
6.1
About the CMDB
The Configuration Database area of the Navigator uses a hierarchical navigation structure to enable you to quickly locate people, equipment and any other items that the service desk supports.
Each of the images represents a configuration item (CI) style; you can have as many styles as you wish and for each you can specify alphanumeric, numeric, date, currency, hyperlink, maintenance, tracking and history fields, as well as selecting the icon from an icon library. The structure can have multiple levels and items can be added, copied, pasted, moved, and drag n’ dropped.
Information about configuration items (CIs) can be imported electronically from external directory structures and databases. The example to the right shows departments, contacts and assets; this is the most widely used navigation method.
Item Styles are added and changed (edited) in the Setup Console and their usage is controlled using user rights, which are configured in the Setup Console (see next section). Once added, users and automated import routines can add items into the configuration database using the item style as a template.
Copyright © 1984 – 2010 Richmond Systems Ltd Page 28 of 147
6.2
Adding and Changing Configuration Item Styles
The Setup Console (Program Files Richmond Systems SupportDesk Setup Console) has an area called Configuration Management where Item Styles can be created and modified. The screen below shows the Contact Style Alphanumeric field list being edited:
To change (edit) an existing style select it from the drop down list and click on Update when you have finished editing. To add a new style click on Add New and enter a style name. Each style attribute can have up to 100 characters and can be mandatory or optional. The values are as follows:
Style Attribute Value that can be entered by user Total fields available
Alphanumeric Any value 15
Numeric Any numeric value 10
Date Any date 4
Currency Any number to 2 decimal places 4
Hyperlink Any hyperlink or description 4
The other tabs are described later but in summary they are for the following functions:
Style Function Function Description
Misc Allows you to pick the icon for the style from an icon library Maintenance Enables maintenance for any items using this style
Tracking Enables tracking for any items using this style (see page 93) History Enables history for any items using this style
Copyright © 1984 – 2010 Richmond Systems Ltd Page 29 of 147
6.3
Manually Adding Items to the CMDB/Navigator
CIs are added to the CMDB within the SupportDesk under the Node that is currently selected as follows:
Either Right-click and select Add Item from the right-click menu (shown below), or
From the Main Menu select Asset Management New Inventory Item, or
Press the F3 Key
This will open a blank CI Item Details window as shown below. You must save the item details before the other tabs become enabled.
Storing Email Addresses: Email addresses are stored in the System IDs tab (shown below). Usually these are imported from Active Directory but you can add them manually, for example, for suppliers, or feeder schools that are not in your AD structure.
If you add an email address for a contact then:
The contactcan email your designated support email address and an Incident record will be automatically created and associated with them
The contact can be directly emailed from an incident record (a record of the email is kept as an Action in the Incident record)
The contact can be sent automated emails (e.g. when they log an incident, when the service desk closes an incident, etc.)
The contact can reply to emails sent from SupportDesk and they will automatically be logged in the relevant incident record and notify the Specialist
Copyright © 1984 – 2010 Richmond Systems Ltd Page 30 of 147
6.4
Adding Users and Computers from Active Directory
This section is about populating the Configuration Management Database with
information about users and computers by connecting to and synchronising with
Active Directory.
*NB: This section is based upon adding data to your live database, i.e. rsupdesk.
The first step is to launch and login to the Quick Active Directory Setup Module:
Programs Richmond Systems Active Directory Synchronisation
Quick Active Directory Setup Module
Now follow the steps in the wizard:
Copyright © 1984 – 2010 Richmond Systems Ltd Page 32 of 147
THEN...
Copyright © 1984 – 2010 Richmond Systems Ltd Page 35 of 147 6.4.1 Active Directory Import Troubleshooting
The most frequent cause of data not being imported is that the Active Directory Service is not running. The reason for this could be that it is set to Manual. To set the service to Automatic:
Copyright © 1984 – 2010 Richmond Systems Ltd Page 36 of 147
6.5
Adding Items to the CMDB using the Data Import Wizard
Data from external databases or CSV files can be added using the Data Import Wizard. This works by mapping external data to the items in the CMDB. When you run the data import wizard you will need:
Access to the data source and the SupportDesk Database
To pick the item style to be used
To select the target location in the CMDB (Navigator)
To specify what attributes (e.g. make, model, serial No.) of the source data you want to import
*IMPORTANT NOTE: We strongly advise that users of the data import tool have a good
understanding of relational databases as you will need to understand the structure of the source database for import. Most customers seek professional services assistance when importing data; this has the additional advantage of fast-tracking related configuration such as scheduling imports. Using the data import module does not lend itself to a telephone support session.
*IMPORTANT NOTE: If you do run the data import module yourself then westrongly recommend
that you back up the SupportDesk SQL database before you undertake data imports. If you make a mistake, e.g. import data that you don’t want, it could be quite time consuming to remove it!
Copyright © 1984 – 2010 Richmond Systems Ltd Page 37 of 147
6.6
Printing from the CMDB
Clicking the Print button with an Item Selected creates a pre-configured attribute report for that item (and its children if you say Yes to the “Include sub-items” question).
6.7
Exporting from the CMDB
Selecting the “Item List” (F4 Key) opens a list of CMDB Items. From here you can select an item Style to view, select the columns for that item and print/export the data using the Print button on the main toolbar (or File Print). Initially this creates a report in the Report Viewer, from there select the preferred output format.
Copyright © 1984 – 2010 Richmond Systems Ltd Page 38 of 147
7
Useful Information to Put in the CMDB
7.1
Helping Supported Schools
SupportDesk is designed as a consolidated service desk. This means it can manage multiple support functions from the same application and database. A common model in the education system is for a secondary school to provide IT support to a number of primary or “supported” schools.
SupportDesk is ideal for managing requests from supported schools, in the demonstration database and illustrated below there is a simple CMDB structure with two schools and a contact in each school. There is no limit to the number of schools and contacts you can have; SupportDesk is used by many Local Authorities supporting hundreds of schools.
EMAIL SUPPORT: By putting the email address of the contact in the contacts record, emails from the supported school will be processed as incidents. Furthermore, by creating a separate email profile (page 82) these incidents can be routed into a specific call queue e.g. “supported school requests”.
WEB SUPPORT: SupportDesk has a Self Service Portal (page 106), which provides web-based access to end-users. The portal look and feel is governed by a “Customer Group”. As a base case you have one group that everyone logs into. Or you can create two (or more) groups and supported schools log into one group and your internal staff log into another; again, requests can be routed into a specific “supported school” call queue.
Incidentally the PROJECTOR03 icon shows that this projector is on-loan to this school. You can loan out equipment and set reminders for return using SupportDesk’s tracking capability (see page 93).
Copyright © 1984 – 2010 Richmond Systems Ltd Page 39 of 147
8
Users, Groups, Rights and Skills
SupportDesk can have multiple Groups (Teams) and multiple Rights Groups, which define what Specialists, can and cannot do. Specialist users are then added to the Users area where their Group and Rights Groups are applied. Other settings, including Windows Authentication, are shown below.
In an IT Service Desk environment you may want one group for first line and another for second line. In a consolidated service desk environment you might have the desk being used by IT, Facilities and Finance, in which case you can create groups for these “support” staff. SupportDesk has multiple email profiles in which you can define the automated emails that get sent to users when calls are logged, responded to, resolved etc.
Figure 8: Specialist User Configuration Settings
8.1
Configuring Groups
User Groups allow you to assign Users to individual Departments or Teams within SupportDesk. Each SupportDesk User must be assigned to a User Group.
Groups are configured in the Setup Console:
Setup Console General Groups
Group Name
Help Desk
Facilities Management Finance
Copyright © 1984 – 2010 Richmond Systems Ltd Page 40 of 147
8.2
Configuring Rights Groups
Rights are configured to specifically allow and deny Users from performing certain functions within SupportDesk. By default an Administrator Rights Group exists. Members of this group have the rights to perform all tasks within SupportDesk.
Setup Console General Rights
Group Name
1st Line ICT Support 2nd Line ICT Support Facilities
Finance
At first look the number of rights might seem a little daunting. Don’t worry, the defaults are fairly logical so you can just make adjustments here and there as you configure the system and use the desk. The reason there are so many rights is it gives you a high degree of control over who can do what.
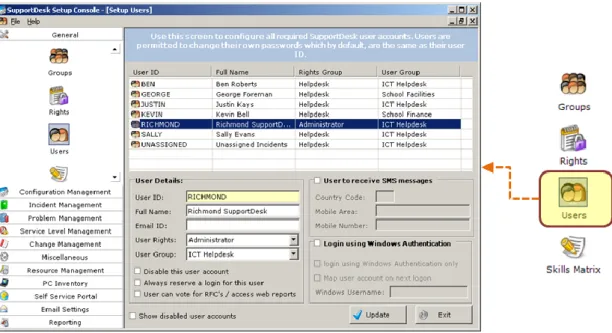
8.3
Configuring Users
Users can be created for each individual that requires access to the SupportDesk Database as part of your support function. Users in SupportDesk are also referred to as Specialists.
Setup Console General Users
Username [10 characters
Max]
Full Name Email ID Group Rights Group
De d icated L ic en ce [y /n ] U se W in d o w s Au th en ticat ion [y/n ]
Unassigned New Web or Email Call
Copyright © 1984 – 2010 Richmond Systems Ltd Page 41 of 147
8.4
Configuring the Skills Matrix
This is optional; you do not need the Skills matrix defined in order to use SupportDesk and not everyone wants to use a skills matrix.
The Skills Matrix is used to define which Users are skilled or unskilled in each Category. This will allow the routing of an Incident to Users that are knowledgeable in the selected Category. For example, you could use the skills matrix to avoid routing software application related issues to Specialists responsible for hardware support.
Setup Console General Skills
Figure 9: The Skills Matrix
To apply skills to users: 1. Select a Group
2. Select the relevant Categories 3. Click on Load Matrix
4. Click on each square in the grid to toggle between skill’s settings
Setting Action
SKILLED: An Incident can be assigned to this SpecialistX
NOT SKILLED: Incident cannot be assigned to this SpecialistCopyright © 1984 – 2010 Richmond Systems Ltd Page 42 of 147
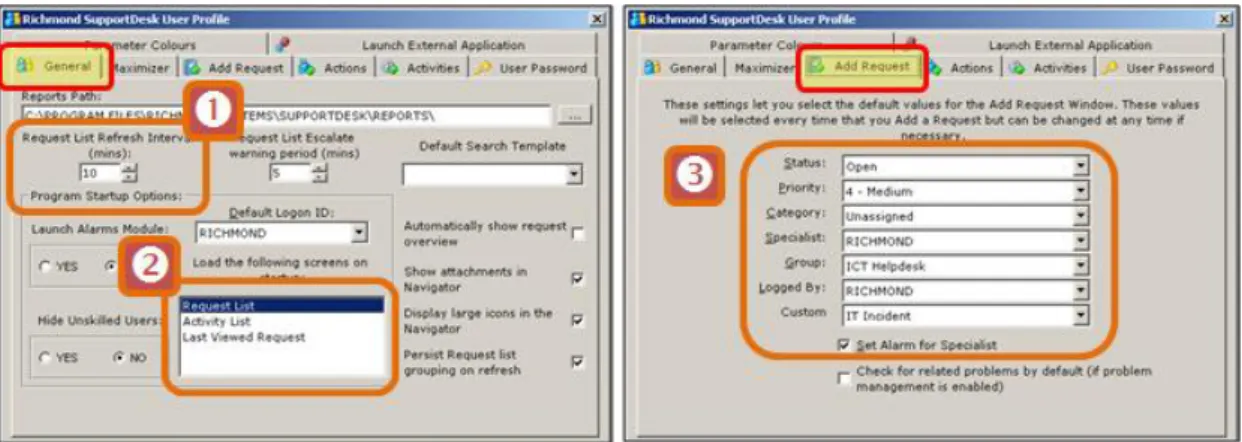
8.5
Setting up a User Profile (Defaults)
A user profile controls the default settings for a Specialist when logging a call, adding an action etc. Setting up a user profile is quick, easy and saves a lot of time when logging incidents. The five most-used settings are listed below.
User profiles, by definition, are setup per service desk user and are accessed from the Utility Menu or the User Profile toolbar button (if enabled).
Figure 10: Setting up a User Profile The Incident Details Screen:
The Incident list refresh interval defaults to 10 minutes; you can change this interval.
When you open the SupportDesk application you can select the screens that automatically open, for example, the incident list or the last viewed incident. When you add an incident you can specify the default values for Status, Priority, Category, Specialist, Group, Logged by and Custom Classification field.
When you add an Action (completed task) to an incident you can specify the default Action Type.
When you add an Activity (future task) to an incident you can specify the default Activity Type.
Copyright © 1984 – 2010 Richmond Systems Ltd Page 43 of 147
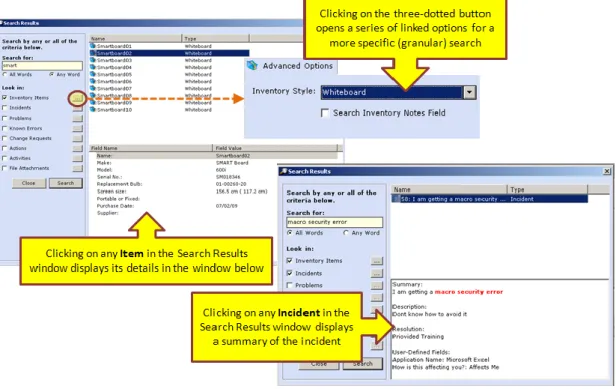
9
The Search Console
The SupportDesk Search Console allows you to search most aspects of SupportDesk. The Console has a search box (what to look for) and tick boxes to select options for where to look. Clicking on the button to the right of each option allows further granularity of search.
Results are presented in a search window and clicking on a result will present further details in a window below. The right click menu is quite a useful way of selecting the action you want to perform on/with the selected search result. Hot keys and toolbar buttons will also be available.
Copyright © 1984 – 2010 Richmond Systems Ltd Page 44 of 147
10
Incident Management (Call Logging) Configuration
The following sections describe how to configure the main settings in the Setup Console for Incident Management (call logging and management), including:
Statuses (Open, Closed, etc.)
Priorities (Low, Medium, etc.)
Categories (Hardware, Software, etc.)
Category User Defined Fields (questions related to categories)
Actions and Activities (Completed and scheduled task types)
Resolution Codes (First time fix, training, upgrade, etc.)
Customer Surveys (value-based questions and comments)
Terminology (Incident, Call, Request, Ticket, etc.)
Custom Classification (Customisable pick-list to further classify Incidents, requests)
Copyright © 1984 – 2010 Richmond Systems Ltd Page 45 of 147
10.1
Statuses
Statuses are used to describe the current state of an Incident. A status is applied to an Incident when it is first logged. The status of an Incident can be changed throughout the life-cycle of the Incident and Statuses are used extensively in reporting and statistical reporting in the Management Console.
A Status can be set to have escalation enabled (green) or disabled (red). When the escalation is enabled the escalation (SLA) clock will be active (ticking) on any Incident using that Status. If the escalation is disabled the escalation clock will not be active on any Incident using that Status. The defaults in both the demonstration and blank database have a combination of escalating and non-escalating statuses.
Escalations are automated Service Level Agreements (SLAs) and are configured in the Service Level Management area of the Setup Console. An escalation can drive response & resolution times, pending response & resolution times, priority changes and can trigger notifications and alerts. For more information about SLAs please refer to Service Level Management and SLAs on page 136.
The grid below shows the default entries (Open, Closed, On Hold, With Contact and With 3rd Party). You can add/delete/edit entries in the list.
Status Escalating Status
Open TRUE
Closed FALSE
On Hold FALSE
With Contact FALSE
With Supplier FALSE
10.1.1 Which Statuses Should I Escalate?
The status that you choose to escalate depends upon your personal view about when your resolution times should be being measured.
For example, if you take a call from an end-user and need to escalate (pass) the issue to a supplier “With Supplier”, from your end-user’s perspective the ball is in the court of the service desk and therefore this status should probably be escalating.
Copyright © 1984 – 2010 Richmond Systems Ltd Page 46 of 147 However, if you ask the end-user for some more information, or to do something that is related to their support request, then it would be reasonable to say that the ball is in their court and therefore the status “With Contact” should not be escalating.
For a delaying status such as “On Hold”, the escalation rules depend upon how and why you are using the status. If, for example, there is no immediate resolution and you have communicated this to the end-user then it would seem reasonable for the status to not be escalating.
As you can see the rules are a little subjective – feel free to give us a call if you want to discuss your particular scenario.
10.2
Priorities
Priorities are used to describe the
urgency of an Incident. A priority is applied to a new Incident either manually (user selects) or when an SLA is selected for the Incident. Priorities can be used to define the different escalation steps associated with a SLA. The Priority order is defined by the order that they appear in the Priority list. The default priorities are listed in the grid opposite; you can change these and add your own.
Priority Urgent High Medium Low
Copyright © 1984 – 2010 Richmond Systems Ltd Page 47 of 147
10.3
Categories
Categories provide a way to group related records. Categories are stored in a hierarchical structure which can be customised to suit different types of support functions and environments.
Reporting takes advantage of the categorisation of records. Considerations should be made when constructing your category structure to reflect your reporting needs. The Category structure is also used to define which Categories particular Specialists are skilled in (Skills Matrix) and also to arrange Knowledge Base articles.
Categories can also have linked fields called Category User Defined Fields
(UDFs), which are a useful way of eliciting additional and relevant information.
Categories can have Service Level Agreements (SLAs) so that when an Incident is logged against a particular category a corresponding SLA is invoked. For example, you may want to assign an SLA to critical infrastructure categories such as Servers.
10.3.1 Configuring Categories
Categories are configured in the General Area of the Setup Console; the topmost option. You can mark Categories as being visible (and selectable) to end-users via the Self Service Portal (SSP). For example, you might make Software, Hardware and General Request top-level categories visible, but hide the sub-top-level categories for the service desk staff to select.
There are no limits to the size or hierarchy (nesting levels) of categories in SupportDesk. However, consideration should be given to Service Desk Specialists who need to apply the correct categorisation and also reporting requirements. Too many categories can make selecting difficult and prone to errors; likewise reporting across too many categories can dilute the relevance of the reports. Category User Defined Fields (UDFs – see section 10.4 on page 49) can be used to reduce the number of categories required.
Copyright © 1984 – 2010 Richmond Systems Ltd Page 48 of 147 10.3.2 Category Matrix with Examples
Category Matrix Category SLA SS P vis ib le ?
SUB Category SLA
SS P vis ib le ? Unassigned Impact 3 N Hardware Impact 3 Y Laptop Impact 3 N Desktop PC Impact 3 N Server Impact 2 N
Mobile device Impact 3 N
Software Impact 3 Y
Microsoft Office Impact 4 N
Finance System Impact 3 N
HRM System Impact 3 N
Sales System Impact 2 N
Network Impact 2 N
Internet Impact 3 N
Email Impact 1 N
Phone System Impact 1 N
General Request Impact 4 Y
Password Reset Impact 3 Y
User Storage Space Impact 5 Y IT Equipment Request Impact 5 Y
Copyright © 1984 – 2010 Richmond Systems Ltd Page 49 of 147
10.4
Category User Defined Fields (UDFs)
User Definable Fields (UDF) are customisable fields used for the collection and recording of information relating to Incidents and Problems. User Definable Fields can be used by SupportDesk Specialists and by end-users logging Incidents through the Self Service Portal.
UDFs can relate to one or more Categories or Sub Categories, and can be free form text or list fields (list fields can be typed or imported).
The settings are very flexible so, for example, you could have a category of Application (for software support) and two UDF fields: Application name and Version. The Application Name
field can be made visible via the SSP and mandatory (user must select from list) whereas the Version can be hidden from the end-user but made mandatory for the Service Desk Specialist to complete when they open the Incident record.
UDFs are a good way of reducing the number of categories. For example, rather than have a list of MS Office Applications in the Category tree have a category of Productivity Software and a linked set of UDFs with a dropdown containing a list of all the productivity applications used. Category UDF Assigned To Field Name Requ ir
ed? Input Method (Type or Pick List) V isi b le in th e S S P ?
Pick List Items
Hardware Asset Tag Y Type N N/A
Application Name Y Pick Y Word
Excel PowerPoint Access
Version N Type Y N/A
Copyright © 1984 – 2010 Richmond Systems Ltd Page 50 of 147
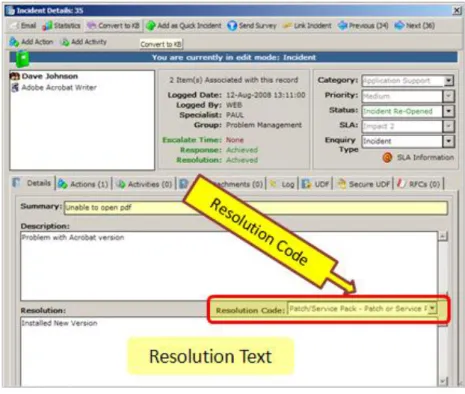
10.5
Resolution and Resolution Codes
The Resolution area of an Incident record allows the recording of free-form resolution text and resolution codes. A call is resolved when text is entered into the resolution area shown below. Resolution is one of SupportDesk’s triggers (optional) to send an automated email to the user associated with the Incident to let them know their issue has been resolved.
Figure 14: Applying a Resolution and Resolution Code
Resolution Codes are selectable from a drop down list on Incident records and are particularly helpful sources of management information about, for example, the proportion of Incidents resolved through Training, User Intervention, Patch, Password Reset, and so on. The Management Console provides a drillable view of resolution codes (inset) and there are report templates to show, for example, resolution codes set against categories.
Copyright © 1984 – 2010 Richmond Systems Ltd Page 51 of 147 Resolution Codes are configured in Incident Management Resolution Codes.
The following checklist can be used to list Resolution Codes.
Resolution Code Resolution Description
FTF First Time Fix
PWR Password Reset
Figure 16: Resolution Code Checklist
10.6
Configuring Resolution Codes
1. From the Setup Console Select: Incident Management Resolution Codes
2. Right Click on the interface to add (or delete) a resolution code.
3. To edit a resolution code select it then change the code and/or description as required.
Copyright © 1984 – 2010 Richmond Systems Ltd Page 52 of 147
10.7
Reporting by Resolution Codes
A particularly useful report is the one titled “Category by Resolution Code.rpt” (example below). This report allows you to scan across categories looking for patterns or hotspots in the final resolution. For example, application support calls might have a disproportionately high number of training resolutions, which highlights an opportunity to target training to reduce support calls (and increase productivity).
Copyright © 1984 – 2010 Richmond Systems Ltd Page 53 of 147
10.8
Logging Incidents Manually (Specialist Adds Incident)
Incidents logged by phone will typically be assigned to the Specialist taking the call (or whoever the Specialist assigned the Incident to) although the Incident could be logged as Unassigned if need be.
If the End-User is calling about an existing Incident you can simply type the Incident ID into the quick find box located on the toolbar of the Main Client Interface (usually on the left).
For New Incidents you probably want to locate the user or the equipment they are calling about. To do this open the Search Console (Ctrl + F) or click the Search Console button pictured right.
In the example below a search has been made for a caller called Kevin. Two contacts are retrieved in the search window, which also shows the email address and Detail information for each contact. Right Clicking on a contact opens a menu (shown) from which a New Incident can be raised. From this menu you can also open the contact’s record, add a Quick Incident, Add a Problem, Add an RFC, View the Incidents for the contact and locate the contact in the CMDB (Navigator).
Copyright © 1984 – 2010 Richmond Systems Ltd Page 54 of 147
10.9
Adding a New Incident
This section provides a brief run through of the incident adding/call logging process; for a more detailed overview please see page 16).
Following on from the Search Console above selecting ‘Add New Incident’ opens the Add New Incident window below. You can see that the contact (Kevin Bell) is in the associations window (top-left). More associations can be dragged in from the CMDB or added directly from the search console.
From here a summary and some details must be entered before progressing. The Category, SLA, Status, Priority, Specialist and Group can be selected – NB the User Profile can pre-populate these settings to save time. User Defined information can be added and you can also search the Knowledgebase and Similar Incidents from this screen.
Figure 19: The Add New Incident Screen
Clicking on the Add and Show button adds the Incident into the system and shows the Incident Details (below). If there were any incomplete mandatory User Defined Fields (UDFs) then you would be prompted for the information at this point.
From the Incident Details you can add Actions, Activities, Resolution and Resolution Codes. Ctrl + F2 reassigns the Incident. If you have resolutions enabled then you must supply a resolution before closing an Incident. Also, the Extended Incident Options (Setup Console) allow you to prevent an Incident being closed when it has outstanding (incomplete) Activities.
When an Incident is Closed you can send a Customer Satisfaction Survey from the Incident record. If you select print from an Incident record a pre-formatted Incident report will be created (some users use these as job sheets).
Copyright © 1984 – 2010 Richmond Systems Ltd Page 55 of 147
10.10
Adding Associations to Incidents
From an Incident Details record you can add associations by dragging items across from the CMDB and dropping them into the association box.
You can also add associations by locating items in the Search Console and adding them. For example, if Kevin was calling about his laptop then you can search on, say, Asset ID, and then right-click to ‘Add as Association’ into the Incident Record (see below).
Copyright © 1984 – 2010 Richmond Systems Ltd Page 56 of 147
11
Actions (Completed Tasks) and Activities (Future Tasks)
Actions and Activities are used within an Incident to record events that have been completed, events as they are happening or events that need be scheduled (future tasks). This builds up a history of an Incident and make it easy to review what has been done.
Actions = Completed or current tasks
Activities = Planned or scheduled tasks
Figure 21: Actions in an Incident Record
Once completed, Activities can be converted into Actions. Also, Action text can be copied into the Incident resolution area (right click on Action and select “Copy Text to Resolution”) to save typing time!
You can have different Action and Activity types, and for each Action type a number of attributes can be set as shown below.
Copyright © 1984 – 2010 Richmond Systems Ltd Page 57 of 147
11.1
Configuring Actions
Actions are configured in the Setup Console Incident Management
Action / Activity Setup
When you first install SupportDesk there are a number of pre-configured Actions and Activities. Adding to and modifying these is easy:
1. To add an Action click on Add New, give the Action a name and set the attributes 2. To modify an Action, select it and change the attributes.
General Options Tab (above)
Action Attribute Description
Action Name If the Action and Activity name are the same, then a converted Activity will automatically become an Action of that type. Default to Private The Action will not be visible to end-users via the SSP. This flag
can be set at any time from within the Incident record.
Forced Duration The Specialist adding the Action is required to enter a duration. This setting has a sub-option to use a default duration. For example, if you allow 4 hours to rebuild a server then you can create a rebuild server task with a default duration of 4 hours. Change Icon There is an icon library, this is also editable.
Copyright © 1984 – 2010 Richmond Systems Ltd Page 58 of 147 Action Response Tab (below)
Action Attribute Description
Counts as Response An Incident is not regarded as having been responded to until some form of response has been entered. An action can count as a response, for example, a Phone Call. The Response trigger is used to assess SLA Response Time success/failure and also to trigger an automated email (if this option is set).
Misc Tab (below)
Action Attribute Description
Instant Action When you convert an Activity to an Action you are prompted to edit the Action. If you don’t want this to happen, i.e. the Activity just converts to an Action, then tick the Instant Action box.