Access 2013:
Create web-based
databases
Practical workbook
Aims and Learning Objectives
Access web apps can only be used via Microsoft’s SharePoint. The easiest way to gain access to SharePoint is to subscribe to SharePoint Online, which is available from Microsoft for an annual fee. This then lets you host, use and share Access web apps from any Internet-enabled device. This document will be of no use if you do not have access to SharePoint Online.
This document assumes that you are experienced at designing and building Access databases so, rather than dwelling on these aspects, concentrates on the core building blocks – the ‘must knows’ –
necessary for getting an Access web app online. The core learning objectives for this document are to:
Set up a new SharePoint Online Site to host your app
Choose, ‘launch’ and use an Access web app from a template Modify your new Access web app
Note on versions of Access:
Access 2013: Create web-based databases (January 2014) © 2014 University of Bristol.
Document information
Course files
This document and any associated practice files (if needed) are available on the web. To find these, go to http://www.bristol.ac.uk/it-services/learning/resources and in the Keyword box, type the document code given in brackets at the top of this page.
Related documentation
Other related documents are available from the web at: http://www.bristol.ac.uk/it-services/learning/resources
This document is licensed under a Creative Commons Attribution-Noncommercial-Share Alike 2.0 UK: England & Wales Licence (http://creativecommons.org/licences/by-nc-sa/2.0/uk/). Its “original author” is the University of Bristol which should be acknowledged as such in any derivative work.
Contents
Document information
Task 1 Create a new SharePoint Site ... 1 Task 2 Select a pre-existing template and ‘launch’ it to your new Site ... 2 Task 3 Modify your Access web app ... 4
.
Important: prerequisites/support
1. You must have a SharePoint Online account before you can use this document. 2. You must determine in advance what Microsoft Services you need. You can compare
options at http://office.microsoft.com/en-gb/sharepoint/collaboration-tools-compare-sharepoint-plans-FX103789400.aspx.
3. You may also need to buy further Microsoft Services, such as Office 365 to ensure that your version of Access is always up-to-date (SharePoint Online only lets you modify or launch new Access apps using the current version of Access).
Please note: IT Services does not provide support for any issues to do with creating, hosting, using or sharing Access web apps on SharePoint Online or for any problems in launching web apps. The SharePoint Online and Office 365 services are provided by Microsoft – for support you should go to http://support.microsoft.com/ph/15834#tab6.
Important: security information
Remember that if you store or otherwise process personal or restricted University data on a database, whether web-based or otherwise, you should be aware of your responsibilities toward keeping this data safe and secure, both from point of view of University regulations and the Data Protection Act.
Task 1
Create a new SharePoint Site
Objectives To login to your SharePoint Online account and create a new Site to host your Access web app.
Comments By creating a new Site you make it easier to control access to your Access web app if you intend to share your database with others and let them update it online.
1.1 To login to your SharePoint Online account and go to Sites:
Open Internet Explorer and navigate to https://login.microsoftonline.com/ and enter your SharePoint username (which is in the form of an email address) and password. Note Chrome and other browsers do not work well (if at all) with SharePoint Online.
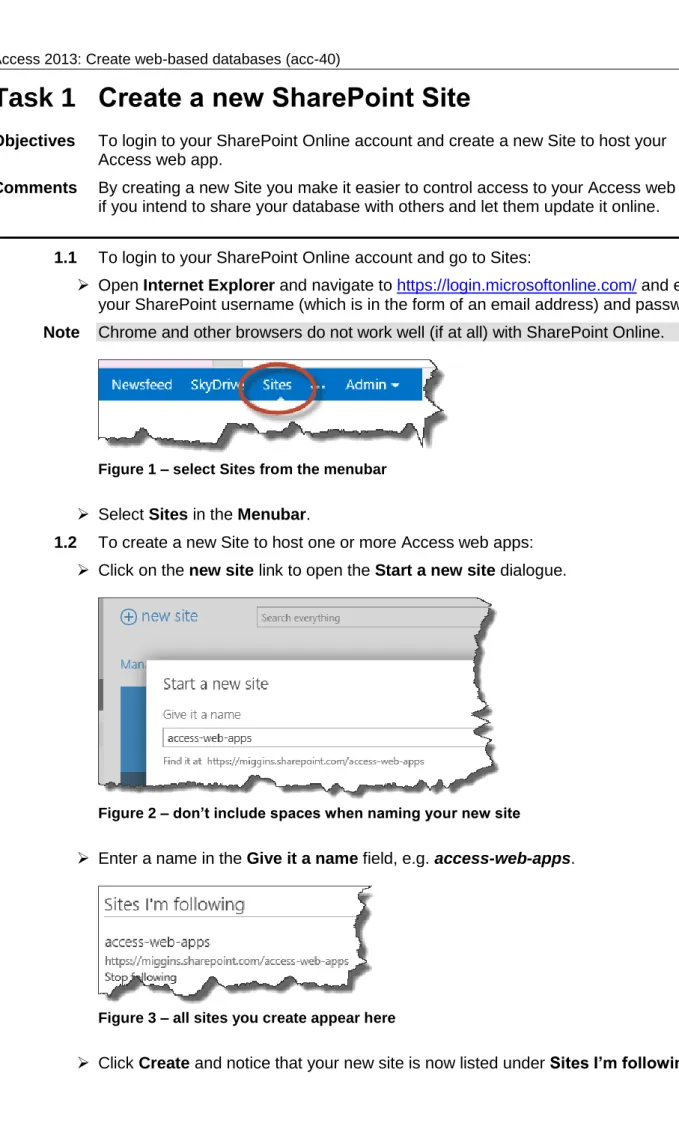
Figure 1 – select Sites from the menubar Select Sites in the Menubar.
1.2 To create a new Site to host one or more Access web apps: Click on the new site link to open the Start a new site dialogue.
Figure 2 – don’t include spaces when naming your new site
Enter a name in the Give it a name field, e.g. access-web-apps.
Figure 3 – all sites you create appear here
2
Task 2
Select a pre-existing template and ‘launch’ it to
your new Site
Objectives To look at the pre-existing templates and select one that has at least some of the functionality that you want for your database and to ‘launch’ the new app to your SharePoint Site
Comments You could build the app from scratch – in which case you would create a blank web database, build it and then ‘launch’ it.
2.1 To create a custom web app:
Figure 4 – click on the extremely intrusive Custom web app icon Open Access and select Custom web app.
In App Name type a name that tells you what the database does, e.g. MyContacts. Note Keep this simple, with no spaces, because it becomes part of the URL.
Figure 5 – enter the web address properly – typos cause confusing error messages In Web Location enter the URL of your SharePoint Online site complete with the
name of the site to which you want to upload your new app – i.e. your SharePoint web address, followed by a forward-slash, followed by the name of your new site, then click on Create.
In the Add Tables window that opens enter a search term to look for pre-existing templates, e.g. type contacts.
Figure 6 – the best matches will appear in the list below the search box
Select Contacts and when Access has stopped processing your request click on Navigation Pane to see the objects that make up your new app.
Figure 7 – launch your new Access web app
If you want to do some minor editing to remove fields that you know you don’t want, or to move the order of fields, you can do this now – otherwise select Launch App. Note You may be asked to login to your Microsoft Office 365 account at this point – if your
browser gives a warning message select to run the required plugin. You may find that Access opens Chrome if you have it set as your default browser, in which case close this and open Internet Explorer instead. Chrome does not work well (if at all) with SharePoint Online.
Have a play with your new online database noting that it is generic and will most likely need modification, such as adding new fields or removing unwanted ones, unless you want to do something very simple with it.
(If you're not sure how to use your new database, check out one or more YouTube videos.)
4
Task 3
Modify your Access web app
Objectives To get to know the required workflow for modifying an existing Access web app; to lightly modify an existing Access web app.
Comments You could, if you want, modify your Access web app prior to first launching, but it generally helps to see how any app looks in situ first.
3.1 To prepare your web app for modification:
Login to your SharePoint Online account (if not already logged in) - make sure that you are using Internet Explorer and not Chrome.
Figure 8 – find your new database by selecting Site Contents
Navigate to the site in which you have created your Access web app and click on Site Contents in the left-hand navigation. (It may also be available under Recent.)
Figure 9 – click on the cog and select Customize in Access
Open the database, then click on the Cog icon in the top, right-hand corner and select Customize in Access.
(Select Open if a popup message appears asking what you want to do with the database.)
(If a message opens when Access opens, select OK.)
Enter your SharePoint Online account username and password when prompted. (If this doesn’t work try again with your Microsoft account details instead. Sometimes one works, sometimes the other – please don’t ask why!)
3.2 To modify the Contacts table:
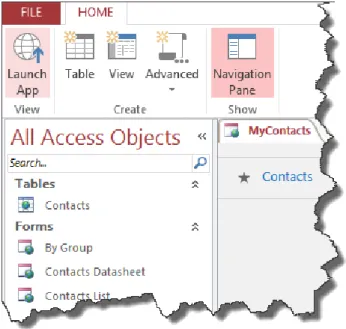
Figure 10 – select Navigation Pane to view all Access objects
In Access click on the Navigation Pane option to see the objects that make up the database.
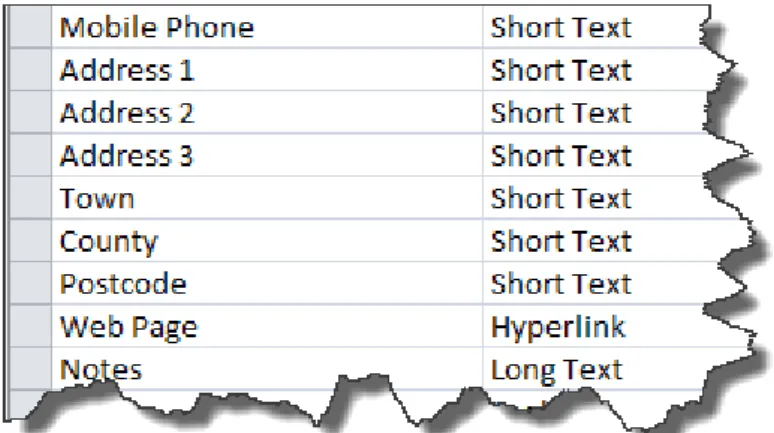
Right-click on the Contacts table and select Design View. Change City to Town, State to County and Zip to Postcode. Right-click in Country and select Delete Rows, followed by Yes.
Figure 11 – how the updated field names and data types should look
Right-click in Town and select Insert Rows and add a new field Address 3 (leave it as the default Short Text).
Close the table and save the changes. 3.3 To modify the Contacts List form:
Right-click on Contacts List in the Navigation Pane.
Change the labels on the fields that you altered above (Town, County and
Postcode). You may not have to rename them all because the labels don’t always
seem to match the fieldname!
Delete Country (you have to delete field and label individually).
Move Postcode to the space left by deleting Country, then move Town and County in turn.
Drag Address 3 across from the Field List to the space on the form left by moving Town across.
6 Figure 12 – how the updated form should look
Close the form and save when prompted then click on Launch App.
Warning! Annoyingly, this is likely to open your web app in Chrome or other browser if Internet Explorer is not your default browser. You may have to logout and log back in to your SharePoint Online account and re-navigate to your app to see the updated version. If lucky you may get away with clicking on Back to Site and then on the app name in the Recent or Site Contents list.
3.4 To complete modification of your app:
Figure 13 – select Datasheet
In Internet Explorer, navigate to your app in SharePoint Online and click on the Datasheet option.
Notice that it still shows the old fields and field names.
Click on the Cog icon and select Customize in Access and select appropriate options (see Task 3) for any messages that pop-up.
Right-click on Contacts Datasheet in the Navigation Pane, select Open and make the necessary changes, then save.
Launch the app again, most likely pausing only to logout and log back in to your SharePoint Online account in Internet Explorer – annoying, isn’t it?