NerveCenter
Copyright
Portions ©1989-2008 OpenService, Inc. All rights reserved.
Disclaimers
OpenService, Inc. (“OpenService”, “Open”) makes no representations or warranties, either expressed or implied, by or with respect to anything in this manual, and shall not be liable for any implied warranties of merchantability or fitness for a particular purpose or for any indirect, special or consequential damages.
These applications are available through separate, individual licenses. Not every feature or application described herein is licensed to every customer. Please contact OpenService if you have licensing questions.
No part of this publication may be reproduced, stored in a retrieval system or transmitted, in any form or by any means, photocopying, recording or otherwise, without prior written consent of OpenService. While every precaution has been taken in the preparation of this book, OpenService assumes no responsibility for errors or omissions. This publication and the features described herein are subject to change without notice.
The program and information contained herein are licensed only pursuant to a license agreement that contains use, reverse engineering, disclosure and other restrictions.
Trademarks
OpenService is registered in the U.S. Patent and Trademark Office. Security Threat Manager, NerveCenter, and the Open Logo are trademarks of OpenService, Inc.
All other products or services mentioned in this manual may be covered by the trademarks, service marks, or product names as designated by the companies who market those products.
OpenService, Inc. 67 Forest Street Marlborough, MA 01752 Phone 508-597-5300 Fax 508-597-5399 http://www.openservice.com
C
Contents
1
Introduction
About This Book . . . 2
Requirements for Using This Book . . . 3
Understanding NerveCenter . . . 4
SNMP Basics . . . 5
2
Installing NerveCenter
NerveCenter Architecture . . . 8Installing NerveCenter on UNIX. . . 9
Preparing Your System for Installation . . . 9
Running the Installation Script. . . 10
Setting Environment Variables. . . 12
Installing NerveCenter on Windows . . . 13
Running the Windows Setup Wizard . . . 13
Setting Up the NerveCenter Database on Windows. . . 17
3
Preparing To Use NerveCenter
Starting the NerveCenter Server . . . 20Starting the NerveCenter Client. . . 20
Adding Nodes to the Database . . . 24
Contents
C
Turning on the Alarm . . . 40
Enabling the IfLoad Behavior Model . . . 40
Viewing the IfLoad Alarm. . . 41
Poll That Triggers the Alarm. . . 42
Turning on the alarm . . . 44
Generating an Alarm Instance . . . 44
5
Monitoring Alarms
Viewing Alarm Instances . . . 46The Tree View . . . 46
The Alarm Detail View . . . 47
Analyzing Historical Detail for an Alarm Instance . . . 49
Reading Logged Data . . . 51
Resetting and Disabling Alarms . . . 53
Suggestions for Customizing the Behavior Models . . . 54
IfData_LogToFile Behavior Model Changes . . . 54
IfLoad Behavior Model Changes. . . 55
6
Where To Go from Here
NerveCenter Documentation Library . . . 58Expanding on What You Have Learned . . . 60
Configuration Options . . . 61
Node Management. . . 62
Event Correlation. . . 63
Alarm Actions . . . 64
The Web Client . . . 66
Reports. . . 67
Shutting Down the Client . . . 68
Shutting Down the Server. . . 69
1
Getting a Quick Start with NerveCenter
Introduction
Getting a Quick Start with NerveCenter provides a short, concise introduction to OpenService NerveCenterTM. This manual does the following:
Teaches basic concepts without theoretical detail
Guides you through a simple trial installation of some NerveCenter components Provides an overview of basic NerveCenter functions by showing you what a behavior
model is and how it works
Use this guide to preview NerveCenter before actually installing it on a production machine.
Section Description
About This Book on page 2 Describes the purpose of this book and who should read it.
Requirements for Using This Book on page 3 Defines what is required to install NerveCenter and complete the sections of this book.
Understanding NerveCenter on page 4 Provides a brief overview of NerveCenter.
SNMP Basics on page 5 Summarizes the Simple Network Management Protocol (SNMP) that NerveCenter uses to monitor networks.
Introduction
1
About This Book
This tutorial takes about one to two hours to complete. If you are new to NerveCenter, it is recommended that you read this book and perform its exercises before proceeding with any other NerveCenter tasks—including installation.
Getting a Quick Start with NerveCenter is primarily intended for people who:
Have never used NerveCenter before and want a brief tour before they begin learning to customize the application
Are evaluating NerveCenter
The material covered in this book is designed to help you acquire a degree of confidence and familiarity with NerveCenter. First, you will perform a simple NerveCenter installation that requires no configuration. Afterward, you will define a few nodes for NerveCenter to manage, and then monitor certain conditions on these nodes.
NOTE NOTE NOTE NOTE
The stand-alone installation that you will perform using this book does not enable NerveCenter to be integrated with a network management platform, such as OpenView Network Node Manager. If you intend to set up integration, you will need to reinstall.
In addition to the above restriction, the installation here does not support SNMP v2c or v3 agents.
After completing this book, you will likely need to reinstall the software to customize NerveCenter to work with your network. The last chapter of the book, Where To Go from Here, expands on the information covered in the exercises. For example, the chapter describes a full range of options for node discovery, event correlation, and integration with a network management platform.
Requirements for Using This Book
1
Requirements for Using This Book
You must meet the following requirements to install NerveCenter and complete the sections in this book:
NOTE NOTE NOTE NOTE
These requirements are for a demo installation only. For a full list of requirements, refer to Installing NerveCenter. Refer also to the Requirements in NerveCenter 5.0.00 Release Notes for details about supported hardware and software.
TABLE 1-1. Prerequisites for Completing Getting a Quick Start with NerveCenter
Prerequisite Description
System The machine on which you install NerveCenter will require the following:
Windows: 2003 Server with SP1, or XP with SP2; 256 MB RAM; 200 MB disk space
Unix: Linux Enterprise Server 3, Solaris 8, or HP-UX 11.i; 256 MB RAM; 200 MB disk space
In addition, the installation machine should have a color monitor with 1024x768 resolution. The machine must also have access to a CD-ROM used for installing NerveCenter.
Installation CD and license key You must have the installation CD and serial number that were shipped with NerveCenter.
Administrator rights You will need the following user rights:
On Windows, you must be logged on as an administrator or a member of the domain administrator’s group.
Introduction
1
Understanding NerveCenter
NerveCenter provides powerful management of distributed, cross-platform networks using SNMP messages. (See SNMP Basics on page 5 for a summary of SNMP.)
Using Perl expressions, you can manipulate SNMP messages to monitor thresholds, management information base (MIB) variables, and other indicators of network performance. NerveCenter additionally relies on Internet Control Message Protocol (ICMP) messages from your network to provide basic information about unresponsive devices. NerveCenter’s correlation engine then filters all this data from your network and uses automated responses—such as informing a platform, paging, logging, sending e-mail, setting MIB values, or sending traps—to track events, notify you of critical events, and perform corrective actions.
NerveCenter implements predefined and user-defined behavior models to perform event correlation. These behavior models determine the following:
Which nodes the behavior model monitors
Which conditions NerveCenter detects on these nodes How NerveCenter correlates the conditions it detects How NerveCenter responds to network problems
NerveCenter handles event correlation across network workstations (Windows and UNIX), servers, routers, bridges, and other devices. NerveCenter can run coresident with a network management platform, such as Hewlett-Packard’s OpenView Network Node Manager and IT/Operations. NerveCenter can additionally forward specified events to IBM Tivoli Netcool/OMNIbus. Finally, NerveCenter supports the extension of MIB definitions to include private, vendor-specific objects that are defined in SNMP versions 1, 2 and 3.
SNMP Basics
1
SNMP Basics
If you’re familiar with the Simple Network Management Protocol (SNMP), you know that managed devices containing SNMP agents are associated with a management information base (MIB), which has a defined organization. This organization resembles a tree with branches that categorize managed systems and their object components, each represented as an entry in the information tree. Different devices, or agents, contain different objects. For example, a workstation wouldn’t be expected to store routing-table information, whereas a router would have this
information.
Attributes are associated with MIB objects. Some attributes, such as the speed of an interface, are statically defined, while others, such as the entries in a routing table, are dynamic. Still other attributes require ongoing measurement for comparison and evaluation. An example of this is the number of packets transmitted without errors during a given period of time.
While reading this book, you will learn how NerveCenter uses behavior models to monitor MIB values. This book will also show you how NerveCenter communicates with agents by sending SNMP GetRequest, GetNextRequest, and SetRequest messages, as well as by processing SNMP traps received from an agent.
NOTE NOTE NOTE NOTE
Though NerveCenter supports SNMP v3, this book does not include instructions for configuring SNMP v3 agents for NerveCenter. For that reason, the scope of this book is limited to SNMP v1 agents.
Introduction
2
Getting a Quick Start with NerveCenter
Installing NerveCenter
This section guides you through a simple stand-alone installation—an installation that doesn’t involve integration with a network management platform. This allows you to learn how NerveCenter behaves without affecting your network or adding the complications of external network management software. You will not install all the NerveCenter components at this time.
CAUTION
For this installation, we recommend installing NerveCenter on a non-production (test) machine suitable for evaluating software. After completing this manual, to comply with your license agreement, uninstall this version before installing NerveCenter on a production machine.
Do not install NerveCenter over an existing version. This book doesn’t cover such topics as updating or working with existing files. Those topics are covered in
Upgrading NerveCenter.
Finally, though NerveCenter supports SNMP v3, this book does not include instructions for configuring NerveCenter to work with SNMP v2c or v3 agents. You should therefore install on a machine that uses SNMP v1.
After completing this manual, you can reinstall NerveCenter with all its components and configure the software to work with your network. For example, you may want to monitor nodes by subnet, set up mail or pager capability, integrate NerveCenter with a network management platform, and configure other settings.
Installing NerveCenter
2
NerveCenter Architecture
NerveCenter is a distributed client/server application that includes a server, files used for storing NerveCenter data, user-interface software, and several additional tools. NerveCenter includes the following main applications:
In addition to the modules mentioned above, you should also be aware of other NerveCenter components, which are not covered in this book:
Platform adapter—Enables NerveCenter to communicate with various network management platforms.
Web Client—Lets you monitor your network using the Microsoft Internet Explorer or Netscape Navigator Internet browser.
Database management tools—Allow you to convert, update, or migrate the NerveCenter database or data file.
Command line interface—Provides access to NerveCenter functions from a Windows command prompt or UNIX shell. You can issue commands manually or from a script.
TABLE 2-1. NerveCenter Applications
Module Description
Server The background engine that correlates network events, enables communication among the NerveCenter modules, and manages vital NerveCenter files. The procedure in this chapter includes installing the server.
Client The interface you use to create and manage behavior models, as well as monitor and report on network activity.
The procedure in this chapter includes installing the client.
Administrator The interface you use to configure server settings and manage NerveCenter operations.
The installation procedure in this chapter does not include the administrator. You will need to install it later to configure NerveCenter to work with your network.
Installing NerveCenter on UNIX
2
Installing NerveCenter on UNIX
You run an installation script to install and configure NerveCenter on UNIX systems. NOTE
NOTE NOTE NOTE
You must have the appropriate rights, hardware, and software to install
NerveCenter. See Requirements for Using This Book on page 3 to find out what’s required to install NerveCenter and perform the exercises in this book.
The following sections describe how to install NerveCenter on UNIX platforms: Preparing Your System for Installation on page 9
Running the Installation Script on page 10
Setting Environment Variables on page 12
Preparing Your System for Installation
Prior to installing NerveCenter, you need to prepare your installation machine.
TOPREPAREFOR NERVECENTERINSTALLATION
1. Create two new groups: ncadmins and ncusers.
2. Create a new user nervectr whose primary group is ncadmins. Create the user in the NIS database if the installation machine is using NIS for user authentication.
3. If you are working in an HP-UX environment, perform the following steps to ensure that the HP Services utility is configured to search NIS and /etc/services:
Installing NerveCenter
2
Running the Installation Script
This section describes how to run the UNIX installation script. Prior to installation, close all applications that are running.
TORUNTHEINSTALLATIONSCRIPT
1. Mount the NerveCenter CD-ROM. On HP-UX, use the following command:
mount -F cdfs -o cdcase CDROMdevice localMountpoint
2. Navigate to mountpoint/bin, where mountpoint is the directory you’re using to mount.
3. Enter the name of the installation script exactly as it appears in your bin directory, including any semicolons or versions. Enter the entire string.
On HP-UX systems, enter ./INSTALL.SH\;1
On Solaris systems, enter ./INSTALL.SH
The script displays brief instructions and checks to see whether you’ve set up the necessary groups, as described in Preparing Your System for Installation on page 9.
The script periodically prompts you to press Enter to continue.
4. Press Enter when prompted to continue. The script eventually displays the following:
Where do you want to install NerveCenter? [/opt/OSInc]
5. Press Enter to accept the default directory. The script displays the following:
Directory /opt/OSInc doesn’t exist... Shall I create it? [y]
6. Press Enter to accept the default answer.
The script asks which NerveCenter components you want to install.
Installing NerveCenter on UNIX
2
8. Press Enter to continue.
The NerveCenter files are extracted to the target directory. This may take a minute or two. The script then displays the following prompt:
Enter the path of the X motif libraries. [/usr/dt/lib]
9. Press Enter to accept the default path.
The script checks to see if NIS is installed on your system and whether you want to update the services file.
10. If prompted whether to update the services file, respond as appropriate for your system and continue with the installation.
The script prompts you to enter your license key.
11. Type the 32-character serial number provided with your NerveCenter license and press
Enter.
If you have more than one serial number, enter only the server serial number now. NOTE
Four characters are not used in NerveCenter serial numbers: These are 0 (zero), 1 (one), 5, and Q.
The scripts asks if you are running NerveCenter co-resident with OpenView. NerveCenter needs to know if OpenView is installed on your machine before configuring certain port settings. Because this quick-start preview installation is not intended for a production machine, you should not have OpenView installed.
12. Press Enter to accept the default value of n, indicating that NerveCenter is not co-resident with OpenView.
You are asked to enter the path and name of your Internet browser.
Installing NerveCenter
2
Setting Environment Variables
Depending on your environment, the installation script may have told you to run one of the NerveCenter environment scripts to set your environment variables. You should run that script now. You must perform this step before you can start NerveCenter.
TOSETENVIRONMENTVARIABLES
1. Change to the /opt/OSInc/userfiles directory.
This directory contains the scripts described in the following table:
2. Enter the command to set the environment variables in your shell. For example, you might enter the following:
../ncenv.shellSuffix
After setting the environment variables, you’re ready to start NerveCenter and complete the remaining sections in the book.
Script/Shell suffix When to use the script
ncenv.ksh Use this script if you are working in a Korn shell. ncenv.sh Use this script if you are working in a Bourne shell. ncenv.csh Use this script if you are working in a C shell.
Installing NerveCenter on Windows
2
Installing NerveCenter on Windows
You run a setup wizard to install and configure NerveCenter on Windows. NOTE
NOTE NOTE NOTE
You must have the appropriate rights, hardware, and software to install
NerveCenter. See Requirements for Using This Book on page 3 to find out what’s required to install NerveCenter and perform the exercises in this book.
Installing NerveCenter on Windows involves two main steps: Running the Windows Setup Wizard on page 13
Setting Up the NerveCenter Database on Windows on page 17
Running the Windows Setup Wizard
This section describes how to run the Windows Setup wizard. Prior to installation, close all applications that are running.
TORUNTHE WINDOWS SETUP
1. Insert the NerveCenter CD into your CD-ROM drive.
2. From the Windows Control Panel, double-click Add/Remove Programs and select Install. The Welcome dialog box is displayed. This dialog box includes cautions regarding copyright and installation prerequisites. The prerequisites that concern you right now are detailed in the section Requirements for Using This Book on page 3.
3. Select Next.
Installing NerveCenter
2
5. Select the following checkboxes:
Client—Lets you monitor your network or manage behavior models.
Server—Monitors managed nodes, performs actions associated with alarm transitions, and maintains NerveCenter objects. The server is installed as a Windows service by default.
Online Documentation—Helps you learn to use NerveCenter.
6. Select Next.
The Destination Directory dialog box is displayed. In this dialog box, you specify the directory where you want NerveCenter to be installed.
7. Select Next to accept the default location.
The NT Service Configuration dialog box is displayed. For this installation, we will start the NerveCenter Server manually.
Installing NerveCenter on Windows
2
8. Select Next without making any changes.
The License Key dialog box is displayed. The NerveCenter license limits the number of clients that can connect to the server and the number of nodes that can be managed.
9. Enter the serial number you received with your NerveCenter license by typing four
characters in each of the eight fields. If you have more than one serial number, enter only the server serial number now.
NOTE
Four characters are not used in NerveCenter serial numbers: These are 0 (zero), 1 (one), 5, and Q.
When you are finished, select Next.
The Security Options dialog box is displayed. This dialog box lets you set up the groups that NerveCenter uses to authenticate users.
Installing NerveCenter
2
10. Select Next without changing the default value.
NOTE
Your name is automatically added to the NerveCenter Admins group.
The Trap Options dialog box is displayed. This dialog box lets you choose the SNMP trap source.
11. Select Microsoft SNMP Trap Service (MSTRAP) and then select Next.
For the remaining dialog boxes, select Next to accept the default values. Setup copies all files to your disk. When the files are copied, the Setup Complete dialog box is displayed. This dialog box reminds you to add users to your groups and to configure NerveCenter using the Administrator module. Since you did not install the Administrator at this time, you will not be making these settings.
12. Select Finish.
The DBWizard application is displayed so that you can set up a database. Continue to the next section, Setting Up the NerveCenter Database on Windows on page 17.
Installing NerveCenter on Windows
2
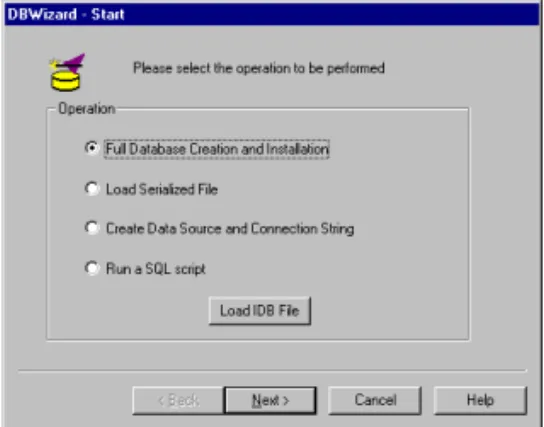
Setting Up the NerveCenter Database on Windows
After you have completed the Setup instructions detailed in the previous section, the DBWizard application is displayed. Using the wizard, you can set up your NerveCenter database.
This section describes how to set up a Microsoft Access database. Access does not have to be installed on your system for you to create the database.
FIGURE 2-1. DBWizard Dialog Box
TOCREATEAN ACCESSDATABASE
1. Select Full Database Creation and Installation and select Next. The Select DBMS dialog box is displayed.
2. Select MS Access and select Next.
The ODBC for Access dialog box is displayed. This dialog box enables you to provide a name for the ODBC data source you want to use. It also lets you specify the name and location of the database. For your installation, use the default NCAccess.mdb.
Installing NerveCenter
2
3. In the ODBC Data Source Name field, enter a name that can easily be identified as the data source for this installation of NerveCenter 5.0.00, and then select Next.
The NerveCenter Paths and Files dialog box is displayed.
4. Accept the default values and select Next. The Finish dialog box is displayed.
5. Select the Create and Execute InstallDB checkbox and select Next.
The Events Status dialog box displays the information you have specified for your database.
6. Verify that the information is correct, and then select Finish.
The InstallDB Status Screen dialog box shows you the status of your database installation.
7. Select OK when it becomes enabled. The installation process is completed.
8. When prompted to restart, select Yes.
3
Getting a Quick Start with NerveCenter
Preparing To Use NerveCenter
Before you can work with behavior models, you must start the software modules that you installed and add some nodes to the NerveCenter database.
Section Description
Starting the NerveCenter Server on page 20
Describes how to start the NerveCenter Server.
Starting the NerveCenter Client on page 20
Describes how to start the NerveCenter Client and connect it to the server.
Adding Nodes to the Database on page 24
Shows you how to define the nodes you want to monitor and check your connection with those nodes.
Preparing To Use NerveCenter
3
Starting the NerveCenter Server
Though NerveCenter can be installed to start automatically as a UNIX daemon or Window service, we installed NerveCenter so that the Server must be started manually.
TOSTARTTHESERVER
Depending on your platform, do one of the following: In a UNIX shell, enter the following command:
ncserver &
If the server is unable to start, make sure you have correctly set your environment variables. See Setting Environment Variables on page 12.
On Windows, choose Start > OpenService NerveCenter > Service. The NerveCenter Server is started on your machine.
Starting the NerveCenter Client
The NerveCenter Client is the interface you use to monitor network conditions, create and modify the behavior models used to track events, and perform other tasks such as generating reports. Before you can monitor network conditions or work with behavior models, you must start the NerveCenter Client and connect to the NerveCenter Server.
NOTE NOTE NOTE NOTE
The Server must already be running before you can establish a connection to it. See
Starting the NerveCenter Server on page 20 for details.
TOSTARTTHECLIENTANDCONNECTTOTHESERVER
1. Depending on your platform, do one of the following:
Starting the NerveCenter Client
3
On Windows, choose Start > OpenService NerveCenter > Client. The client window is displayed.
3. In the Server Name field, type the name of the machine on which NerveCenter is installed.
4. Type your user name and password in the User ID and Password fields.
If you are using Windows and have multiple accounts with the same user ID (on your local machine and domain or in multiple domains), the passwords must all be the same. If not, your logon could fail.
5. Select Connect.
When the client successfully connects to the server, all of the buttons in the toolbar become enabled, and the Aggregate Alarm Summary window is displayed. Later, you will use this window to monitor your network alarms.
2. From the Server menu, select Connect. The Connect to Server window is displayed.
Preparing To Use NerveCenter
3
FIGURE 3-1. NerveCenter Client Aggregate Summary Window
Table 3-1 lists the functions and information you can access from the client’s toolbar.
TABLE 3-1. Client Toolbar Button Description
Establishes a connection with a NerveCenter Server.
Disconnects you from a NerveCenter Server.
Displays a list of currently defined property groups and the properties contained in each group. Displays the number of alarm
instances for each severity level.
Displays information about the current alarm instances for the folder selected in the left pane.
Starting the NerveCenter Client
3
Displays a list of currently defined trap masks that NerveCenter uses to detect and filter SNMP traps.
Displays a list of currently defined alarms. Later in this book, you will open the alarm list to examine and enable alarms.
Displays a list of currently defined correlation expressions. Correlation expressions enable you to create alarms from boolean expressions.
Display’s a list of currently defined severities. You will look at severities while monitoring alarms later in this book.
Displays a list of currently defined Perl subroutines used with NerveCenter alarm actions.
Displays a list of available reports generated by Seagate Software’s Crystal Reports.
Displays a list of defined Action Router rules that enable alarms to perform assigned actions based on conditions that you specify.
Enables you to import a behavior model.
Enables you to export NerveCenter objects individually or in groups.
Opens the Server Status window that contains the current settings for any NerveCenter to
TABLE 3-1. Client Toolbar (Continued) Button Description
Preparing To Use NerveCenter
3
Adding Nodes to the Database
This section describes how to add nodes to the NerveCenter database and assign attributes to those nodes. You will verify your connection to these nodes by sending ICMP messages and listening for responses.
Later in this book, you will use one or two of these nodes to cause an alarm condition, which you can monitor in the client.
The following sections describe procedures for: Defining Nodes on page 24
Querying Nodes on page 27
Defining Nodes
NerveCenter’s database contains definitions of attributes for every device it manages. Generally, if you have a sizable network, you’ll use a discovery mechanism to gather this information and populate the database. For now, however, you will enter definitions manually for one or two network devices. Defining nodes manually helps you understand the attributes associated with nodes, such as property group and IP address.
NOTE NOTE NOTE NOTE
In order to complete the next sections of this book, at least one node must be a workstation—either Windows or UNIX—that contains one or more software applications. This node can be the one on which you installed NerveCenter. Additional nodes can be workstations or other network devices, such as routers, hubs, or bridges.
All nodes you define for this exercise must be running an SNMP agent for SNMP v1. As mentioned in Installing NerveCenter on page 7, this book does not include instructions for managing nodes using SNMP v2c or v3.
Adding Nodes to the Database
3
TODEFINEANODEMANUALLY
2. In the Node List window, do either of the following:
To configure the node in the list, select that node and select Open. Then, skip to step 4. To define a new node, select New. Proceed to the next step.
The Node Definition window is displayed. If you are defining a new node, the Name field is blank.
1. From the client’s Admin menu, choose Node List.
The Node List window is displayed. Note that it contains only one device—the machine on which you installed NerveCenter.
Preparing To Use NerveCenter
3
3. Type the name of the node in the Name field.
4. Select the MIB-II property group from the Property Group drop-down listbox. You can start typing the first few letters, and NerveCenter scrolls down to the first item that starts with the letters you typed.
The property group you assign to a node determines which set of NerveCenter polls and alarms manage the node. The MIB-II group contains properties associated with the information you’re going to monitor. By selecting the MIB-II group, you enable NerveCenter to poll this node for the related MIB attributes.
TIP
NerveCenter allows you to modify property groups by adding, changing, and removing properties. You can also create new property groups. This feature will be useful later as you create and customize behavior models to fit your network management strategy.
5. Type the node’s IP address in the New IP text field and select Add to add the address to the IP Address list.
Adding Nodes to the Database
3
Repeat the above steps for every device you want to add to the NerveCenter database. TIP
Instead of creating a completely new definition for each node you want to add, you can copy node definitions. In the Node List window, select a node you’ve already defined, right-click, and choose Copy. Then enter the information that is unique to the new node.
Querying Nodes
After defining a node, you may want to query the node. To query a node, you can send an ICMP Echo request (ping) or SNMP GetRequest message. There are two reasons for doing this:
To ensure that there is a connection with the node To obtain system information about the node
TOQUERYANODE
1. From the client’s Admin menu, choose Node List. The Node List window is displayed.
2. Highlight one of the nodes you defined and select Open. The Node Definition window appears.
3. Select the Query Node tab.
1. From the client’s Admin menu, choose Node List. The Node List window is displayed.
Preparing To Use NerveCenter
3
4. If you entered more than one IP address for the node, choose the address you want to check from the IP Address drop-down listbox.
5. Select Ping.
If the ping is successful, the Ping Result field displays the reply IP address and response time.
6. Select Get.
If the command is successful, NerveCenter displays the node’s description, its SNMP system object identifier, and length of time the node has been up (in hundredths of a second).
NOTE
NerveCenter must know the node’s SNMP version before it can perform a GetRequest message. When you define nodes manually, NerveCenter sets the version to SNMP v1 by default.
If your commands failed to obtain responses, check to be sure that the node is turned on. If the ping was successful but the GetRequest was not, make sure the node is running an SNMP agent. You can also check the node’s network settings to be sure its community name matches the name in its definition window.
4
Getting a Quick Start with NerveCenter
Working with Behavior Models
NerveCenter obtains data from SNMP agents running on managed nodes. To correlate and filter this data, NerveCenter uses general models of network and system behavior that define the various problems each type of managed resource might exhibit.
In this section, you first learn how a behavior model works. Then, you will enable two models and start monitoring some events on the nodes you’ve defined.
Section Description
Understanding Behavior Models on page 30
Defines the components that make up a behavior model.
How Behavior Models Operate on page 30
Describes how the components of behavior models work together to monitor network devices.
Importing the
IfData_LogToFile Behavior Model on page 32
Explains how and why you import the IfData_LogToFile behavior model.
Enabling the IfData_LogToFile Behavior Model on page 34
Provides an overview of the IfData_LogToFile behavior model and describes how to turn the behavior model on.
Enabling the IfLoad Behavior Model on page 40
Provides an overview of the IfLoad behavior model and describes how to turn the behavior model on.
Working with Behavior Models
4
Understanding Behavior Models
To work with behavior models, you need to understand a behavior model’s components and how they interact.
A behavior model is not a NerveCenter object. Rather, it is a construct that relies on the interaction of associated NerveCenter objects to detect and handle specific network behavior. NerveCenter uses the following objects to define behavior models:
How Behavior Models Operate
A behavior model is based on the following operational construct: A NerveCenter trigger-generating object detects a network event on a targeted node and raises a trigger. This trigger generator might be a NerveCenter poll that looks for a specified network condition or a trap mask that detects a certain type of SNMP trap. NerveCenter has other trigger generators as well, such as
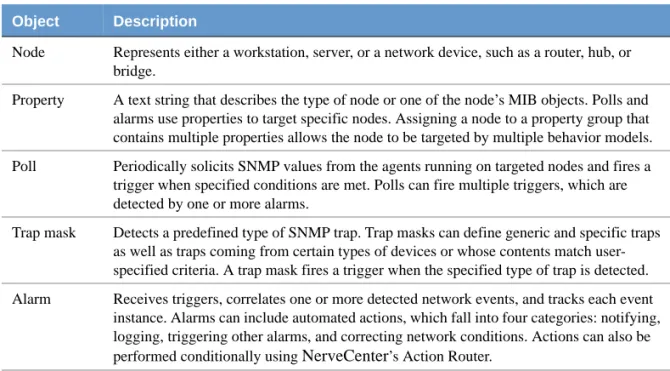
TABLE 4-1. NerveCenter Objects Used with Behavior Models Object Description
Node Represents either a workstation, server, or a network device, such as a router, hub, or bridge.
Property A text string that describes the type of node or one of the node’s MIB objects. Polls and alarms use properties to target specific nodes. Assigning a node to a property group that contains multiple properties allows the node to be targeted by multiple behavior models. Poll Periodically solicits SNMP values from the agents running on targeted nodes and fires a
trigger when specified conditions are met. Polls can fire multiple triggers, which are detected by one or more alarms.
Trap mask Detects a predefined type of SNMP trap. Trap masks can define generic and specific traps as well as traps coming from certain types of devices or whose contents match user-specified criteria. A trap mask fires a trigger when the user-specified type of trap is detected. Alarm Receives triggers, correlates one or more detected network events, and tracks each event
instance. Alarms can include automated actions, which fall into four categories: notifying, logging, triggering other alarms, and correcting network conditions. Actions can also be performed conditionally using NerveCenter’s Action Router.
How Behavior Models Operate
4
Figure 4-1 shows the interaction of objects in a sample model with a single poll and alarm.
FIGURE 4-1. Relationships Among Objects in a Simple Behavior Model
When an alarm detects its first trigger, the alarm transitions to the next state, where it remains until another trigger is received—either from the same or another generator. For example, an alarm might detect a trigger from a poll when an interface on a router goes down. Continued polling would indicate whether the first trigger signified a momentary network flutter or whether the interface is actually down. The sequence of transitions enables NerveCenter to monitor persistent, simultaneous, or sequential events that, taken together, indicate a critical or important condition. All associated components must be operational for the behavior model to function. For example, a poll is requested only when there is at least one node targeted to receive the poll—a node whose property group contains the MIB base object defined in the poll and additionally any property assigned to the poll. Furthermore, an alarm must be enabled and contain a transition that the poll can trigger. If the alarm is assigned a property, the node’s property group must include that property as well. NerveCenter implements these restrictions to control network traffic.
Polled MIB data Trigger
Optional property MI
B o bject
Gro up
A property group contains MIB and user-defined properties
Poll Alarm
Working with Behavior Models
4
Importing the IfData_LogToFile Behavior Model
Though NerveCenter ships with a large number of behavior models, not all these behavior models are included in the default database. To limit file size, NerveCenter’s database contains only those behavior models that are most commonly used. You can, however, easily import the remaining models as needed.
Of the two models you will operate during the course of this tutorial, one model— IfData_LogToFile—must be imported before you can enable its alarm.
TOIMPORTTHE IFDATA_LOGTOFILEBEHAVIORMODEL
1. From the client’s Server menu, choose Import Objects and Nodes. The Import Objects and Nodes dialog box is displayed.
2. Select Browse.
The Import File Name dialog box is displayed. This is where you select the behavior model you want to import.
Importing the IfData_LogToFile Behavior Model
4
4. Select ifdata_logtofile.mod and then select Open.
The Import File Name dialog box closes and your file name and path are displayed in the Import Objects and Nodes dialog box.
5. Select OK.
NerveCenter displays a message box informing you that the model imported successfully.
6. Select OK.
The IfData_LogToFile behavior model is added to the NerveCenter database. Its related alarm and poll are now available for use.
Working with Behavior Models
4
Enabling the IfData_LogToFile Behavior Model
The IfData_LogToFile behavior model repeatedly logs interface attribute values that help you track bandwidth and data-flow levels over a period of time. You can use these values to establish baselines, identify user patterns, determine network utilization, and anticipate potential problems. Because you can change the attributes that are logged, you can use this behavior model to identify and log a variety of information about your network.
Viewing the IfData_LogToFile Alarm
The IfData_LogToFile alarm—a key element of the behavior model—is instantiated when a node returns values for all the attributes that are polled. To see how the alarm accomplishes this, open the alarm’s definition window.
TOOPENTHE IFDATA_LOGTOFILE ALARM DEFINITIONWINDOW
1. From the client’s Admin menu, choose Alarm Definition List.
The Alarm Definition List window is displayed. All alarms are turned off by default when you install NerveCenter.
Enabling the IfData_LogToFile Behavior Model
4
2. Select the IfData_LogToFile alarm and select Open.
The Alarm Definition window is displayed. Figure 4-2 whows the alarm’s finite state diagram.
FIGURE 4-2. IfData_LogToFile Alarm State Diagram As you can see from the diagram, the alarm contains two states:
Ground—NerveCenter has not received any of the specified interface values from a node. Logging—NerveCenter has received the specified interface values and has logged these
values in a file.
The alarm also contains two ifData transitions. The name assigned to a transition is based on the name of the trigger that causes the transition to occur.
In this alarm, the first ifData trigger instantiates the alarm, which transitions to the Logging state and automatically writes alarm data to a file. Subsequent ifData triggers continue the logging action.
TIP
The Ground state has a green icon to signify Normal severity.
An ifData trigger instantiates the alarm, which then transitions to the Logging state.
Repeated ifData triggers continue the logging action. The Logging state also has a green icon (Normal severity).
Working with Behavior Models
4
NOTE NOTE NOTE NOTE
To find out what severity is associated with an alarm state, double-click the state. Severities help you quickly identify alarm instances that are urgent. If you will be working with a network management platform, NerveCenter’s severities can be mapped to those of your platform. NerveCenter Severities in Designing and Managing Behavior Models provides a more detailed discussion of severities.
Select Notes to see a description of the alarm, including its severities, any polls or masks that trigger the alarm, any actions associated with a transition, and other useful information.
TIP
Notes provide an easy way to obtain information about NerveCenter objects. In addition to using the Notes button here, you can access notes about an alarm from the Alarm Definition List window. Notes are available for most NerveCenter objects.
Poll that Triggers the Alarm
Only one poll is associated with this alarm—the IfData poll. This poll is configured to solicit attribute values for certain base object attributes belonging to the interfaces MIB-II group. The poll fires the ifData trigger when these values are detected in a node.
Enabling the IfData_LogToFile Behavior Model
4
TOOPENTHE IFDATA POLL DEFINITIONWINDOW
2. Select the IfData poll and select Open.
The IfData Poll Definition window is displayed.
1. From the client’s Admin menu, choose Poll List.
The Poll List window is displayed. All polls are turned on by default when you install NerveCenter.
Working with Behavior Models
4
Using Polls in Designing and Managing Behavior Models describes polls in detail. For now, however, you will take only a cursory look at the IfData poll. Note specifically the following poll attributes:
Property—The poll is not assigned any particular property. However, because the IfData poll detects ifEntry MIB object values, a node’s property group must include these attributes before the node can be polled. For this reason, you assigned the MIB-II property group to your nodes.
If you were to assign a property to the poll, you could further restrict the poll to an even more limited set of nodes.
Poll Rate—The polling period is set to 15 minutes by default. This means that, when you enable the alarm, you must wait that long between polls.
Poll Condition—The poll condition contains the interfaces (ifEntry) MIB objects that the poll is configured to detect.
Trigger—The poll condition also includes a FireTrigger() command that fires the ifData trigger when the MIB objects are detected.
The data-entry fields in the definition window are unavailable when the poll is on. If you want to make changes, for example by changing the poll rate, you must do the following:
TOMAKECHANGESTOAPOLL
1. In the Poll Definition window, select the Enable Off radio button.
2. Make the changes you want to the poll.
3. Select Save.
4. Select the Enable On radio button and then select Save. This turns the updated poll back on.
Enabling the IfData_LogToFile Behavior Model
4
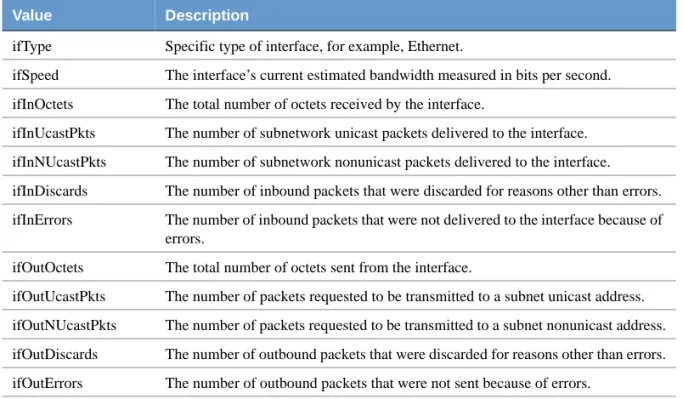
The ifData poll solicits information for MIB values found in the Interfaces group in MIB-II. Each value represents one instance of the Interfaces ifEntry base object. Table 4-2 contains a brief description of these MIB values:
TABLE 4-2. MIB Values Detected by the ifData Poll
Value Description
ifType Specific type of interface, for example, Ethernet.
ifSpeed The interface’s current estimated bandwidth measured in bits per second. ifInOctets The total number of octets received by the interface.
ifInUcastPkts The number of subnetwork unicast packets delivered to the interface. ifInNUcastPkts The number of subnetwork nonunicast packets delivered to the interface. ifInDiscards The number of inbound packets that were discarded for reasons other than errors. ifInErrors The number of inbound packets that were not delivered to the interface because of
errors.
ifOutOctets The total number of octets sent from the interface.
ifOutUcastPkts The number of packets requested to be transmitted to a subnet unicast address. ifOutNUcastPkts The number of packets requested to be transmitted to a subnet nonunicast address. ifOutDiscards The number of outbound packets that were discarded for reasons other than errors. ifOutErrors The number of outbound packets that were not sent because of errors.
Working with Behavior Models
4
Turning on the Alarm
You enable the IfData_LogToFile behavior model by turning on its alarm and poll. In our case, because all polls are turned on by default when you install NerveCenter, you need only turn on the alarm.
TOTURNONTHE IFDATA_LOGTOFILEALARM
2. Select the IfData_LogToFile alarm and select Open. The Alarm Definition window is displayed.
3. Select the Enabled On radio button.
4. Select Save.
The IfData_LogToFile alarm is now enabled and will transition when the defined MIB attributes are detected on one of the nodes you defined.
TIP
You can also turn on an alarm from the Alarm Definition List window. Right-click the alarm in the list and choose On from the pop-up menu.
Enabling the IfLoad Behavior Model
The IfLoad behavior model monitors each interface on managed nodes and determines whether device load is low, medium, or high. Load is the amount of interface traffic compared to the media's capacity, expressed as a percentage. There are two definitions for each load level—one for point-to-point networks and one for broadcast networks.
This model can give an immediate impression of network and system utilization. By measuring
1. From the client’s Admin menu, choose Alarm Definition List. The Alarm Definition List window is displayed.
Enabling the IfLoad Behavior Model
4
Viewing the IfLoad Alarm
The IfLoad alarm is instantiated when the load on a node changes from low to medium or high. To see how the alarm monitors load conditions, open the alarm’s definition window.
TOOPENTHE IFLOAD ALARM DEFINITIONWINDOW
2. Select the IfLoad alarm and select Open.
The Alarm Definition window is displayed. Figure 4-3 is a picture of the alarm’s finite state diagram.
1. From the client’s Admin menu, choose Alarm Definition List. The Alarm Definition List window is displayed.
Working with Behavior Models
4
MediumLoad—For point-to-point networks, indicates that the load is 10-75 percent of maximum utilization. For broadcast networks, the load is 0.1-1 percent of maximum utilization. The alarm enters this state when it detects a mediumLoad trigger. This state has a light blue icon, indicating a traffic severity of Medium.
HighLoad—For point-to-point networks, indicates that the load is greater than 75 percent of maximum utilization. For broadcast networks, the load is greater than 1 percent of maximum utilization. The alarm enters this state when it detects a highLoad trigger. This state has a cyan icon, indicating a traffic severity of High.
The HighLoad state fires a trigger after the alarm has received its third HighLoad trigger. The trigger transitions the alarm to the HighLoadPersists state and can be seen by double-clicking the HighLoad circular transition.
HighLoadPersists—The interface being monitored has experienced a high load for three successive polls, at which time an inform is sent to the platform. This state has a yellow icon, indicating a minor fault severity.
When the alarm has entered the MediumLoad, HighLoad, or HighLoadPersists state, receiving a lowLoad trigger returns the alarm to Low and clears any alarm instances.
Poll That Triggers the Alarm
The ifLoadRates poll is responsible for triggering the high, medium, and low states in the IfLoad alarm.The poll solicits load information from managed nodes and fires one of three triggers when its specified condition is detected in a node. Each trigger transitions the corresponding state in the IfLoad alarm.
To see how the ifLoad alarm is instantiated, open the definition window for the ifLoadRates poll.
TOOPENTHEIFLOADRATES POLL DEFINITIONWINDOW
2. Select the ifLoadRates poll and select Open.
1. From the client’s Admin menu, choose Poll List. The Poll List window is displayed.
Enabling the IfLoad Behavior Model
4
Using Polls in Designing and Managing Behavior Models describes polls in detail. For now, however, you will take only a cursory look at the ifLoadRates poll. Note specifically the following poll attributes:
Property—Though the poll is not assigned a specific property, it is configured to detect certain ifEntry MIB object values. This means that a node’s property group must include these attributes before it can be polled.
Poll Rate—The polling period is set to five minutes by default. This means that, when you enable the alarm, you must wait that long between polls.
Working with Behavior Models
4
Turning on the alarm
You enable the behavior model by turning on its alarm and polls. In our case, because all polls are turned on by default when you install NerveCenter, you need only turn on the alarm.
TOTURNONTHE IFLOADALARM
2. Select the IfLoad alarm and select Open. The Alarm Definition window is displayed.
3. Select the Enabled On radio button.
4. Select Save.
The IfLoad alarm is now enabled and will transition when any of its associated polls detect a medium or high load condition on a managed node.
TIP
You can also turn an alarm on from the Alarm Definition List window. Right-click the alarm in the list and choose On from the pop-up menu.
Generating an Alarm Instance
Your next step is to make sure one of your managed nodes causes an IfLoad alarm instance. One easy way to do this is to start a fairly large software application on the node, thus temporarily increasing its load.
TOINCREASETHELOADONANODE
1. From the client’s Admin menu, choose Alarm Definition List. The Alarm Definition List window is displayed.
5
Getting a Quick Start with NerveCenter
Monitoring Alarms
After you have enabled a behavior model, you can monitor its alarms and obtain information about the nodes it manages.
Both the NerveCenter Client and the NerveCenter Web Client provide information about current alarm instances. Though you will not use the Web Client now, you can learn more about it in the section The Web Client on page 66.
Section Description
Viewing Alarm Instances on page 46
Describes the Alarm Summary window that displays alarm instances.
Analyzing Historical Detail for an Alarm Instance on page 49
Explains how you can obtain more information about the events leading up to an alarm instance.
Reading Logged Data on page 51
Explains how to view the log file created by the IfData_LogToFile alarm and describes the information contained in the file.
Resetting and Disabling Alarms on page 53
Describes how to reset and turn alarms off.
Suggestions for Customizing the Behavior Models on page 54
Suggest ways in which you may want to modify the IfData_LogToFile and ifLoad behavior models to suit your network management strategy.
Monitoring Alarms
5
Viewing Alarm Instances
NerveCenter displays information about current alarm instances in the Alarm Summary window. If your network later includes more than one NerveCenter Server, you can use the Aggregate Alarm Summary window to view alarm instances from all servers at once. For now, you will use the Alarm Summary window, which displays alarm instances for one server at a time.
TOOPENTHE ALARM SUMMARYWINDOW
The Tree View
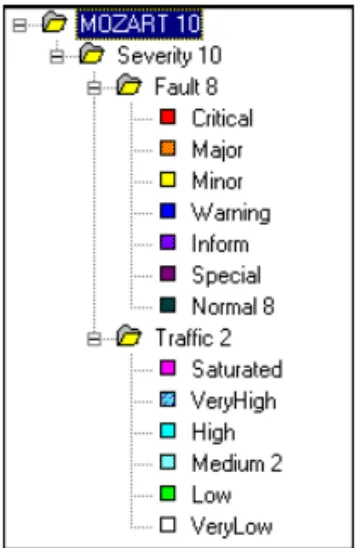
The left pane contains a tree that displays the total number of current alarm instances, the number of instances in each severity group (Fault and Traffic), and the number of instances of each severity. If there is no number next to a severity, there are no active alarm instances of that severity.
Figure 5-1 shows a sample tree.
From the client’s Admin menu, choose Alarm Summary. The Alarm Summary window is displayed.
Viewing Alarm Instances
5
TOVIEWINFORMATIONINTHETREE
To expand a level and display the items within it, select the [+] next to the folder you want to expand.
To view information for any level—for example, all instances in the Fault folder or all instances of a particular severity—select the level. The information is displayed in the right pane.
The Alarm Detail View
The right pane provides detailed information about each current alarm instance related to the folder that is highlighted in the tree view. You can monitor the IfData_LogToFile and IfLoad alarm instances using the detail view.
FIGURE 5-2. Alarm Summary Detail
NOTE NOTE NOTE NOTE
As mentioned earlier, the ifLoad alarm reverts to its originating state when a low load condition is detected. This causes the corresponding alarm instance in the Alarm Summary window to disappear. If the node’s load decreases during a poll
Monitoring Alarms
5
Table 5-1 explains what information is available for each alarm instance.
The alarm detail pane is designed primarily for viewing. However, you can perform a couple of actions from this pane:
You can select any of the column headings to alphabetize the entries by the values in that column. Selecting the column heading a second time reverses the order of the entries. This feature is useful for grouping alarm instances, for example, if you want to see at a glance all instances for a particular node.
You can double-click the entry for an alarm instance to open an alarm history window. This is covered in the next section, Analyzing Historical Detail for an Alarm Instance on page 49.
TABLE 5-1. Fields in the Alarm Detail Pane
Column Description
Name The name of the alarm from which the alarm instance was created. Time The time at which the alarm instance’s most recent transition occurred. Node The host name or IP address of the node the alarm instance is monitoring. SubObject The subobject associated with the alarm instance. The subobject consists of a MIB
base object plus an instance number—for example, ifEntry.1. The instance often tells you which interface on a device is being monitored.
State The current state of the alarm instance. The name of the state should indicate the condition NerveCenter is reporting. For example, an IfLoad instance might be in the Medium or High state.
Severity The severity of the alarm instance’s current state.
Trigger The name of the trigger that caused the most recent alarm transition.
Type The type of trigger that caused the most recent alarm transition. So far, you’ve worked only with alarms that are triggered by polls. Some other possibilities are mask and alarms.
Analyzing Historical Detail for an Alarm Instance
5
Analyzing Historical Detail for an Alarm Instance
To obtain more information about an alarm instance, you can examine its alarm history. The Alarm History window displays read-only information that allows you to track an alarm’s sequence of events.
TOOPENTHE ALARM HISTORYWINDOW
From the Alarm Summary window, double-click an alarm instance. The Alarm History window is displayed.
The Alarm History window contains the state diagram for an alarm instance. If you selected an IfData_LogToFile instance, the window on your screen resembles Figure 5-3.
Monitoring Alarms
5
NOTE NOTE NOTE NOTE
If you are looking at an ifLoad instance, you probably have only one transition in your list. The reason is that your targeted node experienced only one instance involving a significant load. When you start monitoring your full network using a variety of behavior models, you will typically see a number of lines in the history list.
TOFOLLOWTHEPATHOFTRANSITIONS
Select each line of the history list, first to last. The corresponding transition turns red.
If Refresh becomes enabled, you can select it to update the history with any transitions that have occurred since you first opened the window.
When you select a transition from the transition list, the Node and Poll buttons become enabled. Selecting an enabled button opens a definition window for the related object, such as the poll that caused the highlighted transition. This feature is useful for analyzing and troubleshooting network events. If your alarm instance belonged to a behavior model that monitors unresponsive nodes, you could select Node and, from the node’s definition window, ping the node to establish whether it was up.
When you have finished looking at the history for this alarm instance, select Cancel to close the window. Repeat the process for one or two other alarm instances in your Alarm Summary window.
Reading Logged Data
5
Reading Logged Data
This section describes how to examine the log file that the IfData_LogToFile alarm creates.
TOOPENTHELOGFILE
1. Start a text editor or viewer on your system.
2. Open the ifdata.log file:
On Windows systems, this file is located in your NerveCenter installation\log directory. On UNIX systems, this file is located in your NerveCenter installation/userfiles/logs
directory.
Figure 5-4 shows a sample entry from a log file. Each entry in the ifdata.log file refers to a single interface on a node.
FIGURE 5-4. Sample Entry from Ifdata.log
Monitoring Alarms
5
NOTE NOTE NOTE NOTEThe log file also contains four additional labels related to traps: TrapPduTime, TrapPduGenericNumber, TrapPduEnterprise, and TrapPduSpecificNumber. These fields are not related to your polled data and are not covered in this book.
When you later create and customize alarms, you’ll be able to specify precisely what data you want logged. This versatility can help you monitor specific information about certain types of nodes.
TABLE 5-2. Fields in a Log Entry
Field Contains
Time Date and time the record was logged. The format of the time is mm/dd/yyyy hh:mm:ss day (for example, 10/29/1997 14:32:22 Sat).
LogId Identification number of the log entry. NerveCenter assigns a sequential number to each log entry.
DestStateSev Severity of the transition’s destination state. The severity in the sample illustration is Normal.
NodePropertyGroup Property group of the node that caused the alarm to change states. NodeName Name of the node that caused the alarm to change states.
AlarmName Name of the alarm. The alarm triggered in the previous sample illustration is IfData_LogToFile.
OrigState Name of the state from which the alarm moves when the logged transition occurs.
TriggerName Name of the trigger that causes the alarm to move from the Ostate to the Nstate.
DestState State of the alarm after the logged transition occurs.
TriggerInstance The specific base object instance for which the transition occurred. TriggerBaseObject The base object associated with the transition.
Attribute ... The attribute values of the node that caused the transition. Each is printed in the format Attribute attribute.instance=value. For a description of the attributes logged by the ifData poll, see MIB Values Detected by the ifData Poll on page 39.
Resetting and Disabling Alarms
5
Resetting and Disabling Alarms
Some alarms, such as IfLoad, are designed to revert to their original state when a condition is met. Others, such as IfData_LogToFile, remain in a particular state until you manually reset the alarm. When you’ve obtained the information you need about an alarm instance, you may want to reset some or all alarm instances. You can reset alarms using a number of methods from different NerveCenter windows. For now, we’ll use the Alarm Summary window.
TORESETALARMS
2. Select all the alarms in the list.
TIP
To highlight a block of items in a list, select the first item in the block, press and hold the Shift key, and then select the last item in the block. To highlight nonconsecutive items, select the first item, press and hold the Ctrl key, and select each additional item.
3. Right-click and choose Reset to Ground from the pop-up menu. The alarm instances disappear from the screen.
NOTE NOTE NOTE NOTE
If you select only one alarm instance—or the instances you select all belong to the same alarm—the pop-up menu offers you another choice besides Reset to Ground. You can also reset the instances to one of the alarm’s other states. If you reset
1. From the client’s Admin menu, choose Alarm Summary. The Alarm Summary window is displayed.
Monitoring Alarms
5
TOTURNOFFTHE IFDATA_LOGTOFILEAND IFLOADALARMS
2. Highlight the IfData_LogToFile and IfLoad alarms.
3. Right-click and choose Off from the pop-up menu.
Your alarms are now disabled. Any alarm instances that were listed in the Alarm Summary window are gone.
Suggestions for Customizing the Behavior Models
Earlier, you were able to monitor the IfData_LogToFile and IfLoad behavior models without changing their polls or alarms. The only customization you provided was to define the nodes they monitored.
When you start using these behavior models later on, you may want to tailor them to match your management strategy. Following are some suggestions.
IfData_LogToFile Behavior Model Changes
You may want to make the following changes to the IfData poll: Change the ifEntry attributes to be polled to log information more applicable to your own network strategy.
Change the poll’s property to target certain types of nodes. The nodes must be assigned to a property group that contains the property you specify in the poll.
Change the poll rate to reduce the amount of logging. For example, you may want to poll nodes once a day and evaluate your logged data over a period of several weeks.
1. From the client’s Admin menu, select Alarm Definition List. The Alarm Definition List window is displayed.
Suggestions for Customizing the Behavior Models
5
IfLoad Behavior Model Changes
You may want to make the following changes to ifLoad:
In the associated polls, change the poll rates to reduce network traffic. In the associated polls, change the property to target a subset of nodes.
In the ifLoadRates poll, modify the poll condition values that determine what load values are considered to be high, medium, or low. There are two sets for each condition—one for point-to-point networks and one for broadcast networks. Change either or both to appropriate percentages for your environment.
In the alarm, add an action to the transition to the high state. You may want NerveCenter to notify someone by e-mail or to log associated data.