Dual Axis Solar Panel Tracker
by
Javier Harrison, Xavier Lugue, Nick Wolfe
Senior Project
ELECTRICAL ENGINEERING DEPARTMENT
California Polytechnic State University
Table of Contents
Abstract 5
Chapter 1: Introduction 6
Chapter 2: Customer Needs, Requirements, and Specifications 7
Customer Needs 7
Requirements and Specifications 7
Chapter 3: Functional Decomposition (Level 0 and Level 1) 9
Dual Axis Solar Tracker Level 0 Block Diagram 9
Dual Axis Solar Tracker Level 1 Block Diagram: Microprocessor 10
Dual Axis Solar Tracker Level 1 Block Diagram: Actuator 11
Dual Axis Solar Tracker Level 1 Block Diagram: LCD Display 11
Chapter 4: Project Planning 13
Gantt Charts 13
Cost Estimates 14
Chapter 5: Design 15
Motor Driver 16
Sensor Selection 17
Board Selection 17
Algorithm 17
Chapter 6: Construction 19
System Structure 19
Mode Operations 19
Magnetic Encoders 19
Actuators 19
Sensors 19
Chapter 7: Testing 21
RELAY_INIT( ) & SET_RELAY( ) 21
photoresistors( ) 21
set_mode( ) 22
readAngle( ) 22
modeDisplays( ) 23
set_day( ) 24
set_time( ) 26
pyranometer( ) 27
menu( ) and menu_loop( ) 27
solar_path( ) 29
main( ) 33
Final Project Schematic 34
Chapter 8: Conclusions and Recommendations 35
References 36
Appendices 38
A. Senior Project Analysis 38
B. Parts List 42
C. Function Listing 43
List of Tables and Figures
Tables Page
1. Dual Axis Solar Tracker Requirements and Specifications 8
2. Dual Axis Solar Tracker Level 0 Block Diagram Parameters 9
3. Dual Axis Solar Tracker Level I Block Diagram: Microprocessor Parameters 10
4. Dual Axis Solar Tracker Level I Block Diagram: Actuator Parameters 11
5. Dual Axis Solar Tracker Level I Block Diagram: LCD Display Parameters 11
6. Estimated Parts and Labor Cost 14
7. Motor Driver Operation 17
Figures
1. Dual Axis Solar Tracker Level 0 Block Diagram 9
2. Dual Axis Solar Tracker Level I Block Diagram: Microprocessor 10
3. Dual Axis Solar Tracker Level I Block Diagram: Actuator 11
4. Dual Axis Solar Tracker Level I Block Diagram: LCD Display 11
5. Dual Axis Solar Tracker Level I Block Diagram 12
6. EE460 Gantt Chart 13
7. EE461 Gantt Chart 13
8. EE462 Gantt Chart 13
9. Solar Photovoltaic System 15
10. First Motor Driver Layout 16
11. Final Motor Driver Layout 16
12. Sensors on Solar Panel 18
13. Photoresistors Flow Diagram 21
14. Set Mode Function Flow Diagram 22
15. Read Angle Function Flow Diagram 23
16. Mode Displays Function Flow Diagram 24
17. Set Day Function Flow Diagram 25
18. Set Time Function Flow Diagram 26
19. Menu Loop Function Flow Diagram 28
20. Solar Coordinate Vector Diagram 30
21. Normal Vector Diagram 31
22. East-West Tilt Angle Perspective Diagram 31
23. Main Flow Diagram 33
Dual Axis Solar Panel Tracker
Javier Harrison Xavier Lugue Nick Wolfe EE 460-07
EE 461/462 Dale Dolan
1. I agree to supervise this senior project. ______ 2. The specifications are [1]-[2]:
☐ Implementation Free—Describes what project should
do, not how.
☐ Bounded—Identify project boundaries, scope, and
context
☐ Complete—Include all the requirements identified by
the customer, as well as those needed to define the project.
☐ Unambiguous—Concisely state one clear meaning.
☐ Verifiable—A test can prove if system meets
specification.
☐ Traceable—Each engineering specification serves at
least one marketing requirement.
ADVISORS: Please initial above, if you agree to supervise this senior project. Also, please check the applicable boxes above. Comment below, if requirements or specifications require revision.
Abstract
Photovoltaic systems generate more energy when orthogonally facing the sun where solar cells absorb the most light. By creating an effective, autonomous solar tracking system, the developed solar panels consistently generate maximum energy while using less power. Dual axis solar trackers surpass single axis trackers in energy generation, however, their cost and reliability provide a significant drawback. This project develops different algorithmic implementations designed to provide optimal and efficient behavior for photovoltaic systems. These algorithms adjust the solar panel’s position
Chapter 1: Introduction
After the discovery of the photovoltaic effect in 1839, it wasn’t until 1954 when the first silicon-based solar cell was created [12]. These solar cells are the building blocks which almost all modern solar panels are made of today. As solar panels are slowly becoming more efficient, they are also becoming more viable for both residential and commercial use as a renewable energy source. By seeking to improve the overall design of photovoltaic systems, the world could slowly transition towards cleaner energy sources such as solar energy. The overall objective of this project is to improve solar panel energy generation and efficiency by designing multiple algorithms for a pre-existing solar module with dual axis control. The completed system will be used for performance comparison against several dual axis and single axis designs.
Chapter 2: Customer Needs, Requirements, and Specifications
Customer Needs
Solar tracker consumers purchase single axis solar tracking panels because the price lessens compared to dual axis tracking. The energy transferred through the dual axis system lingers slightly above the single axis’ energy generation. For a valid dual axis investment, the algorithm constructed must merit significant optimization considering various weather patterns and conditions. Day-to-day adaptability potentially separates the two technologies. Increasing the energy production becomes vital for profit. Regarding price, the customer would prefer the system to sell inexpensively. Improved energy generation hits a threshold despite advancement in tracking, so decreasing the tracker’s production cost makes it more affordable. A price decrease and electrical generation improvements would make it a competitor against single axis tracking.
The solar tracker consumers energy so minimizing the power consumption plays an important role. Everytime the solar tracker realigns and faces the sun, the energy generated exhibits electrical and mechanical energy loss as movement. The customer benefits from a balance between the tracker’s duty cycle considering the tradeoff amidst the controller’s generation and consumption.
The customer requests reliable performance. Being a dual axis tracker, the system provides a range of motion so the movement must not realign at random. Whatever the solar trackers initial position on the axes, the panels must visibly rotate in the direction of the sun. The dual axis’ fluid movement allows for reductions in motion. The customer wants the ability to switch between mode functionality. If the sun frequently aligns with one axis, it reasons to change to the matching axis. The consumer can choose to move the panels or leave them in a set position. Multiple modes allow for different accommodations and volatility.
Requirements and Specifications
Table 1. Dual Axis Solar Tracker Requirements and Specifications
Marketing Requirements
Engineering
Specifications Justification
1 Dual axis algorithm generates 5-7% more
average energy per year than the single-axis algorithm
Through research this is the average gain in energy generation when going from single to dual-axis tracking.
3 Operates using an inexpensive
microcontroller and sensors under $200
It would not be cost effective to use a microcontroller with more power or features than required.
4, 6 Operates as a dual axis, single axis
(longitudinal or latitudinal), or manual system
User able to operate system differently based on their need or situation
1, 5 Minimizes actuator activation while
maintaining high power generation.
Compares data samples between 15 degrees every hour
Trade-off between power generation versus power consumption needs to be maximized
2, 6 Incorporates different tracking algorithms
for sunny, cloudy, and partially cloudy days
Sunlight diffuses differently with cloud density and coverage. Some algorithms may outperform in certain weather
3, 5, 7 Interface displays voltage, current, power,
or average energy within two decimals places
The screen will provide all the numeral information, and less buttons makes functionality easier.
Marketing Requirements
1. High Energy Generation 2. Weather Adaptable 3. Low Cost
4. Multi-mode Operation 5. Low Power Consumption 6. Multiple Algorithms 7. Simple User Interface
Chapter 3: Functional Decomposition (Level 0 and Level 1)
Figure 1. Dual Axis Solar Tracker Level 0 Block Diagram
Table 2. Dual Axis Solar Tracker Level 0 Block Diagram Parameters
MODULE SOLAR TRACKING SYSTEM
INPUTS SUN POSITION DATA: 0V TO 5V RANGE
SYSTEM POWER: 12V DC
USER INPUT: VARIES SUN TRACKING ALGORITHM OR MODE
OUTPUTS PANEL POSITION DATA: 0V TO 3.3V RANGE
GUI DATA: DISPLAYS CURRENT MODE AND POWER GENERATION
FUNCTIONALITY THE SOLAR TRACKING SYSTEM OBTAINS DATA TRACING THE SUN’S POSITION.
Figure 2. Dual Axis Solar Tracker Level I Block Diagram: Microprocessor
Table 3. Dual Axis Solar Tracker Level I Block Diagram: Microprocessor Parameters
MODULE MICROPROCESSOR
INPUTS SOLAR SENSORS: ANALOG VOLTAGE SIGNAL
VOLTAGE SENSOR: 0 TO 5V ANALOG SIGNAL
CURRENT SENSOR: 0 TO 5V ANALOG SIGNAL
BUTTONS: GPIO VOLTAGE
SYSTEM POWER: 9V DC
CLOCK: INTERNAL CLOCK RUNNING AT LOWEST FREQUENCY
OUTPUTS ACTUATOR 1 POSITION VOLTAGE: 0V TO 3.3V RANGE
ACTUATOR 2 POSITION VOLTAGE: 0V TO 3.3V RANGE
I2C: DATA TO OPERATE DISPLAY
Figure 3. Dual Axis Solar Tracker Level I Block Diagram: Actuator
Table 4. Dual Axis Solar Tracker Level I Block Diagram: Actuator Parameters
MODULE ACTUATOR
INPUTS M+: MOTOR EXTEND SIGNAL
M-: MOTOR RETRACT SIGNAL
OUTPUTS MECHANICAL MOVEMENT (EXTENDING OR RETRACTING)
FUNCTIONALITY THE ACTUATORS ROTATE THE SOLAR PANEL TO THE POSITION GIVEN FROM THE MICROPROCESSOR’S DATA POINTS.
Figure 4. Dual Axis Solar Tracker Level I Block Diagram: LCD Display
Table 5. Dual Axis Tracker Level I Block Diagram: LCD Display Parameters
MODULE LCD DISPLAY
INPUTS LCD COMMAND: 8-BIT BUS
POWER: 5V DC
OUTPUTS INFORMATION: TEXT ON SCREEN
FUNCTIONALITY THE LCD DISPLAY CONVEYS MESSAGES TO THE USER TO COMMUNICATE FUNCTIONALITY OF THE SYSTEM. IT TAKES THE DATA OBTAINED FROM THE
Figure 5. Dual Axis Solar Tracker Level I Block Diagram
The level 0 diagram illustrated the solar tracker’s function. The utilized sensors convert the solar’s position into tangible data. The actuators move the solar panels in the direction where there’s greater energy generation due to the data obtained by sensors and translated to an appropriate amount by the microprocessor. The three subsystems creating the solar tracker are the actuators, display, and microprocessor excluding the solar panel.
Chapter 4: Project Planning
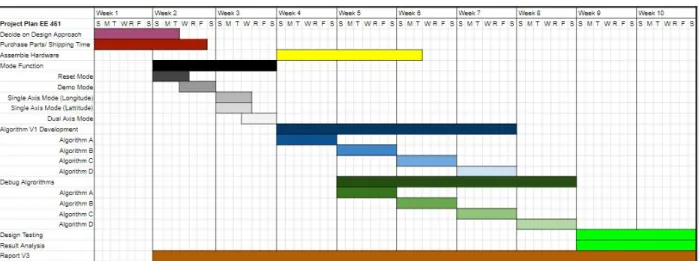
Figure 6. EE460 Gantt Chart
Figure 7. EE461 Gantt Chart
Table 6. Estimated Parts and Labor Cost
Part Part Number / Model Part Cost Quantity Total
Microcontroller MSP432P401R $19.99 1 $19.99
Solar Sensors SUF268J001 $11.15 4 $44.60
LCD Screen EA SER161-ENLWK $80 1 $80
Buttons PB6B2HS7M1CAL00 $5.60 6 $33.60
Enclosure $15 1 $15
Mounting Hardware $10 N/A $10
Wires $40 N/A $40
Parts Total $243.19
Labor
3 hours per week per person
Estimated $75k per year
$11,250
Total Cost $11,493.54
stimated P arts Cost
E = cost + 4a cost6 + m costb
stimated P arts Cost
E = $218.19 + 4 × $243.54 + $3506
stimated P arts Cost 257.05
E = $
Chapter 5: Design
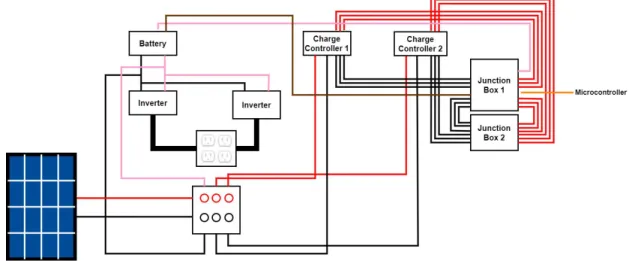
The Dual Axis Solar Tracker was a project before, so the device was readily available. The solar system of the panel includes two inverters and two charge controllers with one 12V battery storage system. Prior to designing, records were searched for prior information regarding the design of the tracking system. Through observation and tracing wires, the following schematic was created to understand the system.
Figure 9. Solar Photovoltaic System
Motor Driver
Two designs were made for the subsystem that controls the linear actuators. The first design proved to be more complex.
Figure 10. First Motor Driver Layout
The first design was intended to make use of the two H-bridges that were used by the group before. As seen in Figure 10, the design required the H-Bridges and multiple relays which defeated the purpose of the H-Bridge. The coil (Pin 7 and Pin 8) that would change the direction of the relays would require at least 8V to trigger the switch and at max 3V to return to the original, positive direction. The battery was the only device that could reach both the required operation voltages demanded by the H-bridge, however, additional relays or switches would be required to control the directions of the actuators. This design was not feasible due to the lack of zero state operation; the linear actuators would constantly move in one direction without a second relay. A microprossing board that has a GPIO of 8V would be the alternative to avoid additional components.
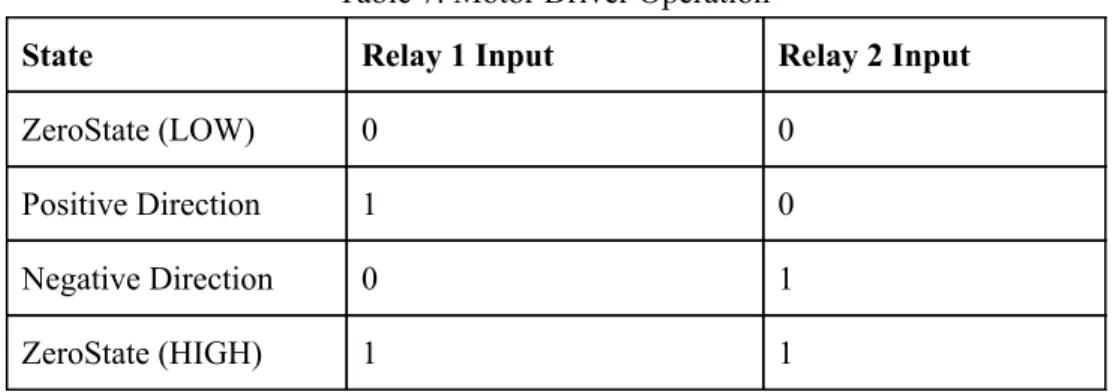
Figure 11. Final Motor Driver Layout
input/output signal. With the relays, each actuator is controlled by two signals. When they are both low, the actuator is not moving (zero state). The one and zero combination that allows the motor to match the terminals of the battery is the positive direction, and the combination with opposite terminals is the negative direction. Two relays are required for each linear actuator.
Table 7. Motor Driver Operation
State Relay 1 Input Relay 2 Input
ZeroState (LOW) 0 0
Positive Direction 1 0
Negative Direction 0 1
ZeroState (HIGH) 1 1
Sensor Selection
Materials used previously from the prior group included a pyranometer and a magnetic encoder. For sensing the position of the sun, these two devices prove useful. The magnetic encoder is apt for measuring the angle of the panels. The device is connected directly to the rotating rod of the linear actuator. With algorithms, it can be used to relocate previous positions that held the highest irradiance or energy absorption through the sensors for sampling intervals. The pyranometer will be useful for adapting to weather conditions and finding the angle with the highest irradiance.
The new additions for the solar tracking system include light sensitive devices. These devices are photoresistors and photodiodes. These devices essentially behave similarly, but the photodiode induces current whereas the photoresistor decreases in resistance thus indirectly proportional to current. These elements will be encapsulated so the sensors react accordingly to shading. The photodiode has more range with an incidence angle of 80 degreed max whereas the photoresistor can be less sensitive.
Board Selection
Due to familiarity, the choice of microcontroller units was between the MSP432R or the Arduino Mega. The MSP has more capability and flexibility in terms of programming, but the Arduino proved to be easier to implement. Both boards operate with 3.3V and 5V pins. The Arduino Mega has a total of 54 digital pins and 16 analog pins. Although the Arduino has one clock, built in functions will allow for delays and counting clock cycles. If interrupts were required, the Arduino Mega has a limit of 5 interrupt pins.
Algorithm
The basic algorithms are derived from the sensors, but they would be looped to operate at the conditions of weather at which they operate best. The photoresistor and photodiodes will have similar functioning algorithms since they both have the encasing to reduce incoming sunlight. Four photoresistors are mounted onto a small structure along the sides of the solar panel. Depending on the orientation of the panel in relation to the sun, a shadow might be cast on a photoresistor. This will increase the resistance thus decreasing the current. One or both of the relays will be tripped, turning on the actuator that will move the panel opposite of the shadow casted. This motion will continue until the relay is turned off under the condition that both of the photoresistors are within the same value or, in other words, not shaded. Depending on the interval of time or angle that the panel is allowed to increment, the motors will run until it is perpendicular then continue finding the maximum point of energy generation with the next axis. Since the gradient of motion is not sensitive because the sun is moving slowly, it is not necessary to track both axises at the same time. Instead, they will be reiterated an n-number of times until the sensor finds the minimum angle of incidence. The photodiode will be set up in the same manner as the
photoresistor, but they will be separate around the solar panel rather than being close together.
Figure 12. Sensors on Solar Panels
The pyranometer will be on the same plane as the solar panel, but will be only one side. Attached to the frame is a metal plate where the Apogee pyranometer was mounted previously, which will be used for mounting again. The pyranometer will be used as a sole sensor to track the sun. Once we accumulate a reasonable amount of data to distinguish the data from cloudy days to that of sunny days, the pyranometer will be capable of switching the algorithm to detect cloudy or rainy days. For this case, we will allow the panel to be parallel to the ground to catch the maximum amount of irradiance bouncing from the clouds in all directions. Besides the weather detection, it will be used to move about a radius of the original position and store the position with the highest irradiance. Once the samples are taken, the panel will set the actuator to the angles of the stored position. It will wait a certain interval of time then continue the same process.
Chapter 6: Construction
System Structure
The mechanical structure of the project, which was decided to be kept as it were, was completed by previous senior project groups. One actuator controls the North-South direction of the solar panel while the other actuator controls the East-West direction. The actuators’ arms extend and contract to push and pull the panel which rotate along bearing-supported metal rods connected to the supporting frame. The panel itself is supported by an aluminum frame that is both lightweight and durable. The bottom of the structure is placed on caster wheels to allow repositioning and transportation of the entire structure. Both charge controllers and both inverters are mounted to a plastic side panel of the frame itself. The 12 V battery is located beneath the frame and mounted to the bottom of the structure. A latched box serves as the designated housing for the smaller electrical components of the system as well as a secondary box containing four 120 V outlets from the inverters.
Mode Operations
The different modes will be selected using a series of buttons to navigate through the menu displayed on the LCD screen. The screen will display the various operating modes, the ability to select and change modes, and various important input/output metrics. The manual mode of the system will be a set of buttons to manually move the panel in both directions on either of its axes. This could possibly be used for demonstration purposes as the sun does not move noticeably fast as well as situations in which setting a fixed tilt angle would be needed. The sensor tracking modes are discussed below under sensors.
Magnetic Encoders
The magnetic encodes which will be used to measure the tilt angle on either axis are mounted directly to the metal bar and bearings in which the panels rotate. In previous designs of the project, there were two magnetic encoders, one for each axis, but as of taking on this project there was only one left which had become damaged and unusable. Two new encoders will be used for verifying tilt angles through a 10-bit serial data signal to the microcontroller, and will be used for implementing the astrological tracking method.
Actuators
The two actuators which were used in previous iterations of the project are still in working order and will continue to be used for this project, but if the budget allows, may be replaced. The actuators work while being powered by a positive or negative 12 V signal which will cause them to extend or contract, respectively. This motion will push or pull the panel to rotate along either of its axes.
Sensors
The structure of the photodiodes will differ slightly from the photoresistor structure as the diode sensors face perpendicular to the circuit board compared to the photoresistors which face parallel. Additionally, as these sensors are much more precise and sensitive, shading will not need to be used as in the photoresistor case. Their mounting structures and encasings will also be 3-D printed for protection and durability.
Chapter 7: Testing
With the start of a new quarter, COVID-19 changed the structure classes at Cal Poly. Students were not permitted to be on campus, and the buildings were closed for the entire quarter. During the first few weeks of Spring 2020, the plan was to finish constructing the system and begin testing. Because the buildings were closed and the dual axis tracker is located in the back of Engineering East, the project was
not accessible. Configuring the project was limited to testing the functions and subsystems individually until they could be integrated together. With the virus, ordering parts resulted in delayed shipping which slowed down the construction and testing. In this chapter, the purpose of each function will be explained and the software diagrams will be included.
For the construction of the Arduino code, it is important to note that the value of many variables interchange. Because values of variables change, repetitive variables need to be declared in the beginning of the code so it is defined as a global variable. If variables were defined within the
functions, the scope of variables would not allow the values to carry or they would be reinitialized.
RELAY_INIT( ) & SET_RELAYS(STATUS_1, STATUS_2, STATUS_3, STATUS_4)
These functions are short but essential to reduce the lines of code. It allows the relays to be initialized in the void_setup(). It labels all the relays as outputs. The SET_RELAYS takes the input, which can be written as ON or OFF, and writes these signals to the relays. It allows multiple relays to be set with one line of instruction.
photoresistor( )
This function covers one of the main algorithms for finding the optimal position perpendicular to the sun. It reads the input from four photoresistors. These photoresistors are placed on each surface around a rectangular box. Depending on the angle that the box faces the sun, one or two of the photoresistors will be shaded. The photoresistor that produces less voltage due to shading will cause the relay to correspond to Figure 13. Photoresistors Flow
the opposite direction to move the actuator in the direction that brings the solar panel towards the sun. In
the code, it is omitted, but the set_mode( ) function should follow each if statement in order to correctly
apply the mode that the dual axis was set to operate. One new actuator was bought to test the code at home. The actuator was tested for one set of directions then the counterparts. The relay shines a LED when it is activated, but the actuator is connected to see if it moved in the proper direction.
set_mode( )
The variable mode is used as a flag or indicator to keep track of the operation of the actuators, whether
one or both are on. This function uses a switch-case to set the relays that should be on depending on the
mode. For photoresistors( ), the function operates both actuators by default, so a delay is used for this
case. Manual mode has its own functions, so a delay is put in place of it. For the single axis case, the directions that are not being used are both set off. This function would be better to test with two actuators. It had not been tested properly since one set of directions was only able to be tested at once. Testing both actuators would be better, because there may be subtle drifts in the other direction for the single axis cases
due to the set_mode( ) being a few lines of code after the function initializing both axises.
Figure 14. Set Mode Function Flow Diagram
readAngle( )
This function reads the data coming into the magnetic encoder and returns an integer. When the CS signal on the magnetic encoder is set LOW, the program toggles the CLK signal twelve times. With each
code. The part has two models, a 10-bit and 12-bit model. Using the Serial Print, the numbers being generated were debugged. The ten bit versions of the code were unsuccessful, so the code was generated as if it were the 12-bit encoder. The CS is set back HIGH to stop the encoder from reading.
Figure 15. Read Angle Function Flow Diagram
modeDisplays( )
This function was created to provide a neutral or stand-by screen with information that may be useful for
the user. For the dual axis mode, the readAngle( ) function is used to get the readings from the magnetic
encoders. The angle according to the magnetic encoder is displayed on the LCD. For the single axis tracking, “SINGLE AXIS” with the appropriate direction is displayed on the first line. The second line displays the angle measured within a range from 0 to 359. Depending on the orientation desired, this can be changed to display a range from -179 to 179, but the variable type would have to be changed. At the moment, it is written with an unsigned variable type, so subtracting by 180 would display a number
greater than the scope (e.g. 216). For the Manual mode, submenus display the buttons to press to move the
Figure 16. Mode Displays Function Flow Diagram
set_day( )
set_time( )
This function works in the similar fashion to set_day, but it waits on four button presses. It changes the
hour_w variable. It can range from 00:00-23:59. FORWARD and ENTER are the only inputs. Both these functions were tested by using the LCD. The buttons were pressed and the edge cases were set so the numbers did not go outside the established range.
pyranometer( )
The analog pin corresponding to the pyranometer is read. The number obtained would range from 0-1024. This number must be multiplied by the sensitivity declared by the datasheet. An important note, the ground of the battery and the signal ground must be tied to accurately obtain the values. Upon testing, the pyranometer did not react to changes of light from flashlights and surrounding sunlight. A multimeter was used to read the voltage across the signal ground, but it would read around 10 millivolts.
check_mode ( )
This function is a simple if-else statement. It keeps track of the MODE button. Before the menu( )
function was integrated, it was supposed to serve as a way to change which actuator was on. As the project continued, this function was no longer needed since there was another function dedicated to changing the mode.
menu( ) and menu_loop( )
solar_path( )
This function executes the dual axis solar tracking method using calculated solar coordinates which are
defined by an altitude angle, 𝞪, and an azimuth angle, φ. Equations for calculating solar coordinates and
converting clock time to solar time from Renewable and Efficient Electric Power Systems by Gilbert M. Masters:
Due to the mechanical design of the preexisting solar panel system, its rotational axes differ from that of
the rotational axes in calculations. Azimuth angle (φ) rotates about the z-axis and altitude angle (𝛂)
determines the z-component of the vector that points towards the sun. The solar panel system utilizes a North-South angle (σ) and an East-West angle (τ) that rotates about the axis tilted σ degrees away from
Figure 20. Solar Coordinate Vector Diagram
Figure 21. Normal Vector Diagram
When facing the panel, V1 represents the center to the top edge of the solar panel and V2 represents the center to the left edge of the panel. Together they define the plane of the panel and their cross product determines the normal vector that points towards the direction of the sun. V1 and V2 vectors defined by their x, y, and z components:
Normal vector is calculated by:
Setting n equal to Vs and solving for σ and τ:
main( )
This function relies on all the previous functions. Using these functions allowed the code to be short. The
check_time( ) function is first in the loop to check the elapsed time between readings. This function is limited to one minute, so it relies heavily on the loop running under two minutes max. The
modeDisplays( ) is required to display the proper home menu that gives the angle measurement readings. From there an if-else statement is written to operate the actuators depending on the algorithm set. One statement is constantly waiting to see if the MODE button is pressed to open the menu.
Final Project Schematic
The final schematic of the Dual Axis Tracker used four buttons, two magnetic encoders, an LCD screen, four 200Ω resistors, a potentiometer, a pyranometer, a 12V Battery, four photoresistors, and four relays. The potentiometer must be adjusted so the characters on the Liquid Crystal Display can be seen.
Chapter 8: Conclusion and Recommendations
With the shift in circumstance due to COVID-19, the project is not as complete as it could have been if classes were not virtual during the spring quarter. The focus during the spring quarter, in regards to testing, was functionality. The behavior of the tracker was difficult to observe visually without the tracking system. The individual functions, along with the main( ), work as desired, but improvements can be made. The biggest concerns are the function pertaining to the sun path algorithm. This function, due to all the math, would stall the program run time. As long as it does not take more than a minute to loop back to the main function, no problems would reside.
The entire dual axis still needs to be constructed to properly test the dual axis tracker. From the testing, we are only sure that the tracker reacts as it should to the sensors, so diagnostics would still need to be made. The references that are considered as zero would need to be tweaked. For the encoders, in example, the numbers that are read depend on the position that the encoders are mounted onto the shaft. It can be shifted mechanically or by subtracting within the Arduino code. With the sensors provided, more algorithms can be made by combining different components to increase the effectiveness of the tracker.
Apart from all the diagnostics that can be made, the project can be taken further by documenting the energy production of the different algorithms. This would allow the effectiveness of the algorithms to be measured with tangible data. Additional modifications or test cases would be able to be constructed in forms of actuator running times. At the moment, the actuators would be constantly running which would decrease energy generation since power would be lost when sampling.
References
1. K. Kee-Hoon and C. Sung-Bae, “An efficient concentrative photovoltaic solar system with
Bayesian selection of optimal solar tracking algorithms,” Applied Soft Computing, Vol 83,
October. 2019. DOI: 10.1016/j.asoc.2019.105618
2. A. Ashi, A. A. Joudeh, M. Shafeey, B. H. Sababha and S. N. Istehkam, “A PV Solar Tracking System: Design, Implementation and Algorithm Evaluation” presented at the 5th International Conference on Information and Communication Systems. ICICS. 1-3 April, 2014. DOI: 10.1109/IACS.2014.6841948.
3. S. Seme, G. Štumberger and J. Voršič, "Maximum Efficiency Trajectories of a Two-Axis Sun
Tracking System Determined Considering Tracking System Consumption," in IEEE Transactions
on Power Electronics, vol. 26, no. 4, pp. 1280-1290, April 2011.
4. M. Mirdanies and R. P. Saputra, “Dual-axis solar tracking system: A combined astronomical estimation and visual feedback” presented at International Conference on Sustainable Energy Engineering and Application (ICSEEA), Jakarta, Indonesia, 3-5 Oct, 2016. DOI:
10.1109/ICSEEA.2016.7873573
5. R. U. Sabran and A. C. Fajardo, “Sunflower Inspired Solar Tracking Strategy: A Sensorless Approach for Maximizing Photovoltaic Panel Energy Generation” presented at IEEE 10th International Conference on Humanoid, Nanotechnology, Information
Technology,Communication and Control, Environment and Management (HNICEM), Baguio City, Philippines, Philippines, 29 Nov.-2 Dec. 2018. DOI: 10.1109/HNICEM.2018.8666379.
6. Z. Judkins, “Photovoltaic Assembly for Use in Diffuse Weather Conditions and Related Methods,” U.S. Patent 8,455,806, June 4, 2013
7. PA-04 Datasheet, Progressive Automation, Arlington, WA, USA. 2019. Accessed: October 21, 2019. [Online]. Available:
https://cdn.shopify.com/s/files/1/0061/7735/7891/files/PA-04.pdf?9652
8. E20-435-COM Datasheet, SunPower Corporation, San Jose, CA. 2017. Accessed: October 21, 2019. [Online]. Available:
9. TSM-DE14A(II) Datasheet, Trina Solar Limited, Changzhou, China. 2017. Accessed: October 21, 2019. [Online]. Available:
https://static.trinasolar.com/sites/default/files/EN_TSM_DE14A_II_Tallmaxplus_B_2017_web.p df
10. Solanki, Chetan Singh. Solar photovoltaics: fundamentals, technologies and applications. PHI Learning Pvt. Ltd., 2015.
11. United States Department of Energy. Office of Energy Efficiency and Renewable Energy. “The History of Solar”. Accessed November 12th, 2019. [Online]. Available:
https://www1.eere.energy.gov/solar/pdfs/solar_timeline.pdf
12. Masters, Gilbert M. Renewable and Efficient Electric Power Systems. Hoboken, New Jersey. John Wiley & Sons, Inc. 2004.
13. AEAT-6010/6012 Magnetic Encoder Datasheet, Avago Technologies, California, United States. August 12, 2011. Accessed: March 12, 2020. [Online]. Available:
https://docs.broadcom.com/doc/AV02-0188EN
14. SP-212-215 Pyranometer, Apogee Instruments Inc, Utah, California, United States. January 2019. Accessed: April 26, 2020. [Online]. Available:
APPENDIX A - ANALYSIS OF SENIOR PROJECT DESIGN EE 460-07
Project Title:
Dual Axis Solar Panel Tracker
Student’s Name:
Javier Harrison, Xavier Lugue, Nick Wolfe
Student’s Signature:
Advisor’s Name:
Dale Dolan
Advisor’s Initials:
Date:
• 1. Summary of Functional Requirements
The overall function of the project is to create an algorithm that maximizes a dual axis
solar tracker’s energy generation as efficiently as possible. The project builds off a preexisting
dual axis solar panel module and utilizes a microcontroller and sensors to implement the
algorithm. Generally, solar panels generate maximum energy when orthogonally facing the sun.
The algorithm tracks the sun while taking into account weather conditions and adjusts the solar
panel’s position accordingly.
• 2. Primary Constraints
A prominent challenge this project faces is in finding a dual axis tracking system that
proves to be a feasible upgrade over single axis tracking. Since there is generally a small increase
in efficiency between these two methods, the system must be optimized at every stage. Another
challenge facing this project is developing the ideal tracking algorithm. Research must be done
to decide whether GPS, light sensors, or a combination of the two are the most efficient.
• 3. Economic
Economic impact of this system affects a variety of capitals. Technicians would have to
be trained to install and maintain the system; though we are unsure at this time if it would be
feasible to maintain our own team versus offering training to existing solar installation
companies. While a tracking system is a larger upfront investment than a stationary one, the
gains in efficiency will help overcome this. There would also have to be investments in facilities
in which to manufacture this system and house an administration and research team. This facility
would need to be equipped with the necessary tools and machines for the production of this
system. Since our system relies on purchasing “off the shelf” components and assembling them,
the natural capital needed for production could vary depending on the suppliers we choose for
each component.
tracker system, those who use it will also profit. According to a study from the International
Journal of Engineering and Technology, on average a dual axis solar tracker is close to 82%
more efficient than a fixed-tilt solar panel. Based on the average energy generation of a solar
panel per year to be approximately 500 kWh, the efficiency increase of a dual axis tracker, and
the average cost of electricity per kWh in the U.S, customers could save $50 per year per panel.
This product could emerge towards the end of June 2020 after the completion of this
project. When referring to the algorithm designed in the project, it could last indefinitely. The
photovoltaic system however may last years. The required maintenance and operation costs of
the product would be occasional cleaning of the system as well as replacement of damaged or
faulty components. The original development time was estimated at a minimum of 100 hours per
person in a group of three engineering students or three quarters at Cal Poly. (See Figures II,III,
and IV above). At the end of the project, it will most likely be kept as a displayable project for
the Electrical Engineering Department at Cal Poly.
• 4. If manufactured on a commercial basis:
The cost of the solar tracking system estimates around $243.19. Depending on the
amount of wires and enclosure cost, the number may reduce or increase. Table III shows the
major component and hardware cost. With the cost of the actuators, each at a cost of $149, the
total price per unit increases to $541.19. The purchase price would be $1000 for a single solar
tracking system. The profit from each purchase would be $458.91. Based on an estimated 2,000
sales per year, the net profit per year would be $917,820. The estimated operating cost for the
user per year would be likely less than $20 per year per panel in order to clean and maintain each
panel.
• 5. Environmental
The environmental impact of our dual axis tracking system includes all the usual
nonrenewable natural resources that are required to manufacture solar panels, namely silicon and
copper. Additional resources are required to make the tracking system; this includes metals for
the actuators as well as more silicon and other compounds for the tracking system itself. This
adds up to increases the required materials to deploy a panel. However, due to the increased
efficiency of a tracking system versus a stationary system, less land can be used to produce the
same amount of energy. This reduction in space needed for solar production could lessen the
impact solar farms have on the local habitat.
• 6. Manufacturability
quality control system must be implemented . The probability is faulty equipment is low, but
with every sensor added to benefit the tracking system; the chance of faulty parts increases but
would still be low in scale. The microprocessors produced require the software to be preinstalled.
• 7. Sustainability
The core of this system is to improve the sustainability of our society's consumption. As
stated in the Manufacturing section, all the hardware for our system is to be sourced from other
manufacturers. To ensure our system reflects our desire for sustainability we must analyze the
manufacturing processes and business practices used by suppliers when we are choosing where
to buy our components. The design and components of our system will ensure the longest
possible lifespan of the system. The system will also be designed to allow the consumer to
upgrade the solar cell that is mounted on the tracking unit, this will help reduce waste.
• 8. Ethical
.
Ethical implications of our system may arise in the deployment of our system. A large
scale deployment of our system would generate a large amount of power, which could be
hazardous if not executed properly. Because of this we must acknowledge the IEEE Code of
Ethics which states: “
to maintain and improve our technical competence and to undertake
technological tasks for others only if qualified by training or experience, or after full disclosure
of pertinent limitations.” To uphold this rule we will ensure that any persons that are tasked with
installing our system have the proper training to safely complete their task.
We must also strive to be as transparent about the advantages of our system as possible.
Dual axis tracking systems have proven to be inherently hard to justify versus their single axis
counterparts; because of this our system may not be the ideal system for every consumer.
Keeping the Golden Rule in mind, we should not deceive the public and be sure to only publish
accurate and clear information about our system’s efficiency and reliability.
• 9. Health and Safety
If the tracking mechanism were to malfunction and move quicker than intended, the
actuators can possibly hit someone with the solar panels. Because the solar panels and actuators
are heavy, the slow speed, big mass is enough to hurt someone.
The solar panel produces current that may shock anyone who makes modifications to the
tracking system. Any exposed wires can potentially shock or burn anyone who comes in contact,
which results in injury or death. Exposed wires or circuitry run risk with rain that can cause
electrocution.
• 10. Social and Political
Solar energy is growing, so there have been more policies that subsidize the production
of solar panels. In regards to manufacturing, the lowering cost of solar panels would allow for
increased solar panel production. Solar tracking would be more applicable for commercial or
industrial practices. In a mass produce scale, the solar tracker would be used for mass energy
production. If the algorithms produce more energy than an immobile solar panel, more energy
can be distributed to a load consuming the energy. In residential use, the owner would benefit
from lowered energy bills from their electrical provider and make money if the extra electricity
is sent back to the grid.
Solar energy provides a cleaner method of generating energy. The most pollution
generated comes from the manufacturing of the solar panel. The lifetime of pollution would be
constrained to the manufacturing span of the use lifetime. Compared with other sources of
energy, the amount of pollution continues through the span of the medium. If the solar tracker
were used to produce a solar farm, job opportunities with diagnosing errors or tracking
maintenance creates regular jobs for people.
• 11. Development
During the course of this project, learning how solar panels and photovoltaic systems in
general worked was a new concept. In order to fully understand the components and the system
as a whole, new techniques such as finding credible research was essential. As electrical
APPENDIX B - PARTS LIST
●
4 Resistors ( 200Ω )
●
4 Buttons
●
1 12 V Lithium Deep Cycle Battery
●
1 Apogee Pyranometer Model SP-215
●
2 AEAT-6010/6012 Magnetic Encoder
●
1 QAPASS 1602A Liquid Crystal Display
●
1 Potentiometer
●
2 Linear Actuators
●
2 SONGOL SRD-05VDC-SL-C Relays
APPENDIX C - FUNCTION LIST
RELAY_INIT( )
SET_RELAY( )
photoresistors( )
set_mode( )
readAngle( )
modeDisplays( )
set_day( )
set_time( )
pyranometer( )
check_mode( )
menu( )
APPENDIX D - SENIOR PROJECT CODE
● #include <Wire.h>
● #include <Keypad.h>
● #include <LiquidCrystal_I2C.h>
● #include <LiquidCrystal.h>
●
● // Define Digital Inputs
● #define ON 0
● #define OFF 1
● #define RELAY_NORTH 50
● #define RELAY_SOUTH 51
● #define RELAY_EAST 52
● #define RELAY_WEST 53
● #define MODE 46
● #define ENTER 45
● #define BACK 47
● #define FORWARD 44
● #define LCD_RW 10
● #define LCD_RS 11
● #define LCD_EN 12
● #define MAG_NS 20
● #define MAG_CLK_NS 22
● #define MAG_CS_NS 24
● #define MAG_EW 21
● #define MAG_CLK_EW 23
● #define MAG_CS_EW 25
● #define BIT4 30
● #define BIT5 31
● #define BIT6 32
● #define BIT7 33
● #define Pyrano 3
● // Define Analog Inputs
● #define PhotoD1 A5
● #define PhotoD2 A6
● #define PhotoD3 A7
● #define PhotoD4 A8
● #define SENSOR_NORTH A0
● #define SENSOR_SOUTH A1
● #define SENSOR_EAST A2
● #define SENSOR_WEST A3
● //Variables
● unsigned long onemin = 60000;
● unsigned long previousMill = 0;
● unsigned long currentMill = 0;
● unsigned long time = 0;
● unsigned long actuator_runtime = 100;
● unsigned int DO_NS = 0;
● int input = 0;
● int mode = 0;
● int back = 0;
● int menu = 0;
● int algorithm = 0;
● int half_period_microS = 50;
● int data[10];
● int NSEW[4] = {0, 0, 0, 0};
● int NORTH = 0;
● int SOUTH = 0;
● int EAST = 0;
● int WEST = 0;
● int NS = 0;
● int EW = 0;
● int n = 1;
● float hour_w = 0;
● LiquidCrystal lcd(LCD_RS, LCD_EN, BIT4, BIT5, BIT6, BIT7);
●
● double lat = 35.2828;
● double longitude = 120.6596;
● double decl;
● //double hour_w;
● double B = 0;
● double E = 0;
● double ST = 0;
● float ha_deg = 0;
● float alt_deg = 0;
● float az_deg = 0;
● float az_deg_corrected;
● float NS_tilt_deg = 0;
● float EW_tilt_deg = 0;
● double conv = PI/180; //convert degrees to radians
●
● void setup() {
● // Configure Inputs and Outputs
●
● // Serial.begin(115200);
●
● pinMode( MODE, INPUT);
● pinMode( ENTER, INPUT);
● pinMode( BACK, INPUT);
● pinMode( FORWARD, INPUT);
● pinMode( SENSOR_NORTH,INPUT);
● pinMode( SENSOR_SOUTH,INPUT);
● pinMode( SENSOR_WEST,INPUT);
● pinMode( SENSOR_EAST,INPUT);
● pinMode( Pyrano,INPUT);
● pinMode( PhotoD1,INPUT);
● pinMode( PhotoD3,INPUT);
● pinMode( PhotoD4,INPUT);
● pinMode( MAG_NS,INPUT);
● pinMode( MAG_CLK_NS, OUTPUT);
● pinMode( MAG_CS_NS, OUTPUT);
● pinMode( MAG_EW, INPUT);
● pinMode( MAG_CLK_EW, OUTPUT);
● pinMode( MAG_CS_EW, OUTPUT);
● pinMode( LCD_RW, OUTPUT);
● pinMode( LCD_RS, OUTPUT);
● pinMode( LCD_EN, OUTPUT);
● pinMode( BIT4, OUTPUT);
● pinMode( BIT5, OUTPUT);
● pinMode( BIT6, OUTPUT);
● pinMode( BIT7, OUTPUT);
● digitalWrite(23, HIGH);
● digitalWrite(22, HIGH);
● RELAY_INIT(); //initialize relay
● lcd.begin(16,2);
● }
●
● void loop() {
● //modify MODE with switch/case
● check_time();
● // check_mode();
● modeDisplays();
● if (digitalRead(MODE) == HIGH){
● menu = 1;
● menu_loop();
● }
● if (algorithm == 0){
● photoresistor();
● }
● else if (algorithm == 1){
● solarpath();
● }
● }
●
● //void manual_Relay_NS(){
● //if (digitalRead(FORWARD) == HIGH){
● // digitalWrite(RELAY_SOUTH, HIGH);}
● //else{
● // digitalWrite(RELAY_SOUTH, LOW);}
● //if (digitalRead(BACK) == HIGH){
● // digitalWrite(RELAY_NORTH, HIGH);}
● // else{
● // digitalWrite(RELAY_NORTH, LOW);}
● //}
● //void manual_Relay_EW(){
● //if (digitalRead(FORWARD) == HIGH){
● // digitalWrite(RELAY_WEST, HIGH);}
● //else{
● // digitalWrite(RELAY_WEST, LOW);}
● //if (digitalRead(BACK) == HIGH){
● // digitalWrite(RELAY_EAST, HIGH);}
● //else{
● // digitalWrite(RELAY_EAST, LOW);}
● //}
●
● void RELAY_INIT(void) {
● pinMode(RELAY_NORTH, OUTPUT);
● pinMode(RELAY_SOUTH, OUTPUT);
● pinMode(RELAY_EAST, OUTPUT);
● pinMode(RELAY_WEST, OUTPUT);
● SET_RELAYS(OFF, OFF, OFF, OFF);
● }
●
● void SET_RELAYS(unsigned char STATUS_1, unsigned char STATUS_2, unsigned char STATUS_3, unsigned char STATUS_4) {
● digitalWrite(RELAY_NORTH, STATUS_1);
● digitalWrite(RELAY_SOUTH, STATUS_2);
● digitalWrite(RELAY_EAST, STATUS_3);
● digitalWrite(RELAY_WEST, STATUS_4);
● }
●
● void photoresistor(void){
● NORTH = analogRead(SENSOR_NORTH); //read sensors
● SOUTH = analogRead(SENSOR_SOUTH);
● EAST = analogRead(SENSOR_EAST);
● WEST = analogRead(SENSOR_WEST);
●
● NS = (NORTH+ 7)-(SOUTH - 6); //compare sensors with calibration
● EW = (EAST + 25)-(WEST -25);
●
● if ((NORTH > 900) && (SOUTH > 900) && (EAST > 900) && (WEST > 900)) { //turn relays off when too dark
● SET_RELAYS(OFF, OFF, OFF, OFF);
● }
● else if (NS > 20 && EW > 20) { //SE
● SET_RELAYS(OFF, ON, ON, OFF);
● }
● else if (NS < -20 && EW < -20) { //NW
● SET_RELAYS(ON, OFF, OFF, ON);
● }
● else if (NS > 20 && EW < -20) { //SW
● SET_RELAYS(OFF, ON, OFF, ON);
● else if (NS < -20 && EW > 20) { //NE
● SET_RELAYS(ON, OFF, ON, OFF);
● }
● else if (NS > 20) { //S
● SET_RELAYS(OFF, ON, OFF, OFF);
● }
● else if (NS < -20) { //N
● SET_RELAYS(ON, OFF, OFF, OFF);
● }
● else if (EW > 20) { //E
● SET_RELAYS(OFF, OFF, ON, OFF);
● }
● else if (EW < -20) { //W
● SET_RELAYS(OFF, OFF, OFF, ON);
● }
● else {
● SET_RELAYS(OFF, OFF, OFF, OFF); //Balanced
● }
● delay(500); //wait 0.5 seconds
● }
●
● void check_time(){
● unsigned long currentMill = millis();
● unsigned long elapse = currentMill - previousMill;
● if (elapse > onemin){
● previousMill = currentMill;
● hour_w = hour_w + 0.0166666667;
● }
● else{
● hour_w = hour_w;}
● if (hour_w > 24){
● n = n + 1;
● hour_w = 0;
● }
● if (n > 365){
● n = 0;
● }
● }
●
● void set_day(){
● lcd.clear();
● int hund_stat = 1;
● int ten_stat = 1;
● int one_stat = 1;
● int hundreds = 0;
● int tens = 0;
● int ones = 1;
● lcd.setCursor(0,0);
● lcd.setCursor(0,1);
● lcd.cursor();
● lcd.print("DAY: " + String(hundreds)+String(tens)+String(ones));
● lcd.setCursor(5,1);
● lcd.blink();
● while (hund_stat > 0){
● delay(125);
● if (digitalRead(FORWARD)== HIGH){
● if (hundreds <= 2){
● hundreds = hundreds + 1;
● }
● else{
● hundreds = 0;}
● lcd.setCursor(0,1);
● lcd.print("DAY: " + String(hundreds)+String(tens)+String(ones));
● lcd.setCursor(5,1);
● }
● else if (digitalRead(ENTER) == HIGH){
● lcd.setCursor(6,1);
● lcd.blink();
● hund_stat = 0;
● }
● // else if (digitalRead(BACK == HIGH)){
● // lcd.setCursor(0,1);
● // lcd.print("DAY: " + String(n));
● // break;
● // }
● }
● while (ten_stat > 0){
● delay(125);
● if (digitalRead(FORWARD)== HIGH){
● if (hundreds <= 2){
● if (tens <= 8){
● tens = tens + 1;}
● else{
● tens = 0;
● }
● }
● else{
● if (tens <= 5){
● tens = tens + 1;}
● else{
● tens = 0;
● }
● }
● lcd.setCursor(0,1);
● lcd.print("DAY: " + String(hundreds)+String(tens)+String(ones));
● lcd.setCursor(6,1);
● else if (digitalRead(ENTER) == HIGH){
● lcd.setCursor(7,1);
● lcd.blink();
● ten_stat = 0;
● }
● // else if (digitalRead(BACK == HIGH)){
● // lcd.setCursor(0,1);
● // lcd.print("DAY: " + String(n));
● // break;
● // }
● }
● while (one_stat > 0){
● delay(200);
● if (digitalRead(FORWARD)== HIGH){
● if (hundreds == 3){
● if (tens <= 5){
● if (ones <= 8){
● ones = ones + 1;
● }
● else{
● ones = 0;
● }
● }
● else{
● if (ones <= 4){
● ones = ones + 1;
● }
● else{
● ones = 0;
● }
● }
● }
● else{
● if (ones <= 8){
● ones = ones + 1;}
● else{
● ones = 0;
● }
● }
● lcd.setCursor(0,1);
● lcd.print("DAY: " + String(hundreds)+String(tens)+String(ones));
● lcd.setCursor(7,1);
● }
● else if (digitalRead(ENTER) == HIGH){
● lcd.setCursor(8,1);
● lcd.blink();
● one_stat = 0;
● }
● // lcd.setCursor(0,1);
● // lcd.print("DAY: " + String(n));
● // break;
● // }
● }
● n = hundreds*100 + tens*10 + ones;
● lcd.clear();
● lcd.noBlink();
● delay(500);
● }
●
● void set_time(){
● int tens_hr_stat = 1;
● int ones_hr_stat = 1;
● int tens_min_stat = 1;
● int ones_min_stat = 1;
● int tens_hr = 0;
● int ones_hr = 0;
● int tens_min = 0;
● int ones_min = 0;
● lcd.clear();
● lcd.setCursor(0,0);
● lcd.print("USE 00:00-23:59");
● lcd.setCursor(0,1);
● lcd.print("TIME: " +
String(tens_hr)+String(ones_hr)+":"+String(tens_min)+String(ones_min));
● lcd.setCursor(6,1);
● lcd.blink();
● while (tens_hr_stat > 0){
● delay(125);
● if (digitalRead(FORWARD)== HIGH){
● if (tens_hr <= 1){
● tens_hr = tens_hr + 1;}
● else{
● tens_hr = 0;
● }
● lcd.setCursor(0,1);
● lcd.print("TIME: " +
String(tens_hr)+String(ones_hr)+":"+String(tens_min)+String(ones_min));
● lcd.setCursor(6,1);
● }
● else if (digitalRead(ENTER) == HIGH){
● lcd.setCursor(7,1);
● lcd.blink();
● tens_hr_stat = 0;
● }
● // else if (digitalRead(BACK == HIGH)){
● // lcd.print("TIME: " + String(hour_w));
● // }
● }
● while (ones_hr_stat > 0){
● delay(125);
● if (digitalRead(FORWARD)== HIGH){
● if (tens_hr == 2){
● if (ones_hr <= 2){
● ones_hr = ones_hr + 1;
● }
● else{
● ones_hr = 0;
● }
● }
● else{
● if (ones_hr <= 9){
● ones_hr = ones_hr + 1;}
● else{
● ones_hr = 0;
● }
● }
● lcd.setCursor(0,1);
● lcd.print("TIME: " +
String(tens_hr)+String(ones_hr)+":"+String(tens_min)+String(ones_min));
● lcd.setCursor(7,1);
● }
● else if (digitalRead(ENTER) == HIGH){
● lcd.setCursor(9,1);
● lcd.blink();
● ones_hr_stat = 0;
● }
● // else if (digitalRead(BACK == HIGH)){
● // lcd.print("TIME: " + String(hour_w));
● // break;
● // }
● }
● while (tens_min_stat > 0){
● delay(125);
● if (digitalRead(FORWARD)== HIGH){
● if (tens_min <= 4){
● tens_min = tens_min + 1;}
● else{
● tens_min = 0;
● }
● lcd.setCursor(0,1);
● lcd.print("TIME: " +
String(tens_hr)+String(ones_hr)+":"+String(tens_min)+String(ones_min));
● lcd.setCursor(9,1);
● }
● lcd.setCursor(10,1);
● lcd.blink();
● tens_min_stat = 0;
● }
● // else if (digitalRead(BACK == HIGH)){
● // lcd.print("TIME: " + String(hour_w));
● // break;
● // }
● }
● while (ones_min_stat > 0){
● delay(200);
● if (digitalRead(FORWARD)== HIGH){
● if (ones_min <= 8){
● ones_min = ones_min + 1;}
● else{
● ones_min = 0;
● }
● lcd.setCursor(0,1);
● lcd.print("TIME: " + String(tens_hr)+String(ones_hr)+ ":" + String(tens_min)+String(ones_min));
● lcd.setCursor(10,1);
● }
● else if (digitalRead(ENTER) == HIGH){
● lcd.setCursor(11,1);
● lcd.blink();
● ones_min_stat = 0;
● }
● // else if (digitalRead(BACK == HIGH)){
● // lcd.print("TIME: " + String(hour_w));
● // break;
● // }
● }
● lcd.clear();
● delay(500);
● hour_w = tens_hr*10+ones_hr+(tens_min*10+ones_min)*0.0166666667;
● lcd.noBlink();
● }
●
● void set_mode(){
● switch(mode){
● case 0: //Dual Axis
● delayMicroseconds(1);
● case 1: //Single Axis (NS)
● digitalWrite(RELAY_EAST, LOW);
● digitalWrite(RELAY_WEST, LOW);
● case 2: //Single Axis (EW)
● digitalWrite(RELAY_NORTH, LOW);
● digitalWrite(RELAY_SOUTH, LOW);
● delayMicroseconds(1);
● }
● delay(2);
● }
●
● unsigned int readAngle_NS(){
● DO_NS = 0;
● digitalWrite(MAG_CS_NS, LOW);
● delayMicroseconds(1); //Waiting for Tclkfe
●
● //Passing 12 times, from 0 to 11
● for(int x=0; x<12; x++){
● digitalWrite(MAG_CLK_NS, LOW);
● delayMicroseconds(1); //Tclk/2
● digitalWrite(MAG_CLK_NS, HIGH);
● delayMicroseconds(1); //Tdo valid, like Tclk/2
● DO_NS = (DO_NS << 1) | digitalRead(MAG_NS); //shift MSB left and pass the pin state
● }
● digitalWrite(MAG_CS_NS, HIGH); //deselects the encoder from reading
● DO_NS = DO_NS * 0.0879;
● // Serial.println(DO_NS);
● return DO_NS;
● delayMicroseconds(1);
● }
●
● unsigned int readAngle_EW(){
● DO_EW = 0;
● digitalWrite(MAG_CS_EW, LOW);
● delayMicroseconds(1); //Tclkfe delay
●
● //Passing 12 times, from 0 to 11
● for(int x=0; x<12; x++){
● digitalWrite(MAG_CLK_EW, LOW);
● delayMicroseconds(1); //Tclk/2
● digitalWrite(MAG_CLK_EW, HIGH);
● delayMicroseconds(1); //Tdo valid, like Tclk/2
● DO_EW = (DO_EW << 1) | digitalRead(MAG_EW); //shift MSB left and pass the pin state
● }
● digitalWrite(MAG_CS_EW, HIGH); //deselects the encoder from reading
● DO_EW = DO_EW * 0.0879;
● // Serial.println(DO_EW);
● return DO_EW;
● delayMicroseconds(1); //Tcs delay
● }
●
● void solarpath(){
● decl = 23.45*sin((360/365)*(n-81)*conv);
● B = (360/364)*(n-91);
● E = 9.87*sin(2*B*conv)-7.53*cos(B*conv)-1.5*sin(B*conv);
● ST = hour_w + (4/60)*(120-longitude) + E/60;
● ha_deg = 15*(12 - ST);
● alt_deg =
asin(cos(lat*conv)*cos(decl*conv)*cos(ha_deg*conv)+sin(lat*conv)*sin(decl*conv))*(1/c onv);
● az_deg = asin((cos(decl*conv)*sin(ha_deg*conv))/cos(alt_deg*conv))*(1/conv);
● az_deg_corrected = az_deg;
●
● // Corrects for proper azimuth
● if(cos(ha_deg*conv) < tan(decl*conv)/tan(lat*conv)) {
● az_deg_corrected = 180 - az_deg;
● }
● if(az_deg_corrected > 180){
● az_deg_corrected = -180 - az_deg;
● }
●
● EW_tilt_deg = asin(cos(alt_deg*conv)*sin(az_deg_corrected*conv))*(1/conv);
● NS_tilt_deg = acos(sin(alt_deg*conv)/cos(EW_tilt_deg*conv))*(1/conv);
●
● //Move the Relays According to Solar Path
● if (readAngle_NS() < NS_tilt_deg){
● while(readAngle_NS() < NS_tilt_deg){
● SET_RELAYS(ON, OFF, OFF, OFF);
● }
● }
● else{
● while(readAngle_NS() > NS_tilt_deg){
● SET_RELAYS(OFF, ON, OFF, OFF);
● }
● }
●
● if (readAngle_EW() < EW_tilt_deg){
● while(readAngle_EW() < EW_tilt_deg){
● SET_RELAYS(OFF, OFF, OFF, ON);
● }
● }
● else{
● while(readAngle_EW() > EW_tilt_deg){
● SET_RELAYS(OFF, OFF, ON, OFF);
● }
● }
● }
●
● int pyranometer(){
● int irr = analogRead(Pyrano);
● return irradiance;
● }
●
● void check_mode(){
● if (digitalRead(MODE) == HIGH){
● if (mode == 3){
● mode = 0;
● }
● else{
● mode = mode + 1;
● }
● }
● delay(50);
● }
●
● void modeDisplays(){
● if (mode == 0){
● int EW_tilt = readAngle_EW();
● int NS_tilt = readAngle_NS();
● lcd.clear();
● lcd.setCursor(0,0);
● lcd.print("NS Tilt: " + String(NS_tilt));
● lcd.setCursor(0,1);
● lcd.print("EW Tilt: " + String(EW_tilt));
● }
● else if (mode == 1){
● int NS_tilt = readAngle_NS();
● lcd.clear();
● lcd.setCursor(0,0);
● lcd.print("SINGLE AXIS (NS)");
● lcd.setCursor(0,1);
● lcd.print("NS Tilt: " + String(NS_tilt));
● }
● else if (mode == 2){
● int EW_tilt = readAngle_EW();
● lcd.clear();
● lcd.setCursor(0,0);
● lcd.print("SINGLE AXIS (EW)");
● lcd.setCursor(0,1);
● lcd.print("EW Tilt: " + String(EW_tilt));
● }
● else if (mode == 3){
● lcd.clear();
● lcd.setCursor(0,0);
● lcd.print("Manual: N to S");
● lcd.setCursor(0,1);
● lcd.print(" <-(N) (S)->");
● menu = 12;