Concepts & Examples
ScreenOS Reference Guide
User Authentication
Release
6.3.0, Rev. 02
Published: 2012-12-10 Revision 02
Juniper Networks, Junos, Steel-Belted Radius, NetScreen, and ScreenOS are registered trademarks of Juniper Networks, Inc. in the United States and other countries. JunosE is a trademark of Juniper Networks, Inc. All other trademarks, service marks, registered trademarks, or registered service marks are the property of their respective owners.
Juniper Networks assumes no responsibility for any inaccuracies in this document. Juniper Networks reserves the right to change, modify, transfer, or otherwise revise this publication without notice.
Products made or sold by Juniper Networks or components thereof might be covered by one or more of the following patents that are owned by or licensed to Juniper Networks: U.S. Patent Nos. 5,473,599, 5,905,725, 5,909,440, 6,192,051, 6,333,650, 6,359,479, 6,406,312, 6,429,706, 6,459,579, 6,493,347, 6,538,518, 6,538,899, 6,552,918, 6,567,902, 6,578,186, and 6,590,785.
Copyright © 2009, Juniper Networks, Inc. All rights reserved.
Revision History
December 2012—Revision 02
Content subject to change. The information in this document is current as of the date listed in the revision history.
SOFTWARE LICENSE
The terms and conditions for using this software are described in the software license contained in the acknowledgment to your purchase order or, to the extent applicable, to any reseller agreement or end-user purchase agreement executed between you and Juniper Networks. By using this software, you indicate that you understand and agree to be bound by those terms and conditions.
Generally speaking, the software license restricts the manner in which you are permitted to use the software and may contain prohibitions against certain uses. The software license may state conditions under which the license is automatically terminated. You should consult the license for further details.
For complete product documentation, please see the Juniper Networks Website atwww.juniper.net/techpubs. END USER LICENSE AGREEMENT
The Juniper Networks product that is the subject of this technical documentation consists of (or is intended for use with) Juniper Networks software. Use of such software is subject to the terms and conditions of the End User License Agreement (“EULA”) posted at
http://www.juniper.net/support/eula.html. By downloading, installing or using such software, you agree to the terms and conditions of that EULA.
Abbreviated Table of Contents
About This Guide . . . xv
Part 1
auth
Chapter 1 Authentication . . . 3Chapter 2 Authentication Servers . . . 15
Chapter 3 Infranet Authentication . . . 45
Chapter 4 Authentication Users . . . 53
Chapter 5 IKE, XAuth, and L2TP Users . . . 73
Chapter 6 Extensible Authentication for Wireless and Ethernet Interfaces . . . 95
Part 2
Index
Index . . . 111Table of Contents
About This Guide . . . xv
Document Conventions . . . xvi
Document Feedback . . . xviii
Requesting Technical Support . . . xviii
Part 1
auth
Chapter 1 Authentication . . . 3User Authentication Types . . . 3
Admin Users . . . 4
Handling Admin Authentication Failures . . . 5
WebUI . . . 6
CLI . . . 6
Clearing the Admin Lock . . . 6
WebUI . . . 6
CLI . . . 6
Multiple-Type Users . . . 6
Group Expressions . . . 7
Example: Group Expressions (AND) . . . 8
WebUI . . . 9
CLI . . . 9
Example: Group Expressions (OR) . . . 10
WebUI . . . 10
CLI . . . 10
Example: Group Expressions (NOT) . . . 11
WebUI . . . 11
CLI . . . 11
Banner Customization . . . 12
Example: Customizing a WebAuth Banner . . . 12
WebUI . . . 12
CLI . . . 12
Login Banner . . . 12
Example: Creating a Login Banner . . . 13
Chapter 2 Authentication Servers . . . 15
Authentication Server Types . . . 15
Local Database . . . 17
Example: Local Database Timeout . . . 18
WebUI . . . 18
External Authentication Servers . . . 18
Auth Server Object Properties . . . 19
Auth Server Types . . . 20
Remote Authentication Dial-In User Service . . . 21
RADIUS Auth Server Object Properties . . . 21
Supported User Types and Features . . . 22
RADIUS Dictionary File . . . 23
RADIUS Access Challenge . . . 24
Supported RADIUS Enhancements for Auth and XAuth Users . . . 26
SecurID . . . 29
SecurID ACE Server Cluster . . . 30
Multiple Server Cluster Instances . . . 30
SecurID Auth Server Object Properties . . . 30
Supported User Types and Features . . . 31
Lightweight Directory Access Protocol . . . 31
LDAP Auth Server Object Properties . . . 32
Supported User Types and Features . . . 32
Terminal Access Control Access Control System Plus (TACACS+) . . . 33
TACACS+Server Object Properties . . . 34
Prioritizing Admin Authentication . . . 34
Defining Auth Server Objects . . . 35
Example: RADIUS Auth Server . . . 35
WebUI . . . 36
CLI . . . 36
Example: SecurID Auth Server . . . 37
WebUI . . . 38
CLI . . . 38
Example: LDAP Auth Server . . . 38
WebUI . . . 39
CLI . . . 39
Example: TACACS+ Auth Server . . . 39
WebUI . . . 40
CLI . . . 40
Defining Default Auth Servers . . . 41
Example: Changing Default Auth Servers . . . 41
WebUI . . . 42
CLI . . . 42
Configuring a Separate External Accounting Server . . . 42
Example: Configuring a Separate Accounting Server . . . 42
Chapter 3 Infranet Authentication . . . 45
Unified Access Control Solution . . . 45
How the Security Device Works with the Infranet Controller . . . 47
Dynamic Auth Table Allocation . . . 49
Supporting a Unified Access Control Solution in a Virtual System Configuration . . . 49
Viewing the Configuration of an Infranet Controller Instance . . . 51
WebUI . . . 51
CLI . . . 51
Chapter 4 Authentication Users . . . 53
Referencing Auth Users in Policies . . . 53
Run-Time Authentication . . . 53
Pre-Policy Check Authentication (WebAuth) . . . 54
WebUI . . . 55
CLI . . . 55
Referencing Auth User Groups in Policies . . . 55
Example: Run-Time Authentication (Local User) . . . 56
WebUI . . . 56
CLI . . . 57
Example: Run-Time Authentication (Local User Group) . . . 58
WebUI . . . 58
CLI . . . 59
Example: Run-Time Authentication (External User) . . . 59
WebUI . . . 59
CLI . . . 60
Example: Run-Time Authentication (External User Group) . . . 61
RADIUS Server . . . 61
WebUI . . . 62
CLI . . . 62
Example: Local Auth User in Multiple Groups . . . 63
WebUI . . . 63
CLI . . . 65
Example: WebAuth (Local User Group) . . . 65
WebUI . . . 65
CLI . . . 66
Example: WebAuth (External User Group) . . . 66
RADIUS Server . . . 67
WebUI . . . 67
CLI . . . 68
Example: WebAuth + SSL Only (External User Group) . . . 68
RADIUS Server . . . 69
WebUI . . . 70
CLI . . . 71
Chapter 5 IKE, XAuth, and L2TP Users . . . 73
IKE Users and User Groups . . . 73
Example: Defining IKE Users . . . 74
WebUI . . . 74
CLI . . . 75
Example: Creating an IKE User Group . . . 75
WebUI . . . 75
CLI . . . 75 Table of Contents
Referencing IKE Users in Gateways . . . 76
XAuth Users and User Groups . . . 76
Event Logging for IKE Mode . . . 77
XAuth Users in IKE Negotiations . . . 77
Example: XAuth Authentication (Local User) . . . 79
Example: XAuth Authentication (Local User Group) . . . 80
Example: XAuth Authentication (External User) . . . 82
Example: XAuth Authentication (External User Group) . . . 83
Example: XAuth Authentication and Address Assignments (Local User Group) . . . 86
XAuth Client . . . 89
Example: Security Device as an XAuth Client . . . 90
L2TP Users and User Groups . . . 90
Example: Local and External L2TP Auth Servers . . . 91
WebUI . . . 92
CLI . . . 93
Chapter 6 Extensible Authentication for Wireless and Ethernet Interfaces . . . 95
Overview . . . 95
Supported EAP Types . . . 96
Enabling and Disabling 802.1X Authentication . . . 96
Ethernet Interfaces . . . 96 WebUI . . . 96 CLI . . . 96 Wireless Interfaces . . . 97 WebUI . . . 97 CLI . . . 97 Configuring 802.1X Settings . . . 97
Configuring 802.1X Port Control . . . 98
WebUI . . . 98
CLI . . . 98
Configuring 802.1X Control Mode . . . 98
WebUI . . . 99
CLI . . . 99
Setting the Maximum Number of Simultaneous Users . . . 99
WebUI . . . 99
CLI . . . 99
Configuring the Reauthentication Period . . . 99
WebUI . . . 100
CLI . . . 100
Enabling EAP Retransmissions . . . 100
WebUI . . . 100
CLI . . . 100
Configuring EAP Retransmission Count . . . 100
WebUI . . . 100
CLI . . . 100
Configuring the Silent (Quiet) Period . . . 101
WebUI . . . 101
CLI . . . 101
Configuring Authentication Server Options . . . 101
Specifying an Authentication Server . . . 102
Ethernet Interfaces . . . 102
Wireless Interfaces . . . 102
Setting the Account Type . . . 102
WebUI . . . 102
CLI . . . 103
Enabling Zone Verification . . . 103
WebUI . . . 103
CLI . . . 103
Viewing 802.1X Information . . . 103
Viewing 802.1X Global Configuration Information . . . 103
Viewing 802.1X Information for an Interface . . . 104
Viewing 802.1X Statistics . . . 104
WebUI . . . 104
CLI . . . 104
Viewing 802.1X Session Statistics . . . 105
Viewing 802.1X Session Details . . . 105
Configuration Examples . . . 105
Configuring the Security Device with a Directly Connected Client and RADIUS Server . . . 105
Configuring a Security Device with a Hub Between a Client and the Security Device . . . 106
Configuring the Authentication Server with a Wireless Interface . . . 107
Part 2
Index
Index . . . 111List of Figures
About This Guide . . . xv
Figure 1: Images in Illustrations . . . xviii
Part 1
auth
Chapter 1 Authentication . . . 3Figure 2: Authentication During L2TP-over-IPsec VPN Tunnel . . . 4
Figure 3: Admin Authentication Process . . . 5
Chapter 2 Authentication Servers . . . 15
Figure 4: Types of Authentication Servers . . . 17
Figure 5: Local Authentication . . . 17
Figure 6: External Auth Server . . . 19
Figure 7: Auth Server Object Properties . . . 20
Figure 8: Admin Timeout Property . . . 20
Figure 9: Using RADIUS as an External Auth Server . . . 21
Figure 10: RADIUS Access-Challenge Sequence . . . 25
Figure 11: SecurID Token . . . 29
Figure 12: LDAP Hierarchical Structure . . . 32
Figure 13: Authenticating to a TACACS+ Server . . . 33
Figure 14: RADIUS Backup Example . . . 36
Figure 15: SecurID Backup Example . . . 38
Figure 16: LDAP Backup Example . . . 39
Figure 17: TACACS+ Backup Example . . . 40
Chapter 3 Infranet Authentication . . . 45
Figure 18: Deploying the Infranet Enforcer with Unified Access Control . . . 46
Chapter 4 Authentication Users . . . 53
Figure 19: Policy Lookup for a User . . . 54
Figure 20: WebAuth Example . . . 54
Figure 21: Auth User Groups . . . 56
Chapter 5 IKE, XAuth, and L2TP Users . . . 73
Figure 22: Phases 1 and 2 Rekey Operations and XAuth IP Address Lifetime . . . 78
Figure 23: Authenticating Users with L2TP . . . 91
Figure 24: Local and External L2TP Servers . . . 92
Chapter 6 Extensible Authentication for Wireless and Ethernet Interfaces . . . 95
Figure 25: Security Device with a Directly Connected Client and RADIUS Server . . . 106
Figure 26: Security Device with a Hub Between a Client and the Security Device . . . 107
List of Tables
Part 1
auth
Chapter 1 Authentication . . . 3
Table 1: Group Expression Examples . . . 8
Chapter 2 Authentication Servers . . . 15
Table 2: Authentication Server Type, User Types, and Features . . . 16
Table 3: Auth Server Object Properties . . . 19
Table 4: Radius Auth Server Object Properties . . . 21
Table 5: XAuth Attribute Support . . . 22
Table 6: RADIUS Dictionary File Contents . . . 23
Table 7: Supported Attributes . . . 27
Table 8: SecurID Auth Server Object Properties . . . 30
Table 9: LDAP Auth Server Object Properties . . . 32
Table 10: TACACS+Server Object Properties . . . 34
Chapter 6 Extensible Authentication for Wireless and Ethernet Interfaces . . . 95
Table 11: EAP Types . . . 96
About This Guide
User Authentication describes the methods in ScreenOS for authenticating different types of users. It provides an introduction to user authentication, presents the two locations that can store user profiles—the internal database and an external
authentication server—and provides numerous examples for configuring authentication, IKE, XAuth, and L2TP users and user groups. Some other aspects of user authentication are also covered, such as changing login banners, creating multiple-type users (such as an IKE/XAuth user, for example), and using group expressions in policies applying authentication.
This volume contains the following chapters:
• “Authentication” on page 3details the various authentication methods and uses that ScreenOS supports.
• “Authentication Servers” on page 15presents the options of using one of four possible types of external authentication server—RADIUS, SecurID, TACACS+, or LDAP—or the internal database and shows how to configure the security device to work with each type.
• “Infranet Authentication” on page 45details how the security device is deployed in a unified access control (UAC) solution. Juniper Networks UAC secures and ensures the delivery of applications and services across an enterprise infranet.
• “Authentication Users” on page 53explains how to define profiles for authentication users and how to add them to user groups stored either locally or on an external RADIUS authentication server.
• “IKE, XAuth, and L2TP Users” on page 73explains how to define IKE, XAuth, and L2TP users. Although the XAuth section focuses primarily on using the security device as an XAuth server, it also includes a subsection on configuring select security devices to act as an XAuth client.
• “Extensible Authentication for Wireless and Ethernet Interfaces” on page 95explains the options available for and examples of how to use the Extensible Authentication Protocol to provide authentication for Ethernet and wireless interfaces.
• Document Conventions on page xvi
• Document Feedback on page xviii
Document Conventions
This document uses the conventions described in the following sections: • Web User Interface Conventions on page xvi
• Command Line Interface Conventions on page xvi
• Naming Conventions and Character Types on page xvii
• Illustration Conventions on page xvii Web User Interface
Conventions
The Web user interface (WebUI) contains a navigational path and configuration settings. To enter configuration settings, begin by clicking a menu item in the navigation tree on the left side of the screen. As you proceed, your navigation path appears at the top of the screen, with each page separated by angle brackets.
The following example shows the WebUI path and parameters for defining an address: Policy > Policy Elements > Addresses > List > New: Enter the following, then clickOK:
Address Name: addr_1 IP Address/Domain Name:
IP/Netmask: (select), 10.2.2.5/32 Zone: Untrust
To open Online Help for configuration settings, click the question mark (?) in the upper right of the screen.
The navigation tree also provides a Help > Config Guide configuration page to help you configure security policies and Internet Protocol Security (IPSec). Select an option from the list, and follow the instructions on the page. Click the?character in the upper right for Online Help on the Config Guide.
Command Line Interface Conventions
The following conventions are used to present the syntax of command line interface (CLI) commands in text and examples.
In text, commands are inboldfacetype and variables are initalictype. In examples:
• Variables are initalictype.
• Anything inside square brackets [ ] is optional. • Anything inside braces { } is required.
• If there is more than one choice, each choice is separated by a pipe ( | ). For example, the following command means “set the management options for the ethernet1, the ethernet2,orthe ethernet3 interface”:
NOTE: When entering a keyword, you only have to type enough letters to identify the word uniquely. Typingset adm u whee j12fmt54will enter the commandset admin user wheezer j12fmt54. However, all the commands documented in this guide are presented in their entirety.
Naming Conventions and Character Types
ScreenOS employs the following conventions regarding the names of objects—such as addresses, admin users, auth servers, IKE gateways, virtual systems, VPN tunnels, and zones—defined in ScreenOS configurations:
• If a name string includes one or more spaces, the entire string must be enclosed within double quotes; for example:
set address trust “local LAN” 10.1.1.0/24
• Any leading spaces or trailing text within a set of double quotes are trimmed; for example,“local LAN ” becomes“local LAN”.
• Multiple consecutive spaces are treated as a single space.
• Name strings are case-sensitive, although many CLI keywords are case-insensitive. For example,“local LAN”is different from“local lan”.
ScreenOS supports the following character types:
• Single-byte character sets (SBCS) and multiple-byte character sets (MBCS). Examples of SBCS are ASCII, European, and Hebrew. Examples of MBCS—also referred to as double-byte character sets (DBCS)—are Chinese, Korean, and Japanese.
• ASCII characters from 32 (0x20 in hexadecimals) to 255 (0xff), except double quotes ( “), which have special significance as an indicator of the beginning or end of a name string that includes spaces.
NOTE: A console connection only supports SBCS. The WebUI supports both SBCS and MBCS, depending on the character sets that your browser supports.
Illustration Conventions
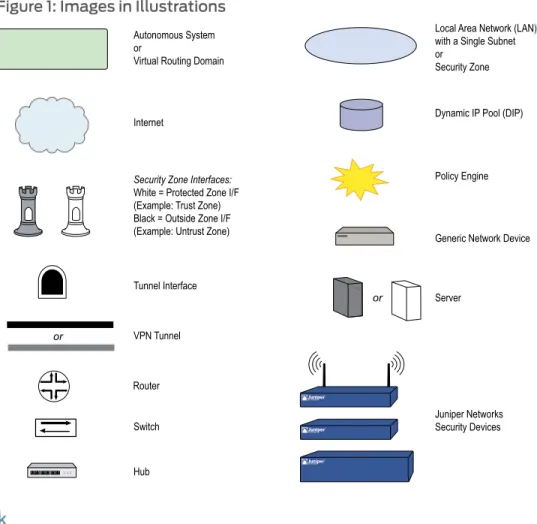
Figure 1 on page xviiishows the basic set of images used in illustrations throughout this volume.
Figure 1: Images in Illustrations
Document Feedback
If you find any errors or omissions in this document, contact Juniper Networks at
Requesting Technical Support
Technical product support is available through the Juniper Networks Technical Assistance Center (JTAC). If you are a customer with an active J-Care or JNASC support contract, or are covered under warranty, and need postsales technical support, you can access our tools and resources online or open a case with JTAC.
• JTAC policies—For a complete understanding of our JTAC procedures and policies, review theJTAC User Guidelocated at
http://www.juniper.net/customers/support/downloads/710059.pdf. • Product warranties—For product warranty information, visit
Self-Help Online Tools and Resources
For quick and easy problem resolution, Juniper Networks has designed an online self-service portal called the Customer Support Center (CSC) that provides you with the following features:
• Find CSC offerings—http://www.juniper.net/customers/support/
• Search for known bugs—Find product
documentation—http://www.juniper.net/techpubs/
• Find solutions and answer questions using our Knowledge Base—http://kb.juniper.net/
• Download the latest versions of software and review your release notes—
http://www.juniper.net/customers/csc/software/
• Search technical bulletins for relevant hardware and software notifications—
http://www.juniper.net/alerts/
• Join and participate in the Juniper Networks Community Forum—
http://www.juniper.net/company/communities/
• Open a case online in the CSC Case Manager—
http://www.juniper.net/customers/cm/
• To verify service entitlement by product serial number, use our Serial Number Entitlement (SNE) Tool—
https://tools.juniper.net/SerialNumberEntitlementSearch/
Opening a Case with JTAC
You can open a case with JTAC on the Web or by telephone.
• Use the Case Manager tool in the CSC athttp://www.juniper.net/customers/cm/. • Call 1-888-314-JTAC (1-888-314-5822—toll free in USA, Canada, and Mexico). For international or direct-dial options in countries without toll-free numbers, visit us at
http://www.juniper.net/customers/support/requesting-support/.
PART 1
auth
• Authentication on page 3
• Authentication Servers on page 15
• Infranet Authentication on page 45
• Authentication Users on page 53
• IKE, XAuth, and L2TP Users on page 73
CHAPTER 1
Authentication
After a general introduction to the different types of authentication that are available for different types of network users, this chapter contains a brief section on admin user authentication. It then provides information on combining different user types, the use of group expressions, and how to customize the banners that appear on HTTP, FTP, L2TP, Telnet, and XAuth login prompts. The final section describes how to create a large, 4Kbyte banner that pre-empts all individually defined administrative access and firewall authentication banners. This chapter contains the following sections:
• User Authentication Types on page 3
• Admin Users on page 4
• Multiple-Type Users on page 6
• Group Expressions on page 7
• Banner Customization on page 12
• Login Banner on page 12
User Authentication Types
The following chapters describe the different types of users and user groups that you can create and how to use them when configuring policies, IKE gateways, and L2TP tunnels:
• “Authentication Users” on page 53
• “IKE Users and User Groups” on page 73
• “XAuth Users and User Groups” on page 76
• “L2TP Users and User Groups” on page 90
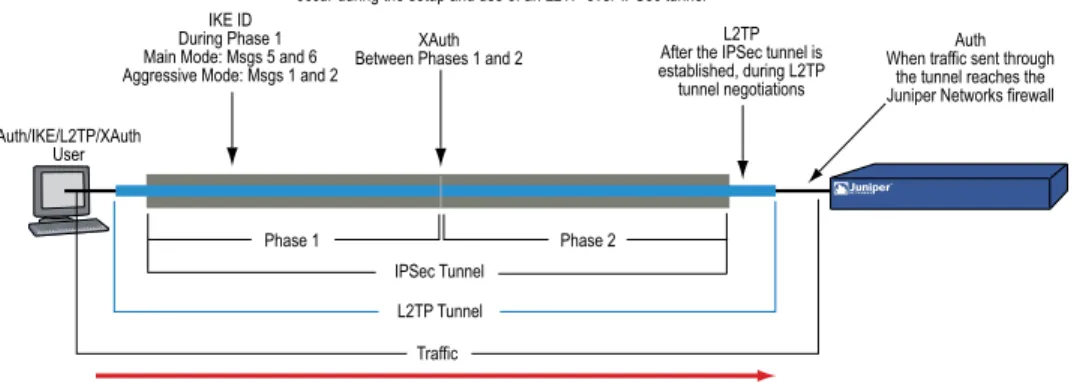
The security device authenticates the different types of users at different stages in the connection process. IKE, XAuth, L2TP, and auth user authentication techniques occur at different times during the creation of an L2TP-over-IPsec VPN tunnel. SeeFigure 2 on page 4.
Figure 2: Authentication During L2TP-over-IPsec VPN Tunnel
Admin Users
Admin users are the administrators of a security device. There are five kinds of admin users:
• Root admin
• Root-level read/write admin • Root-level read-only admin • Vsys admin
• Vsys read-only admin
NOTE: For information about the privileges of each type of admin user and for examples of the creation, modification, and removal of admin users, see Administration.
Although the profile of the root user of a security device must be stored in the local database, you can store vsys users and root-level admin users with read/write and read-only privileges either in the local database or on an external auth server.
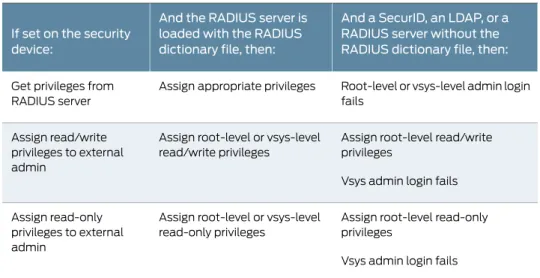
If you store admin user accounts on an external RADIUS auth server and you load the RADIUS dictionary file on the auth server, you can elect to query admin privileges defined on the server. Optionally, you can specify a privilege level to be applied globally to all admin users stored on that auth server. You can specify either read/write or read-only privileges. If you store admin users on an external SecurID or LDAP auth server, or on a RADIUS server without the RADIUS dictionary file, you cannot define their privilege
attributes on the auth server. Therefore, you must assign a privilege level to them on the security device.
And a SecurID, an LDAP, or a RADIUS server without the RADIUS dictionary file, then: And the RADIUS server is
loaded with the RADIUS dictionary file, then: If set on the security
device:
Root-level or vsys-level admin login fails
Assign appropriate privileges Get privileges from
RADIUS server
Assign root-level read/write privileges
Vsys admin login fails Assign root-level or vsys-level
read/write privileges Assign read/write
privileges to external admin
Assign root-level read-only privileges
Vsys admin login fails Assign root-level or vsys-level
read-only privileges Assign read-only
privileges to external admin
Figure 3 on page 5shows the admin authentication process.
Figure 3: Admin Authentication Process
Handling Admin Authentication Failures
You must be a root admin user to configure this feature. To minimize the chances of an unauthorized user will log into a device, you can limit the number of unsuccessful login attempts allowed and lock the unauthorized user’s account for a specified period if the unsuccessful login attempts exceed the limit.
This restriction also protects against certain types of attacks such as automated dictionary attacks. By default, the device allows up to three unsuccessful login attempts and has a lockout time of one minute. The security device automatically unlocks the locked user account after the period expires. When the lockout time is set to0, the security device locks the user account permanently. However, a root administrator or a read-write security administrator can unlock the account.
In this example, you set the maximum number of authentication failures5and the user account lockout time to60minutes.
To set the number of login attempts and the lockout time: WebUI
Configuration > Admin > Management: Enter the following, then clickApply: Max Login Attempts: 5
Lock the Admin accounts on authentication failure: 60 CLI
set admin access attempts 5 set admin access lock-on-failure 60 save
When the authentication attempt fails for the fifth successive time, the security device prevents the admin user from accessing the device and locks the user account for 60 minutes. You can lock the user account for a maximum of 1440 minutes.
NOTE: Only a root admin can set the maximum number of login attempts. However, a root admin or a read-write admin with security role attribute can unlock the locked user account.
Clearing the Admin Lock
Only a root administrator can unlock a locked admin user's account. To unlock the user account:
WebUI
Configuration > Admin > Administrators: In the Admin Name field, enter the username, then click Clear.
CLI
clear admin lock name_str
Multiple-Type Users
You can combine auth, IKE, L2TP, XAuth users to create the following combinations to store on the local database:
• Auth/IKE user • Auth/IKE/XAuth user • Auth/L2TP user • IKE/XAuth user • Auth/IKE/L2TP user • L2TP/XAuth user • IKE/L2TP user
• Auth/XAuth user
• Auth/IKE/L2TP/XAuth user
Although you can make all of the above combinations when defining multiple-type user accounts on the local database, consider the following points before creating them: • Combining an IKE user type with any other user type limits the potential to scale. You
must store an IKE user account on the local database. If you create auth/IKE, IKE/L2TP, and IKE/XAuth user accounts and then the number of users grows beyond the capacity of the local database, you will not be able to relocate these accounts to an external auth server. If you separate IKE user accounts from other types of accounts, you have the flexibility to move the non-IKE user accounts to an external auth server should the need arise to do so.
• L2TP and XAuth provide the same services: remote user authentication and IP, DNS server, and WINS server address assignments. It is not recommended to use L2TP and XAuth together for an L2TP-over-IPsec tunnel. Not only do the two protocols
accomplish the same goals, but the L2TP address assignments overwrite the XAuth address assignments after Phase 2 IKE negotiations complete and L2TP negotiations take place.
• If you create a multiple-type user account on the local database combining auth/L2TP or auth/XAuth, the same username and password must be used for both logins. Although it is more convenient to create a single multiple-type user account, separating the user types into two single accounts allows you to increase security. For example, you can store an auth user account on an external auth server and an XAuth user account on the local database. You can then assign different login usernames and passwords to each account and reference the XAuth user in the IKE gateway
configuration and the auth user in the policy configuration. The dialup VPN user must authenticate himself twice, potentially with two completely different usernames and passwords.
Group Expressions
A group expression is a statement that you can use in policies to conditionalize the requirements for authentication. Group expressions allow you to combine users, user groups, or other group expressions as alternatives for authentication (“a” OR “ b” ), or as requirements for authentication (“ a” AND “ b” ). You can also use group expressions to exclude a user, user group, or another group expression (NOT “ c” ).
NOTE: Although you define group expressions on the security device (and store them on the local database), the users and user groups that you reference in the group expressions must be stored on an external RADIUS server. A RADIUS server allows a user to belong to more than one user group. The local database does not permit this.
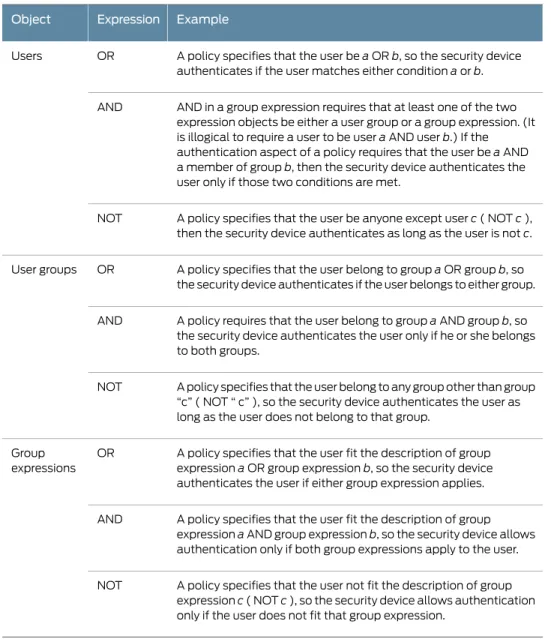
Group expressions make use of the three operators OR, AND, and NOT. The objects in the expression to which OR, AND, and NOT relate can be an auth user, an auth user group,
or a previously defined group expression.Table 1 on page 8lists objects, group expressions, and examples.
Table 1: Group Expression Examples
Example Expression
Object
A policy specifies that the user beaORb, so the security device authenticates if the user matches either conditionaorb. OR
Users
AND in a group expression requires that at least one of the two expression objects be either a user group or a group expression. (It is illogical to require a user to be useraAND userb.) If the authentication aspect of a policy requires that the user beaAND a member of groupb, then the security device authenticates the user only if those two conditions are met.
AND
A policy specifies that the user be anyone except userc( NOTc), then the security device authenticates as long as the user is notc. NOT
A policy specifies that the user belong to groupaOR groupb, so the security device authenticates if the user belongs to either group. OR
User groups
A policy requires that the user belong to groupaAND groupb, so the security device authenticates the user only if he or she belongs to both groups.
AND
A policy specifies that the user belong to any group other than group “c” ( NOT “ c” ), so the security device authenticates the user as long as the user does not belong to that group.
NOT
A policy specifies that the user fit the description of group expressionaOR group expressionb, so the security device authenticates the user if either group expression applies. OR
Group expressions
A policy specifies that the user fit the description of group expressionaAND group expressionb, so the security device allows authentication only if both group expressions apply to the user. AND
A policy specifies that the user not fit the description of group expressionc( NOTc), so the security device allows authentication only if the user does not fit that group expression.
NOT
Example: Group Expressions (AND)
In this example, you create a group expression “s+m” that states “ sales AND marketing” . You have previously created the auth user groups “ sales” and “ marketing” on an external RADIUS auth server named “ radius1” and populated them with users. (For an example on how to configure an external RADIUS auth server, see“Example: RADIUS Auth Server” on page 35.) You then use that group expression in an intrazone policy whose
authentication component requires a user be a member of both user groups to be able to access the confidential contents on a server named “ project1” (10.1.1.70).
NOTE: For an intrazone policy to work properly, the source and destination addresses must be in different subnets connected to the security device through interfaces that are both bound to the same zone. There cannot be any other routing device beside the security device that can route traffic between the two addresses. For more information about intrazone policies, see Policies.
WebUI
1. Address
Policy > Policy Elements > Addresses > List > New: Enter the following, then clickOK:
Address Name: project1 IP Address/Domain Name:
IP/Netmask: (select), 10.1.1.70/32 Zone: Trust
2. Group Expression
Policy > Policy Elements > Group Expressions > New: Enter the following, then click
OK:
Group Expression: s+m
AND: (select), sales AND marketing 3. Policy
Policy > Policies > (From: Trust, To: Trust) New: Enter the following, then clickOK:
Source Address:
Address Book Entry: (select), Any Destination Address:
Address Book Entry: (select), project1 Service: ANY
Action: Permit
Position at Top: (select)
> Advanced: Enter the following, then clickReturnto set the advanced options and return to the basic configuration page:
Authentication: (select) Auth Server: (select)
Use: radius1
Group Expression: (select), External Group Expression - s+m
CLI
1. Address
set address trust project1 10.1.1.70/32 2. Group Expression
set group-expression s+m sales and marketing 3. Policy
set policy top from trust to trust any project1 any permit auth server radius1 group-expression s+m
save
Example: Group Expressions (OR)
In this example, you create a group expression “a/b” that states “ amy OR basil” . You have previously created auth user accounts “ amy” and “ basil” on an external RADIUS auth server named “ radius1.” (For an example on how to configure an external RADIUS auth server, see“Example: RADIUS Auth Server” on page 35.) You then use that group expression in a policy from the Trust zone to the DMZ. The authentication component of the policy requires the user to be either amy or basil to be able to access the Web server named “ web1” at 210.1.1.70.
WebUI
1. Address
Policy > Policy Elements > Addresses > List > New: Enter the following, then clickOK:
Address Name: web1 IP Address/Domain Name
IP/Netmask: (select), 210.1.1.70/32 Zone: DMZ
2. Group Expression
Policy > Policy Elements > Group Expressions > New: Enter the following, then click
OK:
Group Expression: a/b OR: (select), amy OR basil 3. Policy
Policy > Policies > (From: Trust, To: DMZ) New: Enter the following, then clickOK:
Source Address:
Address Book Entry: (select), Any Destination Address:
Address Book Entry: (select), web1 Service: ANY
Action: Permit
Position at Top: (select)
> Advanced: Enter the following, then clickReturnto set the advanced options and return to the basic configuration page:
Authentication: (select) Auth Server: (select)
Use: radius1
Group Expression: (select), External Group Expression - a/b CLI
2. Group Expression
set group-expression a/b amy or basil 3. Policy
set policy top from trust to dmz any web1 any permit auth server radius1 group-expression
a/b save
Example: Group Expressions (NOT)
In this example, you create a group expression “-temp” that states “ NOT temp” . You have previously created a local auth user group “ temp” on an external RADIUS auth server named “ radius1.” (For an example on how to configure an external RADIUS auth server, see“Example: RADIUS Auth Server” on page 35.) You then use that group expression in a policy from the Trust zone to the Untrust zone that allows Internet access to all full-time employees, but not to temporary contractors. The authentication component of the policy requires everyone in the Trust zone to be authenticated except the users in “ temp,” who are denied access to the Untrust zone.
WebUI
1. Group Expression
Policy > Policy Elements > Group Expressions > New: Enter the following, then click
OK:
Group Expression: -temp OR: (select), NOT temp 2. Policy
Policy > Policies > (From: Trust, To: Untrust) New: Enter the following, then clickOK:
Source Address:
Address Book Entry: (select), Any Destination Address:
Address Book Entry: (select), Any Service: HTTP
Action: Permit
Position at Top: (select)
> Advanced: Enter the following, then clickReturnto set the advanced options and return to the basic configuration page:
Authentication: (select) Auth Server: (select)
Use: Local
Group Expression: (select), External Group Expression - -temp
CLI
1. Group Expression
set group-expression -temp not temp
2. Policy
set policy top from trust to untrust any any any permit auth server radius1 group-expression -temp
save
Banner Customization
A banner is a message that appears on a monitor in different places depending on the type of login:
• At the top of a Telnet or console display when an admin user connects to the security device
NOTE: You can include an additional banner line under a Telnet or console banner. The second banner line remains the same for both Telnet and console login displays although the Telnet banner can differ from the console banner. To create a secondary banner, enter the following command:set admin auth banner secondarystring.
• At the top of a browser screen after an auth user has successfully logged into a WebAuth address
• Before or after a Telnet, an FTP, or an HTTP login prompt, success message, and fail message for auth users
All of the banners, except that for a console login, already have default messages. You can customize the messages that appear on the banners to better suit the network environment in which you use the security device.
Example: Customizing a WebAuth Banner
In this example, you change the message that appears in the browser to indicate that an auth user has successfully authenticated himself after successfully logging in via WebAuth. The new message is “Authentication approved.”
WebUI
Configuration > Admin > Banners > WebAuth: In the Success Banner field, type Authentication approved, then clickApply.
CLI
set webauth banner success “Authentication approved” save
Login Banner
The size of the login banner is increased to a maximum of 4Kbytes. This provides space for terms of use statements, which are presented before administrators and authenticated
must be calledusrterms.txt. You activate the banner by restarting of the system. If the banner file is greater than 4Kbytes, the security device will not accept it and will continue using existing banners entered through the CLI and the WebUI.
When activated, the login banner is used globally by the root system and all virtual systems (vsys). You cannot differentiate or customize between or within a vsys. The login banner pre-empts all individually defined administrative access banners and firewall authentication banners. After entering a username and password, the user must click theLoginbutton. Pressing theEnterkey will not log the user into the device.
Example: Creating a Login Banner
Use the SCP utility to securely copy the banner file to the security device. With the following command, an administrator with usernamenetscreencopies the banner file
my_large_banner.txtto a security device at IP address 1.1.1.2. The banner file must be saved on the security device asusrterms.txt.
linux:~#scp my_large_banner.txt [email protected]:useterms.txt
You must restart the device to activate the new banner. To modify the banner file, create a new file and overwrite the existing one with the new one.
To remove the banner, issue the following command on the security device:
device-> delete file usrterms.txt
This disables the login banner feature after you restart the device.
CHAPTER 2
Authentication Servers
This chapter examines different kinds of authentication servers—the local database built into every security device, and external RADIUS, SecurID, and LDAP authentication servers. This chapter includes the following sections:
• Authentication Server Types on page 15
• Local Database on page 17
• External Authentication Servers on page 18
• Auth Server Types on page 20
• Prioritizing Admin Authentication on page 34
• Defining Auth Server Objects on page 35
• Defining Default Auth Servers on page 41
• Configuring a Separate External Accounting Server on page 42
Authentication Server Types
You can configure the security device to use the local database or one or more external authentication servers to verify the identities of the following types of users:
• Auth • IKE • L2TP • XAuth • Admin • 802.1x
NOTE: IKE user accounts must be stored on the local database. The only external server to support L2TP and XAuth remote setting assignments and admin privilege assignments is RADIUS.
In addition to its local database, a security device supports external RADIUS, SecurID, LDAP, and TACACS+ servers. You can use each kind of authentication server to
authenticate auth users, L2TP users, XAuth users, and admin users. ScreenOS also supports WebAuth, an alternative authentication scheme for auth users. (For a WebAuth example, see“Example: WebAuth + SSL Only (External User Group)” on page 68.) Any auth server that contains auth user account types is eligible to be the default WebAuth auth server.Table 2 on page 16lists supported servers types and authentication features.
Table 2: Authentication Server Type, User Types, and Features
Supported User Types and Features
Server Type Group Expressions User Groups Admin Users XAuth Users L2TP Users IKE Users Auth
Users Auth Privileges
Remote Settings Auth Remote Settings Auth X X X X X X X X X Local X X X X X X X X X RADIUS X X X X SecurID X X X X LDAP X X TACACS+
On most Juniper Networks security devices, you can simultaneously employ up to 10 primary authentication servers per system—root system and virtual system—in any combination of types. This total includes the local database and excludes backup authentication servers. A RADIUS or LDAP server supports two backup servers, and a SecurID server supports one backup server; so, for example, you might use the local database and nine different primary RADIUS servers, with each RADIUS server having two backup servers assigned to it. SeeFigure 4 on page 17.
Figure 4: Types of Authentication Servers
The following sections explain the local database and each authentication server in detail.
Local Database
All Juniper Networks security devices support a built-in user database for authentication. When you define a user on the security device, the security device enters the username and password in its local database. SeeFigure 5 on page 17.
Figure 5: Local Authentication
The local database supports the following types of users and authentication features: • Users: • Auth • IKE • L2TP • XAuth • Admin • 802.1x
• Authentication features:
• Admin privileges
• WebAuth
• User groups
• Group expressions
NOTE: You define the group expressions on the security device, but the users and user groups must be stored on an external RADIUS auth server. For more information about group expressions, see“Group Expressions” on page 7.
The local database is the default authentication server (auth server) for all types of authentication. For instructions on how to add users and user groups to the local database via the WebUI and CLI, see“Authentication Users” on page 53and“IKE, XAuth, and L2TP Users” on page 73.
Example: Local Database Timeout
By default, the local database authentication timeout for both admins and auth users is 10 minutes. In this example, you change it to never time out for admins and to time out after 30 minutes for auth users.
WebUI
Configuration > Admin > Management: Clear the Enable Web Management Idle Timeout check box, then clickApply.
Configuration > Auth > Servers > Edit (for Local): Enter30in the Timeout field, then click Apply.
CLI
set admin auth web timeout 0 set auth-server Local timeout 30 save
External Authentication Servers
A security device can connect to one or more external authentication servers, orauth servers, on which you store user accounts. When the security device receives a connection request that requires authentication verification, the security device requests an authentication check from the external auth server specified in the policy, L2TP tunnel configuration, or IKE gateway configuration. The security device then acts as a relay between the user requesting authentication and the auth server granting authentication.
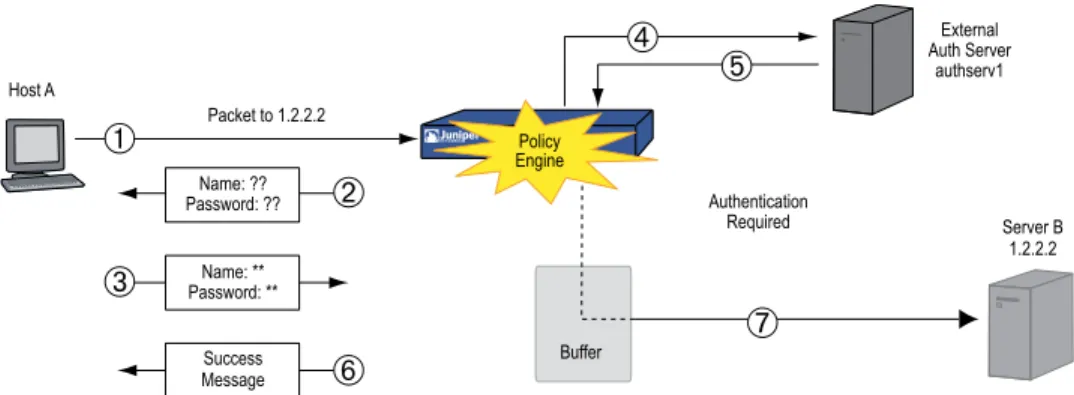
Figure 6 on page 19shows the steps to a successful authentication check by an external auth server.
Figure 6: External Auth Server
1. Host A sends an FTP, an HTTP, or a Telnet TCP SYN packet to 1.2.2.2.
2. The security device intercepts the packet, notes that its corresponding policy requires authentication from authserv1, buffers the packet, and prompts the user for a username and password.
3. The user replies with a username and password.
4. The security device relays the login information to authserv1.
5. Authserv1 sends back a notification of success to the security device.
6. The security device informs the auth user of his or her login success.
7. The security device then forwards the packet from its buffer to its destination of 1.2.2.2.
Auth Server Object Properties
A security device treats each auth server as an object that it can reference in policies, IKE gateways, and L2TP tunnels. The properties described inTable 3 on page 19define and uniquely identify an auth server object.
Table 3: Auth Server Object Properties
Description Property
A name string, such as authserv1. (The only predefined auth server is Local.) Object name
You can set the ID number or allow the security device to set it automatically. If you set an ID number, you must choose one that is not already in use.
ID number
RADIUS, SecurID, LDAP, TACACS+. Type
The IP address or domain name of the server. Server name
The IP address or domain name of a primary backup server. Backup1
The IP address or domain name of a secondary backup server. Backup2
One or more of the following types of users: Auth, L2TP, 802.1x, XAuth; or Admin by itself.
Account Type
Table 3: Auth Server Object Properties
(continued)
DescriptionProperty
The timeout value is idle timeout, and takes on a different meaning if it is for an auth user or if it is for an admin user.
Timeout value
The timeout countdown begins after the first authenticated session completes. If the user initiates a new session before the countdown reaches the timeout threshold, the timeout countdown resets. The default timeout value is 10 minutes, the maximum is 255 minutes. To disable the timeout feature, set the timeout value to 0. SeeFigure 7 on page 20.
Auth user
If the length of idle time reaches the timeout threshold, the security device terminates the admin session. To continue managing the security device, the admin must reconnect to the device and reauthenticate himself. The default timeout value is 10 minutes, the maximum is 1000 minutes. To disable the timeout feature, set the timeout value to 0. SeeFigure 8 on page 20. Admin user
Forced timeout, unlike idle timeout, does not depend on the idleness of the user, but on an absolute timeout after which access for the authenticated user is terminated. The auth table entry for the user is removed, as are all associated sessions for the auth table entry. The default is 0 (disabled), the range is 0 to 10000 (6.9 days).
Forced Timeout
Figure 7: Auth Server Object Properties
NOTE: User authentication timeout is not the same as session idle timeout. If no activity occurs in a session for a predefined length of time, the security device automatically removes the session from its session table.
Figure 8: Admin Timeout Property
In addition to the above properties that apply to all auth server objects, each server has a few others specific to itself. These are explained in“Auth Server Types” on page 20
• Remote Authentication Dial-In User Service (RADIUS) • SecurID
• Lightweight Directory Access Protocol (LDAP)
• Terminal Access Controller Access Control System Plus (TACACS+)
Remote Authentication Dial-In User Service
The Remote Authentication Dial-In User Service (RADIUS) is a protocol for an authentication server that can support up to tens of thousands of users.
Figure 9: Using RADIUS as an External Auth Server
The RADIUS client (that is, the security device) authenticates users through a series of communications between the client and the server. Basically, RADIUS asks the person logging in to enter his or her username and password. It then compares these values to those in its database, and once a user is authenticated, the client provides the user with access to the appropriate network services.
To configure the security device for RADIUS, you must specify the IP address of the RADIUS server and define a shared secret—the same as that defined on the RADIUS server. The shared secret is a password the RADIUS server uses to generate a key to encrypt traffic between the security and RADIUS devices.
RADIUS Auth Server Object Properties
In addition to the generic auth server properties listed in“Auth Server Object Properties” on page 19, a RADIUS server also makes use of the properties described inTable 4 on page 21.
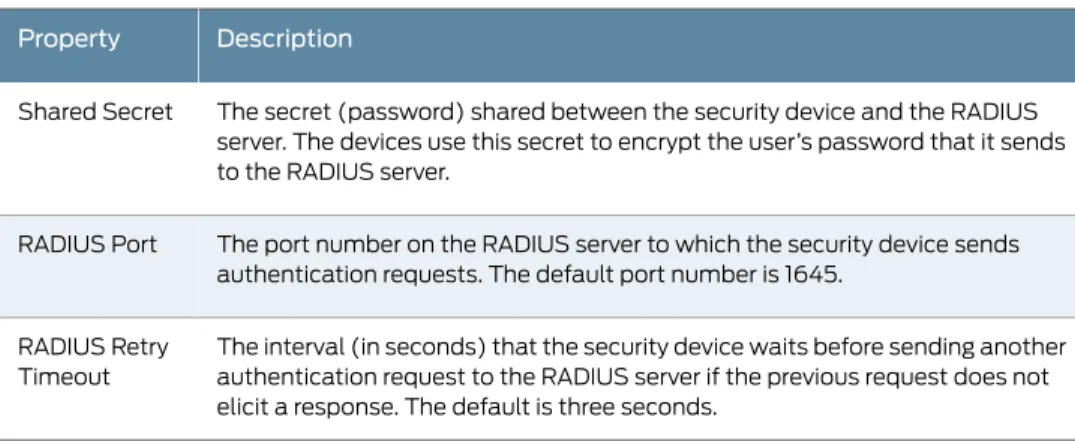
Table 4: Radius Auth Server Object Properties
Description Property
The secret (password) shared between the security device and the RADIUS server. The devices use this secret to encrypt the user’s password that it sends to the RADIUS server.
Shared Secret
The port number on the RADIUS server to which the security device sends authentication requests. The default port number is 1645.
RADIUS Port
The interval (in seconds) that the security device waits before sending another authentication request to the RADIUS server if the previous request does not elicit a response. The default is three seconds.
RADIUS Retry Timeout
Supported User Types and Features
A RADIUS server supports the following types of users and authentication features: • Auth users
• L2TP users (authentication and remote settings) • Admin users (authentication and privilege assignments) • User groups
• XAuth users (authentication and remote settings)
The XAuth module provides support for the Session-timeout and Idle-timeout attributes retrieved from the RADIUS server described inTable 5 on page 22.
Table 5: XAuth Attribute Support
Description Attribute
If the Session-timeout attribute is a non-zero value, the phase-1/phase-2 security association (SA) and the XAuth are both terminated when the timeout value is reached.
Session-timeout
If the Idle-timeout attribute is a non-zero value, it takes preference over the local phase-2 SA idle time configuration and member SA hold time. If the Idle-timeout value is 0, the local phase-2 SA idle time and member SA hold time is used.
Idle-timeout
The XAuth Accounting start is sent to the external RADIUS server after the user is authenticated correctly.
XAuth Accounting Start
The XAuth Accounting stop is sent to the external RADIUS server when the XAuth connection is torn down. All phase-1/phase-2 SA and XAuth connection is terminated under the following conditions:
• RADIUS server Session-timeout attribute is reached • RADIUS server Session-timeout attribute is not configured
The XAuth session lifetime is used instead.
• RADIUS server Idle-timeout attribute is reached on all Phase-2 SAs • Client disconnect is detected via dead peer detection (DPD) or heartbeat. • Locally configured phase-2 SA idle time or the member SA hold time is
reached because RADIUS server is not providing an Idle-timeout attribute. XAuth Accounting
Stop
A RADIUS server can support all of the user types and features that the local database supports except IKE users. Among the four types of external auth servers, RADIUS is the only one at this time with such broad support. For a RADIUS server to support such ScreenOS-specific attributes as admin privileges, user groups, and remote L2TP and XAuth IP address, and DNS and WINS server address assignments, you must load a RADIUS dictionary file that defines these attributes onto the RADIUS server.
NOTE: ScreenOS uses the standard RADIUS attribute for IP address assignments. If you only want to use RADIUS for IP address assignments, you do not have to load the ScreenOS vendor-specific attributes (VSAs).
RADIUS Dictionary File
A dictionary file defines vendor-specific attributes (VSAs) that you can load onto a RADIUS server. After defining values for these VSAs, ScreenOS can then query them when a user logs into a security device. ScreenOS VSAs include admin privileges, user groups, and remote L2TP and XAuth IP address, and DNS and WINS server address assignments. There are two RADIUS dictionary files, one for Cisco RADIUS servers and one for Funk Software RADIUS servers. If you are using a Microsoft RADIUS server, there is no dictionary file. You must configure it as outlined in Bi-Directional Remote VPN using xAuth and Firewall Authentication with Microsoft Internet Authentication Service (IAS), which you can download from
http://kb.juniper.net/kb/documents/public/kbdocs/ns10382/ns10382.pdf
Each RADIUS dictionary file contains the specific information described inTable 6 on page 23.
Table 6: RADIUS Dictionary File Contents
Description Field
The ScreenOS vendor ID (VID; also called an “IETF number” ) is 3224. The VID identifies a specific vendor for a particular attribute. Some types of RADIUS server require you to enter the VID for each attribute entry, while other types only require you to enter it once and then apply it globally. Refer to your RADIUS server documentation for further information.
Vendor ID
The attribute names describe individual ScreenOS-specific attributes, such as NS-Admin-Privilege, NS-User-Group, NS-Primary-DNS-Server, and so on.
Attribute Name
The attribute number identifies an individual vendor-specific attribute. ScreenOS-specific attribute numbers fall into two ranges:
• ScreenOS: 1 – 199
• Global PRO: 200 and above
For example, the ScreenOS attribute number for user groups is 3. The Global PRO attribute number for user groups is 200.
Attribute Number
The attribute type identifies the form in which attribute data (or “value” ) appears—a string, an IP address, or an integer.
Attribute Type
The RADIUS server automatically receives the above information when you load the RADIUS dictionary file onto it. To make new data entries, you must manually enter a
value in the form indicated by the attribute type. For example, an entry for a read-write admin appears as follows:
Value Attribute Type Attribute Number Attribute Name VID 2 (2 = all privileges) data=int4 (i.e., integer)
1 NS-Admin-Privileges 3224
To download a dictionary file, go to
http://www.juniper.net/customers/csc/research/netscreen_kb/downloads/dictionary/funk_radius.zip
or
http://www.juniper.net/customers/csc/research/netscreen_kb/downloads/dictionary/cisco_radius.zip
Log in and save the file to a local drive.
NOTE: All new installations of Funk Steel Belted RADIUS has the RADIUS firewall dictionary file already loaded on the RADIUS server.
RADIUS Access Challenge
Juniper Networks security devices can now process access-challenge packets from an external RADIUS server when an authentication user attempts to log in via Telnet. Access challenge presents an additional condition to the login process after the approval of a username and password. After an authentication user responds to a login prompt with the correct username and password, the RADIUS server sends an access challenge to the security device, which then forwards it to the user. When the user replies, the security device sends a new access request with the user’s response to the RADIUS server. If the user’s response is correct, the authentication process concludes successfully.Figure 10 on page 25lists the steps required for an authentication user who wants to telnet to a server.
Figure 10: RADIUS Access-Challenge Sequence
1. An authentication user sends a SYN packet to initiate a TCP connection for a Telnet session to a Telnet server.
2. A security device intercepts the packet, checks its policy list, and determines that this session requires user authentication. The security device caches the SYN packet and proxies the TCP 3-way handshake with the user.
3. The security device prompts the user to log in with a username and password.
4. The authentication user enters his or her username and password and sends it to the security device. The security device then sends an access request with the login information to a RADIUS server.
5. If the information is correct, the RADIUS server sends the security device an access challenge with a reply-message attribute that prompts the user to provide a response to a challenge. (The access challenge can optionally prompt the authentication to provide a username again. The second username can be the same as the first or a different one.) The security device then sends the user another login prompt that contains the content of the reply-message attribute.
6. The authentication user enters his or her challenge response (and, optionally, a username) and sends it to the security device. The security device then sends a second access request, with the user’s challenge response, to the RADIUS server.
If the RADIUS server needs to authenticate the challenge response via another auth server—for example, if a SecurID server must authenticate a token code—the RADIUS server sends the access request to the other auth server.
7. If the RADIUS server forwarded the challenge response to another auth server and that server sends an access accept, or, if the RADIUS server itself approves the challenge response, the RADIUS server sends an access-accept message to the
security device. The security device then notifies the authentication user that his or her login is successful.
8. The security device forwards the initial SYN packet to its original destination: the Telnet server.
NOTE: ScreenOS does not support access challenge with L2TP at the time of this release.
Supported RADIUS Enhancements for Auth and XAuth Users
ScreenOS supports RADIUS enhancements through the Authentication and Extended Authentication (XAuth) modules with the following attributes:
• “NS Access Service Type” on page 26
• “Framed Pool and Framed IP Address” on page 26
• “Account Session ID” on page 27
• “Calling Station ID” on page 28
• “Called Station ID” on page 28
• “Compatibility RFC-2138” on page 28
• “Username” on page 28
• “Separator” on page 28
• “Fail-Over” on page 28 NS Access Service Type
TheNS-Access-Service-Typeattribute provides information about the service type. The security device adds this attribute to each Access-Request indicating the type of service required by the user. This attribute is enabled by default.
If the RADIUS module receives the request from a Telnet, FTP, or HTTP Authentication module, it sets the value to WEB-AUTH (2). If the RADIUS module receives the request from the XAuth module, it sets the value to VPN-IPSEC (3).
The device includes the ns-access-service-type and value in the Access-Request message. If the RADIUS server determines that the requesting user is allowed to access to the service, it sends an Access-Accept message. If the service-type is not applicable to the requesting user, the RADIUS server sends an Access-Reject message.
The RADIUS server does not include the ns-access-service-type attribute in the Access-Response messages.
Framed Pool and Framed IP Address
user from this pool. However, the device does not send the Framed-Pool attribute in Access-Request messages.
Table 7 on page 27shows how the device handles the framed-pool and framed-ip-address attributes. The RADIUS enhancements also includes the ability to handle address pools at the virtual system (VSYS) level.
Table 7: Supported Attributes
Resolution Supported Attributes
The Framed-Pool attribute is always ignored by the RADIUS server unless the
Framed-IP-Address value is 0xFFFFFFFE (255.255.255.254). Then, the device allocates an address from the Framed-Pool attribute sent by the RADIUS server.
Framed-Pool attribute and the
Framed-IP-Address attribute are both included in the Access-Accept message.
The device does not assign an IP address to the end user.
Framed-Pool attribute and the
Framed-IP-Address attribute are both absent from the Access-Accept message.
The device allocates an IP address from the default IP address pool that is configured for that VSYS.
Framed-IP-Address attribute is included in the Access-Accept message and it has a value of 0xFFFFFFFE (255.255.255.254).
Framed-Pool attribute is absent.
The following error messages are generated and the negotiation is terminated:
• Login failed: IP pool needed but not configured.
• Login failed: No more IP address available in IP pool.
In both scenarios, the client receives the following message:
No more IP address available in IP pool The pool sent out in the Framed-Pool attribute
is not configured, or it does not have any IP addresses.
Account Session ID
Theacct-session-iduniquely identifies the accounting session. Each time an XAuth user connects to the device and the device authenticates the user, the device establishes a new acct-session-id, which identifies the accounting session. The accounting session lasts between the time the device sends the RADIUS server an Accounting-Start message, and the time it sends an Accounting-Stop message. To identify the user, each RADIUS access or request message may contain the calling-station-id (described below). Theacct-session-id lengthnumberis the length of the account-session-id in bytes. The default length of this value is 11 bytes. The number setting is for accommodating some RADIUS servers, which may have problems with the default length. You can set the length of acct-session-id from 6 bytes to 10 bytes, inclusive. To restore the default setting, execute the following command:
unset auth-servername_strradius attribute acct-session-idnumber
Calling Station ID
The calling-station-id attribute identifies the originator of the call. For example, this value might consist of the phone number of the user originating the call.
Called Station ID
The called-station-id attribute identifies the destination or receiver of the call. For example, this value might consist of the phone number of the user originating the call.
Compatibility RFC-2138
Thecompatibility rfc-2138attribute makes RADIUS accounting comply with RFC 2138, as compared with RFC 2865. For operations where RFC 2865 (the most recent standard) and RFC 2138 are mutually exclusive, the command works in accordance with RFC 2138, instead of RFC 2865. In cases where the behavior is additive, the command works compatibly with both RFC 2865 and RFC 2138.
Username
Theusername specifies a domain name for a particular auth server, or a portion of a username from which to strip characters. If you specify a domain name for the auth server, it must be present in the username during authentication.
Separator
The device uses a separator character to identify where stripping occurs. Stripping removes all characters to the right of each instance of the specified character, plus the character itself. The device starts with the right most separator character. An example of a separator command is as follows:
set auth-servername_strusername separatorstringnumbernumber
where:
• name_stris the name of the authentication server. • stringis the character separator.
• numberis the number of character separator instances with which to perform the character stripping.
If the specified number of separator characters (number) exceeds the actual number of separator characters in the username, the command stops stripping at the last available separator character.
NOTE: The device performs domain-name matching before stripping.
Fail-Over
When an authentication request sent to a primary server fails, the device tries the backup servers. If authentication through a backup server is successful, and the revert interval has not elapsed, the device sends subsequent authentication requests to the backup server. Otherwise, it resumes sending the requests to the primary server. The range is 0 seconds (disabled) to 86400 seconds.
The following is an example of thefail-overandrevert-intervalcommands:
set auth-servername_strfail-over revert-intervalnumber
where:
• name_stris the name of the authentication server. • numberis the length of time (expressed in seconds).
NOTE: This feature applies to RADIUS, LDAP, and TACACS servers only.
SecurID
Instead of a fixed password, SecurID combines two factors to create a dynamically changing password. SecurID issues a credit-card-sized device, known as anauthenticator
(Figure 11 on page 29) atoken codewith an LCD window that displays a randomly generated string of numbers that changes every minute. The user also has a personal identification number (PIN). When logging on the user enters a username and PIN along with the current token code.
Figure 11: SecurID Token
The authenticator performs an algorithm known only by RSA to create the values that appear in the LCD window. When the user to be authenticated enters the PIN and the string of numbers on the card, the ACE server, which also performs the same algorithm, compares the values received with those in its database. If they match, the authentication is successful.
The relationship between the security device and RSA SecurID ACE server is similar to that of a security device and a RADIUS server. That is, the security device acts as a client, forwarding authentication requests to the external server for approval and relaying login information between the user and the server. SecurID differs from RADIUS in that the user’s password involves a continually changing token code.
SecurID ACE Server Cluster
RSA supports a primary server and up to 10 replica servers where each server can process authentication requests. The primary and slave server can be configured with DNS or static IP. Replica servers are IP addresses that are dynamically provisioned by server upon requests from firewall. To avoid conflict in processing authentication requests, the following functions are supported:
• Name locking
The security device sends a username lock request to the server. The server locks the username and denies access to other servers in the realm. Once the security device sends the token code, the user is authenticated and can access the server. This avoids both unauthorized access and duplicate authentication. Username is unlocked once the authentication process is complete as either failure or success.
• Load balancing and failover
Load balancing occurs automatically and is determined by the security device during run time. This functionality helps the agent select the best server to communicate with. Multiple Server Cluster Instances
ScreenOS supports multiple server cluster instances if the following parameters are met: • Master and replica1 server must be in the same realm.
• At least one primary and slave server must have static IP and must be available during system startup.
• All servers in the cluster must be running the same version of RSA authentication manager.
NOTE: If auth servers are configured with different versions of RSA
authentication manager, the node-secret stored in the outgoing interface as a key must be different. The agent uses the node-secret to communicate with servers with different versions.
SecurID Auth Server Object Properties
In addition to the generic auth server properties listed in“Auth Server Object Properties” on page 19, a SecurID server also makes use of the properties described inTable 8 on page 30.
Table 8: SecurID Auth Server Object Properties
Description Property
The port number on the SecurID ACE server to which the security device sends authentication requests. The default port number is 5500. Authentication Port