Introduction
Webparts360 is a Microsoft certified partner since 2001, our flagship product
"Webparts360 AppStudio" empowers organizations to build applications in
SharePoint with NO coding.
It provides an intuitive visual design tool that manages all of the essential
resources and functions within an application: from input, workflow, navigation
and reports. Solutions are assembled using a central repository of configurable
web parts that can be saved as templates for subsequent rapid deployment.
Building collaborative web applications is as easy as creating a spreadsheet.
This solution provides a complete framework for building end to end
comprehensive solution, not just workflow or interface widgets. It transforms
SharePoint into a transactional, relational and contextual application
development platform; from design, deploy thru management cycle.
Our solutions have been successfully used in global companies such as Coca Cola,
Daikin, Prudential, Malaysian Airlines, NTT, University of Nottingham and many
others. This is your opportunity to see how this game-changing tool will
revolutionize the way you build applications in SharePoint.
This step by step guide will take you through the process of building a complete
project expense tracking solution. We have also provided video links that will
assist you if you prefer not to read.
Building your first application with webparts360 2 | P a g e
Why should you
bother?
One could convincingly argue that SharePoint’s huge popularity is due to its user empowerment aspiration. Today, many business users are creating team collaboration sites; sharing document and data effortlessly without any assistance from IT or the need for complex programming.
What happens when you wish to go beyond just content sharing and move into building comprehensive solutions such as project management, budget tracking, employee self-service, helpdesk and etc...? Can you do this just as easily, without any programming skills? And that is the precisely why Webparts360 AppStudio was built!
Typically, when you need to build an end-to-end solution, you need to cover all aspect of the user requirements; from data input, workflow processes, reporting and interface control. And to this, Microsoft and other vendors have introduced many different tools to address the differing needs, including:
1. SharePoint designer – to create custom views, change layout and build simple workflows
2. InfoPath – to build complex data input forms 3. Business data catalog – to connect to external data 4. SQL reporting services – to build reports
5. PerformancePoint – to design and build complex dashboards
6. Visual Studio – to build controls, workflow and other advanced features 7. Third-party specialized tools such as Nintex, K2 for workflow
8. Third-party components such as Dundas Charts – for building charts and gauges 9. Third-party migration tools such as AvePoint, Metalogics to move and deploy sites Obviously, the skill sets for mastering all these tools is not without its challenges. That is perhaps why good SharePoint resources are so scarce and expensive. But if you want to empower your business users, you might need to reconsider your options. After all, it will be very costly and time consuming to train them to learn all these different tools. Webparts360 takes a radical approach by creating different software patterns that can be re-applied to solve common problems in software development. Much like pre-fabricated building components that is used in modern building construction, we provide essential building blocks such as data entry forms, workflow, data grids, charts, navigation and etc… to make it possible to build many different applications using the same common web parts. This is the magic of Webparts360.
This guide will help you to take the first step in your journey of empowering “business developers”: business users who are empowered to build their own solutions. Imagine the possibilities, if the same executive that prepared the company’s projects budget on Microsoft Excel also created and build the budget approval system. Today, we are going to see how this can be done. Your job is to determine if these steps are easy enough that even Bob, from accounting can be trained to do this.
Building your first application with webparts360 3 | P a g e
How long will it take
you?
Before we start, let me take you through the functionality of the system so that you can understand the scope of work. The main thing that you need to do is to determine how long it will take you to build this solution using whichever tools or methods that you know. Seriously, consider how long would it take you to build the solution below? The main objective of this system is to help project managers to keep their projects within budget. The system is relative simple; project managers and its team members can access of all their projects via a project portfolio dashboard shown below.
Figure 1: Project Portfolio Dashboard
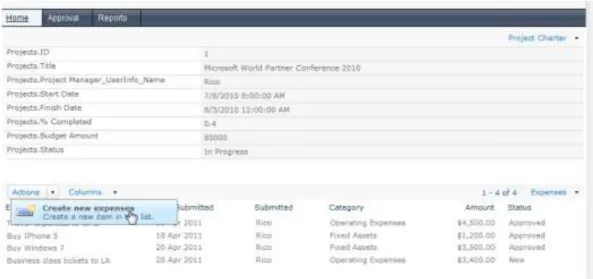
Note that each project has a designated project manager that is responsible for approving project expenses. When you click on each project name, they will be able to drill-down to the project workspace where they can see the project details and
associated expense items for that project.
Figure 2: Project Workspace
If they have expenses to submit, they can then add a new expense item using the actions options – Create new expenses. When they submit their expenses, they get to fill in the following form.
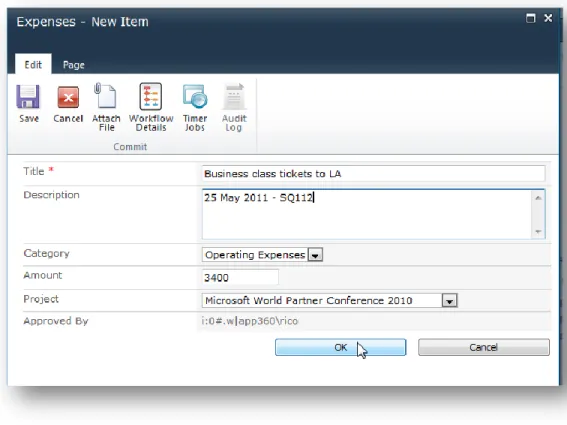
Building your first application with webparts360 4 | P a g e Figure 3: New expense item request
Please note that the “Approved By” field is locked and will default to the project manager. Once you submit this expense claim request. It will appear on the project manager approval dashboard.
Figure 4: Project Expense Approval dashboard
And when he clicks to approve/reject the expense claim, he will see the following expense approval form.
Building your first application with webparts360 5 | P a g e Figure 5: Expense approval
Note that all the fields submitted by the employee are locked and ONLY the project manager can choose to approve or reject the request by selecting the Status column. The system also updates the Date Approved field when it is approved. If it is rejected this request is send back to the original requester. At any point of this transaction, the user can click on the workflow details and it will see the animated audit trail that shows the steps it took and details at each stage.
Building your first application with webparts360 6 | P a g e The system also provides a chart that helps project manager to keep track of the actual expenses over the budgeted value. They can also click on the columns to drill down into the project workspace.
Here are some security considerations, when a project manager logs in, he can see the following:
But when the project team member logs in he is restricted to the Home Page.
Building your first application with webparts360 7 | P a g e
Ready, set and GO!
For this example, we have created a site template called “ProjectDemo” so that we donot need to waste time to define each table in the system. So we will start by creating a new site to hold this application. I will use a standard site template for this.
Use Site Settings (at the top of the menu), Select New Site
Select the Project Demo template, enter name of the site and site url name and then press create.
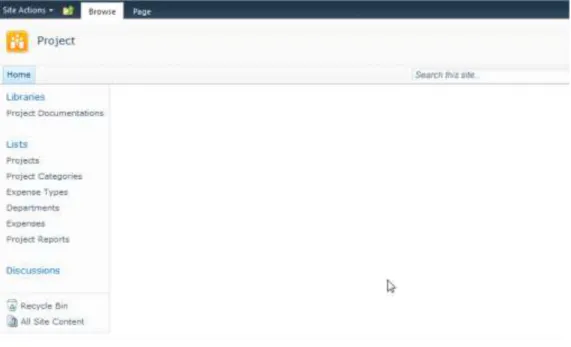
This will create a new SharePoint 2010 sub site that will contact a copy of all the custom lists and document libraries that I have earlier defined in the site template. Then you will see the screen below that shows all the libraries and lists from this template.
Building your first application with webparts360 8 | P a g e Figure 7: Default page
As you can see this is the default view of SharePoint and its main objective is to enable you to manage contents. So when you select the Expense you will see the default view of all the expenses items.
Building your first application with webparts360 9 | P a g e While SharePoint gives you a data entry form that easily lets you key in data, it does not permit you to control which columns are accessible to which users. In a typical
application, only certain columns are accessible during the different stage of the data entry process. Webparts360 SmartList is precisely designed to provide granular control over each column throughout the life cycle of the transaction.
Starting
Webparts360
AppStudio
Webparts360 provides you with a design console for your application. To access this site feature, simply select Webparts360 AppStudio menu option under Site Settings.
The following screen will appear with many options. All these functionalities are explained in our user manual but for now, just use the default settings and press “Create” to transform this site into a solution
Building your first application with webparts360 10 | P a g e
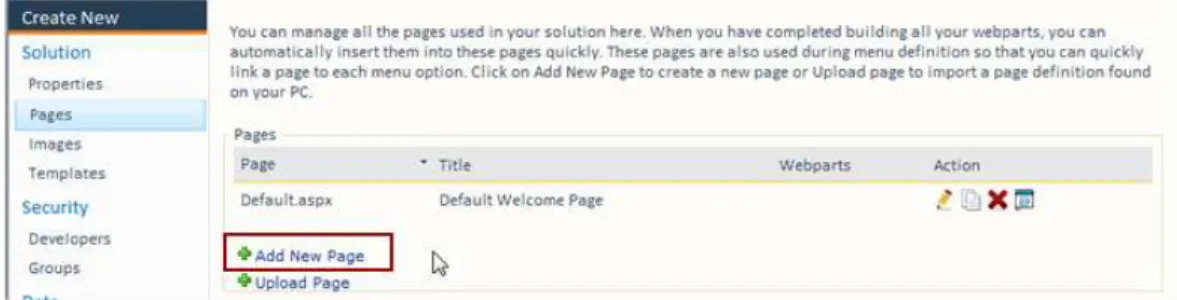
Managing your
Pages
Webparts360 provides you with a solution design console that allows you to manage all the resources within an application. For instance, you can manage all the pages for this application which provides the interface for the applications. To create a new page, simply select on Pages on the main menu, and click on “Add new page”
Then it will allow you to create your page. For this example, key in “ProjectWorkspace” and update the title. You can select the page format, and then press “Create”
Building your first application with webparts360 11 | P a g e When you are done, you can see all the pages together with the web parts within the system.
Managing your data
Let’s focus on attention on data by bringing in all the lists that are within this site.Select Custom Lists under Lists & Librariesoption, and then click on Link ExistingList to pull existing lists into this solution. Click on the lists and then press Link.
Building your first application with webparts360 12 | P a g e Then you will see the following lists within your solution.
Building your first application with webparts360 13 | P a g e
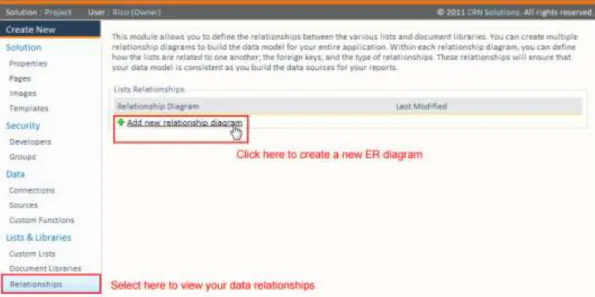
Making SharePoint
Relational
This feature allows you to transform SharePoint data to work as a relational data source. Under the Lists & Libraries, you can use the Relationships option to define all the data relationships in this solution.
Figure 9: Entity Relationship
When you start a new relationship diagram, you see the following screen.
Building your first application with webparts360 14 | P a g e When you drag it into the design canvas, you will be able to see all the fields within the Projects list.
Building your first application with webparts360 15 | P a g e Next follow up with Project Categories, Expenses and Expense Types and you will see the following diagram. Rename it to Project ER Diagram and press Save.
Now your lists are relational.
Creating the
navigation
Let’s start by creating the menu system and the pages that will be used to hold these applications. Under the webparts section in the main menu, click on Navigations to access the application menu.
Building your first application with webparts360 16 | P a g e Then you will see the above page, press on Add New Node to create a new menu option.
Create the menu item for Approvals and Reports. You can create a new page at the same time by pressing on the Page icon shown above.
When you are done select your favorite menu option under Advanced Settings. Save and you are done.
Building your first application with webparts360 17 | P a g e
Making SharePoint
Contextual
Now that we have the pages in place, let us fill up the different interface for the system. The main purpose is to make SharePoint aware of your selection and to perpetuate this context to the rest of the solution.
Creating dashboards
Let’s begin by building the main project lists for the project managers and team
members. Under Webparts, choose Reports and press Add a new SmartView definition to create a new report.
Building your first application with webparts360 18 | P a g e Call this report “Project.Listing” and you can add any description that you need to help you identify this web part. You can use the Filter Category to group similar components together.
Building your first application with webparts360 19 | P a g e You will see the following screen where you can select the data source from the
available data sources within this solution. Choose “Projects” and press Save.
Next select the appropriate Data Views that you want. Choose “Add new gantt”
Then you can select to include the columns that you wish to include in your report. You can change the captions by overwriting the column header caption.
Building your first application with webparts360 20 | P a g e Click on Menu to create a contextual menu, and then you will see:
Building your first application with webparts360 21 | P a g e Then specify the start, finish and % completed for the gantt settings.
Building your first application with webparts360 22 | P a g e Congratulations, you will see the new gantt report in your default page.
Next we create the drill-down page where users can zoom into the Project Workspace page
Creating Drill-down
reports
Next we will create another report to show actual expenses versus the budgeted value. Use webparts > Reports and create a new Report. Let’s call this report “Project.Detail”.
Building your first application with webparts360 23 | P a g e Click on Select Columns
Building your first application with webparts360 24 | P a g e First, define the data source – Click on Add new data source
Select Expense – Change name to Project Expense Summary Join this list to Projects.
Building your first application with webparts360 25 | P a g e System will show your default relationships which was defined earlier. Press Save. Change the title to Expenses by Projects.
Now we need to group these values by using Project. Under view type – Choose “Aggregate Group”
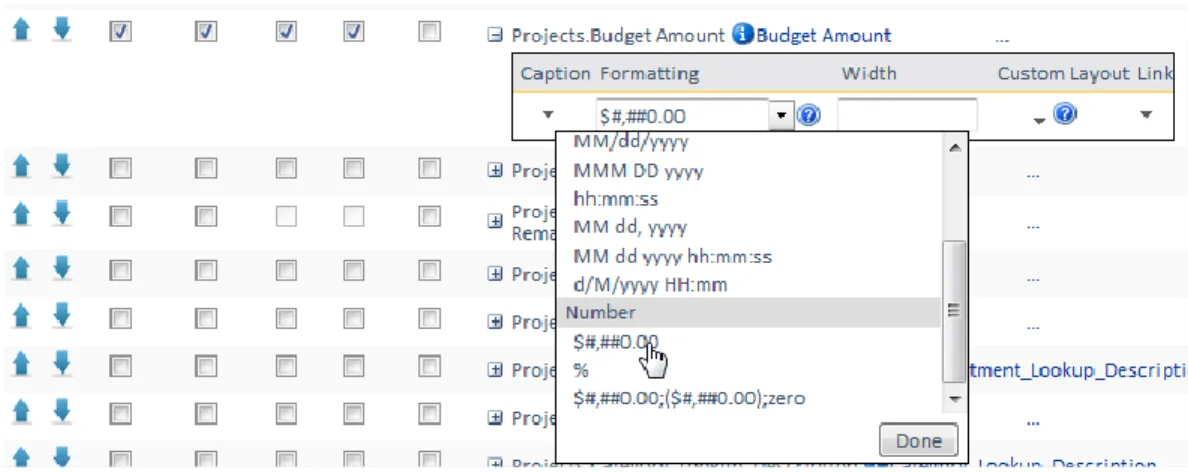
Building your first application with webparts360 26 | P a g e Select Projects.Title
Building your first application with webparts360 27 | P a g e Category_count will count how many transactions, Expenses.Amount sum will calculate total expenses and Expense.Project Min will return the Project Id, Projects.Budget Min will return the Project budgeted expenses.
Building your first application with webparts360 28 | P a g e Let’s pretty up the chart with labels
Then we create the drill down using the advanced settings feature
Building your first application with webparts360 29 | P a g e Then add a parameter ?ProjectID= and Select Category Value
Building your first application with webparts360 30 | P a g e
Creating Expense
Report
We will now create the project expense detail report. Now we will create the drill down report by adding a new SmartView and Call it project.expense.detail. Create a data source, select Expense list. This time, just leave it as default view and save.
Building your first application with webparts360 31 | P a g e Now let’s create a data grid instead
Select all the columns you want to display, you can change the column heading caption or display format if required. For instance, amount.
Building your first application with webparts360 32 | P a g e Next let’s total it up on the expense column
Next, Add a filter by Project – using the context [param:ProjectID]
Building your first application with webparts360 33 | P a g e And now you have created a contextual report
With drill-down capability
Building your first application with webparts360 34 | P a g e
Making SharePoint
Transactional
Now that we have our reports, Let’s define a transaction. I will start with my expense claim. By transactional, I expect SharePoint to understand the various stages of a expense submit/approve process.
Click on “Expenses” to edit it. You will see the following screen.
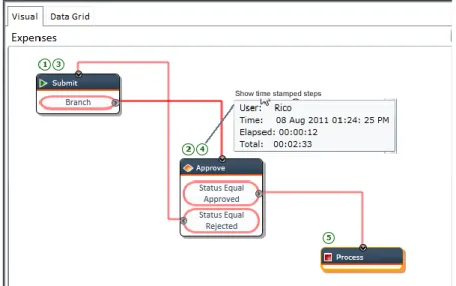
Click on the VISUAL tab and you will see the transaction workflow design canvas instead.
Building your first application with webparts360 35 | P a g e It begins with the default stage icon called “Stage 1”. Double click on it and it will allow you to change the caption. Type “Submit” to rename this stage.
Create another new stage by dragging a new stage icon into the design canvas. Call this stage Approve and repeat it for the final stage Process.
1. Next drag the branch icon unto each stage and link it to the next stage. Link Submit to Approve.
And repeat the same from Approve to Process. You can click on the Branch Edit Icon to set the branching condition.
Building your first application with webparts360 36 | P a g e Then the systems will pop-up the Condition Setting screen. Select the field “Status” and the Operator “Equal”. When you select the value, it will display the options, select Approved.
Repeat the same thing for Reject, but this time links it back to the submit stage. And when you have completed, you will see the following screen.
Building your first application with webparts360 37 | P a g e Next click on the users icon on the Submit stage.
[me] is a reserved word in SharePoint that means everybody. When you click on the Edit Role icon, it will show the following screen so that you can select which form you wish to change. We will select the New Form by clicking on the Edit Icon .
Building your first application with webparts360 38 | P a g e Then select the columns that you wish to enable, lock and hide.
means that the field is editable.
means that the field is locked, i.e. cannot be changed means that the field is hidden from view.
In this example, you will see the fields (column) Title, Descriptions, Category, Amount and Project are all editable, while the Approved By is locked. The Status, Approval Remarks and Date Approved fields are all hidden at this stage because they are NOT used during the creation of a new expense item stage. Similarly change the permission for the approval form as shown below.
These fields are meant for the team members to
submit Approved by is determined by the project manager of the
selected project Approval fields are only
required during the approval form.
Approval fields are only required during the
Building your first application with webparts360 39 | P a g e
Fields Look-up
Next, let’s do some look up validations since we need to determine the person who isgoing to approve an expense item based on who is the project manager. To do so, we will add a new look up for this form. Press on the Add New Lookup under Global Settings.
Select the “Projects” list as the look up data source.
The system will prompt you to select a list, Choose Projects and press Save.
Change the name to Lookup Project. We will use the Project ID as the value (key) while the Project Title is the displayed field. Now, we can determine which column will be using this lookup by clicking on Add Column.
Building your first application with webparts360 40 | P a g e Select Project and then press on the options box to determine what default value you want to assign to.
Click on “Add Projection” to select what field we what to apply for this lookup. In this case, we will default the field Approved By to the Projects.Project Manager.
With this lookup in place, each time someone selects the project, it will retrieve the project manager and populate the expense.approved by field with it. Save this transaction and you are ready to test it out.
1.
Submit new claim – see, you have less fields for data entry2.
Approve – see locked fields, only approval fields are enabled for data entry3.
View the processed transaction, and you can even see the animated workflow with audit trails of each activity.Congratulations, you have just completed building your first applications with Webparts360.