OVERVIEW The IPedge program update process is controlled through Enterprise Manager. The software update can be performed using three different methods.
• Online Update — IPedge systems running R1.5.1 and later can use
the online update to download the needed file from a FTP server maintained by Toshiba. Connection to the Internet and permission to access and use an FTP server is required.
• Remote Update — The update files are downloaded to the
Administrator’s PC or saved onto the Primary IPedge server in a multi-node system.
• Local Update — The update files are loaded onto a USB flash drive.
This process requires the administrator to plug the flash drive into the IPedge server.
Program Update The IPedge program update process is controlled through Enterprise Manager. The software update can be performed using three different methods.
Local Program Update A Local Program Update is performed while on site, with physical access to the IPedge server. Local means that the update files are on a USB drive connected to the IPedge server. Program Update can update the IPedge core software, the Linux operating system and the Media Library. The program update file can be accessed from a USB drive connected to the IPedge server.
Note: The IPedge system must be running for at least 20 consecutive minutes before starting a program update process.
Remote Program Update
A Remote Program Update means the administrator may not be on site. The update files are loaded on an IPedge server in the network or loaded on the administration PC.
Important! Perform a manual database backup using the Webmin > IPedge > Backup and Restore tool before the software update. This backup file will be used in the event you choose to roll back the update. Store the backup file off of the IPedge server.
Online Update IPedge systems running R1.5.1 and later software have a program update mechanism called Online Program Update. New software updates will be available on an FTP server. The IPedge server checks the FTP server each night for new software files. When a later version software file is found the system administrator will see a notice the next time
Enterprise Manager is logged into.
Note: The IPedge system must have access to the internet and be allowed FTP server access for the Online Update feature to function.
The administrator can view the update files and decide whether to run the update.
The IPedge software in the form of an RPM file can be uploaded to a predefined directory on the IPedge server. In addition to RPMs, a
manifest file is provided that describes the IPedge software release. This manifest file is in xml format and contains information about the software
Manager select Maintenance > System Maintenance > Program Update.
Version check Enterprise Manager verifies the version when the administrator selects software upgrade. The system will allow an upgrade to be applied when the new version is the same or newer. A multi-node system Member server can only upgrade to a version that is the same or newer than the Primary server. A member server that does not have the 1.5.1-1 or later software will be displayed as ‘unknown’ until it has been upgraded.
License Checking The Online Program Update checks for a valid license before the user can select the server. If license failed on validation such as no license or maintenance license expired, the check box will be disabled.
4
192.168.254.251 192.168.254.252 North Campus
South Campus
License current License expired
The en_US (US english language pack) is checked and disabled just for display purpose. The English language pack is always the default. Enterprise Manager will compare the langPack version and always download the latest one regardless which software the user selected. • Software list section – List available version of software that is same
or newer than local version.
• Release note display – Display the text that is in the manifest xml file. • Server list section – List of master and member servers. It indicates
license status and validates version compatibility.
Systems running R1.5.1 and later software will check the maintenance license prior to starting a program update.
All results will be logged into a history file in xml format on the IPedge server. A report viewer can display detail status of each rpm.
Online Update Page Content
Online program update supports multiple nodes. Multiple servers can be upgrading in parallel with the same version of selected software.
Each server in a multi-node system will download its own rpm files and will handle its own update. The Primary server will be in a waiting state while the member servers are updating. The Primary server will start its own update when all of the selected members have finished the updates.
Update Result: The process status will display the update process; starting, downloading, updating, and update complete.
• The log files reside in each server.
• Each update job creates one log file. The administrator selects the server and log file to see the summary.
North Campus 192.168.254.253 South Campus 192.168.254.251 1.5.1.09 1.5.1.201 1.5.1.206 1.5.1.207 192.168.254.251 192.168.254.252 192.168.254.253 North Campus West Campus Warehouse 1.5.1.09 1.5.1.201 1.5.1.207
• Re-try while downloading files from the Toshiba FTP site
• Download files and ‘Wait to upgrade’
PROGRAM UPDATE The IPedge program update process is controlled through Enterprise Manager. The software update can be performed using three different methods.
• Online Update — IPedge systems running R1.5.1 and later can use
the online update to download the needed file from a FTP server maintained by Toshiba. Connection to the Internet and permission to access and use an FTP server is required.
• Remote Update — The update files are downloaded to the
Administrator’s PC or saved onto the Primary IPedge server in a multi-node system.
• Local Update — The update files are loaded onto a USB flash drive.
This process requires the administrator to plug the flash drive into the IPedge server.
CAUTION! The IPedge system must be running for at least 20 consecutive minutes before starting a program update process.
PROGRAM UPDATE PROCEDURE
A Local Program Update is performed while on site, with physical access to the IPedge server. Local means that the update files are on a USB drive connected to the IPedge server. Program Update can update the IPedge core software, the Linux operating system and the Media Library. The program update file can be accessed from a USB drive connected to the IPedge server.
Note: The IPedge system must be running for at least 20 consecutive minutes before starting a program update process.
A Remote Program Update means the administrator may not be on site. The update files are loaded on an IPedge server in the network or loaded on the administration PC.
Important! Perform a manual database backup using the Webmin > IPedge > Backup and Restore tool before the software update. This backup file will be used in the event you choose to roll back the update. Store the backup file off of the IPedge server.
ONLINE UPDATE IPedge systems running R1.5.1 and later software have a program update mechanism called Online Program Update. New software updates will be available on an FTP server. The IPedge server checks the FTP server each night for new software files. When a later version software file
is found the system administrator will see a notice the next time Enterprise Manager is logged into.
Note: The IPedge system must have access to the internet and be allowed FTP server access for the Online Update feature to function.
The administrator can view the update files and decide whether to run the update.
The IPedge software in the form of an RPM file can be uploaded to a predefined directory on the IPedge server. In addition to RPMs, a
manifest file is provided that describes the IPedge software release. This manifest file is in xml format and contains information about the software release, release version, RPM files and release date. In Enterprise Manager select Maintenance > System Maintenance > Program Update.
Version check Enterprise Manager verifies the version when the administrator selects software upgrade. The system will allow an upgrade to be applied when the new version is the same or newer. A multi-node system Member server can only upgrade to a version that is the same or newer than the Primary server. A member server that does not have the 1.5.1-1 or later software will be displayed as ‘unknown’ until it has been upgraded.
License Checking The Online Program Update checks for a valid license before the user can select the server. If license failed on validation such as no license or maintenance license expired, the check box will be disabled.
Language Pack The language pack is under advanced update section. The administrator must click on the option to expand it. The default is not expanded and all languages are not checked.
The en_US (US english language pack) is checked and disabled just for display purpose. The English language pack is always the default. Enterprise Manager will compare the langPack version and always download the latest one regardless which software the user selected. • Software list section – List available version of software that is same
or newer than local version.
• Release note display – Display the text that is in the manifest xml file. • Server list section – List of master and member servers. It indicates
license status and validates version compatibility.
Systems running R1.5.1 and later software will check the maintenance license prior to starting a program update.
All results will be logged into a history file in xml format on the IPedge server. A report viewer can display detail status of each rpm.
Online Update Page Content
Online program update supports multiple nodes. Multiple servers can be upgrading in parallel with the same version of selected software.
Each server in a multi-node system will download its own rpm files and will handle its own update. The Primary server will be in a waiting state
192.168.254.251 192.168.254.252 North Campus
South Campus
License current License expired Move cursor over the icon for additional information.
while the member servers are updating. The Primary server will start its own update when all of the selected members have finished the updates.
Update Result: The process status will display the update process; starting, downloading, updating, and update complete.
• The log files reside in each server.
• Each update job creates one log file. The administrator selects the server and log file to see the summary.
ENHANCED ONLINE UPGRADE
IPedge systems running R1.6 and later software have an enhanced Online Program Update process. The added enhancements are:
• Re-try while downloading files from the Toshiba FTP site
• Download files and ‘Wait to upgrade’
• ‘Cancel’ download or check download status later
Download Retries If an error occurs during the upgrade files download the IPedge system will wait 30 seconds after the transfer failure then try the download again. The files successfully loaded will not need to be reloaded. The retry will continue until it completes or it is canceled by the user.
If the download is taking longer than anticipated the user can cancel the download or check the progress of the update later.
The technician can select the update to begin immediately after the North Campus 192.168.254.253 South Campus 192.168.254.251 1.5.1.09 1.5.1.201 1.5.1.206 1.5.1.207 192.168.254.251 192.168.254.252 192.168.254.253 North Campus West Campus Warehouse 1.5.1.09 1.5.1.201 1.5.1.207
Cancel Upgrade Button When the user starts an upgrade the Cancel Current Job button is visible. On a multiple server update, the cancel applies to all servers.
• This cancel button stops current running tasks.
• If server is downloading upgrade files the task is stopped immediately. All files already downloaded will be cached in the IPedge server. When the download is run again only the remaining files will be processed.
• If server is processing the call processing data back-up, the task will continue until the backup cycle is finished.
• The Cancel button cannot stop an upgrade on a server that is in the upgrading state. The server that is in upgrading state will continue its update process.
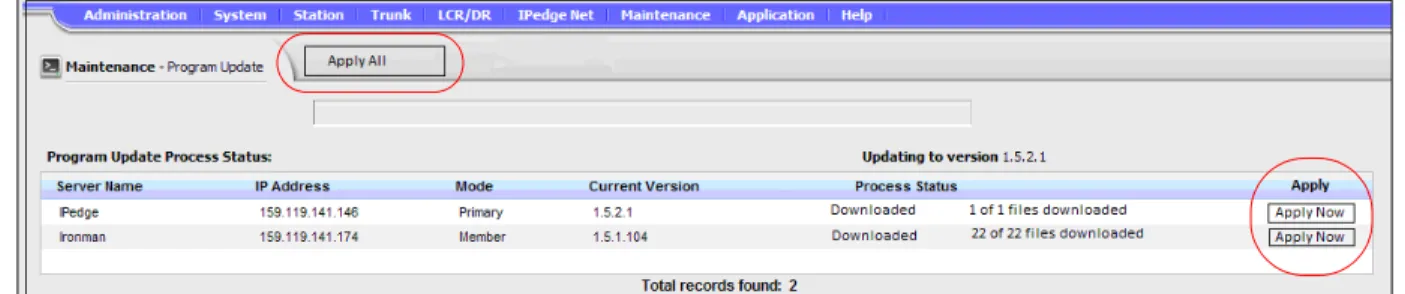
Figure 1 Program Upgrade Screen
Wait to Upgrade The online program update provides an option to apply the update immediately after download or wait for customer action. The default action is download software and wait to upgrade. The user can download the upgrade files and be able to run upgrade at a later time. The user check marks the Apply box to have the upgrade start immediately after the file download.
The option to ‘Apply immediately’ or ‘Wait’ can be changed while the file update is starting, downloading and in the waiting state.
Once a server starts upgrading the software it will continue its update process. At this point the Cancel button will be disabled.
The Apply All button will cause all of the servers in a multi-node system to update.
If the user choice is download and wait, there will be two reports
generated for this update. One report for the download status and one for the update status.
Figure 3 Apply Upgrade
ONLINE UPDATE PROCEDURE
The following procedures detail some of the upgrade files download and system upgrade processes available on IPedge systems running R1.6 and later software.
Download Then Apply Update Later
1. Login to Enterprise Manager.
2. Navigate to Maintenance > System Maintenance > Program Update.
3. Select Online Program Update. 4. Select software version.
5. Select target server(s).
6. Click on Run. The server will download the upgrade files. 7. The user may log out or navigate to other page.
8. When ready to start the upgrade, Navigate to Maintenance > System Maintenance > Program Update.
9. The server upgrade status will be displayed. Refer to Figure 3. 10. Uncheck the Apply check-box before the download is finished for the
C. When upgrading multiple servers the data connection is shared by all of the servers.
D. The time required to download the upgrade files and complete the upgrade process varies by server type and the size of the update file(s).
E. In locations with low bandwidth it may be more efficient to upgrade one server at a time.
Download and Apply Immediately
This procedure is used to download updates and apply the updates immediately.
1. Login to Enterprise Manager.
2. Navigate to Maintenance > System Maintenance > Program Update.
3. Select Online Program Update. 4. Select software version.
5. Select target server(s).
6. Click on Run. The server will download the upgrade files. 7. Click to check-mark the Apply box next to each server.
8. When the server has finished the file download the upgrade will begin.
Change To Apply Immediately
The default update condition is download files then wait for a manual upgrade start. This procedure changes the system to start the upgrade as soon as the download is complete.
1. Login to Enterprise Manager.
2. Navigate to Maintenance > System Maintenance > Program Update.
3. Select Online Program Update. 4. Select software version.
5. Select target server(s).
6. Click on Run. The server will download the upgrade files. 7. The Apply check-boxes will be displayed.
Headquarters Second Site
9. The update will begin as soon as the download is complete.
Note: If the Apply check-box is un-checked before the update starts the system will wait until you click on the Apply Now button. Once the update starts it cannot be canceled.
10. Click to check-mark the Apply box.
Change To Wait This procedure changes the system from ‘start the upgrade as soon as the download is complete’ to download and wait.
1. Login to Enterprise Manager.
2. Navigate to Maintenance > System Maintenance > Program Update.
3. Select Online Program Update. 4. Select software version.
5. Select target server(s).
6. Click on Run. The server will download the upgrade files. 7. Click the Apply check box. This step set the system to start the
upgrade as soon as the file download is complete.
8. Commit changes.
9. Uncheck the Apply check-box before the download is finished for the system to wait after loading the update files. Click on the Apply Now
button or the Apply All button start the update. 10. Commit changes.
Cancel Update Steps 1 through 5 start the update file download process. The download can be canceled anytime before it is complete, step 7. Any update files that were downloaded before the Cancel was clicked will be retained. When the update is attempted later these files will not need to be downloaded again.
1. Login to Enterprise Manager.
2. Navigate to Maintenance > System Maintenance > Program Update.
3. Select Online Program Update. 4. Select software version.
5. Select target server(s).
Remove One Sever From Upgrade
When an upgrade on a multi-node system has been started, one, or more, of the nodes can be removed from the upgrade. When a server is removed from the update process all of the downloads are canceled then, the update is started with the appropriate servers selected.
1. Login to Enterprise Manager.
2. Navigate to Maintenance > System Maintenance > Program Update.
3. Select Online Program Update. 4. Select software version.
5. Select target server(s). For example; A, B and C.
6. Click on Run. The servers will download the upgrade files. For example: A=5/10, B=6/10 and C=1/10.
7. Click on Cancel All Download. 8. Click on Yes to confirm.
9. Downloads for all servers are canceled. 10. Select software version
11. Select target server(s). For example; A and B.
12. Click on Run. The servers will download the upgrade files. For example: A=6/10, B=7/10.
Add A Server to the Update
To add a server to the update process all of the downloads are canceled then, the update is started with the appropriate servers selected.
1. Login to Enterprise Manager.
2. Navigate to Maintenance > System Maintenance > Program Update.
3. Select Online Program Update. 4. Select software version.
5. Select target server(s). For example; A and B.
6. Click on Run. The servers will download the upgrade files. For example: A=5/10 and B=6/10.
7. Click on Cancel All Download. 8. Click on Yes to confirm.
9. Downloads for all servers are aborted. 10. Select software version
11. Select target server(s). For example; A, B and C.
12. Click on Run. The servers will download the upgrade files. For example: A=6/10, B=7/10, and C starts from 0/10.
13. The update results will be displayed.
Notes:
• The update file download can be canceled anytime. All files that had finished loading will be retained. On the next file download those files will not download again.
• The server update process can not be stopped once it has started.
OFFLINE UPDATE PROCEDURE
The offline update uses files loaded on a USB flash drive or onto one of the IPedge servers in the same network as the server being updated.
LOCAL UPDATE The local update process requires the system administrator to load the update files to a prepared USB flash drive and be present on site during the update process. In Enterprise Manager select Maintenance > Program Update then check-mark Upgrade IPedge use Offline Program Upgrade.
USB Drive Requirements The following are the USB drive requirements for successful IPedge Program Update:
• The USB drive must be Linux mountable. Some USB drives on the
market contain an auto_start feature or custom driver which is not Linux compatible.
• The USB drive recommended capacity is 4G Byte or more
Select the server
Click on the date and time to display details
Click on the download and/or Update lines for details.
Update File Source Update files can be downloaded from the Toshiba FYI web site or the Toshiba TSD Technical Support web site. The update files are TGZ format.
Important! Before starting this procedure use a PC to perform a virus test on the USB flash drive.
1. Download the compressed update file from a Toshiba web site to your PC.
2. Create a folder named update on the root of the USB drive.
3. Copy the files to the update folder on a USB drive. Do not extract (un-compress) the files.
The update file can then be loaded onto:
• The IPedge server (update target server) or
• Another IPedge server
Update Procedure 1. In Enterprise Manager select Maintenance > System Maintenance > Program Update.
2. In the Select Target Server screen click to check-mark the server you will update then click on the Next button.
Select the update mode.
• Local Update - The update file is in the update folder on a USB drive connected to the IPedge server. Go to Step 3. • Remote Update - The update file is on the PC used to
connect to the IPedge server. Refer to “REMOTE UPDATE PROCEDURE” on page -17.
3. When Local Update is selected, select USB in the Update Device menu.
4. Check-mark the boxes with the same names as the tgz files downloaded from the FYI web site.
5. If the update files are already extracted click on the Skip button to skip the extract process and start the file update process.
— OR —
Select the files to be used then, click on the Extract button. The extract button will extract the compressed file and copy it to the target IPedge server.
Note: The file will only extract if it is newer than file already on the server.
6. When the file extraction is complete the Run update button will appear. Click to run the update then, go to Step 8. If the update file is not a newer file than what is already on the IPedge server the Run update button will not appear.
7. Select the IPedge server that has the extracted update files available.
Note: If the target server is already running the same software version of the download, Enterprise Manager will advise that no update is necessary and the Run update button will not appear.
8. Some updates will cause a system restart. If this occurs Enterprise Manager will logout. If the server does not restart the update complete screen will be displayed.
Important! Remove the USB device and ensure that there is no DVD in the server before the reboot.
Update can update the IPedge core software, the Linux operating system and the Media Library. The program update file can be accessed from a USB drive connected to the IPedge server.
Important! Perform a manual database backup using the Webmin > IPedge > Backup and Restore tool before the software update. This backup file will be used in the event you choose to roll back the update.
1. In Enterprise Manager select Maintenance > System Maintenance > Program Update.
2. In the Select Target Server screen click to check-mark the server you will update then click on the Next button then, select Remote Update
mode.
3. Select the IPedge server that has the extracted update files available. Check-mark From other IPedge server then, select the server from the pull-down list. Go to Step 5.
OR
-From the Primary IPedge server only; Check-mark From Client computer then, Click to upload files. Click to Browse to the update file.
4. Click to Extract the file(s)then go to Step 7.
5. Click on the Download File button.
6. When the file download is complete the Run update button will appear.
7. Click on the Run update button to start the update process.
Note: If the target server already has updates Enterprise Manager will advise that no update is necessary and the Run update button will not appear.
8. Updates will cause a system restart. If this occurs Enterprise Manager will logout. If the server does not restart the update complete screen will be displayed.
9. Login to Enterprise Manager. 10. Synchronize the database.
SYSTEM REBOOT Some program update procedures require that the System Administrator reboot the system.
Important! Remove any USB device from the server before the reboot.
CAPACITY Not applicable
AVAILABILITY Applies to IPedge systems only. Refer to the Restrictions section below. The VIPedge system is updated automatically and requires no user intervention.
RESTRICTIONS IPedge systems running on R1.1.2 and earlier systems cannot update directly to R1.5 software.
Upgrading systems running R1.1.2 and earlier software involves restoring the system from the R1.5 Recovery disk.
IPedge system running R1.2 an R1.3 software are updated to R1.5 using this files downloaded from the Toshiba FYI web site.
Important! The Public Numbering Plan will be deleted during this procedure. Determine and record the numbering plan for this location before starting.
IPedge systems running R1.5.1 and later software can use the Online Update process.
IPedge systems must be running R1.5.1, TGZ 107 software to update to R1.6 software. Refer to the IPedge Install manual for detailed instructions on updating