Deploying Avaya Aura
®
applications from
System Manager
© 2015-2016, Avaya, Inc.
All Rights Reserved. Notice
While reasonable efforts have been made to ensure that the information in this document is complete and accurate at the time of printing, Avaya assumes no liability for any errors. Avaya reserves the right to make changes and corrections to the information in this document without the obligation to notify any person or organization of such changes.
Documentation disclaimer
“Documentation” means information published in varying mediums which may include product information, operating instructions and performance specifications that are generally made available to users of products. Documentation does not include marketing materials. Avaya shall not be responsible for any modifications, additions, or deletions to the original published version of Documentation unless such modifications, additions, or deletions were performed by or on the express behalf of Avaya. End User agrees to indemnify and hold harmless Avaya, Avaya's agents, servants and employees against all claims, lawsuits, demands and judgments arising out of, or in connection with, subsequent modifications, additions or deletions to this documentation, to the extent made by End User.
Link disclaimer
Avaya is not responsible for the contents or reliability of any linked websites referenced within this site or Documentation provided by Avaya. Avaya is not responsible for the accuracy of any information, statement or content provided on these sites and does not
necessarily endorse the products, services, or information described or offered within them. Avaya does not guarantee that these links will work all the time and has no control over the availability of the linked pages.
Warranty
Avaya provides a limited warranty on Avaya hardware and software. Refer to your sales agreement to establish the terms of the limited warranty. In addition, Avaya’s standard warranty language, as well as information regarding support for this product while under warranty is available to Avaya customers and other parties through the Avaya Support website: https://support.avaya.com/helpcenter/
getGenericDetails?detailId=C20091120112456651010 under the link “Warranty & Product Lifecycle” or such successor site as designated by Avaya. Please note that if You acquired the product(s) from an authorized Avaya Channel Partner outside of the United States and Canada, the warranty is provided to You by said Avaya Channel Partner and not by Avaya.
“Hosted Service” means an Avaya hosted service subscription that You acquire from either Avaya or an authorized Avaya Channel Partner (as applicable) and which is described further in Hosted SAS or other service description documentation regarding the applicable hosted service. If You purchase a Hosted Service subscription, the foregoing limited warranty may not apply but You may be entitled to support services in connection with the Hosted Service as described further in your service description documents for the applicable Hosted Service. Contact Avaya or Avaya Channel Partner (as applicable) for more information.
Hosted Service
THE FOLLOWING APPLIES ONLY IF YOU PURCHASE AN AVAYA HOSTED SERVICE SUBSCRIPTION FROM AVAYA OR AN AVAYA CHANNEL PARTNER (AS APPLICABLE), THE TERMS OF USE FOR HOSTED SERVICES ARE AVAILABLE ON THE AVAYA WEBSITE, HTTPS://SUPPORT.AVAYA.COM/LICENSEINFO
UNDER THE LINK “Avaya Terms of Use for Hosted Services” OR SUCH SUCCESSOR SITE AS DESIGNATED BY AVAYA, AND ARE APPLICABLE TO ANYONE WHO ACCESSES OR USES THE HOSTED SERVICE. BY ACCESSING OR USING THE HOSTED SERVICE, OR AUTHORIZING OTHERS TO DO SO, YOU, ON BEHALF OF YOURSELF AND THE ENTITY FOR WHOM YOU ARE DOING SO (HEREINAFTER REFERRED TO INTERCHANGEABLY AS “YOU” AND “END USER”), AGREE TO THE TERMS OF USE. IF YOU ARE ACCEPTING THE TERMS OF USE ON BEHALF A
IF YOU DO NOT WISH TO ACCEPT THESE TERMS OF USE, YOU MUST NOT ACCESS OR USE THE HOSTED SERVICE OR AUTHORIZE ANYONE TO ACCESS OR USE THE HOSTED SERVICE.
Licenses
THE SOFTWARE LICENSE TERMS AVAILABLE ON THE AVAYA WEBSITE, HTTPS://SUPPORT.AVAYA.COM/LICENSEINFO, UNDER THE LINK “AVAYA SOFTWARE LICENSE TERMS (Avaya Products)” OR SUCH SUCCESSOR SITE AS DESIGNATED BY AVAYA, ARE APPLICABLE TO ANYONE WHO DOWNLOADS, USES AND/OR INSTALLS AVAYA SOFTWARE, PURCHASED FROM AVAYA INC., ANY AVAYA AFFILIATE, OR AN AVAYA CHANNEL PARTNER (AS APPLICABLE) UNDER A COMMERCIAL AGREEMENT WITH AVAYA OR AN AVAYA CHANNEL PARTNER. UNLESS OTHERWISE AGREED TO BY AVAYA IN WRITING, AVAYA DOES NOT EXTEND THIS LICENSE IF THE SOFTWARE WAS OBTAINED FROM ANYONE OTHER THAN AVAYA, AN AVAYA AFFILIATE OR AN AVAYA CHANNEL PARTNER; AVAYA RESERVES THE RIGHT TO TAKE LEGAL ACTION AGAINST YOU AND ANYONE ELSE USING OR SELLING THE SOFTWARE WITHOUT A LICENSE. BY INSTALLING, DOWNLOADING OR USING THE SOFTWARE, OR AUTHORIZING OTHERS TO DO SO, YOU, ON BEHALF OF YOURSELF AND THE ENTITY FOR WHOM YOU ARE INSTALLING, DOWNLOADING OR USING THE SOFTWARE (HEREINAFTER REFERRED TO
INTERCHANGEABLY AS “YOU” AND “END USER”), AGREE TO THESE TERMS AND CONDITIONS AND CREATE A BINDING CONTRACT BETWEEN YOU AND AVAYA INC. OR THE APPLICABLE AVAYA AFFILIATE (“AVAYA”).
Avaya grants You a license within the scope of the license types described below, with the exception of Heritage Nortel Software, for which the scope of the license is detailed below. Where the order documentation does not expressly identify a license type, the applicable license will be a Designated System License. The applicable number of licenses and units of capacity for which the license is granted will be one (1), unless a different number of licenses or units of capacity is specified in the documentation or other materials available to You. “Software” means computer programs in object code, provided by Avaya or an Avaya Channel Partner, whether as stand-alone products, pre-installed on hardware products, and any upgrades, updates, patches, bug fixes, or modified versions thereto. “Designated Processor” means a single stand-alone computing device. “Server” means a Designated Processor that hosts a software application to be accessed by multiple users. “Instance” means a single copy of the Software executing at a particular time: (i) on one physical machine; or (ii) on one deployed software virtual machine (“VM”) or similar deployment.
License type(s)
Designated System(s) License (DS). End User may install and use each copy or an Instance of the Software only on a number of Designated Processors up to the number indicated in the order. Avaya may require the Designated Processor(s) to be identified in the order by type, serial number, feature key, Instance, location or other specific designation, or to be provided by End User to Avaya through electronic means established by Avaya specifically for this purpose.
Concurrent User License (CU). End User may install and use the Software on multiple Designated Processors or one or more Servers, so long as only the licensed number of Units are accessing and using the Software at any given time. A “Unit” means the unit on which Avaya, at its sole discretion, bases the pricing of its licenses and can be, without limitation, an agent, port or user, an e-mail or voice mail account in the name of a person or corporate function (e.g., webmaster or helpdesk), or a directory entry in the administrative database utilized by the Software that permits one user to interface with the Software. Units may be linked to a specific, identified Server or an Instance of the Software.
Database License (DL). End User may install and use each copy or an Instance of the Software on one Server or on multiple Servers provided that each of the Servers on which the Software is installed communicates with no more than one Instance of the same
indicated in the order provided that the performance capacity of the Server(s) does not exceed the performance capacity specified for the Software. End User may not re-install or operate the Software on Server(s) with a larger performance capacity without Avaya’s prior consent and payment of an upgrade fee.
Named User License (NU). You may: (i) install and use each copy or Instance of the Software on a single Designated Processor or Server per authorized Named User (defined below); or (ii) install and use each copy or Instance of the Software on a Server so long as only authorized Named Users access and use the Software. “Named User”, means a user or device that has been expressly authorized by Avaya to access and use the Software. At Avaya’s sole discretion, a “Named User” may be, without limitation, designated by name, corporate function (e.g., webmaster or helpdesk), an e-mail or voice mail account in the name of a person or corporate function, or a directory entry in the administrative database utilized by the Software that permits one user to interface with the Software.
Shrinkwrap License (SR). You may install and use the Software in accordance with the terms and conditions of the applicable license agreements, such as “shrinkwrap” or “clickthrough” license accompanying or applicable to the Software (“Shrinkwrap License”). Heritage Nortel Software
“Heritage Nortel Software” means the software that was acquired by Avaya as part of its purchase of the Nortel Enterprise Solutions Business in December 2009. The Heritage Nortel Software is the software contained within the list of Heritage Nortel Products located at https://support.avaya.com/LicenseInfo under the link “Heritage Nortel Products” or such successor site as designated by Avaya. For Heritage Nortel Software, Avaya grants Customer a license to use Heritage Nortel Software provided hereunder solely to the extent of the authorized activation or authorized usage level, solely for the purpose specified in the Documentation, and solely as embedded in, for execution on, or for communication with Avaya equipment. Charges for Heritage Nortel Software may be based on extent of activation or use authorized as specified in an order or invoice. Copyright
Except where expressly stated otherwise, no use should be made of materials on this site, the Documentation, Software, Hosted Service, or hardware provided by Avaya. All content on this site, the documentation, Hosted Service, and the product provided by Avaya including the selection, arrangement and design of the content is owned either by Avaya or its licensors and is protected by copyright and other intellectual property laws including the sui generis rights relating to the protection of databases. You may not modify, copy, reproduce, republish, upload, post, transmit or distribute in any way any content, in whole or in part, including any code and software unless expressly authorized by Avaya. Unauthorized reproduction, transmission, dissemination, storage, and or use without the express written consent of Avaya can be a criminal, as well as a civil offense under the applicable law.
Virtualization
The following applies if the product is deployed on a virtual machine. Each product has its own ordering code and license types. Note that each Instance of a product must be separately licensed and ordered. For example, if the end user customer or Avaya Channel Partner would like to install two Instances of the same type of products, then two products of that type must be ordered.
Third Party Components
“Third Party Components” mean certain software programs or portions thereof included in the Software or Hosted Service may contain software (including open source software) distributed under third party agreements (“Third Party Components”), which contain terms regarding the rights to use certain portions of the Software (“Third Party Terms”). As required, information regarding distributed
software. The Third Party Terms shall take precedence over these Software License Terms, solely with respect to the applicable Third Party Components to the extent that these Software License Terms impose greater restrictions on You than the applicable Third Party Terms.
The following applies only if the H.264 (AVC) codec is distributed with the product. THIS PRODUCT IS LICENSED UNDER THE AVC PATENT PORTFOLIO LICENSE FOR THE PERSONAL USE OF A CONSUMER OR OTHER USES IN WHICH IT DOES NOT RECEIVE REMUNERATION TO (i) ENCODE VIDEO IN COMPLIANCE WITH THE AVC STANDARD (“AVC VIDEO”) AND/OR (ii) DECODE AVC VIDEO THAT WAS ENCODED BY A CONSUMER ENGAGED IN A PERSONAL ACTIVITY AND/OR WAS OBTAINED FROM A VIDEO PROVIDER LICENSED TO PROVIDE AVC VIDEO. NO LICENSE IS GRANTED OR SHALL BE IMPLIED FOR ANY OTHER USE. ADDITIONAL INFORMATION MAY BE OBTAINED FROM MPEG LA, L.L.C. SEE HTTP://WWW.MPEGLA.COM.
Service Provider
THE FOLLOWING APPLIES TO AVAYA CHANNEL PARTNER’S HOSTING OF AVAYA PRODUCTS OR SERVICES. THE PRODUCT OR HOSTED SERVICE MAY USE THIRD PARTY COMPONENTS SUBJECT TO THIRD PARTY TERMS AND REQUIRE A SERVICE PROVIDER TO BE INDEPENDENTLY LICENSED DIRECTLY FROM THE THIRD PARTY SUPPLIER. AN AVAYA CHANNEL PARTNER’S HOSTING OF AVAYA PRODUCTS MUST BE AUTHORIZED IN WRITING BY AVAYA AND IF THOSE HOSTED PRODUCTS USE OR EMBED CERTAIN THIRD PARTY SOFTWARE, INCLUDING BUT NOT LIMITED TO MICROSOFT SOFTWARE OR CODECS, THE AVAYA CHANNEL PARTNER IS REQUIRED TO INDEPENDENTLY OBTAIN ANY APPLICABLE LICENSE AGREEMENTS, AT THE AVAYA CHANNEL PARTNER’S EXPENSE, DIRECTLY FROM THE APPLICABLE THIRD PARTY SUPPLIER.
WITH RESPECT TO CODECS, IF THE AVAYA CHANNEL PARTNER IS HOSTING ANY PRODUCTS THAT USE OR EMBED THE G.729 CODEC, H.264 CODEC, OR H.265 CODEC, THE AVAYA CHANNEL PARTNER ACKNOWLEDGES AND AGREES THE AVAYA CHANNEL PARTNER IS RESPONSIBLE FOR ANY AND ALL RELATED FEES AND/OR ROYALTIES. THE G.729 CODEC IS LICENSED BY SIPRO LAB TELECOM INC. SEE
WWW.SIPRO.COM/CONTACT.HTML. THE H.264 (AVC) CODEC IS LICENSED UNDER THE AVC PATENT PORTFOLIO LICENSE FOR THE PERSONAL USE OF A CONSUMER OR OTHER USES IN WHICH IT DOES NOT RECEIVE REMUNERATION TO: (I) ENCODE VIDEO IN COMPLIANCE WITH THE AVC STANDARD (“AVC VIDEO”) AND/OR (II) DECODE AVC VIDEO THAT WAS ENCODED BY A CONSUMER ENGAGED IN A PERSONAL ACTIVITY AND/OR WAS OBTAINED FROM A VIDEO PROVIDER LICENSED TO PROVIDE AVC VIDEO. NO LICENSE IS GRANTED OR SHALL BE IMPLIED FOR ANY OTHER USE. ADDITIONAL INFORMATION FOR H.264 (AVC) AND H.265 (HEVC) CODECS MAY BE OBTAINED FROM MPEG LA, L.L.C. SEE HTTP:// WWW.MPEGLA.COM.
Compliance with Laws
You acknowledge and agree that it is Your responsibility for
complying with any applicable laws and regulations, including, but not limited to laws and regulations related to call recording, data privacy, intellectual property, trade secret, fraud, and music performance rights, in the country or territory where the Avaya product is used. Preventing Toll Fraud
“Toll Fraud” is the unauthorized use of your telecommunications system by an unauthorized party (for example, a person who is not a corporate employee, agent, subcontractor, or is not working on your company's behalf). Be aware that there can be a risk of Toll Fraud associated with your system and that, if Toll Fraud occurs, it can
the Avaya Support website: https://support.avaya.com or such successor site as designated by Avaya.
Security Vulnerabilities
Information about Avaya’s security support policies can be found in the Security Policies and Support section of https://
support.avaya.com/security.
Suspected Avaya product security vulnerabilities are handled per the Avaya Product Security Support Flow (https://
support.avaya.com/css/P8/documents/100161515). Downloading Documentation
For the most current versions of Documentation, see the Avaya Support website: https://support.avaya.com, or such successor site as designated by Avaya.
Contact Avaya Support
See the Avaya Support website: https://support.avaya.com for product or Hosted Service notices and articles, or to report a problem with your Avaya product or Hosted Service. For a list of support telephone numbers and contact addresses, go to the Avaya Support website: https://support.avaya.com (or such successor site as designated by Avaya), scroll to the bottom of the page, and select Contact Avaya Support.
Trademarks
The trademarks, logos and service marks (“Marks”) displayed in this site, the Documentation, Hosted Service(s), and product(s) provided by Avaya are the registered or unregistered Marks of Avaya, its affiliates, its licensors, its suppliers, or other third parties. Users are not permitted to use such Marks without prior written consent from Avaya or such third party which may own the Mark. Nothing contained in this site, the Documentation, Hosted Service(s) and product(s) should be construed as granting, by implication, estoppel, or otherwise, any license or right in and to the Marks without the express written permission of Avaya or the applicable third party. Avaya and Avaya Aura® are registered trademarks of Avaya Inc.
All non-Avaya trademarks are the property of their respective owners. Linux® is the registered trademark of Linus Torvalds in the U.S. and
Contents
Chapter 1: Introduction
... 9
Purpose
... 9
Prerequisites
... 9
Change history
... 9
Chapter 2: Avaya Aura overview
... 11
Avaya Aura® Virtualized offers
... 11
Appliance Virtualization Platform overview
... 11
Fresh deployment of Avaya Aura® applications
... 13
Solution Deployment Manager
... 13
Solution Deployment Manager overview
... 13
Solution Deployment Manager client
... 14
Solution Deployment Manager
... 20
Virtual machine management
... 22
Utility Services in the Avaya Aura® Virtualized Appliance offer
... 23
Chapter 3: Planning and configuration
... 24
Supported servers
... 24
Software requirements
... 24
Chapter 4: Initial setup and connectivity
... 26
Accessing Solution Deployment Manager
... 26
Deployment checklist
... 26
Chapter 5: Preinstallation tasks
... 29
Installing Appliance Virtualization Platform
... 29
Configuring servers preinstalled with Appliance Virtualization Platform
... 31
Uploading a file to the software library
... 34
Downloading the OVA file to System Manager
... 35
Chapter 6: Deploying Avaya Aura
®applications
... 36
Managing the location
... 36
Viewing a location
... 36
Adding a location
... 36
Editing the location
... 37
Deleting a location
... 37
VM Management field descriptions
... 37
New and Edit location field descriptions
... 42
Managing the host
... 43
Adding an ESXi host
... 43
Editing an ESXi host
... 44
Changing the network settings for an Appliance Virtualization Platform host from Solution
Deployment Manager
... 47
Changing the password for an Appliance Virtualization Platform host
... 50
Enabling and disabling SSH on Appliance Virtualization Platform from Solution Deployment Manager
... 51
Enabling and disabling SSH on Appliance Virtualization Platform from System Manager CLI
... 51
Changing the IP address and default gateway of the host
... 52
Shutting down the Appliance Virtualization Platform host
... 53
Restarting the Appliance Virtualization Platform host
... 54
Deleting an ESXi host
... 54
Mapping the ESXi host to an unknown location
... 54
New and Edit host field descriptions
... 55
Change Network Parameters field descriptions
... 55
Host Network / IP Settings field descriptions
... 56
Change Password field descriptions
... 57
Update field descriptions
... 58
Managing the virtual machine
... 58
Deploying the System Manager OVA file by using the Solution Deployment Manager client
... 58
VM Deployment field descriptions
... 60
Installing service packs and software patches on System Manager by using the Solution Deployment Manager client
... 63
Managing the virtual machine
... 64
Deploying the Utility Services OVA file
... 64
Deploying an OVA file for an Avaya Aura® application
... 66
Editing a virtual machine
... 68
Deleting a virtual machine
... 70
Changing the network parameters of Appliance Virtualization Platform and Avaya Aura® applications
... 70
Updating Services Port Static Routing on an Avaya Aura® application
... 72
Starting a virtual machine from Solution Deployment Manager
... 72
Stopping a virtual machine from Solution Deployment Manager
... 73
Restarting a virtual machine from Solution Deployment Manager
... 73
VM Deployment field descriptions
... 73
VM Deployment Configuration and Network Parameters field descriptions
... 77
Update Static Routing field descriptions
... 80
Installed Patches field descriptions
... 80
Update VM field descriptions
... 81
Reestablish Connection field descriptions
... 81
Network parameter update for Avaya Aura® applications
... 82
Certificate validation
... 83
Certification validation
... 83
Generating and accepting certificates
... 84
Updating the certificate on the ESXi host from VMware
... 85
Managing certificates for existing hosts
... 86
Generating new self-signed certificates for the ESXi host
... 87
Managing vCenter
... 88
Adding a vCenter to Solution Deployment Manager
... 88
Editing vCenter
... 89
Deleting vCenter from Solution Deployment Manager
... 89
Map vCenter field descriptions
... 90
New vCentre and Edit vCentre field descriptions
... 91
Monitoring a host and virtual machine
... 92
Monitoring a host
... 92
Monitoring a virtual machine
... 92
Chapter 7: Installing software patches, service packs, and feature packs for
applications
... 93
Installing software patches
... 93
Installed Patches field descriptions
... 94
Chapter 8: Out of Band Management configuration
... 97
Avaya Aura® Out of Band Management
... 97
Appliance Virtualization Platform Out of Band Management
... 98
Out of Band Management in Virtualized Environment
... 100
Utility Services Out of Band Management
... 100
System Manager Out of Band Management
... 101
Out of Band Management in System Manager
... 101
Configuring Out of Band Management on System Manager
... 102
Configuring Out of Band Management on System Manager in the Geographic Redundancy setup
... 103
Communication Manager Out of Band Management
... 104
Detailed description of Out of Band Management
... 104
Out of Band Management management administration
... 105
Screens for administering Out-of-Band management
... 105
Administering the Out of Band Management of management data
... 105
Adding a static route between the Out-of-Band management interface and the enterprise network
... 107
Session Manager Out of Band Management ports
... 107
Application Enablement Services Out of Band Management
... 108
Out of Band Management in Avaya Breeze™
... 109
Out of Band Management in SAL
... 109
Chapter 9: Post Installation Verification
... 111
Verifying the installation of System Manager
... 111
Post installation checklist
... 111
Verifying the connections
... 112
Downloading and installing an authentication file on the Avaya Aura® application
... 114
Chapter 11: Resources
... 116
Documentation
... 116
Finding documents on the Avaya Support website
... 117
Training
... 117
Viewing Avaya Mentor videos
... 119
Support
... 119
Glossary
... 120
Chapter 1: Introduction
Purpose
This document contains installation, configuration, initial administration, and basic maintenance checklist and procedures for deploying applications in Avaya Aura® Virtualized Appliance on
Appliance Virtualization Platform by using Avaya Aura® System Manager Solution Deployment
Manager.
This document is intended for people who install and configure a verified Avaya Aura® application
reference configuration at a customer site.
Prerequisites
Before you deploy the product, ensure that you have the following knowledge, skills, and tools:
Knowledge
• Avaya Aura® releases
• Linux® operating system
• VMware® and virtualized environment
Skills
• VMware® and virtualized environment
Tools
• Avaya supported servers or VMware® supported servers
• Solution Deployment Manager client if System Manager is unavailable or unreachable • System Manager virtual machine resource requirements for each profile.
• Configuration tools and utilities
Issue Date Summary of changes
2.0 May 2016 • Added procedures for installing the Release 7.0.1 feature pack on Release 7.0.
• Added procedures for the following in VM Management:
- Enabling and disabling SSH on Appliance Virtualization Platform. - Changing network settings that includes, changing VLAN ID, NIC
speed, and NIC team and unteaming for an Appliance Virtualization Platform host.
- Restarting the Appliance Virtualization Platform host. - Shutting down the Appliance Virtualization Platform host.
- Viewing the job history of all operations that are performed on VM Management.
- Updating the license status of hosts and virtual machines state. - Removing the Appliance Virtualization Platform patch.
- Changing the IP address and default gateway of the host. - Validating the certificates.
• Cleaning up the current pending or pause state of applications during upgrade.
• Added procedure for installing custom patches for Avaya Aura®
applications.
• Added flexibility to select application and data port numbers during the Solution Deployment Manager client installation.
• Added support for Dell™ PowerEdge™ R630 and HP ProLiant DL360
G9 common servers.
• Added Out of Band Management configuration chapter. Introduction
Chapter 2: Avaya Aura overview
Avaya Aura
®Virtualized offers
Starting with Release 7.0, Avaya Aura® supports the following two Avaya virtualization offers based
on VMware:
• Avaya Aura® Virtualized Appliance (VA) - Avaya-provided server, Avaya Appliance
Virtualization Platform, based on the customized OEM version of VMware® ESXi 5.5.
• Avaya Aura® Virtualized Environment (VE) - Customer-provided VMware infrastructure
The virtualization offers, provides the following benefits:
• Simplifies IT management using common software administration and maintenance. • Requires fewer servers and racks which reduces the footprint.
• Lowers power consumption and cooling requirements. • Enables capital equipment cost savings.
• Lowers operational expenses.
• Uses standard operating procedures for both Avaya and non-Avaya products.
• Deploys Avaya Aura® virtual products in a virtualized environment on Avaya provided servers
or customer-specified servers and hardware.
• Business can scale rapidly to accommodate growth and to respond to changing business requirements
Related links
Appliance Virtualization Platform overview on page 11
Appliance Virtualization Platform overview
From Release 7.0, Avaya uses the VMware®-based Avaya Appliance Virtualization Platform to
provide virtualization for Avaya Aura® applications in Avaya Aura® Virtualized Appliance offer.
Avaya Aura® Virtualized Appliance offer includes:
• Common Servers: Dell™ PowerEdge™ R610, Dell™ PowerEdge™ R620, HP ProLiant DL360 G7,
HP ProLiant DL360p G8, Dell™ PowerEdge™ R630, and HP ProLiant DL360 G9
Avaya-supplied servers. Appliance Virtualization Platform provides greater flexibility in scaling customer solutions to individual requirements.
From Release 7.0, Appliance Virtualization Platform replaces System Platform.
Avaya Aura® Release 7.0.1 supports the following applications on Appliance Virtualization Platform:
• Utility Services 7.0.1 • System Manager 7.0.1 • Session Manager 7.0.1
• Branch Session Manager 7.0.1 • Communication Manager 7.0.1
• Application Enablement Services 7.0.1 • WebLM 7.0.1
• Avaya Breeze™ 3.1.1
• SAL 2.5
• Communication Manager Messaging 7.0 • Avaya Aura® Media Server 7.7.0.292 (SP3)
• Avaya Scopia® 8.3.5
• Avaya Proactive Contact 5.1.2
For more information about installing Avaya Proactive Contact and administering Appliance Virtualization Platform with Avaya Proactive Contact, see the Avaya Proactive Contact documentation.
Related links
Avaya Aura Virtualized offers on page 11
Fresh deployment of Avaya Aura
®applications
In Avaya Aura® Virtualized Appliance model, for fresh deployments, Avaya Aura® is available to
end-users through a set of Avaya-supplied common servers. Avaya Aura® Virtualized Applianceis
prepackaged with the virtualization software, and delivered to customers in a ready-to-run state. In a customer-provided environment, VMware user can install Avaya Aura® applications by using
vCenter that VMware provides.
Solution Deployment Manager
Solution Deployment Manager overview
Solution Deployment Manager is a centralized software management solution in System Manager that provides deployments, upgrades, migrations, and updates to Avaya Aura® 7.0 applications.
Solution Deployment Manager supports the operations on customer Virtualized Environment and Avaya Aura® Virtualized Appliance model.
Solution Deployment Manager provides the combined capabilities that Software Management, Avaya Virtual Application Manager, and System Platform provided in earlier releases.
Note:
In Release 7.0.1, Solution Deployment Manager does not support migration of Virtualized Environment-based 6.x applications to Release 7.0.1 in customer Virtualized Environment. Use vSphere Client to migrate to customer Virtualized Environment.
Release 7.0 and later supports a standalone version of Solution Deployment Manager, the Solution Deployment Manager client. For more information, see Using the Solution Deployment Manager client.
System Manager is the primary management solution for Avaya Aura® 7.0 and later applications.
System Manager with the Solution Deployment Manager runs on:
From Release 7.0, Appliance Virtualization Platform replaces System Platform.
• Customer-provided Virtualized Environment solution: Avaya Aura® applications are deployed
on customer-provided, VMware® certified hardware.
With Solution Deployment Manager, you can perform the following operations in Virtualized Environment and Avaya Aura® Virtualized Appliance models:
• Deploy Avaya Aura® applications.
• Upgrade and migrate Avaya Aura® applications.
• Download Avaya Aura® applications.
• Install service packs, feature packs, and software patches for the following Avaya Aura®
applications:
- Communication Manager and associated devices, such as gateways, media modules, and TN boards.
- Session Manager
- Branch Session Manager - Utility Services
- Appliance Virtualization Platform, the ESXi host that is running on the Avaya Aura®
Virtualized Appliance.
The upgrade process from Solution Deployment Manager involves the following key tasks: • Discover the Avaya Aura® applications.
• Refresh applications and associated devices, and download the necessary software components.
• Run the preupgrade check to ensure successful upgrade environment. • Upgrade Avaya Aura® applications.
• Install software patch, service pack, or feature pack on Avaya Aura® applications.
For more information about the setup of the Solution Deployment Manager functionality that is part of System Manager 7.x, see Avaya Aura® System Manager Solution Deployment Manager Job-Aid.
Solution Deployment Manager client
For the initial System Manager deployment or when System Manager is inaccessible, you can use the Solution Deployment Manager client. The client can reside on the computer of the technician. The Solution Deployment Manager client provides the functionality to install the OVAs on an Avaya-provided server or customer-Avaya-provided Virtualized Environment.
A technician can gain access to the user interface of the Solution Deployment Manager client from the computer or web browser.
The Solution Deployment Manager client runs on Windows 7.0 and Windows 8, 64 bit. Use the Solution Deployment Manager client to:
• Deploy System Manager and Avaya Aura® applications on Avaya appliances and Virtualized
Environment.
• Upgrade System Platform-based System Manager.
• Install System Manager software patches, service packs, and feature packs. • Install Appliance Virtualization Platform patches.
• Restart and shutdown the Appliance Virtualization Platform host. • Start, stop, and restart a virtual machine.
• Change the footprint of Avaya Aura® applications that support dynamic resizing. For example,
Session Manager and Avaya Breeze™. Note:
You can deploy or upgrade the System Manager virtual machine only by using the Solution Deployment Manager client.
Figure 1: Solution Deployment Manager client dashboard Related links
Capability comparison between System Manager Solution Deployment Manager and the Solution Deployment Manager client on page 15
Installing the Solution Deployment Manager client on your computer on page 16
Accessing the Solution Deployment Manager client dashboard on page 18
Solution Deployment Manager client capabilities on page 19
Capability comparison between System Manager Solution Deployment
Manager and the Solution Deployment Manager client
Centralized Solution Deployment Manager Solution Deployment Manager client
Manage virtual machine lifecycle Manage virtual machine lifecycle Deploy Avaya Aura® applications Deploy Avaya Aura® applications
Deploy hypervisor patches only for Appliance Virtualization Platform
Deploy hypervisor patches only for Appliance Virtualization Platform
Upgrade Avaya Aura® applications Upgrade System Platform-based System Manager
Centralized Solution Deployment Manager Solution Deployment Manager client
Release 7.x supports upgrades from Linux-based or System Platform-based to Virtualized Environment or Appliance Virtualization Platform. Release 7.0.1 does not support Virtualized Environment to Virtualized Environment upgrades.
Install software patches for Avaya Aura® applications
excluding System Manager application
Install System Manager patches
Discover Avaya Aura® applications Deploy System Manager
Analyze Avaya Aura® applications
-Create and use the software library
-Related links
Solution Deployment Manager client on page 14
Installing the Solution Deployment Manager client on your computer
About this task
In Avaya Aura® Virtualized Appliance offer, when the centralized Solution Deployment Manager on
System Manager is unavailable, use the Solution Deployment Manager client to deploy the Avaya Aura® applications.
You can use the Solution Deployment Manager client to install software patches and hypervisor patches.
Use the Solution Deployment Manager client to deploy, upgrade, and update System Manager.
Note:
Click Next only once, and wait for the installer to load the next screen.
Before you begin
1. If an earlier version of the Solution Deployment Manager client is running on the computer, remove the older version from Control Panel > Programs > Programs and Features. If you are unable to uninstall, see Uninstalling the Solution Deployment Manager client. 2. Ensure that Windows 7 or 8.1 64-bit operating system is installed on the computer.
Tip:
On Computer, right-click properties, and ensure that Windows edition section displays the version of Windows operating system.
3. Ensure that at least 5 GB of disk space is available at the location where you want to install the client.
Tip:
Using the Windows file explorer, click Computer, and verify that the Hard Disk Drives section displays the available disk space available.
4. To avoid port conflict, stop any application server that is running on your computer.
Tip:
From the system tray, open the application service monitor, select the application server that you want to stop, and click Stop.
5. Ensure that the firewall allows the ports that are required to install the Solution Deployment Manager client installation and use the Solution Deployment Manager functionality.
6. Ensure that ports support Avaya Aura® 7.0.1 supported browsers.
7. Close all applications that are running on your computer.
8. Do not set CATALINA_HOME as environment variable on the computer where you install the Solution Deployment Manager client.
Tip:
On Computer, right-click properties, and perform the following: a. In the left navigation pane, click Advanced system settings.
b. On the System Properties dialog box, click Advanced tab, and click Environment Variables.
c. Verify the system variables.
9. Ensure that the computer on which the Solution Deployment Manager client is running is connected to the network.
Operations that you perform might fail if the computer is not connected to the network.
Procedure
1. Download the Avaya_SDMClient_win64_7.0.1.0.0620211_43.zip file from the Avaya PLDS website at https://plds.avaya.com/.
On the Avaya PLDS website, at https://plds.avaya.com/, click Support by Products >
Downloads, and provide the product System Manager, and version as 7.0.x.
2. Copy the zip file, and extract to a location on your computer by using the WinZip application. You can also copy the zip file to your software library directory, for example, c:/tmp/Aura. 3. Right click on the executable, and select Run as administrator to run the
Avaya_SDMClient_win64_7.0.1.0.0620211_43.exe file. The system displays the Avaya Solution Deployment Manager screen. 4. On the Welcome page, click Next.
5. On the License Agreement page, read the License Agreement, and if you agree to its terms, click I accept the terms of the license agreement and click Next.
6. On the Install Location page, perform one of the following:
• To install the Solution Deployment Manager client in the system-defined folder, click
Restore Default Folder.
8. On the Preinstallation Summary page, review the information, and click Next. 9. On the User Input page, perform the following:
a. To start the Solution Deployment Manager client at the start of the system, select the
Automatically start SDM service at startup check box.
b. To change the default directory, in Select Location of Software Library Directory, click
Choose and select a directory.
The system saves the artifacts in the specified directory. During deployments, you can select the OVA file from the directory.
c. In Data Port No, select the appropriate port from the range 1527 through 1627. d. In Application Port No, select the appropriate port from the range 443 through 543. e. (Optional) Click Reset All to Default.
10. On the Summary and Validation page, verify the product information and the system requirements.
The system performs the feasibility checks, such as disk space and memory. If the requirements are not met, the system displays an error message. To continue with the installation, make the disk space, memory, and the ports available.
11. Click Install.
12. To exit the installer, on the Install Complete page, click Done. The installer creates a shortcut on the desktop.
13. To start the client, click the Solution Deployment Manager client icon, .
Next steps
• Configure the laptop to get connected to the services port if you are using the services port to install.
• Connect the Solution Deployment Manager client to Appliance Virtualization Platform through the customer network or services port.
For more information, see “Methods to connect Solution Deployment Manager client to Appliance Virtualization Platform”.
Related links
Solution Deployment Manager client on page 14
Accessing the Solution Deployment Manager client dashboard
About this task
Note:
If you perform deploy, upgrade, and update operations from the Solution Deployment Manager client, ignore the steps that instruct you to access System Manager Solution Deployment Manager and the related navigation links.
Procedure
To start the Solution Deployment Manager client, perform one of the following: • Click Start > All Programs > Avaya, and click SDM Client > Avaya SDM Client. •
Click .
Related links
Solution Deployment Manager client on page 14
Solution Deployment Manager client capabilities
The Solution Deployment Manager client provides the following capabilities and functionality: • Runs on the technician computer on the following operating systems:
- Windows 7, 64-bit Professional or Enterprise - Windows 8.1, 64-bit Professional or Enterprise
• Supports the same web browsers as System Manager Release 7.0.1.
• Provides the user interface with similar look and feel as the central Solution Deployment Manager in System Manager Release 7.0.1.
• Supports deploying the System Manager OVA. The Solution Deployment Manager client is the only option to deploy System Manager.
• Supports Flexible footprint feature. The size of the virtual resources depends on the capacity requirements of the Avaya Aura® applications.
• Defines the physical location, Appliance Virtualization Platform or ESXi host, and discovers virtual machines that are required for application deployments and virtual machine life cycle management.
• Manages lifecycle of the OVA applications that are deployed on the ESXi host. The lifecycle includes start, stop, reset virtual machines, and establishing trust for virtual machines. • Deploys the Avaya Aura® applications that can be deployed from the central Solution
Deployment Manager for Avaya Aura® Virtualized Appliance and customer Virtualized
Environment. You can deploy one application at a time.
• Configures application and networking parameters required for application deployments. • Supports the local computer or an HTTP URL to select the application OVA file for deployment.
You do not need access to PLDS.
• Supports changing the hypervisor IP address on Appliance Virtualization Platform. • Supports installing patches for the hypervisor on Appliance Virtualization Platform. • Supports installing software patches, service packs, and feature packs only for System
Manager.
Related links
Solution Deployment Manager client on page 14
Solution Deployment Manager
The Solution Deployment Manager capability simplifies and automates the deployment and upgrade process.
With Solution Deployment Manager, you can deploy the following Avaya Aura® applications in
Release 7.0.1:
• Utility Services 7.0.1 • System Manager 7.0.1 • Session Manager 7.0.1
• Branch Session Manager 7.0.1 • Communication Manager 7.0.1
• Application Enablement Services 7.0.1 • WebLM 7.0.1
• Avaya Breeze™ 3.1.1
• SAL 2.5
• Communication Manager Messaging 7.0 • Avaya Aura® Media Server 7.7.0.292 (SP3)
• Avaya Scopia® 8.3.5
• Avaya Proactive Contact 5.1.2
For more information about installing Avaya Proactive Contact and administering Appliance Virtualization Platform with Avaya Proactive Contact, see the Avaya Proactive Contact documentation.
Note:
You must deploy the Release 7.0 OVA, and then install the Release 7.0.1 file on the Avaya Aura® Release 7.0 application.
With Solution Deployment Manager, you can migrate, upgrade, and update the following applications:
• Linux-based Communication Manager 5.x and the associated devices, such as Gateways, TN boards, and media modules.
Note:
In bare metal Linux-based deployments, the applications are directly installed on the server and not as a virtual machine.
• Linux-based Session Manager 6.x
• System Platform-based Communication Manager
- Duplex CM Main / Survivable Core with Communication Manager
- Simplex CM Main / Survivable Core with Communication Manager, Communication Manager Messaging, and Utility Services
- Simplex Survivable Remote with Communication Manager, Branch Session Manager, and Utility Services
- Embedded CM Main with Communication Manager, Communication Manager Messaging, and Utility Services
- Embedded Survivable Remote with Communication Manager, Branch Session Manager, and Utility Services
• System Platform-based Branch Session Manager
- Simplex Survivable Remote with Communication Manager, Branch Session Manager, and Utility Services
- Embedded Survivable Remote with Communication Manager, Branch Session Manager, and Utility Services
Note:
However, you must manually migrate Services virtual machine that is part of the template. The centralized deployment and upgrade process provide better support to customers who want to upgrade their systems to Avaya Aura® Release 7.0.1. The process reduces the upgrade time and
error rate.
Solution Deployment Manager dashboard
You can gain access to the Solution Deployment Manager dashboard from the System Manager web console or by installing the Solution Deployment Manager client.
Solution Deployment Manager capabilities
With Solution Deployment Manager, you can perform deployment and upgrade-related tasks by using the following links:
• Manage Software: To upgrade IP Office.
• VM Management: To deploy OVA files for the supported Avaya Aura® application.
• Upgrade Management: To upgrade Communication Manager that includes TN boards, media gateways and media modules, Session Manager, Communication Manager Messaging, Utility Services, Branch Session Manager to Release 7.0.1.
• User Settings: To configure the location from where System Manager displays information about the latest software and firmware releases.
• Download Management: To download the OVA files and firmware to which the customer is entitled. The download source can be the Avaya PLDS or an alternate source.
• Software Library Management: To configure the local or remote software library for storing the downloaded software and firmware files.
• Upload Version XML: To save the version.xml file to System Manager. You require the version.xml file to perform upgrades.
Virtual machine management
The VM Management link from Solution Deployment Manager provides the virtual machine management.
VM Management provides the following capabilities:
• Defines the physical location, Appliance Virtualization Platform or ESXi host, and discovers virtual machines that are required for application deployments and virtual machine life cycle management.
• Supports password change, patch installation, restart, shutdown, and certificate validation of host. Also, enables and disables SSH on the host.
• Manages lifecycle of the OVA applications that are deployed on the ESXi host. The lifecycle includes start, stop, reset virtual machines, and establishing trust for virtual machines. • Deploys Avaya Aura® application OVAs on customer-provided Virtualized Environment and
Avaya Aura® Virtualized Appliance environments.
• Removes the Avaya Aura® application OVAs that are deployed on a virtual machine.
• Configures application and networking parameters required for application deployments. • Supports flexible footprint definition based on capacity required for the deployment of the
Avaya Aura® application OVA.
You can deploy the OVA file on the virtual machine by using the System Manager Solution Deployment Manager and the Solution Deployment Manager client.
Related links
Certification validation on page 83
Utility Services in the Avaya Aura
®Virtualized Appliance
offer
From Avaya Aura® Release 7.0, Utility Services replaces the console domain (C-dom). Utility
Services runs the Services Port connection that was previously run through Dom-0 on System Platform. Therefore, Utility Services with the Services Port is a key component of the Avaya Aura®
Virtualized Appliance offer in Release 7.0, You must deploy Utility Services on each Appliance Virtualization Platform.
With Services Port, you can connect a laptop directly to Ethernet 1 on an Avaya-supported server, and connect the laptop to any of management interface of applications that run on an Appliance Virtualization Platform host. On the S8300D and S8300E servers, Services Port is on the front plate. The Services Port virtual machine also supports ASG logins and install of a customer ASG file on to the system. By default, a generic ASG file is available on the system.
The Services Port virtual machine incorporates the Serviceability Agent for alarming and log collection from System Manager.
From Avaya Aura® Release 7.0, Utility Services does not include IP Phone firmware. The
administrator must download the latest version of the firmware from PLDS and install on Utility Services.
Utility Services migration
In the Avaya Aura® Virtualized Appliance offer on Appliance Virtualization Platform, you require
Utility Services for services static routing. Therefore, you must deploy Utility Services if Utility Services is part of the solution.
In the following two use cases, you might require to deploy Utility Services.
1. Migration of Communication Manager or Session Manager on the Linux® server: Utility
Services is mandatory for migration of systems running on the Linux® server. In this case,
before you migrate, you must deploy Utility Services from VM Management.
2. Migration of Communication Manager or Session Manager on System Platform: In this case, the template already contains Utility Services. In this case, the process migrates Utility Services, and you do not require to deploy Utility Services separately.
Chapter 3: Planning and configuration
Supported servers
In the Avaya appliance model, the customer can deploy or upgrade to Avaya Aura® Release 7.0.1
applications on the following Avaya-provided servers: • Dell™ PowerEdge™ R610 2CPU MID2
• HP ProLiant DL360 G7 2CPU MID4 • Dell™ PowerEdge™ R620 2CPU MID3
• HP ProLiant DL360p G8 • Dell™ PowerEdge™ R630
• HP ProLiant DL360 G9
• S8300D, for Communication Manager and Branch Session Manager • S8300E, for Communication Manager and Branch Session Manager
• Intel 1006r server. Only to deploy Utility Services and Avaya Aura® Messaging OVA files.
Software requirements
Avaya Aura® supports the following software versions:
• Avaya Aura® Virtualized Appliance offer: Appliance Virtualization Platform 7.0.x on a
customized version of VMware® ESXi 5.5
• Customer-provided Virtualized Environment offer: Supports the following software versions: - VMware® vSphere ESXi 5.0
- VMware® vSphere ESXi 5.1
- VMware®vSphere ESXi 5.5
- VMware® vSphere ESXi 6.0
- VMware® vCenter Server 5.0
- VMware® vCenter Server 5.1
- VMware® vCenter Server 5.5
To view compatibility with other solution releases, see VMware Product Interoperability Matrix at http://partnerweb.vmware.com/comp_guide2/sim/interop_matrix.php.
Note:
Avaya Aura® Release 7.0 and later does not support ESXi releases earlier than 5.0.
Chapter 4: Initial setup and connectivity
Accessing Solution Deployment Manager
About this task
You require to start Solution Deployment Manager to deploy and upgrade virtual machines, and install service packs or patches.
Procedure
Perform one of the following:
• If System Manager is not already deployed, double-click the Solution Deployment Manager client. • If System Manager is available, on the web console, click Services > Solution Deployment
Manager.
Deployment checklist
Use the following checklist for the initial deployment of Appliance Virtualization Platform, Utility Services and System Manager by using the Solution Deployment Manager client.
# Action Link/Notes
1 Download the
Avaya_SDMClient_win64_7.0.1.0.0 620211_43.zip file from the Avaya Support website at http://
support.avaya.com.
Perform the task if System Manager is unavailable.
2 Install the
Avaya_SDMClient_win64_7.0.1.0.0 620211_43.exe file.
Installing the Solution Deployment Manager client on your computer on page 16
3 From the Avaya Support website at http:// support.avaya.com, download OVA files for Utility Services and System Manager, and Release 7.0.1 feature pack files for Utility Services, System Manager, and Appliance Virtualization Platform.
# Action Link/Notes
4 Ensure that the following is accessible: • Hostnames
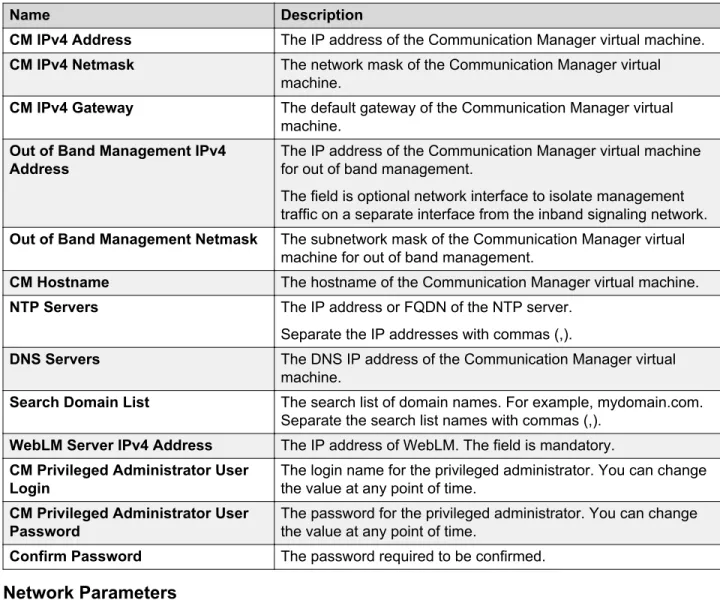
• Out of Band Management considerations
• Network configuration data such as naming conventions, IP address, netmask and gateway
-5 For Avaya Aura® Virtualized Appliance
deployments, install the supported server.
Supported servers on page 24
6 Install Appliance Virtualization Platform on the server for applications such as
Communication Manager and Branch Session Manager that use S8300D or S8300E.
Appliance Virtualization Platform is preinstalled on Common Release 2 and 3 servers.
Installing Appliance Virtualization Platform on page 29
7 Using the Solution Deployment Manager client, add a location.
Adding a location on page 36
8 Using the Solution Deployment Manager client, add the Appliance Virtualization Platform host, 192.168.13.6, to the location.
Adding an ESXi host on page 43
9 Deploy Utility Services OVA, and select the appropriate footprint size and the service mode.
While deploying OVA, provide the IP address of System Manager that you want to deploy.
Deploying the Utility Services OVA file
on page 64 10 Install the Utility Services 7.0.1 feature
pack.
Installing software patches on page 93
11 Using the Solution Deployment Manager client, deploy System Manager virtual machine.
Deploying the System Manager OVA file by using the Solution Deployment Manager client on page 58 12 Install the System Manager Release 7.0.1
bin file.
Installing service packs and software patches on System Manager by using the Solution Deployment Manager client on page 63
13 To activate the serviceability agent registration, reset the Utility Services virtual machine.
Use the following checklist to deploy all other Avaya Aura® applications by using the Solution
Deployment Manager client or from System Manager Solution Deployment Manager.
# Action Link/Notes
1 From the Avaya Support website at http:// support.avaya.com, download OVA files and feature pack files for Avaya Aura®
applications that you want to deploy.
-2 Ensure that the following is accessible: • Hostnames
• Out of Band Management considerations
• Network configuration data such as naming conventions, IP address, netmask and gateway
-3 For Avaya Aura® Virtualized Appliance
deployments, install the supported server.
Supported servers on page 24
4 Install Appliance Virtualization Platform on the server for applications such as
Communication Manager and Branch Session Manager that use S8300D or S8300E.
Appliance Virtualization Platform is preinstalled on Common Release 2 and 3 servers.
Installing Appliance Virtualization Platform on page 29
5 Add a location. Adding a location on page 36 6 Add an Appliance Virtualization Platform
host as 192.168.13.6.
Adding an ESXi host on page 43
7 Deploy Utility Services virtual machine, and install the Release 7.0.1 feature pack.
Deploying the Utility Services OVA file
on page 64
Installing software patches on page 93 8 Deploy Avaya Aura® applications one at a
time, and then install the Release 7.0.1 feature pack for each application.
Deploying an OVA file for an Avaya Aura application on page 66
Installing software patches on page 93 9 Verify the installation of all applications. Post installation checklist on page 111 Initial setup and connectivity
Chapter 5: Preinstallation tasks
Installing Appliance Virtualization Platform
About this task
Warning:
You can obtain the root password for the Appliance Virtualization Platform system from the USB configuration file. The file must be kept secure. After installation, you must change the root password for the Appliance Virtualization Platform host to a different value with the password change option from Solution Deployment Manager.
Install Appliance Virtualization Platform on one of the following servers: • Dell™ PowerEdge™ R610 2CPU MID2
• HP ProLiant DL360 G7 2CPU MID4 • Dell™ PowerEdge™ R620 2CPU MID3
• HP ProLiant DL360p G8 • Dell™ PowerEdge™ R630
• HP ProLiant DL360 G9
• S8300D for Communication Manager • S8300E for Communication Manager
Release 7.0 and later does not support S8510 and S8800 servers.
Before you begin
• Configure the USB drive.
• Ensure that the backup file is saved on a different server because after the Appliance Virtualization Platform installation, server restarts, and all data is lost.
• To use the Solution Deployment Manager client for deploying the virtual machines, install the Solution Deployment Manager client on your computer.
Note:
To install Appliance Virtualization Platform server while connected to the customer network, ensure that the IP address used for Appliance Virtualization Platform is not in use by another system. If the configured IP address is already in use on the network during installation, the installation process stops. You must remove the duplicate IP address, and restart the
Procedure
1. Insert the USB drive and the Appliance Virtualization Platform CD-ROM into the server. Use an external Avaya-approved USB and CD-ROM drives for installing Appliance Virtualization Platform on S8300D or S8300E. The only supported USB CD-ROM drive is Digistor DIG73322, comcode 700406267.
2. Log on to the System Platform web console, and click Server Management > Server Reboot/Shutdown > Reboot to restart the server.
Warning:
When the server restarts, Appliance Virtualization Platform is installed, and all existing data on the server is lost.
The system installs Appliance Virtualization Platform and ejects CD-ROM. The installation process might takes about 30 minutes to complete.
Note:
If using a monitor, the screen changes to black before the installation is complete. A message in red text might briefly display, which is an expected behavior. Do not take any action.
3. Remove the USB drive and CD-ROM.
Note:
When installing Appliance Virtualization Platform on an HP server, you must remove the USB drive when the server ejects CD-ROM. Otherwise, the server might become nonoperational on reboot. If the server becomes nonoperational, remove the USB drive, and restart the server.
4. Using an SSH client, connect to the server through the eth1 services port by using the following network parameters for your system:
• IP address: 192.168.13.5 • Netmask: 255.255.255.248 • Gateway: 192.168.13.1
The SSH client must use UTF-8. Alternatively, you can connect to the public network address that was configured during the installation from a computer on the customer network.
5. Log in to Appliance Virtualization Platform as root and provide the password that is configured in the spreadsheet.
The system displays the End user license agreement (EULA) screen. 6. Read the EULA, and type Y to accept the terms.
You can press any key to read EULA, and use the space bar to scroll down.
Warning:
Accept EULA before you deploy virtual machines. If deployments are attempted before you accept EULA, deployments fail.
7. On the System Manager web console, click Services > Solution Deployment Manager, and then click VM Management.
8. Install the Appliance Virtualization Platform patch.
For more information, see Installing the Appliance Virtualization Platform patch from Solution Deployment Manager.
9. Deploy the Utility Services virtual machine, and then all other virtual machines with the data that you noted in “System Platform and Template values”.
For instructions to deploy Utility Services and other virtual machines, see Deploying Avaya Aura® applications from System Manager.
10. From System Manager Solution Deployment Manager, install the required software patches for the virtual machines.
Configuring servers preinstalled with Appliance
Virtualization Platform
About this task
You can obtain the root password for the Appliance Virtualization Platform system from the USB configuration file. The file must be kept secure. After installation, you must change the root password for the Appliance Virtualization Platform host to a different value with the password change option from Solution Deployment Manager.
For newly purchased common servers, Appliance Virtualization Platform is preinstalled. This does not apply for migration. You must configure the customer network settings through the Solution Deployment Manager client that is installed on a computer that is running Windows. The media comes with the server. The new S8300D and S8300E servers require an installation at the customer site.
Note:
When possible, perform the deployment from the System Manager Solution Deployment Manager. Only when System Manager is unreachable, use the Solution Deployment Manager client that is installed on the computer.
Procedure
1. Turn on the server.
2. Install the Solution Deployment Manager client on the computer.
3. Configure the computer with the following: • IP address: 192.168.13.5
• Netmask: 255.255.255.248 • Gateway: 192.168.13.1
4. Connect to NIC2 with a network cable.
5. Start an SSH session, log in to 192.168.13.6 as root, and type Avaya123$ as password. The system prompts to change the password immediately.
6. To change the root password, perform the following: a. At the prompt, type the current UNIX password. b. Type the new password.
For more information about password rules, see “Password policy”. c. Type the password again.
The system changes the host password. 7. Read and accept the license terms.
8. Type cd /opt/avaya/bin.
Not all commands are available in the /opt/avaya/bin location, and must be run with ./. For example, ./nic_port. The system only runs the commands that are specified in the procedure from /opt/avaya/bin or as directed by Avaya Services. The system might get incorrectly configured if you run commands that are not specified in the procedure.
Most systems do not enable Out of Band Management. Use the set_oobm command only to enable Out of Band Management for the host and all virtual machines.
9. (Optional) To enable Out of Band Management on the Appliance Virtualization Platform host, type # ./set_oobm on.
The system displays Host Out of Band Management set up is complete. 10. At the prompt, do the following:
a. Type ./serverInitialNetworkConfig.
The host IP address details are mandatory. Though DNS and NTP values are optional, you must provide the values.
b. At the prompt, provide the following host details:
System is not in a default setup, please use SDM to change IP addresses Do you wish to setup networking? (y/n) y
Please enter IP addres for the AVP host in the format x.x.x.x For example 172.16.5.1
Please enter value 172.16.107.21
Please enter subnet mask for the AVP host in the format x.x.x.x For example 255.255.255.0
Please enter value 255.255.255.0
Please enter a default gateway for the AVP host in the format x.x.x.x For example 172.16.5.254
Please enter value 172.16.107.1
Please enter a hostname for the AVP host. For example myhost
Please enter value avphost
Please enter a domain for the AVP host. For example mydomain.com
Please enter value mydomain.com
Please enter a main DNS server for the AVP host. For example 172.16.10.54
Please enter value 172.16.107.1
Please enter a secondary DNS server for the AVP host. For example 172.16.10.54
Please enter value 172.16.107.2
Please enter a NTP server for the AVP host For example 172.16.10.55
Please enter value 172.16.107.50 Stopping ntpd
watchdog-ntpd: Terminating watchdog process with PID 33560 Starting ntpd
11. To verify the vmk0 settings, type # esxcli network ip interface ipv4 get.
Note:
Do not change the vmk1s address. vmk1s is fixed for the services port. The system displays the following details:
Name IPv4 Address IPv4 Netmask IPv4 Broadcast Address Type DHCP DNS ---- --- --- --- ---- ---vmk1 192.168.13.6 255.255.255.248 192.168.13.7 STATIC false vmk0 172.16.107.21 255.255.255.0 172.16.107.255 STATIC false
12. While connected to the services port, start the Solution Deployment Manager client. 13. Add a location.
14. Add the Appliance Virtualization Platform host as 192.168.13.6.
15. Check the version, and install the Release 7.0.1 feature pack on Appliance Virtualization Platform if required.
Note:
The common Release 3 servers require you to install the Appliance Virtualization PlatformRelease 7.0.1 feature pack.
16. Deploy Utility Services.
17. Deploy other Avaya Aura® applications that will reside on this Appliance Virtualization
Platform host.
18. Install the Release 7.0.1 patch files for all Avaya Aura® applications.
Uploading a file to the software library
About this task
Use the procedure to upload software files such as OVA, images, and firmware that are required during the deployment, migration, upgrade, and update of Avaya Aura® applications.
Before you begin
• Start an SSH session.
• On Download Management page, click Refresh Families.
• When you add or update details in the versions.xml file, click Refresh Families again to get the updated information.
Procedure
1. On the System Manager web console, click Services > Solution Deployment Manager. 2. In the left navigation pane, click Software Library Management.
3. Click Manage Files.
4. From System Manager command line interface, copy the required OVA file to the / swlibrary/staging/sync/ location that you had created in System Manager.
Note:
You require admin privileges to the /swlibrary/staging/sync/ location. The system displays the file that you copied in the Sync Files from directory section. 5. Provide the following information:
• MD5 Checksum: The value mentioned in the source or original location of the file. • Software Library: The local or remote software library.
• Product Family Note:
For SAL, in Product Family, Device Type, and Software Type fields, select Others. • Device Type
• Software Type
If the file is already in versions.xml, the system populates the information.
If the file does not already exist in versions.xml, the system does not display the file details. You cannot use the file for upgrade in Upgrade Management. You can use the file only for new deployment from VM Management.
6. Select the file. 7. Click Sync.
In File Sync Started Message, the system displays a message about the status of the schedule of the job.