User Guide
Notes: Before using this information and the product it supports, be sure to read the following: • Safety, Warranty, and Setup Guide
• Regulatory Notice
• “Important safety and handling information” on page iii • Appendix E “Notices” on page 75
TheSafety, Warranty, and Setup Guideand theRegulatory Noticehave been uploaded to the Web site. To refer to them, go to http://www.lenovo.com/ThinkPadUserGuides.
First Edition (December 2012) © Copyright Lenovo 2012.
LIMITED AND RESTRICTED RIGHTS NOTICE: If data or software is delivered pursuant a General Services Administration “GSA” contract, use, reproduction, or disclosure is subject to restrictions set forth in Contract No. GS-35F-05925.
Contents
Read this first . . . .
iii
Important safety and handling information . . . iii
Chapter 1. Product overview . . . 1
Product layout . . . 1
Front view. . . 1
Rear view . . . 2
Tablet layout . . . 3
Front and side view . . . 4
Back-side view. . . 7
Accessories . . . 8
Features . . . 8
Specifications . . . 9
Operating environment . . . 10
Lenovo programs . . . 10
Chapter 2. Using your tablet . . . . .
13
Initial setup instructions . . . 13
Using the multi-touch screen . . . 13
Using the On-Screen Keyboard and the Touch Keyboard . . . 14
Using the Tablet Digitizer Pen . . . 14
Downloading games and applications . . . 15
Using the keyboard dock . . . 15
Using the function keys . . . 17
Using the ThinkPad pointing device . . . . 19
Power management . . . 19
Charging the battery . . . 19
Extending the battery life between charges. . 21
Checking the battery status . . . 21
Using the cameras . . . 22
Using synchronization solutions . . . 22
Using the GPS satellite receiver . . . 22
Chapter 3. Wireless networks and
devices . . . .
23
Installing and removing the SIM card . . . 23
Determining which mobile network you are using . 24 Connecting to a mobile data network . . . 25
Connecting to a Wi-Fi network . . . 25
Sharing your Internet connection . . . 26
Using Bluetooth devices . . . 27
Using NFC . . . 27
Chapter 4. Security . . . .
29
Attaching a mechanical lock . . . 29
Using passwords. . . 29
Passwords and sleep mode. . . 29
Entering passwords . . . 30
Power-on password . . . 30
Hard disk passwords . . . 30
Supervisor password . . . 32
Setting the security chip . . . 34
Notice on deleting data from your mSATA solid-state drive . . . 35
Using firewalls . . . 36
Protecting data against viruses . . . 36
Chapter 5. Recovery overview . . . .
37
Refreshing your tablet . . . 37
Resetting your tablet to the factory default settings . . . 37
Advanced startup options . . . 37
Chapter 6. Advanced configuration . .
39
Installing device drivers . . . 39
ThinkPad Setup . . . 39
Main menu . . . 39
Config menu. . . 40
Date and Time menu . . . 44
Security menu . . . 44
Startup menu . . . 47
Restart menu . . . 49
Updating your system UEFI BIOS . . . 49
Using system management. . . 49
System management . . . 50
Setting management feature . . . 50
Chapter 7. You and your tablet . . . .
51
Comfort and accessibility . . . 51
Using your tablet more comfortably . . . . 51
Accessibility information . . . 51
Getting updates . . . 51
Traveling with your tablet. . . 52
Travel tips . . . 52
Travel accessories . . . 52
Care and maintenance . . . 53
Chapter 8. Troubleshooting
problems . . . .
55
Diagnosing problems . . . 55
Troubleshooting . . . 55
Recovering from a severe software problem . . . 56
Error messages . . . 57
Errors without messages. . . 58
Chapter 9. Getting support . . . .
59
Lenovo technical support . . . 59
Lenovo user forums. . . 60
Finding ThinkPad options . . . 60
Appendix A. Regulatory
information . . . .
61
Wireless related information . . . 61
Location of the UltraConnect wireless antennas . . . 62
Export classification notice . . . 62
Electronic emission notices. . . 62
Federal Communications Commission (FCC) Declaration of Conformity . . . 63
Industry Canada Class B emission compliance statement . . . 63
European Union - Compliance to the Electromagnetic Compatibility Directive . . . 63
German Class B compliance statement . . . 64
Korea Class B compliance statement . . . . 64
Japanese VCCI Class B statement . . . 64
Japan compliance statement for products which connect to the power mains with rated current less than or equal to 20 A per phase . 64 Lenovo product service information for Taiwan . . . 65
Additional regulatory information . . . 65
Appendix B. Environmental,
recycling, and disposal information .
67
Lenovo recycling statement . . . 67Japan recycling statements . . . 67
Recycling information for Brazil . . . 68
Important WEEE information . . . 68
Battery recycling information for Taiwan . . . 68
Battery recycling information for the United States and Canada . . . 69
Battery recycling information for the European Union . . . 69
China recycling information for Waste Electrical and Electronic Equipment (WEEE) . . . 69
Appendix C. Restriction of Hazardous
Substances Directive (RoHS) . . . . .
71
China RoHS. . . 71
Turkish RoHS . . . 71
Ukraine RoHS . . . 71
India RoHS . . . 72
Appendix D. ENERGY STAR model
information . . . .
73
Appendix E. Notices . . . .
75
Read this first
Be sure to follow the important tips given here to get the most use and enjoyment out of the tablet. Failure to do so might lead to discomfort or injury, or cause the tablet to fail.
Important safety and handling information
To avoid personal injury, property damage, or accidental damage to your ThinkPad®Helix (hereafter
referred to as the tablet), read all of the information in this section before using it.
For detailed operating instructions, refer to theThinkPad Helix User Guide(this publication). You can access theThinkPad Helix User Guideby using one of the following methods:
• Go to http://www.lenovo.com/ThinkPadUserGuides and follow the instructions on the screen. • Start the tablet. TapLenovo Supporton the Start screen. Then tapUser Guide.
• Open Windows®Help and Support. Then tapLenovo User Guide.
For additional tips to help you operate the tablet safely, go to: http://www.lenovo.com/safety
Handle your tablet with care:
Do not drop, bend, puncture, insert foreign objects, or place heavy objects on your tablet. Sensitive components inside might become damaged.
Your tablet screen is made of glass. The glass might break if the tablet is dropped on a hard surface, is the subject of a high impact, or is crushed by a heavy object. If the glass chips or cracks, do not touch the broken glass or attempt to remove it from the tablet. Stop using the tablet immediately and contact Lenovo®technical support for repair, replacement, or disposal information.
Do not disassemble or modify your tablet:
Your tablet is a sealed unit. There are no end-user serviceable parts inside. All internal repairs must be done by a Lenovo-authorized repair facility or a Lenovo-authorized technician. Attempting to open or modify your tablet will void the warranty.
Do not attempt to replace the internal battery:
Replacement of the internal rechargeable battery must be done by a Lenovo-authorized repair facility or a Lenovo-authorized technician. Lenovo-authorized repair facilities or technicians recycle Lenovo batteries according to local laws and regulations.
Prevent your tablet and adapter from getting wet:
Do not immerse your tablet in water or leave it in a location where it can get saturated with water or other liquids.
Use approved charging methods only:
You can use any of the following charging methods to safely recharge the internal battery of your tablet and the Enhanced Keyboard Dock for ThinkPad Helix (hereafter referred to as the keyboard dock):
• Plug the ac power adapter into an ac power outlet, and then insert the jack into the tablet to charge the internal battery of the tablet.
• Plug the ac power adapter into an ac power outlet, and then insert the jack into the keyboard dock to charge the internal battery of the keyboard dock.
• Insert the tablet into the keyboard dock to establish the connection. Then, plug the ac power adapter into an ac power outlet, and then insert the jack into the keyboard dock to charge the tablet and the keyboard dock at the same time.
• Insert the tablet into the keyboard dock to establish the connection. If the internal battery of the tablet is not full and the internal battery of the keyboard dock does not run out of power, the keyboard dock will charge the tablet.
Note: Ensure that all power cord connectors are securely and completely plugged into receptacles.
Charging devices might become warm during normal use. Ensure that you have adequate ventilation around the charging device. Unplug the charging device if any of the following occurs:
• The charging device has been exposed to rain, liquid, or excessive moisture. • The charging device shows signs of physical damage.
• You want to clean the charging device.
Lenovo is not responsible for the performance or safety of products not manufactured or approved by Lenovo.
Prevent hearing damage:
Your tablet has a headphone connector. Always use the headphone connector for headphones (also called a headset) or earphones.
CAUTION:
Excessive sound pressure from earphones and headphones can cause hearing loss. Adjustment of the equalizer to maximum increases the earphone and headphone output voltage and the sound pressure level. Therefore, to protect your hearing, adjust the equalizer to an appropriate level.
Excessive use of headphones or earphones for a long period of time at high volume can be dangerous if the output of the headphone or earphone connectors do not comply with specifications of EN 50332-2. The headphone output connector of your tablet complies with EN 50332-2 Sub clause 7. This specification limits the tablet's maximum wide band true RMS output voltage to 150 mV. To help protect against hearing loss, ensure that the headphones or earphones you use also comply with EN 50332-2 (Clause 7 limits) for a wide band characteristic voltage of 75 mV. Using headphones that do not comply with EN 50332-2 can be dangerous due to excessive sound pressure levels.
If your tablet came with headphones or earphones in the package, as a set, the combination of the
headphones or earphones and the tablet already complies with the specifications of EN 50332-1. If different headphones or earphones are used, ensure that they comply with EN 50332-1 (Clause 6.5 Limitation Values). Using headphones that do not comply with EN 50332-1 can be dangerous due to excessive sound pressure levels.
Take care when using your tablet in a motor vehicle or on a bicycle:
Always prioritize your safety and the safety of others. Follow the law. Local laws and regulations might govern how you can use mobile electronic devices, such as your tablet, while you drive a motor vehicle or ride a bicycle.
Dispose according to local laws and regulations:
When your tablet reaches the end of its useful life, do not crush, incinerate, immerse in water, or dispose of your tablet in any manner contrary to local laws and regulations. Some internal parts contain substances that can explode, leak, or have an adverse environmental affect if disposed of incorrectly.
Keep your tablet and accessories away from small children:
Your tablet contains small parts that can be a choking hazard to small children. Additionally, the glass screen can break or crack if dropped on or thrown against a hard surface.
Protect your data and software:
Do not delete unknown files or change the name of files or directories that were not created by you; otherwise, your tablet software might fail to work.
Be aware that accessing network resources can leave your tablet vulnerable to viruses, hackers, spyware, and other malicious activities that might damage your tablet, software, or data. It is your responsibility to ensure that you have adequate protection in the form of firewalls, antivirus software, and anti-spyware software and keep this software up to date.
Keep electrical appliances such as an electric fan, radio, high-powered speakers, air conditioner, and microwave oven away from your tablet because the strong magnetic fields generated by these appliances can damage the screen and the data on the tablet.
Be aware of heat generated by your tablet:
When your tablet is turned on or the battery is charging, some parts might become hot. The temperature that they reach depends on the amount of system activity and the level of charge in the battery. Extended contact with your body, even through clothing, could cause discomfort or even a skin burn. Avoid keeping your hands, your lap, or any other part of your body in contact with a hot section of the tablet for any extended time.
Polyvinyl Chloride (PVC) cable and cord notice
WARNING:Handling the cord on this product or cords associated with accessories sold with this product will expose you to lead, a chemical known to the State of California to cause cancer, and birth defects or other reproductive harm. Wash hands after handling.
Chapter 1. Product overview
This chapter provides an overview of the tablet, including the locations of connectors and controls, tablet features, accessories, specifications, and operating environment.
Product layout
This topic introduces the product hardware features to give you the basic information you will need to start using the product.
Front view
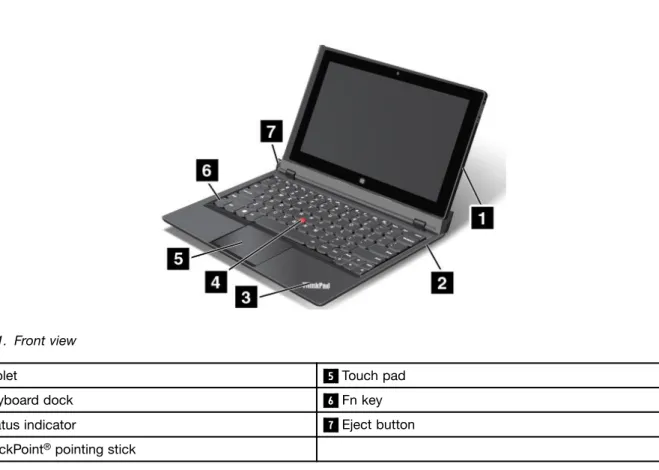
Figure 1. Front view
1 Tablet 5 Touch pad
2 Keyboard dock 6 Fn key
3 Status indicator 7 Eject button
4 TrackPoint®pointing stick
1 Tablet
The tablet is the main unit of the product. For more information, see “Tablet layout” on page 3.
2 Keyboard dock
The keyboard dock is designed specifically for the ThinkPad Helix. It provides the function of a port replicator and holds the tablet in an upright position to provide a typing experience similar to that of a notebook computer.
For more information about how to use the keyboard dock, see “Using the keyboard dock” on page 15.
3 Status indicator
The illuminated ThinkPad logo on the palm rest functions as a system status indicator.
• Blink three times: The tablet or the keyboard dock is connected to an ac power source. • On: The tablet is on and in use.
• Off: The tablet is off or in hibernation mode. • Slow blinking: The tablet is in sleep mode.
• Fast blinking: The tablet is entering hibernation mode or sleep mode.
ThinkPad pointing device
4 TrackPoint pointing stick
5 Touch pad
The keyboard dock contains the Lenovo unique ThinkPad pointing device. Pointing, selecting, and dragging are all part of a single process that you can perform without moving your fingers from a typing position. For more information, see “Using the ThinkPad pointing device” on page 19.
6 Fn key
Use the Fn key to take advantage of ThinkPad function keys. For more information, see “Using the function keys” on page 17.
7 Eject button
Use the eject button to release the tablet from the keyboard dock. For more information, see “Using the keyboard dock” on page 15.
Rear view
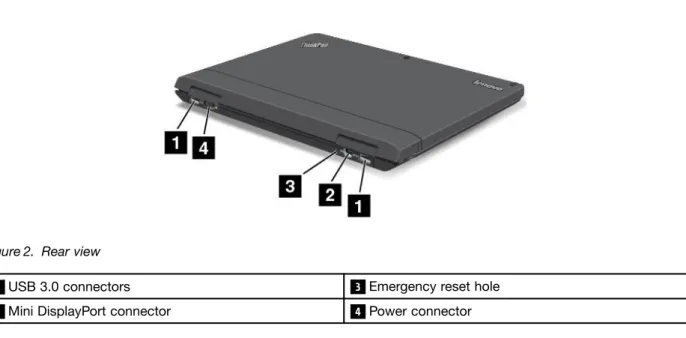
Figure 2. Rear view
1 USB 3.0 connectors 3 Emergency reset hole
2 Mini DisplayPort connector 4 Power connector
1 USB 3.0 connectors
The Universal Serial Bus (USB) 3.0 connectors are used for connecting devices compatible with a USB interface, such as a USB printer or a digital camera.
Attention: When you attach a USB cable to the connector, ensure that the USB mark is facing upward. Otherwise the connector might be damaged.
2 Mini DisplayPort connector
Use the mini DisplayPort connector to connect the tablet to a compatible projector, external monitor, or high-definition television.
3 Emergency reset hole
If the tablet stops responding and you cannot turn it off or turn it on by pressing the power button, remove the ac power adapter and reset the tablet by inserting a needle or a straightened paper clip into the emergency reset hole to turn off the tablet.
4 Power connector
Connect the ac power adapter to the power connector to provide ac power to the tablet and the keyboard dock and charge the batteries. See “Charging the battery” on page 19.
Tablet layout
This topic introduces the tablet hardware features to give you the basic information you will need to start using the tablet.
Front and side view
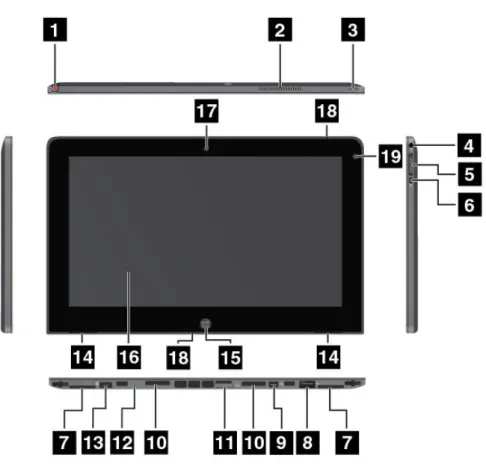
Figure 3. ThinkPad Helix front and side view
1 Tablet Digitizer Pen storage 11 SIM card tray
2 Fan louvers 12 Emergency reset hole
3 Power button 13 Power connector
4 Combo audio jack 14 Built-in stereo speakers
5 Volume control buttons 15 Windows button
6 Screen rotation lock button 16 Multi-touch screen
7 Label trays 17 Front-facing camera
8 USB 2.0 connector 18 Microphones
9 Mini DisplayPort connector 19 Ambient light sensor
10 Keyboard dock connectors
1 Tablet Digitizer Pen storage
If the tablet is shipped with a Tablet Digitizer Pen or you have purchased one, use the storage to store it.
2 Fan louvers
3 Power button
Press the power button to turn on the tablet.
To turn off the tablet, swipe in from the right edge of the screen to display the charms. Then tapSettings➙
Power➙Shut down.
If the tablet stops responding and you cannot turn it off, press and hold the power button for four seconds or more. If the tablet still is not responding, remove the ac power adapter and use the emergency reset hole to reset the tablet.
You also can program the power button so that by pressing the power button you can shut down the tablet or put it into sleep or hibernation mode. To achieve this, you need to change your power plan settings. To access power plan settings, do the following:
1. From the desktop, tap the battery status icon in the Windows notification area. 2. TapMore power options.
3. In the navigation panel, tapChoose what the power buttons do. 4. Follow the onscreen instructions to configure settings.
4 Combo audio jack
To listen to the sound from your tablet, connect a headphone or a headset that has a 3.5 mm 4-pole plug to the combo audio jack.
Notes:
• If you are using a headset with a function switch, for example, a headset for an iPhone mobile digital device, do not press this switch while using the headset. If you press it, the headset microphone will be disabled, and the integrated microphones on the tablet will be enabled instead.
• The combo audio jack does not support a conventional microphone.
5 Volume control buttons
Press the volume up or down button to adjust the tablet volume.
6 Screen rotation lock button
Press the button to disable the screen auto-rotation function. Press again to enable it.
7 Label trays
Pull the label trays out to view product labels.
8 USB 2.0 connector
The USB 2.0 connector is used for connecting devices compatible with a USB interface, such as a USB mouse, USB keyboard, or USB memory key.
Attention: When you attach a USB cable to the connector, ensure that the USB mark is facing upward. Otherwise the connector might be damaged.
9 Mini DisplayPort connector
Use the mini DisplayPort connector to connect the tablet to a compatible projector, external monitor, or high-definition television.
10 Keyboard dock connectors
Use these connectors to connect the keyboard dock.
11 SIM card tray
Place a Subscriber Identification Module (SIM) card into the SIM card tray to establish a wireless Wide Area Network (WAN) connection. For instructions on how to install and remove the SIM card, see “Installing and removing the SIM card” on page 23.
Note: The SIM card tray is not functional on Wi-Fi-only models.
12 Emergency reset hole
If the tablet stops responding and you cannot turn it off or turn it on by pressing the power button, remove the ac power adapter and reset the tablet by inserting a needle or a straightened paper clip into the emergency reset hole to turn off the tablet.
13 Power connector
Connect the ac power adapter to the power connector to provide ac power to the tablet and charge the battery. See “Charging the battery” on page 19.
14 Built-in stereo speakers
The integrated speakers provide audio output for video and music playback.
15 Windows button
Press the Windows button to go to the Start screen.
16 Multi-touch screen
Tap the screen to use the controls on the screen including icons, menu items, and the onscreen keyboard. For more information, see “Using the multi-touch screen” on page 13.
17 Front-facing camera
Your tablet has a 2-megapixel front-facing camera, which you can use to take pictures, create videos, or make video calls in collaboration with Web applications. When the camera is started, the green camera-in-use indicator turns on. For more information, see “Using the cameras” on page 22.
18 Microphones
The built-in microphones capture sound and voice when they are used with an application capable of handling audio.
19 Ambient light sensor
The ambient light sensor detects the brightness of the environment. The screen brightness automatically adjusts depending on the ambient light conditions detected by the built-in ambient light sensor.
Back-side view
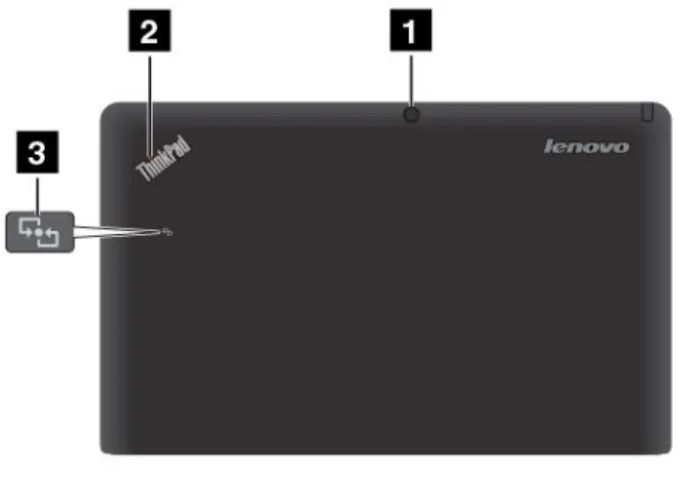
Figure 4. ThinkPad Helix back-side view
1 Rear-facing camera 3 NFC logo (on some models)
2 Status indicator
1 Rear-facing camera
Your tablet has a 5-megapixel rear-facing camera, which you can use to take pictures and create videos. When the camera is started, the green camera-in-use indicator turns on. For more information, see “Using the cameras” on page 22.
2 Status indicator
The illuminated dot in the ThinkPad logo on the backside of the tablet works as a system status indicator. • Blink three times: The tablet or the keyboard dock is connected to an ac power source.
• On: The tablet is on and in use.
• Off: The tablet is off or in hibernation mode. • Slow blinking: The tablet is in sleep mode.
• Fast blinking: The tablet is entering hibernation mode or sleep mode.
3 NFC logo (on some models)
If your tablet comes with the Near Field Communication (NFC) feature, the NFC logo is on the rear cover. For more information about NFC function, see “Using NFC” on page 27.
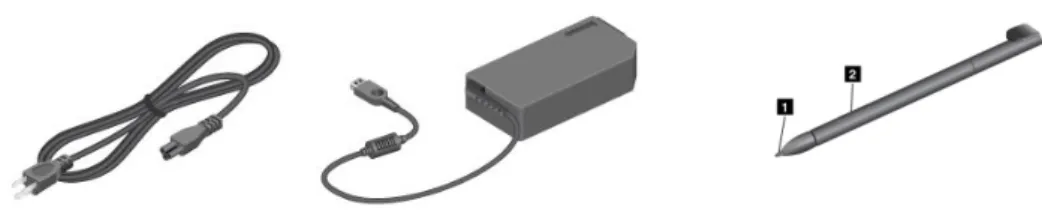
Accessories
Note: The power adapter and power cord might look different from the illustrations above.
Figure 5. Accessories
• Power cord and ac power adapter: Use the power cord together with the ac power adapter to provide ac power to your tablet and the keyboard dock and charge the batteries.
Note: Ensure that all power cord connectors are securely and completely plugged into receptacles. • Tablet Digitizer Pen(on some models): If your tablet is equipped with a Tablet Digitizer Pen, use it to
input text or draw graphics in a natural manner and perform other operations without tapping the screen with your finger. For more information, see “Using the Tablet Digitizer Pen” on page 14.
Features
Processor• Intel®Core™i3, i5, or i7 ULV processor
Operating system
• Microsoft®Windows 8 (64-bit)
Memory
• 4 GB
Internal storage
• mSATA solid-state drive: 128GB, 180GB, 256 GB (depending on the model)
Display
• Infinity Glass
• Size: 294.64 mm (11.6 inches) • Screen resolution: 1920 x 1080 pixels
• Automatic brightness control (ambient light sensor) • Multi-touch technology
• Support for the ThinkPad Digitizer Pen input • Built-in digital dual array microphones
Keyboard on keyboard dock
• 6-row full size keyboard
• ThinkPad pointing device (TrackPoint pointing device and touch pad) • Fn key function
• Volume control buttons • Speaker mute button • Microphone mute button
Integrated cameras
• Front-facing camera, 2 megapixel • Rear-facing camera, 5 megapixel
Connectors
• Tablet:
– One USB 2.0 connector
– One Mini DisplayPort connector – One ac power connector – Two keyboard dock connectors – One combo audio connector • Keyboard dock:
– Two USB 3.0 connectors – One Mini DisplayPort connector – One ac power connector
GPS and wireless features
• Global Positioning System (GPS) satellite receiver (on models with wireless WAN) • Bluetooth 4.0 (on some models)
• NFC (on some models) • Wireless LAN (802.11a/g/n) • Wireless WAN (on some models)
Specifications
Size• Tablet:
– Width: 296.1 mm (11.66 inches) – Depth: 187.3 mm (7.37 inches) – Height: 11.1 mm (0.44 inches) • Keyboard dock:
– Width: 296.1 mm (11.66 inches) – Depth: 226 mm (8.90 inches) – Height: 8.5 mm (0.33 inches)
Battery
• Tablet: 42Wh Li-Polymer battery
• Keyboard dock: 28Wh Li-Polymer battery
Power source (ac power adapter)
• Sine-wave input at 50 to 60 Hz
• Input rating of the ac power adapter: 100 V ac to 240 V ac
Operating environment
• Maximum altitude without pressurization: 3048 m (10 000 ft) • Temperature:
– At altitudes up to 2438 m (8000 ft)
Operating: 5.0°C to 35.0°C (41°F to 95°F) Storage: 5.0°C to 43.0°C (41°F to 109°F) – At altitudes above 2438 m (8000 ft)
Maximum temperature when operating under unpressurized conditions: 31.3°C (88°F) • Relative humidity:
– Operating: 8% to 80% – Storage: 5% to 95%
If possible, place your tablet in a dry, well-ventilated area without direct exposure to sunshine. Do not use or store your tablet in dusty, dirty areas, or extreme hot or cold areas.
Lenovo programs
Your tablet comes with Lenovo programs to help you work more easily and securely.
To access Lenovo programs, swipe in from the right edge of the screen to display the charms. Then tap the
Searchcharm to search for the desired program.
The following table provides a brief introduction to some Lenovo programs that might be preinstalled on your tablet.
Note: Preinstalled Lenovo programs vary by geographic locations and are subject to change.
Application Description
Lenovo Cloud solution
Access, view, upload, or download massive resources, software, and information on a remote cloud server in a secured environment.
Lenovo Companion Get the information about the accessories for your tablet, view blogs and articles about your tablet, and check for recommended programs.
Lenovo QuickSend Transfer files from your tablet to another device even if your tablet is not connected to the network.
Lenovo Settings Enhance your computing experience by turning your tablet into a portable hotspot, sharing your Internet connection using the NFC technology, configuring camera and microphone settings, optimizing your power settings, and creating and managing multiple network profiles.
Application Description
Lenovo Solution Center
Troubleshoot and resolve tablet problems. It combines diagnostic tests, system information collection, security status, and support information, along with hints and tips for maximum system performance.
Lenovo Support Register your tablet with Lenovo, check the tablet health condition and battery status, view user manuals for your tablet, get the warranty information for your tablet, and explore help and support information.
Lenovo ThinkVantage®
Tools
Provide easy access to various Lenovo applications, such as System Update, Password manager, and so on.
System Update Keep the software on your tablet up-to-date by downloading and installing software packages (ThinkVantage programs, device drivers, UEFI BIOS updates, and other programs).
Password Manager Automatically capture and fill in authentication information for Windows applications and Web sites.
Chapter 2. Using your tablet
This chapter provides instructions on how to use some basic applications and many of your tablet’s features.
Initial setup instructions
To use the tablet the first time after you take it out of the box, ensure that you follow the instructions below: 1. Use the supplied power cord and ac power adapter to connect the tablet to an electrical outlet. 2. Press the power button to turn on the tablet.
3. Follow the onscreen instructions to complete the initial setup.
Using the multi-touch screen
This topic provides instructions on how to use the multi-touch screen.
Tap
Tap gently on the screen with your fingertip to launch an application, select an item, open a menu, or input text using the onscreen keyboard.
Press and hold
Press and hold an object or a blank area on the screen until an action occurs.
Drag
To move an item such as an image and an icon on the screen, tap and hold your finger on the item, move your finger to the desired location, and then take your finger off the screen.
Swipe or slide
Move your finger in a vertical or horizontal direction on the screen to scroll through the Start screen, Web pages, lists, picture thumbnails, and so on.
Zoom
• Zoom out: Move two fingers close together on the screen as if you are picking something up to reduce the view of an image or a Web page.
• Zoom in: Move two fingers apart on the screen to enlarge the view of an image or a Web page.
Double-tap
For some applications, quickly tap twice on the screen to zoom in. Double-tap again to zoom out.
Rotate the screen
Your tablet has a built-in motion sensor that supports the screen auto-rotation feature. By default, this feature is enabled. When you rotate the tablet, the screen automatically rotates to landscape or portrait view. To disable the screen auto-rotation feature, press the screen rotation lock button.
Note: Some applications do not support the screen auto-rotation feature.
Using the On-Screen Keyboard and the Touch Keyboard
Use the On-Screen Keyboard or the Touch Keyboard to type text, numbers, symbols, and other characters. When you rotate the tablet, the On-Screen Keyboard or the Touch Keyboard automatically rotates to the corresponding portrait or landscape view.
To open the On-Screen Keyboard, do the following:
1. Swipe in from the right edge of the screen to display the charms. 2. Tap theSearchcharm to search forOn-Screen Keyboard. 3. TapOn-Screen KeyboardinApps.
To open the Touch Keyboard, do the following:
1. Swipe in from the right edge of the screen to display the charms. 2. Tap theSettingscharm.
3. TapKeyboard.
To configure the input language, do the following:
1. From the desktop, swipe in from the right edge of the screen to display the charms. 2. TapSettings➙Control Panel.
3. TapChange input methods. The Language window opens. 4. Follow the onscreen instructions to configure the input language.
Using the Tablet Digitizer Pen
The Tablet Digitizer Pen enables you to input text in a natural manner, as well as taking notes, annotating PDF files, and drawing graphics together with applications capable of editing and sketching.
Some tablets are equipped with a Tablet Digitizer Pen as a standard feature.
The Tablet Digitizer Pen consists of a tip 1 and a click button 2. Hold the pen and point the tip at the display to move the cursor .
To make a selection (single-click), tap the display once with the pen. To double-click, tap twice without pausing. To do a right-click, tap the display and hold the tip of the pen on the display; the right-click icon appears.
Downloading games and applications
To extend the functionality of your tablet, download and install additional applications from the Windows Store and Lenovo App Store. Both Windows Store and Lenovo App Store provide an easy and quick way for you to shop for games and mobile applications.
To download or buy an application or a game from Windows Store, tapStorefrom the Start screen, and then follow the onscreen instructions.
To download or buy an application or a game from Lenovo App Store, do the following: 1. From the Start screen, tapLenovo App Store.
2. Scroll and browse listed applications or games to locate the desired application or game.
3. Tap the application or game, and then follow the instructions on the screen to download and install it.
Using the keyboard dock
To use the keyboard dock, install the tablet into the keyboard dock first. Ensure that the tablet is secured in place.
Then, you can use the tablet as a notebook computer.
To release the tablet from the keyboard dock, do the following: 1. Press the eject button in the direction as shown.
To use tablet mode when you move around with the tablet and the keyboard dock, do the following:
1. Position the tablet as shown. Then, insert the tablet into the keyboard dock until the tablet is secured in place.
2. Slowly and carefully close the tablet display.
Using the function keys
The keyboard dock has several function keys.
Volume and mute control
• Speaker mute
Note: When the speakers are muted, the LED on the F1 key is on. • Speaker volume down
• Speaker volume up • Microphone mute
Note: When the microphones are muted, the LED on the F4 key is on.
Screen control
• Brightness down • Brightness up
Application control
• Open theSettingscharm • Open theSearchcharm
• View all applications that you have opened • View all applications
Other function keys
• Switch a display output location • Enable or disable wireless features
Fn key control
•
You can use the function keys in default mode or in legacy mode.
In default mode, to initiate the special functions illustrated on each key, press the corresponding key directly. The LED on the Fn key is off in default mode. To switch to the legacy mode, press Fn + Esc. In legacy mode, to initiate the special functions illustrated on each key, press and hold the Fn key and then press the desired function key, then release both keys. The LED on the Fn key is on in legacy mode. To switch to the default mode, press Fn + Esc.
Using the ThinkPad pointing device
The keyboard dock comes with the ThinkPad pointing device. The ThinkPad pointing device consists of the TrackPoint pointing stick 1 and the touch pad 2, each of which is itself a pointing device with both basic and extended functions.
To move the pointer 3 on the screen, do either of the following:
• Apply pressure to the nonslip cap on the pointing stick 1 in any direction parallel to the keyboard; the pointing stick itself does not move. The speed at which the pointer moves depends on the pressure you apply to the pointing stick.
• Slide your fingertip over the touch pad 2 in the direction in which you want the pointer to move.
Using the multi-touch touch pad
The touch pad of the keyboard dock supports multi-touch with which you can zoom in, zoom out, or scroll on the touch pad while browsing the Internet or reading or editing a document.
Customizing the touch pad
To customize the touch pad, do the following:
1. From the desktop, swipe in from the right edge of the screen to display the charms. 2. TapSettings➙Control Panel➙Hardware and Sound➙Mouse.
3. In the Mouse Properties windows, tap theThinkPadtab. 4. Follow the onscreen instructions to customize the touch pad.
Power management
This section provides instructions on how to charge the battery, how to extend the battery life between charges, and how to check the battery status.
Charging the battery
The tablet is shipped with an ac power adapter to charge the tablet from any standard ac power outlet.
Note: The battery is not fully charged when shipped.
To charge the battery, connect the power cord, ac power adapter, and the tablet as shown. Then, plug the ac power adapter into a standard ac power outlet.
To charge the battery, you also can connect the power cord, ac power adapter, and the keyboard dock as shown. Then, plug the ac power adapter into a standard ac power outlet.
Note: Ensure that all power cord connectors are securely and completely plugged into receptacles. Disconnect the ac power adapter from your tablet when the battery power is full, or leave the ac power adapter connected to operate from ac power.
Alternatively, you can use any of the following charging methods to safely recharge the internal battery of the tablet or the keyboard dock:
• Plug the ac power adapter into an ac power outlet, and then insert the jack into the tablet to charge the internal battery of the tablet.
• Plug the ac power adapter into an ac power outlet, and then insert the jack into the keyboard dock to charge the internal battery of the keyboard dock.
• Insert the tablet into the keyboard dock to establish the connection. Then, plug the ac power adapter into an ac power outlet, and then insert the jack into the keyboard dock to charge the tablet and the keyboard dock at the same time.
• Insert the tablet into the keyboard dock to establish the connection. If the internal battery of the tablet is not full and the internal battery of the keyboard dock does not run out of power, the keyboard dock will charge the tablet.
Extending the battery life between charges
When you are traveling outdoors with your tablet and ac power is not available, you can extend the battery life by doing the following:
• Turn off Wi-Fi, mobile data network, GPS, and Bluetooth when not in use. To turn off Wi-Fi, mobile data network, GPS, and Bluetooth, do the following:
1. Swipe in from the right edge of the screen to display the charms. 2. TapSettings➙Change PC settings.
3. In the navigation panel, tapWireless.
4. Slide to the right to turn onAirplane modeto disable all wireless devices. • Turn off automatic synchronization if you do not need it.
To turn off the automatic synchronization function, do the following: 1. Swipe in from the right edge of the screen to display the charms. 2. TapSettings➙Change PC settings.
3. In the navigation panel, tapSync your settings. 4. Switch offSync your settings.
• Lower the brightness level of the screen.
To lower the brightness level of the screen, do the following:
1. Swipe in from the right edge of the screen to display the charms. 2. TapSettings➙Brightness.
3. Slide down to lower the brightness.
• Enter sleep mode when the tablet is temporarily not in use. To enter sleep mode, do the following:
1. Swipe in from the right edge of the screen to display the charms. 2. TapSettings➙Power➙Sleep.
• Turn off your tablet if you are not going to use it for a while. To turn off your tablet, do the following:
1. Swipe in from the right edge of the screen to display the charms. 2. TapSettings➙Power➙Shut down.
Checking the battery status
Get the approximate status of your battery at any time by checking the desktop battery status icon in the Windows notification area.
To check for the accurate status and adjust your tablet power settings to achieve the best balance between performance and power saving, do the following:
1. From the Start screen, tapLenovo Settings➙Power. 2. Check your battery status and configure settings.
To check the battery status in Lenovo Support, do the following: 1. From the Start screen, tapLenovo Support➙Battery Health. 2. Check your battery status and configure settings.
Using the cameras
Your tablet has two cameras, a front-facing camera and a rear-facing camera. The rear-facing camera has an auto-focus feature that enables you to capture high-quality pictures and videos.
To launch a camera and configure the camera settings, do the following: 1. From the Start screen, tapLenovo Settings➙Camera.
2. Follow the onscreen instructions to configure settings and use the camera.
To switch between the front-facing camera and the rear-facing camera, do the following: 1. From the Start screen, tapLenovo Settings➙Camera.
2. In theViewsection, selectFront PanelorBack Panelfrom theSelect viewdrop-down list box to switch the cameras.
You also can use the camera with other applications that provide features such as photographing, video capturing, and video conferencing. To download other applications, tapLenovo App Storeor Windows
Storefrom the Start screen. Then follow the onscreen instructions.
Using synchronization solutions
By using synchronization solutions, you can easily synchronize settings between your tablet and personal computer.
Synchronizing settings by using the Windows synchronization solution
To access Windows synchronization solution, do the following: 1. Swipe in from the right edge of the screen to display the charms. 2. TapSettings➙Change PC settings.
3. In the navigation panel, tapSync your settings. 4. Configure settings as desired.
Synchronizing files by using the Lenovo Cloud solution
The Lenovo Cloud solution enables you to access, view, upload, or download massive resources, software, and information on a remote cloud server in a secured environment.
For more information about the Lenovo Cloud solution, go to http://www.lenovo.com/cloud.
Using the GPS satellite receiver
Your tablet might have a global positioning system (GPS) satellite receiver that enables you to pinpoint your location down to the street level. Use location-based applications to find your current location, get directions to your destination, and find other location-based information.
Chapter 3. Wireless networks and devices
Your tablet can connect to a variety of networks and devices, including mobile networks (3G or 4G), Wi-Fi data networks, Bluetooth devices, and NFC-enabled devices.
Note:Some tablet models can connect to both mobile networks (3G or 4G) and Wi-Fi networks, while others can connect to Wi-Fi networks only. If your tablet supports Wi-Fi connection only, the information related to mobile networks does not apply to your tablet.
Installing and removing the SIM card
If the tablet supports mobile network connection, a SIM card might be required to connect to a mobile network. Depending on the country of delivery, the SIM card might be shipped with the tablet or you need to purchase one from the service carrier.
Attention: When installing or removing a SIM card, do not touch the SIM card metal connectors. As a precaution, always hold the tablet in your hand before you install or remove the SIM card to avoid electrostatic discharges.
To remove a SIM card, do the following: 1. Turn off the tablet.
2. Insert a straightened paper clip into the hole of the SIM card tray 1. The tray ejects 2. Slide the tray out.
3. Remove the SIM card as shown.
To install a SIM card, do the following: 1. Turn off the tablet.
2. Insert a straightened paper clip into the hole of the SIM card tray. The tray ejects. Slide the tray out. 3. Place the SIM card into the SIM card tray as shown until the SIM card is hooked.
4. Insert the SIM card tray into the slot as shown. Then, restart the tablet.
Determining which mobile network you are using
If you have connected to a network, you can check the network name to see which mobile network you are using.
To check the network name, do one of the following:
• Swipe in from the right edge of the screen to display the charms. Then tap theSettingscharm. The network name is displayed under the network icon.
• On the desktop, move the cursor to the network icon in the Windows notification area. The network name is displayed.
Connecting to a mobile data network
A SIM card is required to connect to a mobile network. Refer to “Installing and removing the SIM card” on page 23 for instructions on how to install a SIM card.
Note: Some tablets support access to Wi-Fi networks only. See “Connecting to a Wi-Fi network” on page 25 for instructions on connecting to a Wi-Fi network.
If you use a mobile data network, you might have to sign up for a data plan with your service carrier in your area. The Lenovo Mobile Access program enables you to manage your mobile broadband connection. You can create an account, add money to the account, and purchase mobile broadband sessions using your account.
To use the Lenovo Mobile Access program, do the following:
1. TapLenovo Mobile Accesson the Start screen. The Lenovo Mobile Access program opens. 2. Sign into your account and follow the onscreen instructions.
When you are connected to the mobile data network, set the active mobile network as metered connection to reduce the amount of data you send and receive.
To set the active mobile network as metered connection, do the following: 1. Swipe in from the right edge of the screen to display the charms. 2. Tap theSettingscharm.
3. Tap the network icon. A list of available networks is displayed.
4. Tap the network name and hold your finger on the screen for two seconds. Then take your finger off the screen. A menu is displayed.
5. TapSet as metered connection.
After you set your mobile network as metered connection, you can disable the Download over metered connections feature to prevent extra charges.
To disable the Download over metered connections feature, do the following: 1. Swipe in from the right edge of the screen to display the charms. 2. TapSettings➙Change PC settings.
3. In the navigation panel, tapDevices.
4. In theDownload over metered connectionssection, slide to the left to turn it off.
Connecting to a Wi-Fi network
Wi-Fi is a wireless networking technology that provides network access at distances of up to 100 meters (328 feet) depending on the Wi-Fi router and your surroundings. You can connect any ThinkPad Helix to a Wi-Fi network.
A Wi-Fi connection requires access to a functioning Wireless Access Point (WAP), also called a hotspot. Some hotspots are open to the public, but some others implement security features to limit access to specific groups or individuals.
Note: The range and quality of the Wi-Fi signal are affected by the number of connected devices, the infrastructure, and the objects through which the signal is transmitted.
Connecting to a Wi-Fi network
To establish a Wi-Fi network connection, do the following:
1. Swipe in from the right edge of the screen to display the charms. 2. Tap theSettingscharm.
3. Tap the network icon. A list of available Wi-Fi networks is displayed. 4. Tap the ID of the network you want to connect.
5. Follow the onscreen instructions to connect to the Wi-Fi network.
To view speed, security, address, and other information about the Wi-Fi network you are connected, tap its ID and hold your finger on the screen for two seconds. Then take your finger off the display. A menu is displayed. Select one of the menu items to view the information you need.
Your tablet supports the proxy feature for Wi-Fi connection. The proxy feature enables you to access more Web-based source and browse Internet more securely. If you want to configure the proxy settings when you are connecting to a Wi-Fi network, do the following:
1. Open the Internet options window. For information about how to open this window, see the Windows Help and Support program.
2. Tap theConnectionstab. 3. Configure the proxy settings.
Adding a Wi-Fi network
If you want to access a Wi-Fi network that does not broadcast its network name (also called a service set identifier or SSID), you must add that Wi-Fi network before you can connect to it.
To add a Wi-Fi network, do the following:
1. Swipe in from the right edge of the screen to display the charms. 2. Tap theSettingscharm.
3. Tap the network icon. A list of available Wi-Fi networks is displayed. 4. TapHidden network.
5. Follow the onscreen instructions to add a Wi-Fi network.
Adding a network profile
Each location profile stores all the network and Internet configuration settings needed for connecting to a network infrastructure from a specific location such as a home or an office. By switching between location profiles as you move your tablet from place to place, you can quickly and easily connect to a network with no need to reconfigure your settings manually and restart the tablet each time.
To add a network profile, do the following: 1. From the Start menu, tapLenovo Settings. 2. TapLocation Awareness.
3. Follow the onscreen instructions to add a network profile.
Sharing your Internet connection
2. In theSet up hotspotsection, choose the network to share, create a name and a password for your mobile hotspot, and then select a security option.
3. TapStart Sharingto turn your tablet into a mobile hotspot. Then other users can connect to your network by entering the correct mobile hotspot name and password.
4. In theManage Userssection, you can view users who are connected to your network in the drop-down list box.
Using Bluetooth devices
Bluetooth is a short-range wireless communications technology. Use Bluetooth to establish a wireless connection with another Bluetooth-enabled device over a distance of about 10 m (32.8 ft).
Pairing with a Bluetooth device
To connect and exchange data with another Bluetooth device, pair your tablet with the Bluetooth device by doing the following:
1. Swipe in from the right edge of the screen to display the charms. 2. TapSettings➙Change PC settings.
3. In the navigation panel, tapDevices. 4. TapAdd a device.
5. When the Bluetooth device you want to pair is found, tap the ID of the Bluetooth device and follow the instructions on both devices to pair them.
Unpairing a Bluetooth device
To unpair a Bluetooth device, do the following:
1. Swipe in from the right edge of the screen to display the charms. 2. TapSettings➙Change PC settings.
3. In the navigation panel, tapDevices.
4. Tap the ID of the Bluetooth device you want to unpair. A remove icon is displayed. 5. Tap the remove icon. A notification prompt is displayed.
6. TapRemove.
Using NFC
NFC is a high-frequency and short-range wireless communications technology. Use the NFC function to establish radio communications with another NFC-enabled device over a distance no more than a few centimeters.
To connect and exchange data with another NFC-enabled device, do the following: 1. From the Start screen, tapLenovo Settings➙Mobile Hotspot.
2. In theEnable NFCsection, slide to the right to enable NFC.
3. Turn your tablet into a mobile hotspot. See “Sharing your Internet connection” on page 26. 4. Bring the two devices into very close proximity or touch them together.
5. If you want to direct the invited user to a Web site address when the user is connected to your hotspot, locate theTap to Sharesection, select the check box next to the Web site address field, and fill in a Web site address into the field.
Note: The invited user will be directed to the defined Web site address when the user is connected to your hotspot.
6. In theTap to Sharesection, tap the invitation message to send an invitation notification to the user you want to invite.
Note: The invited user must tap the invitation notification prompt within one minute to connect to your hotspot. Otherwise, you have to tap the invitation message to send the invitation notification again.
Chapter 4. Security
This chapter provides information about the tablet security.
Attaching a mechanical lock
You can attach a mechanical lock to the keyboard dock to prevent the tablet from being removed without your permission.
To attach a mechanical lock to the keyboard dock, do the following: 1. Open the small cover of the keyboard dock 1.
2. Pull out the keyhole 2.
3. Secure the chain on the lock to a stationary object. Refer to the instructions shipped with the mechanical lock.
Note: You are responsible for evaluating, selecting, and implementing the locking device and security feature. Lenovo makes no comments, judgments, or warranties about the function, quality, or performance of the locking device and security feature.
Using passwords
By using passwords, you can prevent your tablet from being used by others. Once you set a password, a prompt is displayed on the screen each time you turn on the tablet. Enter your password at the prompt by using the onscreen keyboard. You cannot use the tablet unless you type the correct password.
Passwords and sleep mode
If you have set passwords and you put your tablet into sleep mode: • You are not prompted to enter the password when resuming operation.
• If the mSATA solid-state drive has a hard disk password, it is unlocked automatically when you resume operation.
Note: If a Windows password has been set, you will be prompted to enter it.
Entering passwords
If this icon is displayed, enter a power-on password or a supervisor password.
If this icon is displayed, enter a user hard disk password.
If this icon is displayed, enter a supervisor password.
Power-on password
You can set a power-on password to protect your tablet against access by unauthorized users.
If you set a power-on password, the password prompt is displayed on the screen whenever you turn on the tablet. You must enter the correct password to start using the tablet.
Setting a power-on password
1. Print these instructions.
2. Save all open files, and exit all programs. 3. Turn your tablet off and then turn it on again.
4. When the logo screen is displayed, tap “To interrupt normal startup, press Enter”. The Boot Menu window opens.
5. Tap the Application Menu tab. Tap Setup. The ThinkPad Setup program main menu opens. 6. TapSecurity.
7. TapPassword.
8. TapPower-on Password.
9. Tap theEnter New Passwordfield, enter a desired password, and tap Enter by using the onscreen keyboard.
10. In theConfirm New Passwordfield, reenter the password and tap Enter.
Note: You might want to record your password and store it in a safe place. Otherwise, if you forget it, you have to take your tablet to a Lenovo reseller or a marketing representative to have the password canceled.
11. In the Setup Notice window that is displayed, tap Yes to continue. 12. Save configuration changes and exit.
Changing or removing the power-on password
To change the power-on password, follow steps 1 through 8. Enter your current password. When theEnter New Passwordfield is displayed, enter a new password in the field and then reenter it to verify. To remove the password, follow steps 1 through 8. Enter your current password. When theEnter New Password
field is displayed, leave it blank and tap Enter twice.
Hard disk passwords
Two types of hard disk passwords help protect the information stored on the mSATA solid-state drive: • User hard disk password
If a user hard disk password has been set, but no master hard disk password has been, the user must enter the user hard disk password in order to gain access to files and programs on the mSATA solid-state drive. The master password can be set and used only by a system administrator. Like a master key, it enables the administrator to get access to any hard disk drive in a system. The administrator sets the master password; no one else knows it. Then the administrator sets a user password for each computer in the network, and tells each user the password for his or her computer. The user can then change the user password as desired, but the administrator still can get access by using the master password.
Note: When a master hard disk password is set, only the administrator can remove the user hard disk password.
Setting a hard disk password
1. Print these instructions.
2. Save all open files, and exit all programs. 3. Turn your tablet off and then turn it on again.
4. When the logo screen is displayed, tap “To interrupt normal startup, press Enter”. The Boot Menu window opens.
5. Tap the Application Menu tab. Tap Setup. The ThinkPad Setup program main menu opens. 6. TapSecurity.
7. TapPassword.
8. TapHard Disk1Password.
9. A password window opens. You are prompted to selectUserorUser + Master. SelectUserif you want to set only one hard disk password. If you are an administrator or supervisor, you can selectUser + Masterto set two passwords. (The user can change the user password later.)
• If you selectUser + Master, do the following:
a. When a window for entering the new user hard disk password opens, enter your new password in theEnter New Passwordfield. Tap Enter.
b. In theConfirm New Passwordfield, reenter the password you just entered to verify it. Tap Enter. c. A message window opens and prompts you to set the master hard disk password. Tap Enter to
continue.
d. A window for entering the new master hard disk password opens. Enter your new password in theEnter New Passwordfield. Tap Enter.
e. In theConfirm New Passwordfield, reenter the password you just entered to verify it. Tap Enter. • If you selectUseronly, do the following:
a. When a window for entering the new password opens, enter your new password in theEnter New Passwordfield. Tap Enter.
Notes:
– You can set the minimum length of a hard disk password through theSecuritymenu.
– If you set a hard disk password of over seven characters, the hard disk drive can be used only with a computer that can recognize a hard disk password of over seven characters. If you then install the hard disk drive in a computer that cannot recognize a hard disk password that contains more than seven characters, you cannot get access to the drive.
b. In theConfirm New Passwordfield, reenter the password you just entered to verify it. Tap Enter.
Attention: You might want to note down your passwords and keep them in a safe place. Otherwise, if you forget the user password, or both user and master passwords, Lenovo cannot reset your passwords
or recover data from the mSATA solid-state drive. You must take your tablet to a Lenovo reseller or a marketing representative to have the mSATA solid-state drive replaced. Proof of purchase is required, and a fee will be charged for parts and service.
10. In the Setup Notice window that is displayed, tap Yes to continue. 11. Save configuration changes and exit.
The next time you turn on your tablet, you will have to enter the user or master hard disk password in order to start your tablet and get access to your operating system.
Changing or removing a hard disk password
Follow steps 1 through 8 in “Setting a hard disk password” on page 31, entering your password to get access to the ThinkPad Setup program.
To change or remove the user hard disk password, do the following:
• To change the hard disk password, enter the current password in theEnter Current Passwordfield. Then enter the new password in theEnter New Passwordfield, and reenter the password you just entered to verify it in theConfirm New Passwordfield. Tap Enter, and a Setup Notice window is displayed. Tap Yes to exit from the Setup Notice window. The user hard disk password will be changed.
• To remove the hard disk password, enter the current password in theEnter Current Passwordfield. Then leave theEnter New PasswordandConfirm New Passwordfields blank, and tap Enter. A Setup Notice window is displayed. Tap Yes to exit from the Setup Notice window. The user hard disk password will be removed.
To change or remove theUser + Masterhard disk passwords, selectUser HDPorMaster HDP. If you chooseUser HDP, do the following:
• To change the user hard disk password, enter the current user hard disk password or the current master hard disk password in theEnter Current Passwordfield. Then enter the new user hard disk password in theEnter New Passwordfield, and reenter the password you just entered to verify it in theConfirm New Passwordfield. Tap Enter, and a Setup Notice window is displayed. Tap Yes to exit from the Setup Notice window. The user hard disk password is changed.
• To remove the user hard disk password, enter the current master hard disk password in theEnter Current Passwordfield. Then leave theEnter New PasswordandConfirm New Passwordfields blank, and tap Enter. A Setup Notice window is displayed. Tap Yes to exit from the Setup Notice window. Both the user and master hard disk passwords will be removed.
If you chooseMaster HDP, do the following:
• To change the master hard disk password, enter the current master hard disk password in theEnter Current Passwordfield. Then enter the new master hard disk password in theEnter New Password
field, and reenter the password you just entered to verify it in theConfirm New Passwordfield. Tap Enter, and a Setup Notice window is displayed. Tap Yes to exit from the Setup Notice window. The master hard disk password is changed.
• To remove the master hard disk password, enter the current master hard disk password in theEnter Current Passwordfield. Then leave theEnter New PasswordandConfirm New Passwordfields blank, and tap Enter. A Setup Notice window is displayed. Tap Yes to exit from the Setup Notice window. Both the user and master hard disk passwords will be removed.
• If a supervisor password is set, a password prompt is displayed when you try to start the ThinkPad Setup program. Unauthorized users cannot get access to configuration data.
• The system administrator can use the supervisor password to get access to a computer even if the user of that computer has set a power-on password. The supervisor password overrides the power-on password. • If both a supervisor password and a power-on password are set, you can do the following only if you
have the supervisor password: – Deleting the power-on password
– Changing or deleting the supervisor password – Changing date and time
– Enabling or disabling the Lock UEFI BIOS Settings feature – Enabling or disabling the Password at unattended boot feature
– Specifying the minimum length for power-on passwords and hard disk passwords – Changing the setting for the security chip
– Enabling or disabling the Boot Device List F12 Option feature – Enabling or disabling the Boot Order Lock feature
– Enabling or disabling the Flash BIOS Updating by End-Users feature – Enabling or disabling the internal wireless device
– Enabling or disabling the internal Bluetooth device – Enabling or disabling the internal wireless WAN device – Enabling or disabling the Security mode
Notes:
• The system administrator can set the same supervisor password on many tablets to make administration easier.
• By enabling the Lock UEFI BIOS Settings feature on thePasswordmenu when you set the supervisor password, you make it impossible for anyone but you to make changes.
Setting, changing, or removing a supervisor password
Only a system administrator can set, change, or remove a supervisor password. To set, change, or remove a supervisor password, do the following:
1. Print these instructions.
2. Save all open files, and exit all programs. 3. Turn your tablet off and then turn it on again.
4. When the logo screen is displayed, tap “To interrupt normal startup, press Enter”. The Boot Menu window opens.
5. Tap the Application Menu tab. Tap Setup. The ThinkPad Setup program main menu opens. 6. TapSecurity.
7. TapPassword.
8. TapSupervisor Password.
9. A window opens, prompting you to enter a new password. Depending on your needs, do one of the following:
• To set a password, do the following:
a. In theEnter New Passwordfield, enter a desired password and tap Enter.
b. In theConfirm New Passwordfield, reenter the password and tap Enter. • To change a password, do the following:
a. In theEnter Current Passwordfield, enter the current supervisor password and tap Enter. b. In theEnter New Passwordfield, enter the new supervisor password; then reenter the password
you just entered to verify it in theConfirm New Passwordfield. Tap Enter. • To remove a password, do the following:
a. In theEnter Current Passwordfield, enter the current supervisor password and tap Enter. b. Leave theEnter New PasswordandConfirm New Passwordfields blank. Tap Enter.
Attention: You might want to note down your password and keep it in a safe place. If you forget your supervisor password, Lenovo cannot reset your password. You must take your tablet to a Lenovo reseller or a Lenovo marketing representative to have the system board replaced. Proof of purchase is required, and a fee will be charged for parts and service.
10. In the Setup Notice window that is displayed, tap Yes to continue. 11. Save configuration changes and exit.
The next time you open the ThinkPad Setup program, you will be prompted to enter your password to proceed.
Setting the security chip
Strict security requirements are imposed on network client computers that transfer confidential information electronically. Depending on the options you ordered, your tablet might have an embedded security chip, a cryptographic microprocessor.
Setting the security chip
The choices offered on theSecurity Chipsubmenu under theSecuritymenu of the ThinkPad Setup program are the following:
• Security Chip Selection: select he security chip you want to use. • Security Chip: activate, inactivate, or disable the security chip.
• Security Reporting Options: enable or disable each security reporting option. • Clear Security Chip: clear the encryption key.
• Physical Presence for Provisioning: enables or disables the confirmation message when you change the settings of the security chip.
• Physical Presence for Clear: enables or disables the confirmation message when you clear the security chip.
Notes:
1. Ensure that the supervisor password has been set in the ThinkPad Setup program. Otherwise anyone can change the settings for the security chip.
2. If the security chip is removed or replaced, or a new one has been added, the tablet will not start. You will hear four cycles of four beeps each.
3. If the security chip is inactive or disabled, theClear Security Chipoption will not be displayed. 4. When you clear the security chip, be sure to turn your tablet off and then turn it on again after you set