Oracle Risk
Management Cloud
Securing Risk Management
Oracle Risk Management Cloud Securing Risk Management 20D
Part Number F34462-01
Copyright © 2011, 2020, Oracle and/or its affiliates. Author: David Christie
This software and related documentation are provided under a license agreement containing restrictions on use and disclosure and are protected by intellectual property laws. Except as expressly permitted in your license agreement or allowed by law, you may not use, copy, reproduce, translate, broadcast, modify, license, transmit, distribute, exhibit, perform, publish, or display any part, in any form, or by any means. Reverse engineering, disassembly, or decompilation of this software, unless required by law for interoperability, is prohibited.
The information contained herein is subject to change without notice and is not warranted to be error-free. If you find any errors, please report them to us in writing.
If this is software or related documentation that is delivered to the U.S. Government or anyone licensing it on behalf of the U.S. Government, then the following notice is applicable:
U.S. GOVERNMENT END USERS: Oracle programs (including any operating system, integrated software, any programs embedded, installed or activated on delivered hardware, and modifications of such programs) and Oracle computer documentation or other Oracle data delivered to or accessed by U.S. Government end users are "commercial computer software" or "commercial computer software documentation" pursuant to the applicable Federal Acquisition Regulation and agency-specific supplemental regulations. As such, the use, reproduction, duplication, release, display, disclosure, modification, preparation of derivative works, and/or adaptation of i) Oracle programs (including any operating system, integrated software, any programs embedded, installed or activated on delivered hardware, and modifications of such programs), ii) Oracle computer documentation and/or iii) other Oracle data, is subject to the rights and limitations specified in the license contained in the applicable contract. The terms governing the U.S. Government's use of Oracle cloud services are defined by the applicable contract for such services. No other rights are granted to the U.S. Government.
This software or hardware is developed for general use in a variety of information management applications. It is not developed or intended for use in any inherently dangerous applications, including applications that may create a risk of personal injury. If you use this software or hardware in dangerous applications, then you shall be responsible to take all appropriate fail-safe, backup, redundancy, and other measures to ensure its safe use. Oracle Corporation and its affiliates disclaim any liability for any damages caused by use of this software or hardware in dangerous applications. Oracle and Java are registered trademarks of Oracle and/or its affiliates. Other names may be trademarks of their respective owners.
Intel and Intel Inside are trademarks or registered trademarks of Intel Corporation. All SPARC trademarks are used under license and are trademarks or registered trademarks of SPARC International, Inc. AMD, Epyc, and the AMD logo are trademarks or registered trademarks of Advanced Micro Devices. UNIX is a registered trademark of The Open Group.
This software or hardware and documentation may provide access to or information about content, products, and services from third parties. Oracle Corporation and its affiliates are not responsible for and expressly disclaim all warranties of any kind with respect to third-party content, products, and services unless otherwise set forth in an applicable agreement between you and Oracle. Oracle Corporation and its affiliates will not be responsible for any loss, costs, or damages incurred due to your access to or use of third-party content, products, or services, except as set forth in an applicable agreement between you and Oracle.
Oracle Risk Management Cloud
Securing Risk Management
Contents
Preface
i
1
Introduction
1
Overview of Risk Management Security ... 1
Predefined Security Jobs ... 2
2
Users
3
The Risk Management Implementation User ... 3Prepare for and Manage Risk Management Users ... 3
3
Functional Security
5
Overview of Risk Management Roles ... 5Security Visualizations ... 5
Generate a Visualization ... 6
Options for Viewing a Visualization Graph ... 6
Visualization Table Display Options ... 8
Create Risk Management Roles in the Security Console ... 9
Copy or Edit Risk Management Roles in the Security Console ... 11
Compare Roles ... 12
Simulate Navigator Menus in the Security Console ... 14
Analytics for Roles ... 14
Configure the Security Console ... 15
4
Data Security
19
Overview of Risk Management Data Security ... 19Select Users or Groups for Records ... 19
Manage User Assignment Groups ... 20
Use the Mass Edit Security Assignment Tool ... 21
Oracle Risk Management Cloud
Oracle Risk Management Cloud
Securing Risk Management
Preface
Preface
This preface introduces information sources that can help you use the application.
Using Oracle Applications
Help
Use help icons to access help in the application. If you don't see any help icons on your page, click your user image or name in the global header and select Show Help Icons. Not all pages have help icons. You can also access the Oracle Help Center to find guides and videos.
Watch: This video tutorial shows you how to find and use help. You can also read about it instead.
Additional Resources
• Community: Use Oracle Cloud Customer Connect to get information from experts at Oracle, the partner community, and other users.
• Training: Take courses on Oracle Cloud from Oracle University.
Conventions
The following table explains the text conventions used in this guide.
Convention Meaning
boldface Boldface type indicates user interface elements, navigation paths, or values you enter or select.
monospace Monospace type indicates file, folder, and directory names, code examples, commands, and URLs.
Oracle Risk Management Cloud
Securing Risk Management
Preface
Documentation Accessibility
For information about Oracle's commitment to accessibility, visit the Oracle Accessibility Program website.
Videos included in this guide are provided as a media alternative for text-based help topics also available in this guide.
Contacting Oracle
Access to Oracle Support
Oracle customers that have purchased support have access to electronic support through My Oracle Support. For information, visit My Oracle Support or visit Accessible Oracle Support if you are hearing impaired.
Comments and Suggestions
Please give us feedback about Oracle Applications Help and guides! You can send an e-mail to: [email protected].
Oracle Risk Management Cloud
Securing Risk Management
Chapter 1
Introduction
1
Introduction
Overview of Risk Management Security
In Risk Management applications, you grant access to functionality by assigning job roles (and through them, duty roles and privileges). You grant access to data by appointing users who can work with each individual record as you create or edit that record.
Risk Management Roles
A job role conceptually represents a job that a user performs in an organization. It typically provides broader functional
access than a duty role, which represents one or more tasks included within a job.
Even so, either role type may define function security policies, role hierarchies, or both. A function security policy grants
privileges to complete specific tasks. A role hierarchy is a set of subordinate roles; the parent role inherits functional
access from them.
A job role provides broad enough access for assignment to a user. You can assign job roles directly to users, but you can't assign duty roles. A user is granted duty roles only indirectly, as elements in the hierarchy of a job role.
You are encouraged to assign predefined job roles to users. However, you can create and manage job and even duty roles. To do so, you would use Oracle Applications Security, also known as the Security Console.
Data Security in Risk Management
The person who creates a record automatically becomes its owner, and that person may select other users as owners,
editors, or viewers. An owner can modify the details of a record, including its security configuration (the selection of
users who can work with the record, and the level of their access). An editor can't change the security configuration, but can modify other details. A viewer can see, but not change, record details.
No matter what objects a user's roles enable him or her to work with, access is actually granted only to records the user has created or has been selected for. If you assign predefined roles to users, owners may select them for records at any of the three levels.
An owner can select less access for a record than a user's role allows. For example, an owner may select a user as a viewer of a transaction model in Advanced Financial Controls. If so, that user can't edit the model, even if he or she remains eligible to be selected as an editor or owner of other models.
Owners may also assign data-security rights that are specific to individual Risk Management applications. For example, in Financial Reporting Compliance a user may have a role that grants rights to review or approve records. But those rights would apply only to records whose owners have selected the user as a reviewer or approver.
Owners may assign data rights to individual users or to user assignment groups, in the latter case assigning rights to all members of each group at once. You create these groups in a Risk Management Data Security work area.
Oracle Risk Management Cloud
Securing Risk Management
Chapter 1
Introduction
Business Object Security
In Advanced Financial Controls, models and controls define risks, then uncover transactions displaying those risks. Business objects provide business-application data for models and controls to analyze. As a further element of data security, you can select the business objects each user has access to. You make these selections in the Risk Management Data Security work area.
Related Topics
• Manage User Assignment Groups
• Secure Business Objects
Predefined Security Jobs
A job called Security Synchronization determines whether users assigned to records have the proper privileges to be eligible for their authorizations. Users who don't are flagged as ineligible and lose access to the records for which they're no longer eligible. This may happen, for example, if users' role assignments change. Note that ineligible users continue to have access until the job has been run.
Two other jobs update worklists to match current security definitions: Result Worklist Synchronization does this in Advanced Controls, and Financial Reporting Compliance Worklist Synchronization completes the same task in Financial Reporting Compliance. The Security Synchronization job launches these two jobs. However, they're separate from Security Synchronization, and the Monitor Jobs page includes separate entries for their runs.
Use the Scheduling page to set or modify the schedule on which the Security Synchronization job runs, or use its Run Now feature to run the job on demand. Your ideal schedule should reflect the frequency of changes to roles and user assignments in your environment.
Because the Security Synchronization job launches the two worklist-synchronization jobs, you don't do anything to schedule or run them. Their runs are dependent on the schedule you set for Security Synchronization, and they don't appear in the Scheduling page.
Related Topics
Oracle Risk Management Cloud
Securing Risk Management
Chapter 2
Users
2
Users
The Risk Management Implementation User
The service activation mail from Oracle provides the service URLs, user name, and temporary password for the test or production environment. Use these credentials to create an implementation user whose responsibility is to set up Risk Management within each environment. Setup involves:
• Configuring perspectives.
• Configuring security.
• Selecting features and assessment activities available to objects in the Financial Reporting Compliance module. Unlike other implementation tasks, this activity establishes some settings that can't be changed once application users create operational data.
• Setting administrative features that configure Risk Management for use and routine maintenance.
• Testing the implementation, in effect by using Risk Management features to ensure they return expected results.
Note: You may use Risk Management as a tool to manage risk in other Oracle Cloud offerings. If so, you're expected
to coordinate the implementation of Risk Management with the implementation of those other offerings. This is likely to require the creation of implementation users for those other offerings in addition to the Risk Management implementation user. Consult documentation for those other offerings for information about their requirements. Create the Risk Management implementation user in Oracle Human Capital Management (HCM), for example with Create User functionality available in a Manage Users Work area. Doing so associates the implementation user with a person record, which is needed for the testing of an email notification feature.
Note: It's possible to create user accounts in the Security Console. However, this doesn't create a person record and
so is inappropriate for the Risk Management implementation user. Use HCM, not the Security Console, to create the Risk Management implementation user.
As you create the implementation user, you may assign these predefined job roles:
• Risk Administrator: This role enables the user to perform module and administrative setup, create perspectives, define user groups, configure business object security, and mass-edit security assignments.
• IT Security Manager: This role provides access to the Security Console, where the user can create Risk Management roles. You would need this only if you elect not to assign predefined job roles to Risk Management users.
• Risk Management job roles appropriate to use, and therefore test, the features you implement.
Prepare for and Manage Risk Management Users
During implementation, you prepare your Oracle Applications Cloud service for application users. Tasks include determining whether:
• The creation of a person, user, or party record automatically creates a related user account.
Oracle Risk Management Cloud
Securing Risk Management
Chapter 2
Users
• A user account is suspended automatically when the user has no roles, and reactivated automatically when roles are assigned.
During implementation, you can use the Create User task to create test application users. By default, this task creates a minimal person record and a user account. After implementation, you should use the Hire an Employee task to create application users. You can also import users. These tasks are available through HCM.
For detailed information on preparing for, creating, and managing application users, see the Securing ERP document. You can set certain standards for user accounts in the General Administration page of the Security Console. These include the format of the user name (the value a user enters during sign-in to identify himself), and password format and policy.
Oracle Risk Management Cloud
Securing Risk Management
Chapter 3
Functional Security
3
Functional Security
Overview of Risk Management Roles
Risk Management provides six predefined job roles:
• Access Certification Administrator. This provides features of the Access Certification component of Advanced Access Controls, and setup and administration features that support Access Certification.
• Advanced Access Controls Analyst. This provides Advanced Access Controls features (other than those that apply to Access Certification), and setup and administration features that support Advanced Access Controls.
• Advanced Transaction Controls Analyst. This provides Advanced Financial Controls features, and setup and administration features that support Advanced Financial Controls.
• External Auditor. This role organizes activities for users responsible for enterprise auditing in advanced access and transaction controls, and in financial reporting compliance controls.
• Risk Activities Manager. This provides Financial Reporting Compliance features, and setup and administration features that support Financial Reporting Compliance.
• Risk Administrator. This grants access to all features in the Setup and Administration, Perspective, and Risk Management Data Security work areas. It's used by administrators, but is also typically the starting point for implementation job roles.
It's recommended that you assign predefined job roles to users. To limit the access they provide, owners select users only for data records appropriate for them.
You may instead create your own job roles, but even if you do, it's recommended that you include predefined duty roles in their hierarchies. A common strategy is to copy a predefined job role that applies to a product area. You would then remove duty roles from the copy, or potentially add duty roles to it, until you're left with what you want users to have. You may also create duty roles, or copy predefined duty roles and edit the copies. However, you should rarely have occasion to do so. In most cases, the predefined duty roles should meet your needs.
How to Work with Roles
The remaining topics in this chapter apply to you if you intend to create, edit, or review roles. You configure Risk Management roles, and may assign them to users, within Oracle Applications Security. Its Security Console enables you to:
• Create roles, either from scratch or by copying existing roles and editing the copies. As you create or edit job roles, you can also assign them to users.
• Visualize hierarchical relationships among users, roles, and privileges.
• Simulate Navigator menus available to roles or users.
• Compare versions of roles.
To open the Security Console, select Tools in the home page. Among its options, select Security Console. You must have the IT Security Manager role to do so.
Oracle Risk Management Cloud
Securing Risk Management
Chapter 3
Functional Security
Security Visualizations
A Security Console visualization graph consists of nodes that represent security items. These may be users, roles, privileges, or aggregate privileges. Arrows connect the nodes to define relationships among them. You can trace paths from any item in a role hierarchy either toward users who are granted access or toward the privileges roles can grant. You can select one of the following two views:
• Radial: Nodes form circular (or arc) patterns. The nodes in each circular pattern relate directly to a node at the center. That focal node represents the item you select to generate a visualization, or one you expand in the visualization.
• Layers: Nodes form a series of horizontal lines. The nodes in each line relate to one node in the previous line. This is the item you select to generate a visualization, or the one you expand in the visualization.
For example, a job role might consist of several duty roles. You might select the job role as the focus of a visualization (and set the Security Console to display paths leading toward privileges):
• The Radial view initially show nodes representing the duty roles encircling a node representing the job role.
• The Layers view initially show the duty-role nodes in a line after the job-role node.
You can then manipulate the image, for example, by expanding a node to display the items it consists of.
Alternatively, you can generate a visualization table that lists items related to an item you select. For example, a table may list the roles that descend from a role you select, or the privileges inherited by the selected role. You can export tabular data to an Excel file.
Generate a Visualization
Here's how you can generate a visualization:
1. On the Security Console, click Roles.
2. Search for the security item on which you want to base the visualization.
◦
In a Search field, select any combination of item types, for example, job role, duty role, privilege, or user.◦
In the adjacent field, enter at least three characters. The search returns the matching records.◦
Select a record.Alternatively, click Search to load all the items in a Search Results column, and then select a record.
3. Select either Show Graph or View as Table button.
Note: On the Administration page, you can determine the default view for a role.
4. In the Expand Toward list, select Privileges to trace paths from your selected item toward items lower in its role hierarchy. Or select Users to trace paths from your selected item toward items higher in its hierarchy.
Oracle Risk Management Cloud
Securing Risk Management
Chapter 3
Functional Security
Options for Viewing a Visualization Graph
Within a visualization graph, you can select the Radial or Layers view. In either view, you can zoom in or out of the image. You can expand or collapse nodes, magnify them, or search for them. You can also highlight nodes that represent types of security items.
1. To select a view, click Switch Layout in the Control Panel, which is a set of buttons on the visualization.
2. Select Radial or Layers.
Node Labels
You can enlarge or reduce a visualization, either by expanding or collapsing nodes or by zooming in or out of the image. As you do, the labels identifying nodes change:
• If the image is large, each node displays the name of the item it represents.
• If the image is small, symbols replace the names: U for user, R for role, S for predefined role, P for privilege, and A for aggregate privilege.
• If the image is smaller, the nodes are unlabeled.
Regardless of labeling, you can hover over a node to display the name and description of the user, role, or privilege it represents.
Nodes for each type of item are visually depicted such that item types are easily distinguished.
Expand or Collapse Nodes
To expand a node is to reveal roles, privileges, or users to which it connects. To collapse a node is to hide those items. To expand or collapse a node, select a node and right-click or just double-click on the node.
Using Control Panel Tools
Apart from the option to select the Radial or Layers view, the Control Panel contains these tools:
• Zoom In: Enlarge the image. You can also use the mouse wheel to zoom in.
• Zoom Out: Reduce the image. You can also use the mouse wheel to zoom out.
• Zoom to Fit: Center the image and size it so that it's as large as it can be while fitting entirely in its display window. (Nodes that you have expanded remain expanded.)
• Magnify: Activate a magnifying glass, then position it over nodes to enlarge them temporarily. You can use the mouse wheel to zoom in or out of the area covered by the magnifying glass. Click Magnify a second time to deactivate the magnifying glass.
• Search: Enter text to locate nodes whose names contain matching text. You can search only for nodes that the image is currently expanded to reveal.
Oracle Risk Management Cloud
Securing Risk Management
Chapter 3
Functional Security
Using the Legend
A Legend lists the types of items currently on display. You can take the following actions:
• Hover over the entry for a particular item type to locate items of that type in the image. Items of all other types are grayed out.
• Click the entry for an item type to disable items of that type in the image. If an item of that type has child nodes, it's grayed out. If not, it disappears from the image. Click the entry a second time to restore disabled items.
• Hide or expose the Legend by clicking its button.
Using the Overview
On the image, click the plus sign to open the Overview, a thumbnail sketch of the visualization. Click any area of the thumbnail to focus the actual visualization on that area.
Alternatively, you can click the background of the visualization and move the entire image in any direction.
Refocusing the Image
You can select any node in a visualization as the focal point for a new visualization: Right-click a node, then select Set as Focus.
Note: You can review role hierarchies using either a tabular or a graphical view. The default view depends on the
setting of the Enable default table view option on the Administration tab.
Visualization Table Display Options
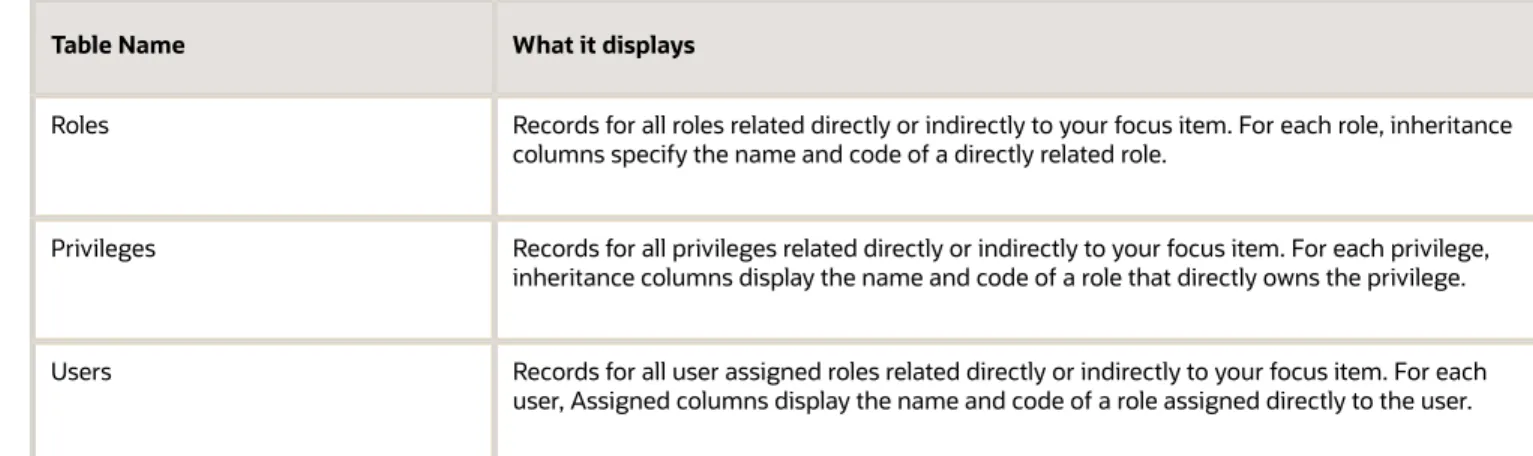
A visualization table contains records of roles, privileges, or users related to a security item you select. The table displays records for only one type of item at a time:
• If you select a privilege as the focus of your visualization, select the Expand Toward Users option. Otherwise the table shows no results. Then use the Show option to list records of either roles or users who inherit the privilege.
• If you select a user as the focus of your visualization, select the Expand Toward Privileges option. Otherwise the table shows no results. Then use the Show option to list records of either roles or privileges assigned to the user.
• If you select any type of role or an aggregate privilege as the focus of your visualization, you can expand in either direction.
◦
If you expand toward privileges, use the Show option to list records of either roles lower in hierarchy, or privileges related to your focus role.◦
If you expand toward users, use the Show option to list records of either roles higher in hierarchy, or users related to your focus role.Oracle Risk Management Cloud
Securing Risk Management
Chapter 3
Functional Security
Table Name What it displays
Roles Records for all roles related directly or indirectly to your focus item. For each role, inheritance columns specify the name and code of a directly related role.
Privileges Records for all privileges related directly or indirectly to your focus item. For each privilege, inheritance columns display the name and code of a role that directly owns the privilege.
Users Records for all user assigned roles related directly or indirectly to your focus item. For each user, Assigned columns display the name and code of a role assigned directly to the user.
The table columns are search-enabled. Enter the search text in a column field to get the records matching your search text. You can export a table to Excel.
Create Risk Management Roles in the Security Console
You can use the Security Console to create Risk Management job or duty roles.
In many cases, an efficient method of creating a role is to copy an existing role, then edit the copy to meet your requirements. Typically, you would create a role from scratch if no existing role is similar to the role you want to create. To create a role from scratch, select the Roles tab in the Security Console, then click the Create Role button. Enter values in a series of role-creation pages, selecting Next or Back to navigate among them.
Provide Basic Information
On a Basic Information page:
1. In the Role Name field, create a display name, for example North America Risk Manager.
2. In the Role Code field, create an internal name for the role, such as GRC_NA_RISK_MGR_JOB.
Note: Don't use "ORA_" as the beginning of a role code. This prefix is reserved for roles predefined
by Oracle. You can't edit a role with the ORA_ prefix.
3. In the Role Category field, select a tag that identifies a purpose the role serves in common with other roles. Typically, a tag specifies a role type and an application the role applies to. For Risk Management, appropriate tags are "GRC - Job Roles" and "GRC - Duty Roles."
If you select the duty-role category, you can't assign the role you're creating directly to users. To assign it, you would include it in the hierarchy of a job role, then assign that role to users.
4. Optionally, describe the role in the Description field.
Add Function Security Policies
A function security policy selects a set of functional privileges; each permits use of a field or other user-interface feature. On a Function Security Policies page, you may define a policy for a duty role. The policy selects functional
Oracle Risk Management Cloud
Securing Risk Management
Chapter 3
Functional Security
privileges to be inherited by other roles the duty role belongs to. Typically, you don't add function security policies directly to a job role.
As you define a policy, you can either add an individual privilege or copy all the privileges that belong to an existing role:
1. Select Add Function Security Policy.
2. In a Search field, select the value Privileges or types of role in any combination, and enter at least three characters. The search returns items of the types you selected, whose names contain the characters you entered.
3. Select a privilege or role. If you select a privilege, click Add Privilege to Role. If you select a role, click Add Selected Privileges.
The Function Security Policies page lists all selected privileges. When appropriate, it also lists the role a privilege is inherited from. You can:
• Click a privilege to view details of the code resource that it secures.
• Delete a privilege. If, for example, you added the privileges associated with a role, but want to use only some of them, you must delete the rest. To delete a privilege, click its x icon.
Data Security Policies
Data security policies (as they can be configured in the Security Console) apply to Oracle Cloud applications other than
Risk Management. In the Data Security Policies page in the Create Role train of the Security Console, make no entries. Simply click Next to move to the next page.
Note: For Risk Management purposes, you may opt to set the Data Security Policies page to be read-only. To do so,
select the Administration tab, and then the Roles tab on the Administration page. Locate and clear an "Enable edit of data security policies" option.
Configure the Role Hierarchy
A Role Hierarchy page displays either a visualization graph, with the role you're creating as its focus, or a visualization table. Select the Show Graph button or View as Table button to select between them. In either case, link the role you're creating to other roles from which it's to inherit functional privileges.
• If you're creating a duty role, you can add duty roles to it. In effect, you're creating an expanded set of duties for incorporation into a job role.
• If you're creating a job role, you can add duty roles to it. To add a role:
1. Select Add Role.
2. In a Search field, select a combination of role types, and enter at least three characters. The search returns items of the types you selected, whose names contain the characters you entered.
3. Select the role you want, and click Add Role Membership. You add not only the role you have selected, but also its entire hierarchy.
In the graph view, you can use the visualization Control Panel, Legend, and Overview tools to manipulate the nodes that define your role hierarchy.
Oracle Risk Management Cloud
Securing Risk Management
Chapter 3
Functional Security
These conflicts are defined by provisioning rules, so this page has value only if your organization uses Advanced Controls to create provisioning rules. (For more on creating these rules, see the user guide for Advanced Controls.) If so, click the Analyze button. If the hierarchy of the role you're creating involves rule violations, the page then lists pairs of conflicting roles. You would then be expected to return to the Role Hierarchy page to remove one role from each pair. However, no validation is performed to confirm that you have done so. Be aware, therefore, that if you don't perform this role cleanup, you're creating a role that can't be assigned to any user without creating what your organization considers to be a separation of duties conflict.
This page has no purpose if your organization doesn't use the provisioning rules feature of Advanced Controls. In that case, you can inactivate the page by setting an ASE_SEGREGATION_OF_DUTIES_SETTING profile option to No in the Manage Administrator Profile Values page of Setup and Maintenance.
Add Users
On a Users page, you can select users to whom you want to assign a job role you're creating. (You don't assign a duty role directly to users.)
Note: For the Users page to be active, you must select an "Enable edit of user role membership" option. To locate
it, select the Administration tab, and then the Roles tab on the Administration page. If this option isn't selected, the Users page is read-only.
When you add a user to a job role, he or she can access pages the role grants functional access to. Data appears in data-secured pages, however, only when the user creates records (if the role grants that capability) or is selected for records by owners of those records.
To add a user:
1. Select Add Users.
2. In a Search field, select the value Users or types of role in any combination, and enter at least three characters. The search returns items of the types you selected, whose names contain the characters you entered.
3. Select a user or role. If you select a user, click Add User to Role. If you select a role, click Add Selected Users; this adds all its assigned users to the role you're creating.
The Users page lists all selected users. You can delete a user. You may, for example, have added all the users associated with a role. But you may intend to assign your new role only to some of them, and so must delete the rest. To delete a user, click its x icon.
Complete the Role
On a Summary and Impact Report page, review the selections you have made. Summary listings show the numbers of function security policies, roles, and users you have added and removed. An Impact listing shows the number of roles and users affected by your changes. Expand any of these listings to see names of policies, roles, or users included in its counts.
If you determine you want to make changes, navigate back to the appropriate page and do so. If you're satisfied with the role, select Save and Close.
Oracle Risk Management Cloud
Securing Risk Management
Chapter 3
Functional Security
Copy or Edit Risk Management Roles in the Security
Console
You can edit roles you have created from scratch. Or, you can copy any role, then edit the copy to create a new role.
Note: You can't edit predefined roles. That's because your edits would be overwritten during each upgrade, when
Oracle updates predefined roles to the specifications for the newer release. You can identify a predefined role by the ORA_ prefix in its role code. Or, a Predefined role box is checked in the Basic Information page for a role if it's shipped by Oracle.
Initiate a copy or an edit from the Roles tab of the Security Console. Do either of the following:
• Create a visualization graph and select any role in it. Right-click and select Copy Role or Edit Role.
• Generate a list of roles in the Search Results column of the Roles page. Select one of them, and click its menu icon. In the menu, select Copy Role or Edit Role.
If you're copying a role, you must also select one of two options:
• Copy top role: You copy only the role you have selected. The source role has links to roles in its hierarchy, and the copy inherits links to the original versions of those roles. If you select this option, subsequent changes to the inherited roles affect not only the source top role, but also your copy.
• Copy top role and inherited roles: You copy not only the role you have selected, but also all of the roles in its hierarchy. Your copy of the top role is connected to the new copies of subordinate roles. If you select this option, you insulate the copied role from changes to the original versions of the inherited roles.
Next, an editing train opens. Essentially, you follow the same process in editing a role as you would to create one. However, note the following:
• As is true for role creation, the Data Security Policies page in the Edit Role train has no application to Risk Management.
• By default, the name and code of a copied role match those of its source role, except that a prefix, suffix, or both are appended. In the Roles Administration page, you can configure the default prefix and suffix for each value.
• A copied job role can't inherit users from its source job role. You must select users for the copied role. (They may include users who belong to the source role.)
• The Role Hierarchy page displays all roles subordinate to a role you copied. Even so, you can add roles only to (or remove them from) the top role you copied.
To monitor the status of a role-copy job, select the Administration tab, and then the Role Copy Status tab of the Administration page.
Oracle Risk Management Cloud
Securing Risk Management
Chapter 3
Functional Security
For example, assume you have copied a role and edited the copy. You then upgrade to a new release. You can compare your edited role from the earlier release with the role as shipped in the later release. You may then decide whether to incorporate upgrade changes into your edited role. If the changes consist of new function security policies, you can upgrade your edited role by adding the new policies to it.
Select Roles for Comparison
1. Select the Roles tab in the Security Console.
2. Do any of the following:
◦
Click the Compare Roles button.◦
Create a visualization graph, right-click one of its roles, and select the Compare Roles option.◦
Generate a list of roles in the Search Results column of the Roles page. Select one of them, and click its menu icon. In the menu, select Compare Roles.3. Select roles for comparison:
◦
If you began by clicking the Compare Roles button, select roles in both First Role and Second Role fields.◦
If you began by selecting a role in a visualization graph or the Search Results column, the First Role field displays the name of the role you selected. Select another role in the Second Role field.For either field, click the search icon, enter text, and select from a list of roles whose names contain that text.
Compare Roles
1. Select two roles for comparison.
2. Use the Filter Criteria field to filter for any combination of these artifacts in the two roles:
◦
Function security policies◦
Inherited rolesThe data security policies option doesn't apply to Risk Management.
3. Use the Show field to determine whether the comparison returns:
◦
All artifacts existing in each role◦
Those that exist only in one role, or only in the other role◦
Those that exist only in both roles4. Click the Compare button.
You can export the results of a comparison to a spreadsheet. Select the Export to Excel option.
After you create the initial comparison, you can change the filter and show options. When you do, a new comparison is generated automatically.
Add Policies to a Role
1. Select two roles for comparison.
Oracle Risk Management Cloud
Securing Risk Management
Chapter 3
Functional Security
◦
As the Second Role, select the role you're adding the policies to. This must be a custom role. You can't modify a predefined role.2. In the Filter Criteria field, select Function security policies. The Data security policies option doesn't apply to Risk Management, and the Inherited roles option is to be excluded for any application.
3. As a Show value, select Only in first role.
4. Click the Compare button.
5. Among the artifacts returned by the comparison, select those you want to copy.
6. An Add to Second Role option becomes active. Select it.
Simulate Navigator Menus in the Security Console
You can simulate Navigator menus available to roles or users. From a simulation, you can review the access inherent in a role or granted to a user. You can also determine how to alter that access to create roles.
Opening a Simulation
To open a simulated menu:
1. Select the Roles tab in the Security Console.
2. Create a visualization graph, or populate the Search Results column with a selection of roles or users.
3. In the visualization graph, right-click a role or user. Or, in the Search Results column, select a user or role and click its menu icon.
4. Select Simulate Navigator.
Working with the Simulation
In a Simulate Navigator page:
• Select Show All to view all the menu and task entries that may be included in a Navigator menu.
• Select Show Access Granted to view the menu and task entries actually assigned to the selected role or user. In either view:
• A padlock icon indicates that a menu or task entry can be, but isn't currently, authorized for a role or user.
• An exclamation icon indicates an item that may be hidden from a user or role with the privilege for it, because it has been modified.
To plan how this authorization may be altered:
1. Click any menu item on the Simulate Navigator page.
2. Select either of the two options:
◦
View Roles That Grant Access: Lists roles that grant access to the menu item.◦
View Privileges Required for Menu: Lists privileges required for access to the menu item. ListsOracle Risk Management Cloud
Securing Risk Management
Chapter 3
Functional Security
Analytics for Roles
You can review statistics about the roles that exist in your Oracle Cloud instance. On the Analytics page, click the Roles tab. Then view these analyses:
• Role Categories. Each role belongs to a category that defines some common purpose. Typically, a category contains a type of role configured for an application, for example, "Financials - Duty Roles."
For each category, a Roles Category grid displays the number of:
◦
Roles◦
Role memberships (roles belonging to other roles within the category)◦
Security policies created for those rolesIn addition, a Roles by Category pie chart compares the number of roles in each category with those in other categories.
• Roles in Category. Click a category in the Role Categories grid to list roles belonging to that category. For each role, the Roles in Category grid also shows the number of:
◦
Role memberships◦
Security policies◦
Users assigned to the role• Individual role statistics. Click the name of a role in the Roles in Category grid to list the security policies and users associated with the role. The page also presents collapsible diagrams of hierarchies to which the role belongs.
Click Export to export data from this page to a spreadsheet.
Configure the Security Console
Before you start using the Security Console, ensure that you run the background processes that refresh security data. You can use the Security Console Administration pages to select the general options, role-oriented options, and track the status of role-copy jobs. You can also select, edit, or add notification templates.
Run the Background Processes
Here are the background processes you must run:
• Retrieve Latest LDAP Changes - This process copies data from the LDAP directory to the Oracle Cloud
Applications Security tables. Run this process once, before you start the implementation.
• Import User and Role Application Security Data - This process imports users, roles, privileges, and data
security policies from the identity store, policy store, and Oracle Cloud Applications Security tables. Schedule it to run regularly to update those tables.
Oracle Risk Management Cloud
Securing Risk Management
Chapter 3
Functional Security
To run the Retrieve Latest LDAP Changes process:
1. In the Setup and Maintenance work area, go to the Run User and Roles Synchronization Process task in the Initial Users functional area.
2. If you want to be notified when this process ends select the corresponding option.
3. Click Submit.
4. Review the confirmation message and click OK.
To run the Import User and Role Application Security Data process:
1. In the Tools work area, select Scheduled Processes.
2. Click Schedule New Process.
3. Search for the Import User and Role Application Security Data process and select it.
4. Click OK.
5. Click Submit.
6. Review the confirmation message and click OK.
Configure the General Administration Options
1. On the Security Console, click Administration.
2. In the Certificate Preferences section, set the default number of days for which a certificate remains valid. Certificates establish keys for the encryption and decryption of data that Oracle Cloud applications exchange with other applications.
3. In the Synchronization Process Preferences section, specify the number of hours since the last run of the
Import User and Role Application Security Data process. When you select the Roles tab, a warning message
appears if the process hasn't been run in this period.
Configure the Role Administration Options
1. On the Security Console, click Administration.
2. On the Roles tab, specify the prefix and suffix that you want to add to the name and code of role copies. Each role has a Role Name (a display name) and a Role Code (an internal name). A role copy takes up the name and code of the source role, with this prefix or suffix (or both) added. The addition distinguishes the copy from its source. By default, there is no prefix, the suffix for a role name is "Custom," and the suffix for a role code is "_CUSTOM."
3. In the Graph Node Limit field, set the maximum number of nodes a visualization graph can display. When a visualization graph contains a greater number of nodes, the visualizer recommends the table view.
4. Deselect Enable default table view, if you want the visualizations generated from the Roles tab to have the radial graph view.
5. Enable edit of data security policies: Determine whether users can enter data on the Data Security Policies page of the role-creation and role-edit trains available from the Roles tab.
6. Enable edit of user role membership: Determine whether users can enter data on the Users page of the role-creation and role-edit trains available from the Roles tab.
Oracle Risk Management Cloud
Securing Risk Management
Chapter 3
Functional Security
Oracle Risk Management Cloud
Securing Risk Management
Chapter 3
Oracle Risk Management Cloud
Securing Risk Management
Chapter 4
Data Security
4
Data Security
Overview of Risk Management Data Security
To secure data in Risk Management, you (as an owner) select users who can work with the following types of data records as you create or edit those records, and you set the level of access at which each user can work. These security settings apply to records of:
• Processes, risks, controls, assessments, issues, and remediation plans in Financial Reporting Compliance.
• Models, advanced controls, and incident results in Advanced Access Controls and Advanced Financial Controls.
• Certification projects in Access Certification.
In addition, you can use a Risk Management Data Security work area to:
• Create user assignment groups. When an owner selects a group for a record, all members of the group are authorized to work with the record.
• Make mass edits to the assignments of users or groups to records.
• Select the business objects to which each Advanced Financial Controls user has access.
Select Users or Groups for Records
You may be the owner of a record either because you created it or because you have been added as an owner of it. If so, you can modify data security for that record: You can select users who can work with it, and you can set their levels of access to it.
Depending on the type of object you're working with:
• Security configuration may occur as a step in a "guided process" as you create or edit a record.
• A Security Assignment button may appear in the page to view or edit a record; clicking it opens a Security Assignment page. (The button isn't available while the record is being created, but appears immediately after its creator saves or submits it for the first time.)
In either case, you can select individuals or user groups.
To select individual users, click Add in a User Assignments region. Search for and select a user in a Name field. Then make these selections:
• In an Authorized As field, select Owner, Editor, or Viewer. An owner can edit details of the record, including its security configuration. An editor can't modify the security configuration, but can modify other details. A viewer can see, but not change, record details. These are authorizations that apply in any Risk Management application. You must select one value for each user you add to a record.
You can select less access for a record than a user's role allows. For example, a user may be eligible to be a risk owner, editor, or viewer in Financial Reporting Compliance. If you select that user as a viewer for a risk, he can't edit that risk, even though he remains eligible to be selected at any level for other risks.
• In an Authorizations field, optionally select one or more authorizations specific to individual Risk Management applications, such as the ability to manage or certify roles in Access Certification, or the ability to review or
Oracle Risk Management Cloud
Securing Risk Management
Chapter 4
Data Security
approve records in Financial Reporting Compliance. (This field doesn't apply to Advanced Controls, and so doesn't appear as you select users for its records.)
The two types of authorization are distinct. For example, you may select a user as a viewer of a risk in Financial Reporting Compliance. You may also select her as an approver. If so, she can't edit the risk record itself, but she does have write access to the page in which the risk is either approved or rejected.
While an Authorizations selection is optional for individual users, making no selection for any user would have an impact on functionality. For example, if you select no user as an approver or reviewer of a Financial Reporting Compliance record, then that record isn't subject to review or approval; it becomes approved the moment it's created. For another example, it makes no sense to create a certification project in Access Certification if you select no users to manage and certify roles within it.
Note: Although owners have authority to edit security assignments, an owner can't downgrade his or her own
authorization to editor or viewer, or remove himself or herself from the record. That's because by making the change, the owner would lose the authority to save the change. An owner who wants to make such a change would need to add another user to the record as an owner, and then arrange for that owner to make the change.
To select user groups, click Add in a Group Assignment region. Search for and select a group. In this case, though, groups are granted authorizations as they're created. You can view those authorizations as you select groups for a record, but you can't change them.
See the user guides for Financial Reporting Compliance, Advanced Controls, and Access Certification for user-authorization details that are specific to the individual applications.
Related Topics
• Secure Records in Advanced Controls
• Secure Records in Financial Reporting Compliance
• Secure the Certification
Manage User Assignment Groups
As they create or edit records, owners may select user assignment groups, assigning data rights to all members of each group at once.
Groups specify their own authorizations. While selecting a group for a record, an owner can view the authorization it provides, but can't change that authorization.
Each group grants only one authorization. If you were authorizing an individual user for a risk record in Financial Reporting Compliance, for example, you might select up to five authorizations: one of Owner, Editor, or Viewer in an Authorized As field, and then any combination of Approver, Reviewer, Issue Owner, and Issue Validator in an Authorizations field. If you were creating a group, however, you could select only one of these seven values. To gain access to a record, a user (and so a group member) must be selected as an owner, editor, or viewer. As you create groups, you can combine this authorization with others by creating multiple groups, one with each authorization and all with the same members. In the example, one group might select a set of users as Editor, and another might select the same users as Reviewer. The owner of a record could then select both groups for that record.
Oracle Risk Management Cloud
Securing Risk Management
Chapter 4
Data Security
2. To create a new group, select Add. A Create a User Assignment Group page opens.
3. In a Details region:
◦
Name the group.◦
Select an object. The group you're creating becomes available for selection by an owner working with a record of this object type.◦
Select an authorization. The authorizations available for selection are those appropriate for the object you have selected.4. In a Members region, select users who are to belong to the group:
◦
To select members individually, select Add. In a list of users, search for those you want, and then click check boxes next to their names. Then click Add.◦
Instead, you can select an Add All Eligible Users option.5. Click Save and Close.
To edit an existing group, search for it, then select the Edit icon in its row. You can't modify the object and authorization selections. Otherwise, follow the creation procedure to edit either the group name or the selection of its members. You can add or delete members. To do the latter, click the x icon in their rows.
Use the Mass Edit Security Assignment Tool
Use the Mass Edit Security Assignment tool to modify the security settings for any number of records at once. You can perform these security mass-edits only on records for which you're authorized as owner.
Note: There's one special case: If you're assigned the Risk Administrator job role, you can act as the owner of every
record in your system, even those for which you haven't been directly selected as owner. Because that feature makes the role very powerful, it should be assigned to few users.
Broadly, the procedure for security mass edits involves selecting the records you want to update, and then defining how security should change for those records. But to update security for records of incidents generated in Advanced Controls, you select them outside of the Mass Edit Security Assignment tool. More on this in a minute.
Other records for which you can mass-edit security assignments include models and controls in Advanced Controls; processes, risks, controls, assessments, issues, and remediation plans in Financial Reporting Compliance; and certifications in Access Certification. To update security for these records:
1. Navigate to Risk Management > Risk Management Data Security. Select the Mass Edit Security Assignment tab.
2. In an Object field, select an object to update security for records of that object. A list of object records appears.
3. Optionally, filter the list of object records. Click Show Filters, and enter filtering parameters in the Filters region. Then click Search.
4. Select the check boxes for records whose security authorizations are to be reassigned. Or click a Select All check box.
5. Click the Edit button.
6. Enter values in a Define Security Assignment Goals region. Then click Continue.
◦
In a What Assignment Type Do You Want to Update field, select user or group.◦
In a What Action Do You Want to Perform field, select Append to add users or groups to records,Remove to remove them from records, or Replace to substitute one user or group for another in records. Subsequent options depend on the selection you make here.
Oracle Risk Management Cloud
Securing Risk Management
Chapter 4
Data Security
7. If you selected Append in step 6, a Define Security Assignment Authorizations region becomes active. (If you selected Remove or Replace, this disappears from view.) Make selections, then click Continue.
◦
In a What Authorization Do You Want to Update field, select Owner, Editor, or Viewer.◦
Depending on the object you selected, application-specific authorizations may also be available to you. If the object is Access Control, for example, you can update a Result Owner authorization.8. In a final "Identify" region, your options depend on previous selections. Select the user or group to add to or remove from records. Or, select the user or group you want to replace, and the user or group you want to replace it with.
9. Click the Submit button.
An access or transaction control may generate thousands of incidents, but the preceding procedure limits your security updates to 500 records. To escape that limit as you update incident records, follow the "Filter-Based" method of selecting incidents for mass-edit, as described in the Advanced Controls user guide. Click the link to the Mass-Edit Incidents topic for complete details, but in summary:
• Start from either the Controls page in the Advanced Controls work area or the Results by Control Summary page in the Results work area. In the record of a control, click its Results Count value.
• A Results page lists incidents generated by the control you selected. Filter the list to include only those you want to edit. Then click a Mass Edit button.
• In a Mass Edit page, select a Mass Edit Security radio button.
• That takes you to the Mass Edit Security Assignment tool. The incidents you want to update are already selected, so all that's left is to define how you want to update them. To do that, complete steps 6 through 9 of the preceding procedure.
Related Topics
• Mass-Edit Incidents
Secure Business Objects
A business object is, in effect, a set of related data fields from a business application. Business objects supply data
for analysis by transaction models and controls created in Advanced Financial Controls. By default, however, each Advanced Financial Controls user has no access to business objects. You must assign each user the objects he or she can use to create models and controls. This applies not only to delivered business objects, but also to imported objects and user-defined objects.
Note: This feature applies only to Advanced Financial Controls. Although Advanced Access Controls and Access
Certification also make use of three business objects, these must be (and so are automatically) available to all users who create access models or controls, or initiate certifications. Financial Reporting Compliance doesn't use business objects.
To select the business objects available to users of Advanced Financial Controls:
1. Navigate to Risk Management > Risk Management Data Security. Select the Business Object Security tab.
2. A Business Object Security page presents a list of users under the heading User Access to Business Objects. Users appear in this list if they're assigned roles that include two privileges, View Transaction Model and View
Oracle Risk Management Cloud
Securing Risk Management
Chapter 4
Data Security
4. If you click the user's name:
◦
No objects may yet be assigned to the user. In that case, a page offers you a choice between adding objects manually or selecting another user to copy that user's access. To do the latter, search for and select a user in the User field, and click the Copy button. Or, to select business objects manually, click Add.◦
If objects have already been assigned to the user, the page offering the option to copy another user's access is skipped, and the page to add objects appears, displaying the user's current access.In the page to add objects, you can select products, and so add all the business objects that apply to each product you select. If you take this approach, the user's access to business objects is updated automatically to reflect any future changes to the business objects that apply to each product.
1. Click Add in the Access by Product region of the page to add objects. A new row appears.
2. Use the drop-down list to search for and select a product.
3. Click Save. This selects all the business objects appropriate for that product.
Repeat the process for any other products you want to select. Or, you can click the x icon in the row for any product you want to delete.
Alternatively, you can select business objects themselves:
1. Click Add in the Access by Business Object region of the page to add objects. A new row appears.
2. Use the drop-down list to search for and select a business object.
3. Click Save.
4. Repeat the process to add other objects.
You can't select an object in both regions. In other words:
• You can't select a product in the Access by Product region if you have selected any of its objects in the Access by Business Object region.
• You can't select an object in the Access by Business Object region if you have already selected the product it applies to.
If you have selected some objects belonging to a product, but then want to select their product instead, first remove the objects from the Access by Business Object region:
1. Use the search field to search for the objects you want to remove.
2. Click the check box in the row for each object.
Oracle Risk Management Cloud
Securing Risk Management
Chapter 4
Oracle Risk Management Cloud
Securing Risk Management
Glossary
25
Glossary
authorizationA grant of access to a data record. A user must be authorized as an owner, editor, or viewer, and may be authorized to complete other application-specific tasks.
business object
A set of related fields in a data source subject to models and controls created in Advanced Controls. While creating a model, a user selects one or more business objects that supply data for evaluation.
data security policy
A component of a role that defines data appropriate for the functional access granted by the role. Risk Management roles don't use data security policies, although roles created for other Oracle Cloud applications do.
data source
The supplier of data to business objects cited in models and controls created in Advanced Controls. For most business objects, this is your Oracle Cloud instance. However, an Internal data source corresponds to the Advanced Controls instance in which you're working, and supplies data to business objects such as User and Access Entitlement. Imported Business Object is a data source name that applies to business objects imported in .xml files.
duty role
A grant of access to privileges required to complete a specific task, or a set of related tasks.
editor
A grant of access to a data record that prevents a user from modifying its security configuration, but permits the user to modify other details of the record.
function security policy
A component of a role that grants privileges to complete specific tasks.
incident
A record of a transaction or access assignment that exceeds the risk defined by an advanced control.
job role
A grant of access to duties required to complete a broad range of tasks. You can assign job roles to users. In combination, the job roles assigned to a person encompass all he or she's hired to do.
owner
A grant of access to a data record that enables a user to modify the details of the record, including its security configuration. The person who creates a record is automatically its owner, and may select other users as owners, editors, or viewers.
Oracle Risk Management Cloud
Securing Risk Management
Glossary
privilege
A specific feature the application can make available to users.
role category
A tag that identifies a purpose the role serves in common with other roles. Typically, this tag specifies a role type and an application the role applies to.
role code
An internal name for a role, such as GRC_NA_RISK_MGR_JOB. In role codes, the prefix ORA is reserved for roles predefined by Oracle.
role hierarchy
A definition of parent-child relationships among roles. A parent role inherits functional access from the child roles in its hierarchy. For example, the hierarchy of a job role may include duty roles.
user assignment group
A set of users associated with a single authorization to work with data records. While securing a record, its owner may select a group to authorize its members to work with the record.
viewer
A grant of access to a data record that permits a user to see but not to modify the record.
visualization
A graphical or tabular depiction of the hierarchical relationships among users, roles, and privileges. A visualization is generated in the Security Console.