Printed on 31 March, 2004
Administration Guide
Merak Windows
Administration
Version 7.4.2
i
Contents
Server Windows Administration
3
Main Menu... 4
Remote Server Administration... 7
Configuration Backup and Restore ... 8
How to create your own digital certificate? ... 9
Find Dialog...11
Accounts...13
Domain...17
User ...31
Mailing List ...49
List Server ...59
Executable ...65
Remote Account...67
Static Route ...73
Notification...77 Catalog ...81 Server Monitor...95 System...101 Server ...102 Service Settings...104
Server Service Status...111
Server Ports Assignment ...113
Professional ...115
Data Base Settings ...116
ODBC Settings ...119
ODBC Logging...120
LDAP ...120
Remote Server Watchdog...132
Task Schedule...134
TCP/IP Tunnel ...137
Multi CPU Support ...137
Options...139
Logging ...140
Other Options...141
User Statistics ...143
Directories ...144
Proxy Server ...145
Header / Footer ...149
System Monitor...150
Auto Archive ...151
Auto Backup ...153
Security ...155
Instant Anti Spam Engine, Spam Assassin & Bayesian Filters...155
Content Filter...177
Black & White List ...197
Static Filters...202
Security ...209
Service Watchdog ...210
Tarpitting...211
Firewall ...212
Delivery...215
Anti Relaying...216
Delivery...218
ETRN / ATRN...220
Connection...222
Instant Messaging ...225
Instant Messenger ...229
ICQ, AOL, MSN and Yahoo plugin ...237
GroupWare...238
License Information ...241
Index
243
3
In This Chapter
Main Menu ... 4
Accounts... 13
Server Monitor... 95
System ... 101
Professional ... 115
Options ... 139
Security ... 155
Delivery... 215
Instant Messaging ... 225
GroupWare ... 238
License Information ... 241
C
H A P T E R1
Main Menu
The main menu contains several sections which let you control some of the basic functions of the administration interface.
Field Description
Open File You can open any text file with the Merak text editor. This menu item servers only for viewing or editing purposes.
Save Config Save your current configuration to the files or to a remote server. Reload
Config Refresh your visible configuration of a previously saved configuration of your server from a HD or remote server. Connect Lets you connect and remotely administer any existing Merak installation. See the Remote Server
Administration (on page 7) Disconnect Disconnect from a remote server. Exit Exit Merak administration interface.
Chapter 1 Server Windows Administration 5
Field Description
Create Digital
Certificates Allows you to generate your own digital certificate for secured SSL connections. IP Address SSL
Certificates
Allows you to assign IP addresses to certificates.
Backup
Configuration Backup your current configuration to a .mcb file (Merak Backup file). This file contains your entire server and user/domain configuration information. Restore
Configuration Restore your saved configuration from a backup file. Previously you should delete the config directory before restoring. Export License
Information
Lets you export your license information to an XML formated file. If you have any license problem, just send this file with a short description to our technical support.
Use Safe
Confirmation If checked, all important action dialogs would be confirmed with the default safe button selection. Show Splash
Screen At Startup
Allows you enable or disable the welcome screen.
Require Authentication To Access Settings
Lets you set forced authentication of your Merak administration interface. Only Administrators or users with administration permissions can run and modify your configuration. The flag is set directly in the configuration files so when backup and restore is performed it will still require the authentication.
Do Not Include License Numbers in Backups
If you don not want to have your license data included in your .mcb backup files, you can use this option. When restoring such backups the licence will be missing and you will have to reenter it.
Field Description
All Sections Lets you access all sections directly in the Merak administration interface You can use shortcuts too.
Expand all Panels
Field Description
New Domain Creates a new domain in Merak. You can use the shortcut or the tool bar icons.
Make Primary Make any domain a primary domain. Primary domain is used to specify the system postmaster and other information.
Add Allows you to add any account to Merak. It is possible to use shortcuts. Groups Lets you specify a group of users or items in Merak.
Groups are special item containers you can use by simple specifying in any merak options. Instead of just typing in multiple item data you can create a group and then specify the group directly in that option.
See the example file for more details.
Find Find feature lets you easily search all domains for particular search criteria. You can search for user names, aliases or email addresses. Merak uses a basic search criteria with a limited output of users.
See more details in the Find Dialog section. Import
Windows NT users
Chapter 1 Server Windows Administration 7
Account Defaults
Allows you specify default account data. Specified parameters will be used for every new user account created in Merak. The account defaults are applied for all Merak tools. Including the GUI, WebAdmin, WebMail, API and others.
Edit the default file to specify the data. See more information in the example file. Password
Policy
The password policy makes sure all passwords meet certain criteria. When enabled all new accounts or accounts being saved have to obey the set policy.
You can use this dialog for the particular random password generation too. Display
Domain Description
By default Merak displays the domain names in the list and the primary domain on the top. You can change the listing by displaying the domain description at the beginning and the sorting will be done accordingly.
Statistics Display the Merak statistics of the currently selected object. It can be either a domain or an account. Rather than typing in the domain name or email address of the account in the Server Monitor you should use this method.
Remote Server Administration
Merak lets control any remote mail server using the same administration interface as you are used to on your server. When administering remotely most of the features are present and can be used in the interface. However, some of them might be disabled to avoid connection problems.
All data transferred to and from the remote server is encrypted using a secure cipher and also compressed for a better performance. It is a very safe procedure.
Field Description
Host The host specifies the remote hostname of IP address of the server running Merak.
Administrator Administrator is the username defined on the remote mail server who has the Administrator account type. No other users will be able to authenticate to the server. Merak does not use the Windows user details. Only the Merak accounts are considered.
Password Password to the administrator account.
Port Port specifies the TCP/IP port number Merak is listening on the remote server. The port is the same as the Control port and Control SSL port.
Use SSL connection Enables the SSL connection.
Configuration Backup and Restore
The Merak Mail Server configuration data is stored in these folders: /Merak/Config/
/Merak/Spam/ /Merak/Calendar/
/Merak/WebMail/Config/
The information stored there is the following: § General server settings
§ All account and domain settings (usernames, passwords, details etc.) § Licenses
§ Databases § any many more
Chapter 1 Server Windows Administration 9
It is recommended that you perform a backup after your final configuration and after entering your purchased license information.
In case of a hardware failure you will be able to restore not only your configuration, but also your license. It is recommended that this file is kept somewhere safe such as written to a removable media and taken off the site regularly.
Configuration Restore
Choosing the Restore option will prompt you for a file containing backed up data. Once a file is chosen and opened, the configuration will be restored. Use this option carefully in order to prevent overwriting your active configuration with an older version. You should previously rename the Config directory so the restore is completely fresh.
Should a server have to be rebuilt and all software freshly installed, this Restore provides an excellent way of retrieving all the users' account information without retyping.
Also, the license key is backed up with the configuration. Therefore it is a good idea to make a backup as soon as the product has been registered!
How to create your own digital certificate?
Our certificate generator lets you create your own certificate for secured SSL connections. It is in fact very simple. See below:
2. Fill in all important information in the form (as shown below) and save the output file (cert.pem) to the Merak directory.
You are required to fill in the common name which should be the value of the host running the SSL.
11
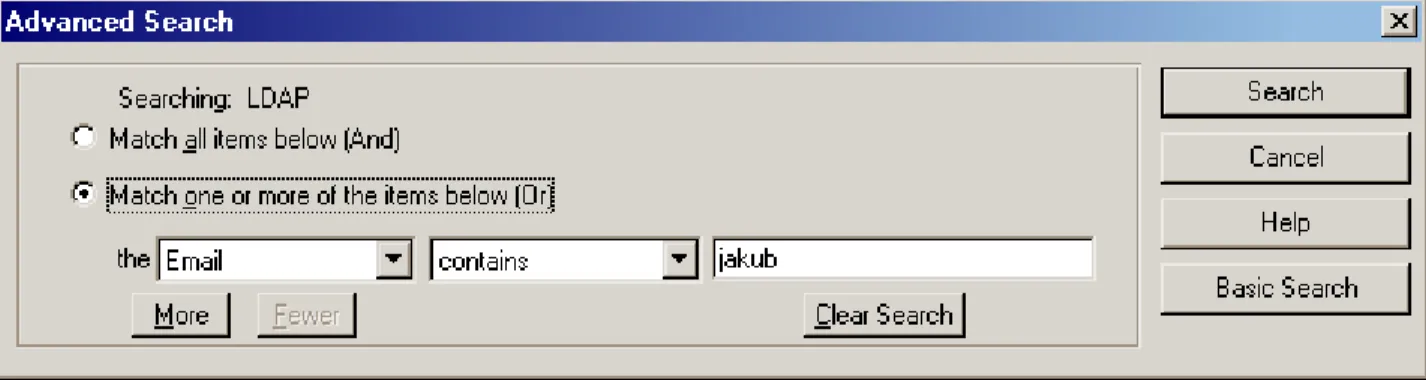
Find Dialog
We can easily find any user in any domain by using the "Find" dialog. This feature is very important and useful for big and medium Merak installations. Using this feature is really easy. See the example below: I want to find any users name or aliases that contain the word "user" in the domain "merakdemo.com"
You can specify in this window what Alias/Name, or what domain you are trying to find. Of course it is possible to limit the number of results to display.
All results are displayed in the default users list. However as you can see, we are in [Search] mode (if you want to leave this mode, just press F5 to refresh), in this mode only users matching the search criteria are displayed.
13
Accounts
The Accounts Tab is probably the most used part of the Merak Mail Server Administration.
Once the Mail Sever is working properly, you will only need to create new accounts or domains and manipulate them.
Account Manipulation.
Cut, Copy and Paste can be used to manipulate accounts only.
Add will allow the creation of new accounts or domains to the system.
To add a new account you can also use the corresponding graphics icon from the Merak tool bar
C
H A P T E R3
Chapter 3 Server Windows Administration 15
Or the same with the Right-Button-Mouse Click.
Account / Domain Editing
By a simply selecting any account or domain you will be able to edit the data of that object immediately. Then confirm the changes by pressing the Save button.
You can also use the multi selection mode which lets you specify multiple objects of the same type simultaneously and change the updated information only to all of the selected objects. This may become handy if you require to change some default data to all users at once. Simply use the Shift or Ctrl key to multi select the accounts and then make you changes and save.
Account / Domain Deletion
Delete will remove an account or domain object. It will delete its all settings and information.
It is also possible to use the multi selection mode which lets you to select multiple objects of the same type and delete them all at once.
The object's directory folder deletion has to be confirmed:
Notice, that the default button selection is Yes. So you can remove the account by pressing key Enter only. For multiple selected objects there is also a button All which servers the same purpose as Yes but to all objects.
However if you select the "Use Safe Confirmation" option, the default will be No.
In This Chapter
Domain... 17
User ... 31
Mailing List ... 49
List Server ... 59
Executable ... 65
Remote Account ... 67
Static Route ... 73
Notification... 77
17
Domain
New Domain will bring up the new domain section and allow more domains to be entered.
Make Primary will convert the selected domain into the primary domain. At least one domain has to be Primary. The server administrator is specified by the primary postmaster administrator. Some system messages are always sent to the administrator. These might be license warnings, system reports etc. The Primary Domain is marked with the small letter P in the icon.
We can say, that Primary Domain Postmaster is "master or masters" - the most informed user.
There is no particular difference between a primary and a secondary domain. It all works the same. Once you have working the primary domain the secondary has to work too. You should realize that domain names and host names are not the same. That means if you have a secondary domain then if you want your users to connect to mail.secondary.com or similar both MX and A DNS records must exist.
Merak displays the domains and accounts in a hierarchical format. Expanding a domain will show the types of accounts which belong to it, expanding the types will show the individual accounts setup. The default order of the domains is alphabetic by domain name.
If you need different order, or domains grouping for the maintenance purposes, use Domain Description field and the option Show Domain Description. The domains will be listed in the Domain Description order.
In This Chapter
Domain - Definition ... 19
Domain - Administrator ... 21
Domain - Unknown Users ... 22
Domain - Options... 23
Domain - Miscellaneous... 27
Chapter 4 Server Windows Administration 19
Domain - Definition
Field Description
Name This is the name of the domain. It is not an IP address, shortcut or alias but the actual full domain name. Messages can be only delivered to created domains. If a domain does not exist, messages will be forwarded outside your server. This is called the relaying.
For extended domain names such as IDN and domain literals see the Domain Options for more information.
Description A simple short description of the domain. You can use it for informative purposes.
Domain Type Domain type specifies how the domain should be used in the whole system. There are several domain types you can see the below.
Standard This specifies a standard domain with users who have separate mailboxes. This is a default domain you would most of the time use.
ETRN/ATRN Queue This is an enhanced option specifying the domain should hold the mail for another mail server that will issue the ETRN or ATRN SMTP client
command in order to receive the mail. The server will hold all mail until the remote server requires the messages to be delivered to it.
This option will be used mostly by ISPs.
The “To:” field will be an IP Address if the remote host is static, or empty if it is dynamic. A dynamic host will usually be a company’s mailserver that connects to the Internet using a dialup rather than a permanent connection. When you create an ETRN/ATRN Domain, you have to create only one account in the domain. This account will be used to hold the messages and it should be a standard user account with all the settings you need.
Beware of the password though. Most of the settings to the user are ignored. The important ones are Password, Alias, Mailbox Path and ETRN/ATRN. You have to switch the ETRN/ATRN option on. This is the only case when this option is needed and is mandatory - it will not work without this switch. If you set a password for this account the remote mail server issuing the ETRN client command must add the password too.
The ATRN always require the password to be set and is more advanced than ETRN. ATRN supports multiple domains to be queried in one
command whereas ETRN supports only one. The other advantage of ATRN is that the queued messages are sent in the same session so the roles of the client and server are changed. The server will become a client and the client a server.
The remote mail server that needs to issue the ETRN command should do it so in this way:
ETRN domain or
Chapter 4 Server Windows Administration 21
Domain Alias This specifies that any mail received to this domain should be forwarded straight onto the one specified in the “To:” box.
This is commonly done when a client registers various combinations of their domain e.g. domain.com domain.net etc. and wants all mail to be directed into a single set of mailbox accounts. You only need to create accounts for the primary domain ie. the one where mail is forwarded to. Backup Domain Also known as the Domain Gateway. This feature specifies that any mail
received to this domain should be held and forwarded straight to the host name specified in the “To:” box. If the host is not reachable the messages are queued and sent later.
You do not need to create any users in this domain and you may simply redirect all messages for this domain to another mail server (external or local). This solution is used for backup domain mail servers. You can still create some exceptional accounts in this domain and in such case they will be used as ordinary accounts and mail for them will not be forwarded. If the To field is empty the standard MX queries will be used to deliver the message. Only the lower MX preference values will be used. It has
mechanism to avoid looping from Merak to itself.
Domain - Administrator
Field Description
Default alias Specifies the postmaster aliases. Aliases can be separated by the semi-colon ‘;’ delimiter without spaces. This means you do not need to create those users in the domain as accounts.
By default the mostly used and required aliases are inserted. Each domain should have a defined set of a aliases.
E-Mail Specifies the actual account for all the postmaster aliases. Multiple accounts can be specified (semicolon delimiter), even remote email addresses for different domains. The primary domain is required to have an administrator email defined. It is used by the system notification emails and other reports.
Domain - Unknown Users
Field Description
Info to admin If an email is sent to an unknown user, the admin (postmaster) for this domain will be notified regardless of whether the mail is rejected or forwarded.
Reject mail If an email is sent to an unknown user, this option specifies that it should be rejected and returned to the sender. No message will be ever transferred. This is the recommended setting.
Forward to If an email is sent to an unknown user, this will forward it to the specified account. It is quite common to setup a “catch all” account (for server Domain POP) that will receive all unknown mails.
This is how ISPs offer unlimited email aliases since you can send mail to [email protected]. When using a catch all account it is suggested to switch on the Add X-Envelope-To option for that account.
Delete mail If an email is sent to an unknown user, it will be deleted and the sender and recipients will not be notified.
Chapter 4 Server Windows Administration 23
Domain - Options
Local Domain Options
Local Domain Options are valid for the domain and all users of this domain.
The default value of the options (zero - 0) means: "without limits". Some of the options are disabled and need to be enabled by the global domain options.
Field Description Domain admin
account limit
Domain Administrator can create up to specified # Accounts from the WebAdmin. All accounts are considered not only the user accounts.
Domain disk quota
The total disk space used by the all users from domain can not exceed the
specified quota. If the quota is exceeded no more messages will be received to the domain.
This option should be used the Administrator for domain administrator maintained domains.
User mailbox size
Any user of the domain can receive mails, only until total size of the all received mails in the mailbox (and not downloaded via PO3 or deleted via IMAP) will not exceed the value specified there.
User megabyte send limit per day
User of domain can send mails with total size up to the specified limit per day. If exceeded no more messages will be sent from this user in the day.
User number send limit per day
User of domain can send total number of mails up to the specified limit per day. You can limit your users to send large amount of emails outside of your mail server.
User max. message size
This parameter limits the maximum size of the ANY message sent or received by the domain user.
The user domain settings can be overrode by the user account specific options.
Global Domain Options
Global Domain Options are valid for WHOLE SERVER - All Domains, which are specified in the parametric file.
Chapter 4 Server Windows Administration 25
Field Description
Enable domain
literals It will automatically bind virtually your domain names also to IP addresses. So the result will be your domain will be also capable of receiving emails in the following format:
user@[IP]
The real IP value depends on the Virtual IP Binding option and the system IP addresses.
Enable IDN support Use Domain Disk
Quota This option indicates that specified domains should be checked for disk quota when receiving new mail. If the quota exceeds the limit the mail will be rejected. Any domains requiring a quota need to be specified in a file
diskquot.dat (in the Config subdirectory).The file can be opened with the edit button
The format of the file is as follows: Domain=limit
Example:
usa.net=5192 *=10000
This would specify that all domains have a 10MB limit apart from usa.net which has 5MB.
Use Domain User Limits
This option is enabling/disabling the usage of the User limits specified above: § User Mailbox Size
§ User Megabyte Send Limit per day § User Number Send Limit per day § User Max. Message size
Works for WHOLE SERVER, ALL DOMAINS.
If you want to control just some of the users, you have to enable this option and for each individual domain enter the User limit values you want.
Use Welcome Messages
This option specifies that when a new user is created, a welcome mail will be saved into his mailbox. You can specify different messages for particular domains and not all domains have to have the welcome message set.
The welcome mails must be created in separate text files. These text files are referred to in the file messages.dat (in the Config subdirectory) which can be opened for editing using the edit button
The structure of the file is as follows: domain=filename
Example:
icewarp.com=c:\merak\welcome.tmp
If a line specifies an asterisk as the domain, the specified welcome file will be used for the rest of the domains. Remember that if you want to use this option, the asterisk must be on the last line of the file because the following lines will not be checked.
It would be wise to send such message to any mailbox on the server and then use the mail\domain\mailbox\xxxxx.tmp.
Example:
From: Support <[email protected]> To: All new users
Subject: Welcome our new user Dear new user,
we would like to welcome ... Warn User When
Mailbox Size Exceeds (%)
The warning email is send to the any user of the domain, when his mailbox is so full, that exceeds specified % of the total reserved space for him.
The 0% means no warning. Override Global
Settings
If checked, domain settings will override global limits settings Disable Login To
this domain
This option is available when Use domain user limits option si checked. Disables all users to login
Chapter 4 Server Windows Administration 27
The welcome file must be a normal mail ie specify fields such as From: Subject: etc and end the file with a carriage return, period ('.') carriage return at the end.
Field Description
Domain virtual IP binding A domain can be logically bound onto IPs. You can specify multiple IP addresses using semi-colon.
If the primary domain s bound to an IP it is required that the other domains are also bound.
When a user connects to authenticate, Merak will use the specified IP to find the domain. It is not recommended to use this option unless you know what you are doing.
Make sure you use this option only if you know what you are doing. If you have many domains and each can have a unique IP it is suggested to use this option. It will speed up the user database access.
Domain B&W filter In b&w filters you can specify email addresses, domains and IP addresses that are or are not allowed to send messages to your server. You can even create message content conditions.
This is a textfile which defines rules for accepting or rejecting email for this domain. The Global B&W Filter option must be switched on to have this working.
Click on the edit button to bring up the textfile for editing. See more details in the example file.
Domain account defaults When using the User account defaults option this button will be enabled and offers you to create different default data sets for each domain. By default the original default file will be used. Once you create the domain account defaults file the new one will be used instead.
Services access This dialog lets you enable or disable selected services for whole domain. The options are dependent on the Processing Mode of the particular service. That means if the mode is not selected properly this option here will be disabled. See more information about the Processing Mode in the administration section of each service.
Chapter 4 Server Windows Administration 29
Domain - Info
The Info Tab shows the most overall quick information about the selected domain.
Use the "Statistics" button to view all domain statistics information (number of users, used space, total number of messages etc..).
31
User
Users are the mostly used accounts on the mail server. Every user has an access to his mailbox and can send/receive messages from/to his account. A user account is protected by a password and username. You can set plenty of options for each user to meet your special needs.
Every user has a set of rights. User can be a full administrator or just an ordinary user. You can also set different service access rights.
Typical email address looks like: [email protected]
However keep in mind, that for the Authentication process you use the
Username (Account name in Outlook) which is not an email by default
In This Chapter
User - Basic Setup... 32 User - Import Windows NT Users ... 36 User - Shared IMAP Folders ... 37 User - IMAP Settings ... 40 User - Options... 42 User - Responder ... 44 User - Special... 46
C
H A P T E R5
Chapter 5 Server Windows Administration 33
Field Description
Alias A unique identifier of the account in the domain. This is the user’s name which is usually the same as username. Alias is the first part of the email address.
Example: To setup the email address [email protected] enter the alias "support". Multiple aliases can be used by separating them with semi-colon:
support;help;bugs;info
Username This is identification name of the mailbox. It is usually the same as the primary alias of the account. Usernames are used for all authentications to Merak services. It defaults to the same as the alias but does not have to.
Password The password for the mailbox. If you want to be sure you entered the password properly repeat the entering process in in the confirmation field. Merak will automatically compare both.
Name The real name or an identifier of the account. Fill in anything. Comment You can specify some short commentary for any account.
Field Description
Mailbox Path This specifies the location of the user account. All files and messages related to the account will be stored in this path. Merak automatically fills this with the domain and alias but you can change it to anything. This field can even contain a full qualified path.
Remote Address
This specifies that mail will not be stored in the mailbox path but forwarded to a remote address instead. This address should be of the format [email protected]. It can contain multiple addresses separated with semi-colon.
Forward To All incoming mail will be always forwarded to any addresses specified in this field. This provides a mechanism for copying email to remote or local accounts.
Multiple addresses can be specified with semi-colon. Mailbox Type Specifies the mailbox type:
POP3
Ordinary POP3 account accessible via POP3 only. IMAP
IMAP account accessible via IMAP only. IMAP & POP3
A combination of both IMAP and POP3. You can access the mailbox using either of the protocols. Remeber the POP3 usually deletes the messages from the Inbox folder.
Chapter 5 Server Windows Administration 35
Account Type Description
Standard A standard user account which can access all services except he cannot change any settings from the WebAdmin. When used with Web Mail they can change the settings easily.
Self
Configurable User
All of the above plus the user also gains the access to the Web Admin self configuration section.
Domain Administrator
All of the above plus the user is defined as the Domain Administrator. Domain administrators can maintain accounts in their domains
themselves but cannot change the global settings.
At the right there is a button for defining additional domains the domain administrator can maintain including the some rights and other information. Please, see the example file for more details.
Administrator Full Server Administration without limitations. The user can access the WebAdmin and also can use the Remote Administration access.
User State Description
Enabled Fully working account.
Disabled (Login) Partially disabled account. Mail is received, but the user can not log-in and access message. It is very suitable for ISP providers, if they need to disable account just temporarily.
Disabled (Login, Receive)
Completely disabled account. Disabled
(Tarpitting)
If and email is delivered to this account, sender is considered as a "tarpitter" (See SECURITY Tab, Tarpitting) and his IP address is blocked as set in the Tarpitting Options.
State Description Spam
Administrator
This checkbox depends on your Instant Anti Spam settings. User can be a "Spam Administrator". Such user can administrate Instant Anti Spam message databases and approve messages indexing.
See more details in the Instant Anti Spam section.
Mailboxes Lets you specify additional mailboxes the spam admin should be able to maintain or moderate via the Instant Anti Spam access. See more details in the example file.
User - Import Windows NT Users
You might already have the user accounts set up in the Windows NT or Active Directory user database. To save retyping, these can be imported into the mail server.
Select the users you want to import and press the Import button. More users can be loaded from different domains/servers using the Load button. If there are any aliases or mailboxes with the same value these users will be ignored and not imported. Passwords can never be retrieved from any Windows system thus will be empty and you need to edit them.
Chapter 5 Server Windows Administration 37
The user authentication mode lets you specify the mode for all imported users. See the user account authentication mode description. User - Special
User - Shared IMAP Folders
IMAP Shared Folders is a unique Merak Mail feature, which enables you to share content of specified IMAP folders with other IMAP users. You can set rights, create several shared folders and much more. The Shared Folders button is a global option accessible from any account. It is not an account specific feature.
The Shared Folders button lets you open the Folder dialog where you can edit/delete and add new shared folders.
Field Description
Name The folder name that will be displayed in the IMAP session.
Domains Should be empty by default. You can specify multiple domains separated with semi-colons. Only users from these domains will be able to see and access the shared folder. When empty, all domains will access the shared folder.
IMAP Account Each shared folder is linked with to one IMAP account. This field contains the email address of the IMAP account. The IMAP account is used only as a storage for the shared folder messages. You can still use the account as an ordinary account. One folder of the IMAP account will be used for the sharing purposes. By default it is the INBOX folder.
IMAP Folder If empty the INBOX of the IMAP account will be used as the shared IMAP folder. You can also specify a different folder here.
Chapter 5 Server Windows Administration 39
In this dialog you set the rights to each email account that will login to IMAP. You can also use the "anyone" account which stands for all non defined accounts. You should always set the "anyone" rights first and then specify the additional users.
Field Description
Lookup (l) User can see this folder in their personal list of IMAP folders Read (r) User can open this folder and view its contents.
Write (w) User can change flags on messages in this folder. Insert (i) User can append and copy messages into this folder. Create (c) User can create subfolders within this folder. Delete (d) User can delete messages from this folder.
Set Seen Flag (s) User can change the read/unread status of messages in this folder. Administer (a) User can administer the ACL for this folder.
Chapter 5 Server Windows Administration 41
Field Description
Direct mailbox SMTP
delivery
To send a message directly to some IMAP folder you need to enable the Direct mailbox SMTP delivery option of that IMAP account. When sending the email the email address of the recipient must be specifed using the following syntax:
"alias:imapfolder"@domain.com Example:
"imap:Received Messages"@usa.net
A message will be sent to [email protected] and will be delivered to the Received Messages IMAP folder. This syntax can be used for any email address specification. Use the syntax exactly as you see it including the quotes.
Default SMTP delivery mailbox
By default you should leave the Mailbox field empty in all cases. If the account is IMAP enabled, Merak will place the incoming mail into the IMAP folder specified. This is usually "inbox", if empty INBOX will be used.
Rules Rules are used for all SMTP delivered messages to IMAP mailboxes unless the message was sent directly to Mailbox via IMAP.
You can specify conditions just like for black & white filters and then the Folder on IMAP to move the message to.
The Move To field contains all IMAP folders for the IMAP account. It contains the private folders and also the public shared folders.
Each message will be checked by the rules. If a rule meets the criteria the message will be moved to the proper IMAP folder. If not the message will be tried to be delivered to the Default SMTP delivery mailbox or to INBOX.
Chapter 5 Server Windows Administration 43
Field Description
Limit mailbox
size A quote can be assigned to a mailbox. If the user fills their mailbox any new mail will be returned to the sender. The option overrides the domain setting.
Megabyte send limit per day
A non-zero value here specifies the amount of data a user can send out in a day. Also, if a mail is sent to two recipients the usage is doubled. If the user exceeds the limit he has to wait till the next day until being able to send some more.
The option overrides the domain setting. Number send
limit per day A non-zero value here specifies the number of mails a user can send out in a day. The same logics applies as for the Megabyte send limit. The option overrides the domain setting.
Max message size
A non-zero value here specifies the maximum message size a user can send or receive with his account.
The option overrides the domain setting. User can send
mail only to local domains
This specifies that the user can only send mail to domains which are defined on this mail server. It will not let the user relay messages outside the server. Delete mail older
than
Merak will remove any messages after the specified period. This takes place at midnight.
Forward mail older than to:
Merak will forward any messages after the specified period to the account listed. Multiple accounts may be specified with semi-colon.
Field Description
Incoming Mail Specifies email addresses to copy all incoming mail to. Outgoing Mail Same as above, except outgoing mail is copied.
Chapter 5 Server Windows Administration 45
Responder
Field Description
Status This option sets up an auto responder, which is useful if someone is away from their email for a period of time. A short email message will be sent to the sender with the response message.
Do Not Respond The option is disabled. Respond Always
All messages sent to this account will have the auto response message generated.
Respond Once
A response message will be sent to all senders only once. Merak keeps a log of previous email senders so messages will not loop and will be sent only once to the sender while having this option set.
Responder file This button opens the responder file for editing. The file is a Merak script file which can contain commands and variables. You can easily create a multipart message with attachments and html parts.
Inside of the Responder file you can use the Merak System variables for passing various system values. See the example file for more details. By default you do not have to fill in the file name. Merak will do that for you. Just enable it and click the edit button.
No responder for This button opens the file that specifies exception email addresses and domains of senders that will not get a response message when sent a message to this account. Each email address or domain on a separate line. Reply from This is the return address that will be used in the auto responder. If blank the
email of the account
Reply only between dates This option lets you specify exactly time period for auto-responder. Reply only if to me If a message sent to this account contains the email address in the To field
that belongs to this account then a response will be generated.
Expires if inactive for [Days]
Account expires if not used for specified number of days. When expired the account is disabled
Expires on (yyyy/mm/d) Specifies that the account is only valid until this date. After the validity expiration. When expired the account is disabled
Notify before expiration (Days)
Specified how many days before the account expiration a notification will be sent about it.
Notification file This specifies the full path and filename of the report that will be sent to the user informing them that their account will soon expire. If not specified a standard report will be generated.
Delete account when expired
Expired accounts will be deleted if this option is on.
Chapter 5 Server Windows Administration 47
Field Description
NULL account This option specifies that this is a dummy account and all messages sent to this account will be dropped and deleted. Mail can still be sent to it, but no mail is saved. However all the forwarding and auto responder functions will work. The user will not be able to login.
ETRN/ATRN account
This specifies that this is the account in which all the messages will be kept for the remote mail server that will issue the ETRN/ATRN command. This account must be the first and the only account defined in the domain. It is used only when the domain is an ETRN/ATRN domain. See the Domain section for more details Add
X-Envelope-To
This option specifies that all messages received for this accounts should have the X-Envelope-To header added with the real recipient. This option is used for Catch All accounts so the remote mail server knows exactly to whom the message was sent to. No mailing list Specifies that this user will be excluded from all Merak mailing lists that have
"Send to All" specified. Spam folder
mode
See the Instant Anti Spam section for more details. This option sets the spam folder support to the account. The Default mode inherits the global IAS settings.
Authentication mode
The authentication mode lets you specify the way the mail server authenticates login requests.
Standard
This is the default mode you will be using most of the time. The mail server uses its own authentication engine and supports all authentication schemes like CRAM-MD5, CRAM-MD5, DIGEST-CRAM-MD5, PLAIN, LOGIN etc.
NT Domain
The NT domain mode specifies that the NT Domain controller should be used to authenticate the user. The mail server must have the SE_TCB_NAME privilege. The authentication value field can specify additionally the name of the domain controller and the username to authenticate with. If empty the local machine and user will be used.
Format:
NT Controller;NT username
Active Directory
The Active Directory server gets popular lately. For this reason you can use the Active Directory authentication mode. This will allow the mail server to authenticate the user against the AD server. By default the localhost AD and username made of email address is used.
It is also possible to specify a different AD server and username in the authentication value option.
Format:
AD server;AD username
Any Password
This specifies that no matter what password is given, it will always be accepted. A dangerous option but can be used easily for any trial account show off or similar. Service access This option lets you enable or disable selected services. The availability of the
fields depends on the Processing Mode of the services. If some of them are disabled you need to specify the proper Processing Mode to enable them and then set
49
Mailing List
The mailing list feature is an easy way of sending off a mail to a single address that will be forwarded onto all the members of the list. They are especially useful as discussion groups or connecting with others who share the same interests and ideas.
The members of the list can be stored in a plain text file, database or it can be Merak system users. You can also user personalized mailing lists which are specially formated messages with variable fields. Every email message can be customized and personalized for each member of the list.
When creating a new mailing list account you should follow a certain set of rules. You should always set some security level such as the Moderator and make sure there is never the mailing list address in list members of the same mailing list.
In This Chapter
Mailing List - General ... 49 Mailing List - Message... 52 Mailing List - Security ... 54 Mailing List - Other ... 56
Mailing List - General
Field Description
Alias A unique identifier of the account in the domain. Description A short descriptive text of the account.
Owner The email address of the owner of the list. Multiple addresses can be specified using the semicolon delimiter. Owner has special rights to this account.
List file If the list is to be used to send mail to various recipients located in a text file a list file needs to be used.
The list file specifies the full path and filename of a text file containing the email addresses of the list members. After specifying the path and filename use the edit button to edit the members of the list.
See the example file for more details. Each member on a separate line.
Users from list file
Chapter 6 Server Windows Administration 51
Users from ODBC
Email addresses can be stored in database. An ODBC source will be used. The connection string has to be written in the ODBC settings dialog. ODBC Settings (on page 119)
Non-personalized email:
Fill in the SQL statement. The query has to return only one or two fields which will include the email addresses. The first column must contain the email address and the second if present the members rights.
Example:
SELECT Email From Customers
It is suggested to use the Test SQL query button. This button will execute the query and will show you the result of the query in a text file. The text file should look like a list file.
Personalized Email:
SQL query can return more than one field. The field names have to match to the names used in the personalized mail. Personalized field name in the email body have to be enclosed to the {{}}. The first column contains the list of email addresses, the second the members rigths and the following contain the personalized fields.
SQL Statement Example:
SELECT Email, ContactName, Totalsales FROM Customers WHERE Totalsales > 1000
Personalized Mail Example:
Hello {{ContactName}},Your total sales exceeded {{Totalsales}}!!! You win a prize - wife of my boss... :-(. Cheers...
Users from domain
This option will forward a mail received by the list to every user in the domain. All users Message will be forwarded to all accounts on the mail server including all domains. All domain
administrators
Message will be forwarded to all domain administrators on the mail server. All
administrators
Message will be forwarded to all administrators on the mail server.
SQL query SQL command used to select the mail recipients (to create mailing list on fly). See the Source section for more details.
Test SQL query...
Performs SQL state command to see if everything has been setup properly. ODBC
settings...
Sets the ODBC source for the database connection.
Chapter 6 Server Windows Administration 53
Field Description
From &
Reply-To: Headers You can specify what each header should contain. It depends on your needs. Either you want to set the From field to Sender and Reply To to the email address of the mailing list (this will cause all replies to go to the mailing list back to the mailing list).
Or you want to set the Reply-To field to Sender and From to the email address of the mailing list (this will cause all replies to go to the sender of the message). You can also set your own value to any of the headers.
Set recipient to To: header
Specifies a new recipient in the To header. Each message sent out from the
mailing list will have a final recipient of the mailing list member in the To: header. Add to Subject This prefixes the subject line with the specified string. If the text is already present
it does not duplicate it. If the subject line is not present it is created.
Add headers You can any number of customer headers to the mailing list message. You can use the system variables here as well.
Header file Specifies a text file that should be inserted at the beginning of all messages passing through the mailing list. Always a full path name.
Footer file Specifies a text file that should be inserted at the end of all messages passing through the mailing list.
Originator This is an advanced SMTP option. You can specify the exact content of the SMTP MAIL FROM command.
The possible values are: § Empty Mail From <> § Sender
§ Owner
If the Empty Mail From <> is selected (default) some email servers might reject the message.
When you choose the Sender or Owner all bounce backs of failed messages will be sent to that email address.
Chapter 6 Server Windows Administration 55
Field Description
Only members can post messages
Specifies that only the members of the mailing list can send messages to the mailing list. If members have some flags set they need the POST flag.
Moderated A moderated mailing list is where a message needs to contain a password for the message to be approved and sent to list members. There must be a password at the start of the Subject. If the password is not specified then the message is sent to the list owner who can add it and send it back. When the message is sent out to list members the password part from the Subject is removed.
Is used along with the option Server moderated all messages are saved on server and when replied to them the original message will be sent out to members. In that case the reply serves as a password message only. To delete stored messages on the server and not sending them out to the mailing list add '-DELETE' to your approval password.
Some mail clients support the X-Approved MIME header which contains the password. Merak automatically checks that header. If it finds it and the password is correct it does not check and remove the first line. It will only remove the X-Approved header.
Server moderated
If the mail is sent without a password, it will stay waiting on the server for confirmation and the notification email is automatically sent to the sender.
If sender replies to this notification mail, the original mail is sent from the server to the recipients on the mailing list.
This processing should be used as a protection against unauthorized senders. Password Password for the moderated
Allow subscribers
You can also specify a list of email addresses that are eligible to join the mailing list. A complete path and filename is required.
Example:
c:\merak\allowed.txt
Max mail size Specifies the maximum message size that can be sent to the mailing list.
Deny EXPN If a client issues the EXPN command the list members will be returned. Using this option prevents from such behaviour. "No such mailing list" response will be returned.
Chapter 6 Server Windows Administration 57
Field Description
Send to sender If unchecked and a user (on the list) sends a message to the list, he himself will not receive the message. If checked he will receive a copy of his own message.
Forward copy to owner
If the owner is not on the list, this option will copy messages to the email address specified in the "owner" field. However, it is suggested that owners subscribe to the list themselves.
Digest mailing list Specifies that all messages sent to this mailing list will be saved and kept in a package file which will contain the list of messages and their bodies.
At midnight a single message will be sent to the digest members of the mailing list. Process mailing
list variables
There are certain variables you can use inside of the body of sent mailing list messages. These are the system variables. If this option is set Merak will replace the variable definitions with the proper values.
Personalized mailing list - variable fields
The personalized mailing list option lets you customize your messages with variables linked to the members of the list.
Variables with the following format {{item}} in messages will be replaced with the corresponding value of the member. The values can be static or fetched from a database using an SQL statement.
The fields and values use the URL encoded format. Static Mailing List Syntax:
emailaddress;parameters;field1=value1&field2=value2....fieldn=valuen Personalized Mailing List Example:
[email protected];;name=Jakub&totalsales=1050&pricecode=gtysrv778 [email protected];;name=Ladi&totalsales=1500&pricecode=dert464566 Personalized Mail Example:
Dear {{name}}},
Congratulation! Your sales exceed ${{totalsales}}. Let us offer you the special price for the next purchases. Your new pricecode is {{pricecode}}.
Remove dead email addresses
When this feature is enabled, Merak will automatically remove any email address from the members list file when it encounters a permanent fatal error while attempting delivery.
The removing process is applied when sending a new message to the mailing list. Max # messages
to send out in 1 min.
If this field is other than 0 it specifies the number of messages that can be sent out per 1 minute. Merak lets you control the flow of outgoing messages using this option. It might become handy when sending large amounts of messages (more than 10000).
Join/Leave File You can specify your own greeting and farewell messages using these file specifications.
Notify owner You can notify the owner of the list of certain events. These are:
Join
Somebody joined the mailing list.
Leave
59
List Server
List Server is used for controlling the Mailing Lists and Black & White filters via emails. Every list server account has a set of commands you can specify in your email so the server can perform certain actions. You should always use the Command rights so not all commands are available. It is also recommended to use a moderated list server so all commands will be protected by passwords.
The only fully controllable mailing lists are are text file based mailing lists. All others can only be used to list the members of them.
In This Chapter
List Server - Creating a List Server... 59 List Server - Commands... 61 List Server - Options ... 62
List Server - Creating a List Server
Field Description
Alias A unique identifier of the account in the domain. Description A short descriptive text of the account.
Owner The email address of the owner of the list server. Multiple addresses can be specified with semi-colon. This option is used for replies from the list server and as a
confirmation email address.
List file By default this option should be empty and serves to all mailing list.
If you require to specify the allowed mailing lists for the list server this file contains a list of all the mailing lists that can be administered through it.
Each mailing list email address on a separate. [email protected]
[email protected] Confirmed
subscription
All subscriptions to mailing lists will have to be confirmed via email by the owner. Command in
Subject By default the list server will accept commands specified in the Subject of the message. You can change this by unchecking this option so the commands will be embedded into the body and you can even use multiple commands on several lines. List server
help If a user sends the HELP command to the list server, the server respodnds with a standard help message. You can change the content of the response message by specifying a text file here.
If you add a semi-colon and another text file path here, this file will be used in the confirmation message from the list server when used confirmed subscriptions. helpfile;confirmationfile
Allowed commands
These checkboxes specify commands the list server is allowed to process. See the list of commands and the description in the following chapter.
Chapter 7 Server Windows Administration 61
List Server - Commands
Command Description Usage
JOIN or SUBSCRIBE (JOIN-DIGEST or SUBSCRIBE-DIGEST)
The join or subscribe commands are issued by users who want to join the list.
The DIGEST appendix is a special flag so the user is subscribed for the DIGEST mode. A DIGEST mode holds all day correspondence in one message and sends the message in the end of the day. A mailing list has to have the Digest mailing list option checked in order to successfully process the DIGEST members. When using the Confirmation subscription a confirmation message is sent to the owner of the list for approval.
JOIN [password] {listname}, [mail address], [full name] or
SUBSCRIBE [password] {listname}, [mail address], [full name]
The values inside the braces are optional. If no email address is given, the one they use to send the request will be used. If moderated list server you are required to specify the password as the first parameter of the command.
Example:
JOIN [email protected] LEAVE or
UNSUBSCRIBE (LEAVE-DIGEST or UNSUBSCRIBE-DIGEST)
Users can leave the list automatically using the leave or unsubscribe command.
LEAVE [password] {listname}, [mail address]
or
UNSUBSCRIBE [password] {listname}, [mail address] NORMAL or DIGEST Users can change the mode of their
subscription either to normal or to digest.
NORMAL [password] {listname}, [mail address] or
DIGEST [password] {listname}, [mail address]
LISTS Use this command to obtain a list of all the mailing lists that are served by this list server.
LISTS [password]
WHICH This command returns you a listing of all the mailing lists to which you have subscribed.
WHICH [password] [mail address]
RECIPIENTS or REVIEW
Get a listing of all members of the specified mailing list.
RECIPIENTS [password] <list> or
HELP Use this command to get a description of all the list server commands (as on this page). This response can be customized by the Help file parameter of the list server.
HELP [password]
BLACKLIST or
WHITELIST (BL or WL)
Use this command to add a new black or white list item to the user's black & white list.
Merak has the power to control the user's b&w list directly thru a list server. The user can simply control their filters by sending a list server command.
These commands are only working for the user's private black & white list. Global and domain cannot be controlled by users.
BLACKLIST [password] {email}, [sender], ["remove"] or
WHITELIST [password] {email}, [sender], ["remove"]
Chapter 7 Server Windows Administration 63
Field Description
Suppress subscription replies
All failure or success responses will be suppressed and never sent to the sender of the list server email message. This might be useful when processing web form requests by emails for instance.
Moderated list server
When checked all list server commands will be protected by a password. This password is placed after the command name as a first parameter. If a password is not given or is incorrect the list server command will not be processed.
Password Password for moderated list server.
Originator This is an advanced SMTP option. You can specify the exact content of the SMTP MAIL FROM command.
The possible values are: § Empty Mail From <> § Sender
§ Owner
If the Empty Mail From <> is selected (default) some email servers might reject the message.
When you choose the Sender or Owner all bounce backs of failed messages will be sent to that email address.
65
Executable
The executables are good ways of running jobs/processes on a server without having to use any remote admin tools. Simply setup a job in advance, then the job can be executed by sending an email to the server.
Do not forget the application must properly exit at the end. Some applications usually require the temporary message file name as the input or any other parameters.
It would be a good idea to use the b&w filters to only allow your email address through to this account though or to use executable password.
Field Description
Alias A unique identifier of the account in the domain. Description A short descriptive text of the account.
Application Specifies the path and filename of the application or library to execute. This can be a DOS, Win32 application or a DLL. It must not be a GUI application which requires a user input.
You are required to specify the application type using the below radio buttons. StdCall and Cdecl are library interface specifications when you are calling a DLL file.
Parameters Specifies the parameters to pass to the application. They can be any of the Merak system variables. You can find the complete list in the system variable example file. Some examples can be found below.
%%From%% - who the mail was sent from %%To%% - who the mail was sent to %%Subject%% - the subject of the mail %%Date%% - the date of the mail
%%Message-ID%% - the message id header of the message
%%MessageFile%% - the full path and filename to the received message Password The executable account can be protected by a password. If this field is filled
the Subject of the message will be checked for the password. If found the password will be deleted from the Subject and executable will be processed. Else the executable will not be processed and no bounce back will be sent too. Forward to Specifies that the contents of any mail is also forwarded to the specified
67
Remote Account
Remote Accounts are used to fetch mail from user accounts on external POP3 servers. You can assign Merak to check for waiting mails on a remote server. It can either be done for one account only or for the whole domain using the Domain POP feature and other related options.
Domain POP is a very powerful feature where Merak parses all messages received from the remote servers and places them in proper mailboxes based on the message headers and other information. All basic Merak features also work for remote accounts such as the Antivirus, Instant Anti Spam, Content Filters and others.
All Remote Accounts send a message to the Forward to addresses if they are not Domain POP.
C
H A P T E R9
Field Description
Name The name of this remote account. It is used purely for informational and display purposes.
Server Specifies the POP3 host name server (incoming mail server). This is the server the mailbox resides on.
Example:
pop3.demon.com
Username This is the username which is used for the authentication on the remote server. Password The password to the remote mailbox.
Forward to You are required to specify an email address (or email addresses) where all the received messages should be sent to. This will be mostly a local account.
When used with the Domain POP option you are still required to specify a special email address for cases when the recipient on the local server could not be found. APOP Check this to ensure that Merak uses the secure APOP authentication command.
The remote server must support this. APOP is a secure login using md5 encryption. Dedupe
collected mail
Merak will read the messages' Message-ID header field and if some messages have the same ID the message will be processed only once and no message duplicates will be done. This procedure works only in one session.
Leave messages on server
Merak will leave messages on the remote server after retrieving them. In other words, it will not erase them. It keeps a local logs of downloaded messages and their IDs.
Delete message if older than
This option is related to the Leave messages on server option. If the message on the remote server is older than the specified number of days it will be deleted.
Delete messages if more than
This option is related to the Leave messages on server option. If there is the specified number of messages or more on the remote server, messages will be deleted.
Schedule Specifies the schedule tasks for this remote account that need to be entered. This is the standard schedule dialog.
You can also set a global schedule account that will let you leave all of your remote account schedule properties empty.
Chapter 9 Server Windows Administration 69
In This Chapter
Remote Account - Domain POP ... 69 Remote Account - Special ... 71