vShield Administration Guide
vShield Manager 5.5
vShield App 5.5
vShield Edge 5.5
vShield Endpoint 5.5
This document supports the version of each product listed and
supports all subsequent versions until the document is
replaced by a new edition. To check for more recent editions
of this document, see
http://www.vmware.com/support/pubs
.
You can find the most up-to-date technical documentation on the VMware Web site at: http://www.vmware.com/support/
The VMware Web site also provides the latest product updates.
If you have comments about this documentation, submit your feedback to: [email protected]
Copyright © 2010 – 2015 VMware, Inc. All rights reserved. Copyright and trademark information.
VMware, Inc.
3401 Hillview Ave. Palo Alto, CA 94304 www.vmware.com
Contents
vShield Administration Guide 13
1
Overview of vShield 15
About vShield Components 15 Migration of vShield Components 17
About VMware Tools on vShield Components 17 Ports Required for vShield Communication 17
2
vShield Manager User Interface Basics 19
Log in to the vShield Manager User Interface 19 About the vShield Manager User Interface 20
vShield Manager Inventory Panel 20 vShield Manager Configuration Panel 21
3
Management System Settings 23
Edit DNS Servers 23
Edit the vShield Manager Date and Time 24 Edit Lookup Service Details 24
Edit vCenter Server 24 Specify Syslog Server 25
Download Technical Support Logs for vShield 25
Add an SSL Certificate to Identify the vShield Manager Web Service 26 Import an SSL certificate 26
Working with Services and Service Groups 27 Create a Service 27
Create a Service Group 28 Edit a Service or Service Group 28 Delete a Service or Service Group 29 Grouping Objects 30
Working with IP Address Groups 30 Working with MAC Address Groups 32 Working with Security Groups 34
4
User Management 37
Configure Single Sign On 37 Managing User Rights 38
Managing the Default User Account 39 Add a User Account 39
Edit a User Account 41 Change a User Role 41
Delete a User Account 42
5
Updating System Software 43
View the Current System Software 43 Upload an Update 43
6
Backing Up vShield Manager Data 45
Back Up Your vShield Manager Data on Demand 45 Schedule a Backup of vShield Manager Data 46 Restore a Backup 46
7
System Events and Audit Logs 49
View the System Event Report 49
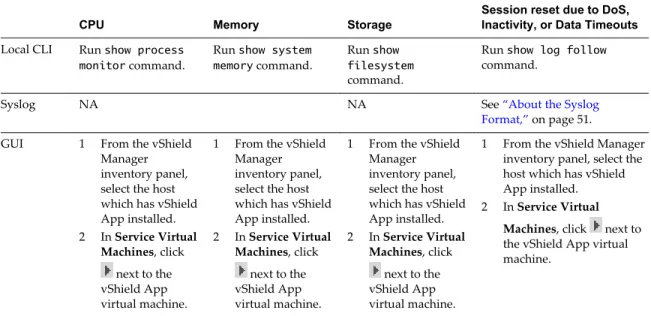
vShield Manager Virtual Appliance Events 49 vShield App Events 50
About the Syslog Format 51 View the Audit Log 51
8
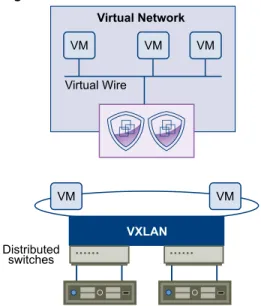
VXLAN Virtual Wires Management 53
Preparing your Network for VXLAN Virtual Wires 54 Associating Clusters with Distributed Switches 54
Assign Segment ID Pool and Multicast Address Range to vShield Manager 55 Create a VXLAN Virtual Wire 55
Add a Network Scope 55 Add a VXLAN Virtual Wire 56
Connect a VXLAN Virtual Wire to a vShield Edge 56 Deploy Services on a VXLAN Virtual Wire 57 Connect Virtual Machines to a VXLAN Virtual Wire 57 Test VXLAN Virtual Wire Connectivity 58
Viewing Flow Monitoring Data for a VXLAN Virtual Wire 59 Working with Firewall Rules for VXLAN Virtual Wires 59 Prevent Spoofing on a VXLAN Virtual Wire 60
Editing Network Scopes 60
View and Edit a Network Scope 60 Expand a Network Scope 60 Contract a Network Scope 61 Edit a VXLAN Virtual Wire 61
Sample Scenario for Creating VXLAN Virtual Wires 62
John Admin Associates Cluster with Distributed Switches 64
John Admin Assigns Segment ID Pool and Multicast Address Range to vShield Manager 65 John Admin Adds a Network Scope 65
John Admin Adds a VXLAN Virtual Wire 65
9
vShield Edge Management 67
View the Status of a vShield Edge 68 Configure vShield Edge Settings 68 Managing Appliances 68
Change an Appliance 69 Delete an Appliance 69 Working with Interfaces 70
Add an Interface 70
Change Interface Settings 71 Delete an Interface 71 Enable an Interface 72 Disable an Interface 72 Working with Certificates 73
Configure a CA Signed Certificate 73 Configure a Self-Signed Certificate 74 Using Client Certificates 75
Add a Certificate Revocation List 75 Managing the vShield Edge Firewall 76 Add a vShield Edge Firewall Rule 76 Change Default Firewall Rule 79 Change a vShield Edge Firewall Rule 80
Change the Priority of a vShield Edge Firewall Rule 80 Delete a vShield Edge Firewall Rule 80
Managing NAT Rules 81 Add a SNAT Rule 81 Add a DNAT Rule 82 Working with Static Routes 83
Set the Default Gateway 83 Add a Static Route 83 Managing DHCP Service 84
Add a DHCP IP Pool 84 Add a DHCP Static Binding 85 Managing VPN Services 86
IPSec VPN Overview 86 SSL VPN-Plus Overview 109 Managing Load Balancer Service 140
Configure Load Balancer Service 140 Edit a Server Pool 143
Delete a Server Pool 144 Edit a Virtual Server 144 Delete a Virtual Server 144 About High Availability 145
Change HA Configuration 146 Configure DNS Servers 146
Configure Remote Syslog Servers 147 Change CLI Credentials 147
Upgrade vShield Edge to Large or X-Large 147 Download Tech Support Logs for vShield Edge 148 Synchronize vShield Edge with vShield Manager 148 Redeploy vShield Edge 149
10
Service Insertion Management 151
Inserting a Network Services 151 Register Service Manager 152 Register Service 152
Create Service Profiles 153 Deploy Service 154
Change Service Precedence 154 Edit a Service Manager 154 Delete a Service Manager 155 Edit a Service 155
Delete a Service 155 Edit a Service Profile 155 Delete a Service Profile 156
11
vShield App Management 157
Sending vShield App System Events to a Syslog Server 157 Viewing the Current System Status of a vShield App 158 Restart a vShield App 158
Forcing a vShield App to Synchronize with the vShield Manager 158 Viewing Traffic Statistics by vShield App Interface 159
Download Technical Support Logs for vShield App 159 Configuring Fail Safe Mode for vShield App Firewall 159 Excluding Virtual Machines from vShield App Protection 159
12
vShield App Flow Monitoring 161
Viewing the Flow Monitoring Data 161
Add or Edit App Firewall Rule from the Flow Monitoring Report 164 Change the Date Range of the Flow Monitoring Charts 165
13
vShield App Firewall Management 167
Using App Firewall 167
Namespaces in a Multi Tenant Environment 167 About Services and Service Groups 168
Designing Security Groups 168
About System Defined Rules in App Firewall 168 About General and Ethernet Rules 168
Firewall Rules Precedence 168
Planning App Firewall Rule Enforcement 169 Working with Firewall Rules 169
Add a Firewall Rule 169 Delete a Firewall Rule 172
Revert to a Previous Firewall Configuration 173 Change the Order of a Rule 173
Using SpoofGuard 174
SpoofGuard Screen Options 175 Enable SpoofGuard 175 Approve IP Addresses 176
Delete an IP Address 177
14
vShield Endpoint Events and Alarms 179
View vShield Endpoint Status 179 vShield Endpoint Alarms 180
Host Alarms 180 SVM Alarms 180 vShield Endpoint Events 180
vShield Endpoint Audit Messages 181
15
vShield Data Security Management 183
vShield Data Security User Roles 183 Defining a Data Security Policy 184
Select Regulations 184
Specify Areas Participating in the Policy Scan 185 Specify File Filters 185
Editing a Data Security Policy 186 Running a Data Security Scan 187 Viewing and Downloading Reports 187 Creating Regular Expressions 188 Available Regulations 188
Arizona SB-1338 188 ABA Routing Numbers 189
Australia Bank Account Numbers 189
Australia Business and Company Numbers 189 Australia Medicare Card Numbers 190
Australia Tax File Numbers 190 California AB-1298 190
California SB-1386 191
Canada Social Insurance Numbers 191 Canada Drivers License Numbers 191 Colorado HB-1119 192
Connecticut SB-650 192 Credit Card Numbers 192 Custom Account Numbers 192 EU Debit Card Numbers 193
FERPA (Family Educational Rights and Privacy Act) 193 Florida HB-481 193
France IBAN Numbers 193
France National Identification Numbers Policy 193 Georgia SB-230 Policy 194
Germany BIC Numbers Policy 194
Germany Driving License Numbers Policy 194 Germany IBAN Numbers Policy 194
Germany National Identification Numbers Policy 194 Germany VAT Numbers Policy 194
Hawaii SB-2290 Policy 195
HIPAA (Healthcare Insurance Portability and Accountability Act) Policy 195
Idaho SB-1374 Policy 195 Illinois SB-1633 196 Indiana HB-1101 Policy 196
Italy Driving License Numbers Policy 196 Italy IBAN Numbers Policy. 196
Italy National Identification Numbers Policy 196 Kansas SB-196 Policy 197
Louisiana SB-205 Policy 197 Maine LD-1671 Policy 197 Massachusetts CMR-201 198 Minnesota HF-2121 198 Montana HB-732 198
Netherlands Driving Licence Numbers 198 Nevada SB-347 199
New Hampshire HB-1660 199 New Jersey A-4001 199 New York AB-4254 200
New Zealand Inland Revenue Department Numbers 200 New Zealand Ministry of Health Numbers 200
Ohio HB-104 200 Oklahoma HB-2357 201
Patient Identification Numbers 201
Payment Card Industry Data Security Standard (PCI-DSS) 201 Texas SB-122 201
UK BIC Numbers 202
UK Driving Licence Numbers 202 UK IBAN Numbers 202
UK National Health Service Numbers 202 UK National Insurance Numbers (NINO) 202 UK Passport Numbers 202
US Drivers License Numbers 203 US Social Security Numbers 203 Utah SB-69 203
Vermont SB-284 203 Washington SB-6043 203 Available Content Blades 204
ABA Routing Number Content Blade 204
Admittance and Discharge Dates Content Blade 204 Alabama Drivers License Content Blade 204 Alaska Drivers License Content Blade 204 Alberta Drivers Licence Content Blade 204 Alaska Drivers License Content Blade 205 Alberta Drivers Licence Content Blade 205 American Express Content Blade 205 Arizona Drivers License Content Blade 205 Arkansas Drivers License Content Blade 205 Australia Bank Account Number Content Blade 205 Australia Business Number Content Blade 206
Australia Medicare Card Number Content Blade 206 Australia Tax File Number Content Blade 206 California Drivers License Number Content Blade 206 Canada Drivers License Number Content Blade 206 Canada Social Insurance Number Content Blade 206 Colorado Drivers License Number Content Blade 206 Connecticut Drivers License Number Content Blade 207 Credit Card Number Content Blade 207
Credit Card Track Data Content Blade 207 Custom Account Number Content Blade 207
Delaware Drivers License Number Content Blade 207 EU Debit Card Number Content Blade 207
Florida Drivers License Number Content Blade 208 France Driving License Number Content Blade 208 France BIC Number Content Blade 208
France IBAN Number Content Blade 208
France National Identification Number Content Blade 208 France VAT Number Content Blade 208
Georgia Drivers License Number Content Blade 208 Germany BIC Number Content Blade 208
Germany Driving License Number Content Blade 209 Germany IBAN Number Content Blade 209
Germany National Identification Numbers Content Blade 209 Germany Passport Number Content Blade 209
Germany VAT Number Content Blade 209 Group Insurance Numbers Content Blade 209 Hawaii Drivers License Number Content Blade 209 Italy National Identification Numbers Content Blade 209 Health Plan Beneficiary Numbers 210
Idaho Drivers License Number Content Blade 210 Illinois Drivers License Number Content Blade 210 Indiana Drivers License Number Content Blade 210 Iowa Drivers License Number Content Blade 211 Index of Procedures Content Blade 211
Italy Driving License Number Content Blade 211 Italy IBAN Number Content Blade 211
ITIN Unformatted Content Blade 212
Kansas Drivers License Number Content Blade 212 Kentucky Drivers License Number Content Blade 212 Louisiana Drivers License Number Content Blade 212 Maine Drivers License Number Content Blade 212 Manitoba Drivers Licence Content Blade 212
Maryland Drivers License Number Content Blade 213 Massachusetts Drivers License Number Content Blade 213 Michigan Drivers License Number Content Blade 213 Minnesota Drivers License Number Content Blade 213 Mississippi Drivers License Number Content Blade 213 Missouri Drivers License Number Content Blade 213 Montana Drivers License Number Content Blade 214
NDC Formulas Dictionary Content Blade 214 Nebraska Drivers License Number Content Blade 214 Netherlands Driving Licence Number Content Blade 214 Netherlands IBAN Number Content Blade 214
Netherlands National Identification Numbers Content Blade 215 Netherlands Passport Number Content Blade 215
Nevada Drivers License Number Content Blade 215 New Brunswick Drivers Licence Content Blade 215
New Hampshire Drivers License Number Content Blade 215 New Jersey Drivers License Number Content Blade 215 New Mexico Drivers License Number Content Blade 216 New York Drivers License Number Content Blade 216
New Zealand Health Practitioner Index Number Content Blade 216 New Zealand Inland Revenue Department Number 216
New Zealand National Health Index Number Content Blade 216 Newfoundland and Labrador Drivers Licence Content Blade 216 North Carolina Drivers License Number Content Blade 216 North Dakota Drivers License Number Content Blade 216 Nova Scotia Drivers Licence Content Blade 217
Ohio Drivers License Number Content Blade 217 Oklahoma License Number Content Blade 217 Ontario Drivers Licence Content Blade 217 Oregon License Number Content Blade 217 Patient Identification Numbers Content Blade 217 Pennsylvania License Number Content Blade 217 Prince Edward Island Drivers Licence Content Blade 217 Protected Health Information Terms Content Blade 218 Quebec Drivers Licence Content Blade 218
Rhode Island License Number Content Blade 218 Saskatchewan Drivers Licence Content Blade 218 SIN Formatted Content Blade 218
SIN Unformatted Content Blade 219 SSN Formatted Content Blade 219 SSN Unformatted Content Blade 219
South Carolina License Number Content Blade 219 South Dakota License Number Content Blade 219 Spain National Identification Number Content Blade 219 Spain Passport Number Content Blade 219
Spain Social Security Number Content Blade 220 Sweden IBAN Number Content Blade 220 Sweden Passport Number Content Blade 220 Tennessee License Number Content Blade 220 UK BIC Number Content Blade 220
UK Driving License Number Content Blade 221 UK IBAN Number Content Blade 221
UK National Health Service Number Content Blade 221 UK NINO Formal Content Blade 222
Virginia License Number Content Blade 222 Visa Card Number Content Blade 222
Washington License Number Content Blade 222 Wisconsin License Number Content Blade 222 Wyoming License Number Content Blade 223 Supported File Formats 223
16
Troubleshooting 229
Troubleshoot vShield Manager Installation 229
vShield OVA File Cannot Be Installed in vSphere Client 229
Cannot Log In to CLI After the vShield Manager Virtual Machine Starts 229 Cannot Log In to the vShield Manager User Interface 230
Troubleshooting Operational Issues 230
vShield Manager Cannot Communicate with a vShield App 230 Cannot Configure a vShield App 230
Firewall Block Rule Not Blocking Matching Traffic 231 No Flow Data Displaying in Flow Monitoring 231 Troubleshooting vShield Edge Issues 231
Virtual Machines Are Not Getting IP Addresses from the DHCP Server 231 Load-Balancer Does Not Work 232
Load-Balancer Throws Error 502 Bad Gateway for HTTP Requests 232 VPN Does Not Work 232
SSL VPN does Not Work 233
Troubleshoot vShield Endpoint Issues 233 Thin Agent Logging 233
Component Version Compatibility 233
Check vShield Endpoint Health and Alarms 234 Troubleshooting vShield Data Security Issues 234
Review Scan Start and Stop Timestamp 234 About Accuracy in Detecting Violations 234
Index 237
vShield Administration Guide
The vShield Administration Guide describes how to install, configure, monitor, and maintain the VMware® vShield™ system by using the vShield Manager user interface, and the vSphere Client plug-in. The information includes step-by-step configuration instructions, and suggested best practices.
Intended Audience
This manual is intended for anyone who wants to install or use vShield in a VMware vCenter environment. The information in this manual is written for experienced system administrators who are familiar with virtual machine technology and virtual datacenter operations. This manual assumes familiarity with VMware Infrastructure 5.x, including VMware ESX, vCenter Server, and the vSphere Client.
Overview of vShield
1
VMware® vShield is a suite of security virtual appliances built for VMware vCenter Server and VMware ESX integration. vShield is a critical security component for protecting virtualized datacenters from attacks and helping you achieve your compliance-mandated goals.
This guide assumes you have administrator access to the entire vShield system. The viewable resources in the vShield Manager user interface can differ based on the assigned role and rights of a user, and licensing. If you are unable to access a screen or perform a particular task, consult your vShield administrator.
n About vShield Components on page 15
vShield includes components and services essential for protecting virtual machines. vShield can be configured through a web-based user interface, a vSphere Client plug-in, a command line interface (CLI), and REST API.
n Migration of vShield Components on page 17
The vShield Manager and vShield Edge virtual appliances can be automatically or manually migrated based on DRS and HA policies. The vShield Manager must always be up, so you must migrate the vShield Manager whenever the current ESX host undergoes a reboot or maintenance mode routine.
n About VMware Tools on vShield Components on page 17
Each vShield virtual appliance includes VMware Tools. Do not upgrade or uninstall the version of VMware Tools included with a vShield virtual appliance.
n Ports Required for vShield Communication on page 17
About vShield Components
vShield includes components and services essential for protecting virtual machines. vShield can be configured through a web-based user interface, a vSphere Client plug-in, a command line interface (CLI), and REST API.
To run vShield, you need one vShield Manager virtual machine and at least one vShield App or vShield Edge module.
vShield Manager
The vShield Manager is the centralized network management component of vShield and is installed from OVA as a virtual machine by using the vSphere Client. Using the vShield Manager user interface, administrators install, configure, and maintain vShield components. A vShield Manager can run on a different ESX host from your vShield App and vShield Edge modules.
The vShield Manager leverages the VMware Infrastructure SDK to display a copy of the vSphere Client inventory panel.
For more on the using the vShield Manager user interface, see Chapter 2, “vShield Manager User Interface Basics,” on page 19.
vShield Edge
vShield Edge provides network edge security and gateway services to isolate the virtual machines in a port group, vDS port group, or Cisco® Nexus 1000V. The vShield Edge connects isolated, stub networks to shared (uplink) networks by providing common gateway services such as DHCP, VPN, NAT, and Load Balancing. Common deployments of vShield Edge include in the DMZ, VPN Extranets, and multi-tenant Cloud environments where the vShield Edge provides perimeter security for Virtual Datacenters (VDCs).
NOTE You must obtain an evaluation or full license to use vShield Edge.
Standard vShield Edge Services (Including vCloud Director)
n Firewall: Supported rules include IP 5-tuple configuration with IP and
port ranges for stateful inspection for TCP, UDP, and ICMP.
n Network Address Translation: Separate controls for Source and
Destination IP addresses, as well as TCP and UDP port translation.
n Dynamic Host Configuration Protocol (DHCP): Configuration of IP
pools, gateways, DNS servers, and search domains.
n Configuration of DNS servers for relay name resolution requests from
clients and syslog servers.
n Static route for data packets to follow.
Advanced vShield Edge
Services n Site-to-Site Virtual Private Network (VPN): Uses standardized IPsecprotocol settings to interoperate with all major firewall vendors.
n Load Balancing: Simple and dynamically configurable virtual IP
addresses and server groups.
n High Availability: Ensures that a vShield Edge appliance is always
available on your virtualized network.
n SSL VPN-Plus: Allows remote users to connect securely to private
networks behind a vShield Edge gateway. vShield Edge supports syslog export for all services to remote servers.
vShield App
vShield App is an interior, vNIC-level Layer 2 firewall that allows you to create access control policies regardless of network topology and to achieve network isolation in the same VLAN. A vShield App monitors all traffic in and out of an ESX host, including between virtual machines in the same port group. vShield App includes traffic analysis and container-based policy creation. Containers can be dynamic or static, vCenter constructs such as datacenters or objects defined in vShield Manager such as a security group, IPset, or MACset. vShield App supports multi-tenancy.
vShield App installs as a hypervisor module and firewall service virtual appliance. vShield App integrates with ESX hosts through VMsafe APIs and works with VMware vSphere platform features such as DRS, vMotion, DPM, and maintenance mode.
vShield App provides firewalling between virtual machines by placing a firewall filter on every virtual network adapter. Rules can include multiple sources, destinations, and applications. The firewall filter operates transparently and does not require network changes or modification of IP addresses to create security zones. You can write access rules by using vCenter containers, like datacenters, cluster, resource
You should install vShield App instances on all ESX hosts within a cluster so that VMware vMotion™ operations work and virtual machines remain protected as they migrate between ESX hosts. By default, a vShield App virtual appliance cannot be moved by using vMotion.
The Flow Monitoring feature displays allowed and blocked network flows at the application protocol level. You can use this information to audit network traffic and troubleshoot operational issues.
NOTE You must obtain an evaluation or full license to use vShield App.
vShield Endpoint
vShield Endpoint offloads antivirus and anti-malware agent processing to a dedicated secure virtual appliance delivered by VMware partners. Since the secure virtual appliance (unlike a guest virtual machine) doesn't go offline, it can continuously update antivirus signatures thereby giving uninterrupted protection to the virtual machines on the host. Also, new virtual machines (or existing virtual machines that went offline) are immediately protected with the most current antivirus signatures when they come online. vShield Endpoint installs as a hypervisor module and security virtual appliance from a third-party antivirus vendor (VMware partners) on an ESX host.
NOTE You must obtain an evaluation or full license to use vShield Endpoint.
vShield Data Security
vShield Data Security provides visibility into sensitive data stored within your organization's virtualized and cloud environments. Based on the violations reported by vShield Data Security, you can ensure that sensitive data is adequately protected and assess compliance with regulations around the world.
Migration of vShield Components
The vShield Manager and vShield Edge virtual appliances can be automatically or manually migrated based on DRS and HA policies. The vShield Manager must always be up, so you must migrate the vShield Manager whenever the current ESX host undergoes a reboot or maintenance mode routine.
Each vShield Edge should move with its datacenter to maintain security settings and services.
vShield App, vShield Endpoint partner appliance, or vShield Data Security cannot be moved to another ESX host. If the ESX host on which these components reside requires a manual maintenance mode operation, you must de-select the Move powered off and suspended virtual machines to other hosts in the cluster check box to ensure these virtual appliances are not migrated. These services restart after the ESX host comes online.
About VMware Tools on vShield Components
Each vShield virtual appliance includes VMware Tools. Do not upgrade or uninstall the version of VMware Tools included with a vShield virtual appliance.
Ports Required for vShield Communication
vShield requires the following ports to be open:
n vShield Manager port 443 from the ESX host, the vCenter Server, and the vShield appliances to be
deployed
n UDP123 between vShield Manager and vShield App for time synchronization n 902/TCP and 903/TCP to and from the vCenter Client and ESX hosts
n 443/TCP from the REST client to vShield Manager for using REST API calls
n 80/TCP to 443/TCP for using the vShield Manager user interface and initiating connection to the
vSphere SDK
vShield Manager User Interface
Basics
2
The vShield Manager user interface offers configuration and data viewing options specific to vShield use. By utilizing the VMware Infrastructure SDK, the vShield Manager displays your vSphere Client inventory panel for a complete view of your vCenter environment.
NOTE You can register the vShield Manager as a vSphere Client plug-in. This allows you to configure
vShield components from within the vSphere Client. See Set up vShield Manager in the vShield Installation
and Upgrade Guide.
n Log in to the vShield Manager User Interface on page 19
You access the vShield Manager management interface by using a Web browser.
n About the vShield Manager User Interface on page 20
The vShield Manager user interface is divided into two panels: the inventory panel and the
configuration panel. You select a view and a resource from the inventory panel to open the available details and configuration options in the configuration panel.
Log in to the vShield Manager User Interface
You access the vShield Manager management interface by using a Web browser. Procedure
1 Open a Web browser window and type the IP address assigned to the vShield Manager.
The vShield Manager user interface opens in an SSL/HTTPS session (or opens a secure SSL session). 2 Accept the security certificate.
NOTE It is recommended that you use an SSL certificate for verification of the vShield Manager. See “Add an SSL Certificate to Identify the vShield Manager Web Service,” on page 26.
The vShield Manager login screen appears.
3 Log in to the vShield Manager user interface by using the username admin and the password default.
You should change the default password as one of your first tasks to prevent unauthorized use. See
“Edit a User Account,” on page 41. 4 Click Log In.
About the vShield Manager User Interface
The vShield Manager user interface is divided into two panels: the inventory panel and the configuration panel. You select a view and a resource from the inventory panel to open the available details and configuration options in the configuration panel.
When clicked, each inventory object has a specific set of tabs that appear in the configuration panel.
n vShield Manager Inventory Panel on page 20
The vShield Manager inventory panel hierarchy mimics the vSphere Client inventory hierarchy.
n vShield Manager Configuration Panel on page 21
The vShield Manager configuration panel presents the settings that can be configured based on the selected inventory resource and the output of vShield operation. Each resource offers multiple tabs, each tab presenting information or configuration forms corresponding to the resource.
vShield Manager Inventory Panel
The vShield Manager inventory panel hierarchy mimics the vSphere Client inventory hierarchy.
Resources include the root folder, datacenters, clusters, port groups, ESX hosts, and virtual machines. As a result, the vShield Manager maintains solidarity with your vCenter Server inventory to present a complete view of your virtual deployment. The vShield Manager and vShield App virtual machines do not appear in the vShield Manager inventory panel. vShield Manager settings are configured from the Settings & Reports resource atop the inventory panel.
The inventory panel offers multiple views: Hosts & Clusters, Networks, and Edges. The Hosts & Clusters view displays the datacenters, clusters, resource pools, and ESX hosts in your inventory. The Networks view displays the VLAN networks and port groups in your inventory. The Edges view displays the port groups protected by vShield Edge instances. The Hosts & Clusters and Networks views are consistent with the same views in the vSphere Client.
There are differences in the icons for virtual machines and vShield components between the vShield Manager and the vSphere Client inventory panels. Custom icons are used to show the difference between vShield components and virtual machines, and the difference between protected and unprotected virtual machines.
Table 2‑1. vShield Virtual Machine Icons in the vShield Manager Inventory Panel
Icon Description
A powered on virtual machine that is protected by a vShield App. A powered on virtual machine that is not protected by a vShield App.
A powered off virtual machine.
Refreshing the Inventory Panel
To refresh the list of resources in the inventory panel, click . The refresh action requests the latest resource information from the vCenter Server. By default, the vShield Manager requests resource information from the vCenter Server every five minutes.
Searching the Inventory Panel
To search the inventory panel for a specific resource, type a string in the field atop the vShield Manager inventory panel and click .
vShield Manager Configuration Panel
The vShield Manager configuration panel presents the settings that can be configured based on the selected inventory resource and the output of vShield operation. Each resource offers multiple tabs, each tab presenting information or configuration forms corresponding to the resource.
Because each resource has a different purpose, some tabs are specific to certain resources. Also, some tabs have a second level of options.
Management System Settings
3
You can edit the vCenter Server, DNS and NTP server, and Lookup server that you specified during initial login. The vShield Manager requires communication with your vCenter Server and services such as DNS and NTP to provide details on your VMware Infrastructure inventory.
This chapter includes the following topics:
n “Edit DNS Servers,” on page 23
n “Edit the vShield Manager Date and Time,” on page 24 n “Edit Lookup Service Details,” on page 24
n “Edit vCenter Server,” on page 24 n “Specify Syslog Server,” on page 25
n “Download Technical Support Logs for vShield,” on page 25
n “Add an SSL Certificate to Identify the vShield Manager Web Service,” on page 26 n “Working with Services and Service Groups,” on page 27
n “Grouping Objects,” on page 30
Edit DNS Servers
You can change the DNS servers specified during initial login. The primary DNS server appears in the vShield Manager user interface.
Procedure
1 Click Settings & Reports from the vShield Manager inventory panel. 2 Click the Configuration tab.
3 Ensure that you are in the General tab. 4 Click Edit next to DNS Servers. 5 Make the appropriate changes. 6 Click OK.
Edit the vShield Manager Date and Time
You can change the NTP server specified during initial login. Procedure
1 Click Settings & Reports from the vShield Manager inventory panel. 2 Click the Configuration tab.
3 Ensure that you are in the General tab. 4 Click Edit next to NTP Server. 5 Make the appropriate changes. 6 Click OK.
7 Reboot the vShield Manager.
Edit Lookup Service Details
You can change the Lookup Service details specified during initial login. Procedure
1 Click Settings & Reports from the vShield Manager inventory panel. 2 Click the Configuration tab.
3 Ensure that you are in the General tab. 4 Click Edit next to Lookup Service. 5 Make the appropriate changes. 6 Click OK.
Edit vCenter Server
You can change the vCenter Server with which you registered vShield Manager upon initial login. You should do this only if you change the IP address of your current vCenter Server.
Procedure
1 If you are logged in to the vSphere Client, log out. 2 Log in to the vShield Manager.
3 Click Settings & Reports from the vShield Manager inventory panel. 4 Click the Configuration tab.
5 Ensure that you are in the General tab. 6 Click Edit next to vCenter Server. 7 Make the appropriate changes. 8 Click OK.
9 Log in to the vSphere Client. 10 Select an ESX host.
What to do next
You can install and configure vShield components from the vSphere Client.
Specify Syslog Server
If you specify a syslog server, vShield Manager sends all audit logs and system events from vShield Manager to the syslog server.
Procedure
1 Click Settings & Reports from the vShield Manager inventory panel. 2 Click the Configuration tab.
3 Ensure that you are in the General tab. 4 Click Edit next to Syslog Server. 5 Type the IP address of the syslog server. 6 (Optional) Type the port for the syslog server.
If you do not specify a port, the default UDP port for the IP address/host name of the syslog server is used.
7 Click OK.
Download Technical Support Logs for vShield
You can download vShield Manager audit logs and system events from a vShield component to your PC. Audit logs refer to configuration change (such as firewall configuration change) logs while system events refer to events that happen in the background while vShield Manager is running. For example, if vShield Manager looses connectivity to one of the vShield App or vShield Edge appliances, a system event is logged. Both audit logs and system events are logged with the syslog server at the Info level. System events, however, have an internal severity which is added to the syslog message sent for that system event. Procedure
1 Click Settings & Reports from the vShield Manager inventory panel. 2 Click the Configuration tab.
3 Click Support.
4 Under Tech Support Log Download, click Initiate next to the appropriate component.
Once initiated, the log is generated and uploaded to the vShield Manager. This might take several seconds.
5 After the log is ready, click the Download link to download the log to your PC. The log is compressed and has the file extension .gz.
What to do next
You can open the log using a decompression utility by browsing for All Files in the directory where you saved the file.
Add an SSL Certificate to Identify the vShield Manager Web Service
You can generate a certificate signing request, get it signed by a CA, and import the signed SSL certificate into vShield Manager to authenticate the identity of the vShield Manager web service and encrypt
information sent to the vShield Manager web server. As a security best practice, you should use the generate certificate option to generate a private key and public key, where the private key is saved to the vShield Manager.
Procedure
1 Click Settings & Reports from the vShield Manager inventory panel. 2 Click the Configuration tab.
3 Click SSL Certificate.
4 Under Generate Certificate Signing Request, complete the form by filling in the following fields:
Option Action
Common Name Type the IP address or fully qualified domain name (FQDN) of the vShield
Manager. VMware recommends that you enter the FQDN.
Organization Unit Enter the department in your company that is ordering the certificate.
Organization Name Enter the full legal name of your company.
City Name Enter the full name of the city in which your company resides.
State Name Enter the full name of the state in which your company resides.
Country Code Enter the two-digit code that represents your country. For example, the
United States is US.
Key Algorithm Select the cryptographic algorithm to use from either DSA or RSA.
VMware recommends RSA for backward compatibility.
Key Size Select the number of bits used in the selected algorithm.
5 Click Generate.
Import an SSL certificate
You can import a pre-existing or CA signed SSL certificate for use by the vShield Manager. Procedure
1 Click Settings & Reports from the vShield Manager inventory panel. 2 Click the Configuration tab.
3 Click SSL Certificate.
4 Under Import Signed Certificate, click Browse at Certificate File to find the file. 5 Select the type of certificate file from the Certificate Type drop-down list.
If applicable, import root and intermediate certificates before importing the CA signed certificate. If there are multiple intermediate certificates, combine them into a single file and then import the file. 6 Click Apply.
A yellow bar containing the message Successfully imported certificate is displayed at the top of the screen.
The certificate is stored in the vShield Manager.
Working with Services and Service Groups
A service is a protocol-port combination, and a service group is a group of services.
Create a Service
You can create a service and then define rules for that service. Procedure
1 Do one of the following.
Option Description
To create a service at the global scope
a Log in to the vShield Manager user interface. b Click Settings & Reports.
c Click Object Library.
To create a service at the datacenter scope
a In the vSphere Client, go to Inventory > Hosts & Clusters. b Select a datacenter from the inventory panel.
c Click the vShield tab.
To create a service at the port group scope
a In the vSphere Client, go to Inventory > Networking. b Select a network from the inventory panel.
c Click the vShield tab.
To create a service at the vShield Edge scope
a In the vSphere Client, go to Inventory > Hosts & Clusters. b Select a datacenter resource from the inventory panel. c Click the Network Virtualization tab.
d Click the Edges tab.
e Double-click a vShield Edge instance. f Click the Configure tab.
2 Click the Services tab. 3 Select Add > Service.
4 Type a Name to identify the service. 5 Type a Description for the service.
6 Select a Protocol to which you want to add a non-standard port. 7 Type the port number(s) in Ports.
8 (Optional) When creating a service at the global or datacenter scope, select Enable inheritance to allow
visibility at underlying scopes to make this service available to underlying scopes.
9 Click OK.
The service appears in the Services table.
Create a Service Group
You can create a service group at the global, datacenter, or vShield Edge level and then define rules for that service group.
Procedure
1 Do one of the following.
Option Description
To create a service group at the global scope
a Log in to the vShield Manager user interface. b Click Settings & Reports.
c Click Object Library.
To create a service group at the datacenter scope
a In the vSphere Client, go to Inventory > Hosts & Clusters. b Select a datacenter resource from the inventory panel. c Click the vShield tab.
To create a service at the port group scope
a In the vSphere Client, go to Inventory > Networking. b Select a network from the inventory panel.
c Click the vShield tab.
To create a service group at the vShield Edge scope
a In the vSphere Client, go to Inventory > Hosts & Clusters. b Select a datacenter resource from the inventory panel. c Click the Network Virtualization tab.
d Click the Edges tab.
e Double-click a vShield Edge instance. f Click the Configure tab.
2 Click the Services tab. 3 Select Add > Service Group.
4 Type a Name to identify the service group. 5 Type a Description for the service.
6 In Members, select the services or service groups that you want to the group.
7 (Optional) When creating a service group at the global or datacenter scope, select Enable inheritance to
allow visibility at underlying scopes to make this service group available to underlying scopes.
8 Click OK.
The custom service group appears in the Services table.
Edit a Service or Service Group
You can edit services and service groups.
A service or service group can be edited at the scope it was defined at. For example, if a service was defined at the global scope, it cannot be edited at the vShield Edge scope.
Procedure
1 Do one of the following.
Option Description
To edit a service at the global scope a Log in to the vShield Manager user interface. b Click Settings & Reports.
c Click Object Library.
To edit a service at the datacenter scope
a In the vSphere Client, go to Inventory > Hosts & Clusters. b Select a datacenter resource from the inventory panel. c Click the vShield tab.
To edit a service at the port group scope
a In the vSphere Client, go to Inventory > Networking. b Select a network from the inventory panel.
c Click the vShield tab.
To edit a service at the vShield Edge scope
a In the vSphere Client, go to Inventory > Hosts & Clusters. b Select a datacenter resource from the inventory panel. c Click the Network Virtualization tab.
d Click the Edges tab.
e Double-click a vShield Edge instance. f Click the Configure tab.
2 Click the Services tab. 3
Select a custom service or service group and click the Edit ( ) icon. 4 Make the appropriate changes.
5 Click OK.
Delete a Service or Service Group
You can delete services or service group.
A service or service group can be deleted at the scope it was defined at. For example, if a service was defined at the global scope, it cannot be deleted at the vShield Edge scope.
Procedure
1 Do one of the following.
Option Description
To delete a service at the global scope
a Log in to the vShield Manager user interface. b Click Settings & Reports.
c Click Object Library.
To delete a service at the datacenter scope
a In the vSphere Client, go to Inventory > Hosts & Clusters. b Select a datacenter resource from the inventory panel. c Click the vShield tab.
To delete a service at the port group scope
a In the vSphere Client, go to Inventory > Networking. b Select a network from the inventory panel.
c Click the vShield tab.
To delete a service at the vShield Edge scope
a In the vSphere Client, go to Inventory > Hosts & Clusters. b Select a datacenter resource from the inventory panel. c Click the Network Virtualization tab.
d Click the Edges tab.
e Double-click a vShield Edge instance. f Click the Configure tab.
2 Click the Services tab.
3 Select a custom service or service group and click the Delete ( ) icon. 4 Click Yes.
The service or service group is deleted.
Grouping Objects
The Grouping feature enables you to create custom containers to which you can assign resources, such as virtual machines and network adapters, for App Firewall protection. After a group is defined, you can add the group as source or destination to a firewall rule for protection.
Working with IP Address Groups
Create an IP Address Group
You can create an IP address group at the global, datacenter, or vShield Edge scope and then add this group as the source or destination in a firewall rule. Such a rule can help protect physical machines from virtual machines or vice versa.
Procedure
1 Do one of the following.
Option Description
To create an IP address group at the global scope
a In the vShield Manager user interface, click Object Library from the vShield Manager inventory panel.
b Ensure that you are in the Grouping tab.
To create an IP address group at the datacenter scope
a In the vSphere Client, go to Inventory > Hosts & Clusters. b Select a datacenter resource from the inventory panel. c Click the vShield tab.
d From the General tab, select the Grouping tab.
To create an IP address group at the port group scope
a In the vSphere Client, go to Inventory > Networking. b Select a network from the inventory panel.
c Click the vShield tab.
To create an IP address group at the vShield Edge scope
a In the vSphere Client, go to Inventory > Hosts & Clusters. b Select a datacenter resource from the inventory panel. c Click the Network Virtualization tab.
d Click the Edges tab.
e Double-click a vShield Edge instance. f Click the Configure tab.
2 Click the Grouping Objects tab.
3 Click the Add ( ) icon and select IP Addresses. The Add IP Addresses window opens.
4 Type a name for the address group.
5 (Optional) Type a description for the address group. 6 Type the IP addresses to be included in the group.
8 Click OK.
Edit an IP Address Group
An IP address group can be edited at the scope it was defined at. For example, if an IP address group was defined at the global scope, it cannot be edited at the vShield Edge scope.
Prerequisites Procedure
1 Do one of the following.
Option Description
To edit an IP address group at the global scope
a In the vShield Manager user interface, click Object Library from the vShield Manager inventory panel.
b Ensure that you are in the Grouping tab.
To edit an IP address group at the datacenter scope
a In the vSphere Client, go to Inventory > Hosts & Clusters. b Select a datacenter resource from the inventory panel. c Click the vShield tab.
d From the General tab, select the Grouping tab.
To edit an IP address group at the port group scope
a In the vSphere Client, go to Inventory > Networking. b Select a network from the inventory panel.
c Click the vShield tab.
To edit an IP address group at the vShield Edge scope
a In the vSphere Client, go to Inventory > Hosts & Clusters. b Select a datacenter resource from the inventory panel. c Click the Network Virtualization tab.
d Click the Edges tab.
e Double-click a vShield Edge instance. f Click the Configure tab.
2 Click the Grouping Objects tab. 3
Select the group that you want to edit and click the Edit ( ) icon. 4 In the Edit IP Addresses dialog box, make the appropriate changes. 5 Click OK.
Delete an IP Address Group
An IP address group can be deleted at the scope it was defined at. For example, if an IP address group was defined at the global scope, it cannot be deleted at the vShield Edge scope.
Procedure
1 Do one of the following.
Option Description
To delete an IP address group at the global scope
a In the vShield Manager user interface, click Object Library from the vShield Manager inventory panel.
b Ensure that you are in the Grouping tab.
To delete an IP address group at the datacenter scope
a In the vSphere Client, go to Inventory > Hosts & Clusters. b Select a datacenter resource from the inventory panel. c Click the vShield tab.
d From the General tab, select the Grouping tab.
Option Description To delete an IP address group at the
port group scope
a In the vSphere Client, go to Inventory > Networking. b Select a network from the inventory panel.
c Click the vShield tab.
To delete an IP address group at the vShield Edge scope
a In the vSphere Client, go to Inventory > Hosts & Clusters. b Select a datacenter resource from the inventory panel. c Click the Network Virtualization tab.
d Click the Edges tab.
e Double-click a vShield Edge instance. f Click the Configure tab.
2 Click the Grouping Objects tab.
3 Select the group that you want to delete and click the Delete ( ) icon.
Working with MAC Address Groups
Create a MAC Address Group
You can create a MAC address group consisting of a range of MAC addresses and then add this group as the source or destination in a vShield App firewall rule. Such a rule can help protect physical machines from virtual machines or vice versa.
Procedure
1 Do one of the following.
Option Description
To create a MAC address group at the global level
a In the vShield Manager user interface, click Object Library from the vShield Manager inventory panel.
b Ensure that you are in the Grouping tab.
To create a MAC address group at the datacenter level
a In the vSphere Client, go to Inventory > Hosts & Clusters. b Select a datacenter resource from the inventory panel. c Click the vShield tab.
d From the General tab, select the Grouping tab.
To create a MAC address at the port group level
a In the vSphere Client, go to Inventory > Networking. b Select a network from the inventory panel.
c Click the vShield tab.
2 Click the Add ( ) icon and select MAC Addresses. The Add MAC Addresses window opens.
3 Type a name for the address group.
4 (Optional) Type a description for the address group. 5 Type the MAC addresses to be included in the group.
6 Select Enable inheritance to allow visibility at underlying scopes if you want the MAC address group to propagate down to objects in the selected datacenter.
Edit a MAC Address Group
A MAC address group can be edited at the scope it was defined at. For example, if a MAC address group was defined at the global scope, it cannot be edited at the vShield Edge scope.
Procedure
1 Do one of the following.
Option Description
To edit a MAC address group at the global scope
a In the vShield Manager user interface, click Object Library from the vShield Manager inventory panel.
b Ensure that you are in the Grouping tab.
To edit a MAC address group at the datacenter scope
a In the vSphere Client, go to Inventory > Hosts & Clusters. b Select a datacenter resource from the inventory panel. c Click the vShield tab.
d From the General tab, select the Grouping tab.
To edit a MAC address group at the port group scope
a In the vSphere Client, go to Inventory > Networking. b Select a network from the inventory panel.
c Click the vShield tab.
To edit a MAC address group at the vShield Edge scope
a In the vSphere Client, go to Inventory > Hosts & Clusters. b Select a datacenter resource from the inventory panel. c Click the Network Virtualization tab.
d Click the Edges tab.
e Double-click a vShield Edge instance. f Click the Configure tab.
2 Click the Grouping Objects tab. 3
Select the group that you want to edit and click the Edit ( ) icon. 4 In the Edit MAC Addresses dialog box, make the appropriate changes. 5 Click OK.
Delete a MAC Address Group
A MAC address group can be deleted at the scope it was defined at. For example, if a MAC address group was defined at the global scope, it cannot be deleted at the vShield Edge scope.
Procedure
1 Do one of the following.
Option Description
To delete a MAC address group at the global scope
a In the vShield Manager user interface, click Object Library from the vShield Manager inventory panel.
b Ensure that you are in the Grouping tab.
To delete a MAC address group at the datacenter scope
a In the vSphere Client, go to Inventory > Hosts & Clusters. b Select a datacenter resource from the inventory panel. c Click the vShield tab.
d From the General tab, select the Grouping tab.
Option Description To delete a MAC address group at
the port group scope
a In the vSphere Client, go to Inventory > Networking. b Select a network from the inventory panel.
c Click the vShield tab.
To delete a MAC address group at the vShield Edge scope
a In the vSphere Client, go to Inventory > Hosts & Clusters. b Select a datacenter resource from the inventory panel. c Click the Network Virtualization tab.
d Click the Edges tab.
e Double-click a vShield Edge instance. f Click the Configure tab.
2 Click the Grouping Objects tab.
3 Select the group that you want to edit and click the Delete ( ) icon.
Working with Security Groups
Create a security group
In the vSphere Client, you can add a security group at the datacenter or port group level.
The security group scope is limited to the resource level at which it is created. For example, if you create a security group at a datacenter level, the security group is available to be added as a source or destination only when you create a firewall rule at the datacenter level. If you create a rule for a port group within that datacenter, the security group is not available.
Procedure
1 Do one of the following.
Option Description
To create a security group at the datacenter level
a In the vSphere Client, go to Inventory > Hosts & Clusters. b Select a datacenter resource from the inventory panel. c Click the vShield tab.
d In the General tab, select the Grouping tab.
To create a security group at the port group level
a In the vSphere Client, go to Inventory > Networking. b Select a network from the inventory panel.
c Click the vShield tab. d Select the Grouping tab.
2 Click Add and select Security Group.
The Add Security Group window opens with the selected datacenter displayed as the Scope. 3 Type a name and description for the security group.
4 Click in the field next to the Add button and select the resource you want to include in the security group.
5 In Members, select one or more resource to add to the security group.
When you add a resource to a security group, all associated resources are automatically added. For example, when you select a virtual machine, the associated vNIC is automatically added to the security group.
Edit a Security Group
A security group can be edited at the scope it was defined at. For example, if a security group was defined at the datacenter scope, it cannot be edited at the port group scope.
Procedure
1 Do one of the following.
Option Description
To edit a security group at the datacenter level
a In the vSphere Client, go to Inventory > Hosts & Clusters. b Select a datacenter resource from the inventory panel. c Click the vShield tab.
d In the General tab, select the Grouping tab.
To edit a security group at the port group level
a In the vSphere Client, go to Inventory > Networking. b Select a network from the inventory panel.
c Click the vShield tab. d Select the Grouping tab.
2
Select the group that you want to edit and click the Edit ( ) icon. 3 In the Edit Security Group dialog box, make the appropriate changes. 4 Click OK.
Delete a Security Group
A security group can be deleted at the scope it was defined at. For example, if a security group was defined at the datacenter scope, it cannot be deleted at the vShield port group scope.
Procedure
1 Do one of the following.
Option Description
To delete a security group at the datacenter level
a In the vSphere Client, go to Inventory > Hosts & Clusters. b Select a datacenter resource from the inventory panel. c Click the vShield tab.
d In the General tab, select the Grouping tab.
To delete a security group at the port group level
a In the vSphere Client, go to Inventory > Networking. b Select a network from the inventory panel.
c Click the vShield tab. d Select the Grouping tab.
2 Select the group that you want to delete and click the Delete ( ) icon.
User Management
4
Security operations are often managed by multiple individuals. Management of the overall system is delegated to different personnel according to some logical categorization. However, permission to carry out tasks is limited only to users with appropriate rights to specific resources. From the Users section, you can delegate such resource management to users by granting applicable rights.
vShield supports Single Sign On (SSO), which enables vShield to authenticate users from other identity services such as AD, NIS, and LDAP.
User management in the vShield Manager user interface is separate from user management in the CLI of any vShield component.
This chapter includes the following topics:
n “Configure Single Sign On,” on page 37 n “Managing User Rights,” on page 38
n “Managing the Default User Account,” on page 39 n “Add a User Account,” on page 39
n “Edit a User Account,” on page 41 n “Change a User Role,” on page 41
n “Disable or Enable a User Account,” on page 42 n “Delete a User Account,” on page 42
Configure Single Sign On
Integrating the single sign on service with vShield improves the security of user authentication for vCenter users and enables vShield to authenticate users from other identity services such as AD, NIS, and LDAP. With single sign on, vShield supports authentication using authenticated SAML tokens from a trusted source via REST API calls. vShield Manager can also acquire authentication SAML tokens for use with other VMware solutions.
Prerequisites
n Single sign on service must be installed on the vCenter Server.
n NTP server must be specified so that the Single Sign On server time and vShield Manager time is in
sync. See Setup vShield Manager in the vShield Installation and Upgrade Guide. Procedure
2 Click the Configuration tab.
3 Ensure that you are in the General tab. 4 Click Edit next to Lookup Service.
5 Type the name or IP address of the host that has the lookup service. 6 Change the port number if required.
The Lookup Service URL is displayed based on the specified host and port. 7 Type the SSO user name and password.
This enables vShield Manager to register itself with the Security Token Service server. 8 Click OK.
What to do next
Assign a role to the SSO user.
Managing User Rights
Within the vShield Manager user interface, a user’s role define the actions the user is allowed to perform on a given resource. The role determine the user’s authorized activities on the given resource, ensuring that a user has access only to the functions necessary to complete applicable operations. This allows domain control over specific resources, or system-wide control if your right has no restrictions.
The following rules are enforced:
n A user can only have one role.
n You cannot add a role to a user, or remove an assigned role from a user. You can, however, change the
assigned role for a user.
Table 4‑1. vShield Manager User Roles
Right Permissions
Enterprise Administrator vShield operations and security.
vShield Administrator vShield operations only: for example, install virtual appliances, configure port groups. Security Administrator vShield security only: for example, define data security policies, create port groups,
create reports for vShield modules.
Auditor Read only.
The scope of a role determines what resources a particular user can view. The following scopes are available for vShield users.
Table 4‑2. vShield Manager User Scope
Scope Description
No restriction Access to entire vShield system Limit access scope to the
selected port groups below Access to a specified datacenter or port group
The Enterprise Administrator and vShield Administrator roles can only be assigned to vCenter users, and their access scope is global (no restrictions).
Managing the Default User Account
The vShield Manager user interface includes a local user account, which has access rights to all resources. You cannot edit the rights of or delete this user. The default user name is admin and the default password is default.
Change the password for this account upon initial login to the vShield Manager. See “Edit a User Account,”
on page 41.
Add a User Account
You can either create a new user local to vShield, or assign a role to a vCenter user.
Create a New Local User
1 Click Settings & Reports from the vShield Manager inventory panel. 2 Click the Users tab.
3 Click Add.
The Assign Role window opens.
4 Click Create a new user local to vShield. 5 Type an Email address.
6 Type a Login ID.
This is used for login to the vShield Manager user interface. This user name and associated password cannot be used to access the vShield App or vShield Manager CLIs.
7 Type the user’s Full Name for identification purposes. 8 Type a Password for login.
9 Re-type the password in the Retype Password field. 10 Click Next.
11 Select the role for the user and click Next. For more information on the available roles, see “Managing User Rights,” on page 38.
12 Select the scope for the user and click Finish. The user account appears in the Users table.
Assign a Role to a vCenter User
When you assign a role to an SSO user, vCenter authenticates the user with the identity service configured on the SSO server. If the SSO server is not configured or is not available, the user is authenticated either locally or with Active Directory based on vCenter configuration.
1 Click Settings & Reports from the vShield Manager inventory panel. 2 Click the Users tab.
3 Click Add.
The Assign Role window opens. 4 Click Select vCenter user.
5 Type the vCenter User name for the user.
NOTE If the vCenter user is from a domain (such as a SSO user), then you must enter a fully qualified
windows domain path. This will allow the default vShield Manager user (admin) as well as the SSO default user (admin) to login to vShield Manager. This user name is for login to the vShield Manager user interface, and cannot be used to access the vShield App or vShield Manager CLIs.
6 Click Next.
7 Select the role for the user and click Next. For more information on the available roles, see “Managing User Rights,” on page 38.
8 Select the scope for the user and click Finish. The user account appears in the Users table.
Understanding Group Based Role Assignments
Organizations create user groups for proper user management. After integration with Single Sign On (SSO), vShield Manager can get the details of groups to which a user belongs to. Instead of assigning roles to individual users who may belong to the same group, vShield Manager assigns roles to groups. Let us walk through some scenarios to help us understand how vShield Manager assigns roles.
Example: Scenario 1
Group option Value
Name G1
Role assigned Auditor (Read only) Resources Global root
User option Value
Name John
Belongs to group G1 Role assigned None
John belongs to group G1 which has been assigned the auditor role. John inherits the group role and resource permissions.
Example: Scenario 2
Group option Value
Name G1
Role assigned Auditor (Read only) Resources Global root
Group option Value
Name G2
Role assigned Security Administrator (Read and Write) Resources Datacenter1
User option Value
Name Joseph
Belongs to group G1, G2 Role assigned None
Joseph belongs to groups G1 and G2 and inherits a combination of the rights and permissions of the Auditor and Security Administrator roles. For example, John has the following permissions:
n Read, write (Security Administrator role) for Datacenter1 n Read only (Auditor) for global root
Example: Scenario 3
Group option Value
Name G1
Role assigned Enterprise Administrator Resources Global root
User option Value
Name Bob
Belongs to group G1
Role assigned Security Administrator (Read and Write) Resources Datacenter1
Bob has been assigned the Security Administrator role, so he does not inherit the group role permissions. Bob has the following permissions
n Read, write (Security Administrator role) for Datacenter1 and its child resources n Enterprise Administrator role on Datacenter1
Edit a User Account
You can edit a user account to change the role or scope. You cannot edit the admin account.
Procedure
1 Click Settings & Reports from the vShield Manager inventory panel. 2 Click the Users tab.
3 Select the user you want to edit. 4 Click Edit.
5 Make changes as necessary. 6 Click Finish to save your changes.
Change a User Role
You can change the role assignment for all users, except for the admin user.
Procedure
1 Click Settings & Reports from the vShield Manager inventory panel.
2 Click the Users tab.
3 Select the user you want to change the role for 4 Click Change Role.
5 Make changes as necessary. 6 Click Finish to save your changes.
Disable or Enable a User Account
You can disable a user account to prevent that user from logging in to the vShield Manager. You cannot disable the admin user.
Procedure
1 Click Settings & Reports from the vShield Manager inventory panel. 2 Click the Users tab.
3 Select a user account. 4 Do one of the following.
n Click Actions > Disable selected user(s) to disable a user account. n Click Actions > Enable selected user(s) to enable a user account.
Delete a User Account
You can delete any created user account. You cannot delete the admin account. Audit records for deleted
users are maintained in the database and can be referenced in an Audit Log report. Procedure
1 Click Settings & Reports from the vShield Manager inventory panel. 2 Click the Users tab.
3 Select the user you want to delete. 4 Click Delete.
5 Click OK to confirm deletion.
If you delete a vCenter user account, only the role assignment for vShield Manager is deleted. The user account on vCenter is not deleted.