78 Section 2 Resources and Technology Chapter 4 Tools and Technology 79
78 Section 2 Resources and Technology Chapter 4 Tools and Technology 79
Did You Know?
The metric system was developed in France during the reign of Napoleon in the 1790s. This system missed being adopted by the United States by one vote in the Continental Congress in the late 1700s or early 1800s.
Objectives
The information given in the chapter will help you do the following:
o Summarize the unique abilities of humans.
o Explain how humans are toolmakers and tool users.
o Compare tools, mechanisms, and machines.
o Give examples of the six major types of primary tools.
o Summarize the use of mechanisms as force and distance multipliers. o Explain the six mechanisms, or
simple machines.
o Recall the major parts of a machine tool. o Give examples of the major types of
machine tools.
o Explain how to properly maintain and store tools.
C h a p t e r 4
78 Section 2 Resources and Technology Chapter 4 Tools and Technology 79
78 Section 2 Resources and Technology Chapter 4 Tools and Technology 79
Key Words
These words are used in this chapter. Do you know what they mean?
distance multiplier drilling machine force multiplier
grinding and sanding machines inclined plane
lever
machine tool mechanism
milling and sawing machines planing and shaping machines pulley screw shearing machine simple machine tool turning machine wedge
wheel and axle
Preparing to Read
In this chapter, you will learn about the different categories of tools and machines. As you read the chapter, outline the different types of tools and machines discussed.
Humans are unique in the world of living things. People have the ability to reason. Using this ability, we can predict events and plan actions. For example, you can say, “If this is true, that must also be true,” “If I do this, I can expect that to happen,” or “I must do this first and then do that next.”
People can also think about the future. They can plan activities over a period of time and decide to do something at a later date. In addition, humans can think of different ways to do the same task. They can offer alternatives for action. People can adjust their actions to meet different situations and
events. Their minds connect things, actions, and relationships. All these traits combine to produce an ability only humans have. This ability is called rational thought.
A second unique ability humans have is complex language. People use this language to describe their thoughts to other people. Early language was based on sounds that became the spoken language. Later, symbols were used to represent these sounds. These symbols evolved into an alphabet, the basis for written language. See Figure 4‑1.
Humans also have value systems. They have a sense of what is right and what is wrong. People can think, “It is okay to do this. I shouldn’t, however, do that.” This reasoning is called moral judgment.
The abilities to reason, use complex language, and make moral judgments are positive differences between humans and other mammals. Humans, however, lack some basic survival traits and innate knowledge other animals have. People lack an inherited “blueprint” of action on how to lead our lives. Animals can survive with their built-in knowledge, called instincts. Beavers instinctively know how to build dams. Bees use their instincts to collect pollen. Salmon know how to return to their spawning ground after several years in the ocean. Birds know the path from their summer homes to winter habitats. Humans, however, have to learn most of
Figure 4‑1. The Greek alphabet.
This chapter covers the benchmark topics for the following Standards for Technological Literacy: 3 7 1 2
Research
Have the students explore how individual languages name the same technological objects.
TechnoFact
80 Section 2 Resources and Technology Chapter 4 Tools and Technology 81
80 Section 2 Resources and Technology Chapter 4 Tools and Technology 81
these things. We cannot instinctively build homes, grow food, or make clothing.
In fact, humans are poorly equipped physically to meet the challenges of the world. People cannot lift much weight, run very fast, withstand cold temperatures very well, or see very far. Other animals are better equipped to survive in the natural environment. Eagles can see movement of prey from hundreds of feet in the air. Lions have great speed to catch food. Geese have the strength to fly hundreds of miles toward warmer climates in the winter. Ants can lift several times their weight. Bears have heavy fur to fight the cold. In contrast, modern humans cannot survive with only their natural equipment. They would starve or freeze to death without help.
Toolmakers
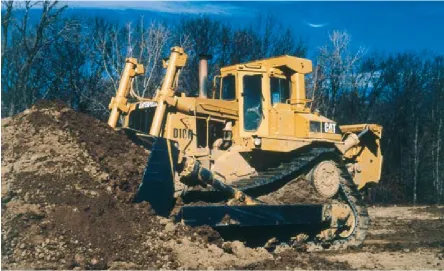
[image:3.612.95.539.435.706.2]To overcome physical weaknesses, humans have another special ability. They can design, make, and use tools. See
Figure 4‑2. Tools are devices people develop and use to do specific tasks.
Over the history of humankind, people have developed many types of tools. Early humans used things they could find to make their tools. They used sticks, rocks, bones, and other natural elements for tools. These humans used pointed sticks to hunt animals and spear fish, tree limbs for clubs, and animal bones as needles to make clothing.
As civilization advanced, tree limbs were used to plow the soil. Weapons were made from copper and other metals. Clay vessels were shaped and fired. Hammers were made from the newly developed steel.
Today, people have tools for every job. Dentists have a set of tools to work on their patients’ teeth. Surgeons have special tools to perform operations. Auto mechanics use different tools from what plumbers use. Have you ever seen a carpenter at work? Carpenters use many different types of tools. They use a heavy
Figure 4‑2. Humans have designed, built, and used many tools and machines. (Caterpillar, Inc.)
Demonstrate
Shape a simple clay vessel storage tool. Present the act as toolmaking.
Research
Ask the students to research and list some typical tools developed during the Stone Age.
TechnoFact
80 Section 2 Resources and Technology Chapter 4 Tools and Technology 81
80 Section 2 Resources and Technology Chapter 4 Tools and Technology 81
hammer to drive stakes into the ground. A smaller hammer or an air nailer is used to nail 2 × 4s together. Still another hammer or nailer is used to attach the trim around windows and doors. Each profession has its own set of tools. These tools can be understood better by looking at the major differences among a tool, a mechanism, and a machine. See Figure 4‑3:
• A tool is a device people design and use to complete a task.
• A mechanism is a device people design and use to adjust or power a tool.
• A machine is a combination of tools and devices people design and use to complete complex tasks.
Tools
[image:4.612.303.590.62.307.2]Throughout history, humans have survived by using their hands, arms, and brains. In earliest times, the hand held a rock to form a crude hammer. The brain directed the arm to move in a controlled manner. Later, a stick was attached to the rock to make the first hammer. Exchanging the rock with a sharp stone produced a hatchet. Each of these examples is a human-made device called a tool. See
Figure 4‑4. Over time, humans have developed many different types of tools:
• Tools used with language, such as pens, pencils, and printing presses. • Tools used in education, such as
projectors, models, and maps.
• Tools used in business and trade, such as calculators, scales, and money. • Tools used in religion, such as vessels
and special clothing.
• Tools used in art, such as easels, paintbrushes, modeling tools, and sculpture chisels.
Tool + Mechanism = Machine
Saw + Wheel and axle = Circular saw
Figure 4‑3. People use tools, mechanisms, and machines to do work. (Combining a tool and a mechanism produces a machine.)
Figure 4‑4. Over time, humans have developed many types of tools. This offshore drilling platform is a special tool of the petroleum industry.
(American Petroleum Institute)
Standards for Technological Literacy 1 2
Extend
Ask the students to list some examples of machines that include tools and mechanisms.
Example
Additional Language Tools: Word processor, typewriter, and photocopier Additional Educational Tools: Charts, software programs, games
TechnoFact
82 Section 2 Resources and Technology Chapter 4 Tools and Technology 83
82 Section 2 Resources and Technology Chapter 4 Tools and Technology 83
• Tools used by the government, such as military weapons and police equipment. • Tools used in games and sports, such
as basketball goals, tennis rackets, soccer balls, and baseball bats.
• Tools used in the pure sciences, such as telescopes, microscopes, and chemical apparatus.
• Tools used in technological systems, such as agricultural, communication, construction, energy conversion, manufacturing, medical, and transportation equipment.
• Tools used in managing companies, such as computers and word
processors.
Each of these groups of tools makes human action more efficient. These tools extend the human potential to do jobs.
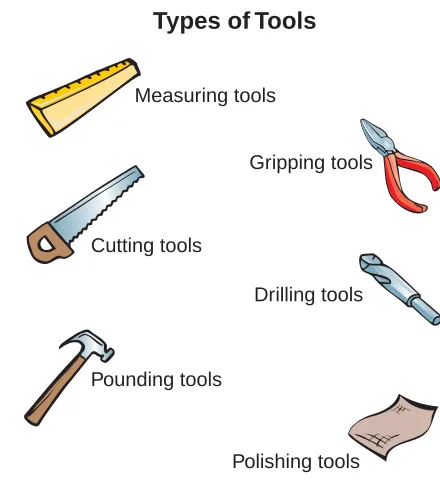
All tools can be traced back to another type of tool. See Figure 4‑5. We call these older tools primary tools. They are the tools people use to make new tools. Without them, humans could not develop new tools and machines to make lives easier.
Measuring Tools
Early humans lived in small groups that moved from place to place, searching for food. These people needed only a few tools to hunt game and gather food. As the population grew, however, the nomadic life gave way to permanent settlements. With this growth of civilization, people needed new tools to measure things. They had to plot fields to farm. These people had to measure material as they made houses. Grain placed in the village storehouses had to be weighed.
Two other types of measurement are also important. People measure distances and relationships. We measure the size of objects (distance) and how one surface relates to another (for example, squareness).
Measuring Distances
Measuring distance tells us how far it is from one point to another. Humans have developed a number of different tools to measure distances. See Figure 4‑6. Some of these tools are considered precision measurement devices. They provide very accurate measurements. Most precision measurement devices measure distances in thousandths (1/1000) of an inch or smaller. Other measurement devices are nonpreci-sion devices. They give us measurements in fractions (such as 1/8, 1/16, and 1/32) of an inch. See Figure 4‑7.
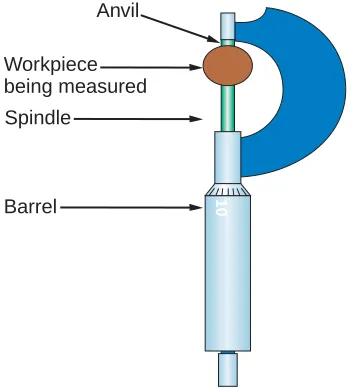
The ruler gives us standard measure-ments. Precision measurements are often made with a micrometer. To use a microm-eter, the part to be measured is placed between the spindle and the anvil. The spindle is brought into contact with the part. The measurement is read on the microm-eter barrel. See Figure 4‑8.
Measuring Relationships
The relationship between two surfaces is often important. People want to know if a part is square. They need to know that a Types of Tools
[image:5.612.86.306.454.696.2]Measuring tools Cutting tools Pounding tools Drilling tools Gripping tools Polishing tools
Figure 4‑5. Types of tools. We can use them to build other tools and mechanisms.
Standards for Technological Literacy 7 1 2
Research
Have the students research and list some early historical measuring units, such as a cubit.
Research
Have the students use the Internet to research the historical development of the U.S. Customary and SI Metric systems of measurement.
Brainstorm
Ask the students why they think one system of measurement might be better than another for technological activities.
TechnoFact
82 Section 2 Resources and Technology Chapter 4 Tools and Technology 83
82 Section 2 Resources and Technology Chapter 4 Tools and Technology 83
side is 90° (at a right angle) to an end. In another case, it is very important that the ends of parts of a picture frame are at 45°. These measurements are made with tools called squares. See Figure 4‑9.
Safety
Be careful when using cutting tools. Never rub fingers over cutting edges. Keep your hands behind any slicing or shearing tools.
Cutting Tools
Cutting tools remove material to size and shape parts. Each tool cuts away unwanted material until the part has a
Common Measuring Tools A Steel Tape
Figure 4‑6. There are many kinds of common measuring tools. A steel tape measures a board to length.
Precision Measurement Nonprecision Measurement
Figure 4‑7. The dyes in this stamping press were developed using precision measurement. The package designer here is using standard measurements. (Dana Corporation)
10
Anvil
Workpiece being measured Spindle
[image:6.612.91.266.496.690.2]Barrel
Figure 4‑8. A micrometer is used for precision measurement.
Standards for Technological Literacy 7 1 2
Figure Discussion
Figure 4-8 shows a micrometer. Micrometers are used to measure extremely small distances. The standard micrometer can measure the thickness or diameter of objects within an accuracy of one ten-thousandth of an inch.
Research
Have your students use a catalog or the Internet to research the different types of squares.
TechnoFact
84 Section 2 Resources and Technology Chapter 4 Tools and Technology 85
84 Section 2 Resources and Technology Chapter 4 Tools and Technology 85
Technology Explained
laser: a device that emits a beam of coherent, monochromatic light.
We are all probably familiar with lasers in one form or another. The word laser stands for “light amplification by stimulated emission of radiation.” A laser is a device that amplifies (strengthens) light. This device is based on the findings of Albert Einstein and Niels Bohr. When atoms are exposed to an outside source of energy, such as electricity or light, the electrons become excited. This raises the electrons to a higher energy level within the atom. When the electrons fall back to their original energy level, they give off light. More light is emitted when this light hits another atom.
Scientists discovered that all the atoms of a material give off light that is the same wavelength. The light has one color because it has one wavelength. Thus, laser light is monochromatic. Laser light is also coherent, meaning all the wave crests line up. See Figure A.
Beams of laser light are very intense and do not spread out as they pass through the air. The heat from the light can become so strong, it can burn a hole in a rock.
The first practical laser used a ruby rod. See Figure B. Ruby is an aluminum-oxide crystal. Some chromium atoms that replace a few aluminum atoms in the crystal cause its deep red color. The ruby rod is polished at each end. The ends are coated with a reflective material. One of the ends has a thinner coating than the other. To start the laser, outside energy excites the chromium atoms. Some of the light waves the chromium atoms emit strike the reflective ends. The light waves hitting the ends bounce back through the ruby rod. The waves strike other atoms, which become excited. The light is amplified as it bounces back and forth between the reflective ends of the rod. Once the light becomes strong enough, some light passes through the end of the rod with the thin coating.
We use many types of lasers today. Lasers are grouped by the amplifying medium they use. For example, the ruby laser used a ruby rod as the amplifying medium. Other lasers use gases, dyes, or semiconductor materials to amplify the light. All lasers operate on the same basic principle as the ruby laser. Each type of laser gives off light that has a different wavelength and, therefore, a different color.
We use lasers in more applications every day. For example, we use them for measurement. We also use them to send messages through fiber-optic cables. Compact disc players and some computer disc drives use lasers to store and retrieve data. People also use lasers for surgery, for welding, for cutting, and in bar code readers.
Reflector Flash tube
Power Ruby
rod Partial
reflector Laser
Ordinary Light Source
Incoherent light
Coherent light
Figure A. Lasers produce
coherent light, meaning the light travels in the same direction as the triggering light. This light, thus, amplifies the triggering light. In incoherent light systems, such as the Sun and the electric lightbulb, light travels in different directions, thus reducing its power.
Figure B. The first laser used a
84 Section 2 Resources and Technology Chapter 4 Tools and Technology 85
84 Section 2 Resources and Technology Chapter 4 Tools and Technology 85
desired shape. Cutting tools include three major types. These are sawing, slicing, and shearing tools. See Figure 4‑10.
Sawing Tools
A saw uses a set of teeth to cut the material. The tooth is a sharp projec-tion (point) on a body. The teeth can be
arranged along a strip. Examples are hand, coping, scroll, or band saws. Other saws have the teeth on a disc.
Slicing Tools
Slicing tools use a sharp, wedge-shaped edge to separate the material. The wedge cuts away unwanted material in the form of shavings. Typical slicing tools are knives, chisels, carving tools, and wood-working planes. See Figure 4‑11.
Shearing Tools
[image:8.612.311.505.60.235.2]Shearing tools fracture material between two opposing edges. The workpiece is placed between the edges. The knives coming together cause the material to sepa-rate. Common shearing tools are tin snips and scissors. See Figure 4‑12.
Figure 4‑9. Squares are tools measuring angles. Note how a try square is used to mark a 90° angle on a board. Squares are often combined with rules.
Types of Cutting Tools
Sawing tools
Shearing tools Slicing tools
Figure 4‑10. These are the different families of cutting tools.
Figure 4‑11. Typical cutting tools include planes, chisels, and files. Hand planes smooth board surfaces.
Standards for Technological Literacy 7 1 2
Research
[image:8.612.72.287.61.360.2]Have the students use a catalog or the Internet to research the different types of saws.
Figure Discussion
Have your students notice that, in Figure 4-11, the person using the hand plane guides the plane with the front knob and creates the cutting stroke with the hand on the rear handle.
TechnoFact
86 Section 2 Resources and Technology Chapter 4 Tools and Technology 87
86 Section 2 Resources and Technology Chapter 4 Tools and Technology 87
Drilling Tools
One of the first tools ancient humans developed was the drill. The first one was no more than a sharp, pointed stone attached to a wooden shaft. The tool user rotated the shaft in the palm of the hands. The stone tip was pointed downward and rested on the piece to be drilled. When the hands were rubbed back and forth, the shaft would rotate. As the shaft turned, downward pressure forced the stone point into the work.
Today, drilling tools and machines use the same action. A steel shaft is formed with cutters on its end. The shaft is rotated, while downward pressure forces it into the workpiece. This action cuts a series of chips, producing a hole.
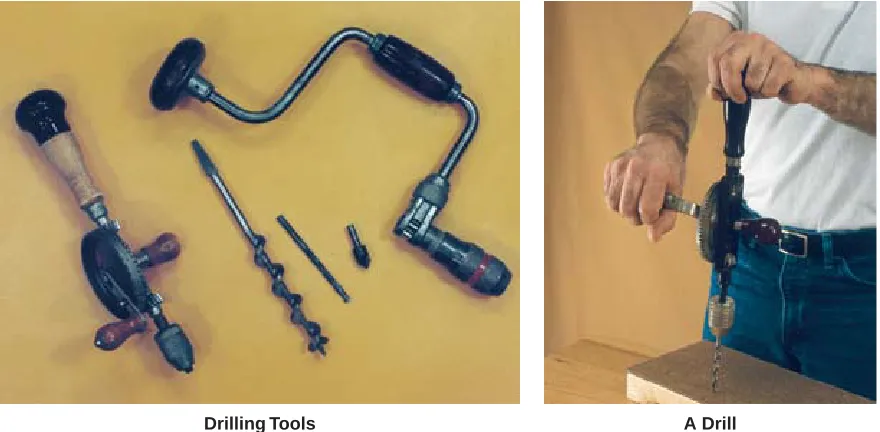
[image:9.612.81.310.58.400.2]Common drilling tools are twist drills, spade bits, and auger bits. These are often held and rotated in a hand drill, brace, portable electric drill, or drill press. See
Figure 4‑13.
Gripping Tools
The human hand is a natural grip-ping device. People hold and twist things with their hands. The hand, however, has
Varieties of Tin Snips
[image:9.612.99.539.499.715.2]Cutting Sheet Metal
Figure 4‑12. Shearing tools use two sharp opposing edges to cut the materials. There are several varieties of tin snips. Tin snips cut sheet metal.
Drilling Tools A Drill
Figure 4‑13. Here is a sample of drilling tools. Drills must be rotated to make them cut.
Standards for Technological Literacy 7 1 2
TechnoFact
Acheulean refers to remnants of a prehistoric industry found near the French town of Saint-Acheul. The site contained many stone hand axes that were more advanced than those found in other sites called
Oldowan sites. The
86 Section 2 Resources and Technology Chapter 4 Tools and Technology 87
86 Section 2 Resources and Technology Chapter 4 Tools and Technology 87
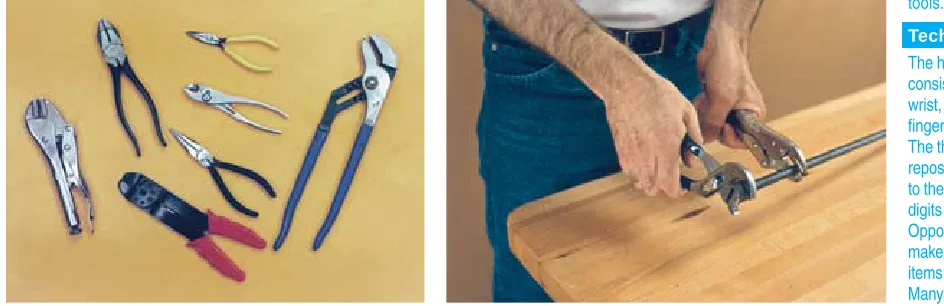
serious limitations. The human hand can exert only a limited amount of force. Also, the human hand is easily damaged when it holds rough materials. Therefore, holding and gripping tools have been developed to extend the power of the hand. Pliers are familiar gripping tools.
Holding Tools
[image:10.612.71.543.563.716.2]Holding tools replace the gripping power of the hand. They are used to hold an object in place. These tools squeeze the part and keep it from moving. Typical holding tools are vises and clamps. See
Figure 4‑14.
Career Highlight
Fishing‑Boat Captains
The Job: A fishing-boat captain manages the overall fishing operation. This includes deciding the fish to seek, the location of appropriate fishing grounds, the fishing method used, the duration of the trip, and the sale of the catch. The captain checks the fishing boat for seaworthiness, purchases needed supplies, hires the crew, and obtains necessary licenses.
Working Conditions: Fishing operations are conducted in many regions and under a variety of environmental conditions. Often, weather can cause hazardous conditions. Many times, help is not readily available when injuries occur.
Education and Training: Captains of large commercial fishing vessels and charter sportfishing boats must complete an approved training course. The U.S. Coast Guard must license them. Although it is not required, students can enroll in secondary school vocational or technical programs or community college and university programs in fishery technology.
Career Cluster: Agriculture, Food & Natural Resources Career Pathway: Natural Resources Systems
Figure 4‑14. Holding tools multiply the squeezing force of the hand. There are many types.
Standards for Technological Literacy 1 2
Research
Have the students use a catalog or the Internet to research the types of gripping tools.
TechnoFact
88 Section 2 Resources and Technology Chapter 4 Tools and Technology 89
88 Section 2 Resources and Technology Chapter 4 Tools and Technology 89
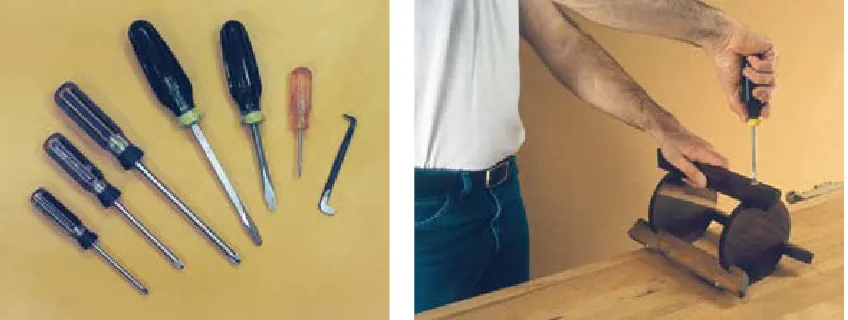
Turning Tools
Turning tools are used to posi-tion objects or tighten fasteners. Typical turning tools are wrenches and screw-drivers. Wrenches are made adjustable or in fixed sizes. Fixed-size wrenches usually come in sets to fit common bolts and nuts. They are either open-end or box styles. Commonly used adjustable wrenches are open-end wrenches and pipe wrenches. See Figure 4‑15.
Screwdrivers are commonly used to set or tighten wood, sheet metal, and machine screws. They are available in several lengths and blade sizes. Screwdrivers are also made to fit different slots in screw heads. There are screwdrivers fitting stan-dard screws and Phillips-head screws. See Figure 4‑16.
Pounding Tools
From early times, people needed to apply a striking force to objects. They needed to pound things into the ground, break them, or shape them. This need to pound objects gave rise to the development of pounding tools. Typically, these tools consist of a heavy head attached to a handle.
Today, we call these tools hammers. Hammers come in many types and styles: • Claw hammers for driving all types of
nails.
• Sledgehammers for driving stakes. • Shingling hammers for attaching roof
shingles.
• Mallets for driving woodworking chisels. • Ball-peen hammers for striking cold
[image:11.612.89.540.360.504.2]chisels.
Figure 4‑15. These tools are useful for assembling parts using bolts and nuts.
Figure 4‑16. These are standard and Phillips screwdrivers. They turn screw fasteners into parts.
Standards for Technological Literacy 1 2
Brainstorm
Ask the students to list the advantages of wrenches over pliers for tightening nuts and bolts.
Research
Have the students use a catalog or the Internet to explore the different types of hammers.
TechnoFact
Many people use the verb hammer. This means to hit or pound something into a shape with a special tool called a
hammer. The word
hammer comes
from the Middle English word
hamer, which was
derived from the Old English word
[image:11.612.108.532.547.707.2]88 Section 2 Resources and Technology Chapter 4 Tools and Technology 89
88 Section 2 Resources and Technology Chapter 4 Tools and Technology 89
• Rubber or plastic mallets for striking parts to align them.
[image:12.612.312.505.350.502.2]Several types of hammers are illustrated in
Figure 4‑17.
Polishing Tools
Many parts and products require smooth surfaces. This type of surface finish can be produced using scrapers and abrasive grits. These tools remove small amounts of material to improve the surface of the material. Hand and cabinet scrapers use a curled edge (burr) to scrape away the unwanted material.
Sanding and grinding tools use abrasives (mineral grit) to create uniform scratches on the material. The action replaces dents and large scratches with small, straight scratches. As these scratches become very small, they cannot be seen. There is a degree of rough-ness. The eye and the hand, however, tell us the material is smooth. Typical abrasive tools are loose and sheet abrasives, sharpening stones, and buffing compounds.
Mechanisms
Hand tools served early humans well. As civilization grew, however, demand for food and products also grew. People using hand tools could not meet the increasing
demand. Machines to produce more goods were needed. These improvements required technological advancements.
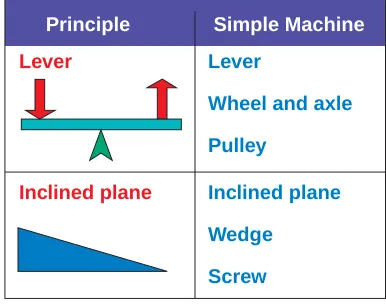
There is not, however, a direct step from a hand tool to a machine. The hand tool must be combined with a mechanism to produce a machine. What is a mechanism? A mecha-nism is a basic device controlling or adding power to a tool. Science calls these mech-anisms simple machines. These simple machines, or basic mechanisms, multiply the force applied or distance traveled. An under-standing of them helps us understand more complex machines. There are six simple machines that work off two basic principles. Levers, wheels and axles, and pulleys use the lever principle. Inclined planes, wedges, and screws use the inclined plane principle. See Figure 4‑18.
Figure 4‑17. Here are some of the many hammers we use. They pound and drive certain types of fasteners. Principle
Lever
Inclined plane
Lever
Wheel and axle
Pulley
Inclined plane
Wedge
Screw
[image:12.612.72.518.554.713.2]Simple Machine
Figure 4‑18. The six simple machines are based on two basic principles.
Standards for Technological Literacy 1 2
Demonstrate
Show how
rottenstone, pumice, or emery can be used to polish a metallic surface.
Brainstorm
Ask the students why materials are polished.
Extend
Look at a
mechanical product and identify the simple machines used in it.
TechnoFact
Many materials can be used as polishing compounds. These include rottenstone (soft decomposed limestone), emery (fine-grained impure corundum), and pumice (powdered, lightweight, and porous lava).
TechnoFact
90 Section 2 Resources and Technology Chapter 4 Tools and Technology 91
90 Section 2 Resources and Technology Chapter 4 Tools and Technology 91
Levers
[image:13.612.99.605.60.409.2]Have you ever seen someone pry open a crate using a crowbar? If you have, you have seen a lever in action. See
Figure 4‑19. A lever, similar to all simple machines, is a force or distance multiplier. This simple machine can increase the force applied to the work. A lever makes us stronger than we really are. This is using it as a force multiplier.
A lever can also let us change the amount of movement created. A small amount of movement at one end produces a large amount of movement at the other end. This is using a lever as a distance multiplier.
This simple machine is a device consisting of a lever arm and a fulcrum. The fulcrum is a pivot point on which the lever arm rotates. A lever consists of the lever
arm, the fulcrum, the load to be moved, and the force to be applied. There are three basic arrangements for these compo-nents of a lever. These arrangements are called classes of levers. See Figure 4‑20.
Scissors and pry bars use the principle of the first-class lever. Wheelbarrows and hand trucks are devices using second-class levers. When you use brooms or baseball bats, you are using third-class levers.
Levers can be force or distance multipliers:
• Force multiplier. See Figure 4‑21
(top). The fulcrum of this first-class lever is located near the load to be moved. Thus, a small amount of force, moving a greater distance, moves a load a shorter distance than the force movement.
Career Highlight
Mechanical Engineering Technicians
The Job: Mechanical engineering technicians use their
knowledge of science, mathematics, technology, and engineering to solve the technical problems many manufacturing companies face. They work with engineers to design, develop, and test manufacturing equipment and consumer products. These technicians might work in product development, process development, production planning, plant layout, or other similar areas.
Working Conditions: Engineering technicians generally work a standard 40-hour workweek. They work in product-development laboratories and manufacturing plants.
Education and Training: Most mechanical engineering technicians have a two-year associate’s degree or a four-year bachelor’s degree in engineering technology. These programs include courses in
science, engineering, manufacturing materials and processes, and mathematics.
Career Cluster: Manufacturing
Career Pathway: Manufacturing Production Process Development
Standards for Technological Literacy 1 2
Extend
Have the students draw a picture of a wheelbarrow and explain why it is a second-class lever.
TechnoFact
90 Section 2 Resources and Technology Chapter 4 Tools and Technology 91
90 Section 2 Resources and Technology Chapter 4 Tools and Technology 91
Load Movement Force
[image:14.612.93.493.63.218.2]Fulcrum
Figure 4‑19. Levers multiply force. The bar on the left is an application of the lever illustrated on the right.
First class
Load
Force
Fulcrum
Second class
Load
Force
Fulcrum
Third class
Load
Force
[image:14.612.307.504.262.568.2]Fulcrum
Figure 4‑20. These are the three classes of levers. Try to think of tools you use fitting these classes.
Force multiplier
Load
X 4X
Force
100 lb.
25 lb.
Distance multiplier
Load Load
X
[image:14.612.87.271.266.661.2]4X Force
Figure 4‑21. We use levers to multiply force and distance. On the top, a 25-pound force is multiplied four times. On the bottom, great force applied on the right moves a short distance to move loads four times further.
Standards for Technological Literacy 1 2
Brainstorm
Have the students list some technological devices that use each type of lever.
TechnoFact
92 Section 2 Resources and Technology Chapter 4 Tools and Technology 93
92 Section 2 Resources and Technology Chapter 4 Tools and Technology 93
• Distance multiplier. See Figure 4‑21
(bottom). The fulcrum is located near the force applied to the lever. Thus, a force moving a short distance can cause a load to be moved a much greater distance. Of course, a much larger force must be applied to multiply the movement of the load.
Look around the school laboratory for examples of levers in use. Did you identify pliers, tin snips, or claw hammers (when pulling a nail)?
Wheels and Axles
The wheel and axle is another mecha-nism, or simple machine. This mechanism consists of a shaft attached to the center of a disc. See Figure 4‑22. This mecha-nism operates a second-class lever. The axle is the fulcrum. The load is applied to the wheel or axle.
If the force is applied to the axle, the mechanism becomes a distance multiplier. One revolution of the axle causes the wheel to rotate one time. The circumference of (distance around) the wheel, however, is greater than the axle. Therefore, the mech-anism moves a greater distance. Bicycle drives and automotive differentials (gears turning the axle) use this action.
The mechanism is a force multiplier if the force is applied to the wheel. A screw-driver is a good example of this action. Try to drive a screw by gripping the shaft (axle)
of a screwdriver. Repeat the task, gripping its handle (wheel). You will find it is much easier to turn the mechanism by applying the force to the wheel. This principle is used for automobile steering wheels, other control knobs and wheels, and wood-working braces. See Figure 4‑23. Note how wheels and axles can be used as both force and distance multipliers. Can you think of other examples?
Pulleys
A pulley is a third type of simple machine, or mechanism. This simple machine is a wheel with a grooved rim attached to a loose axle. People use pulleys for many tasks, including raising sails on ships, hoisting cargo, and pulling parts together.
Pulleys are used by themselves or in sets. They can do three things:
• Change the direction of force. • Multiply force.
• Multiply distance.
Wheel
[image:15.612.343.520.440.691.2]Axle
Figure 4‑22. The wheel and axle is an application of the lever.
Multiply force Multiply distance Force Force Load Load Steering wheel Vehicle wheel
Figure 4‑23. Similar to the lever, the wheel and axle can be either a force multiplier or a distance multiplier.
Standards for Technological Literacy 1 2
Extend
Ask the students to explain how a pulley is like a wheel and axle.
Brainstorm
Ask the students why gear teeth are added to wheels used to transmit power.
Extend
Have the students give an example of using a pulley to do each of the following: 1. Change the direction of the force applied. 2. Multiply the force applied. 3. Multiply the distance a load is moved.
Figure Discussion
92 Section 2 Resources and Technology Chapter 4 Tools and Technology 93
92 Section 2 Resources and Technology Chapter 4 Tools and Technology 93
See Figure 4‑24. Notice how pulleys are used to do each of these jobs.
Inclined Planes
An inclined plane is the fourth type of mechanism, or simple machine. This mechanism uses a sloped surface. See
Figure 4‑25. This mechanism operates on the principle that moving up a slope is easier than lifting straight up.
A simple experiment tests this prin-ciple. Pull a smooth weight up a slope. Use a scale to measure the force. Lift the weight. You will find that the longer the slope is, the easier it is to move the object.
Wedges
[image:16.612.52.610.61.426.2]A wedge is the fifth type of simple machine, or mechanism. This simple machine is a set of two inclined planes. See
Figure 4‑26. This mechanism is used in many simple hand tools. The wood chisel, knife, ax, splitting wedge (for firewood), and cold chisel operate on the wedge prin-ciple. Also, nails are wedges.
Screws
A screw is the last type of mecha-nism, or simple machine. This mechanism is actually an inclined plane wrapped on a round shaft. The threads move slowly up the shaft as they go around it. The screw is a great force multiplier. It takes a great deal of rotating motion to move a nut a short distance onto a bolt.
Career Highlight
Welders
The Job: Welders apply heat to metal pieces to melt and fuse them together. They use many types of welding, including arc, gas tungsten arc, and gas metal arc. Skilled welders often work from drawings and use their knowledge and skill to produce the specified weld.
Working Conditions: These workers normally work in well-ventilated areas. Welders can be exposed to a number
of hazards, however, including the intense arc light, poisonous fumes, and hot materials. They must wear safety shoes, goggles, hoods with protective lenses, and other devices.
Education and Training: Skilled welders are developed using a number of training systems. These systems include on-the-job training, specialized
welding schools, and apprenticeships. Apprenticeships combine on-the-job training with classroom instruction.
Career Cluster: Manufacturing Career Pathway: Production
Brainstorm
Ask the students to list some of the uses for a wedge.
TechnoFact
94 Section 2 Resources and Technology Chapter 4 Tools and Technology 95
94 Section 2 Resources and Technology Chapter 4 Tools and Technology 95
Consider a 1/2″ × 12 bolt (1/2″ diam-eter with 12 threads per inch). To move the nut 1″, the bolt must be turned 12 times. A point on the circumference of the bolt would move almost 19″.
Machines
Every type of technology uses machines of one type or another. There are machines used in agriculture. People use machines to till soil, plant and culti-vate crops, and harvest output. There are machines to irrigate plants, apply insecti-cides and herbiinsecti-cides, and store harvests.
Machines are used in communica-tions. Printing presses produce newspa-pers and magazines. Transmitters send signals through the airways to radios and television sets. Switching gears intercon-nect our telephones.
There are energy conversion machines. They change energy from one form to another. These machines change the energy in coal into electricity. They change the energy in petroleum into mechanical
Load Force Load Force
Load
Force
Direction Change
Force Multiplier
[image:17.612.86.510.68.335.2]Distance Multiplier
Figure 4‑24. Pulleys change direction, multiply force, or multiply distance.
Small
force Load
Low Slope – Easy Lift
Lift
Large
force Load
Steep Slope – Difficult Lift Lift Slope angle
[image:17.612.136.271.439.590.2]Figure 4‑25. Here is an inclined plane. Loads can be lifted with less force. The lower the slope, the easier the load is to move.
Figure 4‑26. People use wedges to split logs. Do you see that the wedge is two inclined planes put together?
Figure Discussion
Explain why the wedge shown in Figure 4-26 splits the log.
TechnoFact
94 Section 2 Resources and Technology Chapter 4 Tools and Technology 95
94 Section 2 Resources and Technology Chapter 4 Tools and Technology 95
energy to power vehicles. Energy conver-sion machines change electrical energy into heat and light.
Machines are used in construction. Bulldozers prepare construction sites. Cranes lift structural steel into place. Cement mixers prepare concrete for use. Power trowels smooth the concrete, while saws cut joints into the concrete.
There are machines used in manufac-turing. They change the forms and shapes of materials. These machines make prod-ucts. Presses stamp out parts. Welders fuse metal. Robots move parts from place to place.
Machines are used in medicine and health care. They restore or improve the health of people and animals. Machines in hospitals monitor patients’ vital signs. X-ray machines help doctors diagnose illnesses. Pharmaceutical (drug-manufac-turing) companies use machines to develop drugs to treat illnesses. Veterinarians use machines to treat diseases in pets and farm animals.
There are machines used in trans-portation systems. Trucks, trains, ships, and airplanes move people and cargo. Conveyors load and unload cargo from vehicles. Computers maintain reservation information.
Many of these machines are presented later in this book. All these machines, however, can be traced back to other types of machines. These other machines are a special type of manufacturing machine. They are called machine tools. Machine tools are the machines that make other machines. Without them, there would be no agricultural, communication, construc-tion, energy conversion, general manufac-turing, medical, or transportation machines. Machine tools change raw materials into parts. These parts later become machines and other products. See Figure 4‑27.
Machine tools have four major elements:
• A basic structure (such as a frame, bed, or table).
• A power unit (such as an electric motor or a hydraulic drive).
• A control unit (such as a feed, speed, or depth-of-cut control).
• A tool (a device to produce a cut). Machine tools can be grouped into six major classes:
• Turning machines. • Drilling machines.
• Milling and sawing machines. • Shaping and planing machines. • Grinding and sanding machines. • Shearing machines.
See Figure 4‑28. Each machine tool has its own way of operating. The machine cuts materials into shapes using different motions and tools.
Turning Machines
Turning machines were some of the first machines to be developed. They are almost as old as civilization itself. The potter’s wheel is an example of an early turning machine. Later turning machines are lathes.
Power unit
Tool
[image:18.612.306.502.60.245.2]Structure
Figure 4‑27. Every machine tool has these three basic parts.
Extend
Have the students look at several pictures of machines and identify their power units, tools, control units, and structures.
Brainstorm
Have the students compare the parts of a bicycle to the four major elements in machines. Ask the students if the bicycle is a machine.
Extend
96 Section 2 Resources and Technology Chapter 4 Tools and Technology 97
96 Section 2 Resources and Technology Chapter 4 Tools and Technology 97
These machines use a stationary tool. The material to be shaped is rotated around an axis. The stationary tool is fed into the work. The cut is created by slowly moving the tool along or into the rotating work.
Drilling Machines
The first drill was probably invented over 40,000 years ago. You learned earlier that it was no more than a pointed stone on a shaft. Today, clamping a drill bit in a chuck (toolholder) is a more common way to produce holes. The chuck is rotated and pushed downward. This causes the rotating drill to feed into the work and cut a hole. The most common drilling machine is the drill press. See Figure 4‑29.
Milling and Sawing
Machines
Milling and sawing machines use either the straight or circular saw blades discussed earlier. A motor makes the blade
[image:19.612.326.541.538.695.2]Figure 4‑28. All machine tools can be classified as one of these six basic types.
Figure 4‑29. A drill press is the most common drilling machine.
Figure Discussion
Starting in the upper-left corner of Figure 4-28, have the students name each of the six types of machines shown.
Discussion
Compare the cutting actions of a table saw, band saw, and scroll saw.
TechnoFact
96 Section 2 Resources and Technology Chapter 4 Tools and Technology 97
96 Section 2 Resources and Technology Chapter 4 Tools and Technology 97
move. The work is fed into the moving blade, creating a cut.
Many of these machines use rotating circular blades or cutters. The most common machines of this type are the milling machine, table saw, and radial saw. The woodworking surfacer, jointer, shaper, and router use the same cutting action.
Power hacksaws, scroll (jig) saws, and saber saws use reciprocating straight blades. The band saw uses a straight blade that has been welded into a loop. The blade travels around two wheels. This produces a linear (straight-line) cutting motion at the workpiece.
Planing and Shaping
Machines
Planing and shaping machines are generally limited to cutting metals. Both machines use a single-point tool. The shaper moves the tool into the work to produce the cut. The metal planer moves the work into the tool. Both machines produce a flat cut on the surface of the work.
Grinding and Sanding
Machines
Grinding and sanding machines use abrasives to cut materials from the work-piece. The abrasives can be bonded into wheels or onto a backing for sheets, discs, and belts. Generally, the work is moved against the moving abrasive. Grinders and sheet, disc, and belt sanders are the common machines in this group.
Shearing Machines
Shearing machines slice materials into parts. They use opposed edges to cut the workpiece. The material is placed between the cutting edges (knives or blades). One edge is moved down, forcing the material against the second edge. As more force is
applied, the material is cut. A pair of scissors uses a shearing action. Common shearing machines are sheet metal shears, punch presses, and paper cutters.
Safety and
Technological
Devices
People have been developing and using tools since humans first walked on the earth. Early tools were simple and crude. Today, tools range from the common hammer to sophisticated computers. Each tool or machine should be used with care so the operator and other people are not injured.
Learning to Use a
Device
Each technological device has its own safety and use considerations. These can be presented in a few sentences. On the other hand, whole books can be devoted to the issue. One simple rule, however, keeps most tool users out of trouble. This rule is “Know your tool.” Some simple procedures can help you obey this rule. These approaches are the following: • Read the owner’s manual. This
booklet tells the new owner about the features of the product and how to install or set up the device. The manual presents proper and safe procedures for use of the product.
• Search for instructions. Use the Internet, books, and how-to magazines to learn how other people use the tool or device properly.
• Ask for instructions. Seek advice from teachers, skilled workers, and knowledgeable friends and neighbors on ways to use the tool or device safely.
Example
Sawing is used to prepare many standard materials in the wood products industry. For example, sawmill is both a plant where timber is sawed into boards and a large machine used for sawing lumber.
Figure Discussion
Explain how sanding is a cutting operation. Discuss the types of sanders.
TechnoFact
98 Section 2 Resources and Technology Chapter 4 Tools and Technology 99
98 Section 2 Resources and Technology Chapter 4 Tools and Technology 99
When in doubt about the proper use or safety procedures, do not use the tool or device.
Simple Safety Rules
for Hand and Power
Tools
You should always have safety in mind when you are using tools. See Figure 4‑30.
Ask yourself the following questions: • Is this the right tool for the job?
• Is the tool in proper working condition? • How should the tool be properly
operated?
• Are there any broken or worn parts? • Are safety guards and switches in
place and working?
• Do I have the proper protective equipment (such as safety glasses, protective clothing, or a face mask)? • Is the work area free of hazards? • Is the work surface at a proper height? • Are other people out of the way?
There are some specific questions that should be in your mind as you use common hand and power tools:
• Are electric tools properly plugged in and grounded?
• Are small workpieces properly clamped to a work surface and held in a vise? • Are the cutting tools or blades sharp? • Are hammerheads held tightly on their
handles?
• Are screwdriver points free of wear? • Do wrenches grip the nut or bolt properly? • Are the tools properly stored after use? For portable electric tools, remember the following rules:
• Do not carry the tool by its cord.
• Do not yank on the cord to disconnect it. • Disconnect all tools when cutters are
being changed.
• Disconnect all electric tools when they are not in use.
[image:21.612.156.477.471.706.2]• Do not use the tools in wet conditions unless they are specifically designed for such conditions.
Figure 4‑30. Note the safety devices shown.
Extend
Describe how machine tools are used to make machines for all technologies.
Research
Have the students use the Internet to research machine safety and develop a set of general rules to post near machines in the technological laboratory.
TechnoFact
98 Section 2 Resources and Technology Chapter 4 Tools and Technology 99
98 Section 2 Resources and Technology Chapter 4 Tools and Technology 99
Tool Storage
Tools and equipment must be regularly inspected and maintained so they remain safe and reliable. Always follow the guide-lines in the owner’s manuals for inspecting, maintaining, storing, and servicing tools and materials. Care should always be taken to properly store tools and materials. They should be kept in an organized fashion in a place where they are easily accessible. Some tools have sharp points that can injure people if not stored carefully. Other tools and materials must be protected from the environment. For example, computer discs should be protected from dust and dirt when stored. If they are not, there is a risk of losing important data.
Summary
Technology is the use of knowledge and action to extend human potential. A
major component of technological action is the use of tools. Tools are devices humans have developed to do jobs. They can be classified as measuring, cutting, drilling, gripping, pounding, and polishing tools.
Tools are used by hand. Handwork can be fun. This work, however, is slow. The demand for more efficient farming, products, communication media, energy, medical care, buildings, and transportation devices gave rise to machines. Humans found that some basic mechanisms could be combined with tools to create these machines. They joined the lever, wheel and axle, pulley, inclined plane, wedge, and screw with the basic tools. From these advancements came machine tools. People developed turning, drilling, milling and sawing, shaping and planing, grinding and sanding, and shearing machines. These machines can be used to make all other machines. From these come agricul-tural, communication, construction, energy conversion, manufacturing, medical, and transportation machines.
STEM Connections
Mathematics
Examine a complex tool or simple woodworking or metalworking machine. Identify a place where mechanical advantage is used. Calculate and graph the mechanical advan-tage using several different forces applied.
Science
Examine a complex tool or simple woodworking or metalworking machine. Identify as many uses of simple machines (mechanisms) as possible. List and describe them.
Curricular Connections
Social Studies
Trace the development of a tool or machine over time. Start with early developments in places such as Egypt and Rome.
Activities
1. List five common tools you use at home.
A. Identify the categories of tools in which they belong. B. Identify any mechanisms they use.
C. Describe how they work.
S
T
CurriculumE
M
Science Technolo gy
Mathema tics Engineer
ing Integrated
Standards for Technological Literacy 3
TechnoFact
2. List three machines you have seen or used.
A. Classify them as one of the six types of machines. B. Describe the task each machine performs.
3. Build a simple item using tools. A. List each tool you use.
B. Group the tools by the families of tools to which they belong.
4. Select a tool from your classroom lab. Prepare a presentation for the class reviewing the proper safety, inspection, maintenance, and storage procedures for the tool. Include a handout with your presentation.
Test Your Knowledge
Do not write in this book. Place your answers to this test on a separate sheet of paper.
1. Why are humans different from other species of living things? A. They can adjust their behaviors to different situations. B. They can design, make, and use tools.
C. In order to control their environments, they have to depend on tools. D. All of the above.
2. Devices people develop and use to complete tasks are called _____. 3. A(n) _____ is a basic device controlling or adding power to a tool. 4. Give an example of each of the six primary tools.
5. A lever producing large movement at one end when a force is applied to the other end is being used as a(n) _____.
6. A pulley can be used to change the direction of force, multiply force, and multiply distance. True or false?
7. Explain each of the six mechanisms.
8. Which of the following are major elements of a machine tool? You can choose more than one answer.
A. Frame. B. Tool.
C. Electric motor. D. Feed control.
E. The part being made.
9. Summarize the qualities of each of the six major classes of machine tools. 10. List two reasons that proper tool storage is important.
Reading Organizer
Create a detailed outline based on what you’ve read about the different types of tools and machines.
Example:
I. Tools
A. Measuring tools B. Cutting tools
1. Sawing tools
100 Section 2 Resources and Technology Chapter 4 Tools and Technology 101
Answers
Chapter 4 Activity A
Tools and Materials as
Resources
Introduction
You have read about tools and technology. Also, your teacher has told you about tools. Now, you are ready to use this knowledge to work. Your teacher will show you how to use tools to extend your ability to do a job.
In this activity, you will have common hand tools to help you build a simple game. You will be using common measuring, cutting, drilling, pounding, and polishing tools to make a tic-tac-toe board. See Figure 4A‑1.
Equipment and Supplies
• 2 × 4 (1 1/2″× 3 1/2″) construction lumber.• 1/4″× 3/4″ wood strips. • 3/8″ dowels.
• 3/4″× No. 6 flathead wood screws. • A steel rule.
[image:24.612.189.397.331.491.2]• A try or combination square. • A crosscut or backsaw. • A miter box and handsaw. • A hand drill.
Figure 4A‑1. Tic-tac-toe.
• A brace.
• A 1/2″ auger bit.
• 1/16″, 9/64″, and 13/32″ twist drills. • A countersink bit.
• A flat wood file or rasp. • A block or smooth plane.
• Abrasive paper and sanding blocks. • A screwdriver.
• A scratch awl or center punch. • A hammer or mallet.
Safety Rules
• Cutting tools have sharp edges. Never carry pointed tools in your pockets. • Always cut and chisel away from your body or the hand holding the part. • Always carry cutting tools with sharp edges pointing down.
• Use each tool for its proper purpose.
• Mushroomed heads on chisels or other tools that are struck with a hammer or mallet are dangerous. Bits of material can fly off and strike you.
• Never use tools with loose handles.
• When using a saw, keep your free hand away from the saw blade. • Never rub your fingers across cutting tools.
• Remove slivers immediately and sterilize the wound.
• Cuts should be allowed to bleed freely for a short time. Bandage properly. • Keep working surfaces free of scrap and unnecessary tools.
• Sweep up scrap and debris from floors and discard in a waste bin.
• If jigs or fixtures have sharp edges, wear protective gloves. Never wear gloves, however, when operating power equipment.
Procedure
The steps of the procedure for the tic-tac-toe game are numbered from 1 to 43. You do not, however, have to complete the steps in order. You can make the pegs, peg-storage hole cover, and game board in any order. Each number is used only once so you and your teacher can easily refer to a specific step without confusion.
Preparing to Make the Product
1. Study the drawings and bill of materials for the tic-tac-toe game. See
Figure 4A‑2 and Figure 4A‑3.
2. Read the procedure for making the game.
3. Carefully watch your teacher demonstrate how to make the game.
Quantity Description
1
1
8
1
Game board
Peg cover
Pegs
Screw
Size
1 1/2″ x 3 1/2″ x 3 1/2″
1/4″ x 3/4″ x 3 1/2″
3/4″ x No. 6 flathead 3/8″ dia. x 5/8″
Material
Spruce or hemlock
Pine Birch dowel
[image:26.612.162.449.62.153.2]Plated steel
Figure 4A‑2. The bill of materials.
1/4″
3/4″
1
1
1 1/4″
1 1/4″ 2 1/4″
2 1/2″ 1 1/4″
1 1/4″
1 1/2″ 3 1/2″
1/4″
1/4″
5/8″ 1/4″
1 1/4″ 3 1/2″ 1 1/4″ 1/4″ 9 holes, 13/32″ diameter x 3/8″ deep
3/4″ 1″ 1″
1/2″
2″ holes, 1/2″ dia x 3″ deep 1/16″ diameter x 1/2″ deep
1/4″
9/64″ diameter, countersunk
Game Block
Peg-Storage Cover
[image:26.612.179.508.191.672.2]3/4″ 3/8″
Figure 4A‑3. Working drawings.
Making the Game Board
To select and lay out the material, do the following:
4. Select a length of 2 × 4 construction lumber. (Note: The actual size is 1 1/2″ thick × 3 1/2″ wide.)
5. Lay out a line 3/8″ from one end. See Figure 4A‑4.
6. Lay out a line 3 1/2″ from the first line.
To cut out the game board, complete the following steps:
7. Cut the end off to the outside of the 3/8″ line to square the end of the board. 8. Cut off the game part, barely leaving your line on the part.
Step 1:Draw lines 1 1/4″ apart.
Step 2: Draw lines 1/4″ from the edges and the ends.
Step 3:Locate and mark the peg holes.
Step 4:Locate and mark the peg- storage and cover pivot holes.
Top View
Side View Top View
[image:27.612.110.524.155.693.2]Top View
Figure 4A‑4. How the game board should be laid out.
To lay out the game board, do the following:
9. Draw lines 1 1/4″ in from the edges and ends of the block. 10. Draw lines 1/4″ in from the edges and ends.
11. Draw lines 1/4″ down from the face on the edges and ends. 12. Locate and mark the nine peg holes.
13. Locate and mark the peg-storage holes on one edge. 14. Locate and mark the peg-cover pivot-screw anchor hole. To produce the game board, complete the following steps:
15. Saw kerfs (shallow slots) about 1/8″ deep on the four 1 1/4″ lines. 16. Drill the nine 13/32″ peg holes 3/8″ deep.
17. Drill the two 1/2″ peg-storage holes 3″ deep. 18. Drill the 1/16″ pivot-screw hole.
19. File and plane the 1/4″× 1/4″ chamfers around the top of the block. 20. Sand all surfaces.
Making the Pegs
To select and lay out the materials, do the following: 21. Select a length of 3/8″ dowel.
22. Check the end to see that it is square.
To produce the pegs, complete the following steps: 23. Set a stop block on the miter saw for a 5/8″ cut. 24. Cut the end of the dowel square, if necessary. 25. Cut eight pieces of dowel, 5/8″ long.
26. Sand and lightly break (round) the ends of the pegs.
Making the Peg‑Storage Hole Cover
To select and lay out the materials, do the following: 27. Select a length of 1/4″× 3/4″ pine.
28. Draw a line 1/4″ from the end. 29. Draw a line 2 1/2″ from the first line. 30. Locate and mark the pivot-screw hole. 31. Lay out the radius on each end.
To produce the peg-storage hole cover, complete the following steps:
32. Cut the end off to the outside of the 1/4″ line to square the end of the board. 33. Cut off the hole cover, barely leaving your line on the part.
34. Drill a 9/64″ pivot-screw hole.
35. Countersink the hole for a No. 6 flathead screw. 36. Sand or file the end radii.
37. Sand all surfaces.
Finishing and Assembling the Game
To apply finish to the parts, do the following:
38. Stain four pegs a dark color and let them dry.
39. Apply a surface finish to the board, peg-storage hole cover, and pegs. 40. Allow all finishes to dry properly.
To assemble the product, complete the following steps:
41. Place the dark pegs in one storage hole and the light pegs in the other hole. 42. Make the screw hole for the peg-storage cover. This hole should be over the
anchor hole in the game board.
43. Attach the cover with a 3/4″× No. 6 flathead wood screw.
Challenging Your Learning
Make a chart similar to the one shown. See Figure 4A‑5. List the steps in the proce-dure in which you used each type of tool.
Type of Tool
Measuring tool
Cutting tool
Drilling tool
Gripping tool
Pounding tool
Polishing tool
[image:29.612.193.441.335.490.2]Procedure Step
Figure 4A‑5. A list of where you used each tool.
Chapter 4 Activity B
Tools as a Resource
The Challenge
Develop a device (tool) that separates marbles according to their diameters.
Introduction
Since the earliest times, human beings have developed tools to do work. Early tools included stone implements and weapons. Now we have complex tools that do work for us. Machines cut materials with ease and accuracy. Vehicles whisk us to faraway places. Computers process information and control machines. People developed each of these devices to help other people. In this challenge, you are faced with a problem. You have a container holding three different sizes of marbles. These marbles need to be sorted by size (their diameters). See Figure 4B‑1.
Measuring each marble individually would take too much time. You have decided to use tech-nology to help you, and you plan to build a device to sort the marbles.
Materials
Develop your technological device using any or all of the following materials: • 1/2″× 1″ wood strips.
• 1/4″ plywood. • White glue. • 3/4″ brads. • 3/8″ dowels. • Masking tape. • Paper clips. • Poster board. • String.
[image:30.612.231.353.364.456.2]Challenging Your Learning
How did your device work? Describe two ways you could improve it.Figure 4B‑1. The marbles need to be sorted by the size of their diameters.