The Resource Manager
University of Michigan Information Technology Division Consulting and Support Services
Contents
1. Introduction ... 3
1.1 What is the Resource Manager? ... 3
1.2 How Does the Resource Manager Work? ... 3
1.3 What is a Job? ... 4
1.4 What is a Job Queue? ... 4
1.5 What is a Pseudodevice? ... 5
1.6 Additional Documentation and Assistance ... 5
2. Batch Processing ... 6
2.1 What is a Batch Job? ... 6
2.1.1 Reasons for Using Batch ... 6
2.2 Submitting a Batch Job ... 7
2.2.1 Entering Commands in a File ... 7
2.2.2 How Long Does Batch Take? ... 8
2.2.3 Monitoring a Batch Job ... 8
2.2.4 Logging Batch Output ... 9
2.2.5 Viewing Batch Output ... 9
2.2.6 Cancelling a Batch Job ... 9
2.2.7 Common Errors with Batch ... 10
2.3 Changing Batch Defaults ... 11
2.3.1 Job Selection and Rates ... 11
2.3.2 Estimating Time and Pages ... 13
2.3.3 Assigning a Job Name ... 14
2.3.4 Mounting Magnetic Tapes ... 14
2.3.5 Setting Print Routes and Delivery Codes ... 14
2.4 Printed Output For Batch Jobs ... 16
2.4.1 Head Sheet, Tail Sheet, and Job Statistics ... 16
2.4.3 Cancelling Hardcopy Output ... 18
2.5 Other Things You Should Know ... 18
2.5.1 Reruning Batch Jobs ... 19
2.5.2 Conditional Sign-off ... 19
2.5.3 Sigfile Processing ... 20
3. Getting Printed Output ... 21
3.1 What is *PRINT*? ... 21
3.2 When to Use $COPY and $LIST ... 21
3.3 Printing Options ... 22
3.3.1 Setting Print Options for the Entire Session ... 22
3.3.2 Setting Print Options for the Current Print Job ... 23
3.3.3 Setting Print Options Using $9700 ... 25
3.3.4 Summary of $SIGNON, $SET, $CONTROL, and $9700 ... 25
3.4 Print Routes and Delivery Codes ... 25
3.5 Multiple Copies ... 26
3.6 Cancelling a Print Job ... 27
3.7 Creating Your Own Print Device ... 27
3.8 Local Printers ... 28
4. Managing Batch and Print Jobs ... 30
4.1 The $CANCEL Command ... 30
4.2 The $CONTROL Command ... 32
4.3 The $CREATE Command ... 36
4.4 The $DISPLAY Command ... 38
4.4.1 Displaying $SET Command Keywords ... 38
4.4.2 Displaying Pseudodevice Names ... 39
4.5 The $LOG Command ... 40
4.6 The $RELEASE Command ... 41
4.7 The $SET Command ... 43
4.8 The $SYSTEMSTATUS Command ... 46
4.8.1 The USERS Keyword ... 46
4.8.2 The QUEUE Keyword ... 46
4.8.3 Explanation of Responses ... 48
4.8.4 When is a Job Purged? ... 49
4.9 The $VIEW Command ... 49
5. The *RMLOG Program ... 52
5.1 PRINT Command Options ... 52
5.2 Time/Date Ranges ... 54
5.3 Record Types ... 56
5.4 Examples ... 56
Appendix A: GDINFO Codes and Sense Data ... 58
GDINFO Type Codes ... 58
Sense Data ... 58
1. INTRODUCTION
This document is intended as an introductory guide to using the Resource Manager. We assume that you are familiar with the material presented in theIntroduction to MTS—Getting Started, T7003. In particular, you should know how to use basic MTS commands, edit files, and run simple programs.
Each MTS mode uses a prompt character that is displayed in the first column of your terminal or printer output. These prompt characters indicate which part of MTS you are talking to:
# MTS operating system : MTS File Editor ($EDIT)
? Several programs use this to prompt for text
This prompt or prefix character appears in the first column of many of the examples; youshould not type it as part of your input.
The following conventions are used for the command notation throughout this document: UPPERCASE indicates material to be repeated verbatim by the user.
lowercase represents a value which is to be replaced by an item supplied by the user. brackets [...] represents a parameter or value that is optional and may be omitted.
braces {...| ...} indicates that the material within the braces represents choices, of which one must be selected. The choices are separated by vertical bars.
1.1 WHAT IS THE RESOURCE MANAGER?
The Resource Manager (RM) is a system that was developed to handle all the facilities associated with printing and batch processing on a large mainframe computer. It is an integral part of the Michigan Terminal System (MTS) and is invoked automatically whenever you initiate a job that performs any of these types of processing.
1.2 HOW DOES THE RESOURCE MANAGER WORK?
Whenever you initiate an operation that requires one of these facilities: (1) page, local, or line printers
(2) batch facility
(3) BITNET file transfers (4) BITNET messages
(1) assigns a job number and job name in order to keep track of your job;
(2) assesses the requirements of your job, based on certain defaults, the size of the job, and information supplied on $CONTROL and $SIGNON commands;
(3) assigns a priority based on this assessment, and passes your job to the appropriate queue to await processing;
(4) releases your job for processing when the required device or facility is available;
(5) directs output to the device indicated by your job (if this is a printer, it recognizes keywords you might have used to modify the manner of printing);
(6) removes a job from the system upon completion or cancellation; (7) retains a record of your job for a period of time;
(8) maintains a log of your job from start to finish.
In the sections that follow, you will see what commands are available to initiate and modify jobs of various types.
1.3 WHAT IS A JOB?
Throughout this document we refer to ajobas the focal point of the Resource Manager. What do we mean by a job? As used in this context, a job is a distinct action initiated by you, the user, that results in a separate and complete process. For example, if you want to print a file called MYFILE you could initiate a job by typing:
$LIST MYFILE ON *PRINT*
After you enter your $LIST command, the Resource Manager sends you a message indicating that it has received and processed your job:
*PRINT* assigned job number 135568
*PRINT* RM135568 released to CNTR 10 images 5 sheets RATE=NORMAL
The Resource Manager also assigns your job a unique name and number. In this case your job name is RM135568 and your job number is 135568. At this point your job, which totals 10 pages to be printed on 5 sheets of paper, has been sent to the print queue (more about queues later) and is waiting to print. The four characters CNTR indicate that your file will be printed at the Computing Center station on North Campus.
1.4 WHAT IS A JOB QUEUE?
There are several queues available for different types of jobs. A print job that is generated in a conversational terminal session will go directly to aprint queue. A batch job must first go to thebatch queue. Then, when it finishes the execution step, any printed output it generates must wait in a print queue.
1.5 WHAT IS A PSEUDODEVICE?
We have described the Resource Manager as a system that manages jobs that require the use of certain facilities. Each of these facilities is described by a pseudodevice name; specifically, we have:
*BATCH* for submitting a batch job. *PRINT* for producing printed output. *PUNCH* for producing 80-byte record output.
*IMPORT* for importing data using BITNET connections. *EXPORT* for exporting data using BITNET connections.
Pseudodevice names are a convenient way of referring to a class or type of device. For example, we have many different printers available for use: the Xerox 9700 Page Printer and the Hewlett-Packard LaserJet, to name only two. Rather than assigning a name to every printer that we have, we assign a general name (called a pseudodevice name) that we can use to refer to any print device. Then when you need to print a file, you can decide which printer you will actually use (the details of how this is done will be described later). It is important that you understand the concept of pseudodevices as they will be used throughout this document.
1.6 ADDITIONAL DOCUMENTATION AND ASSISTANCE
If you need assistance in printing with the Resource Manager, there are many sources of help. The following documents give additional information about the Resource Manager:
Using the Xerox 9700 Page Printer, Reference R1038. BITNET on MTS, Reference R1039.
For additional assistance on MTS, see theIntroduction to MTS, Tutorial T7003, andMTS Volume 1: The Michigan Terminal System, Reference R1001.
2. BATCH PROCESSING
This section describes how to use the MTS batch job facility. It covers general concepts, and presents some basic examples for running a batch job using *BATCH*. This is followed by an explanation of the available sign-on parameters, printed output, and by other useful information.
2.1 WHAT IS A BATCH JOB?
A batch job is simply a set of commands that are processed by the computer without interactive control. In other words, once you have submitted the job you cannot change the sequence of flow, nor correct any errors during execution. You sacrifice the flexibility available ininteractive mode, and you may have to wait several hours, or even overnight, to receive your results. Before deciding to use batch you should ask yourself the following questions.
(1) Do I know the exact steps required to complete the job?
(2) Can I run the program without being prompted for input from the terminal keyboard? (3) Am I confident that the job will run without errors? Often batch jobs will exceed time or
page limits (see “Common Errors with Batch” in this section).
(4) Am I prepared to wait (possibly overnight) to get the results back from my job? If the answer is “yes” to the above questions, then you are ready to use batch.
2.1.1 Reasons for Using Batch
There are two basic advantages for you in using batch mode: the first is cost, the second is time. When you run your job interactively, you are in effect requesting the use of computer resources: for example, printers or disk space. Interactive mode means that the computer attempts to respond to your request as quickly as possible while at the same time responding to similar requests from all other users on the system. Batch mode allows the computer to take its time in responding and allocate resources to your job when they are not required by interactive jobs. What this means for you is perhaps a longer wait for completion of your job, but at a reduced cost. This reduced cost is due to the fact that you are not charged for terminal connect time and that your job may run at a time when the rates are lower. A more detailed explanation of the charges for batch processing is given in “Job Selection” in this section.
In addition to the above situations, any job that is processed at regular intervals in a standard manner is a good candidate for batch processing. These types of jobs are frequently referred to as “production jobs”.
Remember that while you are waiting for your batch job to complete, you are free to continue working on other tasks, such as editing or submitting jobs, provided they do not use files required by your batch job.
2.2 SUBMITTING A BATCH JOB
The easiest way to submit a job to batch is to copy the commands directly to *BATCH*.
Let us assume you were producing a course catalog, using a program in the file CATMAKER to generate your output, and you want to run your job in batch because it will cost less. The course catalog is in an MTS file called CATALOG. You can submit your batch job directly from *SOURCE* (normally the terminal keyboard) to the pseudodevice *BATCH* as follows (remember, you should not type the prompt characters):
# $COPY *SOURCE* *BATCH* > $SIGNON * PAGES=100
*BATCH* assigned job number 273907
> $RUN CATMAKER INPUT=CATALOG PRINT=*PRINT* > $SIGNOFF
> $ENDFILE
# *BATCH* RM273907 released HOST=UM RATE=NORMAL
When you enter the line containing your $SIGNON command, you should always use an asterisk (*) instead of your userID if you are running the batch job from the same userID. This avoids the security risk of typing your password at your terminal. The PAGES=100 parameter requests a limit of 100 pages for your job (the default limit is 50). You may then type in any commands you wish to execute in batch; e.g., running CATMAKER.
After entering the first line, the system assigns your batch job a name and number. Your job name is RM273907 and your job number is 273907. Note that your job name is simply the job number with the letters RM prefixed to it. You can assign your own job names (more about this in “Assigning a Job Name” in this section). You can use your job name to keep track of the progress of your batch job (more about this in “Monitoring a Batch Job” in this section).
You terminate the batch job by typing the line $ENDFILE or by entering an end-of-file at the “>” $COPY prompt. Your job will then be released.
All batch jobs produce printed output which is sent directly to *PRINT*. Since you did not change the default for *PRINT*, the output from the job will be printed on one of the Xerox 9700 page printers. Details on printed output will be covered in “Printed Output for Batch Jobs” in this section.
2.2.1 Entering Commands in a File
If you expect to run the job several times, you can put the commands in an MTS file and copy the file to *BATCH*.
# $EDIT CAT.RUN : INSERT
? $SIGNON * PAGES=100
? $RUN CATMAKER INPUT=CATALOG PRINT=*PRINT* ? $SIGNOFF
: STOP
Now, any time you want to submit this as a batch job, just type:
$COPY CAT.RUN *BATCH*
Your job will be submitted to the batch queue. In general, we recommend that you use this second technique for submitting batch jobs for two reasons: first, it is easier to correct errors; second, if you are submitting the same job several times, it will be more efficient than typing in the entire command sequence each time.
2.2.2 How Long Does Batch Take?
Often a batch job will begin executing immediately after it is submitted; however, this is not always the case. The time required for a job to complete is theturn-around time. Turn-around is affected by a number of factors including the number of users on the system, current jobs executing or in the queue, availability of resources such as printers, and the priority level of the job submitted. Because of this the turn-around for a particular job can vary significantly. The following are a few guidelines to make note of:
(1) A job that is submitted with the parameter RATE=MINIMUM on your $SIGNON command will usually run overnight (more details in “Job Selection” in this section). (2) Jobs requiring large amounts of computer time or resources will, in general, have a slower
turn-around time.
(3) Before submitting your job, it is possible to check current activity on the system using the $SYSTEMSTATUS command (see the section “Managing Batch and Print Jobs”).
(4) The system willnotnotify you when your job has finished; however, you can check using the $SYSTEMSTATUS command. This will be explained in the next section.
2.2.3 Monitoring a Batch Job
Once you have submitted your batch job, you may check its progress.
Assume you have submitted two jobs to *BATCH* and want to see if they are finished. You do not know what their names or numbers are so you issue the command
$SYSTEMSTATUS QUEUE * or more simply
The system will respond with the following:
1ABC:RM316636 is awaiting execution, P7, after 26 jobs. 1ABC:RM316638 was executed at 10:48:52 Sun Jan 14/90 1ABC:RM316639 is awaiting print, P13, after 21 jobs.
The first line refers to a batch job still awaiting execution; there are 26 jobs preceding it in the queue. It has an execution priority of 7 (indicated by P7), which is a medium priority. The second entry tells us that job RM316638 has been executed. The last entry refers to the printed output created by the second job which is waiting to be printed, there are 21 jobs ahead of it in the print queue. Note that $SYSTEMSTATUS QUEUE * will display all of your jobs currently waiting in a queue plus any jobs that have completed execution in the last eight hours.
Another form of the $SYSTEMSTATUS command which can be used as follows: $SYSTEMSTATUS QUEUE USER (or $SY Q U)
This form of the command will only display those jobs that are currently waiting to be executed. You can use this form if you are certain that your job has not been executed.
2.2.4 Logging Batch Output
Once your job has been executed, the output will be sent to *PRINT*. Further details on printed output are given in the section “Printed Output for Batch Jobs” in this section.
Normally output from a batch job is printed. However, if you also want the output of your batch job to be put into a permanent file, then you should include the following commands at the start of your batch job:
$SIGNON * $EMPTY MYLOG
$LOG *MSINK* ON MYLOG .
. (enter batch commands here) .
$SIGNOFF
Note that you will need to have created the file MYLOG before you submit the above job; the results of your batch run will then be placed into the file MYLOG.
2.2.5 Viewing Batch Output
You may use the $VIEW command to look at the command lines of a batch job before it is executed or at the results of the job before they are printed (see the section “The $VIEW Command”).
2.2.6 Cancelling a Batch Job
You can cancel a job submitted to *BATCH* using $CANCEL provided, of course, that the job has not been already executed. For example, suppose you have submitted a job with a low priority and subsequently decide that you want to submit it interactively rather than wait for the results. First, obtain the job name:
The system responds,
1ABC:RM316636 is awaiting execution, P8, after 26 jobs.
Then you enter,
$CANCEL RM316636
You can then check again,
$SYSTEMSTATUS QUEUE *
1ABC:RM316636 was cancelled at 15:53:02 Sun Jan 14/90.
Further details on using $CANCEL are given in the section “Managing Batch and Print Jobs”.
2.2.7 Common Errors with Batch
A batch job will terminate abnormally if it requires more central processing unit (CPU) time or pages than you have allowed. In this case, you will find the message:
GLOBAL item LIMIT EXCEEDED
on the last page of your output, whereitemcould be one of either TIME or PAGES. When you submit a job to batch there are a number of optional parameters that you can specify using $SIGNON. If you do not specify these, the system will automatically assign default values for you: 3 seconds for execution (CPU) time and 50 pages for printed output. If you expect to exceed these limits, be sure to specify appropriate values with the $SIGNON command. It is wise to estimate higher than you expect.
For example, if you are submitting a job that requires about 8 seconds of CPU time and normally prints 376 pages, you could define reasonable limits such as:
$SIGNON * PAGES=400 TIME=10
These are slightly higher than your requirements to allow for a small margin of error, but not so high that the priority of the job would be adversely affected.
There are two reasons why it is not a good idea to request an excess of either time or pages to ensure that your job will execute. First, time and page restrictions are an insurance to you that your job is not out of control producing unwanted pages of output while using up precious computer dollars; second, excessive time limits will lower your job’s position in the execution queue and thus increase the turn-around time and may even cause the job to be held by the operator and not run. For more details on estimating TIME and PAGE requirements, see “Estimating Time and Pages” in this section.
Regardless of the limits you define on your $SIGNON command, you will only be charged for the amount of resources actually used. However, if you request a limit that would exceed the funds remaining in your account—even if your job does not actually require that much—the system willnot let your job sign on. The job will abort.
2.3 CHANGING BATCH DEFAULTS
Unless you explicitly modify the attributes of a batch job, it will execute subject to the following criteria:
(1) The job is executed at normal priority.
(2) It is printed in landscape format on the Xerox 9700 page printer, on standard 8 1/2 by 11 paper.
(3) There is a 3-second global limit for execution (CPU) time and a 50-page global limit for printed output.
(4) All commands and system responses are echoed in the the printout.
You can change these default options by using the $SIGNON command. The first line of your batch job contains a $SIGNON command with either a userID or an asterisk (*). The general form of this command is:
$SIGNON * parameters or
$SIGNON userid parameters
The first form, which uses the asterisk, can only be used when you are submitting a job from your own userID. If you are submitting a job for a userID other than the one you are currently signed on to, then you must use the second form. Note that if you are using the second form, you will also need to provide the password for the userID that you are using. Generally, most users will find the first form easier to use. In both cases parameters are optional and can be one or more selected from the list in Table 2. The following is a simple example:
$SIGNON * RATE=MINIMUM PAGES=200
In the above example you will be signed on to run a job with minimum rates (RATE=MINIMUM) with a limit of 200 pages of printed output (PAGES=200). The order in which $SIGNON parameters are specified is not important. Note that there should be no blank spaces before or after the “=” sign.
The $SIGNON command is described more fully inMTS Volume 1: The Michigan Terminal System, Reference R1001. The remainder of this section discusses some the $SIGNON parameters that are of particular interest to batch users.
2.3.1 Job Selection and Rates
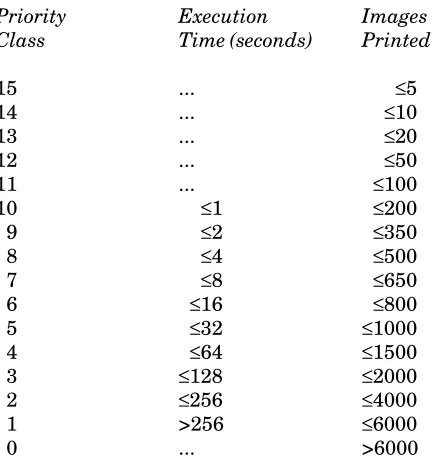
Both the job priority and the rate period are used to select jobs for execution and print processing. The priority of the job is the position of the job within the execution or print queue.
Table 1: Priority Assignments for Jobs
Priority Execution Images Class Time (seconds) Printed
15 ... ≤5
14 ... ≤10
13 ... ≤20
12 ... ≤50
11 ... ≤100
10 ≤1 ≤200
9 ≤2 ≤350
8 ≤4 ≤500
7 ≤8 ≤650
6 ≤16 ≤800
5 ≤32 ≤1000
4 ≤64 ≤1500
3 ≤128 ≤2000
2 ≤256 ≤4000
1 >256 ≤6000
0 ... >6000
Jobs are selected in decreasing order of priority class and, within any given class, in a first-in, first-out (FIFO) basis. The page estimate does not affect the priority calculations for that job.
The rate period specifies the rate at which the job will be charged. Jobs for which RATE=LOW, RATE=DEFERRED, or RATE=MINIMUM is specified are automatically held for execution during the low-, deferred-, or minimum-rate periods. Such jobs are charged at a reduced rate. Jobs for which RATE=NORMAL is specified are eligible for execution at any time.
The rate period schedule is as follows:
Low Rates (45%) 6 pm - 10 pm Monday through Thursday Deferred Rates (65%) 10 pm - 12 am Monday through Thursday
12 am - 2 am Tuesday through Friday 6 pm - 10 pm Friday
7 am - 6 pm Saturday and Sunday Minimum Rates (80%) 2 am - 7 am Tuesday through Friday
12 am - 7 am Friday to Saturday 6 pm - 7 am Saturday to Sunday 6 pm - 7 am Sunday to Monday
Normal Rates All other times
The percentages given above reflect the CPU-rate discount that is applied to sessions run during these periods. Other resources may have differing discounts. Student course accounts on the UB system are assigned a single rate that is in effect all the time.
The rate for a terminal job may not be changed by specifying the RATE option on the $SIGNON command.
Batch jobs are executed at the current rate at sign-on time if the RATE specification is omitted from the $SIGNON command. A higher or lower rate period may be specified by using the RATE option. If a higher rate period is specified, the job will be executed before other batch jobs of lower rate periods. If a lower rate period is specified, the job will be held until the specified rate period is in effect. However, if the job cannot be executed during the next available lower rate period, it will be executed as soon as possible thereafter (i.e., it will not be held over until the lower rate period recurs).
Batch jobs and *PRINT* jobs submitted at LOW, DEFERRED, or MINIMUM rates may be printed anytime, but are assigned priorities lower than would be the case for similar-sized, NORMAL-rate jobs. The priority decrements are as follows:
LOW-rate jobs 2 lower than NORMAL
DEFERRED-rate jobs 3 lower than NORMAL MINIMUM-rate jobs 4 lower than NORMAL
For example, a 50-page job would be priority 12 for NORMAL rates, 10 for LOW rates, 9 for DEFERRED rates, and 8 for MINIMUM rates.
The public file *RATES gives the current rate structure for each of the different classes of accounts. You can obtain this information by issuing the command
$COPY *RATES
2.3.2 Estimating Time and Pages
The amount of time and pages required is tied closely to the type of job being run; however, there are a few general guidelines to follow when making your estimates. If you have run the job previously using either batch or interactive mode, the last page of your listing will usually have an accounting of the pages printed and time used—you should refer to this for approximations.
If you are currently running a job interactively, you can obtain an estimate of the CPU time required by noting the CPU time used which is given on the “Execution terminated” message.
Note the following when you are estimating pages: the Resource Manager counts a single sheet, printed on both sides, as two pages of output. If you are using a format that prints two images on a page, then a single sheet would contain 4 pages of output. Also, remember to include all of the hardcopy that you are directing to *PRINT* in your estimates.
2.3.3 Assigning a Job Name
You can uniquely identify your batch job by assigning a job name by issuing a command of the form $SIGNON * JOBNAME=jobname
The job name is a string of up to eight alphanumeric characters, starting with a letter; for example, ANDY or EPA001. This is useful if you have jobs that you submit on a regular basis. It also makes it easier to remember your job name when you are using the $SYSTEMSTATUS command.
You must use care when assigning names to jobs that are submitted on the UB-MTS system. All printed output from those jobs is assigned a new job number when it is transferred to the UM-MTS system for printing. Thus if you have several jobs with the same name, it may be difficult (or impossible) to distinguish those jobs since you will not know the new job number assigned after the transfer.
2.3.4 Mounting Magnetic Tapes
If your batch job requires magnetic tapes to be mounted, use the TAPES option on the $SIGNON to improve the chances that sufficient tape drives will be available when your job starts:
$SIGNON * TAPES=n
However, even with this, your job may start executing when all the drives are in use. In this event, the operator must stop your job and rerun it later, which could have undesired results (see “Reruning Batch Jobs” in this section). Also, you should use a single $MOUNT command to mount all tapes that must be simultaneously available.
2.3.5 Setting Print Routes and Delivery Codes
The ROUTE option determines where your output is printed; the DELIVERY option implies that your job will be delivered to another site on campus. Either of these options can be altered with your $SIGNON command. A more complete explanation is given in the section “Getting Printed Output”.
Table 2: Options Available on $SIGNON
Option Description
ADDRESS="line1;line2;..."
Specify the campus mail address for delivered output (when DELIVERY=MAIL is set). This option applies only to page-printer output, not to line-printer or local-printer output.
COPIES=n Specify number of copies of printed output. The default is n=1. DELIVERY={station | MAIL | NONE}
FORMAT={PORTRAIT | LANDSCAPE | TWOUP | format-name}
Specify format for page-printer output (see Using the Xerox 9700 Page Printer, Reference R1038, for a complete description and list offormats). The default is LANDSCAPE.
JOBNAME={jobname | DEFAULT}
Assign a job name of 1 to 8 alphanumeric characters to the current job. The first character must be a letter. DEFAULT specifies the default format of “RM” plus six digits.
MARGIN={n.nn | NO}
Set the left margin to “n.nn” inches. “n.nn” must be less than the current page width (8.5 for portrait orientation, 11.0 for landscape). MARGIN=NO resets the margins to the default for the current format (0.5 for PORTRAIT and 0.65 for LANDSCAPE).
{ONESIDED | TWOSIDED}
Specify printing on one or both sides of the paper for page-printer output. The default is TWOSIDED.
OVERLAY={NONE | SHADED | LINED}
Specify an overlay for page-printer output (seeUsing the Xerox 9700 Page Printer, Reference R1038, for a complete description of overlay options). The default is NONE.
PAGES=n Specify maximum number of printed pages for job. The default is n=50. PAPER={PLAIN | 3HOLE | LABEL24 | LABEL33}
Specify paper type for Xerox 9700 page-printer output. The default is PLAIN. The obsolete ANY option is synonymous with PLAIN.
{PORTRAIT | LANDSCAPE | TWOUP}
Specify orientation of page-printer output (synonymous with FORMAT for the corresponding values). The default is LANDSCAPE.
PRINTER={PAGE | LINE}
Specify the type of printer. The default is PAGE. RATE={NORMAL | LOW | DEFERRED | MINIMUM}
Specify job rate group for execution. RERUN={YES | NO}
Specify whether job should be restarted if it is stopped during execution for any reason (see “Reruning Batch Jobs” below). The default is YES.
ROUTE=station Specify a print station for output (use the command $COPY *ROUTE to obtain a list of valid station codes).
SEPCOPY={YES | NO}
COPIES=n is specified. If each copy is more than 50 pages, then SEPCOPY=YES is forced. Currently the default is SEPCOPY=YES. On December 2, 1991 the default will be changed to NO.
SHIFT={YES | NO}Specify whether page-printer output is shifted away from the binding edge. The default is SHIFT=NO.
SIGFILE={ON | OFF}
Specify whether sigfile processing is to be in effect. The default is ON. More information on sigfiles is given below.
TAPES=n Specify number of tape drives required at any one time. Although this is not absolutely necessary, it is highly recommended as it will improve the chances that tape drives are available when your job starts executing. TIME=n Specify maximum CPU time in seconds. The default is 3.
TWOSIDED={YES | NO}
Specify printing on one or both sides of the paper for page-printer output. The default is YES.
WAITUNTIL="time and/or date"
Specify when job will be run. Job will not begin sooner than specified time, but may run some time after depending on the rate group specified. For example, "January 10, 1990" or "15:30 January 10, 1990".
"comment" An arbitrary comment, enclosed within quotes, may be used to identify the job.
2.4 PRINTED OUTPUT FOR BATCH JOBS
Every batch job creates printed output. In some cases this output may only include a head sheet, a tail sheet, and job statistics. Typically, the output consists of the above plus a log of the batch session. This log contains all of the commands that were submitted to *BATCH* plus the system responses to these commands. By default, all printed output from the job is directed to *PRINT*.
2.4.1 Head Sheet, Tail Sheet, and Job Statistics
The first and last pages of the printed job are called thehead sheetandtail sheet. These are used to identify each job, and to separate it from those that printed immediately before and after. The head sheet is printed in very large type and includes: your userID, the job name and number, the time and date it printed, and the delivery code. The tail sheet contains the same information in a much smaller format and also includes a summary of job statistics such as: CPU time, disk storage, lines read, pages printed, and so on for the current job. It also lists accounting charges for each resource used by the job, and gives an approximation of the your remaining balance.
Suppose you submitted a job by using *BATCH* as follows:
# $COPY *SOURCE* *BATCH* > $SIGNON * PAGES=100
> $RUN CATMAKER INPUT=CATALOG PRINT=MYTEXT SERCOM=MYLIST > $SIGNOFF
> $ENDFILE
# *BATCH* RM629384 released HOST=UM RATE=NORMAL
This is what you might expect your job statistics to look like:
ID: 1ABC Project Number: 1AAA
Signon Time: 11:57:06 Tue Jan 16/90 Signoff Time: 11:57:33 Tue Jan 16/90 Last Signon Time/Date: 08:13:12 Mon Jan 15/90
Charging Rate: Batch,Normal,Univ/Gov't,UM,IBM 3090-600E Elapsed Time 0.067 minutes
Cpu Time 0.726 seconds $.50 Active VM Integral 0.633 page-minutes
Wait VM Integral 0.128 page-hours Lines Read 3 lines Page Printer Pages 3 pages Page Printer Lines 125 pages
Page Printer Image 3 images $.12 Page Printer Sheet 2 sheets $.02 Disk I/O 394
Computing Cost $.64 Disk Storage 5760 page-hours $.30 Remaining Balance $927.04 Job name: RM629384
Job number: 629384 Host: UM Devicetype: 9700 Twosided: YES Format: LANDSCAPE Paper: PLAIN
Entered from AF1C at: 11:57:07 Tue Jan 16/90 Printed on PTR2 at: 12:26:59 Tue Jan 16/90
The above example tells you a number of things about your job. The job ran at 11:57 and was charged at normal rates. The total elapsed time was .067 minutes whereas it only used .726 seconds of CPU time. Elapsed time is always higher than CPU time due to the fact that even when a job is executing it will spend a certain amount of time waiting for resources, disk I/O, etc. The job read 3 lines; these are the 3 lines that were submitted to *BATCH* from your terminal. There were 3 images printed on 2 sheets of paper. All of the other output was put into permanent files, as indicated by the parameters PRINT=MYTEXT and SERCOM=MYLIST from the original job. If you had directed all of your output to *PRINT*, you would then expect the lines printed to be much higher. The job was finished at 11:57 and was printed at 12:26. The total cost for the job was $.99. If you had printed the files MYTEXT and MYLIST, there would have been additional charges.
2.4.2 Changing Print Options
The other techniques that you will probably find useful is creating multiple print streams within your batch job. This will allow you to print several files each with different print options within a single batch job. A full explanation of creating user defined pseudodevices (multiple print streams) is provided in the section “Getting Printed Output”. The following is a simple example to illustrate how you might use this technique:
$SIGNON * PAGES=200
$CREATE *LIST* TYPE=PRINT OPEN='FORMAT=TWOUP' $CREATE *TEXT* TYPE=PRINT OPEN='PORTRAIT ONESIDED' $RUN CATMAKER INPUT=CATALOG PRINT=*TEXT* SERCOM=*LIST* $SIGNOFF
This batch job consists of three separate print jobs. The first job is the log of your batch run which is directed to *PRINT*. The second print job is your program listing which will be printed in two-up format; that is, there will be two pages printed on each side of the sheet. Finally, the third print job is the output from your program run which will be printed on one side of the page (ONESIDED) in portrait orientation (PORTRAIT).
All of the options that are available for regular print jobs also apply to batch print jobs. Further details and examples of altering the appearance of your printed output are provided in the section “Getting Printed Output”.
2.4.3 Cancelling Hardcopy Output
You can eliminate hardcopy output from your batch job by using the $CANCEL command. For example, suppose you want to run the previous job with the listing and CATMAKER output placed into permanent files. The only printed output would be the job statistics which you could then cancel as follows:
# $COPY *SOURCE* *BATCH* > $SIGNON * PAGES=100
*BATCH* assigned job number 629384
> $RUN CATMAKER INPUT=CATALOG PRINT=MYTEXT SERCOM=MYLIST > $CANCEL *PRINT*
> $SIGNOFF > $ENDFILE
# *BATCH* RM629384 released HOST=UM RATE=NORMAL
You should use this form of $CANCEL carefully, as it will eliminateallprinted output from your job including error messages.
2.5 OTHER THINGS YOU SHOULD KNOW
Let us quickly look at a few more features which might be used to your advantage. These include: (1) reruning batch jobs
2.5.1 Reruning Batch Jobs
If there is a system failure (or a system shutdown where the operator decides to stop your job), then all jobs that are currently executing will be rerunfrom the beginning. This could present a serious problem if you had already emptied or destroyed input files that were used during an earlier part of your job. If you are adding data to the end of a file, the same information could be added twice, which may not be the desired effect.
Your job will also be automatically rerun if it requires tape drives that were not available while it was running. This problem is less likely to occur if you specify the TAPES option on the $SIGNON command and mount all tapes using a single $MOUNT command. Since tape mounts are not allowed on the UB-MTS system between 10 a.m. and 4 p.m., jobs submitted during that time requiring tape mounts should specify the WAITUNTIL option on the $SIGNON command.
In order to protect yourself against possible problems in the event of a system failure, design your batch job so that it can be rerun from the beginning. If you create a file within the job, empty it right after creation so that it will not contain anything if the job is rerun.
When a job is rerun, whatever was done before the interruption isnotundone when it restarts. You are not explicitly informed when a rerun has occurred, although you might find some clues in your batch job listing. For example, if you get the following system response while trying to create a new file:
File NEWFILE already exists
it is probable that your job was rerun.
One consolation is that you are only charged for the final complete run, and not for the aborted first attempt. If you do not want your job to be rerun, you have the option of specifying RERUN=NO with your $SIGNON command.
2.5.2 Conditional Sign-off
In a batch job, all commands are processed sequentially regardless of previous errors. However, you can use the $IF command after any $RUN command to test for an error condition. Then, depending on the value of thereturn codeset by the program, you can decide whether to sign off or continue. This does not offer as much flexibility as interactive computing, but it does let you terminate a job that is running into trouble.
The following is a simple example:
$IF RUNRC > 4, $SIGNOFF
The return code from the last executed program is tested. If it is greater than 4, the user will be signed off the system. Thus, if a program gives an indication of success or failure through values of the return code, this type of test may be used to abort a batch job if the program fails to execute properly.
2.5.3 Sigfile Processing
In MTS, it is possible to set up a special file called asigfilethat will contain a series of commands to be automatically processed whenever you sign on. You can check to see if you have a sigfile by issuing the command
$DISPLAY SIGFILE
If MTS responds with the name of a file that is your current sigfile. You should print out a copy of this file and familiarize yourself with its contents. If you do not already have a sigfile, the rest of this section will explain briefly how you can set one up.
The following steps will create a sigfile called SIGS:
# $CREATE SIGS # $EDIT SIGS : INSERT
? $SET ROUTE=NUBS ? $SET COST=ON ?
This file will route all your printed output to NUBS and will also turn on the MTS cost display option. The next step is to identify this file as your sigfile by issuing the following command:
$SET SIGFILE=SIGS
The next time you sign on to your userID (and every time thereafter), the two commands in SIGS will automatically be executed. If you decide that you want toturn offsigfile processing for all subsequent signons, issue the following command:
$SET SIGFILE=OFF
3. GETTING PRINTED OUTPUT
Printed output can be produced during a terminal session or as a result of submitting a batch job. The various terms printout, hardcopy, or simplyoutputare most often used to describe the printed results. Earlier we discussed some of the attributes that apply specifically to batch jobs; the following will cover the details of creating a print job from either a terminal or batch session.
3.1 WHAT IS *PRINT*?
In the introduction to this document we described pseudodevices and how they are used. *PRINT* refers to the pseudodevice that is used to produce your printed output. By default, *PRINT* is defined as one of the Xerox 9700 page printers.
You create printed output in a variety of ways. You can use the $LIST command: $LIST filename ON *PRINT* (the ON is optional)
or if the named file contains carriage-control characters (seeMTS Volume 1: The Michigan Terminal System, Reference R1001), you can use $COPY:
$COPY filename TO *PRINT* (the TO is optional) or you can send output directly from a job that is executing, e.g.,
$RUN *PASCALVS INPUT=MYPROG OBJECT=MYOBJ PRINT=*PRINT*
In all of the above cases the Resource Manager follows the same sequence of events. It assigns the job a number and, if you do not assign one explicitly, a default job name. It evaluates the requirements of the job, and then submits it to the print queue for the designated device. Once in the queue the job will:
(1) print immediately, or
(2) print after waiting for jobs that were before it in the queue, or
(3) print when the resources are available (e.g., label stock is loaded into the Xerox 9700 page printer).
If the print device is not functioning when the job is submitted, the Resource Manager will maintain a queue of all jobs until the machine is back in order. This can sometimes cause quite a backlog when the system is busy. The operations staff have the option of holding back very large print jobs, especially if the queue is long. A print job that generates a large amount of output may be printed in smaller segments. Of course, the user picks it up as one complete job.
3.2 WHEN TO USE $COPY AND $LIST
usually inserted by text-processing programs; however, they can be added by the user. A common mistake when getting a printout of a file is to use the $COPY command when the file does not contain carriage-control characters. The result is often that the output may be only one or two lines per page, thus generating an unexpectedly large volume of output. The clearest indication that you have this problem is when the first character of some (or all) of the lines is missing in the printed output.
The easiest way to check for carriage-control characters is to examine the file using the editor and check the first character of each line. If the first character is part of the actual text or data,do notuse $COPY to send that file to the printer; use $LIST instead. On the other hand, if the first character of each line is a blank or a carriage-control character, the printer will use it to control spacing as indicated. Further information about carriage-control characters is given in MTS Volume 1, The Michigan Terminal System, Reference R1001.
The $LIST command also is preferable if you are printing files with long lines since they will be wrapped onto the next line. With the $COPY command, they will be truncated instead.
3.3 PRINTING OPTIONS
All output is sent to the printer with certain default printing options in place. If you do nothing more than direct output to the printer, your output will have the following attributes:
(1) orientation is landscape
(2) typeface is Xerox 1200 fixed-pitch (3) printing is on both sides
(4) printing with no overlay
(5) printing is not shifted from the “binding” edge
(6) paper is 8 1/2 by 11, standard weight, plain (not 3-hole punched)
All of these options can be altered using the $SIGNON, $SET, $CONTROL, or $9700 commands. The choice of which command to use depends on the options required, and how long you want them to be in effect. It is not practical to illustrate here all of the ways that you can change your print options. However, we will discuss each of the four commands briefly and give an example of how they might be used.
3.3.1 Setting Print Options for the Entire Session
The $SIGNON command can be used to set options for an entire session in batch mode. Setting global print options for interactive mode is done using $SET. If you are interested in setting print options for batch processing, you should read the section on the $SIGNON command entitled “Changing Batch Defaults”.
use this technique.
Suppose you want all of your output to be printed with the page oriented in portrait (like this document) instead of in landscape (which is the default format). Assuming that you have a sigfile called MYSIGFILE, you would include the appropriate $SET command as follows:
# $EDIT MYSIGFILE : INSERT
? $SET FORMAT=PORTRAIT
Now the next time you sign on (and for all sign-ons thereafter), all of your output will have portrait orientation. If you want to change this, you can reset the option using:
$SET FORMAT=LANDSCAPE
More details on creating and testing sigfiles is given the section “Sigfile Processing” earlier in this document. Sigfile processing is also useful for setting print routes and delivery codes (more about these in a later section).
3.3.2 Setting Print Options for the Current Print Job
You can use $CONTROL to set print options for a single print job. For example, suppose you were printing a special report and you want to use paper that is lined to make it more readable. The output for your report is stored in a file called REPORT1.
# $CONTROL *PRINT* OVERLAY=LINED *PRINT* assigned job number 357578 *PRINT* RM357579 held
# $COPY REPORT1 TO *PRINT* # $RELEASE *PRINT*
*PRINT* RM357578 released to CNTR 10 images 5 sheets RATE=NORMAL OVERLAY=LINED
After you enter the $CONTROL command, the Resource Manager assigns a job number. You are also notified that your job is beingheld. What this means is that nothing will be printed until you issue $RELEASE *PRINT* or sign off. The Resource Manager displays the specified options once the job has been released.
You can also use $CONTROL to change several options at once. For example, if you want to print a file on 3-hole punched paper at Michigan Union Station (UNYN), you would enter the following:
# $CONTROL *PRINT* PAPER=3HOLE ROUTE=UNYN *PRINT* assigned job number 357595 *PRINT* RM357595 held
# $COPY REPORT1 TO *PRINT* # $RELEASE *PRINT*
*PRINT* RM357595 released to UNYN 10 images 5 sheets RATE=NORMAL PAPER=3HOLE ROUTE=UNYN
The $CONTROL command can also be used to change the format of your output. For example, to print a file using portrait orientation set with a shaded overlay:
# $CONTROL *PRINT* FORMAT=PORTRAIT OVERLAY=SHADED *PRINT* assigned job number 357596
# $RELEASE *PRINT*
*PRINT* RM357596 released to CNTR 10 images 5 sheets RATE=NORMAL FORMAT=PORTRAIT OVERLAY=SHADED
A complete list of formats and overlays is available inUsing the Xerox 9700 Page Printer, Reference R1038.
When you use $CONTROL be aware that each time you issue the command the options you set will affect everything that you have printed but not yet released. For this reason we suggest that you always release your print job when you are finished with a particular print option.
If a line of the form
$9700CONTROL option ...
appears in a file that is copied to *PRINT*, then it will act as if a $CONTROL *PRINT* command with the specified options was issued. For example, if the file contains
$9700CONTROL ONESIDED PAPER=PLAIN
$9700 PORTRAIT MARGIN=0 FONTLIST=(AA1AJP,...)
then copying this to *PRINT* will act the same as if you first issued the command
$CONTROL *PRINT* ONESIDED PAPER=PLAIN
and then copied the file containing the line
$9700 PORTRAIT MARGIN=0 FONTLIST=(AA1AJP,...)
to *PRINT*.
Note that only legal $CONTROL command options may be specified on the $9700CONTROL line. As with the $CONTROL command, all this does is set up the conditions that will be in effect at thestart of the print job. If the same option is used more than once on $9700CONTROL lines in a print job, the last one specified will be the one in effect.
If do not explicitly $RELEASE your print job, it will be automatically released when you sign off. Also once you issue $RELEASE, all of your print options are changed back to their default values with the exception, of course, of those that were changed using $SET.
If you want to find out if a print job is currently being held, you can issue the command $DISPLAY *PRINT*
The message
*PRINT* RM357604 routed to CNTR 20 images 10 sheets RATE=NORMAL
3.3.3 Setting Print Options Using $9700
The $9700 command differs from previous commands since it is used to change print optionswithin the data being printedas opposed to changing the print options for an entire job. In this way, you can alter the printed appearance of your job on a line-by-line or a page-by-page basis.
The $9700 commands are inserted directly into the data stream instead of being issued from MTS. They will allow you to change options such as typeface, fonts, and page orientation. The use of $9700 commands is explained in detail inUsing the Xerox 9700 Page Printer, Reference R1038. If you are interested in altering print options in this manner, you are advised to read this document, or alternatively you should consider using one of the text-processors available on MTS that automatically insert the appropriate $9700 commands.
3.3.4 Summary of $SIGNON, $SET, $CONTROL, and $9700
When you submit a batch job, you can assign your print options for the entire session using the $SIGNON command. If you want a particular print option to always be in effect for either batch or interactive mode, you should create a sigfile and put in the appropriate $SET commands. If you want to specifically change the print options for a single job, the $CONTROL command is the one to use. The $9700 command is quite specialized; its use should not be attempted without further reading as noted above.
A table of $SIGNON parameters is given above in “Changing Batch Defaults”. Similar tables for $SET and $CONTROL can be found in the section “Managing Batch and Print Jobs”.
3.4 PRINT ROUTES AND DELIVERY CODES
You can use ROUTE option to specify where you want your output printed; the DELIVERY option implies that your job will be printed at one location and then delivered to another site by messenger. Let’s look at two simple examples to illustrate the use of these options.
Suppose you are working in the Chemistry Building and you want to have your output printed at the nearby North University Building Station (NUBS). You enter your commands as follows:
# $SET ROUTE=NUBS # $EMPTY MYOBJ
# $RUN *PASCALVS INPUT=MYPROG OBJECT=MYOBJ PRINT=*PRINT* *PRINT* assigned job number 629384
*PRINT* RM629384 released to NUBS 18 images 9 sheets RATE=NORMAL
The listing produced by the compiler *PASCALVS will be printed at NUBS.
Alternatively, suppose you are working on the U-M Dearborn Campus and want the Dearborn messenger to pick up the output for you at the Computing Center. You would submit your job as follows:
# $SET DELIVERY=DBRN # $EMPTY MYOBJ
# $RUN *PASCALVS INPUT=MYPROG OBJECT=MYOBJ PRINT=*PRINT* *PRINT* assigned job number 629384
Note that in the above examples that the ROUTE and DELIVERY options will be in effect for the entire session (this is because you used $SET). If you want to change ROUTE or DELIVERY for a particular job, you would use $CONTROL. If you are submitting a job in batch, you can change the print route or delivery code using $SIGNON (see “Changing Batch Defaults”).
A complete list of available print routes and delivery codes is maintained online; they can be obtained as follows:
$COPY *ROUTE $COPY *DELIVERY
If the DELIVERY=MAIL option is specified, one of two things will happen:
(1) For Xerox 9700 page-printer output, if the ADDRESS option is specified on either the $CONTROL or $SET command, the output will be delivered via campus mail. For example:
$SET DELIVERY=MAIL ADDRESS="Jon Dough;ITD;5074 Fleming 1340"
(2) For line-printer output, or for page-printer output that does not specify the ADDRESS option, the output will be sent to the ITD Mail Librarian for delivery via the US Postal Service at a cost of $7.50 for each mailing in addition to actual shipping costs. The charge will be billed to your userID. To make arrangements for mail delivery, send your job number and mailing address to:
ITD Mail Librarian 535 W. William Street Ann Arbor, MI 48103
or send an electronic message via the MTS Message System to Mail_Librarian. Output from the local printers is never delivered, even if the DELIVERY option is specified.
3.5 MULTIPLE COPIES
If you want to print more than one copy of your entire job (not including head and tail sheets), use the COPIES option with the $CONTROL command and specify the number desired.
# $CONTROL *PRINT* COPIES=3
*PRINT* assigned job number 357615 *PRINT* RM357615 held
# $COPY filename *PRINT* # $RELEASE *PRINT*
*PRINT* RM357615 released to CNTR 40 images 20 sheets per copy RATE=NORMAL COPIES=3
If you require each copy to have a head and tail sheet (i.e., to print as a separate job), include the SEPCOPY=YES option on the $CONTROL command:
$CONTROL *PRINT* COPIES=3 SEPCOPY=YES
The SEPCOPY option applies only to page-printer output. Line-printer output and local printer output are always printed with SEPCOPY=YES in effect.
3.6 CANCELLING A PRINT JOB
It is possible to cancel a job that you have submitted for printing if it is in the queue or is currently printing. First, get the job name and number as follows:
$SYSTEMSTATUS QUEUE *
The system responds,
1ABC:RM316640 (316640) is awaiting print, P8, after 10 jobs.
Then you enter,
$CANCEL RM316640
The system will respond with
Job 1ABC:RM316640 cancelled.
As you can see your output was successfully cancelled. If you have not released *PRINT*, use $CANCEL as follows:
$CANCEL *PRINT*
When you use $CANCEL as shown in the last example, you will be refunded the printing portion of the original charges for your output. Further details on using $CANCEL are given in the section “Managing Batch and Print Jobs.”
3.7 CREATING YOUR OWN PRINT DEVICE
Occasionally you may find that you are changing print options frequently. If this is the case, you might find it useful to create your own print pseudodevices (the concept of pseudodevices was explained in the “Introduction”) with the options that you use for particular types of print jobs. It is possible to do this using the $CREATE command.
For example, suppose you are working on a paper at the Church Street computing site (CHUR). The paper is in an MTS file called THESIS. You want to produce two types of printed output: the first is a file listing that you want printed on the Xerox 4045 local printer at the site; the second is your final text output, with portrait orientation, printed on the Xerox 9700 page printer at the Michigan Union Station (UNYN). You can do this by creating two new pseudodevices called *DRAFT* and *FINAL* as follows:
# $CREATE *DRAFT* TYPE=PRINT OPEN="ROUTE=CHUR" *DRAFT* has been created
# $CREATE *FINAL* TYPE=PRINT OPEN="FORMAT=PORTRAIT ROUTE=UNYN" *FINAL* has been created
# $LIST THESIS ON *DRAFT*
*DRAFT* assigned job number 357400
*FINAL* assigned job number 357401
*FINAL* RM357401 released to UNYN 11 images 6 sheets RATE=NORMAL FORMAT=PORTRAIT
The output from your job has been sent to the specified printers. You are also free to use *DRAFT* or *FINAL* anytime again in the current session. If you want to use *DRAFT* and *FINAL* without explicitly creating them for each session, you should use $CREATE in a sigfile to define them.
When you create print pseudodevices, you specify the attributes by using the OPEN option. Any options that are available with the $CONTROL command may also be used with OPEN. It is also possible to specify several options at once provided they are separated by blanks:
$CREATE *ONE* TYPE=PRINT OPEN="FORMAT=PORTRAIT ONESIDED"
You have created a print device called *ONE* which has the attributes of PORTRAIT and ONESIDED. You cannot create a pseudodevice using a name already defined by the system or a name you created earlier in your session. To see all currently defined pseudodevice names (including predefined ones), use the command:
$FILESTATUS *?*
If you want to remove the definition for a PDN that you have created (if you created it with the wrong values on OPEN, for instance), you can use the $DESTROY command. Once you have destroyed it, you can recreate it, and specify different options.
3.8 LOCAL PRINTERS
Several Campus Computing Sites have Xerox 4045 or Hewlett-Packard LaserJet local printers. These are small page printers which are slower, have fewer built-in fonts, and may be restricted in other capabilities such as printing on only one side of the paper. They are best for printing short file listings, draft copies of documents, and copies of messages.
The Xerox 4045 and H-P LaserJet only support the PORTRAIT, LANDSCAPE, MARGIN, and OVERLAY=LINED $CONTROL options; they do not recognize $9700 command lines.
To send output to a local printer, you must specify the ROUTE parameter on the $CONTROL or $SET command
$CONTROL *PRINT* ROUTE=station
For example, to print the file named DRAFT in portrait orientation on the Xerox 4045 at the Dana Building Computing Site:
$CONTROL *PRINT* PORTRAIT ROUTE=DANA $COPY DRAFT *PRINT*
Route Printer
Code Type Location
AROX Xerox 4045 Angell Hall Courtyard CHUR Xerox 4045 611 Church, 4th Floor
DANA Xerox 4045 Dana Building (Natural Resources) FRZE Xerox 4045 Frieze Building
SPH2 Xerox 4045 School of Public Health UGLS Xerox 4045 Undergraduate Library
4. MANAGING BATCH AND PRINT JOBS
The Resource Manager enables you to modify certain features of any job you submit for processing. It also provides a mechanism for keeping track of jobs once they have been submitted. This section contains a summary of the MTS commands that can be used.
$CANCEL removes a job from the processing queue.
$CONTROL changes the attributes of a specified pseudodevice. $CREATE lets you define pseudodevice names.
$DISPLAY shows the current state of a pseudodevice or set item. $LOG puts a record of your session in a file.
$RELEASE releases a job to the execution or print queue. $SET changes certain global conditions that apply to a job.
$SYSTEMSTATUS keeps track of jobs that have been submitted during the last 8 hours. $VIEW lets you view the results of a batch or print job.
The rest of this section is divided into parts, each describing one of the above commands. Many of these commands have already been introduced in this document; this section is intended as a reference for their use. More detailed information can also be obtained from MTS Volume 1: The Michigan Terminal System, Reference R1001.
Note: Most MTS commands may be abbreviated. However, for clarity abbreviations are used sparingly here.
4.1 THE $CANCEL COMMAND
The $CANCEL command lets you remove a job from the processing queue. You can cancel a job that is not done, i.e.,
(1) executing or waiting to execute (2) printing or waiting to print (3) held by a $CONTROL command The general form of the command is:
$CANCEL {jobname | jobnumber} [USER=userid] or
$CANCEL {*PRINT* | *BATCH*}
The second form is used when the job is still being held (i.e., you have not released it). In this case you must cancel the appropriate pseudodevice name (e.g., *PRINT*).
The effects of cancelling a job are as follows:
(1) If the job has already been executed and printed, cancelling it will have no effect as the job is finished anyway.
(2) If you cancel the pseudodevice namebeforereleasing the job to the processing queue, the job is cancelled and you are not charged.
(3) If you cancel a print job after it is released but before it starts printing, it will not be printed. Note: Your session charges will include the printing charges, but these will be automatically refunded at a later time.
(4) If your print job was in the middle of printing when you cancelled it, it will stop printing at that point and you will be charged for the portion that was printed.
(5) If you cancel a batch job before it starts executing, you will not be charged for it.
(6) If a batch job is executing, or has already executed but has not yet printed, cancelling the job will not cancel the printout. In order to cancel the print job you must issue a second $CANCEL. In any event you will still be charged for the job up to the point where it was cancelled.
Some typical examples:
(1) You have just copied 400 pages to the printer, and suddenly realize that it was the wrong file. The $SYSTEMSTATUS command indicates that your job (138475) is still waiting to print, so you can use:
$SYSTEMSTATUS 138475
1ABC:RM138475 awaiting print, P8, after 10 jobs $CANCEL 138475
Job 1ABC:RM138475 cancelled.
The system response gives the user’s userID (in this example, 1ABC) before the job name. The job will not be printed and you will be automatically refunded for it.
(2) You have submitted a batch job (RM112984), which has already started to execute, and then you realize that you have used the wrong format:
$CANCEL RM112984
Job 1XYZ:RM112984 cancelled. $CANCEL RM112984
Job 1XYZ:RM112984 (112985) cancelled.
When the job began execution, it created a print stream (112985) that was not cancelled the first time. The second $CANCEL command got rid of it.
$CANCEL *PRINT*
*PRINT* RM198765 cancelled.
(The job name RM198765 was assigned by the $CONTROL command.) Theprintcost for images and sheets will be refunded, but you will still incur charges for CPU time used by the $LIST or $COPY command.
(4) You have submitted a batch job to run overnight and you decide you want to cancel it, but you do not know the job name and number. You obtain it as follows:
$SYSTEMSTATUS QUEUE *
1ABC:RM116982 awaiting execution, P10, after 35 jobs.
and now you enter:
$CANCEL 116982
Job 1ABC:RM116982 cancelled.
Your batch job has now been cancelled. Notes:
(1) Use the $SYSTEMSTATUS command to find the job names and current status of any jobs you have submitted within the last 8 hours.
(2) Be sure you specify the correct job name when there is more than one waiting in the queue. If you have assigned the same job name to more than one job, cancelling that job name will cancelalljobs with that name. You can avoid this problem by cancelling the job number instead.
4.2 THE $CONTROL COMMAND
The $CONTROL command lets you modify the attributes of a single print or batch job. You will notice that many of the options are identical to $SET options. The essential difference between $CONTROL and $SET is that $CONTROL changes options for a particular job—only until the job is released or you sign off. The $SET command will affect all jobs until the option is reset or you sign off. When you need a particular set of options for a single job, $CONTROL is the command to use. It is frequently used to change the way output is printed on the Xerox 9700 page printer.
The general form of the $CONTROL command is: $CONTROL *pdn* keyword
or
$CONTROL *pdn* keyword=option
Pseudodevice Facility Provided
*BATCH* For submitting a batch job. *PRINT* For printing output.
*PUNCH* For producing 80-byte records for BITNET files.
*IMPORT* For retrieving BITNET files that have been received from another system. *EXPORT* For sending BITNET files to another system.
The first three pseudodevices have been described in other sections of this document (e.g., *BATCH* was explained in the section “Batch Processing”, *PRINT* was explained in the section “Getting Printed Output”, etc). Each of these sections also contains more examples of using $CONTROL for each particular pseudodevice.
More information about BITNET is available in the documentBITNET on MTS, Reference R1039. Table 3: $CONTROL Keywords and Options
Keyword Description
ADDRESS="line1;line2;..."
Specify the campus mail address for delivered output (when DELIVERY=MAIL is set). This option applies only to page-printer output, not to line-printer or local-printer output.
CANCEL *...* Cancel the job that is currently held for the specified pseudodevice.
CLASS=char A file class to associate with the job. If no file class is assigned to a file, a class of A will be used; otherwise, CLASS is a single letter from A to Z. For BITNET connections only.
COMMENT="text" Specify a comment that will be associated with the job. This comment will be printed on the head sheet of jobs submitted to *PRINT* or *BATCH*. COPIES=n Specify number of copies of output for the given pseudodevice. The default
is 1.
DELIVERY={station | MAIL | NONE}
Specify a delivery station to which output should be delivered by messenger service (see the file *DELIVERY for further details). If MAIL is specified, the output will be delivered by campus mail or the US Postal Service. The default is NONE.
DESTINATION=destination
A BITNET destination, (e.g., userID@site, or proute@site, or croute@site). ENCODING={NONE | NETDATA | DISKDUMP}
Specify how the data should be encoded before a BITNET transfer. By default no encoding is used. MTS files are always sent as variable-length-record files.
FILE={filename | "file name"}
special characters, it must be enclosed in quotes. For *IMPORT*, this option can be used to select from a number of incoming jobs. For BITNET connections only.
FORMAT={LANDSCAPE | PORTRAIT | TWOUP | format-name}
Specify format for page-printer output (see Using the Xerox 9700 Page Printer, Reference R1038, for a complete description and list of formats). The default is LANDSCAPE. Applies only to *PRINT* and *BATCH*. HOLD Explicitly hold the job directed to the specified pseudodevice.
JOBNAME={jobname | DEFAULT}
Assign a job name of 1 to 8 alphanumeric characters to the job directed to the specified pseudodevice. The first character must be a letter. For *IMPORT*, this option can be used to select from a number of incoming jobs. DEFAULT specifies the default format of “RM” plus six digits.
KEEP Similar to CANCEL, but the job is requeued rather than abandoned. Applies only to *IMPORT* for BITNET connections.
{LANDSCAPE | PORTRAIT | TWOUP}
Specify orientation of page-printer output (synonymous with FORMAT for the corresponding values). The default is LANDSCAPE. Applies only to *PRINT* and *BATCH*.
MARGIN={n.nn | NO}
Set the left margin to “n.nn” inches. “n.nn” must be less than the current page width (8.5 for portrait orientation, 11.0 for landscape). MARGIN=NO turns off the margin override and resets the margins to the default for the current format (0.5 for PORTRAIT and 0.65 for LANDSCAPE). Applies only to *PRINT* and *BATCH*.
NUMBER={(b,l,c) | NO}
NUMBER=(b,l,c) numbers pages automatically, starting with number “b”, printing the number on line “l”, ending in column “c”. NUMBER=NO (the default) disables automatic page-numbering. The page number is always printed in the first font of the current format or FONTLIST specification. OVERLAY={NONE | SHADED | LINED}
Specify an overlay for page-printer output (seeUsing the Xerox 9700 Page Printer, Reference R1038, for a complete description of overlay options). The default is NONE. Applies only to *PRINT* and *BATCH*.
PAGES=n Specify a page limit for a print job. The default is no page limit. Applies only to *PRINT*.
PAPER={PLAIN | 3HOLE | LABEL24 | LABEL33}
PRINTER={PAGE | LINE}
Specify the type of printer. The default is PAGE. Applies only to *PRINT* and *BATCH*.
RELEASE Release for processing the job that is currently held for the specified pseudodevice (see also the $RELEASE command).
ROUTE=station Specify a station for output at which output is to be printed (use the command $COPY *ROUTE to obtain a list of valid station codes).
SEPCOPY={YES | NO}
Specify whether each copy will have separate head and tail sheets (YES) or whether all copies will be printed together as one job with a single head and tail sheet (NO). The option is only effective for page-printer output and if COPIES=n is specified. If each copy is more than 50 pages, then SEPCOPY=YES is forced. Currently the default is SEPCOPY=YES. On December 2, 1991 the default will be changed to NO.
SHIFT={YES | NO}Specify whether page-printer output is shifted away from the binding edge. The default is SHIFT=NO. Applies only to *PRINT* and *BATCH*. TWOSIDED={YES | NO}
Specify printing on one or both sides of the paper for page-printer output. The default is YES. Applies only to *PRINT* and *BATCH*.
{TWOSIDED | ONESIDED}
Specify printing on one or both sides of the paper for page-printer output. The default is TWOSIDED. Applies only to *PRINT* and *BATCH*. TYPE={PUNCH | PRINT}
Produce PUNCH- or PRINT-type files. The default is PUNCH. Applies only to *EXPORT* for BITNET connections.
Some typical examples:
(1) The next job you send to *BATCH* is to be printed onesided on 3-hole punched paper. The file called BATRUN should contain MTS commands for a batch job, including a $SIGNON command.
# $CONTROL *BATCH* ONESIDED PAPER=3HOLE *BATCH* assigned job number 345678 *BATCH* RM345678 held
# $COPY BATRUN *BATCH* # $RELEASE *BATCH*
*BATCH* RM345678 released HOST=UM ROUTE=CNTR TWOSIDED=NO PAPER=3HOLE
The job is assigned a number and is automatically held until the $RELEASE command is given. This demonstrates how more than one attribute may be specified on a $CONTROL command.