Multiple
Server
Update
Guide
-i
Part Number: 7100-05692 Release Date: February 1984 Revision: A
FCC WARNING
This equipment has been tested with a Class A computing device and has been found to comply with Part 15 of FCC Rules. Operation in a residential area may cause unacceptable interference to radio and TV reception requiring the operator to take whatever steps are necessary to correct the interference.
NOTICE
Corvus Systems, Inc. reserves the right to make changes in the product described in this manual at any time without notice. Revised manuals will be published as needed and may be purchased from authorized Corvus Systems dealers. This manual is copyrighted. All rights reserved. This document may not, in whole, or in part be copied, photocopied, reproduced, translated or reduced to any elec-tronic medium or machine readable form without prior consent in writing from:
Corvus Systems, Inc. 2100 Corvus Drive San Jose, CA 95124 Telephone: (408) 559-7000 TELEX: 278976
©Copyright 1984 by Corvus Systems, Inc. All rights reserved.
TABLE OF
CONTENTS
How to Use this Guide
Setting the Switches
Merging the User Tables
Updating the Boot Files
Utility Servers Existing Computers New Computers
Volume Mounting Information
1
3
11
15 15
21 25
HOWTOUSE
THIS GUIDE
This guide explains how to update an existing Omninet ™ local area network using Constellation II
software to accept more than one disk server and disk system or OmniDrive ™ mass storage system. The disk
servers must have ROM version DSD9B or later. Contact the Corvus Customer Service Department for further information.
Adding another disk server and disk system or OmniDrive means having multiple servers on the network. Both systems have disk servers: the disk system needs an external disk server to communicate on the network and OmniDrive has its server built in.
Throughout this guide the term server refers to either the combination of a disk server and disk system or an OmniDrive.
Adding multiple servers to a network with one
computer type requires checking the Omninet address, setting the bias switch and merging user tables.
Updating a network with more than one computer type requires the above procedures plus matching the boot files. Adding a new computer type as well as additional servers involves all the above procedures, but matching the boot files may require several extra steps.
First finish the system generation guide for the
particular computer and operating system being used, then turn to this guide.
All users will go to the section "Merging the User Tables" to create matching user tables. The tables of users in the CORVUS volumes on all servers on the network must be identical for users to boot.
Users adding a new server to a network with utility servers or more than one computer type also will go to the section "Updating the Boot Files~' Each utility server or computer type, with several exceptions, has its own boot file in the CORVUS volume. The types of boot files in the CORVUS volumes on all servers on the network must be identical.
SETTING THE
SWITCHES
Before connecting the new server to the network, make sure all servers have unique addresses and their bias switches are set properly. The first server on the network must have the bias on, and all other servers must have the bias off. Follow the steps below to check the addresses and set the bias properly.
1.
Locate the switches on the disk server or OmniDrive.Remove the cover of the disk server to reveal the switches. For instructions, see the
installation guide used to set up the disk server. The OmniDrive switches are visible on the back of the drive.
o -c:=F
o
Disk Server Circuit Board
2.
I;~~~~~~;I ~
II~OOOO~II ~o
Illiilll
012345678
;:0
OmniDrive Back Panel
Check the Omninet address.
Make sure each server has a unique address. For a disk server, use the chart labeled "'Disk Server Addresses and Switch Settings~' For an OmniDrive, use the chart labeled
"OmniDrive Addresses and Switch Settings~'
Be sure to use the right chart.
Address
1 0
...
1·
2...
3·
4...
5·
6...
7·
8...
9·
10...
11·
12...
13·
14...
15·
16...
17
·
18
...
19·
20...
21·
22 ... 23·
24...
25·
26...
27·
28...
29·
30...
31·
1
Address
Switch Setting Address Switch Setting
2 3 4 5 6 1 2 3 4 5 6
... ... ... ...
...
32...
... ...
...
...·
... ... ... ...
... 33·
... ...
...
...·
·
... ...
... ...
34...
·
...
...
...
·
·
... ...
...
...
35· ·
...
...
...·
...
·
... ...
...
36...
...
·
...
...
·
...
·
...
...
...
37·
...
·
...
...
·
·
·
...
... ...
38...
· ·
...
...
·
·
·
...
...
...
39·
·
·
...
...·
... ...
·
...
...
40...
...
...·
...
·
... ...
·
... ...
41·
... ...
·
...
·
·
...
·
......
42...
·
...
·
...
·
·
...
·
... ...
43·
·
...·
...
·
...
·
·
... ...
44... ...
·
·
...
·
...
· ·
...
...
45·
...
·
·
...
·
·
·
·
... ...
46...
·
· ·
...
·
·
· ·
... ...
47· ·
·
·
...
·
... ... ...
·
...
48...
... ...
...
· ·
...
... ...
·
...
49·
...
...
...
·
·
·
...
...
·
...
50...
·
...
...
·
·
·
... ...
·
...
51· ·
...
...
·
·
...
·
...
·
...
52...
...
·
...
·
·
...
·
...
·
...
53·
...
·
...
· ·
·
·
...
·
...
54...
· ·
...
· ·
·
·
...
·
...
55·
·
·
...
·
·
...
...
· ·
...
56... ... ...
·
·
·
...
...
·
·
...
57·
... ...
·
·
·
·
...
·
·
...
58...
·
...
· · ·
·
...
·
·
...
59·
·
...
·
· ·
...
· · ·
...
60...
...
· · ·
·
...
·
·
·
...
61·
...
· ·
·
·
·
· ·
·
...
62...
· ·
·
· ·
·
· ·
·
...
63·
· ·
·
· ·
2 3 4 5 6 1 2 3 4 5 6Switch Setting Address Switch Setting ... = switch up • = switch down
Address
1 0
·
1•
2·
.. 3
•
4
·
5•
6·
7•
8·
9•
10·
11•
12·
13•
14·
15•
16·
17
•
18
·
19•
20·
21•
22·
23•
24·
25•
26·
27•
28·
29•
30·
31•
1
Address
Switch Setting Address Switch Setting
2 3 4 5 6 1 2 3 4 5
· · ·
32· · ·
·
·
· · ·
33•
·
·
·
·
•
· · · ·
34·
•
·
·
·
•
· · · ·
35• •
· · ·
·
•
·
· ·
36· ·
•
· ·
...
· ·
·
37•
·
•
·
·
• •
· ·
·
38·
•
•
·
·
• •
· · ·
39• • •
· ·
· ·
•
·
·
40· · ·
•
·
·
·
•
· ·
41•
·
·
•
·
•
·
•
· ·
42·
•
·
•
·
•
·
•
· ·
43•
•
·
•
·
·
•
•
·
·
44·
·
• •
·
·
• •
· ·
45•
·
• •
·
• • •
·
·
46·
• •
•
·
• •
•
·
·
47• • • •
·
·
· ·
•
·
48· · · ·
•
·
· ·
•
·
49•
· · ·
•
•
· ·
•
·
50·
•
· ·
•
•
·
·
•
·
51• •
·
·
•
·
•
·
•
·
52·
·
•
·
•
·
•
·
•
·
53•
·
•
·
•
•
•
·
•
·
54·
• •
·
•
•
•
·
•
·
55• • •
·
•
·
·
•
•
·
56· · ·
•
•
· ·
• •
·
57•
· ·
• •
•
..
•
•
·
58·
•
·
• •
•
·
• •
·
59•
•
·
•
•
·
• •
•
·
60· ·
• • •
·
•
•
•
·
61•
·
•
•
•
• • •
•
·
62·
•
• • •
• •
• •
·
63•
• •
• •
2 3 4 5 6 1 2 3 4 5Switch Setting Address Switch Setting
• = sWitch up
• = switch down
OmniDrive Addresses and Switch Settings
3.
Check the bias switch on the first server.On a disk server, switch 7 is the bias switch. If a disk server was the first server on the
network, make sure its switch 7 is set ON to set the bias on.
o o
On an OmniDrive, switch 8 is the bias switch. If an OmniDrive was the first server on the network, malse sure its switch 8 is set DOWN to set the bias on.
I;~~~~~~;I ~
II~OOOO~II ~o
Illiilll
04.
Check the bias switch on the new server.If a disk server was just added to the network, make sure switch 7 is set OFF to set the bias off. All additional servers should have the bias off.
If an OmniDrive was just added to the network, make sure switch 8 is set UP to set the bias off. All additional servers should have the bias off.
I;~~~~~~;I
C
II~OOOO~II ~o
Illiilll
0New OmniDrive Bias Switch Setting
MERGING THE
USER TABLES
Merging user tables requires complete control of the network. Make sure that no one is trying to use the network when following the steps below. Turn off all existing mass storage systems.
Connect the new system just generated, and the new computer, if any, to the existing network. Follow the appropriate steps in the setup instructions for the system and the installation guide for the computer.
Use this section to merge the user tables. Make sure the new server is turned on and the existing servers are left turned off until instructed to turn them on.
1.
2.
Log on as
system manager.
Log on at the computer used to generate the new system just connected. The system manager's log-on name and password are in the system manager guide for the computer. If the screen doesn't already display the Constellation II main menu, enter Constellation II.
Turn on the
existing servers.
If you have The Bank ™ mass storage system,
3.
4.
5.
Select the
drive management option.
PressD
The screen displays the drive management main menu.
Select the new server.
Press S
The screen display is similar to:
Type the server name, drive name and password for the new server and press
IRETURNI •
The screen displays the drive management main menu again.
Select the user manager.
6.
7.
Select the merge user tables option.
PressM
After a moment, the screen display is similar to:
The program automatically checks all the servers on the network and displays a similar list for each. Accept the suggested responses until all servers are updated.
Press I SPACE I , then return to the drive
management main menu.
Repeat the steps for an existing server.
8.
Exit Constellation II.When finished merging the user tables, exit Constellation II completely.
Users adding the new server to a network that only has one computer type and no utility servers are done. Go to the appropriate system manager guide to create users and volumes and grant access.
UPDATING THE
BOOT FILES
Updating boot files requires complete control of the network. Make sure that no one is trying to use the network when following the steps below.
Users adding the new server to a network that has utility servers must first go to the subsection "'Utility
Servers~' Multiple server networks that are using a utility server to despool files to a printer must have the PIPES volume on the disk system at Omninet address
O. The utility server cannot despool files from servers other than server O.
Users adding the new server to a network that has more than one computer type must also complete the subsection "Existing Computers~'
Users adding the new server and a new computer type to an existing network of one or more computer types must also complete the subsection "N ew Computers~'
UTILITY SERVERS
1.
Follow the steps below to add the utility server boot files to the new server.
Turn off the new server.
2.
3.
4.
5.
Log
on as
system manager.
Log on at the computer used to establish utility server service initially.
If the screen doesn't already display the Constellation II main menu, enter the Constellation II program.
Turn on
thenew server.
After turning the server on, wait until only the drive's red indicator light labeled READY is lit before performing the next step.
Select the
drive management option.
PressD
The screen displays the drive management main menu.
Select the server
at Omninet address
o.
Press S
6.
7.
Select the boot manager.
Press B
Some computers may unmount a volume and require pressing I SPACE I before
continuing the program.
The screen displays the boot manager main menu:
Select add
a boot file.
Press A
8.
9.
Enter the
boot file name.
The file name is BOOT.PRINTSRV and the type is a printer server, or Printsrv.
The boot file can be found in the PSERVER volume. The system manager should already have access to the PSERVER volume. On a Corvus Concept ™ personal workstation,
type the name using the format
"/PSERVER/filename" to specify the source file name and press I RETURN I . On all other
computers, type the name using the format "PSERVER:filename" and press IRETURNI •
The screen display is similar to:
Enter the
computer type.
TypePRINTSRV and press IRETURNI •
10.
boot file.
Add thePress I RETURN I
The screen display is similar to:
All existing servers must have the proper files for the network to function. Update all servers to ensure that the file is on all servers.
Press I RETURN I
Once all servers are updated, press I SPACE I
11.
Repeat the steps for all types.Repeat steps I through II for each different utility server type on the network.
Users with only one computer type and one or more utility servers are done once the utility server boot files have been added. Go to the appropriate system manager guide to create users and volumes and grant access. Users with more than one computer type, and those having added a new computer type other than the Zenith Z -100 ™ or the DEC
Rainbow IOO:M
must go to the next section, "Existing Computers;' once all utility server boot files have been added.
EXISTING COMPUTERS
1.
2.
3.
Follow the steps below to add all the existing boot files to the new server. The procedure described in this section will be repeated for each computer type, except the Zenith Z-100 and the DEC Rainbow 100, on the network. The Rainbow 100 and the Z-l 00 do not use boot files.
Turn off
thenew server.
Tum off the system just generated.
Log on as
system manager.
Log on at a computer that already works with the network.
If the screen doesn't already display the Constellation II main menu, enter the Constellation II program.
Turn on
thenew server.
4.
5.
6.
Select the
drive management option.
Press D
The screen displays the drive management main menu.
Select the new server.
Press S
Type the server name, drive name and
password for the new server and press IRETURNI.
Select the boot manager.
Press B
Some computers may unmount a volume and require pressing I SPACE I before
continuing the program.
7.
8.
Select add
a boot file.
Press A
The screen displays:
Enter the
boot file name.
The following chart shows the various computer types and boot file names:
Computer Type
Corvus Concept Apple II
Corvus Concept
+
IBM PCTI Professional
FileName
BOOT.CONCEPT BOOT.APPLE2 BOOT. CONCEPT2 BOOT.IBMPC BOOT.TIPC
Type the file name for the computer currently being used and press I RETURN I .
9.
10.
Enter the
computer type.
Type the correct name and press I RETURN I . The screen display is similar to:
Add the
boot file.
Press I RETURN I
The screen display is similar to:
All existing servers must have the proper files for the network to function. Update all servers to ensure that the file is on all servers.
Press I RETURN I
Once all servers are updated, press I SPACE I
11.
Repeat the steps for all types.Repeat steps 1 through 11 for every different existing computer type on the network, except the DEC Rainbow 100 and Zenith Z-100.
If the new system was generated using a new computer type other than the DEC Rainbow
100 or Zenith Z-1 00, go to the next subsection, "New Computers;' once all
existing boot files match. Otherwise, go to the appropriate system manager guide to create users and volumes and grant access.
NEW COMPUTERS
1.
2.
Complete the steps below to add the new computer's boot file to the existing servers.
Turn off the
existing servers.
Turn off all the existing servers, but leave the new server on.
Log on as
system manager.
Log on at the new computer.
3.
4.
5.
Turn on
theexisting servers.
Do not tum on The Bank mass storage
system. Turn on all the existing servers. After turning the servers on, wait until only the red
Select the
drive management option.
PressD
The screen displays the drive management main menu.
Select one of
the existing servers.
Press S
Type the server name, drive name and
password for one of the existing servers and
6.
7.
Select the boot manager.
Press B
Some computers may unmount a volume and require pressing I SPACE I before
continuing the program.
The screen displays the boot manager main menu:
Select add
a boot file.
Press A
8.
9.
Enter the
boot file name.
The following chart shows the various computer types and boot file names:
Computer Type
Corvus Concept Apple II
Corvus Concept +
IBM PC
TI Professional
FileName
BOOT.CONCEPT BOOT.APPLE2 BOOT.CONCEPT2 BOOT.IBMPC BOOT.TIPC
Type the file name for the computer
currently being used and press I RETURN I .
The screen display is similar to:
Enter the
computer type.
Type the correct name and press I RETURN I .
10.
Add the boot file.Press I RETURN
I
The screen display is similar to:
All existing servers must have the proper files for the network to function. Update all servers to ensure that the file is on all servers.
Press I RETURN
I
Once all servers are updated, press ISPACEI
twice, then exit Constellation II.
Go to the appropriate system manager guide to create volumes and users and grant access. The next section, "Volume Mounting
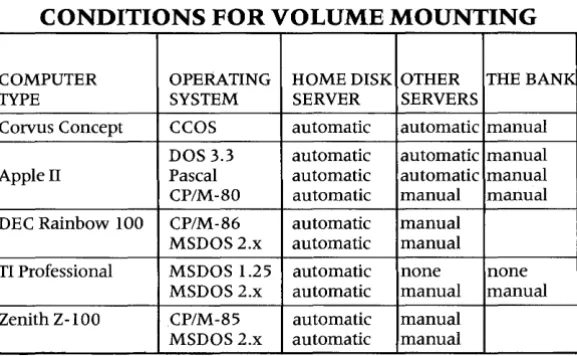
VOLUME MOUNTING
INFORMATION
Different computer types and operating systems handle volume mounting differently on a multiple server network.
The home disk server is the key to volume mounting on a multiple server network. The home disk server is specified when creating the user account. The home disk server contains the user's boot information as well as other volumes.
after booting with the mount manager program. The table below outlines the conditions for mounting on a multiple server network.
CONDITIONS FOR VOLUME MOUNTING
COMPUTER OPERATING HOME DISK OTHER THE BANK TYPE SYSTEM SERVER SERVERS
Corvus Concept CCOS automatic automatic manual DOS 3.3 automatic automatic manual Apple II Pascal automatic automatic manual CP/M-80 automatic manual manual DEC Rainbow 100 CP/M-86 automatic manual
MSDOS2.x automatic manual TI Professional MSDOS 1.25 automatic none none
MSDOS 2.x automatic manual manual Zenith Z-lOO CP/M-85 automatic manual
MSDOS2.x automatic manual
LEGEND
Automatic-Volumes mounted at boot time
Manual -Volumes mounted with the mount manager program