EMC® Unisphere™ for VMAX™
VERSION 8.0.3
Installation Guide
REV 04
Copyright © 2012 - 2015 EMC Corporation. All rights reserved. Published in the USA. Published July, 2015
EMC believes the information in this publication is accurate as of its publication date. The information is subject to change without notice.
The information in this publication is provided as is. EMC Corporation makes no representations or warranties of any kind with respect to the information in this publication, and specifically disclaims implied warranties of merchantability or fitness for a particular purpose. Use, copying, and distribution of any EMC software described in this publication requires an applicable software license.
EMC2, EMC, and the EMC logo are registered trademarks or trademarks of EMC Corporation in the United States and other
countries. All other trademarks used herein are the property of their respective owners.
CONTENTS
Preface
11
Chapter 1: Pre-installation considerations
15
Before you begin 16
Unisphere Initial Setup User 16
Local and remote installation options 16
Unisphere for VMAX licensing 17
Unisphere for VMAX Virtual Appliance 17
Unisphere Lockbox Password 17
X.509 certificate-based user authentication 18
Environment and system requirements 19
Network requirements 19
Solutions Enabler 19
Supported HYPERMAX OS/Enginuity versions 19
Host systems and storage operating environment 19
Concurrent users 19
Symmetrix Management Console 19
VMware and Hyper-V guests 20
Database Storage Analyzer requirements 20
EMC ControlCenter 20
Client screen requirements 20
Client browser requirements 21
Server requirements 21
Server requirements 21
Other requirements 22
Chapter 2: Installing Unisphere for VMAX
23
Pre-installation configuration 24
Setting the event and statistics daemons to autostart on Linux 24
Setting up the PostgreSQL user on Linux 24
Configuring for eNAS link and launch 25
Installing Unisphere for VMAX 26
Step 1: Accessing the software 26
Step 2A: Installing Unisphere for VMAX using the wizard 27 Step 2B: Installing Unisphere for VMAX from the command line 28
Completing the installation 31
Configuring language and regional settings 31
Installing a Unisphere for VMAX license 31
Configuring third-party utilities 31
Importing CA certificates 32
Starting and stopping the performance database 32
Starting and stopping the SMAS service 34
Launching Unisphere for VMAX 35
Launching Database Storage Analyzer 36
Chapter 3: Upgrading Unisphere for VMAX
37
Upgrade paths 38
Before upgrading Unisphere for VMAX 39
Running the Unisphere for VMAX upgrade 40
Upgrading Unisphere for VMAX on Windows 40
Upgrading Unisphere for VMAX on Linux 40
After upgrading Unisphere for VMAX 41
Renewing link and launch client registrations 41
Restoring and verifying system and performance data 41
Chapter 4: Uninstalling Unisphere for VMAX
43
Before you begin 44
Uninstalling from Windows 45
Using Windows Add/Remove Programs 45
Using the command line 45
Using Windows Explorer 45
Uninstalling from Linux 46
Using the wizard 46
Using the command line 46
Chapter 5: Installing the Unisphere for VMAX virtual appliance
47
Introduction 48
Before you begin 50
Installing the virtual appliance directly on the ESX Server 51
Installing the virtual appliance using OVFTOOL 58
Using OVFTOOL 58
Launching Unisphere or the vApp Manager 61
Launching Unisphere 61
Launching the vApp Manager 61
Connecting to the API server 62
Setting the storevntd daemon to start automatically 62
Registering the VASA Provider with vSphere 63
Upgrading the Unisphere for VMAX Virtual Appliance using an ISO image 64
Re-configuring the virtual appliance IP address 66
Deleting the Unisphere for VMAX Virtual Appliance 68
Backing up and restoring the performance database 69
Backing up performance database files to another host 69
Restoring performance database files from another host 69
Installing licenses 71
Installing VMAX-based licenses 71
Installing host-based licenses 71
Appendix A: Technical notes
73
Technical notes 74
Managing thin pools 74
SYMAPI server 74
Local replication management 74
Advanced configuration settings 74
Resetting the host system stable values 74
Configuring idle user timeout 75
Alerts 75
Protecting against POODLE SSLv3 vulnerability 75
Virtual Appliance Technical notes 76
Setting the LDAP user 76
Gatekeeper volumes 76
Host ESX Server configuration 76
Unisphere daemon service 76
Server hostname requirement 76
SSL certificate generation 76
Changing the IP address 76
Least privileged permission requirements 77
Adding gatekeeper volumes 77
Appendix B: Security features
79
Authentication 80
Authorization 81
Appendix C: Replacing the Unisphere for VMAX and CA server certificates
85
Step 1: Obtaining the keystore password 85
Step 2: Generating a certificate request 85
Step 3: Importing the CA-signed certificate into the keystore 86
Step 4: Start the SMAS server 87
Appendix D: Configuring SMAS to work in z/OS
89
FIGURES
Figure Page
Figure 1: Local installation: Unisphere for VMAX 16
Figure 2: Remote installation: Unisphere for VMAX on a server connected to a remote SYMAPI
TABLES
Table Page
Table 1: Unisphere for VMAX client requirements 21
Table 2: Server requirements and limitations 21
Preface
As part of an effort to improve its product lines, EMC periodically releases revisions of its software and hardware. Therefore, some functions described in this document might not be supported by all versions of the software or hardware currently in use. The product release notes provide the most up-to-date information on product features.
Contact your EMC representative if a product does not function properly or does not function as described in this document.
This document was accurate at publication time. New versions of this document might be released on the EMC Online Support website. Check the EMC Online Support sitehttps://support.EMC.com
to ensure that you are using the latest version of this document.
Purpose
This document describes how to configure and use Unisphere for VMAX.
Audience
This document is intended for the host system administrator, storage administrator, system programmer, or operator involved in managing VMAX systems.
Related documentation
The following related documents are available on the EMC Online Support Site at
https://support.EMC.com
◆ EMC Unisphere for VMAX Release Notes ◆ EMC Unisphere for VMAX Online Help
◆ EMC Unisphere for VMAX - vApp Manager Online Help
◆ EMC Solutions Enabler Installation Guide ◆ EMC Solutions Enabler Release Notes
◆ EMC Solutions Enabler SRM CLI Product Guide
◆ EMC Solutions Enabler CLI Command Reference
◆ EMC VMAX Family Security Configuration Guide
Conventions used in this document
EMC uses the following conventions for special notices:
Caution, used with the safety alert symbol, indicates a hazardous situation which, if not avoided, could result in minor or moderate injury.
Notice is used to address practices not related to personal injury. A Note presents information that is important, but not hazard-related.
WARNING indicates a hazardous situation which, if not avoided, could result in death or serious injury.
Style Where used
Normal Used in running (nonprocedural) text for:
◆ Names of interface elements, such as names of windows, dialog
boxes, buttons, fields, and menus
◆ Names of resources, attributes, pools, Boolean expressions, buttons, DQL statements, keywords, clauses, environment variables, functions, and utilities
◆ URLs, pathnames, filenames, directory names, computer names, links, groups, service keys, file systems, and notifications
Bold Used in running (nonprocedural) text for names of commands, daemons, options, programs, processes, services, applications, utilities, kernels, notifications, system calls, and man pages Used in procedures for:
◆ Names of interface elements, such as names of windows, dialog boxes, buttons, fields, and menus
◆ What the user specifically selects, clicks, presses, or types Italic Used in all text (including procedures) for:
◆ Full titles of publications referenced in text ◆ Emphasis, for example, a new term
◆ Variables
Courier Used for:
◆ System output, such as an error message or script
◆ URLs, complete paths, filenames, prompts, and syntax when shown outside of running text
Courier bold Used for specific user input, such as commands
Courier italic Used in procedures for: Variables on the command line User input variables
< > Angle brackets enclose parameter or variable values supplied by the user
[ ] Square brackets enclose optional values
| Vertical bar indicates alternate selections — the bar means “or” { } Braces enclose content that the user must specify, such as x or y or z ... Ellipses indicate nonessential information omitted from the example
Where to get help
EMC support, product, and licensing information can be obtained on the EMC Online Support site as described next.
To open a service request through the EMC Online Support site, you must have a valid support agreement. Contact your EMC sales representative for details about obtaining a valid support agreement or to answer any questions about your account.
Product information
For documentation, release notes, software updates, or for information about EMC products, licensing, and service, refer to EMC online support at:https://support.EMC.com.
Technical support
EMC offers a variety of support options.
Support by Product— EMC offers consolidated, product-specific information on the Web at:
https://support.EMC.com/products.
The Support by Product web pages offer quick links to Documentation, White Papers, Advisories (such as frequently used Knowledgebase articles), and Downloads, as well as more dynamic content, such as presentations, discussion, relevant Customer Support Forum entries, and a link to EMC Live Chat.
EMC Live Chat— Open a Chat or instant message session with an EMC Support Engineer.
eLicensing support
To activate your entitlements and obtain your VMAX license files, visit the Service Center on
https://support.EMC.com, as directed on your License Authorization Code (LAC) letter emailed to you.
For help with missing or incorrect entitlements after activation (that is, expected functionality remains unavailable because it is not licensed), contact your EMC Account Representative or Authorized Reseller.
For help with any errors applying license files through Solutions Enabler, contact the EMC Customer Support Center.
If you are missing a LAC letter, or require further instructions on activating your licenses through the Online Support site, contact EMC's worldwide Licensing team atlicensing@emc.comor call:
◆ North America, Latin America, APJK, Australia, New Zealand: SVC4EMC (800-782-4362) and follow the voice prompts.
◆ EMEA: +353 (0) 21 4879862 and follow the voice prompts.
Your comments
Your suggestions will help us to improve the accuracy, organization, and overall quality of the user publications. Send your opinions of this document to:
Pre-installation considerations
This section contains steps and information you need to take and consider before the actual installation happens.
Before you begin 16
Environment and system requirements 19
Before you begin
The following sections contain steps and information you need to take and consider before the actual installation happens.
Unisphere Initial Setup User
While installing the software, you are prompted to specify a Unisphere Initial Setup User. You can either specify the user ID you currently use to access the storage system (if User Authorization is enabled), or you can use the default user IDsmc. If you plan on using the default ID, there must be
no user IDs listed in the User Authorization database. If there are user IDs in the database
(regardless of whether user authorization is enabled), then you must use SYMCLI to add the default user ID (smc) to the database.
For more information about users and roles, seeSecurity featureson page 79.
The role of the Unisphere Initial Setup User is to install and set up the Unisphere environment (create users and add roles). It is intended to be a temporary role as it allows you only to perform administrative tasks on storage systems that do not have defined user roles (authorization rules). After an Administrator or a SecurityAdmin is assigned to a storage system, the Unisphere Initial Setup User can no longer access or even see the system from the Unisphere console. Therefore, it is recommended that users do not operate in this role for any longer than necessary.
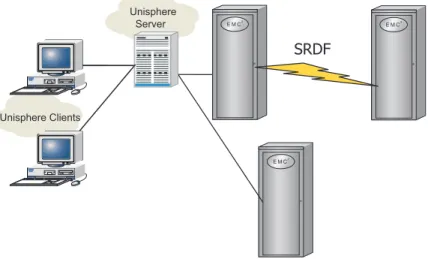
Local and remote installation options
Unisphere for VMAX can be installed in local or remote configurations. In a local configuration, install the Unisphere for VMAX software on a server running Solutions Enabler attached to storage systems (see the Unisphere server inFigure 1). In a remote configuration, install the Unisphere software on a server connected to the SYMAPI server (see the Unisphere server inFigure 2).
Unisphere Server
Unisphere Clients
SRDF
Figure 1: Local installation: Unisphere for VMAX
Figure 2: Remote installation: Unisphere for VMAX on a server connected to a remote SYMAPI server
Unisphere for VMAX licensing
Unisphere for VMAX uses VMAX-based eLicensing.
As a result, you can only manage a storage system from a Unisphere host, if the storage array contains a Unisphere for VMAX (SMC) eLicense. However, you can use Unisphere for VMAX to obtain and install the proper eLicense on the storage system.
Storage systems running Enginuity 5875.198.148 or lower do not require a license key.
After a storage system that has been managed by SMC is upgraded to Enginuity 5876 or higher, Unisphere will operate with the storage array even if the proper eLicense is not present. The Unisphere for VMAX (SMC) eLicense is noted asIn Usein the Unisphere eLicensing report. This designation means that the required eLicense is missing, but access to the system is still allowed to avoid service disruption. To clear this designation, you must obtain and apply the proper eLicense. With the incorporation of Performance Analyzer into Unisphere for VMAX, the former Symmetrix Performance Analyzer host-based eLicense is no longer required.
For more information on eLicensing, refer to theEMC Solutions Enabler Installation Guide.
Unisphere for VMAX Virtual Appliance
The Unisphere for VMAX virtual appliance (vApp) is available for ESX V4.0 (and higher) servers in a VMware environment.
For more information and instructions on installing the appliance, refer to the Installing the Unisphere for VMAX Virtual Appliance chapter.
Unisphere Lockbox Password
In previous releases, a lockbox was created at installation time. The lockbox is a vault containing user and password information, secured with a key. As a security improvement, you can now configure a password, known as the Unisphere Lockbox Password, for the lockbox.
As part of the installation, you can accept the default password (host_name@Smas-1) or you can configure a custom one. If you configure a password other than the default one, you will need that password to perform any subsequent upgrades or support operations that require access to the lockbox.
X.509 certificate-based user authentication
Certificate-based user authentication using X.509 certificates is supported on fresh installations on Windows and Linux servers. You can use a certificate issued by a trusted public third-party certificate authority (CA) to authenticate your identity when using the Unisphere for VMAX web client or REST API interfaces. The use of digital identity smartcards such as Common Access Card (CAC) and Personal Identity Verification (PIV) as part of a multi-factor authentication process is also supported. You can enable certificate-based user authentication as part of the installation and after you have confirmed your intentions, the choice becomes irreversible. You must import the CA certificates before certificate-based user authentication can be used.
TheEMC VMAX Family Security Configuration Guideprovides additional details about certificate management.
Environment and system requirements
The Unisphere web server is supported on the platforms listed inTable 2on page 21. Unisphere for VMAX can be used in remote client/server mode to communicate with SYMAPI servers on other systems, including supported versions of AIX, Linux, Solaris, HP-UX, z/OS, and Windows.
Network requirements
Prior to installing Unisphere for VMAX, verify that the host is in a properly configured IP network and that it can resolve IP addresses and hostnames.
When installing, the use of IPv6 addresses is supported.
Solutions Enabler
Solutions Enabler 64-bit V8.0.3 is required in local and client/server modes. In client/server mode, thestorsrvddaemon must be running on the server.
In V8.0.2, and higher, the Solutions Enabler STP daemon collects data using a new format.
Therefore, features that rely on the earlier STP data format (for example, the Performance Analyzer) will not support the Solutions Enabler V8.0.2, or higher, STP daemon.
Supported HYPERMAX OS/Enginuity versions
Unisphere for VMAX V8.0.3 supports:
◆ VMAX Family systems running HYPERMAX OS 5977 or higher EMC recommends running 5977.497.471 or higher.
◆ Symmetrix VMAX 10K/20K/40K Series systems running Enginuity 5876
◆ Symmetrix DMX systems running Enginuity 5671 and 5773
Host systems and storage operating environment
Unisphere for VMAX runs on a wide range of operating systems and works with certain Enginuity and HYPERMAX OS versions. For detailed interoperability information, refer to E-Lab Interoperability Navigator athttps://support.EMC.com.
Concurrent users
Unisphere for VMAX supports up to 10 concurrent users, with performance degradation occurring with more than three users.
Symmetrix Management Console
Unisphere cannot be installed on the same host as SMC because Unisphere for VMAX and SMC/SPA are not qualified to run on the same machine together due to system resource requirements. However, they can run on separate virtual machines (VMs) on the same server, provided that each VM meets the system and memory requirements.
VMware and Hyper-V guests
Unisphere for VMAX is supported on a guest operating system on the following platforms, provided the guest is listed in the EMC Support Matrix and in VMware/Hyper-V support documentation, and Unisphere for VMAX supports the platform. Note that the guest must provide the same CPU, memory, disk, gatekeeper, and other requirements as if Unisphere for VMAX were installed on a physical machine:
◆ VMware ESX/ESXi Server versions 4.0, 4.1, 5.0, 5.1 and 5.5 (and all updates of each version).
◆ Windows Server versions 2008 R2 (Standard and Enterprise), 2012, and 2012 R2.
Virtual machines must not be running on shared memory/resources.
Database Storage Analyzer requirements
Database Storage Analyzer monitors the performance of Oracle databases (version 10g or higher). The following operating systems are supported:
◆ AIX, version 5.2 and above (64-bit)
◆ Sun Solaris 10 and above (64-bit, SPARC only) ◆ Red Hat Enterprise Linux 5 and above (64-bit)
◆ Linux SUSE 10 and higher
◆ Oracle Linux Server release 5 and higher ◆ HP UX Itanium, version 11.23 and higher
You can use VMware VMDK virtual disks and RDM virtual environments. Other virtual environments (Solaris containers, AIX VIO, VPLEX, and so on) are not supported.
The monitored database must have an Oracle diagnostic pack license.
EMC ControlCenter
Unisphere cannot be installed on the same host as EMC ControlCenter agents because Unisphere requires a 64-bit version of Solutions Enabler and ControlCenter agents require a 32-bit version of Solutions Enabler.
Client screen requirements
The minimum client screen resolution required is 1080 x 1024.
Client browser requirements
The Unisphere for VMAX client is browser based and does not use dynamic ports, so it works with most VPN solutions.
Table 1defines the client requirements for Unisphere for VMAX.
Browser Version Memorya Platform
Internet Explorer 9.0 through 11.0 (Desktop only)
600 MB Windows
Firefox 30 or higher
Chromeb 21.0.1180 or higher
a . Required for the browser as it runs on the machine from which the console is launched . b . Not supported in embedded NAS (eNAS) environments.
Table 1: Unisphere for VMAX client requirements
For the installed browser, the following additional software is required:
◆ Flash Player 11.2.
◆ An appropriate version of Java SE Runtime Environment 7 (JRE), that is, a 32-bit JRE for a 32-bit browser, and a 64-bit JRE for a 64-bit browser.
Server requirements
Table 2defines the server requirements and limitations.
Operating systema Maximum volume count Minimum processor specification Minimum available memoryb Minimum available disk space Maximum managed storage system count Windows 0 - 64,000 Minimum of a 2-core, 1.8 GHz processor 12 GB 120 GB 10 Linux Windows 64,001 -128,000 Minimum of a 2-core, 1.8 GHz processor 16 GB 140 GB 20 Linux Windows 128,001 -256,000 Minimum of a 4-core, 1.8 GHz processor 20 GB 180 GB 20 Linux
a. For specific operating system information, refer to E-Lab™ Interoperability Navigator at: https://support.EMC.com
b. This is the minimum amount of memory required to successfully run Unisphere for VMAX on the server; it is not the total amount of memory on the server. If a server has a total of 12 GB of physical memory installed but there is only 6 GB available before Unisphere for VMAX, you may experience performance issues with the application. If running on a Virtual Machine, this amount must be dedicated memory, not shared memory.
Table 2: Server requirements and limitations
Other requirements
◆ Ensure that DNS is configured correctly on the host.
◆ The host system must have connectivity to one or more storage systems to add users and set
permissions in Unisphere.
◆ Unisphere for VMAX can be installed on the same system as the SYMAPI server, or on a system connected to the SYMAPI server. Refer toFigure 1on page 16 andFigure 2on page 17,
respectively.
◆ Before you attempt to install Unisphere for VMAX on Red Hat Linux 6.0 or a later release, verify that the following packages are installed. Not all installer packages include these libraries by default, so it is important to verify their presence before running the installation program. Do not attempt to run the installation process without them. Without these items, the product fails to install and does not function properly.
The packages are:
• libstdc++-devel-4.4.4-13.el6.x86_64.rpm
• libstdc++-4.4.4-13.el6.x86_64.rpm
• libaio-0.3.107-10.el6.x86_64.rpm
• ncurses-libs-5.7-3.20090208.el6.x86_64.rpm
◆ To install PostgreSQL on Linux, a minimum of 2 GB of shared memory must be available.
For more information about how to configure the size of a shared memory segment, using the
shmmaxkernel parameter, see the documentation for your operating system.
◆ If you are changing your SYMAPI connection type, such as changing from a local connection to a client/server configuration, you must perform a fresh installation.
◆ Before installing Unisphere for VMAX on a host running Linux, ensure that the maximum number of open file descriptors allowed is at least 4096. To do this, complete the following steps:
a. Check the current limit for the number of open file descriptors. At the command line, enter the following command:
ulimit -n
b. If the value returned is less than 4096, set it to the correct limit:
ulimit -n 4096
Installing Unisphere for VMAX
This section describes how to access, install, and run the Unisphere for VMAX software.
Pre-installation configuration 24
Installing Unisphere for VMAX 26
Completing the installation 31
Launching Unisphere for VMAX 35
Launching Database Storage Analyzer 36
Pre-installation configuration
Before you install Unisphere for VMAX, complete the following tasks if they are appropriate for your installation environment:
◆ Setting the event and statistics daemons to autostart on Linuxbelow
◆ Setting up the PostgreSQL user on Linuxbelow
◆ Configuring for eNAS link and launchon the facing page
Setting the event and statistics daemons to autostart on Linux
To install Unisphere for VMAX on a local Linux 64-bit host, complete this task.
To set the event and statistics daemons to autostart:
1. Set the event and statistics daemons to autostart using the following commands:
stordaemon install storevntd -autostart stordaemon install storstpd -autostart
2. Start the same daemons using the following commands:
stordaemon start storstpd stordaemon start storevntd
Setting up the PostgreSQL user on Linux
Before starting a new installation of Unisphere for VMAX on Linux, the PostgreSQL user
(postgres) and group (postgres), must be present. In addition, the user must be a member of
thepostgresgroup.
Use the following commands to create thepostgresgroup and add thepostgresuser to the postgresgroup:
groupadd postgres
useradd -g postgres postgres
Configuring for eNAS link and launch
If you plan to use the embedded NAS (eNAS) link and launch functionality, you must perform some manual configuration before you install Unisphere for VMAX.
To configure for eNAS link and launch:
1. Open the following configuration file for editing: • On Linux systems:/etc/hosts
• On Windows systems:C:\Windows\System32\drivers\etc\hosts
2. Add a mapping for the IP address (in either IPv4 or IPv6 format) and the host name, following the format used by the examples in the file.
3. Save the file and exit.
Further configuration must be performed after Unisphere for VMAX has been installed. For more information, refer to the Unisphere for VMAX online help.
Installing Unisphere for VMAX
To install Unisphere for VMAX:◆ Step 1: Accessing the softwarebelow
◆ Step 2: Installing the softwarebelow
◆ Step 2A: Installing Unisphere for VMAX using the wizardon the facing page
◆ Step 2B: Installing Unisphere for VMAX from the command lineon page 28
Step 1: Accessing the software
The Unisphere for VMAX V8.0.3 software and documentation is available on EMC Online Support at:
https://support.EMC.com
It consists of the following:
◆ For Windows 64-bit:
UNIVMAX_V8.0.3.x_WINDOWS_X86_64.exe
◆ For Linux 64-bit:
UNIVMAX_V8.0.3.x_LINUX_X86_64.bin
◆ For Virtual Appliance:
univmaxpa803_x_suse11__x86_64_vapp_OVF10.ova
In the file names above,xrepresents the software build number. That number varies, based on
when the software was built.
◆ Unisphere for VMAX Online Help
◆ Unisphere for VMAX Release Notes ◆ This installation guide.
To access the software from online support:
1. On the EMC Online Support site:a. ClickSupport By Productin the main navigation bar.
b. In theFind a Productbox, type Unisphere for VMAX and click the arrow. c. Locate the appropriate kit and download it to a directory on the host drive. 2. Continue withStep 2: Installing the software.
Step 2: Installing the software
You can install Unisphere for VMAX using an installation wizard, as described inStep 2A: Installing Unisphere for VMAX using the wizard, or from the command line, as described inStep 2B: Installing Unisphere for VMAX from the command line.
Step 2A: Installing Unisphere for VMAX using the wizard
To install Unisphere for VMAX using the wizard:
1. Save all files and exit all applications.2. Change the directory to the location of the kit and run the appropriate executable for your operating system.
To install Unisphere for VMAX using the wizard in Linux, the display manager must be enabled and the-i swingswitch used, for example:
./UNIVMAX_V8.0.3.x_LINUX_X86_64.bin -i swing
If the display manager is not enabled or the-i swingis not used, the installer defaults to
console mode.
3. On theIntroductionpage, review the recommendations and clickNext.
4. On theChoose Install Folderpage, clickNextto accept the default directory, or clickChoose
to select another directory.
5. On theInitial Setup User and SymAPI Configurationpage:
a. Specify aUnisphere Initial Setup Username (default issmc). You can either accept the
default or use your Windows username if you have authorization enabled on the Unisphere server host. For more information about the role of the Unisphere Initial Setup User, see
Unisphere Initial Setup Useron page 16.
b. Specify aSymAPI Connection Typefor the initial login based on the following:
Local— On a host with Solutions Enabler installed and attached to VMAX systems.
Remote— On a remote server connected to a SYMAPI server, specify the SYMAPI server
Node NameandNet Port. The default net port for SYMAPI is 2707.
For more information about each of the connection types, seeLocal and remote installation optionson page 16.
c. ClickNext.
6. On thePorts Configurationpage, specify the ports to use or enable when connecting to the Unisphere server.
The default ports of the Unisphere server (HTTPS Port No) and performance database (DB Port No) are shown. To use the default ports, verify that they are available, and clickNextto accept and enable them. Or you can specify and enable different ports, and clickNext.
7. On theUnisphere Lockbox Passwordpage, configure the lockbox password.
Note:If you configure a Unisphere Lockbox Password other than the default one, ensure that you take note of the new password. You will need it for subsequent upgrade and support operations.
To accept the default lockbox password, clickNext.
To change the lockbox password, complete the following steps: a. SelectOverwrite default Unisphere lockbox password?. b. In theLockbox Passwordfield, type the new lockbox password.
c. In theConfirm Lockbox Passwordfield, type the new lockbox password again. d. ClickNext
e. In theDefault Lockbox Passworddialog box, clickOK.
8. (Optional) On theX.509 Certificate-based Client Authenticationpage, configure certificate-based user authentication options. The default behavior is for X.509 certificate-certificate-based authentication to remain disabled.
To enable X.509 certificate-based authentication, complete the following steps: a. SelectEnable certificate based client authentication?.
b. Specify whether to use the CN or UPN of the client certificate as the certificate alias. Note that instances of the following special characters are stripped from the alias: @:?;|<>[]+=,*/\
c. ClickNext.
d. On theConfirm Client Authenticationdialog box, clickOK.
If you enable X.509 certificate-based authentication, after installation completes, import the certificate and start SMAS manually. For more information, refer toImporting CA certificateson page 32 andStarting and stopping the SMAS serviceon page 34.
9. If the disk space and/or memory requirements are not met, a warning is displayed. If you want to continue with the installation regardless of the consequences described in the message, clickOK.
10. On thePre-Installation Summarypage, verify the summary information, and clickInstallto continue the installation.
11. To install Unisphere for VMAX on a host with more than one network interface configured, you are prompted to choose the IP address to which Unisphere for VMAX will bind. On theListening (bind) Address Selectionpage, select the server protocol (IPv4 or IPv6), select the IP address, and then clickNext.
12. On theInstall Completepage, clickDone.
13. Refer toCompleting the installationfor instructions on completing the installation.
Step 2B: Installing Unisphere for VMAX from the command line
Online help is available when installing from the command line by entering-?.
To install Unisphere for VMAX from the command line:
1. Save all files and exit all applications.
2. Change the directory to the location of the kit.
3. Run the following command to install Unisphere for VMAX on Windows:
KitName -i console
Run the following commands to install Unisphere for VMAX on Linux:
chmod +x KitName ./KitName -i console
WhereKitNameis one of the following operating system-specific kit names:
• For Windows 64-bit:
UNIVMAX_V8.0.3.x_WINDOWS_X86_64.exe
• For Linux 64-bit:
UNIVMAX_V8.0.3.x_LINUX_X86_64.bin
In the file names above, thexrepresents the software build number. That number varies based on when the software was built.
4. On theIntroductionpanel, review the recommendations and pressEnter.
5. On theChoose Install Folderpanel, pressEnterto accept the default directory, or specify a different directory and pressEnter.
6. On thepostgres User and Grouppanel, you are instructed to create thepostgresgroup and postgresuser before continuing. When complete, pressEnter.
7. On theInitial Setup User and SymAPI Configurationpanel, complete the following steps: a. Specify aUnisphere Initial Setup Username (default is smc).
You can either accept the default username or use your Windows username if you have authorization enabled on the Unisphere server host. For more information about the role of the Unisphere Initial Setup User, seeUnisphere Initial Setup Useron page 16.
b. Specify aSymAPI Connection Typefor the initial login based on the following:
Local— On a host with Solutions Enabler installed and attached to VMAX systems.
Remote— On a remote server connected to a SYMAPI server, specify the SYMAPI server
Node NameandNet Port. The default net port for SYMAPI is 2707.
For more information about each of the connection types, seeLocal and remote installation optionson page 16.
8. On thePorts Configurationpanel, specify the ports to use or enable when connecting to the Unisphere server.
The default ports of the Unisphere server (HTTPS Port Number) and performance database (DB Port Number) are shown. To use the default ports, verify that they are available and pressEnter
to accept and enable them. Or you can specify and enable different ports, and pressEnter. 9. On theUnisphere Lockbox Passwordpanel, clickEnterto accept the default lockbox
password, or configure a new one and then pressEnter.
Note:If you configure a Unisphere Lockbox Password other than the default one, ensure that you take note of the new password. You will need it for subsequent upgrade and support operations.
10. On theX.509 Certificate-based Client Authenticationpanel, configure certificate-based user authentication options. The default behavior is for it not to be enabled.
To enable X.509 certificate-based authentication, complete the following steps: a. At theEnable certificate based client authentication?prompt, type2for Yes. b. Specify whether to use the CN or UPN of the client certificate as the certificate alias.
Note that instances of the following special characters are stripped from the alias: @:?;|<>[]+=,*/\
c. PressEnterto continue.
d. On theConfirm Client Authenticationpanel, confirm your selection.
If you enable X.509 certificate-based authentication, after installation completes, import the certificate and start SMAS manually. For more information, refer toImporting CA certificateson page 32 andStarting and stopping the SMAS serviceon page 34.
11. If the disk space and/or memory requirements are not met, a warning is displayed. If you want to continue with the installation regardless of the consequences described in the message, type1.
12. On thePre-Installation Summarypanel, verify the summary information, and then pressEnter
to continue the installation.
13. On theListening(bind) Address Selectionpanel, to install Unisphere for VMAX on a host with more than one network interface configured, you are prompted to choose the IP address to which Unisphere for VMAX will bind and specify if it is an IPv4 or an IPv6 address.
14. On theInstallation Completepanel, pressEnter.
15. Refer toCompleting the installationfor instructions on completing the installation.
Completing the installation
This section describes the tasks to perform after the installation has been completed:
◆ Configuring language and regional settingsbelow
◆ Installing a Unisphere for VMAX licensebelow ◆ Configuring third-party utilitiesbelow
◆ Importing CA certificateson the next page
◆ Starting and stopping the performance databaseon the next page
◆ Starting and stopping the SMAS serviceon page 34
Configuring language and regional settings
For Windows users outside the United States, you must configure your regional and language settings to English (United States) if you plan on using the graph feature of the Quality of Service (QoS) and Replication Monitors.
The exact steps you need to follow might vary from those listed here, depending on the version of Windows you are using.
To configure the language and regional settings:
1. Stop the EMC SMAS service (if it is running). SeeStarting and stopping the SMAS serviceon page 34.
2. In the WindowsControl Panel, double-clickRegional and Language Options.
3. On theRegional Optionstab, set theStandards and formatstoEnglish (United States). 4. On theAdvancedtab, set theLanguage for non-Unicode programstoEnglish (United States)
and selectApply all setting to the current user account and to the default user profile. 5. Restart the service.
Installing a Unisphere for VMAX license
Before you can manage a VMAX array running Enginuity 5876 or higher, you must install a
Unisphere for VMAX (SMC) eLicense on the VMAX array. For instructions on installing licenses, refer toInstalling Licensesin the Unisphere for VMAX online help.
Configuring third-party utilities
To ensure that third-party software utilities (including virus scanning and backup tools) do not affect the operation of the Unisphere for VMAX software installed on the host, you might need to carry out some additional configuration.
Exclude theinstall_dir\SYMAPI\stp\spadirectory and all subdirectories from any virus
scan.
Exclude the performance database directory,
install_dir\SMAS\jboss\standalone\data\pgsql\data, and all subdirectories, from
the actions performed by any third-party software utility.
Not following this advice may lead to data corruption in the performance database or problems with data collection.
Importing CA certificates
If you chose to use certificate-based user authentication at installation time, import the CA certificates before you login.
You must have root/administrator permissions to complete this task.
When certificate-based user authentication is chosen at install time, the SMAS service does not start automatically after installation completes. After you have imported the CA certificates, manually start the SMAS service.
For more information about starting the SMAS service seeStarting and stopping the SMAS service
on page 34.
To import a CA certificate:
1. Open thedomain.xml.initfile.
For Linux:
install_dir/jboss/domain/configuration/domain.xml.init
For Windows:
install_dir\jboss\domain\configuration\domain.xml.init
2. Search for the instance of "ssl key-alias="tomcat" password=password" 3. Take note of the value of thepasswordattribute.
4. For each root CA and intermediate CA certificate, run the appropriate commands. For Windows:
cd install_dir\SMAS\jboss\bin
service.bat importcacertpassword CA_cert_alias CA_file_path For Linux:
cd install_dir/SMAS/jboss/bin
initcst.sh importcacert password CA_cert_alias CA_file_path Where:
• passwordis the password of the keystore, discovered in step 3. • CA_cert_aliasis the alias of the CA cert chosen at installation time.
Note that when either the CN or UPN is chosen as the alias for the CA cert, instances of the following special characters are stripped from the alias:
@:?;|<>[]+=,*/\
• CA_file_pathis the path to the CA certificate file.
Starting and stopping the performance database
If required to do so, you can start and stop the performance database manually.
Windows
To start or stop theEMC_smasdbservice in Windows, use the Control Panel (Administrative Tools > Services).
Alternatively, you can use the following commands to start or stop the Windows services using the CLI:
net start "EMC_smasdb" net stop "EMC_smasdb"
Linux
Start the performance database before starting the SMAS service. In the same way, stop the SMAS service before stopping the performance database.
To start or stop the performance database (PostgreSQL) in Linux, navigate to this directory: install_dir/SMAS/jboss/standalone/data/pgsql
and use the following commands:
Action Command
Start ./smasdb_unix_helper.sh -S
Stop ./smasdb_unix_helper.sh -k
Starting and stopping the SMAS service
If required to do so, you can start and stop the SMAS service manually.
Windows
To start or stop the EMC Symmetrix Management Application Server in Windows, use theServices
panel. ClickControl Panel > Administrative Tools > Servicesto open theServicespanel. Alternatively, you can use the following commands to start or stop the Windows services using the CLI:
net start "EMC Symmetrix Management Application Server" net stop "EMC Symmetrix Management Application Server"
Linux
Start the performance database before starting the SMAS service. In the same way, stop the SMAS service before stopping the performance database.
To start or stop the SMAS service in Linux, change to this directory:
/etc/init.d
and use the following commands:
Action Command
Start server ./smas start
Stop server ./smas stop
Launching Unisphere for VMAX
To launch Unisphere for VMAX:
1. Type the following URL in a browser:https://host_IP:port_number
The port number is configured during installation. The default HTTPS port number is 8443. The use oflocalhostis not supported.
If the host IP address is an IPv6 address, surround the IP address with square brackets, for example:
https://[2001:db8:ffff:ffff:ffff:ffff:ffff:ffff]:8443
If the host IP address is an IPv4 address, type the IP address as normal, for example:
https://198.51.100.255:8443
For your browser to access the Unisphere for VMAX console, Flash Player 11.2 or a later release is required. Flash Player is available from the Adobe website.
2. Do one of the following:
• At the login window, type the Unisphere Initial Setup User username and password, and clickLogin.
The default username for the Unisphere Initial Setup User issmcand the default password
issmc.
• If you are using certificate-based user authentication, clickOptionsto display more options, and selectUse Client Certificate. If the Unisphere for VMAX login window does not display correctly, ensure that the CA certificates have been imported correctly. 3. ClickLogin.
Launching Database Storage Analyzer
Database Storage Analyser is an application included with Unisphere for VMAX. It provides a database performance troubleshooting solution for Oracle databases (version 10g and above) running on EMC storage systems.
When logging into Database Storage Analyzer, you can use the default Unisphere Initial Setup User. If you have removed the smc user or defined another admin user on the system, create a Database Storage Analyzer admin user in Unisphere for VMAX (Home > Administration > Security > Authorized Users & Groups).
To use Database Storage Analyzer with certificate-based user authentication, you must launch Database Storage Analyzer in a standalone fashion, rather than from within Unisphere for VMAX.
To launch Database Storage Analyzer:
1. Type the following URL in a browser:https://host_IP:port_number/univmax/dsa
The port number is configured during installation. The default HTTPS port number is 8443. 2. At the login window, type the Unisphere Initial Setup User username and password.
If certificate-based user authentication was enabled when Unisphere for VMAX was installed, the Database Storage Analyzer login window displays withUse Client's X.509 Certificate
selected and theUserandPasswordfields dimmed. 3. ClickLogin.
To launch Database Storage Analyzer from within Unisphere for VMAX:
1. In Unisphere for VMAX, select a storage system.2. Select Databases > Databases to open the Database list view. 3. Click Database Storage Analyzer.
4. At the login window, type the Unisphere Initial Setup User username and password, and click
Login.
Upgrading Unisphere for VMAX
This chapter explains how to upgrade Unisphere for VMAX:Upgrade paths 38
Before upgrading Unisphere for VMAX 39
Running the Unisphere for VMAX upgrade 40
After upgrading Unisphere for VMAX 41
Upgrade paths
You can upgrade to Unisphere for VMAX V8.0.3 from Unisphere for VMAX V1.6.2 or Unisphere for VMAX V8.0.x.
The installation program automatically upgrades your installation according to the settings used in the previous installation, including port and connection type.
The following Unisphere for VMAX settings from your previous installation are maintained through the upgrade process:
◆ Users
◆ Alert policies and threshold settings
◆ Email Settings: Mailing list and SMTP configuration
◆ Performance dashboard settings
◆ Queries
When upgrading from V1.6.2, LDAP/AD configuration information is not retained. When upgrading from V8.0.x, LDAP/AD configuration information is retained.
Before upgrading Unisphere for VMAX
Before upgrading Unisphere for VMAX, check the size of the performance database folder. For Unisphere for VMAX V1.6.1, the performance database folder isinstall_
dir\EMC\SMAS\jboss\standalone\data\msqand for Unisphere for VMAX V8.0.1, and
higher, it isinstall_dir\EMC\SMAS\jboss\standalone\data\pgsql.
Ensure that the minimum RAM and disk space requirements for Unisphere for VMAX V8.0.3 are met. For more information about server requirements, seePre-installation considerationson page 15.
Before commencing any upgrade process, ensure that backups of all data have been made. As a safeguard, follow these steps:
1. For each registered storage system, backup the performance database. You must restore each database backup after the upgrade.
2. Take note of the systems registered for collecting performance data. Record the settings for data collection and diagnostic interval for each one.
3. Export the Performance settings (metric and alert definitions and user templates). This operation requires setting a password to use when you import the saved settings to the new system.
Refer to the Unisphere for VMAX online help to perform these tasks.
Running the Unisphere for VMAX upgrade
This section describes how to upgrade the Unisphere for VMAX software.
Upgrading Unisphere for VMAX on Windows
To upgrade Unisphere for VMAX using the wizard on Windows:
1. Access the software, as described inStep 1: Accessing the softwareon page 26. 2. Navigate to the location of the kit and run the appropriate executable for your operating
system.
3. In the instance detected message window, clickUpgrade Installed Features.
4. A database backup warning displays. ClickOKto continue with the upgrade. To preserve performance data, ensure that a backup has been performed.
5. In theIntroduction - Upgrade Unisphere for VMAXpage, clickNext.
6. If the disk space and/or memory requirements are not met, a warning is displayed. If you want to continue with the upgrade regardless of the consequences described in the message, click
OK.
7. In thePre-Installation Summarypage, clickInstall. 8. When the upgrade process completes, clickDone.
Upgrading Unisphere for VMAX on Linux
To upgrade Unisphere for VMAX using the command line on Linux:
1. Stop the SMAS service, as described inStarting and stopping the SMAS serviceon page 34. 2. Access the software, as described inStep 1: Accessing the softwareon page 26.
3. Navigate to the location of the kit and run the appropriate executable for your operating system.
4. When prompted to do so, confirm that you want to upgrade the installed features.
5. The installation script displays the current Unisphere version and the version to which you will upgrade. PressEnter.
6. A database backup warning displays. ClickOKto continue with the upgrade. To preserve performance data, ensure that a backup has been performed.
7. In theIntroduction - Upgrade Unisphere for VMAXpage, clickNext.
8. In thePre-Installation Summarypage, clickInstall. InstallAnywhere guides you through the upgrade installation of Unisphere for VMAX.
9. If the disk space and/or memory requirements are not met, a warning is displayed. If you want to continue with the upgrade regardless of the consequences described in the message, type1. 10. PressEnterthrough each option in the upgrade process.
The upgrade process completes.
11. Complete the tasks described inAfter upgrading Unisphere for VMAXon the facing page.
After upgrading Unisphere for VMAX
This section describes the tasks to perform after the installation has been completed.
Renewing link and launch client registrations
If you were using link and launch client registrations to launch Unisphere from ProSphere, or vSphere VSI clients, re-register your host with Unisphere for VMAX. The Unisphere help information shows how to do this.
Restoring and verifying system and performance data
To restore and verify system and performance data:
1. Re-register the systems that were collecting performance data before the upgrade. 2. Verify your data collection and diagnostic intervals against the values recorded before the
upgrade.
3. Restore your performance database backups using the Unisphere for VMAX console and verify each database.
4. Verify the Performance settings (metric and alert definitions and user templates). If you need to import the Performance settings, use the password you set when you exported the settings. The Unisphere for VMAX Online Help contains instructions on performing these tasks.
Uninstalling Unisphere for VMAX
This chapter explains how to uninstall Unisphere for VMAX:Before you begin 44
Uninstalling from Windows 45
Uninstalling from Linux 46
Before you begin
Before uninstalling Unisphere for VMAX, note the following:
◆ Uninstalling Unisphere removes the performance database. The Unisphere online help provides instructions on backing up/restoring the performance database should you want to reuse it at a later time.
◆ During an uninstallation, the installation program prompts you to export your customized performance settings (metrics and threshold settings only) to a file that can be imported to another Unisphere environment. The Unisphere online help provides instructions on exporting/importing your customized performance settings.
Uninstalling Unisphere terminates all client sessions to the SMAS server and any SYMAPI operations in progress.
Uninstalling from Windows
You can uninstall Unisphere for VMAX from a Windows host using either the WindowsAdd/Remove Programswindow, the command line, or Windows Explorer.
Using Windows Add/Remove Programs
The exact steps you need to follow might vary from those listed here, depending on the version of Windows you are using.
To uninstall Unisphere for VMAX from the Windows Add/Remove Programs window:
1. From the WindowsStartmenu, selectSettings, Control Panel, Add/Remove Programs. 2. In theAdd/Remove Programsdialog, selectEMC Unisphere for VMAXand clickChange/Remove.
3. Complete the remaining steps in the wizard.
Using the command line
To uninstall Unisphere for VMAX using the command line:
1. Change directory location to:install_dir\SMAS\_EMC_SMAS_installation
2. Type the following to launch the uninstallation wizard:
Uninstall_EMC_SMAS_Installation.exe -i console
3. Complete the steps in the wizard.
A few files remain after the uninstallation operation. To remove them you can delete the SMAS folder.
Using Windows Explorer
To uninstall Unisphere for VMAX using Windows Explorer:
1. Double-click the following to launch the uninstallation wizard:install_dir\SMAS\_EMC_SMAS_installation\ Uninstall_EMC_SMAS_Installation.exe
2. Complete the steps in the wizard.
A few files remain after the uninstallation operation. To remove them you can delete the SMAS folder.
Uninstalling from Linux
You can uninstall Unisphere for VMAX from a Linux host using either the wizard or the command line.
Using the wizard
Using the wizard to uninstall Unisphere for VMAX is not supported on virtual machines.
To uninstall Unisphere for VMAX from a Linux host using the wizard:
1. Navigate to the following directory:
install_dir/SMAS/_EMC_SMAS_installation
2. Type the following to launch the uninstallation wizard:
./Uninstall_EMC_SMAS_Installation -i swing
3. Complete the steps in the wizard.
A few files remain after the uninstallation operation. To remove them you can delete the SMAS folder.
Using the command line
To uninstall Unisphere for VMAX from a Linux host using the command line:
1. Navigate to the following directory:install_dir/SMAS/_EMC_SMAS_installation
2. Type the following to launch the uninstallation wizard:
./Uninstall_EMC_SMAS_Installation -i console
3. Complete the steps in the wizard.
A few files remain after the uninstallation operation. To remove them you can delete the SMAS folder.
Installing the Unisphere for VMAX virtual
appliance
This chapter shows how to install the Unisphere for VMAX Virtual Appliance in a VMware infrastructure environment:
Introduction 48
Before you begin 50
Installing the virtual appliance directly on the ESX Server 51
Installing the virtual appliance through a vCenter Server 56
Installing the virtual appliance using OVFTOOL 58
Launching Unisphere or the vApp Manager 61
Registering the VASA Provider with vSphere 63
Upgrading the Unisphere for VMAX Virtual Appliance using an ISO image 64
Re-configuring the virtual appliance IP address 66
Deleting the Unisphere for VMAX Virtual Appliance 68
Backing up and restoring the performance database 69
Installing licenses 71
Introduction
The Unisphere for VMAX Virtual Appliance is a VMware ESX Server virtual appliance that provides all of the components you need to manage your VMAX environment using thestorsrvddaemon and
Solutions Enabler network client access. These include:
◆ EMC Unisphere for VMAX V8.0.3.
◆ EMC Solutions Enabler V8.0.3 (solely intended as a SYMAPI server for Solutions Enabler client access).
◆ Linux OS (SUSE 11 SP3).
Root login is not supported on SUSE 11 SP3 virtual machines.
◆ SMI-S Provider V8.0.3.
In addition, the appliances include a browser-based console to configure your storage environment. The Unisphere for VMAX vApp Manager enables you to perform configuration tasks not available in the appliances directly.
Using this console, you can perform the following tasks:
◆ Launch Unisphere
◆ Monitor the application status
◆ Start and stop selected daemons
◆ Download persistent data
◆ Configure the nethost file (required for client access) ◆ Discover storage systems
◆ Modify options and daemon options
◆ Add host-based license keys
◆ Run a limited set of Solutions Enabler CLI commands
◆ Configure ESX host and gatekeeper volumes
◆ Load VMAX-based eLicenses
◆ Configure LDAP
◆ Configure iSCSI initiator and map iSCSI gatekeeper volumes ◆ Configure additional NIC card (optional)
◆ Download SYMAPI debug logs
◆ Import CA signed certificate for web browser ◆ Import custom certificate for storsrvd daemon
◆ Check disk usage
◆ Clear temporary files ◆ Restart appliance
◆ Configure symavoid entries
◆ Enable SSH ◆ Manage users
◆ Reset hostname
◆ Update/etc/hostsfile
For information on using the Unisphere for VMAX vApp Manager, refer to its online help.
Before you begin
Before you begin to install Unisphere for VMAX Virtual Appliance, carry out the tasks in this section.
◆ Verify that you are installing the latest version of the appliance by checking EMC Online Support for updates.
◆ Verify that the client is running:
• VMware vSphere client
• One of the following browsers with cookies and Javascript enabled: – Internet Explorer 9.0 through 11.0 (Desktop only)
– Firefox 30 or higher
– Chrome 21.0.1180 or higher
Browsers should have Flash Player 11.2 or a later release installed. If your browser has an outdated version of Flash Player, you are prompted to download the latest version when you start the web console.
◆ Verify that the virtual machine is not running shared memory/resources. ◆ Verify that the VMware ESX Server meets the following minimum requirements:
ESX Server
component Requirement
Processor Dual-core or two CPUs
ESX Server version 4.0 or higher
Disk space 120 GB
Memory 16 GB for exclusive use by Unisphere for VMAX
Table 3: Unisphere for VMAX Virtual Appliance VMware ESX Server requirements
If you are upgrading to V8.0.3, the available memory is checked as part of the upgrade operation. If the requirement is not met, the upgrade is canceled.
Installing the virtual appliance directly on the ESX Server
This section describes how to install the Unisphere for VMAX Virtual Appliance directly on the ESX Server.
Step 2 has three configuration options, depending on the virtual appliance network connection:
◆ IPv4 only —Step 2A: Powering on and configuring the virtual appliance (IPv4 only)on the next page
Use this option if the DNS server does not support IPv6 hostnames or the DNS/ESX server is configured on an IPv4-only network.
◆ IPv6 only —Step 2B: Powering on and configuring the virtual appliance (IPv6 only)on page 53 Use this configuration if the network configuration for the virtual appliance is IPv6 only. The virtual appliance is not able to communicate with an IPv4 host unless IPv6 packets are encapsulated inside IPv6 packets using tunneling.
◆ Dual stack —Step 2C: Powering on and configuring the virtual appliance (Dual stack)on page 54
Use this configuration if the system is configured for both IPv4 and IPv6. The system supports both formats but IPv6 addresses are used for configuring the vApp Manager, SMAS and storsrvd. An IPv4 address is used only for reaching IPv4 DNS and ESX servers.
Step 1: Installing the virtual appliance
To install the virtual appliance:
1. On the EMC Online Support site:a. ClickSupport By Productin the main navigation bar.
b. In the Find a Product box, typeUnisphere for VMAXand click the arrow. c. Locate the appropriate kit and download the OVF archive file (*.ova) containing the
installation program to a temporary directory: Unisphere for VMAX Virtual Appliance file name:
univmaxpa803_x_suse11_x86_64_vapp_OVF10.ova
Wherexin803_xrepresents the build number. That number varies depending on when the software was built.
2. Start the vSphere Client and log in to the ESX Server on which you want to install the appliance. 3. ClickIgnorein the security warning message.
4. From theFilemenu, selectDeploy OVF Template.
5. Browse to the OVF archive file, located in the temporary directory you created earlier. Select the OVF archive file with the suffix*vapp_OVF10.ova.
6. ClickNext.
7. On the OVF Template Details page, verify the details about the appliance and clickNext. 8. On the End User License Agreement page, selectAcceptand clickNext.
9. On the Name and Location page, specify a name for the appliance and clickNext.
10. On the Disk Format page, select the format in which to store the virtual machine’s virtual disks and clickNext.
Installing the virtual appliance directly on the ESX Server
11. On the Network Mapping page, select the network you want the virtual appliance to use and clickNext.
12. On the Ready to Complete page, verify the information and clickFinish. 13. In the Completed Successfully message, clickClose.
Step 2A: Powering on and configuring the virtual appliance (IPv4 only)
When configuring a virtual appliance, for each prompt, type the information requested, pressEnter, and then confirm that the information you entered is correct.
To power on and configure the IPv4-only virtual appliance:
1. On the Summary page of the Virtual Infrastructure Client, clickPower On. 2. Click theConsoletab and watch as the appliance starts up.
3. When prompted to do so, specify whether you want to configure an IPv4 or an IPv6 IP address:
Please select your static network configuration [1]/2: For IPv4: Enter 1
For IPv6: Enter 2
Enter your choice [1]/2:
Select IPv4. The following information is requested: • IP Address [ ]:
Type the address assigned to the appliance.
The virtual appliance uses this IP address to query the DNS server and get its hostname. Therefore, you must ensure that the IP address has a hostname mapping in the DNS server.
• Netmask [ ]:
Type the mask of the network on which the appliance is located. • Gateway [ ]:
Type the gateway address to the network on which the appliance is located. • DNS1 [ ]:
Type the IP address of the first DNS server and pressEnter. • DNS2 [ ]:
Type the IP address of the second DNS server and pressEnter.
• Is a proxy server necessary to reach the internet? y/n [n]:
Typeyto configure a proxy server. For each of the following prompts, type the information requested, pressEnter:
– ProxyServer [ ]:
Type the IP address of the proxy server and pressEnter. – ProxyPort [ ]:
Type the proxy port and pressEnter.
Typento continue the configuration without configuring a proxy server.
You have now finished installing the Unisphere Virtual Appliance. 4. Continue withStep 3: Adding gatekeepers.
Step 2B: Powering on and configuring the virtual appliance (IPv6 only)
When configuring a virtual appliance, for each prompt, type the information requested, pressEnter, and then confirm that the information you entered is correct.
In an IPv6-only configuration, any DNS configured have IPv6 addresses. If you want to use one or more DNS servers with IPv4 addresses, seeStep 2C: Powering on and configuring the virtual appliance (Dual stack)on the next page.
To power on and configure the IPv6-only virtual appliance:
1. On the Summary page of the Virtual Infrastructure Client, clickPower On. 2. Click theConsoletab and watch as the appliance starts up.
3. When prompted to do so, specify whether you want to configure an IPv4 or an IPv6 IP address:
Please select your static network configuration [1]/2: For IPv4: Enter 1
For IPv6: Enter 2
Enter your choice [1]/2:
Select IPv6. The following information is requested:
• Does your DNS server configured supports IPv6 hostnames? y/[n] :
To continue, typey. If you typen, configuration cancels. • IP Address [ ]:
Type the IPv6 address assigned to the appliance.
The virtual appliance uses this IP address to query the DNS server and get its hostname. Therefore, you must ensure that the IP address has a hostname mapping in the DNS server.
• Prefix [ ]:
Type the prefix length of the network on which the appliance is located. • Gateway [ ]:
Type the gateway address to the network on which the appliance is located. • DNS1 [ ]:
Type the IPv6 address of the first DNS server of the network on which the appliance is located.
• DNS2 [ ]:
Optional:Type the IPv6 address of the second DNS server of the network on which the appliance is located.
You have now finished installing the Unisphere Virtual Appliance. 4. Continue withStep 3: Adding gatekeepers.
Installing the virtual appliance directly on the ESX Server
Step 2C: Powering on and configuring the virtual appliance (Dual stack)
When configuring a virtual appliance, for each prompt, type the information requested, pressEnter, and then confirm that the information you entered is correct.
In a dual stack configuration, one or more of the DNS servers configured has an IPv4 address. If you want to use only DNS servers with IPv6 addresses, seeStep 2B: Powering on and configuring the virtual appliance (IPv6 only)on the previous page.
To power on and configure the dual stack virtual appliance:
1. On the Summary page of the Virtual Infrastructure Client, clickPower On. 2. Click theConsoletab and watch as the appliance starts up.
3. When prompted to do so, specify whether you want to configure an IPv4 or an IPv6 IP address:
Please select your static network configuration [1]/2: For IPv4: Enter 1
For IPv6: Enter 2
Enter your choice [1]/2:
Select IPv6. The following information is requested:
• Does your DNS server configured supports IPv6 hostnames? y/[n] :
To continue, typey. If you typen, configuration cancels. • IP Address [ ]:
Type the IPv6 address assigned to the appliance.
The virtual appliance uses this IP address to query the DNS server and get its hostname. Therefore, you must ensure that the IP address has a hostname mapping in the DNS server.
• Prefix [ ]:
Type the prefix length of the network on which the appliance is located. • Gateway [ ]:
Type the gateway address to the network on which the appliance is located. • DNS1 [ ]:
Type the IP address (IPv4 or IPv6) of the first DNS server of the network on which the appliance is located.
• DNS2 [ ]:
Optional:Type the IP address (IPv4 or IPv6) of the second DNS server of the network on which the appliance is located.
4. If you entered an IPv4 IP address for one or more DNS servers, you are prompted to specify additional IPv4 configuration information for those DNS servers:
• IPv4 Address [ ]:
Type the IPv4 address assigned to the appliance. • Netmask [ ]:
Type the mask of the network on which the appliance is located.
• Gateway [ ]:
Type the gateway address to the network on which the appliance is located.
• Is a proxy server necessary to reach the internet? y/n [n]:
Typeyto specify the IP address of the proxy server and the port. Typento continue the configuration without configuring a proxy server. You have now finished installing the Unisphere Virtual Appliance.
5. Continue withStep 3: Adding gatekeepers.
Step 3: Adding gatekeepers
Solution Enabler manages VMAX arrays through gatekeeper volumes mapped to the virtual appliance as RDM pass-through volumes. The management is done through EMC proprietary commands using SCSI 3B/3C WRITE/READ commands. For every call, a WRITE command is issued to send the request, and then a READ command to get the results.
Unisphere for VMAX requires gatekeepers. For specific recommendations on the number of gatekeepers required for all VMAX configurations, refer to EMC Knowledgebase solution emc255976 available on the EMC Online Support site.
1. Use either of the following methods to add gatekeeper volumes:
• Add them through the vApp Manager. For instructions, refer to the vApp Manager online help.
After adding gatekeepers through the vApp Manager, restart the SMC daemon through the vApp Manager.
• Present them as raw device mapping (RDM) volumes through the vSphere client. For instructions, refer to the appropriate VMware documentation.
2. Continue withLaunching Unisphere or the vApp Manageron page 61.
Installing the virtual appliance directly on the ESX Server