Installation and User Manual
May 2007Contents
1.0 Introduction... 2 1.1 License (GNU GPL) ... 3 2.0 Requirements ... 3 2.1 Free FTP Programs ... 43.0 Owl Ultralite Installation ... 4
3.1 Downloading and Decompressing (unzipping) ... 4
3.2 Owl Ultralite Configuration... 5
3.2.1 Modifying the “owl.php” file ... 5
3.2.1.1 Where Uploaded Files will be Stored ... 6
3.2.1.2 Changing the Owl Ultralite Default Language ... 7
3.2.1.3 Other Instructions ... 7
3.3 Uploading Owl Ultralite to your web space ... 8
3.4 Testing ... 9
3.4.1 Troubleshooting ... 9
3.4.2 Support (Forums)... 9
3.5 Security ... 9
3.5.1 Password Protection... 10
3.5.2 Securing the Recycle Bin (TrashCan) Only ... 10
3.6 Customizing the Owl Ultralite Appearance... 11
4.0 Using Owl Ultralite... 12
4.1 Uploading Files to Owl Ultralite ... 12
4.2 Opening or Downloading Files from Owl Ultralite... 13
4.3 Deleting, Renaming and E-mailing Files... 13
4.3.1 Deleting Files... 13
4.3.1.1 Recycle Bin Administration ... 14
4.3.2 Renaming Files ... 14
4.3.3 E-mailing Files from Owl Ultralite... 15
4.4 Navigating Folders (Subdirectories) in Owl Ultralite ... 16
4.4.1 Creating Folders (Subdirectories)... 16
4.4.2 Deleting / Renaming / Restoring Folders (Subdirectories)... 17
5.0 How you can help improve Owl Ultralite... 17
Copyright © 2006-2007, Steve Bourgeois
Permission is granted to copy, distribute and/or modify this document under the terms of the GNU Free Documentation License (http://www.gnu.org/licenses/fdl.txt), Version 1.2 or any later version published by the Free Software Foundation (http://www.fsf.org/).
1.0 Introduction
Owl Ultralite was designed to be a powerful, yet simple document management tool that does not require use of a database. This tool can be used to manage almost any kind of computer files (music, video, photographs, documents, spreadsheets, etc.) from a web site.
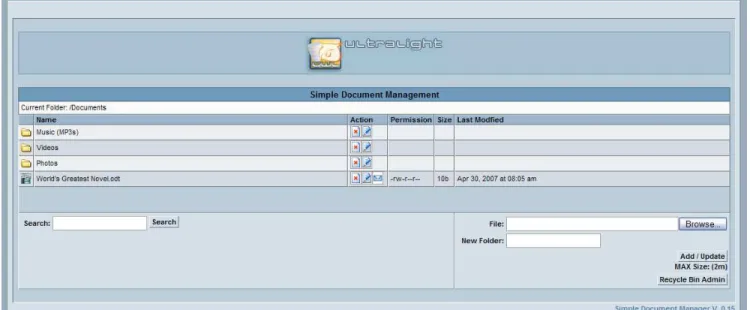
Quite simply, Owl Ultralite creates a web page (or web-based user interface) allowing you and/or others to upload files to a web site. This provides an easy way to share computer files with friends, family or co-workers; even teams. Owl Ultralite is ideal for sharing files too large for e-mail attachments!
Figure 1: Main screen
Owl Ultralite is flexible enough to be used for both home and business applications. In the workplace, Owl Ultralite can be used to manage (and distribute) documents, forms and records such as:
• Employment Application forms • Reports
• Collaborative documents
In effect, Owl Ultralite could be used to simulate a virtual WAN (Wide Area Network) through the Internet.
Owl Ultralite can also be secured; allowing it to be used to distribute controlled documents (e.g., business manuals, Quality Manuals, Operating Procedures, etc.) and certain records (e.g., Corrective Action Requests, Internal Audit Reports) such as those required by ISO 9001, ISO 17025, etc.
However, documents and records requiring greater control should be managed using the FULL version of “Owl Intranet Knowledge Base” (which can be downloaded from: http://owl.sourceforge.net/).
1.1 License (GNU GPL)
Owl Ultralite is a multi-user document repository (knowledgebase), simple document manager and/or document management system (DMS) written in PHP for publishing of files/documents onto the web for a corporation, small business, group of people, or just for yourself.
Copyright © 2005-2007 Steve Bourgeois
This program is free software; you can redistribute it and/or modify it under the terms of the GNU General Public License as published by the Free Software Foundation; either version 2 of the License, or (at your option) any later version.
This program is distributed in the hope that it will be useful, but WITHOUT ANY WARRANTY; without even the implied warranty of MERCHANTABILITY or FITNESS FOR A PARTICULAR PURPOSE. See the GNU General Public License for more details
(http://www.gnu.org/licenses/licenses.html#TOCGPL).
You should have received a copy of the GNU General Public License along with this program; if not, write to the Free Software Foundation, Inc., 51 Franklin Street, Fifth Floor, Boston, MA 02110-1301, USA.
2.0 Requirements
Owl Ultralite can run on all types of operating systems. All you need is: • A Web server that supports PHP (at least version 4.1.0)
• A FTP (File Transfer Protocol) program
If you manage your own web server, skip to section 3.0, “Owl Ultralite Installation”.
If you’re a home user OR a small business / organization using a web hosting service, you will need to obtain the following information from your web hosting service:
• (FTP) Server Address • User Name
• Password
You will need to enter the above information into your FTP program in order to upload Owl Ultralite to your web site.
Note:
If you’re a home user who subscribes to an ISP (Internet Service Provider) that provides online storage (i.e., web space) as part of their service, chances are that you won’t be able to use Owl Ultralite because these free / inclusive web space accounts rarely support PHP. So verify this before proceeding.
2.1 Free FTP Programs
There are a number of open source FTP (File Transfer Protocol) programs available. Some of the more popular free (licensed under the GPL – General Public License) FTP programs include:
For Microsoft WindowsTM:
Filezilla (“2006 Community Choice Awards” winner: Networking category) Download from: http://sourceforge.net/projects/filezilla/
For Mac O/S X: Cyberduck
Download from: http://cyberduck.ch/
For Linux: gFTP
Download from: http://www.gftp.org/
3.0 Owl Ultralite Installation
3.1 Downloading and Decompressing (unzipping)
Download the latest version of Owl Ultralite from: http://owl.sourceforge.net/modules/Download/ At the time of this writing, the current version was compressed in two different file formats titled: “Owl-Ultralite-0.15.zip” (for Microsoft WindowsTM users)
or
“Owl-Ultralite-0.15.tar.gz” (for UNIX / Linux users)
“Zip” and “tar.gz” files are simply compressed files that must be decompressed (expanded) before being used. Many file compression / decompression programs can handle decompressing these types of files. Save the downloaded file in your preferred folder (directory). Then decompress the file in the folder (directory) of your choice. The
decompressed file WILL include many files and subfolders. It should create the file structure shown in Figure 2.
Figure 2: File structure
Note:
Some of the more popular freeware file compression / decompression programs (that will decompress both the “.zip” and “.tar.gz” files) include:
For Microsoft WindowsTM
“FilZip” (Freeware for personal AND commercial use) Download from: http://www.filzip.com/
For Linux
File Roller (licensed under the GPL – General Public License) Download from: http://fileroller.sourceforge.net
3.2 Owl Ultralite Configuration
Configuring Owl Ultralite is extremely easy. Even someone with no experience using PHP can quickly configure this program.
Owl Ultralite has only one configuration file, which is located at: /Owl-Ultralite/config/owl.php
The “owl.php” file defines “where” Owl Ultralite will reside on your web site, as well as “how” it will appear and function. In order to configure “Owl Ultralite”, you must modify the “owl.php” file using your favorite text editor.
In this file you will see a number of variables that tell your web site how to handle ‘Owl Ultralite”. Each line that begins with “//” is a comment (or instructions for configuring Owl Ultralite), and not instructions for the web server. ALL instructions to the web server are preceded with the “$” symbol.
Note:
PHP is an HTML-embedded scripting language. Much of its syntax is borrowed from C, Java and Perl with a couple of unique PHP-specific features thrown in. The goal of the language is to allow web developers to write dynamically generated pages quickly. To learn more about PHP programming, visit:
http://www.freewebmasterhelp.com/tutorials/php or
http://php.about.com/od/learnphp/p/learn_php_free.htm
3.2.1 Modifying the “owl.php” file
In the “\Owl-Ultralite\config” folder you will find a file titled “owl.php”. Open this file using your favorite text editor.
Microsoft WindowsTM Users
For Microsoft Windows users this would typically be “Wordpad” (as “Notepad” may not display the default carriage returns). Microsoft Windows XP users can find “Wordpad” by clicking “Start”, “All Programs”, “Accessories”, “Wordpad”. When “Wordpad” opens, click “File”, “Open”. At the bottom of the dialog box you will see a drop-down box labeled “Files of type:”. Select “All files” (the default is “Rich Text Format (*.rtf)”). Then navigate to the “\Owl-Ultralite\config” folder and open the “owl.php” file.
The first instructions you will see in the default “owl.php” file are: $default->root_url = "/Owl-Ultralite";
$default->root_fs = dirname(dirname(__FILE__));
The first line specifies the location where you plan to place Owl Ultralite on your web site. For example, if you plan to create a directory named “Owl-Ultralite” at (URL):
http://www.YourDomainName.com/Owl-Ultralite
Then you can leave the first instruction as-is. Otherwise, you must change it to whatever directory name you choose to use.
Do NOT modify the second line.
The third line must be changed to specify the exact physical location (NOT the URL) where you plan to place “Owl Ultralite” on your web site. For example:
$default->root_folder = "/export/web20/omega/YourUserName/www/Owl-Ultralite";
Tip:
IF you don’t know and can’t find out the exact physical location of your web space (typically when using a web hosting service), then using a text editor (such as “Notepad” or “Wordpad”), create a new file containing the following:
<?php phpinfo(); ?>
Title the file “phpinfo.php”. Then upload (FTP) the file to your web site. Then go to that page (URL). IF your web server supports PHP, this page will display information from your server about PHP (version, etc.) as well as information that may allow you to determine the exact physical location of your web space. For example:
"/export/web20/omega/YourUserName/www/"
3.2.1.1 Where Uploaded Files will be Stored
The fourth instruction you will see in the “owl.php” file is:$sRootFolderName = "Documents";
This specifies “where” files uploaded using Owl Ultralite will be stored. The default location is: “\Owl-Ultralite\Documents”
If you want to change (rename) this folder, you will need to change this instruction (line of code) AND either rename the “\Owl-Ultralite\Documents” folder OR create a new subfolder under the “\Owl-Ultralite\” folder with the name you specified in the instruction.
IF you delete this directory without changing the “owl.php” file, you will see an error message similar to this one:
The Root Folder does not Exist:
3.2.1.2 Changing the Owl Ultralite Default Language
As you scroll down through the “owl.php” file, you should see a section listing the languages currently available for Owl Ultralite followed by the code that sets the default language to be used.
// ************************************************************** // Default Language Currently available:
// English (en) // Deutsch (de) // Spanish (es) // Russian (ru)
// email translations to: [email protected]
// ************************************************************** $default->language = "English";
Owl Ultralite supports UTF-8 character encoding. So if you choose to use a language that uses non-ASCII characters, make sure that your file system is configured using UTF-8.
To change the default language from English to Spanish, for example, simply make the following change in the “owl.php” file:
$default->language = "Spanish";
You may notice that some Owl Ultralite choices remain in English. To complete the change, ensure that your Operating System and browser languages are also set to the same language you selected in the “owl.php” file.
3.2.1.3 Other Instructions
Modifying the remaining instructions in the “owl.php” file is optional, and un-necessary for “Owl Ultralite” to function (provided the remaining default instructions are unchanged). These additional instructions address:
• Mega Upload Progress Bar (see Note 1 below) • Appearance (which columns to display or hide)
• Limiting which file types can be uploaded (e.g., Word, Excel, OpenOffice, MP3, etc.) • Maximum file upload size (see Note 2 below)
• File permissions (NOT for the novice)
• A single general setting to allow or disallow file uploads / deletions and folder creations/deletions
• Individual settings to allow or disallow: file deletions / renaming
folder deletions / creations / renaming e-mailing files from within Owl Ultralite
• Enable a TrashCan (i.e., Recycle bin) to collect deleted files
Note 1:
The Mega Upload Progress Bar is an advanced feature that is not required for Owl Ultralite to function. Configuring this feature is NOT recommended for the novice. However, if would like to read more information on how to configure the Mega Upload Progress Bar, you can download a “How-To” PDF document from:
http://easynews.dl.sourceforge.net/sourceforge/owl/HOWTO-Setup_OWL_and_OWL_U-Lite_with_Megaupload.pdf
Note 2:
The default maximum file upload size is 5 MB:
$default->max_filesize = 1024 * 1024 * 5; // 5 MB
However, on the Owl Ultralite main screen (under the "Add/Update" button), you may see a smaller file size limitation (e.g., "MAX size: (2m)"). This is because the
“php.ini” file (on your web server, but often accessible to web hosting subscribers in the “/etc/php.ini” folder) specifies a smaller maximum file upload size limit. The Owl Ultralite main screen will display the SMALLER limit (whether it is from the “php.ini” or “owl.php” file).
3.3 Uploading Owl Ultralite to your web space
Now all that’s left to do is to open your FTP program, access your web site, and upload (copy) the “\Owl-Ultralite\” folder – along with all of its files and subfolders – to your web space! For detailed instructions on how to do this, see the Help file associated with your specific FTP program.
3.4 Testing
If you’ve properly configured and uploaded (copied) Owl Ultralite to your web site, you should be able to access it using your favorite web browser. For example, depending upon your configuration, your URL to Owl Ultralite could be:
http://www.YourDomainName.com/Owl-Ultralite/
3.4.1 Troubleshooting
You’re accessing the URL where you think your Owl Ultralite should be, but it’s not there (or not displaying). First, check the modified instructions in the “owl.php” file to ensure there are no typos. Then, go back to Section 3.2.1 “Modifying the “owl.php” file” and ensure that you have the correct, specific, exact physical location (NOT the URL) where you uploaded Owl Ultralite on your web site.
Debugging Tip:
An additional debugging tip for those who use an Apache-based web host; create a “.htaccess” file with the following lines in it:
php_value error_reporting 2047 php_value display_errors 1
Now upload (FTP) the “.htaccess” file to the “/Owl-Ultralite” directory on your web site. If you have any PHP syntax errors from modifying the
“/Owl-Ultralite/config/owl.php” file, the PHP should now display an error message on the screen.
3.4.2 Support (Forums)
If you’re still having problems, visit the Owl web site (http://owl.sourceforge.net/) and click on “SUPPORT”. This will provide a link to “FAQ” and “Forums”
(http://sourceforge.net/forum/?group_id=9444).
You can ask specific questions in the “Forums” section, but you must first create a “UserName” and “Password” at: http://sourceforge.net/account/newuser_emailverify.php
The only personal information that will be required is your e-mail address.
3.5 Security
As mentioned in section 3.2.1.3, “Other Instructions”, there are certain specific security measures that you can impose in Owl Ultralite through modifying instructions in the “owl.php” file. These
additional instructions include:
• Limiting which file types can be uploaded (e.g., Word, Excel, OpenOffice, MP3, etc.) • File permissions (NOT for the novice)
• A single general setting to allow or disallow file uploads / deletions and folder creations / deletions
• Individual settings to allow or disallow: file deletions / renaming
folder deletions / creations / renaming
The comments in the “owl.php” file describe how to set each of these variables. However, there are additional security measures that you may wish to institute; such as password protection.
3.5.1 Password Protection
Once you have Owl Ultralite properly configured and installed, you may have a need to restrict access to Owl Ultralite. If you use a web hosting service that provides an “Account Management” tool, this is the easiest way to secure a folder (directory).
If you are using an Apache-based web host (not Microsoft IIS), you can also do this using the
“.htaccess” and “.htpasswd” files residing in the “/Owl-Ultralite” folder. You may modify these files to create a “Password” dialog box that will display when someone attempts to access the directory where you have placed Owl Ultralite; the root folder (“\Owl-Ultralite\”), or selected individual sub-folders (“\Owl-Ultralite\Documents\Private”). This doesn’t work with Microsoft IIS (Internet Information Server). If using a Microsoft IIS-based we server, check the IIS
documentation for instructions on how to setup directory password.
Note:
For a tutorial on how to use the “.htaccess” and “.htpasswd” files to restrict access to a directory, visit: http://www.freewebmasterhelp.com/tutorials/htaccess/
For a comprehensive guide (instructions) on how to use the “.htaccess” and “.htpasswd” files, visit: http://www.javascriptkit.com/howto/htaccess.shtml
3.5.2 Securing the Recycle Bin (TrashCan) Only
Many users will want to allow multiple people to access Owl Ultralite, but would like to restrict control over files being deleted from the Recycle Bin.
Once Owl Ultralite is properly configured and installed, it will automatically create a
“/Owl-Ultralite/TrashCan” folder (which will serve as the “Recycle Bin”). As mentioned above, if you use a web hosting service that provides an “Account Management” tool, this is the easiest way to secure this folder (directory).
However, if you are using an Apache-based web host (not Microsoft IIS), you may restrict user access to the Owl Ultralite “Recycle Bin” through using the “.htaccess” and “.htpasswd” files. Simply create the “.htaccess” and “.htpasswd” files (as described above) and place them in the “/Owl-Ultralite/TrashCan” folder. These files will create a “Password” dialog that will display when someone attempts to access the “Recycle Bin Admin” (the directory where you have placed Owl Ultralite “TrashCan”).
Owl Ultralite ignores all files beginning with a “dot”; so emptying the Recycle Bin should not delete the “.htaccess” and “.htpasswd” files.
3.6 Customizing the Owl Ultralite Appearance
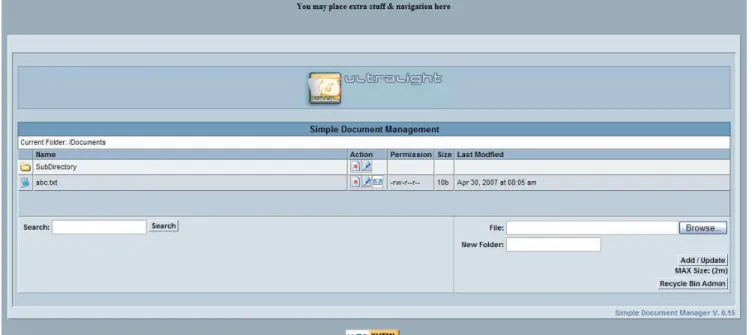
If you know basic HTML (or PHP), you can customize the appearance of Owl Ultralite through adding content to the areas above and/or below Owl Ultralite. Perhaps you would like to place your name (or company name and logo) above Owl Ultralite; or perhaps contact information for whoever is managing the system below the Owl Ultralite screen. This is done through using your favorite text editor (NOT an HTML editor) to modify the “userheader.inc” and/or “userfooter.inc” files located in the “/Owl-Ultralite/lib” folder. Your modified “userheader.inc” and/or
“userfooter.inc” files will display above and below every Owl Ultralite screen.
Figure 4: Main screen with modified “userheader.inc” file.
The default content of the “userfooter.inc” file is the “W3C-XTHML 1.0” Validated icon. Further, perhaps you would like to change the site title from “Simple Document Management” to something better describing your use of Owl Ultralite. This can be done by modifying a single line in the appropriate “language.inc” file located in the “/Owl-Ultralite/locale/” folder. Simply locate and change the following line:
$owl_lang->site_title = "Simple Document Management";
For example:
4.0 Using Owl Ultralite
You’ve properly configured and uploaded (copied) Owl Ultralite to your web site, and are able to access it using your favorite web browser. Now it’s time to start using its features.
4.1 Uploading Files to Owl Ultralite
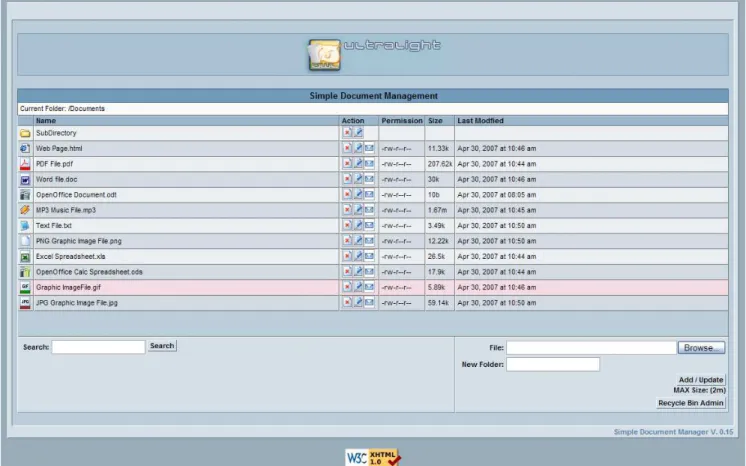
To upload a file to Owl Ultralite, click “Browse”. A “File Upload” dialog box should appear. You can now search and select the file on your computer that you would like to upload to Owl Ultralite. The path to the file you selected should appear in the text box beside the “Browse” button. Now click “Add/Update” to upload the file. If a file already exists with the name you selected, the old file will be over-written (updated). For ease in quickly identifying file types, Owl Ultralite will automatically place an icon (to the left of the file name) identifying each “type” of file.
Tip: Adding File Icons
It’s easy to add new icons for file types not currently included in Owl Ultralite. All you do is add “<new_extension>.gif” (e.g., “doc.gif”) to the
“/graphics/icon_filetype/” directory, and owl Ultralite should recognize
them up automatically. The “file type” icons are approximately 16x20 pixels (20x20 pixel images should display fine too).
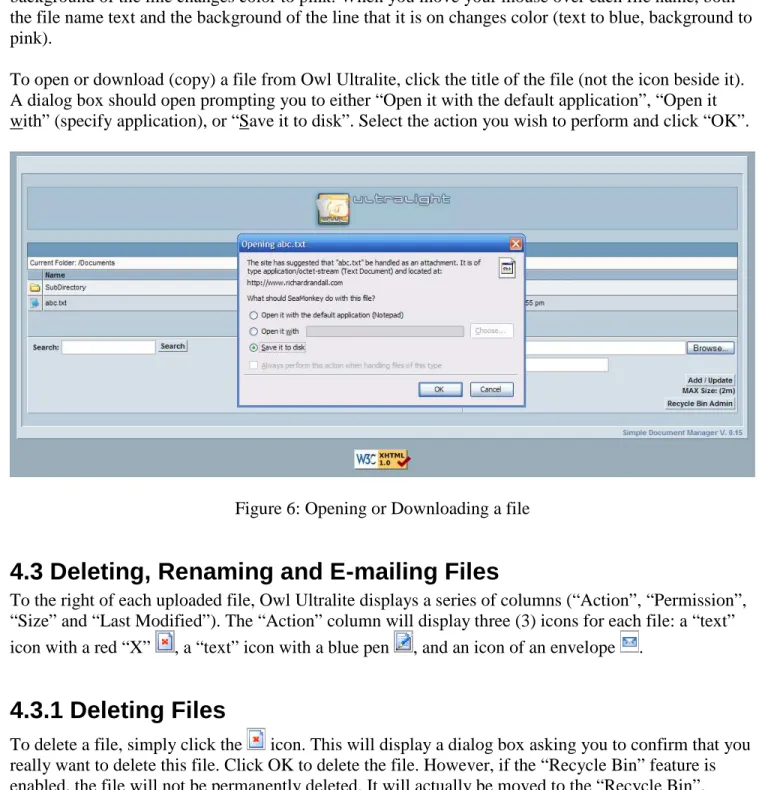
4.2 Opening or Downloading Files from Owl Ultralite
You will notice that, for ease of use, as you move your mouse over the lines containing the files, the background of the line changes color to pink. When you move your mouse over each file name, both the file name text and the background of the line that it is on changes color (text to blue, background to pink).
To open or download (copy) a file from Owl Ultralite, click the title of the file (not the icon beside it). A dialog box should open prompting you to either “Open it with the default application”, “Open it with” (specify application), or “Save it to disk”. Select the action you wish to perform and click “OK”.
Figure 6: Opening or Downloading a file
4.3 Deleting, Renaming and E-mailing Files
To the right of each uploaded file, Owl Ultralite displays a series of columns (“Action”, “Permission”, “Size” and “Last Modified”). The “Action” column will display three (3) icons for each file: a “text” icon with a red “X” , a “text” icon with a blue pen , and an icon of an envelope .
4.3.1 Deleting Files
To delete a file, simply click the icon. This will display a dialog box asking you to confirm that you really want to delete this file. Click OK to delete the file. However, if the “Recycle Bin” feature is enabled, the file will not be permanently deleted. It will actually be moved to the “Recycle Bin”.
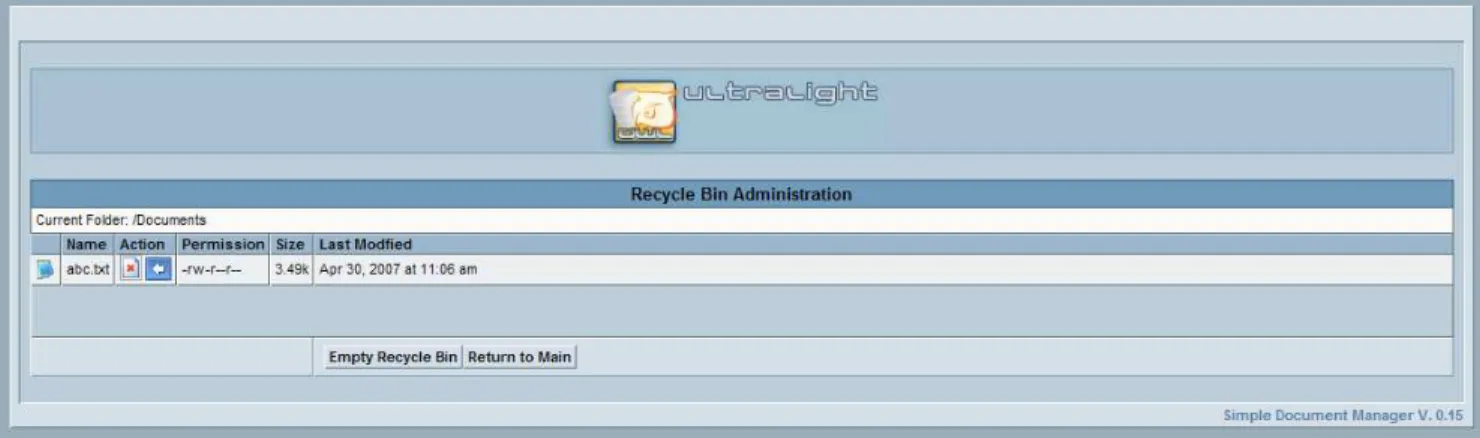
4.3.1.1 Recycle Bin Administration
You may enable a “Recycle Bin” feature (in the “owl.php” file – Ref. section 3.2.1) where deleted files are moved to a “Recycle Bin” (this feature is enabled by default).
To administer the “Recycle Bin” folder, click the “Recycle Bin Admin” button in the lower right of the Main screen. This will open the “Recycle Bin Administration” screen. For example, let’s delete the “abc.txt” file. Now click the “Recycle Bin Admin” button. You should see the “Recycle Bin
Administration” screen (Figure 7). To permanently delete a file, click the icon beside it. However, you may restore individual files by clicking the icon beside it. If you have several files to
permanently delete, you can simply click the “Empty Recycle Bin” button to delete ALL of the files shown.
All of these instructions also apply to deleting / restoring sub-directories (sub-folders).
Figure 7: “Recycle Bin Administration” screen
4.3.2 Renaming Files
To rename a file, click the icon. This will display a new screen with a text field containing the current file name. Type the new file name that you would like in this text field, then either click the “Rename” button (lower right corner) or hit the “Enter” key. For example, if you wanted to rename the “abc.txt” file, Figure 8 would be the resulting screen allowing you to make the change.
If, while typing in a new file name, you decide that you really don’t want to change the file name (for example, you discover that you had selected the wrong file) - before you click the “Rename” button (lower right corner) or hit the “Enter” key, then you can click the “Reset” button to restore the original file name.
You can cancel the action by clicking the “Return to Main” button.
4.3.3 E-mailing Files from Owl Ultralite
Owl Ultralite also allows a user to e-mail a file directly from Owl Ultralite (this feature can be disabled by modifying the “owl.php” file).
To e-mail a file, click the icon by the file (e-mailing multiple files simultaneously is not supported). This will display a new screen titled “EMAIL: selected file name”.
For example, click the e-mail icon by the “abc.txt” file. The “EMAIL” screen will provide for you to type in the recipients e-mail address as well as your e-mail address (both are required). You can also type a subject and a message to accompany the file (not required). If you change your mind about anything that you’ve entered into this screen, click the “Reset” button to reset the screen (clicking “Reset” does NOT cancel the operation. To cancel the operation, click the “Return to Main” button). When satisfied, click “Send Email”. After sending the e-mail, Owl Ultralite returns to the main screen with a message in a black bar at the top of the screen reading “Mail Sent”.
Tip:
You can send a file to multiple e-mail addresses by entering them into the “Email TO:” field separated by commas. For example:
Email TO: [email protected], [email protected], [email protected]
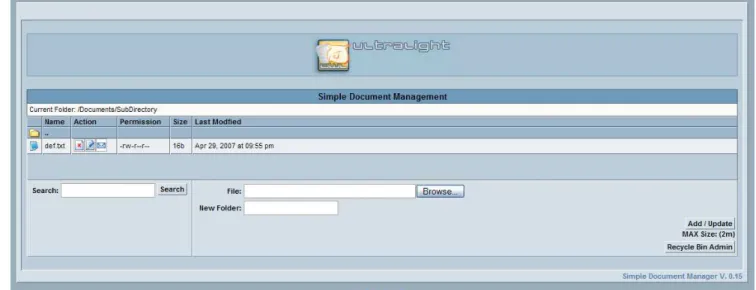
4.4 Navigating Folders (Subdirectories) in Owl Ultralite
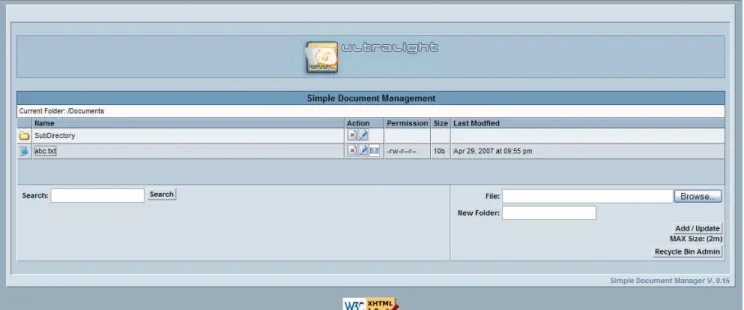
You probably noticed the folder already in Owl Ultralite titled “SubDirectory”. If you click on the text “SubDirectory” (not the icon beside it), it will open a subdirectory (containing a sample text file titled “def.txt”).
Immediately above the “Name” column, you will see a white area listing the “Current Folder” (e.g., “Current Folder: /Documents/SubDirectory”). As you move your mouse over folder names listed after “Current Folder”, they change color to blue. Here you can click the folder that you wish to go directly to. This is the quickest and easiest way to navigate Owl Ultralite – and explains why a “Return to Main” button is not necessary for these screens.
Alternatively, below the “Name” column, you will see a icon followed by “..”. To return to the previous folder (directory), click the “..” (NOT the icon).
Figure 10: Subdirectory Folder
4.4.1 Creating Folders (Subdirectories)
To create a new folder (subdirectory) using Owl Ultralite, enter a title for the folder in the “New Folder” text field. Then click “Add/Update” to create the folder. You can create new folders under the main folder or sub-folders.
4.4.2 Deleting / Renaming / Restoring Folders (Subdirectories)
You can delete or rename individual folders (subdirectories) just as you would delete or rename individual files (as described in sections 4.3.1 and 4.3.2 respectively), using the or icons (respectively).You may also restore individual folders (subdirectories) from the “Recycle Bin Administration” screen - just as you would restore individual files (as described in section 4.3.1.1), using the icon.
5.0 How you can help improve Owl Ultralite
There are many ways that you can help to improve Owl Ultralite!You can donate much-needed funds to this project. Just click on the icon on the Owl web site at: http://owl.sourceforge.net/
If money is tight, you can volunteer to help: • Identify “bugs” in the program;
• Provide translation of Owl Ultralite into different languages (the program is only available in English, German (Deutsch), Russian, and Spanish at the time of this writing);
• Provide translation of this “Installation and User Manual” into different languages; or • Provide PHP programming to improve and enhance Owl Ultralite.
To volunteer, just visit the Forums at: http://sourceforge.net/forum/?group_id=9444
Ultimately, the BEST thing you can do to help us, is to spread Owl Ultralite and Owl Intranet Knowledge Base around the world!