C
an data recovery actually be Do It Yourself? The answer which is sometimes used in Germany is Jein (a combi-nation of Ja [Yes] and Nein [No]). In this article we will cover the basics of what failures one may experience with their hard drives and data, the start-up procedure for the hard drives to better determine what type of failure was experienced, some simple fixes one may do to gain access to their data as well as how to look for a professional Data Recovery Company when needed. One should note that when a drive is brought to a data recovery company they will inspect the drive for signs of tam-pering. If they detect that the drive has been worked on previ-ously by someone, they will most likely charge a high analysis or recovery fee, regardless if the data is recovered or not. Data recovery is a field which requires specialized training, back-ground and equipment to move from software only recoveries to the teardown and reassembly of the hard drives to make it function to the point of recovering the data. This background be-comes critical when working on Electronic and Physical failures. Before we get out the screwdrivers and disassemble our hard drive, we should address a few points.A proper diagnosis of the patient hard drive’s failure can help ensure we cause no further damage to the drive or most importantly the data contained on the hard drive.
Hard Drive Start Process
How does a hard drive start? The startup procedure for a hard drive begins with applying power to the hard drive. Microco-de is loaMicroco-ded from ROM to the drives RAM and the magnetic heads are polled. The drive then begins to spin the platters and when the nominal rotational speed is met, the heads
un-SDUNDQGÀ\DERYHWKHSODWWHUVWRUHDGDGGLWLRQDOPLFURFRGH
from the service area. Lastly the magnetic heads are calibrat-ed then the translator is initializcalibrat-ed. When these steps are
ac-complished successfully, the hard drive will return its correct information (Make, model name and capacity) and the hard drive is ready for use.
Read/Write Head Floats on an Air Bearing
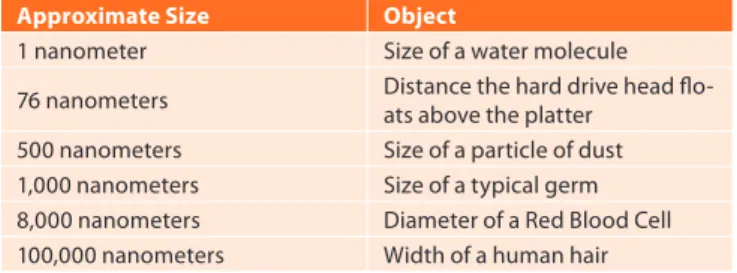
When the hard drive is started, the platters should spin up and stabilize at its nominal speed. When this occurs, the read/write heads will unpark from their storage position and float over the platters on what is called the Air Bearing. The heads fly over the platters as would an airplane fly over the Earth. The distance between the heads and the platters is measured in nanometers. The heads float approximately 76 nanometers above the plat-ters. Looking at table 1 one can see a comparison of common objects we are familiar with and their size in comparison to the Air Bearing distance.
Table 1. Relational Sizes Compared to an Air Bearing
Approximate Size Object
1 nanometer Size of a water molecule 76 nanometers Distance the hard drive head
flo-ats above the platter 500 nanometers Size of a particle of dust 1,000 nanometers Size of a typical germ 8,000 nanometers Diameter of a Red Blood Cell 100,000 nanometers Width of a human hair
Hard drives are pretty robust; however, when looking at how close the tolerances are, one can see why a hard bump while the drive is on could be damaging to the drive.
Hard Drive Failures
Hard drive failures can be broken down into the following three categories:
DO IT YOURSELF
DATA RECOVERY
Electronic data and information has become a crucial portion of one’s
life. Data is important whether it is your Business’ Operations Data,
Secret product development research, Master’s Thesis, pictures of
your baby’s first steps or loves first kiss one needs access to it. When
your data is no longer accessible and/or your hard drive dies there
are a few first steps one may do to regain access.
/RJLFDO: Logical damage to the hard drive’s data may oc-cur by system failure, data corruption or deletion of data. There are many forms of damage that may be experienced i.e. Master Boot Record damage, drive formatted, new op-erating system installed over needed data, when there are bad sectors on the hard drive (unreadable areas) and the application appears to freeze while attempting to access data on the drive, or the intentional or unintentional dele-tion of data through personnel acdele-tions or malware.
(OHFWURQLF The Printed Circuit Board (PCB) or one of its components may be damaged. This problem can occur if the voltage is not stable and a spike occurs damaging the electronic parts on the board. This problem occurs when the code in the ROM is corrupted or the System Area data
LVGDPDJHG7KH¿UPZDUHDQGV\VWHPDUHDFRQWDLQFRGH
that instructs the various components of the hard drive on where to locate the requested data. If the electronics or mi-crocode is damaged, then the hard drive cannot function.
3K\VLFDO This damage may occur through various means. Whether the heads have landed on the platters and do not allow them to turn (Sticktion), the spindle bearing is fro-zen which also prevents the platters from rotating, or the worst case if the hard drive suffers a head crash (dropped hard drive). With head crashes the read/write head can be damaged to the point it will no longer function (hard drive makes clicking noise) or they have been partially or fully dislodged from the arm assembly scraping the magnetic coating from the platters.
Preparing the Workstation
Searching the internet for software to use for data recovery can present the requester with an abundance of choices. Looking through the returned search engine list, you may ask yourself, which one is the best one for me? The answer sounds simple “the one that works for the situation you have been presented!” Remember, software is developed by people who were faced with a task and either there was no software available or if avail-able, it could not handle the task that was to be accomplished. Most software is try before you buy.
Write Protection
Write protection for the patient is of utmost importance. If one overwrites the data on the patient it cannot be recovered follow-ing the guidelines in this article. To protect the hard drive from being written to, one must either use a software or hardware write blocker. Software write blockers can be accomplished with a registry edit, or one can purchase hardware write blockers from Tableau like those used by computer forensic examiners.
Imaging Software
Imaging software can be found in a variety of forms and prices. At the beginning of my journey into data recovery I used a vari-ety of software but eventually I selected the following software to use.
Forensic Toolkit (FTK) Imager (Accessdata). This tool is used by computer forensic examiners to make forensic im-ages of hard drives. FTK Imager is available from Access-Data as a free download.
Disk Recoup (QueTek Consulting). This tool is useful if the drive you are trying to image has bad sectors or oth-er problems which hang up the imaging process. At times when one is imaging a problematic drive, the workstation
must be rebooted due to the system hanging. With Disk Recoup when you restart the program, it will remember where it left off, jump over that area and continue imaging the patient hard drive. This tool is available from QueTek Consulting Corporation as a try before your buy.
R-Studio (R-Tools Technology). This is a more advanced tool which can be used to image patient hard drives. R-Studio then can be used to scan the image and attempt to
UHFRYHUWKH¿OHVWUXFWXUHDQG¿OHVDVRULJLQDOO\IRXQG7KLV
tool is available from R-Tools Technology as a try before you buy.
Data Recovery Software
'DWD5HFRYHU\6RIWZDUHFDQDOVREHIRXQGLQDYDULHW\RI
forms and prices. The data recovery software is used to scan through the images which were created with the Im-aging Software. During the scan the software searches for
¿OHVDQGIROGHUVXVLQJYDULRXVDOJRULWKPVDQGVFDQQLQJ IURPWKH¿UVWVHFWRUWRWKHODVW7KHIROORZLQJLVDVPDOO
sample of available software:
Forensic Toolkit (FTK) Imager (Accessdata). This tool can
EHDOVRXVHGWRH[SRUW¿OHVDQGGLUHFWRULHVRXWRIWKHLP -age. FTK Imager is available from AccessData as a free download.
File Scavenger (QueTek Consulting). This tool is useful for carving data from images which were created from pa-tients using MicroSoft Windows as its operating system. This tool is available from QueTek Consulting Corporation as a try before your buy.
R-Studio (R-Tools Technology). This is a more advanced
WRROZKLFKFDQEHXVHGWRUHFRYHU¿OHVIURPLPDJHVZKRVH
operating system was originally FAT 12/16 to Linux. This tool is available from R-Tools Technology as a try before you buy.
Recovering the Data
There are three types of failures which can occur to a hard drive Logical, Electronic and Physical. We will explore the dif-ferent failures and some do it yourself tips to recover the data. When working on a hard drive that failed, regardless of the failure one must remember the following:
3XUFKDVH D FRXSOH RI LGHQWLFDO GULYHV DQG SUDFWLFH RQ
them. Learn how the make and model of hard drive sounds as power is applied to it.
2QFHWKHSDWLHQWKDUGGULYHLVUXQQLQJDQGDFFHVVWRWKH
data is gained, do not turn it off, for one may never gain ac-cess to the data again.
&UHDWHDQLPDJHRIWKHSDWLHQWKDUGGULYHDQGWKHQZRUN
from the image.
7KHKDUGGULYHIDLOHGRQFHLWFDQDQGPRVWOLNHO\ZLOOIDLO
again.
Logical Failures
This failure can occur at most anytime. This can be presented to us when a novice computer friend decides that they want
WRFOHDQXSWKHLUKDUGGULYH7KH\EHJLQGHOHWLQJ¿OHVDQGGL -rectories they deem unimportant or the hard drive develops bad sectors in critical areas (Master Boot Record, Master File Table) and the data is no longer accessible.
Rectifying this failure is not so problematic and can be done rather quickly (depending upon the size of the patient hard drive).
Before we begin a logical recovery we should have the fol-lowing items available.
([WHUQDO86%KDUGGULYHHQFORVXUHWRSODFHWKHSDWLHQW KDUGGULYHLQWR8VH\RXURZQNQRZQJRRGHQFORVXUH 7DUJHW KDUG GULYH ZKLFK LV ODUJHU WKDQ WKH SDWLHQW KDUG
drive.
6RIWZDUHWRLPDJHWKHSDWLHQWKDUGGULYH
6RIWZDUHWRUHFRYHURUFDUYHWKHGDWDIURPWKHLPDJH 6RIWZDUHRUKDUGZDUHZULWHEORFNHU
Quick and easy software blocker
Creating the software write blocker can be done by registry
HQWU\PRGL¿FDWLRQV7KLVFDQEHDFFRPSOLVKHGTXLFNO\E\FUH
-DWLQJWZR¿OHVWRPRGLI\WKHUHJLVWU\IRUWKHV\VWHP
Disablewrite.reg will be used to disable the writing to
exter-QDO86%GULYHV2SHQDWH[WHGLWRUOLNHQRWHSDGDQGSODFHWKH
following entries into it:
Windows Registry Editor Version 5.00
[HKEY_LOCAL_MACHINE\SYSTEM\CurrentControlSet\Control\ StorageDevicePolicies]
“WriteProtect”=dword:00000001
Save this to your Desktop, naming it Disablewrite.reg
Enablewrite.reg will be used to enable writing to an external
86%GULYH2SHQDWH[WHGLWRUOLNHQRWHSDGDQGSODFHWKHIRO -lowing entries into it:
Windows Registry Editor Version 5.00
[HKEY_LOCAL_MACHINE\SYSTEM\CurrentControlSet\Control\ StorageDevicePolicies]
“WriteProtect”=dword:00000000
Save this to your Desktop, naming it Enablewrite.reg
To activate or deactivate the write-blocker either right-click the Disablewrite.reg or Enablewrite.reg and select Install or Modify depending upon your version of windows. Reboot the computer so that it loads the registry entry.
Logical Failure Recovery Process
The processes used for the logical failure recovery process will be used for imaging and recovering the data regardless of which type of failure you’re presented. The only difference is the other failure types require one to get the hard drive func-tional so that it may be imaged and the data recovered.
Imaging the patient hard drive:
5HPRYHWKHSDWLHQWKDUGGULYHIURPLWVRULJLQDOFRPSXWHURU
external hard drive enclosure.
$WWDFKDWDUJHWKDUGGULYHWRWKHZRUNVWDWLRQ7KHWDUJHW
drive must be larger than the patient hard drive we are go-ing to work with. The target drive will be used to receive the bit-by-bit image of the patient hard drive. Connect this to the appropriate port (IDE or SATA) on the mainboard.
'LVDEOHWKHZULWHIHDWXUHWRH[WHUQDO86%GULYHV7HVWWKLV
to ensure it is functional, by trying to write to an external
GHYLFHLH86%WKXPEGULYH,ILWLVIXQFWLRQDORQHVKRXOG
see the pop-up stating that the drive is write protected.
,QVWDOOWKHSDWLHQWKDUGGULYHLQWRWKHH[WHUQDO86%HQFOR -sure, power it on and listen to the sounds it makes. Ideal-ly the drive will spin up, the heads will leave the park ramp
DQGUHDGWKH6HUYLFH$UHD:KHQWKH86%FDEOHLVFRQ -nected to the computer, Windows should then recognize
WKHKDUGGULYHDQGSURYLGHWKHFRUUHFWLGHQWL¿FDWLRQRIWKH
drive. It may even ask to format the drive, but cancel this.
7RLPDJHWKHGULYHLQWKLVH[DPSOHZHZLOOXVH)7.,PDJHU 2SHQ)7.,PDJHUDQGVHOHFW)LOH$GG(YLGHQFH,WHP« 6HOHFW3K\VLFDO'ULYH2QHZLOOEHRIIHUHGDVHOHFWLRQPHQX
to connect to the appropriate drive. Physical drive is the best choice since the entire drive will be imaged regard-less of the partition it is located in.
– Select the appropriate drive which will be listed similar-ly to \\PHYSICALDRIVE0-Make and model (Size) – Select Finish
,QWKHZLQGRZ(YLGHQFH7UHHFOLFNLQJRQWKHZLOOH[SDQG WKH¿OHIROGHUV)RUWKLVJXLGHZHZLOODVVXPHWKDWWKHVRIW -ware could not recognize a partition.
5LJKW FOLFN WKH WRS RI WKH WUHH ??3+<6,&$/'5,9( DQG
then select Export Disk Image.
7KH &UHDWH ,PDJH ZLQGRZ ZLOO DSSHDU 8QGHU ,PDJH 'HVWLQDWLRQVVHOHFW$GG«
6HOHFW,PDJH7\SHDFFHSWWKHGHIDXOW5DZGGVHOHFWLQJ
Next.
(YLGHQFH,WHP,QIRUPDWLRQPD\EHOHIWEODQNVHOHFW1H[W 6HOHFW,PDJH'HVWLQDWLRQZLQGRZZLOODSSHDU
– Click on Browse; expand the folders until you see the target drive which is connected to your workstation. – Select the drive and click OK.
– Give the image a useful name i.e. Frank_Notebook_
'ULYH8VHDXVHIXOQDPHVRWKDWZKHQ\RXGRPRUHUH -coveries, you can tell whose data belongs to who. – Set Image Fragment Size to 0 (zero) for we want only
RQHLPDJH¿OHIRUWKLVGULYH ± 6HOHFW¿QLVK
:HDUHQRZLQWKH&UHDWH,PDJHZLQGRZ6HOHFWWKHIRO -lowing check boxes: Verify images after they are created and Precalculate Progress Statistics. These two selections will ensure that the image we create is identical to the one we are imaging and also let us know how long the imaging process will take.
&UHDWLQJ,PDJHZLQGRZZLOODSSHDUDQGVKRZXVWKHSUR -gress of this procedure. When it is completed we will be back in the original window of FTK Imager.
&ORVH)7.,PDJHUDQGUHPRYHWKHSDWLHQWKDUGGULYHIURP
the computer. Disable the software write blocker and re-boot the system.
Recovering data from the image
With the drive imaged and safely put away, it is now time to re-cover the data from the hard drive image. Working with the im-age is the most recommended way of conducting data recovery since one can always come back and look for data that was not recovered during the initial recovery.
In this example we will be using File Scavenger to search for the lost data.
2SHQLQJ)LOH6FDYHQJHUWKH¿UVWWKLQJWRGRLVWRPRXQWWKH
image as if it is a drive.
6HOHFW)LOH'LVN,PDJH/RDG«
– The window Open will be displayed – Navigate to where your image is located.
– If the image is not visible, change the Files of type: to All Files (*.*)
– Click on Frank_Notebook_Drive.001 (if FTK Imager and the setting Raw DD were used) and select Open. – A popup will inform you when the image is added.
8QGHUWKH¿HOGStep 1: Search
– The Drive/directory/image.001 should be displayed. – Click on this and the program will load the image.
± ,QWKH¿HOG6HDUFKIRU7KHGHIDXOWVHDUFKZLOOLQFOXGH HYHU\ ¿OH ,I RQH LV RQO\ ORRNLQJ IRU GRFXPHQWV DQG
pictures, click the down arrow on the far side of the
6HDUFKIRU¿HOGDQGVHOHFWWKH¿OHVRILQWHUHVW
– In Search mode there are two choices
± 4XLFN7KLVLVEHVWXVHGZKHQ¿OHVZHUHDFFLGHQWO\GH
-OHWHG7KLVZLOOXVHWKH:LQGRZV¿OHV\VWHPVWUXFWXUH
and is very fast.
– Long- This is best used when the directory structure or
¿OHV\VWHPKDVEHHQGDPDJHG7KLVVFDQFDQWDNHD
long time depending upon the size of the patient hard drive. This setting scans the entire image looking for
¿OHV
– Click on the button Search and the scan will com-mence.
± $WWKHFRPSOHWLRQRIWKHVFDQDOLVWRI¿OHVDQGWKHLUGL -rectory will be returned. The program will provide an
in-GLFDWLRQLIWKH¿OHLV*RRGRU1RW(YHQLIWKHSURJUDP
says it is good, manually sampling the data is required to see if it is in fact usable.
– One can click on the Tree View on the task bar. This will present the data in a Windows Explorer view if pos-sible.
± ,IWKH¿OHV\VWHPLVFRUUXSWWKHQWKHPRVWOLNHO\UHFRY -ery will be a RAW recov-ery and the only folder will be labeled Unknown.
([SRUWLQJWKHGDWDWRWKHWDUJHWGULYH
– On the right side of the program there is a Browse but-ton. Click it and navigate to the external drive where the data will be placed on.
– Select Recover
± 9ROXPHRU3DUWLWLRQ$I¿OLDWLRQZLOOSRSXSVHOHFWWKHGH -fault, clicking on OK.
– The data will begin transferring onto the location
spec-L¿HGLQWKHSUHYLRXVVWHS
± :KHQ¿QLVKHGDQRWKHUSRSXSZLOOGLVSOD\WKHUHVXOWVRI
the recovery.
– Exit the program and go to the directory where the da-ta was recovered to.
± 2SHQDIHZRIWKH¿OHVZKLFKZHUHUHFRYHUHGWRVHHLI
useable data has been recovered.
5HWXUQWKHGDWDWRWKHRZQHU
Electronic Failure
Electronic failures can be quickly recognized. The two most prominent signs of an electronic failure are when power is ap-plied to the hard drive and it does not show any sign of func-tionality (no platter spin-up or sounds coming from the drive) or a puff of smoke appears from the hard drive; however, no Genie appears granting you three wishes.
Electronic Failure Recovery Process
Resolving the electronic failure can be as simple as exchang-ing the Printed Circuit Board (PCB) to complex operations
RIUHSURJUDPPLQJWKH¿UPZDUHPLFURFRGHZLWK$FH/DERUD
-WRU\¶V3&8'0$)RUWKLVJXLGHZHZLOOH[SORUHKRZWR ¿QGDVXLWDEOHGRQRU3&%WRPRYLQJWKHSDWLHQW¶V520WRD
donor PCB. Now comes the warnings, if the data contained on the patient hard drive has a value far exceeding the cost of a professional data recovery company’s prices, then take it to a professional straight away.
Note: The data recovery company will inspect the drive for signs of tampering. If they detect that the drive has been worked on previously by someone, they will most likely charge a high analysis or recovery fee, regardless if the data is recov-ered or not.
During the lifetime of one’s hard drive there are many changes that are not obvious to us, but the hard drive keeps track of them when they occur. These changes are called the adaptive data of a hard drive and are stored and maintained by the hard drive. When a drive is initialized in a factory it is tested for functionality. For instance, when bad sectors are found on the platters they are marked as bad and their location is annotated in the P-List. When the hard drive leaves the
fac-WRU\DQGLVLQXVHE\WKHFXVWRPHUDQ\EDGVHFWRUVLGHQWL¿HG
by the hard drive are marked as bad and an entry is placed in the G-List so that no data will be placed in the bad sector. Adaptive data lists are kept in the Service Area of the hard drive as well as in the ROM chip on the PCB. When you move the PCB of the donor drive to the patient drive, and start it up, the patient drive will read the adaptive data from ROM and ap-ply it to the drive it is on. The hard drive may not function i.e. it may start knocking or not start at all. Some hard drives can
EH¿[HGE\MXVWPRYLQJWKH3&%RYHUWRWKHSDWLHQWDQGLWZLOO
start up without a problem which is an exception not the rule. When presented with a hard drive which has an electronic failure we must take into consideration what may have caused the failure, what component was damaged and do we have
WKHFRUUHFWWRROVWR¿[WKHSUREOHP
The following items are needed when you begin trouble shooting an electronic failure:
7RU[VFUHZGULYHUVHWIURPVL]HWRVL]HGLIIHUHQWPDQ -ufacturers use different sized screws). This will be used to remove the PCB from the hard drive.
0XOWL0HWHU FKHFN WKH LPSHGDQFH RI VRPH HOHFWURQLF
components.
'RQRUKDUGGULYH3&%7KLVLVDWHVWHG3&%ZKLFKLVIXOO\
functional. Never use a PCB from a hard drive containing your data as a donor. A quick PCB change may leave one with two non-operational hard drives.
+RW$LU5HZRUN6WDWLRQRU6ROGHULQJ,URQ
Identify Electronic Errors
The easiest symptom of a damaged PCB is, when attached to a power supply the hard drive remains unresponsive. If there is no sound from the hard drive, this could indicate that component(s) may be damaged on the PCB. The second test one should do is hold the hard drive up to your ear and apply power. Listen carefully to determine if there is no noise or if you hear a sound which sounds like an electronic motor trying to turn a spindle, but it is stuck. This sound can be one of three things which we will talk about in the Physical failure section.
What can one try when there is no sound emitting from the hard drive? Place the PCB on a functional hard drive (same Make and Model) and determine if the drive spins up. If the donor drive does not start, then there is an electronic failure. It is time to look for a donor PCB.
What can Fail on a PCB
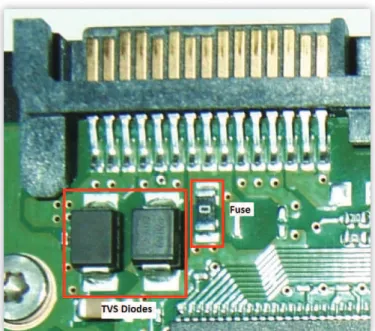
Hard drives have some of their own fault protection built in. The fault protection is used to prevent the data from being damaged on the hard drive. Two items on the PCB which pro-tect the drive are the Transient Voltage Suppression (TVS)
diodes which protect the drive from voltage spikes and a fuse. For this example, in Figure 1 we have a Samsung PCB which has three components highlighted. In the left side block are the 2 TVS Diodes and directly on the right side of the TVS diodes is the fuse. The two types of failures that I have seen
DUHWKHFRPSRQHQWVORRN¿QHEXWZLWKDPXOWLPHWHULWLVGHWHU -mined that they failed or there is a black scorched area where these components once were.
Test the TVS diodes and fuse using a multi-meter which is set on Ohms (200 range). For the TVS diodes when the di-odes are tested, one should see the meter register low
imped-DQFH a 2KPV ZKLFK ZLOO TXLFNO\ GURS LQGLFDWLQJ DQ RSHQ
circuit. This reading indicates the diode is functional. If the im-pedance is close to 0.0 then the diode is most likely bad. One need only to remove the bad TVS diode from the PCB and functionality should be restored. The other component which
SURWHFWVWKHKDUGGULYHLVWKHIXVH8VLQJWKHPXOWLPHWHULIWKH
fuse measures an open circuit, then the fuse is non-functional. Soldering a small piece of wire bridging the connection should restore functionality to the drive. When one bypasses the safe-ty measures, there is the risk of causing more damage to the drive. If the drive starts, move your data off immediately and do not use this drive after your data is recovered (Figure 1).
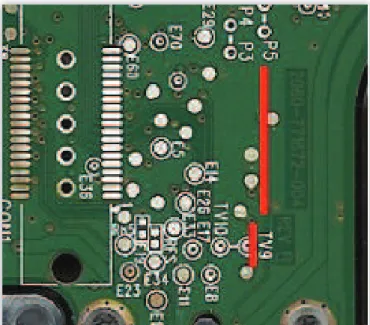
If these three components are not the cause of the failure, then there is another component on the PCB which is non-functional. At this point one can try to move the ROM chip from the patient PCB to the donor PCB. This will require that the patient ROM is removed using a Hot Air Rework station or a soldering iron. The ROM chip is usually an 8 leg chip with a model number embossed on top beginning with the number 25. As seen in Figure 2 the ROM is located in the bottom right of the picture. When removing and reinstalling the chip, en-sure that the orientation of the chip remains the same. This is accomplished, in this case, by ensuring the small indentation on the bottom right of the chip is in the same orientation on the donor PCB. For other manufacturers of hard drives, one will have to research where the ROM chip is located (Figure 2).
Figure 1. Samsung PCB TVS Diodes and Fuse
Figure 2. Samsung PCB ROM location
Figure 4. Western Digital 2.5” Label
Items needed
How to select a Donor PCB
7KHUHDUHPDQ\¿UPVRQHFDQXVHWRSXUFKDVHMXVWWKH3&%
for a hard drive. To order the correct one, there are a couple of key items to look for. Hard drive manufacturers may change the functionality of a PCB for one model of hard drive several times throughout its life-cycle so one needs to look for match-ing numbers.
One can begin the search for a donor PCB by just placing the PCB number into a search engine. The results will more than likely return a variety of vendors who are selling only the PCB. If no results are returned, then use the drive model
num-ber with the PCB numnum-ber. Depending on the availability of the drive and PCB one can get many 1st hit responses which is QLFHEXWDWWLPHV,KDYHVHDUFKHGPRQWKVWR¿QGDQREVFXUH
donor drive.
The following must be taken into consideration when select-ing a donor hard drive for its PCB:
Western Digital 2.5” hard drive
In this example, we are looking for a PCB to use as a donor. Looking at Figure 3 we need to match the Model number, Firmware number and the Country.
0RGHO1XPEHU:'%(97
Firmware Number: 22A0RT0 Country: Malaysia
(Figure 3)
On the PCB of the drive, the board number must be matched. On the 2.5” hard drive the number is located by the underline
LQ)LJXUH7KHFORVHXSYLHZRIWKH3&%LQ)LJXUHVKRZV WKH 3&% 1XPEHU 5(9 $ )LJXUH Maxtor 3.5” Hard Drive
In this example we have a Maxtor DiamondMax10 hard drive.
7R¿QGDGRQRU3&%IRUWKLVGULYHZHQHHGWRORRNDWWKH0RGHO
number as well as the GTLA number on the front label of the hard drive. The drive model number as well as the GTLA num-ber is underlined in Figure 6. Looking closer at the drive label in
)LJXUHZHVHHWKHDOSKDQXPHULFFKDUDFWHUV%6$ 7R¿QGD3&%ZKLFKVKRXOGZRUNRQWKLVZHQHHGWRPDWFKWKH
following : 6B300S006591A (1st and 2nd characters followed by the 10th and 11th characters) (Figure 6).
Seagate 3.5” Hard Drive
In this example we have a Seagate Barracuda 7200.12. To
¿QGDGRQRU3&%IRUWKLVGULYHRQHZRXOGVHDUFKRQWKH3&% QXPEHULQWKLVFDVH5(9%VHH)LJXUH5HVXOWV Figure 5. Western Digital 2.5“ PCB Number
Figure 6. Maxtor DiamondMax10 Labelt
Figure 7. Maxtor DiamondMax10 Label
received will show various Seagate drive models. To narrow the search look for the drives model number ST31000528AS
DVKLJKOLJKWHG)LJXUH Samsung 3.5” Hard Drive
,QWKLVH[DPSOHZHKDYHD6DPVXQJ+'6-7R¿QGDGRQRU
for this drive, one would search for the model number of the
KDUGGULYH)URPWKHUHVXOWVUHFHLYHG¿QGDKDUGGULYHZKLFK ZDVEXLOWDURXQGWKHVDPHWLPHIUDPHDVWKHSDWLHQW¿JXUH
To further narrow down the search one can use the PCB
num-EHUZKLFKLVKLJKOLJKWHGLQ¿JXUH
/RRNLQJ IRU D GRQRU FDQ EH GLI¿FXOW DQG WLPH FRQVXPLQJ 2QHFRXOGVFRXUWKURXJKWKHYDULRXVRQOLQHVDOHVVLWHVWR¿QG
the correct PCB. There are a variety of companies that spe-cialize in the resale of used PCBs. They are a good source of
LQIRUPDWLRQ DQG FDQ ¿QG WKH FRUUHFW GRQRU 3&%2IFRXUVH
at times the price of a PCB is more than the entire drive. If in doubt of which one is required, the highlighted areas in the
YDULRXV¿JXUHVZLOOKHOSLGHQWLI\WKH3&%ZKLFKLVQHHGHG
Physical Failures
Physical failures are the worst of the three categories a hard drive can experience. These failures can range from seized bearings, damage to the read/write heads to the magnetic coating off of the platters. An incorrect analysis of the failure may cause irreversible damage to the drive. Figures 12 and 13 show what occurs when the read/write heads contact the platters.
The damage caused to the outside edge of the platters
LQ ¿JXUH ZDV FDXVHG ZKHQ WKH KHDGV JRW FDXJKW XQGHU WKHSDUNUDPS7KHGDPDJHRQWKHSODWWHUVLQ¿JXUHZDV
caused by the head touching the platters.
Sticktion
6WLFNWLRQLVFDXVHGZKHQDKDUGGULYHLVEULHÀ\SRZHUHGXS
and powered down. The platters do not reach their nominal
URWDWLRQDOVSHHGEXWWKHKHDGVXQSDUNDQGÀRDWRYHUWKHSODW -ter. As the platters spin down, the air bearing cannot support
ÀRDWLQJWKHKHDGVRYHUWKHSODWWHUVDQGWKHKHDGVODQGRQWKH
platters. The surface of the platters as well as the heads are very smooth, so when the heads stop on the platter the
cohe-sion force is stronger than the torque produced by the motor. The drive will then emit the sound of a motor trying to start.
Seized Spindle Bearings
Seized spindle bearings will emit a sound similar to that of sticktion. If this occurs specialized equipment will be required. On some models of hard drives the platters must be removed and reinstalled on a donor Hard Drive Assembly. If one plat-ter of a multiplatplat-ter assembly moves a micron, the data will be irrecoverable. On other drives, the spindle where the plat-ters are attached to will have to be pressed out of the HDA, the bearing replaced by a donor bearing and the assembly pressed back into the original HDA.
When physical failures are suspected, it is best to seek the services of a Data Recovery Company.
How to find a Data Recovery Company
If one places the words data recovery into a search engine the amount of results are enormous, with everyone claiming to be the best. So how do you lessen your chances of sending your drive to the wrong place?
The following recommendations should be followed:
:KHQWKHFRPSDQ\WDONVDERXWWKHLUGDWDUHFRYHU\GRWKH\
discuss the three types of failures? Some companies only reveal data recovery in general terms, which may lead one to believe they can only do logical recoveries.
'RHVWKHLUSULFHOLVWEHJLQZLWK³'DWD5HFRYHU\EHJLQQLQJ
at $” something very tempting? This can get expensive quickly.
:KHQ ORRNLQJ DW WKH SULFH OLVW DUH WKHUH WKUHH GLIIHUHQW
price ranges one for each type of failure? If so, this is a good indication.
'RWKH\OLVWDQ\TXDOL¿FDWLRQVRUFHUWL¿FDWLRQVWKDWVKRZ
their skill has been tested?
In this article we have covered how a hard drive functions, the three types of failures one can be presented with and how to repair certain failures. If professional services are re-quired how to review the different company’s websites to see if they infact state they can handle all three failures as well as how they list their services and prices. Most of all, be curi-ous on what causes drives to fail and how one can get the data back.
FRANK MEINCKE
is the founder and data recovery specialist at Gefund-IT (Data Res-cue) who brings affordable data recovery to the clients served by his company. He is a Certified Data Recovery Professional from IA-CRB and has trained with Ace Laboratory and DeepSpar on the use of the PC-3000 for hard drive restoration and data recovery. Frank is a Certified Computer Examiner who had the privilege of training at the Defense Cyber Investigations Training Academy (DCITA) and being awarded Department of Defense Certified Digital Forensic Examiner. He maintains the credentials of EnCase Certified Examiner, AccessData Certified Examiner as well as CISSP and MCSE. During the course of his career he has attended over 1200 hours of computer specific training. When not at work, Frank enjoys be-ing with his family and when time permits you may catch him snow-boarding on the Alps during the winter.
Figure 10. Seagate 7200.12 Label Figure 11. Samsung HD103SJ Label
Figure 12. Heads getting caught under park ramp
Figure 13. Head contact on platter