RxWorks
Copyright © 2006 RxWorks, Inc.
This publication may not be reproduced or transmitted in any form in whole or in part without the written permission of RxWorks, Inc.
RxWorks
Fees Manual
Table of Contents
Fees ... 1
What is in the Fees Module? ... 2
How the Invoice Price is Calculated ... 3
Standard Fees... 4
Fees Module Structure... 4
Fees Details Page ... 4
Attachments Page ... 21
Categories & Insurance Page... 25
Rationalizing Fees... 28
Income Groups ... 28
Service Headings... 29
Duplicated Items ... 31
Deleting Items ... 32
Typical Fee Setups... 33
Professional Service Item (Consultation) ... 33
Merchandise Item (Frontline) ... 33
Prescription Tablet (Clavulox 250mg Tab) ... 34
Discount... 35
Standard Fees (Injection Fees) ... 36
Injectable Medication (Baytril Injectable) ... 37
Injectable with OTC Option (Procain Pen G) ... 37
Multi-route Injectable (ACP Injection) ... 38
Vaccinations (C5 Vaccination)... 39
Items with Non-linear Pricing (Proheart SR12) ... 42
Quantity Break... 43
Adding New Fees ... 45
Using a Template or Copy Current Item ... 45
Using (no template) ... 47
Examples of essential fields on a fee: ... 48
Appendix 1 : Pricing History ... 51
Appendix 2: Discount Schemes... 52
Appendix 3: Invoice Receipt & Estimate Formats ... 56
Setting up invoice, receipt and estimate formats ... 57
Samples of Invoice Receipt and Estimate Styles ... 60
Appendix 4: Updating Sale Prices... 71
Appendix 5: Data Wizards... 74
Data Wizard Export... 74
Importing Data ... 76
Fees
Overview
The Fees (Products & Services) module manages the pricing of every single item that can be invoiced as well as controlling the automation of healthcare indicators, reminders, handouts, insurance schemes and inventory. It can be opened by clicking the Fees button on the toolbar or using the hotkey F9.
Figure 1 The Fees Module
Figure 1 shows the Fees module open and displaying the Fee Details page for a typical item. This is just one item of several thousand found in most practices. At least one or two people involved in management of the hospital need to become competent in the management of fees.
While this requires an investment of time, the trade off is simplicity and automation in invoicing. Items for invoicing can be chosen from lists, correct pricing will ensue, discounts and quantity breaks are automatic and at the same time, no product will be sold at a loss, handouts are automatically generated, healthcare indicators and reminders are set, patient fields are updated and inventory is adjusted.
Figure 2 Fees Toolbar
The menu system and the toolbar (Figure 2) are used to control most activities in the fees module. In particular you can use:
Save (Ctrl+S) to make changes or additions permanent.
List to display all items in a searchable table. The table can be sorted on Item Name, Service Heading or Species and typing a word will jump to a matching record in the column.
Find which allows you to search for items by name or other parameters.
Add to create new fees.
Edit to modify details of the current fee.
Delete to remove a fee.
NOTE: If you choose to delete a fee that has already been invoiced to a client you will be asked to select another fee to replace it with. This useful where you have duplications and would like to rationalize them.
For example you may have fees for LA Penicillin per ml and LA Penicillin per bottle. For the sake of better stock control you could delete LA Penicillin per bottle and replace it with LA Penicillin per ml and to sell a bottle you invoice for 100mls. You can use a quantity break at 99ml to sell a bottle for less than 100 x the per ml price.
However you can also deactivate a fee if it is no longer required and you can rename it as well. A simple trick to get a fee almost out of the system is to rename it with a Z in front of its old name and then deactivate it.
What is in the Fees Module?
Every single thing that can be added to an invoice is recorded as an ITEM in the Fees (Products & Services) module.
This will include everything from Professional services to Medications, from Laboratory tests to Merchandise, from Grooming to Accounting fees. Most practices have several thousand fees.
Every item must have: Item Name • • • • • • • • • • • •
Item Number which the system generates automatically Service Heading for grouping on the invoice
Selling price (Fee) Un-priced items need $0.00 as the selling price Items can optionally have any of the following:
Printed name Species specificity Cost price
Special Price (for bonus and special deals from suppliers) Fee structure (Fixed and variable components, alternate prices) Quantity breaks
Tax rate (Sales Tax, GST or VAT) Maximum discount
Minimum charge • • • • • • • • • • • • • • • Deactivated date Usage notes (for staff)
Printed notes (withholding periods, instructions) Link to accounting system
Insurance discount Chart / image Attached reminders Attached certificates Attached client handouts Attached label
Active ingredients Stock control
Ideal level / Critical level Pack size
That list should demonstrate the tremendous potential the system offers.
How the Invoice Price is Calculated
All fees in Products & Services can potentially be made up of a fixed and a variable component.
The easiest way to understand this process is to think of how taxi fares are charged. The flag fall is fixed, the distance charge is variable - it depends how far you go!
Flag Fall $5.00 4km @ 0.85c/km $3.40
Total $8.40
Many veterinary fees are calculated in a similar manner. Consider how medication tablets are charged. The dispensing fee is fixed and the tablet component is variable; it depends on the number of tablets.
Dispensing Fee $7.20 12 tabs @ 20c/tab $2.40
Total $9.60
More flexibility is added by allowing an item to have several alternative fixed fees just as a taxi might have different flag-fall charges for late night or public
different prices for subcutaneous, intramuscular and intravenous administration.
Variable fees can have quantity breaks. These are different prices based on the amount sold. The program automatically applies quantity break pricing where applicable.
Standard Fees
There are also a handful of fees referred to as Standard fees. They are not invoiced by themselves but are used as a reference for the fixed component of many other items.
A classic example is a dispensing fee. The dispensing fee is just another item in the system but it is flagged as a standard fee. Then hundreds of prescription items can be set to charge the dispensing fee plus a cost per tablet / capsule / ml / bottle etc.
If the dispensing fee is adjusted then all these prescription items will instantly change in price as well.
Fees Module Structure
The Fees module has separate screens for: Fee Details • • • • Attachments
Categories & Insurance Stock Control
Fees Details Page
Item Name
Identifies the product or service, Clavulox 250mg tabs, Consultation – Standard and so on. It is used to find an item when creating invoices so it needs to be logically named for staff attempting to find it. It can also be used to describe standard fees, for example Injection Fee.
Printed Name
Identifies the item on Invoices and Drug Labels. It is not essential to have a printed name. If it is blank the program uses the Item Name instead. However, for some items it is very useful to use a printed name.
If the Item Name is designed to help staff find the item it could be that there is a better name for the invoice. For example, an item with the Item Name of
Consultation – Standard, that appears on the invoice under the Service Heading of Consultation, will benefit from having a printed name of Standard
to reduce clutter. (Figure 4 Invoice Layout)
Figure 4 Invoice Layout
Another use for printed name is where you do not want the client to see an actual drug name on the invoice. An example is using Analgesic as the printed name for a restricted drug such as Pethidine.
Service Heading
Thisis the heading the item will appear under on invoices. (see Figure 4 Invoice Layout) It is also the group an item belongs to in reports such as Income by Service.
Service headings are managed in Options>Items>Service Headings.
To change the Service Heading for an item, find the item in Fees, choose a new Service Heading from the drop-down list and then save the record. If you wish to change the Service Heading for large numbers if items it is better to use the Item Basics Data Wizard.
Particular Service Headings can control if items are discountable, modifiable by Service Ratio and if they are fully listed (ungrouped) on the invoice or just show as a total for the Service (Grouped). These adjustments to Service Headings are made in Options > Items>Service Headings.
For example, an ungrouped Service Heading might appear:
Medication
Amoxil Injection 9.50 Clavulox Tablets 250mg 8.25
Alternatively if the Service Heading was set to group it would appear:
Medication 17.75
Species
By default, new items are assigned to All Species but they can be restricted to one particular species. The best use for this is where you wish to repeat an item name but with different prices for various species.
For example, you may have an item called Castration with species set to Cat and another called Castration with species set to Rabbit. When adding an invoice for a cat you will not see the rabbit fee.
You may also have drugs only used for one species. Making such drugs species specific means that while adding a counter sale for a dog you will not see cat specific drugs.
At first some practices find this a little restrictive, but most soon realize it is a good feature as it forces the users to perform separate sales for each patient. A separate sale updates each patients record properly including reminders and healthcare indicators. This of course is very important to the standards of care of your practice.
Minimum Charge
Prevents the item ever being charged below a certain price. Its main purpose is to curb staff undercharging as the program will always bring the Sale Price of the item up to the minimum. Minimum charges can be setup in Options > Items > Minimum Fee Levels.
Deactivated Date
Items will not be available for invoicing after their deactivated date. This is useful for items that have become obsolete, unavailable or redundant in your fees list. They can be reactivated by removing the date.
Stock Control
For an item to be Stock Controlled and available for stock purchasing, then you need to check this box. A fourth tab, labeled Stock Control, will appear. Stock Control is explained in detail in the RxWorks Inventory Manual.
Charge Default
This is a useful timesaving feature for any item where the quantity sold is usually constant. For example, a Consultation Fee is normally charged just once on any invoice and by using Charge Default, when the fee is selected during invoicing, it will be charged without asking for a quantity.
It is also useful for many products where customers usually buy just one pack at a time. On occasions where the default is incorrect, selecting the item again will bring up the quantity dialog.
Use Default Tax for this item
This is an option only activated if you using the Dutch version of the program. When you are using the Dutch version and the option is not selected, then when the item is invoiced:
If the client Tax Status = Dutch, then tax on the variable component will assessed at the same rate as the tax on the fixed component, providing the fee does have a fixed component, otherwise it will be assessed at the rate on the variable fee.
•
•
• •
If the client Tax Status = Dutch Export, then tax on the variable component will assessed at the same rate as the tax on the fixed component, providing the fee does have a fixed component, otherwise it will be assessed at 0%.
When you are using the Dutch version and the option is selected, then when the item is invoiced:
If the client Tax Status = Dutch, then tax on the variable component will be assessed at its default rate.
If the client Tax Status = Dutch Export, then tax on the variable component will be assessed at 0%.
Notes, Image, Attached Documents and Statistics
Notes (Top Left & Top Right Buttons)
Both buttons open the same dialog box which has sections for Usage Notes, Printed Notes, Dosage, Indications, Contraindications and Withholding. Each of these has a corresponding merge field for use in Item Labels.
Usage Notes specify instructions to staff invoicing the item. These are visible during the sale process. They could relate a warning about the items use, where the item is located and so on.
Figure 5 Invoice with printed notes
Item Image (Middle Left Button)
Allows you to add an image to the item by scanning a document or photograph. Voice Notes (Middle Right Button)
Allows you to record voice notes for the item.
Attached Documents (Bottom Right button)
Allows any type of file to be attached to the item for automatic printing when the item is sold. It is ideal for material safety data sheets.
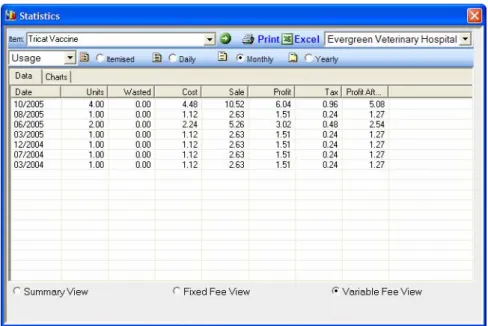
Statistics (Bottom Left button)
Displays analysis of usage, purchasesand adjustmentsof the Item. This data can be printed or exported to Excel.
Figure 6 Item Usage Statistics
The Statistics screen has a number of analysis options, viewing choices and filters. The default is to show usage filtered on variable fees. Some items may not show meaningful data until the view is changed.
Statistic Screen Options
A drop-down list offers the following analysis options:
Usage
Shows information from visit and counter sale invoices. There may be no usage data on consumable items.
Purchases
Shows information from goods inward receipts. There is no purchase data from non-inventory fees.
Adjustments
Shows information from inventory adjustments. Statistics Screen Filters
Itemized
Details from each invoice are displayed. This is useful for investigating which patients have been sold particular products or which supplier has supplied particular products. You can double-click a record in this view to open the related visit screen.
Daily Monthly and Yearly
Summarizes sales of the item for these periods. This can be useful in
determining ideal stocking levels and assessing if a product is worth stocking. Statistic Screen Views
Variable View
The information is restricted to the variable fee components. For medications this is usually the tablets or mls sold.
Fixed Fee View
The information is restricted to the fixed fee component. This is usually the professional charges. In the case of medications this is the dispensing fee or injection fee.
Summary View
This combines the information from Component and Fixed Fee views..
Remember, if you choose Component View on an Item that is only sold by Fixed Fee you will not see anything. You might be tempted to think the item has no sales recorded. Once you choose Fixed Fee View or Summary View you will see the sales figures.
Fixed and Variable Fees
The fee charged to a client is composed of a fixed component and a variable component much the same way as a taxi fare is composed of a flag fall (fixed
The fixed component can have two or more sub types with different prices (just as taxis may have a different flag fall on public holidays).
The variable fee can have quantity breaks where larger quantities qualify for a different price either for the whole quantity (sliding scale) or just for the quantity exceeding the threshold (stepped scale).
The fixed and variable fees on an item can be assigned to different income groups for reporting.
Every item must have either a Fixed Component or Variable Component Sale Price even if it is 0.00. You can always override this when actually creating an invoice.
It is usual for professional fees to have just a fixed fee, merchandise to have just a variable fee and medications to have both. The fixed component for medications will be a dispensing or injection fee, the variable fee will be typically per tablet, per ml or per pack etc.
For items to be stock controlled they must have a variable component.
Fixed Component
In this area you establish the fixed fee component for the item if it is required.
Stock Control is linked to the quantities sold using the variable component so inventory items should not be setup to use solely the fixed component.
Standard Fee List
If appropriate, choose a standard fee from this list. No further settings in the Fixed Component area are then required or available for that matter.
Otherwise, leave this set to (none).
Figure 7 shows an item that does not have its own Fixed Component fee. Instead the fixed component is referenced to the item called Dispensing Fee that has been selected from the Standard Fee list.
Figure 7 Fixed Fee component set to a Standard Fee
Income Group
Items from many services can belong to the same Income Group. Items from Consultation, Anesthesia, Surgery, X-Ray and so on could all be set to Income Group Professional Fees.
Income Groups are set per item and are independent from Service Heading. Therefore all items in particular Service Heading don’t necessarily have the same Income Group setting though quite commonly they do.
Income Groups for the Fixed and Variable Components are independent from each other. This is useful to split a fee into its service and inventory
components. For example medication items can have their dispensing/injection fee set to Income Group Professional while the variable fee can be set to Income Group Drugs. Vaccination items are often split the same way.
Figure 8 Typical Income Group report
Income Groups can be set up in retrospect and are not needed until you want income reports, so it is not urgent to get them right before using the program. Default Value
The quantity sold will default to this value when creating an invoice. It can be overwritten of course but for convenience enter the quantity usually invoiced for this item into the Default Value field. In the Fixed Component the default is almost always 1.
Cost Price
The CostPrice is the amount it costs you to purchase this item, excluding tax. The Fixed Component is often associated with a Professional Fee and for these either leave the cost at zero or put in an estimated cost.
Inventory items should have their cost price entered in the Variable Fee section as it is this section that links to the Inventory Control system. Tax Rate
The GST, VAT or Sales Tax applicable to your area. Do not include the percentage sign. 12.5% is entered as 12.5. In the US where there are Federal, State and County tax components it is usual to put the combined value into the Tax Rate field.
Sale Price
In the final section of the fixed component area you set the Sale Price or Sales Price choices.
Figure 9 Fee - Fixed Component
Figure 10 Fixed Component with choices
Add and Edit buttons in the Fixed Component area open the Fixed Fee Charge dialog (Figure 11) to allow manipulation of the actual fee(s). The Delete button can be used to remove a particular Fixed Fee.
Figure 11 Fixed Fee Charge dialog
Description
The description does not appear on invoices so there is little point in changing it from the default of Service Charge unless you add multiple fixed components. There may be occasions when you do wish to have multiple fixed components as you see in Figure 10. The user will be able to select from these choices when invoicing. In this case you need to change the description from Service Charge to something more meaningful so the user can select the correct fee.
Each of these fees is created with the Add button.
Be aware that RxWorks reports cannot distinguish between various Fixed Component Fees. For example, in the sample shown in Figure 10 there is no
report that can show income generated just from the 0 – 10Kg fee or the 11 – 20Kg fee and so on.
Markup & Sale Price
When setting a fee you can use a Markup (percentage) or a fixed Sale Price but not both. If you use a markup the program calculates the selling price inclusive of tax. It will recalculate the selling price any time the Cost Price or Tax Rate is changed.
If you use a fixed Sale Price you must include tax in the price you set. With a fixed Sale Price changes in Cost Price will not affect the selling price. An asterisk appears before the markup percentage if a fixed Sale Price is being used.
Maximum Discount
This setting can limit the effect of client discounts on the item.
Incidentally, these discounts do not change the price of an item on the invoice as such but the discounts on each item are added together, shown under a Discount service heading and deducted from the invoice total.
Maximum Discount is initially set by the computer to the maximum amount of discount you can give on the variable component fee of this item without losing money. However it defaults to 0% when markup is not used.
You can adjust the calculated Maximum Discount if you wish. If you set it to 5% then even if a client has some default discount such as Pensioner 10%, they will only be given 5% on this item.
A Service Heading can be set to not allow discounts on any items within it which would make Maximum Discount irrelevant.
Discounts generated by the Discount Scheme field on the patients screen are not limited by Maximum Discount or by the Service Headings setting. Maximum Discount for the fixed component and variable component are independently set and need not be the same.
Minimum Service Ratio
This field only appears if you are using Service Ratios on your Clients screen. Service Ratio, in contrast to Discounts, is not shown on the invoice. Instead it changes the price of the item on the invoice. In fact, Service Ratio can actually increase or decrease the price.
Minimum Service Ratio can be used to limit the effect of Service Ratio on the fixed fee component of a particular item. For example, if a client has a Service Ration of 0.8 they are normally charged only 80% of the normal fees. Some practices use such a setting for a particular group of clients such as the elderly. If we set the Minimum Service Ratio on a particular fee to 0.9 then the client with a Service Ration of 0.8 will actually be charged 90% of the normal fee.
Variable Component
Variable fees are usually used for items that are charged in multiple units. The fee can be set to an exact amount or it can be based on a markup of cost price and it can incorporate quantity breaks.
Stock Control is linked to the quantities sold using the variable component so inventory items should not be setup to use only the fixed component.
Some service items are also amenable to being charged using the variable component. i.e. pregnancy testing farm animals per head, surgery per minute.
Figure 12 Variable Component area
Description
Defines the unit being charged. The main use of the Description field is to make sure staff understand what unit the sale price relates to.
Income Group
As for Fixed Fee Income Group. See Income Group on page 10. Default Value
Usual quantity invoiced. For example, a certain tablet may often be dispensed in quantities of 12. You can adjust this at the point of sale but it saves time in most sales by pre-setting the quantity.
It is quite useful for many merchandise items to set Default Value to 1 and use the Charge Default option as well. This saves time when invoicing products that are almost always bought singly.
Dosage Calculator
By using this option when you invoice an item the Charge dialog will be filled with the correct quantity based on the patient weight recorded for that visit.
Figure 13 Quantity calculated by Dosage Calculator
This is particularly useful for injectible items.
To set this up click the Dosage Calculator button beside the Default field.
Figure 14 Dosage Calculator button
You can now enter one or more dosage regimes. If required you can have different dosages for various weight ranges and dosage can be species specific.
Figure 15 Dosage Calculator setup
You must be consistent with the units used.
In this example the drug concentration was 100mg/ml and the dosage was 3mg/kg. You can use mg, ug or anything else but it must be the same in both cases.
NOTE: When complete you must change the default quantity to 0 because if you forget to add the patient's weight to the visit, the Charge dialog will show the default quantity as the dose. If this was any value other than 0 you might assume incorrectly that it was the calculated dose.
Once you setup an item to use the Dosage Calculator you should test it to confirm the settings are correct.
Cost Price
The purchase price (suppliers List price) excluding tax. If adding the cost price manually, it may help to use the built-in calculator. For example, you may be entering a tablet which costs you 87.34 for a bottle of 500. In the cost field type 87.34/500 then press ENTER and you will find the per tablet cost has been calculated.
Cost Price is updated automatically when you process good inwards. Sale Price is immediately updated whenever the cost price changes if the selling price if the item is calculated with a markup percentage.
Special Price
This is the invoice price, the suppliers discounted price. Entering a Special Price does not alter the Sale Price. Special Price is updated when processing goods inwards. Stock Valuation reports will take into account stock purchased at special prices.
Tax Rate
The GST VAT or Sales Tax applicable to your locality. If the tax is 12.5 percent, use 12.5 without the percentage mark.
Sale Price
In the final section of the variable component area you set selling price(s). Buttons are available to Add, Edit or Delete a sale price.
Figure 16 Sales price based on a markup percentage
NOTE You can use markup percentage or a set selling price. In the latter case, changes in cost will not affect the selling price and an asterisk appears before the markup percentage to signify this.
Figure 17 Sales price based on an exact amount
Figure 17 is an example of a price not based on a markup percentage. Spot the difference between this example and the example in Figure 16.
Adding a variable fee
The Add button opens a dialog box that allows you to enter the Variable Component Selling Price details (Figure 18).
Figure 18 Variable Fee Charge dialog
You can use a markup or an exact Sale Price but obviously not both.
Subsequent changes in the cost price will alter a sales price set by markup but not sales price set to an exact amount.
Using markup, the program calculates the selling price inclusive of tax. If you use an exact selling price it must include tax in your calculation.
Note that the quantity defaults to 999999. This is the same as All Quantities seen in Figure 16 and Figure 17.
Maximum discount
This setting can limit the effect of client discounts.
Incidentally, these discounts do not change the price of an item on the invoice as such but the discounts on each item are added together, shown under a Discount service heading and deducted from the invoice total.
Maximum Discount is initially set by the computer to the maximum amount of discount you can give on the variable component fee of this item without losing money. However it defaults to 0% when markup is not used.
You can adjust the calculated Maximum Discount if you wish. If you set it to 5% then even if a client has some default discount such as Pensioner 10%, they will only be given 5% on this item.
A Service Heading can be set to not allow discounts on any items within it which would make Maximum Discount irrelevant.
Discounts generated by the Discount Scheme field on the patients screen are not limited by Maximum Discount or by the Service Headings setting. Maximum Discount for the fixed component and variable component are independently set and need not be the same.
Minimum Service Ratio
Service Ratio, in contrast to Discounts, is not shown on the invoice. Instead it changes the price of the item on the invoice. In fact, Service Ratio can actually increase or decrease the price.
Minimum Service Ratio can be used to limit the effect of Service Ratios. For example, if a client has a Service Ration of 0.8 they are normally charged only 80% of the normal fees. Some practices use such a setting for a particular group of clients such as the elderly.
If we set the Minimum Service Ratio on a particular fee to 0.9 then the client with a Service Ration of 0.8 will actually be charged 90% of the normal fee. Minimum Service Ratio for the fixed component and variable component are independently set and need not be the same.
Quantity Breaks
The variable component can be made up of fees for different quantities and during invoicing the correct quantity price will be calculated automatically. This variation can be up or down but most commonly is the latter in what might be termed a quantity discount.
As an example, say you wanted a quantity breaks for 100 units of an item. The first step is to edit (or add) the first price using quantity 99. Notice in Figure 19 the quantity in the first step is now <=99 instead of All Quantities.
Figure 19 Modify the first quantity to 99
Next, add another price using quantity 999999.
Figure 20 After adding another price for quantity 999999
You can have multiple quantity breaks if you wish. In the Figure 20 example you could have made quantity 199 to have another break at 200 and then added a third price for quantity 999999.
Figure 21 Item with 2 quantity breaks
The price for each step can be determined by markup or by a fixed sale price. Stepped and Sliding Scales
An important option for quantity breaks whether it should apply on a stepped or sliding scale.
A Sliding Scale is where the price of all units is reduced if the quantity exceeds the breakpoint. For example, the items units may have a sale price of 2.20 each reducing to 1.98 each for 100 or more. The price of 150 units is therefore 150 x 1.98.
Using Stepped Scale the full price is paid for the units under the threshold and only those from the threshold upwards have the break price. The price of 150 units in this case is (99 x 220) + (51 x 1.98).
Sliding scale is commonly used for tablets and mls. A good example is where the price required is 0.25 per ml or 20.00 per 100 ml bottle. Set a sliding scale price of 0.25 up to quantity 99 and 0.20 for higher quantities.
Stepped scale is often used for things such as X-Ray plates and pregnancy testing for large animals where you always want the full price for the first unit and a cheaper price for subsequent units.
Figure 22 Quantity break using stepped scale
In this example of stepped scale (Figure 22) the first unit is always charged at 50.00 and subsequent units are charged at 20.00.
Standard Fee Box
A Standard Fee is one which is used as a reference to set the sale price for the Fixed Component of other fees. A Standard Fee cannot have a Variable Component.
Most practices have at least two items set as Standard Fees but rarely more than 10. The two most commonly used are Dispensing Fee and Injection Fee. Some practices use an alternative dispensing fee for prepackaged items and individual Standard Fees for intra-venus, intra-muscular and sub-cutaneous injections.
An unlimited number of items can be linked to a Standard Fee using the Standard Fee list (Figure 7) on the item. The link sets the Fixed Component Sale Price of the item by reference to the Fixed Component Sale Price of the Standard Fee. Any change to the Fixed Component Sale Price of a Standard Fee will immediately change the Fixed Component Sale Price of the items linked to it.
The Standard Fee Box (Figure 23) in the bottom left corner of the screen is used where you wish to make a fee into a Standard Fee.
Figure 23 Standard Fee checkbox
The details seen in Figure 23 are typical for a Standard Fee item such as an Injection Fee or Dispensing Fee.
There are cases where a single fee is inadequate for a Standard Fee. For example, you may have a drug which needs an injection fee when administered by the veterinarian or a dispensing fee if sold over the counter.
You could deal with this by using a Standard Fee called Injection Fee with OTC Option and give it two fixed components as shown in Figure 24.
Figure 24 Standard Fee with Injection/OTC Choice
When this item is invoiced the user will be presented with the appropriate choices.
Figure 25 Invoicing item with Injection/OTC choice
The choice list is always open and highlighted so the user is in no doubt the choice exists. Exercising a choice is easy. To invoice a 20ml injection, at this
point you can press TAB twice, type 20 and press ENTER. To invoice a 100ml bottle press DOWN ARROW, press TAB twice, type 100 and press ENTER.
As another example, some injectable items can be given by more than one route and you may want different prices accordingly. This could be dealt with using a Standard Fee called Injection Fee Choices and adding in several different fixed components as Figure 26 demonstrates.
Figure 26 Injection Fee Choices
For items where choices are not needed it is best to use a simple Standard Fee such as the one shown in Figure 23 rather than the more complex examples that followed. Otherwise you will be adding an unnecessary step while invoicing these items.
Attachments Page
Perhaps equally this could have been called the Actions Page because it allows the setup of numerous actions that can occur when the item is invoiced.
These include: Setting reminders • • • • Printing a label
Printing documents such as certificates and handouts
Updating Custom Fields and HealthCare Indicators on the patient record.
Figure 27 Fees - Attachments Page Update Fields
These are CustomFields and HealthCare Indicators1 on the Patient
Screen that can be automatically Updated when you charge out a fee. This is an extremely useful function and very important to setup correctly for the appropriate items.
The most common items to use Update Fields are vaccinations, worm treatments, flea treatments, heartworm preventatives, food items, desexing services, and euthanasia. However there are many more.
Custom Fields are usually updated with the product name or date of purchase. whereas HealthCare Indicators are updated with product name, date last given and date next due. The date next due is calculated from a reminder which must also be setup on the item.
Apart from being useful information to see on the patient screen, this data can be used in a query such as Last Vaccinated date being more than 2 years ago and, in the case of HealthCare Indicators, they cause HealthCare Prompts to warn staff when a patient they are dealing with has HealthCare treatments overdue. HealthCare Indicators in many instances have made Custom Fields obsolete.
As well as the Custom Fields and HealthCare Indicators there are several other fields that can be updated. These include Microchip Number, Deceased Date, Discount Scheme, the Desexing indicator, the Deactivated patient indicator and the clients Traveling distance.
1 HealthCare is an add-on module to RxWorks. If you do not have it installed and activated you will not see the components discussed in this section.
Most people consider setting up euthanasia charges to update Date Deceased and Deactivated Indicator to be paramount. This is to prevent reminders being sent to deceased patients.
For more information on what setting you should make in the Update Fields see the Attachment Page Checklist on page 24.
Also note that the Update Fields list is in three sections. The first six items are the “other” fields, then there is a heading to note the start of HealthCare fields and finally there is a heading to note the start of the Custom Fields.
Figure 28 Update Fields list Reminders
Invoicing an item can add or update one or more patient reminders. You can have as many reminders as you want on an item and at the time of invoicing can accept or reject each individually. This is one solution for a vaccination which may require a 4 week reminder or 12 month reminder depending on the patients age at the time of vaccination.
Handout Notes & Certificates
One or more Handouts and/or Certificates can be selected to print out when charging a specific fee.
Print Label
By checking the PrintLabel box a label will be automatically produced when the item is invoiced. This should be selected for all items that require a Drug Label on the dispensing package.
Custom labels can be developed for special items or even things such as labels for X-Rays or pathology specimens.
Label Header and Footer Text
Standard label information is pre-set in Options>Items>Labels.
The Standard Header contains the usual required legal information, client & patient name, item name, dosage etc.
The Standard Footer could incorporate the practice name and address. Again, you modify or create this in Options>Items>Labels.
Use the previewbutton at the end of the line to view details. Label Body Text
Label Body Text is usually used for the drug dosage and is mostly left set to (none). The user can select the dosage at the time of creating the invoice. Choices in the Label Body Text list are managed in Options>Items>Labels. Custom Body Text
For some items it may be appropriate to create a Custom Label. However, you cannot use both custom label text and Label Body Text on the same label. You may, if you wish, set Label Header, Footer and Body to (none) and create the entire label in the Custom Body Text box.
The custom label can be made up of plain text and merge fields selected from the Available Merge Fields list. Keep the lines short as the data which merges in will be larger than the merge fields.. Hence, you may need some trial and error to get it right.
Print Labels Button
You can print Labels directly from here to your Label Printer. They will not however include the Customized fields as they have no merge information available. If you wish to do a large Label run it is easier to do this from a fake counter sale for your test client.
Attachments Page Checklist
This checklist should be regarded as a guide only. It should also be noted that you are limited to three Update Fields including HealthCare Indicators. If you are using the HealthCare Manager then HealthCare Indicators would
generally take precedence over other Update Fields. Desexing fees:
Update field: Desexed indicator
• • • • • • • • • •
Update field: Date desexed
Handouts: Sterilization certificate Handouts: Post operative care sheet Euthanasia fees:
Update field: Deceased
Update field: Deactivate patient Worming Items:
HealthCare Indicator: Worming Update field: Date Last wormed Update field: Worming type
Reminder: Worming reminder 3-6 months Flea Products:
HealthCare Indicator: Flea • • • • • • • • • • • • • •
Update field: Flea Prevention Update field: Last Flea Purchase Food Items:
HealthCare Indicator: Food Update field: Food type
Update field: Date Last Food Purchased Vaccinations:
HealthCare Indicator: Vaccination Update field: Last Vaccinated Reminder: Appropriate reminders Handouts: Vaccination certificate Dental fees:
HealthCare Indicator: Dental Update field: Last Dental
Reminder: Appropriate reminders Handouts: Post operative care
Categories & Insurance Page
Figure 29 Fees - Categories and Insurance Page Active Ingredients
If required. Can be merged onto drug labels.
Registration No.
This is used by practices in Holland to record the drug registration number which is used in their Drug Classification Report.
Categories
Categories are used mainly for analysis. They are another way of subdividing your items, for example into Type of Drug, Item Group (Item Family) and Manufacturer.
Analysis Reports and Stock Take lists can be based on these categories. The categories and category lists can be managed in Options > Items > Item Categories & Stock Control.
Figure 30 Setting up Categories in Options
Up to five categories can be configured simply by giving the category a name. The choice list for each category is maintained using the setup button beside the category name.
Typical uses for Categories include: Item Type
This category is primarily used for inventory items to split them into groups within a particular Service Heading.
For example, using the category Item Type allows analysis of the many different types of drug within the service heading of Medication. Likewise you may wish to subgroup items within other services.
When designing your item types, think about each of your service headings and consider what subgroups within it you may want to analyze in the future. The actual values used for medication Item Types could be derived from therapeutic action or therapeutic class perhaps according to a published standard such as the MIMS IVS Annual, the BSAVA Formulary or Plumb's Veterinary Drug Handbook.
For other service headings the Item Type will probably be less formal. If you have a service heading for Food & Diet you may decide to use Item Types of Prescription, Lifestyle, Supplements and so on.
Item Type can also be used on non-inventory items. For example item types Orthopaedic, Soft-tissue, Non-sterile and so on could be used on items within the service Surgery.
Item Group (Item family)
This category allows reporting on all the derivatives of a particular item. For example, the groups could be HeartGuard, Frontline, Advantage, Hills, Clavulox and so on. Income or stock turnover reports based on Item Group would be useful when reviewing a product family, discussing with a sales representative or negotiating with a supplier.
Manufacturer
Again this could be used in income or stock turnover reports. Inventory Group
Some practices find it useful to use an Inventory Group category with choices such as Medication, Foods, Shop Items, Disposables and so on to make the physical inventory count easier by breaking it into more manageable lists for any given staff member.
Classification Exceptions
This is used by practices in Holland to record which classifications of patient should not ordinarily be given this item. If such patients are given this item they will be listed in the Drug Classification report.
General Ledger Accounts
Can be used to define the Income, Expense and Stock accounts for the item if you are using the RxWorks QuickBooks Interface. However, it is optional as the accounts can be defined for the Service Heading as a group.
Discount Scheme
Used to define discount for this item if the patient is a member of an in-house
Discount Scheme. Discount schemes and discount groups can be added in
Options > Items > Discount Schemes.
In the example seen in Figure 29, the hospital has two schemes, HealthCare and HealthCare Plus. The item has a Medication discount which is 25% for HealthCare patients and 50% for HealthCare Plus.
See Appendix 2: Discount Schemes on Page 52.
Markup Group
Markup Groups allows quick and precise changes to be made to the markup percentage used by different groups of items. See Appendix 4: Updating Sale Prices on page 71.
Rationalizing Fees
Many practices end up with their fees in some disarray, particularly in practices that have converted data from an older software system. Rationalizing fees is advantageous for usability, accurate billing, better reporting and better stock control. The process weeds out unused fees and implements time saving options, puts fees into logical Service Headings and into meaningful groups for reporting.
Ultimately you will have to step through the fees one by one, fine tuning and culling as needed. Before you begin this task some groundwork needs covering. This includes:
Setting up Income Groups, Service Headings and Categories
• • • • • • • • • • •
Learning how to add and remove fees Planning what you want to achieve
Income Groups
Income Groups are set independently for the fixed and variable fee on each item. They are only used for reporting and while they can be setup in
retrospect it is actually good to set them up before anything else so they can be applied as you go. See page 10 for details including an example report.
A prime purpose of income group reports is for your tax records so it may be worth discussing requirements with your accountant.
A common basic set of income groups is: Fees
Drugs Traveling
A more complex set might be: Drugs
Professional Fees Other Fees Merchandising Traveling
Income Groups are setup in Options > Items > Income Groups. Take a look and consider if your income groups need attention.
Figure 31 Configure Income Groups dialog
The Configure Income Groups dialog will allow you to edit names, add new names and merge items in one group to another.
For example, if you chose to delete Food as an Income Group the Update Field Values dialog (Figure 32) will automatically open giving you the opportunity to select another Income Group to move Food items into.
Figure 32 Update Field Values dialog
Checking every actual item in the Fees module for its income group is quite tedious! A far more efficient method of checking and setting Income Groups is to use the Item Miscellaneous Data Wizard. See Appendix 5: Data Wizards on page 74.
Service Headings
Principally Service Headings are used as headings on the invoice but they are also used as a grouping for statistical analysis. See page 5 for details.
Service Headings are configured in Options > Items > Service Headings. Take a look and consider if your list of Service Headings needs attention.
Managing Service Headings
Do you need more Service Headings? Many practices in earlier days sold all inventory items under the heading Medication. The trend now is to have only true medications sold under that heading. This requires headings for other inventory items. Some extra headings you might consider include:
Diet
Pet Care
•
Service Headings have a number of options, demonstrated in Figure 33. Some of these are default values for fee items you may add to the service at a future time. As such, changes you make to these options do not affect existing fee items.
Other options do immediately effect existing items and the way your invoicing flows. In fact, it would be worth reviewing these settings for existing services as well as setting them up correctly for new services.
Which of these apply will be explained as each field is discussed.
Figure 33 Configure Services dialog
Fields that are default values for future items
Fixed Fee Income Group and Variable Fee Income Group (see notes on Income Groups, page 28). These are default values for new items you add to the service.
Fixed Tax Rate and Variable Tax Rate are default values for new items you add to the service.
Fields that have immediate effect on your system
Invoice Order controls the relative position of the heading on the invoice. If invoice order for Consultation was 1 and Medication was 2, Medication will be second on the invoice if Consultation is used but first if Consultation is not used.
Estimate Range is a variation that will be added to estimates created in the Visits screen. An estimate takes into account the Estimate Range value for each service and puts a final value on the estimate of “Between $X and $Y” where $X is the value of the items you included in the estimate and $Y is $X plus the aggregated Estimate Range.
Group on Invoice will show the service heading but no item details on the invoice. For most services this would not be used. See page 5 for more details.
Apply Discount and Apply Service Ratio allow you to be selective about which services permit these processes.
Select Apply Discount if discounts are permissible on items in the service. (Note: Insurance Discount will apply even if Apply Discount is not selected.) Select Apply Service Ratio if it is to be allowed on items in this service.
Close on Charging is an option suitable for services where you only ever make one choice in charging, such as Consultation. It makes the highlight jump back to the service list after you choose an item from that service.
Allow Tax Exemption works in conjunction with the optional Tax Status
field on the Client screen. If Allow Tax Exemption isselected and the client Tax Status is Tax Exempt or Dutch Export then the client will be exempted from tax on items within the service.
General Ledger Accounts allows you to setup Income, Expense and Stock accounts for the RxWorks QuickBooks interface. If these are set for a service they will apply to all items within the service unless the item has its own account settings.
Deleting Service Headings
Do you have superfluous Service Headings? For example, you might have Pathology and Laboratory as headings and decide they could be merged.
Figure 34 Deleting a Service Heading
If you choose to delete a Service that has items in it, you have the opportunity to name another Service for the items to be moved to. Just choose a Service from the New Value list. In Figure 34 Radiology is being deleted and radiology items are being moved to Diagnostic Imaging.
Changing an Item’s Service Heading
Find the item and on the Fees page choose another Service Heading from the Service Heading list.
Duplicated Items
For accurate stock control, inventory items must not be duplicated. This may take some reorganization for items such as vaccinations (page 39) or drugs that are in the system as a bottle and per ml (page 37).
On the other hand, duplicating fees for professional service items can be very useful. For example, you can have an item called Boarding and set the species
When invoicing for boarding you will then just see the correct boarding charge for the species of the current patient. The benefit is twofold: less clutter in pricelists and more accurate billing.
Deleting Items
The program will not allow an item to be deleted if it has been used in an invoice.
To prevent an item being invoiced in future you can set a deactivated date on the Fees page. To hide from staff you can rename it to something like
zPilocarpine or zDeactivated Pilocarpine. Some practices actually have a Service Heading called zDeactivated and move all deactivated items into that heading.
Typical Fee Setups
This section shows samples of different fee types and demonstrates how they would typically be setup.
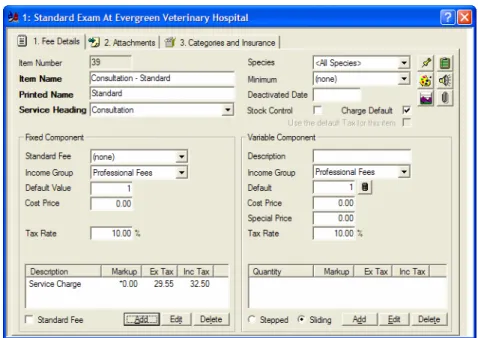
Professional Service Item (Consultation)
Although Standard Consultation is probably your most commonly used fee it is quite simple in its setup.
It will probably be under the service heading Consultation so there is no need to duplicate Consultation in the Printed Name.
Figure 35 Fee setup for Standard Consultation
The Default Value of 1 is important, as is selecting Charge Default. Together they mean you do not have to enter a quantity when invoicing this item.
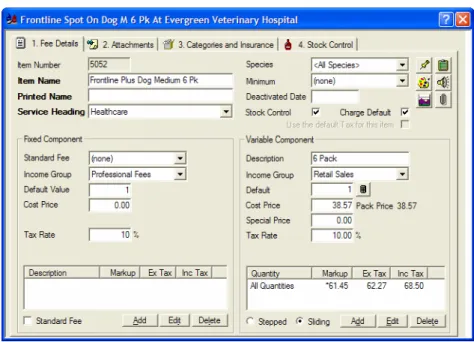
Merchandise Item (Frontline)
Charge Default is again selected so it will automatically bill for 1 pack and this is rarely incorrect for many merchandise items.
Figure 36 Fee setup for Frontline, a merchandise item
Merchandise items can be sold at a set price or marked up price. However, the asterisk on Markup for this example indicates this item is sold at a set price not by a markup percentage.
If the cost price alters for this item, the sale price will not change.
On the Attachments page you may wish to select appropriate update fields.
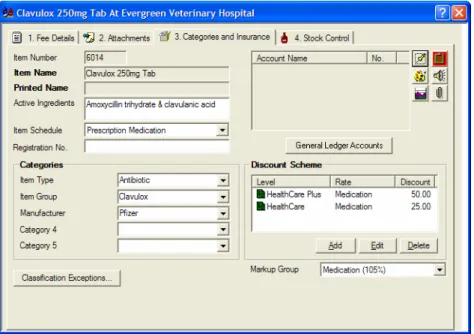
Prescription Tablet (Clavulox 250mg Tab)
The fixed fee is derived from a Standard Fee called Dispensing Fee. On the attachments page you would select Print Label and choose Standard Header as the Label Header Text.
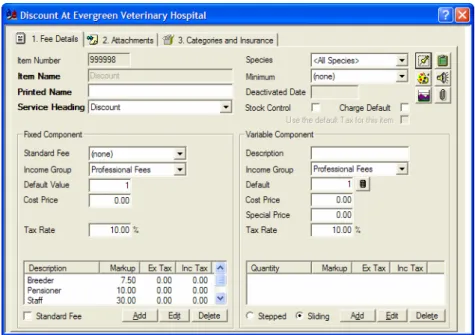
Discount
The Discount item is one of several protected items. It is usually item number 999998 and it cannot be deleted or renamed.
When applied to an invoice it calculates a discount that shows on the invoice and deducts from the total. It can be linked automatically to invoices for selected clients such as pensioners or it can be manually added to an invoice.
Figure 38 Fee setup for the Discount item
In the lower left corner you can add as many different discounts as you need. “Markup” is actually the discount percentage.
Figure 39 Adding a discount 'fee'
These discounts will be available in the Discount Type field on the client screen to allow particular clients to be setup for automatic discounting. To apply a discount to an invoice manually, during the process of creating the invoice you ‘charge’ the discount.
Items added to the invoice after the discount will not automatically be
discounted. When you save the invoice, a message asks if you wish the discount to be recalculated. You can take advantage of this if you would like to discount
Discounts (except insurance discounts) can be completely blocked on certain services (Service Headings section of Options > Items) and they are limited by the Maximum Discount set for any particular item.
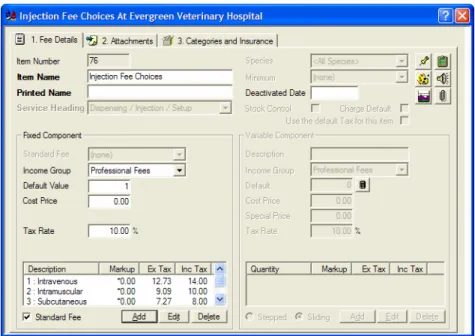
Standard Fees (Injection Fees)
Standard fees can be the fixed component of other fees. Injection fee is a typical example and Dispensing fee is essentially the same. The tick in the Standard Fee box makes it shareable.
Updating the standard fee automatically updates all those fees referring to it.
Figure 40 Injection Fee as a Standard Fee
Some injectable medications may need an option to invoice without an injection fee. Medications you sell to farmers are a good example. A special standard fee can be added for these with options for Injection Fee and OTC Sale.
Some injectables have more than one route of administration and may need different fees. A special standard fee can be used to provide these options.
Figure 42 Injection Fee Choices as a Standard Fee
You would only use the more complicated Standard fees on items that really required it. For normal items it creates an unnecessary step when invoicing.
Injectable Medication (Baytril Injectable)
This example shows an injectable medication using the simple Injection Fee.
Figure 43 Baytril Injectable using an injection fee
Figure 44 Procaine Pen G with OTC option and quantity break
When invoicing for an injection you can charge by the ml and select the injection fee. For the sale of a whole bottle over the counter you can invoice 250ml (the bottle size) which automatically uses a lower price and as well you could choose the OTC Sale fee.
Notice the default quantity has been set to 250 ml as this helps prevent inexperienced staff selling a whole bottle for the price of 1 ml.
Figure 45 Charging Procaine Pen G with an OTC option
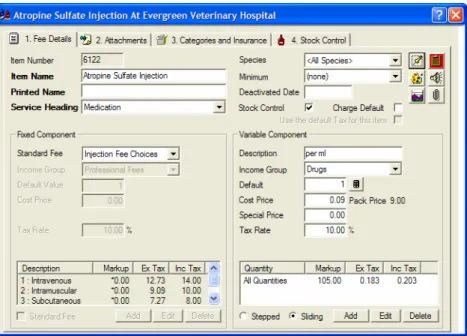
Multi-route Injectable (ACP Injection)
This example shows an injectable that may be given IV, IM or SC. At the time of invoicing you can make the choice.
Figure 46 ACP Injection using Injection Fee Choices
Vaccinations (C5 Vaccination)
Traditionally, vaccinations were charged as a flat fee incorporating an
examination and the medication cost. This works effectively but misrepresents income reporting. It makes the vaccine look spectacularly profitable and does not recognize the large professional component.
Figure 47 Vaccination as a simple fee
This could be rectified by splitting the fee into a fixed component and a variable component shown in Figure 48.
Figure 48 Vaccination split into professional and drug components
For reduced prices on multiple pet vaccinations or litters you can apply a discount manually or build a reducing structure into the fixed fee.
This could be done for each vaccine but would preferably be based on a Standard Fee for easier maintenance. This can then be used as the Fixed Fee component for all your vaccinations.
The variable fee can differ between vaccinations to account for different drug cost. With a little juggling of the values most practices find this very
satisfactory.
Figure 49 Creating a Standard Fee for vaccinations
The full list of fees could include options for litter vaccinations. Figure 50 takes artistic license. It shows the full list of fees you could add though you would never see the whole of this list displayed at one time in the RxWorks interface.
Figure 50 Fees including litter vaccinations
Having set up the standard fee for the examination component of vaccinations you can then deploy it on your vaccine fees.
Figure 51 Vaccination Standard Fee attached to the C5 Vaccination
This works well and is easy to use when invoicing. You just select the appropriate fixed fee option from the dropdown list seen in Figure 52.
Figure 52 C5 Vaccination charging choices
As it defaults to Single Animal Visit, in many cases you just press ENTER twice for the correct fee.
With multiple patient vaccinations each needs a separate invoice for correct history, certificates and reminders. Say you were invoicing one of 3 patients you would use DOWN-ARROW twice then ENTER twice for the correct fee. For litters the number of doses must be changed. With a litter of 6, you would select A: Litter 6 from the list (using DOWN-ARROW or by pressing A on the keyboard), then press Tab and enter 6 as the number of doses.
Figure 53 Charging C4 vaccination for a litter of 6 pups
Note: Vaccinations are also highly amenable to using procedures for multiple pets and litters. See the RxWorks Procedures Manual for setting up
vaccinations as procedures.
Items with Non-linear Pricing (Proheart SR12)
Where the fee is based on price bands rather than a unit such as tablet or ml the fixed fee can be used for price choices and the variable fee, while priced at 0.00, can still be charged per unit for the benefit of stock control.
Figure 54 Fixed fee component price bands
When charging this item, choose the price band from the list then enter the number of mls used.
Figure 55 Selecting the price band when invoicing
Quantity Break
Quantity breaks allow the price to change depending on the quantity sold. There are two variations: sliding scale and fixed scale.
The first example (Figure 56) uses sliding scale quantity discount. The first fee was edited for a quantity of 9 then another fee was added for quantities up to 999999.
Figure 56 Sliding Scale quantity break
With sliding scale, if the client purchases 20 tables they will all be charged at the lesser price. The second example shows quantity break with stepped scale (Figure 57).
Figure 57 Stepped Scale quantity break reducing price
With Stepped Scale, units below the break point are always charged at full price and only those units above the break are charged at the break price. In the case of the example in Figure 57, for a quantity of 3, the charge would be 1 unit at the full price and 2 units at the break price. Stepped scale is often used for items like radiology, fluids and pregnancy testing in large animals. Quantity breaks are not restricted to reduced prices!
Some practices have setup X-Ray charges with a large fixed fee plus a variable charge per plate that was priced at zero for the first 2 units and some value thereafter. The effect is that the fixed charge includes the first 2 plates and extra plates are additional.
Adding New Fees
To add a new fee item you have 3 choices: Copy another item
• • • • • • Use a template
Add the fee filling in every field on a blank new item screen.
An experienced user can add a fee using the first two methods in a comfortable 20 seconds. The third method takes around 2½ minutes! This becomes
significant if you have hundreds of items to add to a new system. A template is a typical fee of a certain type…antibiotic tablet, worming
product, flea treatment etc. Templates will be available in new systems but not for practices converting from another program.
Converted practices already have plenty of fees in the system and a fee similar to a fee you are adding is a better template than a template!
Using a Template or Copy Current Item
If you intend copying an existing item then first find the item to copy. Use the Add button on the Fees page to begin creating the new fee. The New Item dialog appears which allows you to choose a method:
(no template) Template
Copy Current Item.
Practices who have converted from another program will not have the templates listed in this example (Figure 59).
Figure 59 New Item dialog
Figure 60 Copy Item Details dialog
In the Copy Items Details dialog, replace the item name with the new item name then work through each of the fields:
Cost price must NOT include tax.
• • •
Enter a Markup or Sale Price but not both.
If you set the Markup percentage then the Sale Price including tax will be calculated for you.
If you set the Sale Price yourself the program assumes you want a fixed price that does not change if the cost price changes. Make sure you DO include tax in the Sale Price if you are setting it yourself!
Figure 61 The new item details added
Note that the pricing information here is for the variable fee. The fixed fee cannot be set until after the item is added.
The On-Hand Level is the number of selling units you have. Pack Size is the number of selling units contained in your buying unit. In this example, we have just purchased a bottle of 250 tablets.
The critical level is the number of selling units below which the system will trigger an order and the ideal level is the quantity, to the nearest pack, the ordering system will bring our stock level up to.
Using (no template)
The Fee Details page will display with most fields cleared (Figure 62).
Figure 62 New Item screen
Many fields are optional and, while many are highly desirable, to have a fee that can be used on an invoice there are only 4 or 5 fields that are essential. The essential fields to make an item useable are:
Item Name • • • • Service Heading Tax rate (if applicable)
Selling Price, either fixed, variable or both
If you are in a hurry, once you have the essential fields completed you save the record and it is ready to be used on an invoice. Refer to the following section for examples of essential and desirable fields.
To make a thorough job, fill out all data as needed then progressively do the same for Attachments, Categories and Stock Control. (Tick the Stock Control box to activate the Stock page.) When complete, save the record.
Examples of essential fields on a fee:
The following examples indicate must have, should have and could have
information in the Fee Details fields.
The division is somewhat arbitrary particularly between the should have and
could have fields but indicate some difference in importance. The fees will function, at least for invoicing, with just the must have fields completed.
Professional fees
Figure 63 Essential fields on a professional fee
Income Group is only necessary for reporting. Charge Default is a time saving device to relieve you from the necessity of specifying a quantity. This is useful for many professional fees. If Charge Default is used, then you must make sure Default Value has the correct quantity.
Depending on the item, there may be fields in Attachments and Categories desirable as well.
Merchandise Item
Figure 64 Essential fields for a merchandise item
If you use a variable selling price, it is then very desirable to enter a
Description such as Tablet, ml, Bottle etc. so staff understand what unit the variable price applies to.
Income Group is only necessary for reporting.
Cost Price is used for gross profit reporting. For items you wish to sell by a markup, Cost Price becomes a Must Have field.
If you wish to run stock control then Stock Control must be selected.
Charge Default is a time saving device to relieve you from the necessity of specifying a quantity. This is useful for merchandise items usually purchased in a particular quantity. If Charge Default is used, then you must make sure
Default Value has the correct quantity.
Depending on the item there will be other should have and could have fields on the Attachments, Categories and Stock Control pages.
Prescription Medications
Figure 65 Essential fields for a prescription item
Quite commonly, for prescription items, you select a Standard Fee on the Fixed Component side rather than setting a price yourself.
If you use a variable selling price, it is then very desirable to enter a
Description such as Tablet, ml, Bottle etc. so that staff understand what unit the variable price applies to.
Income Group is only necessary for reporting.
Cost Price is used for gross profit reporting. For items you wish to sell by a markup, Cost Price becomes a must have field.
If you wish to run stock control then Stock Control must be selected.
Charge Default is a time saving device to relieve you from the necessity of specifying a quantity. This is useful for prescription items usually dispensed in a particular quantity. This will usually be whole packs such as Amoxil drops. If
Charge Default is used, then you must make sure Default Value has the correct quantity.
Depending on the item there will be other should have and could have fields on the Attachments, Categories and Stock Control pages.