BSCW 5.1
Manual
BSCW – Basic Support for Cooperative Work, Version 5.1
http://www.bscw.de/
BSCW is © 1995-2016 Fraunhofer FIT and OrbiTeam Software GmbH & Co. KG
Distributed by
OrbiTeam Software GmbH & Co. KG
in cooperation with
Fraunhofer FIT – Institute for Applied Information Technology
OrbiTeam Software GmbH & Co. KG Endenicher Allee 35
53121 Bonn Germany
http://www.orbiteam.de Email: [email protected]
Text and figures presented in this manual have been prepared with high diligence. However, the authors cannot guarantee for the correctness. Therefore the publisher and the authors do not offer any warranties or representations, nor do they accept any liabilities with respect to the application description.
Contents
1 Overview 1
1.1 Benefits of using BSCW 1
1.2 Prerequisites for using BSCW 1
1.3 Additional information about BSCW 2
1.4 BSCW at a glance 2
1.4.1 The folder page 2
1.4.2 Shared objects in a workspace 3
1.4.3 The personal objects 5
1.4.4 Actions on the current folder or workspace 6
1.4.5 Actions on selected objects 7
1.4.6 Actions on a particular object 7
1.5 Operating your own BSCW server 8
1.6 What’s new in version 5.1? 9
2 Getting Started 11
2.1 Registering as a BSCW user 11
2.1.1 Registering as a new user 11
2.1.2 Changing your password 12
2.1.3 Forgot your password? 12
2.1.4 Registering an additional e-mail address 13
2.1.5 Destroying one’s own user account 13
2.2 Logging into your BSCW workspaces 14
2.2.1 Starting a BSCW session 14
2.2.2 First time login 14
2.2.3 Closing a BSCW session 15
2.2.4 Parallel BSCW sessions 16
2.2.5 Alternative methods of authentication 16
2.3 Choosing the user interface language 17
2.4 Your personal profile 17
2.5 Configuring your Web browser 19
3 Basic Concepts and Functions 21
3.1 The Web-based user interface 21
3.1.1 Header 22
3.1.2 List of entries 25
3.2 Shareable objects 28
3.2.1 Document 28
3.2.2 Document under version control 29
3.2.3 Note 29
3.2.4 URL 30
3.2.5 Folder 30
3.2.6 Portal 30
3.2.8 Discussion forum 31 3.2.9 Blog 31 3.2.10 E-Mail message 31 3.2.11 Search folder 31 3.2.12 RSS feed 31 3.2.13 Template folder 32 3.2.14 Website folder 32 3.2.15 Calendar 32 3.2.16 Appointment scheduling 32
3.2.17 Poll and voting 33
3.2.18 Community 33
3.2.19 Project and phase 33
3.2.20 Task 33
3.2.21 Flow folder 33
3.3 Actions 34
3.3.1 Creating and changing objects 34
3.3.2 Uploading and changing documents 36
3.3.3 Inviting members 38
3.3.4 Actions on objects in a folder 38
3.4 Personal objects 43 3.4.1 Personal portal 44 3.4.2 Bookmarks 47 3.4.3 Personal templates 48 3.4.4 Clipboard 48 3.4.5 Trash 50 3.5 Public space 51
3.5.1 Allowing anonymous access 51
3.5.2 Accessing folders anonymously 52
3.5.3 Public entry page for anonymous access 53
3.6 Events 54
3.6.1 Displaying event information 55
3.6.2 Event types 55
3.6.3 Catching up on recent events 56
3.6.4 Subscribing to event services 56
3.7 Search 58
3.7.1 The search form 59
3.7.2 Special actions in search folders 63
3.8 Customizing the user interface 64
3.8.1 Style sheets 64
3.8.2 Levels of proficiency 64
3.8.3 User preferences 65
3.8.4 Views on folders 68
3.8.5 Banners 71
3.9 Metadata and info page 72
3.9.1 Metadata profiles 72
3.9.2 Tags 77
3.9.3 The info page 77
4 Workspaces, Access Rights and Roles 79
4.1 Creating and managing shared workspaces 79
4.1.2 Becoming a member: Being invited to a workspace 81
4.1.3 Members’ page 82
4.1.4 Moving shared workspaces 85
4.2 Access rights and roles 86
4.2.1 The BSCW role concept 87
4.2.2 Information about current access rights 88
4.2.3 Assignment of roles 89
4.2.4 Defining and re-defining roles 90
4.2.5 Ownership and ownership transfer 91
5 Address Book and Contacts 95
5.1 Contact lists 95
5.1.1 Creating contacts 95
5.1.2 User contacts and original contacts 96
5.1.3 Changing contacts 97
5.1.4 Sorting and filtering contacts 97
5.1.5 Importing and exporting contacts 97
5.1.6 Contacting contacts 98
5.2 Address book 99
5.2.1 Creating entries in your address book 99
5.2.2 Changing address book entries 100
5.2.3 Structuring the address book 101
5.2.4 Using the address book 101
5.3 Sending messages and BSCW objects 101
5.3.1 Sending messages 101
5.3.2 Sending BSCW objects 102
6 Discussion Forums, Blogs and Feeds 105
6.1 Discussion forums and notes 105
6.1.1 Creating a discussion forum 105
6.1.2 Adding a note 106
6.1.3 Replying to notes 106
6.1.4 Adding attachments to a note 107
6.1.5 Browsing a discussion forum 107
6.1.6 Moving and deleting notes 108
6.1.7 Annotating objects 108
6.2 Blogs 108
6.2.1 Creating and changing blogs 109
6.2.2 Using blogs 111
6.3 RSS feeds 111
7 Alternative User Interfaces 113
7.1 Desktop Widgets 113
7.1.1 Installation of the desktop widgets 113
7.1.2 Using desktop widgets 114
7.2 Mobile Device Interface 118
7.2.1 Mobile access 118
7.2.2 Mobile login to BSCW 119
7.2.3 Mobile portal 119
7.2.5 Domains and functions of the mobile portal 122
7.3 Simplified User Interface 125
7.3.1 Folder view (simplified user interface) 126 7.3.2 Managing folders and documents (simplified user interface) 127 7.3.3 Other actions of the simplified user interface 128
7.3.4 Search (simplified user interface) 128
8 Document and Content Management 129
8.1 Direct editing of documents 129
8.1.1 Creating and editing text documents 130
8.1.2 Creating and editing HTML documents 130
8.1.3 Editing MS Office files 131
8.1.4 Editing documents using external editors 132
8.2 Document functions 133
8.2.1 Resubmitting documents 133
8.2.2 Locking documents 133
8.2.3 Freezing documents and folders 134
8.3 Documents under version control 134
8.3.1 Imposing version control 135
8.3.2 Creating a new version 135
8.3.3 Editing version information 136
8.3.4 Branching versions 137
8.3.5 Managing versions 137
8.3.6 Automatic versioning 138
8.4 Templates and template folders 140
8.4.1 Creating template folders 140
8.4.2 Copying from templates 141
8.5 URLs for objects in workspaces 141
8.5.1 BSCW’s internal address format 142
8.5.2 Folder path URLs 142
8.6 Website folders 143
8.6.1 Creating website folders 144
8.6.2 Creating and editing the contents of website folders 145 8.6.3 Editing the appearance of website folders 146
8.6.4 Using BSCW elements 149
8.6.5 Using text elements 161
8.6.6 Exporting and publishing website folders 162 8.6.7 Integration of an external wiki engine 162
9 Traceability and Social Cooperation 163
9.1 Online status display 163
9.2 Microblogging 165
9.2.1 Displaying microblogs 165
9.2.2 Creating and deleting microblog messages 166
9.2.3 Actions on microblog messages 167
9.2.4 Searching for microblog messages 168
9.2.5 Notification of new microblog messages 168
9.2.6 Personal microblogs 169
9.2.7 Microblogs as widgets and at the mobile interface 169
9.3 Event monitoring using RSS feeds 170
9.3.2 Using BSCW RSS event feeds 171
10 Calendars, Appointment Scheduling and Polls 173
10.1 Calendars 173
10.1.1 Creating an appointment 174
10.1.2 Changing an appointment 175
10.1.3 Deleting an appointment 176
10.1.4 Using different views 176
10.1.5 Calendar actions 178
10.1.6 Calendar options 179
10.2 Appointment scheduling 180
10.2.1 Creating and changing appointment schedulings 180
10.2.2 Voting on the suggested dates 182
10.2.3 Suggesting other persons for participation 183
10.2.4 Fixing a final date 184
10.2.5 Resetting appointment schedulings 184
10.3 Polls and votings 185
10.3.1 Creating polls 186
10.3.2 Creating votings 187
10.3.3 Changing polls and votings 188
10.3.4 Viewing polls and votings as a timeline 189
10.3.5 Responding to polls and votings 189
10.3.6 Resetting polls and votings 190
10.3.7 Viewing and exporting results of a poll or voting 190
11 Communities 191
11.1 Becoming a community member 192
11.2 Creating a community 192
11.3 Managing a community 194
11.4 Communities as shared mailing lists 196
11.5 Hierarchical organization of communities 196
11.6 Inviting communities to member groups and vice versa 198
12 Workflow Management 199
12.1 Tasks and projects 199
12.1.1 Creating and changing projects and phases 200
12.1.2 Creating and changing tasks 203
12.1.3 Task view 208
12.1.4 Starting tasks 209
12.1.5 Personal task list 210
12.1.6 Progress of a task and progress aggregation 211
12.1.7 Processing tasks 212
12.1.8 Handling exceptional task situations 214
12.1.9 Structuring tasks into workflows 217
12.1.10 Viewing tasks and projects as a timeline 223
12.2 Flow folders 223
12.2.1 Creating and changing flow folders 224
12.2.2 Starting and forwarding flow folders 225
12.2.3 Status and history of flow folders 226
12.3.1 Putting documents under review 227
12.3.2 Having documents reviewed 229
13 Import/Export 231
13.1 Archiving and transferring objects 231
13.2 Converting documents 233
13.3 Exporting in PDF 234
13.4 Exporting folders and documents via FTP 235
13.5 BSCW upload helpers 235
13.5.1 Drag & drop uploader 236
13.5.2 Document uploader 236
13.6 Upload per e-mail 237
13.7 Briefcase 239
13.7.1 Briefcase requirements 239
13.7.2 Working with the briefcase 239
13.8 Outlook synchronization 242
13.8.1 System requirements for Outlook synchronization 243
13.8.2 Using Outlook synchronization 243
13.9 WebDAV 246
1 Overview
1.1 Benefits of using BSCW
BSCW supports asynchronous and synchronous cooperation with your partners over the Inter-net, in your Intranet or in a network with your business partners (Extranet).
For asynchronous (non-simultaneous) cooperation, BSCW offers shared workspaces that
groups of people can use to store, manage, jointly edit and share information (documents, notes, URLs, tasks etc.).
The essential advantages:
o With a BSCW workspace, you may share information within a workgroup – indepen-dent of the specific computer systems that the members use.
o You do not need to install any software before using BSCW. You only need a standard Web browser.
o You access BSCW workspaces, browse folders and download documents to your local system just like ‘normal’ Web pages.
o BSCW keeps you informed of all relevant events in a shared workspace.
o You can upload documents to a shared workspace or create notes, URLs, tasks etc. using any standard Web browser.
For synchronous (simultaneous) cooperation, BSCW provides tools for
o planning and organizing meetings,
o ad-hoc communication with partners, who are currently logged into a shared work-space and therefore are likely to be working on a common task.
1.2 Prerequisites for using BSCW
Requirements for using BSCW are minimal:o To register as a user of a BSCW server, you must have a personal e-mail address. o To access shared workspaces and to download documents to your local computer, you
need a modern Web browser with JavaScript and cookies activated. You can choose from, e.g., the current versions of Google’s Chrome, Mozilla Firefox, Microsoft Inter-net Explorer, Opera and Apple’s Safari (you find the minimum requirements for browser versions in 2.5 “Configuring your Web browser” on page 19).
o The standard way to upload documents to a BSCW workspace is to use the built-in file upload function of current Web browsers. In case of problems you may have to use one of BSCW’s upload helpers (see 13.5 “BSCW upload helpers” on page 235).
1.3 Additional information about BSCW
For additional information on BSCW visit the BSCW home page (http://www.bscw.de/). Here you can find news about BSCW, a list of reference installations and projects as well as further information about possible application areas and about questions of licensing BSCW. Under the heading ‘Support’ you find a list of frequently asked questions with our answers. You will also learn how you can try out BSCW on a demo server.
1.4 BSCW at a glance
This section can only touch upon a small subset of BSCW functions. It is intended to give you a first impression of what a BSCW workspace looks like.
Please bear in mind that the objects we describe and also the actions we discuss in the fol-lowing example of a workspace may not be available to you in some of your workspaces. This may be due to, e.g.,
o the configuration of the BSCW server you use,
o the level of proficiency with BSCW that you have chosen for yourself. By default, new users are assigned to the Expert level, allowing all sorts of objects and actions. You may have changed, however, your level of proficiency to a lower level (as de-scribed in 3.8.2 “Levels of proficiency” on page 64). At these lower levels, e.g.
Be-ginner, you will be offered fewer actions and objects at the interface than are shown
below.
1.4.1 The folder page
The basic concept of BSCW is the workspace, which is – adopting Macintosh or Windows terminology – a folder
o for a specific group of registered users, represented by the group icon , who can o read, edit, add, move and delete objects in this shared folder.
As a registered user of a BSCW server you may be a member in an arbitrary number of work-spaces. You may create folders or other objects and share them as required by the tasks at hand.
In its Web-based user interface, BSCW presents the contents of a folder or workspace as the central part of a page – preceded by a header containing pop-up menus, buttons and action shortcuts.
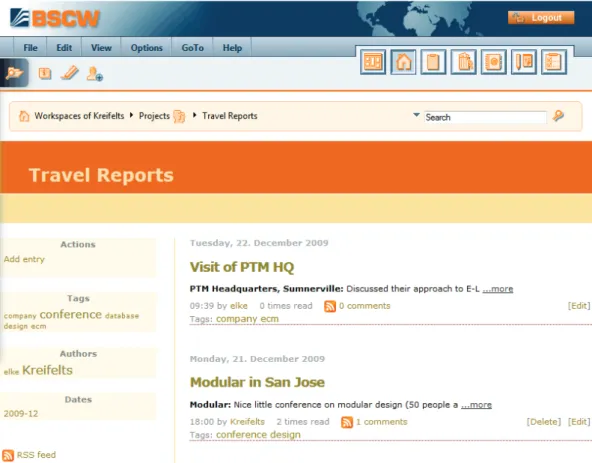
Figure 1 shows a folder page with examples of the objects that you can create and share in BSCW. Please note that different icons are used to represent the different types of objects. In 3.1 “The Web-based user interface” on page 21, the structure of the folder page is explained in detail.
Figure 1: Example folder page
1.4.2 Shared objects in a workspace
Several classes of objects may be created and shared in a BSCW workspace: o Document
o Document under version control o Note o URL o Folder o Search folder o Calendar o Discussion forum o Blog o E-Mail message o Template folder o Website folder o Project / Phase o Flow folder o Task
o Poll / Voting / Appointment scheduling o Contact list
Figure 1 shows instances of many of these object types. Each object is represented by an entry showing the object name, a pop-up action menu button, some icons and additional data, as shown in the following figure.
Figure 2: Representation of an object
Click the icon on the left to display the object’s info page. The following check box may be “ticked” to select the object for some action.
The icon immediately left of the object name denotes the object type. If the object is a docu-ment, the icon represents its file type. If it is a note, the icon may represent a pragmatic aspect picked by the author of the note. BSCW’s object types are discussed in greater detail in 3.2 “Shareable objects” on page 28.
The name of an object is the most prominent part of an object entry. Since BSCW is designed to make sharing of information easier, it is very important to use descriptive object names which will be understood by the other members of the workspace. The names of documents and folders underlie restrictions concerning the use of special characters; you are notified of violations.
To the right of the object name, there is
o a pop-up menu button showing the actions applicable to the object. Please note that different actions are possible for different types of objects. Figure 6 shows a few of the action menu entries permitted for an object.
The action menu may also be invoked by a right mouse click anywhere on the object entry (pressing the Ctrl key along with the right mouse click produces the original browser menu, e.g. for “Save target as…”).
Putting the cursor over the action menu icon displays often used actions (Change Pro-perties, Cut, Copy, Delete) as a horizontal iconized action menu.
BSCW displays additional information about the object depending on object type and the selected viewing preferences:
o the size of the object:
o in case of a folder, the number of objects it contains,
o in case of a document or e-mail message, the size in bytes, kilobytes or megabytes; o zero, one or more of the following icons:
indicates that a folder is shared,
indicates that someone has set a lock for this object, indicates that a note has been added to the object,
indicates how the document has been rated by one or more group members; o the name of its creator and owner;
o date and time of the most recent modification;
o zero, one or more icons indicating that some of the following events have occurred: indicates a new object,
indicates changes of the object,
indicates that someone has read the object, indicates recent modifications in a sub-object;
Please note that nearly all the icons in an object entry are clickable, i.e. you get more informa-tion on a group, a lock, a note, a rating etc. by clicking it.
1.4.3 The personal objects
In the upper right-hand corner of the user interface you find a row of icons that give direct access to your personal objects. These icons of the instant access bar are available in each of your folders or workspaces.
Your personal portal for BSCW can show the contents of important workspaces, an overview of recent BSCW events and current appointments from your BSCW calendar. You can also include external programs (e.g. news, weather forecast, maps).
Your personal workspace or home folder is the folder that may only be accessed by yourself and contains all your folders and all workspaces where you are a member. If you click on the home folder icon in one of your other private objects, you return to the private folder or shared workspace that you visited last. Another click on the home folder icon brings you to the home folder itself.
The listing of your community workspaces contains all such workspaces with commu-nities where you are a member. Commucommu-nities allow workspace access for large groups of users equipped with equal access rights, keeping performance independent of community size; they also offer self-organized platforms for users with similar interests. The community workspaces are also contained in your home folder.
The clipboard serves as an intermediate store when cutting and copying.
The trash helps to prevent unauthorized or unintentional deletion of objects. In BSCW, an object can be irrevocably destroyed only from its owner’s trash.
The address book is used to invite new members to your workspaces and to manage contacts.
The calendar helps you manage your appointments.
The task list contains tasks you are to carry out (includes proper tasks, flow folders and documents to be released; also see 12 “Workflow Management” on page 199).
The bookmarks contain your collected bookmarks and offer quick access to the objects referred to by the bookmarks.
The personal templates and contain templates for often used objects and metadata pro-files that you have defined in addition to the standards supplied by the system.
The briefcase is used to synchronize BSCW documents with their counterparts on a local computer.
1.4.4 Actions on the current folder or workspace
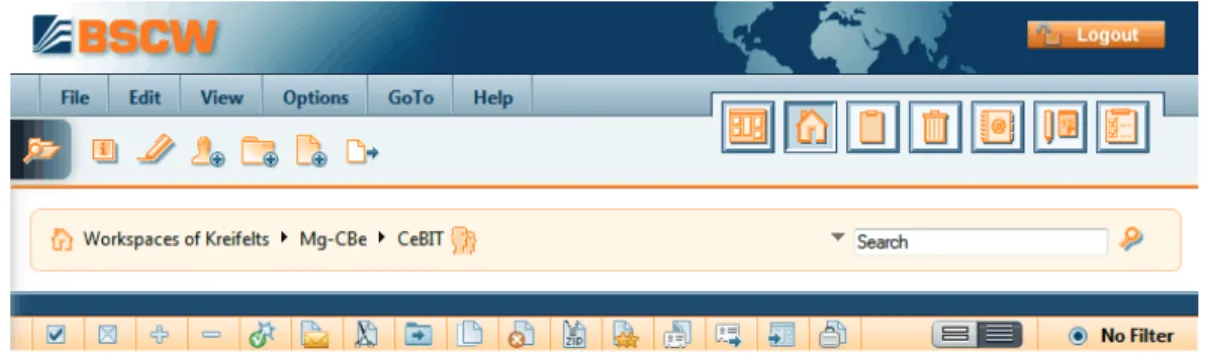
Objects are created by performing actions on the current folder. The pop-up menus, that trig-ger these actions, are located in the top section of the folder page. Below the pop-up menus you find the action shortcut bar for the most frequent of these actions.
Figure 3: Top menu bar and action shortcut bar
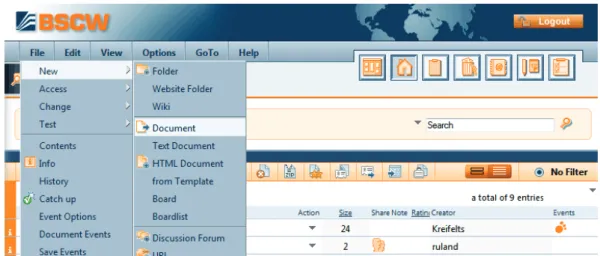
New objects are added by selecting one of the file menu entries from the top menu or by se-lecting the respective action shortcut:
• Select File New Document to upload a file from your local computer system to the
current BSCW folder or workspace.
• Select File New and an object type from the list offered (Workspace, Folder, URL,
Discussion Forum, Poll, Task, Search Folder etc.) to create an object of the specified type directly on the BSCW server.
Figure 4: How to create a document
Most current Web browsers provide the functionality required for file upload. If you use a browser that doesn’t, you have to use one of BSCW’s upload helpers (see 13.5 “BSCW upload helpers” on page 235).
Existing objects are moved around your workspaces using your clipboard:
• Select Edit Paste to add objects to the current folder that were transferred to your
clipboard by the most recent Copy or Cut action. The clipboard objects may also have
1.4.5 Actions on selected objects
Directly above the list of objects in a folder page you find the multi-selection toolbar. This toolbar lists icons of actions which can be applied to several selected objects. The names of the actions are shown as tooltips when you move the cursor over the action icons.
Figure 5: Multi-selection toolbar
Objects are selected by ticking their check boxes. and are shortcuts for selecting or de-selecting all objects within a folder. You may, e.g., transfer the selected objects
• to your clipboard via (or Edit Cut ), or
• to your trash via (or Edit Delete ).
Objects transferred from a workspace to your clipboard or trash are no longer visible to the other members of the workspace.
Some actions, e.g. rate , may only be applied to objects of specific types. A detailed intro-duction to BSCW actions is given in 3.3 “Actions” on page 34.
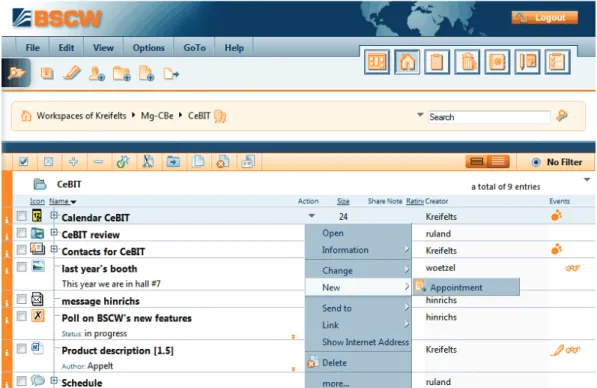
1.4.6 Actions on a particular object
In the middle of each object entry in the folder page you find an action button for opera-tions to be applied to that particular object, as shown in Figure 6.
Figure 6: The action menu for a calendar
The action menu may also be invoked by a right mouse click anywhere on an object entry (pressing the Ctrl key along with the right mouse click produces the original browser menu, e.g. for “Save target as…”).
Putting the cursor over the action menu icon displays often used actions (Change Properties, Cut, Copy, Delete) as a horizontal iconized action menu.
The configuration of the action menu depends on the object type: different actions are avail-able, e.g., for a URL, a folder or a document.
BSCW will not display action menu entries for actions that you may not perform on a specific object. This may be due to the fact that the object type doesn’t allow this action in general or that your role with respect to the object doesn’t let you perform the action. Roles are the basis for access right management in BSCW. You may invite new workspace members assigning roles to them, e.g. ‘teacher’ or ‘student’, if these roles have been defined beforehand. Roles define access profiles and can be attached to any object in BSCW. A set of predefined roles serves as a starting point: Manager, Member, Associate member (cannot invite other mem-bers) and Restricted member (read-only access) are default roles – define your own roles at will. Role assignments are inherited via the folder hierarchy and can be modified any time (see 4.2 “Access rights and roles” on page 86).
1.5 Operating your own BSCW server
You may operate your own BSCW server as an extension of a suitable Web server running on a Unix, Linux, or Windows Server platform.
The BSCW server software is distributed by OrbiTeam Software GmbH & Co. KG, Bonn, Germany, under licence from the Fraunhofer Institute for Applied Information Technology (FIT).
You may download the BSCW server software (http://www.bscw.de/english/download.html) and use it free of charge for a 90 day evaluation period. Starting with the 91st day, usage of your own BSCW server requires a licence. The distribution of BSCW licences is handled by OrbiTeam Software GmbH & Co. KG.
Schools and universities may apply for royalty free licences for educational purposes. Other licensees have to pay a licence fee for use of BSCW beyond the evaluation period. Please contact [email protected] if you need further information regarding the licensing proce-dure.
Acknowledgements
BSCW provides support for HTML editing based on the CKEditor (http://ckeditor.com/ Copyright © 2003-2011 Frederico Knabben) which is integrated with the BSCW software. The CKEditor is licensed under the GNU Lesser General Public Licence (see
http://www.opensource.org/licenses/lgpl-license.php).
The JavaScript calendar integrated into BSCW is based on the DHTML Calendar 1.0 (http://www.dynarch.com/projects/calendar Copyright © 2002-2005 Mihai Bazon, http://www.bazon.net/mishoo) and distributed under the GNU Lesser General Public License (http://www.gnu.org/licenses/lgpl.html).
The mobile user interface is based on the jQuery Mobile Framework (licensed under the terms of the MIT License, see http://jquerymobile.com/). The mobile user interface also includes the datepicker plugin (https://github.com/jtsage/jquery-mobile-datebox Copyright © JTSage) licensed under CC 3.0 Attribution license.
The BSCW desktop widgets are based on Adobe AIR and include the Adobe AIR SDK source files and sample code, Copyright © Adobe Systems Inc., licensed under the Adobe AIR SDK License Agreement (http://www.adobe.com/special/products/air/tools/sdk/eula/).
Direct editing of BSCW documents with local editors and applications is based on the Zope External Editor Client (Copyright © 2008 Thierry Benita, Jean-Nicolas Bes, atReal, Casey Duncan and Zope Corporation, http://www.zope.org/), which is not part of the BSCW soft-ware, but has to be installed by the user. The Zope client is licensed under the Zope Public Li-cense (ZPL).
For a quicker document search, BSCW supports the optional integration of the indexing service PyLucene (http://lucene.apache.org/pylucene/). PyLucene is provided by the Apache Software Foundation under the Apache License.
For the visualization of time related objects in a Gantt chart like manner, BSCW integrates the Timeline component of the SIMILE widgets developed at the Massachusetts Institute of Technology (http://www.simile-widgets.org/timeline/). Timeline is open source software and is licensed under the BSD licence.
For collaborative editing of Web pages, BSCW offers to integrate the MoinMoin wiki engine (see http://moinmo.in/), which is licensed under GNU General Public Licence.
Further, BSCW includes software developed by the Apache Software Foundation (http://www.apache.org/).
1.6 What’s new in version 5.1?
Revision of the BSCW searchThe BSCW search function has been completely revised and simplified. There is now only one single, much more comfortable search form, where you easily can enter com-plex queries. Queries to the Google search engine are no longer supported (see 3.7 “Search” on page 58).
Content view of folders and document preview .
The standard details view on folders has been extended by a new content view which may be activated alternatively. The content view offers more information on the tent of an object entry, e.g., for documents a preview and abstract if available, for con-tacts and user objects a photograph if available and for folders the names of the objects contained. Also, BSCW can display a preview of documents, which you may have en-larged at will – just position your cursor over the object type icon of a document (see 3.8.4 “Views on folders” on page 68).
User-defined metadata
Metadata attributes of an object are summarized in a metadata profile. Metadata attri-butes have a name and a data type (such as text or date) and can be structured into groups within a profile. For most of the existing object types in BSCW (such as Folder or Document) there are predefined system profiles. You may create your own meta-data profiles on the basis of the given system profiles and store these profiles for fur-ther use in template folders (see 3.9.1 “Metadata profiles” on page 72).
Simplified User Interface
The new simplified user interface allows easy access to the most basic features of BSCW and is offered to users who only sporadically log into BSCW. The simplified user interface is restricted to essential functions like navigation, creation and deletion of documents and folders as well as searching (see 7.3 “Simplified User Interface” on page 125).
Microblogging
messages, which are displayed in chronological order. In BSCW, also events are in-cluded into microblogging. Microblogs may be focused on single users, members of a workspace or the whole social network, i.e. the users with whom one is in contact via shared workspaces (see 9.2 “Microblogging” on page 165).
Document review
Document review is to be used in the production of documents that have to meet a cer-tain quality standard. After editing a document is reviewed by one or more persons re-sponsible and is eventually released or rejected. In BSCW, document review can be defined for single documents or entire folders by specifying the different review steps and the persons responsible. (see 12.3 “Document review” on page 226).
Further changes and enhancements
The navigational action shortcut that lets you browse your workspaces is now
always accessible since it remains on the same spot of the browser window, even if the window is scrolled (see 3.1 “The Web-based user interface” on page 21).
The online status has been extended in such a way that users may indicate in their
online status that they do not want to be disturbed (see 9.1 “Online status display” on page 163).
Some BSCW functions have been dropped: The Document Generator (because it is superseded by the improved website folders), the event monitor (because similar functionality is offered by the event widgets in portals and on the desktop) and the
BSCW desktop client (because many other convenient options exist for uploading
documents) (see 13.5 “BSCW upload helpers” on page 235). The user interface
with-out JavaScript doesn’t meet modern user interface requirements and is therefore no
longer offered, i.e. usage of BSCW requires the activation of JavaScript in your brow-ser (also see 3.8.1 “Style sheets” on page 64). In addition, the optional extensions for the visualization of document events and of the relations between workspaces and users (workspace maps) have been omitted for technical reasons.
2 Getting Started
The sections of this chapter describe in detail what to do before you start to use BSCW. Some of these actions are essential, and others will make it easier for you to use BSCW – you should read them all before using the system.
2.1 Registering as a BSCW user
Before starting to use BSCW, you have to be registered as a user of your BSCW server. After a simple authentication procedure you are ‘known’ to the BSCW server as a registered user. Basically, you are identified by a combination of your
o user name,
o password and
o e-mail address.
Using your user name and password, you can access your folders and workspaces from any computer with Internet access and a suitable Web browser.
2.1.1 Registering as a new user
The configuration of a BSCW server determines whether and how one can register as a user. There are the following possibilities:
o Self-registration is allowed for everyone.
o Self-registration is not allowed, but all or certain users may invite other persons to register via their e-mail address.
o Self-registration is not allowed, only the BSCW administrator can set up new users. When registering yourself you proceed as follows.
• Open the home page of your BSCW server (e.g. http://your-bscw-server/pub/) and click [Register] in order to register with your e-mail address and eventually some more personal information required (name, organization, telephone number).
• BSCW sends an e-mail message to the address given. This message contains a special URL which you have to open in your Web browser.
• Opening this URL brings up a form where you fill in your user name and password. For security reasons you may open the URL only once.
• After having submitted the registration form you can log in to your BSCW server using the user name and password chosen.
When you are invited to a workspace of a BSCW server by a user who is already a registered user of this BSCW server, you will receive an e-mail message from this BSCW server and you proceed as above starting with step 2.
When you are registered by the BSCW administrator you will receive your user name and password from the administrator. You can change the password, but you cannot change your user name.
Choosing your user name
Your user name serves as your public identity for the BSCW server. We recommend that you use your last name, possibly combined with your first name, as your user name.
Note: By default, BSCW does not distinguish between upper and lower case letters in user
names.
The BSCW server requires user names to be unique. If your user name is already used by someone else on the server, BSCW will report an error in the registration procedure. In this case, you have to modify your user name, e.g., by adding your first name or a number.
Note: For security reasons you cannot change your user name.
Setting your password
In order to protect your information stored on the BSCW server, choose a sufficiently secure password and change it regularly. For security reasons concerning your local computer sys-tem, you should not use the same password for BSCW as for your local computer.
After submission of the registration form, BSCW is ready for your first login using the user name and password chosen.
2.1.2 Changing your password
You can change your password whenever you want.
• Select Options Change Password in order to enter your new password.
• Fill in the ‘Change Password’ form and click [OK]. Now you are asked to authenti-cate with the new password.
2.1.3 Forgot your password?
If you have forgotten your password, you cannot access your BSCW workspaces any more – and, of course, you cannot change your password as described above.
For exactly this case of emergency, BSCW provides a specific procedure to assign a new password without having to provide the old one:
• Open the registration page of your BSCW server (on FIT’s public BSCW server this is https://public.bscw.de/pub) and click the link “Forgot password?” in order to register a new password. Also the normal login form has this link.
• In the following action form, enter one of the e-mail addresses which BSCW has
al-ready associated with your user name (e.g. your primary e-mail address) and confirm
with [OK].
• BSCW will then send a message to the e-mail address given, which contains the URL of a form that allows you to set a new password for yourself.
2.1.4 Registering an additional e-mail address
If you have several e-mail addresses, which you use in different contexts, e.g. for business and private contacts, it may sometimes happen that you are asked via e-mail to register again on your BSCW server, because someone has invited you to a workspace. This is the case when some other user invites you to a workspace using one of your e-mail addresses different from the one under which you are registered on your BSCW server.
In this case, you have two alternatives: you may register under a new user name which you want to use in conjunction with this e-mail address, or you may register this e-mail address as an additional e-mail address of your existing user account. In the latter case, your BSCW ser-ver will be able to associate your different e-mail addresses with your user name when you are invited using one of your registered e-mail addresses.
When you receive such a registration message, repeat the registration procedure. If you want to register the new e-mail address under your existing user name as an additional address, specify the same user name and password under which you are already registered. BSCW will send the URL of a form to your additional e-mail address. In this form you may confirm that you indeed want to register this e-mail address for your user name.
You may also register additional e-mail addresses under your user name, without having re-ceived an invitation.
• Select Options Profile Change and enter an additional e-mail address into the field
‘Add e-mail address’ of the ‘Personal Data’ section of the action form.
Subsequently, you have to undergo the same shortened registration procedure as described above in order to ensure that the association of your user name with the new e-mail address is indeed valid. You may repeat this process for further e-mail addresses.
The registration of further e-mail addresses makes sense if you expect to be invited to BSCW workspaces under these addresses or if you want to upload documents via e-mail from these addresses. In these cases, BSCW will be able to correctly associate your user name with any of these addresses.
Regardless of the registration of secondary e-mail addresses, BSCW will always use your
primary e-mail address to send e-mail messages to you, e.g. your periodic e-mail report on
workspace activity. This e-mail address is also shown on your user info page.
If you have registered several e-mail addresses, you may change your primary e-mail address
• by choosing Options Profile Change and selecting the address desired from the drop
down list ‘Primary e-mail address’ in the ‘Personal Data’ section of the action form. All your e-mail addresses registered are also shown when you select Options Profile Show .
Scroll down to the field ‘E-Mail addresses attached in the section ‘Administrator details’. Other users see only your primary e-mail address when looking at your user info page.
2.1.5 Destroying one’s own user account
With some BSCW servers that allow self-registration you may be able to also destroy your own user account when you no longer want to use this BSCW server. By default, this feature is not enabled. Note that this action is irreversible and also destroys all data on the server that only you yourself have access to.
• Select Options Destroy Account in the top menu bar.
Note: This action has to be enabled by your BSCW administrator. By default, it is not en-abled.
2.2 Logging into your BSCW workspaces
As a registered user, you have to log in to your BSCW server and identify yourself at the be-ginning of each session.
2.2.1 Starting a BSCW session
You start a session on a BSCW server
• by opening the URL http://your-bscw-server/bscw/bscw.cgi/, or
• by directly accessing an object in one of your folders or workspaces, using a URL, e.g., from your list of bookmarks or favourites.
Note: With recent installations, the address of your BSCW server is by default
http://your-bscw-server/sec/bscw.cgi/. Your BSCW administrator may, however, have chosen an altogether different scheme.
For login and identification, you have to submit your user name and password. You may also log in using your e-mail address instead of your user name. Your BSCW server may also offer alternative ways of logging in (see 2.2.5 “Alternative methods of authentication” on page 16).
If you are directly accessing an object in a workspace by specifying its URL, BSCW will immediately take you to the contents of this object. For instance, if somebody sends you the URL of a folder, you will see this folder page immediately on logging in (provided you have the necessary access rights). Otherwise, you will bes hown your personal portal by default. After a longer period of inactivity, your BSCW session expires and you are requested to au-thenticate again.
2.2.2 First time login
When you log in to BSCW for the very first time, your personal portal contains a lot of widgets (e.g. your home folder, address book, personal calendar, microblog), but these widgets may show very few or no entries at all. In case you have been invited to a workspace, you have at least one concrete example how collaboration in BSCW looks like. But if not, your home folder (“Workspaces of your-user-name”) is empty and you might ask yourself how to start working with BSCW.
The simplest way of starting is to create a workspace of your own that you share with other users:
• Select File New Workspace from the top menu or click on the in the action
shortcut bar. In the section ‘General’ you enter name and optionally tags and a description of the new workspace. The names of documents and folders underlie restrictions concerning the use of special characters; you are notified of violations. Tags are freely chosen keywords under which you or other users may find the workspace.
• In the section ‘General’ you can further choose a template for the subfolder structure of the new workspace. Such templates may be available for your BSCW server. For a first time, you may leave it at ‘no template’.
Finally, you may have certain shared objects automatically generated for the new workspace: a workspace portal, a group calendar, a contact list, a folder for upload per e-mail, a template folder and a workspace-specific trash. Make your choice by check-ing or uncheckcheck-ing the respective check-boxes.
Note: The workspace-specific trash receives all objects deleted by the members of the
workspace. Only the workspace manager and the creator can undelete or finally destroy objects in the workspace trash. The trash itself cannot be deleted after creation.
• Go to the ‘Members’ section of the action form and select the future members of your workspace:
• Select the ‘Enter e-mail addresses or user names’ option of the drop down menu, enter e-mail addresses of people already registered on your BSCW server (you probably won’t know their precise BSCW user names) or of people you want to invite to register with your BSCW server (if you are authorized to invite new users or your server allows self-registration) and hit [Add].
• Alternatively, choose the option ‘Search for BSCW users’ and enter a search string which is meant to be part of a user name. Select any candidates from the search results and hit [Add] again. You can combine both methods of specifying mem-bers.
• Select the desired role, e.g. ‘Member’, for the members of your workspace and enter an optional invitation text that will be added to invitation e-mails to be sent to members that you have invited to register.
• The sections ‘Document Review’ and ‘Automatic Versioning’ are about defining a re-view process and automatic versioning for the documents of the new workspace. For-get about these sections for the time being, you can come back to these subjects later.
• Hit [OK] to create the new workspace.
Open the new workspace, load up some documents you want to share with the members of the new workspace, create a new discussion forum within the workspace or call a meeting in the workspace’s calendar.
For a more in-depth discussion of shared workspaces see 4.1 “Creating and managing shared workspaces” on page 79.
Note: Don’t confuse workspaces and communities. When starting work with BSCW, you will
most probably want to create a workspace and not a community. Communities are meant to accommodate very large groups of users with shared interests and have their specific limita-tions as far as access rights are concerned.
2.2.3 Closing a BSCW session
In order to close a BSCW session,
• select File Logout in the top menu. Alternatively, press at the upper
right-hand corner of the BSCW interface.
• Before actually closing down your session, BSCW deletes any private data that might have been stored in your browser. Such data are, e.g. backup copies of the integrated
HTML editor or locally cached microblogging messages. Subsequently you are pre-sented with the publicly accessible welcome page of your BSCW server.
Note: Should an error occur during the removal of private data, you are notified and
have to delete these data from the local storage of your browser yourself. For Win-dows browsers use the key combination Ctrl-Shift-Del to invoke a dialog for deleting the browsing history, check the website data option (with Firefox check the cookies option) and proceed to delete these data. In Safari you select Safari > Reset Safari, check ‘Delete all website data’ and hit [Reset].
• With some browsers, you are asked to authenticate again before you can log out. In this case, you must authenticate with an empty password to actually close the BSCW session. Cancelling the authentication at this point does not close your session with BSCW.
For some Web browsers the explicit logout cannot be provided. In this case, you have to close a BSCW session by terminating the Web browser program on your local computer. Until log-out or termination of the browser the access rights remain in effect that were granted to you under your user name.
Note: If you share your computer with other people (e.g., in a public Internet cafe), do not
for-get to close your BSCW session after you have finished working with BSCW.
2.2.4 Parallel BSCW sessions
You may have accounts on several BSCW servers, e.g. on a public BSCW server and on a server at your organization. You may also have several different user names on the same server. At any point in time, your Web browser can represent only one user name on any given BSCW server. Parallel sessions with different user names on one BSCW server are not possible.
Most Web browsers, however, will allow you to have active sessions on several different BSCW servers simultaneously under the same user name and password.
Note: A transfer of BSCW objects between different servers, on which you have active
ses-sions in parallel, is possible only via your local computer as a physical relay station. Your clipboards on the different servers are not interconnected although their icons look identical.
2.2.5 Alternative methods of authentication
The default method of authentication for BSCW servers is the standard ‘basic authentication’ scheme of most Web browsers using user name and password. This method of authentication is comparatively insecure: when BSCW server traffic is intercepted, user name and password may be revealed to third parties.
The situation can be improved by encrypting the BSCW server traffic. Indeed, your BSCW server may be operated using HTTPS (a combination of HTTP and a cryptographic transport protocol) for communication between your browser and the BSCW server. Ask your adminis-trator about this possibility if not already in operation (in this case your BSCW server address starts with https:// instead of with http://).
Your BSCW server may also be configured to allow for other methods of authentication, most notably methods that can be used across a variety of Web services without the necessity to memorize different user names and passwords for each service or even to authenticate again and again when switching services (so-called). Alternative methods of authentication
available for your BSCW server are offered to you on the same page that is shown when logging into BSCW.
An example of a single sign-on process is OpenID where authentication is done via specific identification services (known as OpenID providers) where you maintain an OpenID identity. Whenever you see the OpenID icon on the login page, you may log into your BSCW server entering the URL of your OpenID provider.
• Enter the URL of your OpenID provider into the respective field of the BSCW login page. You may obtain an OpenID identity from one of the many OpenID providers. E.g., users with a Google account may log into BSCW using the following URL https://www.google.com/accounts/o8/id.
• You will then be prompted by your OpenID provider to authenticate yourself. After-wards you are logged into BSCW.
The main advantage of this method is that you now do not have to authenticate again with other OpenID-enabled websites. More details are to be found at http://openid.net/.
2.3 Choosing the user interface language
The BSCW user interface language is a personal, user-defined option. It only affects your
view of the information presented. When you are registered as a new user, BSCW
automati-cally takes your preferred Web browser language as your user interface language. You may select a different language
• by choosing Options Preferences in the top menu and pick your favourite language
from the ‘Language (BSCW)’ menu in the ‘General’ tab of the action form.
When you choose English as your user interface language, the online help will also be in English; the same goes for German. All other user interface languages, however, do not have their own online help and use the English version instead.
2.4 Your personal profile
In BSCW, you have a personal profile consisting of useful information about yourself includ-ing full name, organization, address, telephone numbers, a photograph, links to additional in-formation on the Web, e.g. to a personal home page and the website of your organization as well as your contact details in social networks and instant messaging services making it easier for other users to get in touch with you.
The information that you enter into your personal profile is presented in your personal info page, which other users may look up, e.g. to make sure that the person they are about to invite to their workspace under your user name is actually the person they mean.
In order to enter or update information in your personal profile,
• select Options Profile Change .
You may check the appearance of your current personal info page by
• selecting Options Profile Show .
The ‘Change Personal Profile’ form where you enter or update your personal profile has a
number of sections grouping the information contained in the personal profile: o Personal Data
o Communication o Time Zone o Picture
Personal data
Personal data about yourself comprise your full name, organization, phone numbers, home page, postal address and e-mail address. The full name and organization given in your personal profile will also be used in address book entries and members’ pages to represent a user as user entry. Such an entry will read, e.g.,
jhdoe (John H. Doe, Acme Corp.)
when full name and organization are given, while the same user without a full name in his personal profile would be represented as
jhdoe <[email protected]>
You may add tags and a description to your personal data, which are shown as part of the de-scription of your entry on members’ pages.
The ‘Primary e-mail address’ field is set to the e-mail address that BSCW uses for sending messages to you, e.g. the periodic e-mail reports on workspace activity. By default, this is the e-mail address under which you have registered with the BSCW server. If your e-mail address has changed or if you use additional e-mail addresses, please enter the new address or the additional addresses into the ‘Add e-mail address’ field. For each of the secondary addresses you will have to go through a registration process similar to your initial registration.
When you have registered additional e-mail addresses, you may choose one of them as your primary e-mail address via selection in the respective field. Please note that the server confi-guration may not allow every user to enter additional addresses and may confine admissible addresses to certain e-mail domains.
Communication
Here, you may enter information enabling other users to get in touch with you in social net-works or via instant messaging services. To add a social network or instant messaging service to your personal profile,
• select an entry from the drop down list offered and press the [+ Add] button.
• With social networks, give the URL under which you may be reached in the particular network. Possibly augment the description of the network.
• With instant messaging services, specify user number or user identification. Instant messaging services allow real-time communication between two or more users, uti-lizing plain text messages, voice or even video telephony. Click the buttons to learn more about services that you do not know yet.
• In order to remove a social network or instant messaging service from your personal profile, click its button.
The contact data entered will be shown under ‘Contact details’ on your user info page and are to be used by other users wanting to get in contact with you.
Time Zone
Here you may select your local time zone, i.e. the time zone where you are currently located. All temporal information presented at the BSCW interface, e.g. the time of events, is adjusted
to this personal setting. The default value for the time zone is the time zone of your BSCW server.
If you choose ‘no time zone selected’ as your time zone, you may specify your local time zone in the ‘Hour’ and ‘Minute’ fields (value in the latter field should be 0 or 30, otherwise it is rounded to one of these values). With other time zone selections, any input in these fields is ignored.
You may also choose your preferred date format, which is then again used for the display of all dates at your BSCW user interface.
Picture
This section shows a picture of yourself that is shown on your personal info page or along with your messages in microblogs. If such a picture does not yet exist, you may add one to your personal profile.
• Choose ‘Upload picture from external website’ and enter a URL into the ‘Picture URL’ field that points to such an image on the Web,
or
• choose ‘Upload picture from my computer’. Use the [Browse...] button of the ‘Local file’ field to select the picture. The uploaded picture file is stored in the system and the access rights are set in such a way that all registered users may look at this picture. In the same way you can replace an existing picture of yourself. You may also delete such a picture using the button [Delete picture] below the picture.
2.5 Configuring your Web browser
Before using the BSCW server, please check the version and configuration of your Web browser.
• The use of BSCW requires a current version of one of the popular browsers. BSCW works best with one of the following browser versions:
o Internet Explorer 9+, o Safari 6+,
o Chrome 17+, o Firefox 24+, o Opera 15+.
• The browser should always contact the BSCW server before using pages from its cache. This should work fine with current versions of most browsers. If you have doubts in this respect (changes you made are not shown in BSCW pages), you should check your browser configuration. In Microsoft Internet Explorer, e.g., choose “Tools > Internet Options > General > Browsing History [Settings] > Temporary Internet Files > Every time I visit the webpage”. The exact procedure to set this option depends on your browser and browser version.
• Make sure that the clock on your computer is set correctly. Otherwise synchronization between the BSCW server and pages in your local cache will not work correctly.
• BSCW makes use of JavaScript, Dojo and cookies. In order to have BSCW function properly, your Web browser has to be configured so that JavaScript is activated and
cookies are accepted. BSCW cookies are used exclusively for authentication purposes and are valid for a BSCW session.
Most modern browsers like the ones listed above support Dojo. If your browser does not support Dojo, you will be warned and BSCW switches into a non-Dojo mode. In this case, some BSCW features will not work (e.g. the graphical navigator or the new search form), or will work differently (e.g. text fields and selection lists instead of more comfortable widgets).
• When using Internet Explorer you should disable “friendly HTTP error messages” (disable option “Tools > Internet Options > Advanced > Browsing > Show friendly HTTP error messages”). Otherwise Internet Explorer might suppress important error messages.
The following BSCW extensions are implemented as Java applets:
o Document uploader and drag & drop uploader – upload helpers for convenient file up-load,
o Briefcase – a tool that synchronizes BSCW objects with your local file system,
o Outlook synchronization – a tool that synchronizes BSCW contact lists and calendars with your local Outlook data.
If you want to install and use any of these extensions, your Web browser must be configured to run Java applets which are installed locally. How these options are set in your browser, varies between platforms and browsers. Please consult your Web browser’s manual for more information.
As long as the documents that you download from your workspaces can be displayed by your Web browser (with the help of any plug-ins you may have installed), you do not need to change your browser’s configuration in order to use BSCW.
If, however, you want to exchange documents in proprietary formats (e.g. WordPerfect, Ex-cel, Photoshop, etc.) with other members of your workspaces, you should tailor the configura-tion of your browser as follows. All files that BSCW sends to your browser carry an explicit file type. Instruct your browser to link the file types relevant to you to a certain action, e.g., by starting a program that opens and displays the file just transferred. How you proceed to this effect varies between platforms and browsers. Please consult your browser’s manual for more information.
If you do not configure your Web browser in the way indicated, the download of files, that cannot be handled, will produce a prompt asking you which program to use. More recent browser versions will usually allow you to establish a link between the file type of the present file and the program to be used ‘on the fly’. This link will then be applied to the next file with the same file type.
3 Basic Concepts and
Functions
This chapter describes the basic concepts and functions of BSCW, that will help you start cooperating with other users in shared workspaces.
Some details that we describe below may not be available to you in some of your workspaces or may work differently. This may be due to one or more of the following reasons:
• The role you are assigned to (possibly resulting in reduced access rights).
• The level of proficiency with BSCW that you have chosen for yourself. By default, new users are assigned to the Expert level, allowing all sorts of objects and actions. You may have changed, however, your level of proficiency to a lower level (as de-scribed in 3.8.2 “Levels of proficiency” on page 64). At these lower levels, e.g.
Be-ginner, you will be offered fewer actions and objects at the interface than are shown
below.
• The configuration of your BSCW server that may not allow certain functions.
3.1 The Web-based user interface
BSCW manages two basic types of objects: o Objects that do not contain other objects:
o document o note
o widget (of a portal) o URL o appointment o blog entry o poll o contact o user
o Objects that may contain other objects: o folder
o search folder o portal
o calendar o discussion forum o blog o e-mail message o template folder o website folder o project
o phase (of a project) o task
o flow folder o contact list
o member group (of a workspace) o community
o address book o clipboard o trash
In its Web-based user interface, BSCW displays the contents of container objects in pages that share a common basic structure and functionality. The page of a folder may be taken as a model of these pages.
The HTML pages of folders, discussion forums or personal objects like the address book, the clipboard, etc. all have a two-part structure consisting of
o a header and
o a list of entries (the body).
The following sections describe the general structure and functionality of such pages using the folder page as an example. Note that the contents of portals and calendars are displayed dif-ferently.
The folder pages will automatically adapt to the width you choose for the browser window, so that essential functions are still accessible with a narrow browser window.
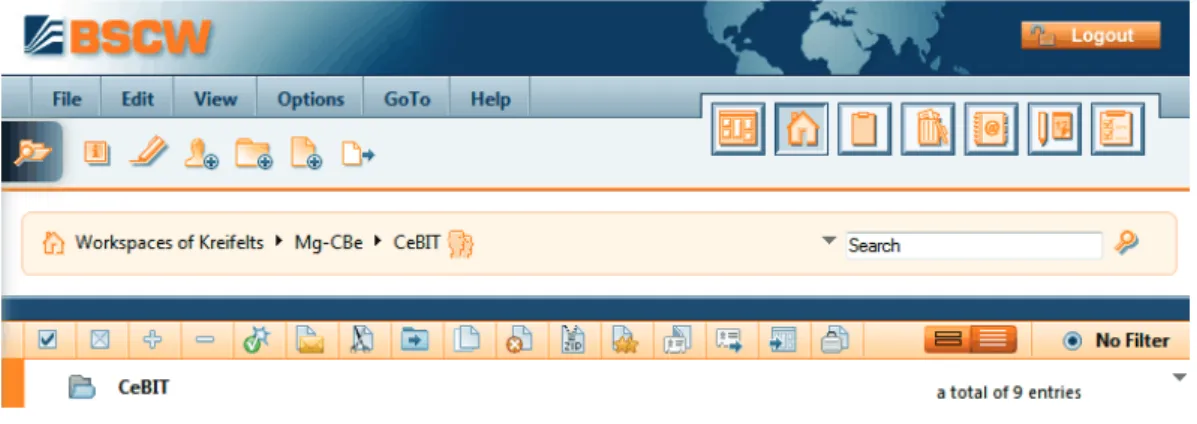
3.1.1 Header
Figure 7: Header elements
The header section of a folder page – like the header section of a calendar page, of an address book page, etc. – has the following elements.
The top menu bar
contains the menus for creating and manipulating objects within the folder (or calen-dar, discussion forum, etc.). Details are given in 3.3 “Actions” on page 34.
The logout button
closes your BSCW session.
The action shortcut bar
consists of frequently used actions like creating objects, e.g., documents, subfolders or discussion forums, initiating a search or getting more information about the current folder.
The first action shortcut lets you browse your workspaces; clicking on the icon opens a window representing your complete workspace hierarchy. This icon is always accessible since it remains on the same spot of the browser window, even if the win-dow is scrolled. For a quick access to a certain workspace, browse your workspaces and click on the workspace to open it in BSCW.
The instant access bar
gives access to personal objects like your home folder, clipboard, trash, address book and calendar. The instant access bar may disappear if the browser window gets too narrow for its display.
The navigation bar
specifies the location of the current object in your folder hierarchy as a path from your home folder to this very object: Workspaces of your-user-name / active
work-spaces. The names in the directory path are links to the respective folder pages.
A search field is integrated into the navigation bar that lets you directly search your
workspaces (“quick search”). Type your search terms into the search field and hit . The results will be presented in a temporary search folder with the location of the objects found in their description. In order to return to your previous workspace, hit
in the instant access bar.
The standard search (“all”) will look for all objects in the current folder where the search terms appear in the name, the content, the description or the tags. You may also select a different type of search from the drop down menu appearing when you point to the triangle preceding the search field: name, tags or documents. A name search looks for all objects in the current folder where the search terms appear in the name, a tag search looks for all objects where the search terms appear in the tags, and a docu-ment search looks for all docudocu-ments that contain the search terms.
Further details on searching in BSCW are given in 3.7 “Search” on page 58.
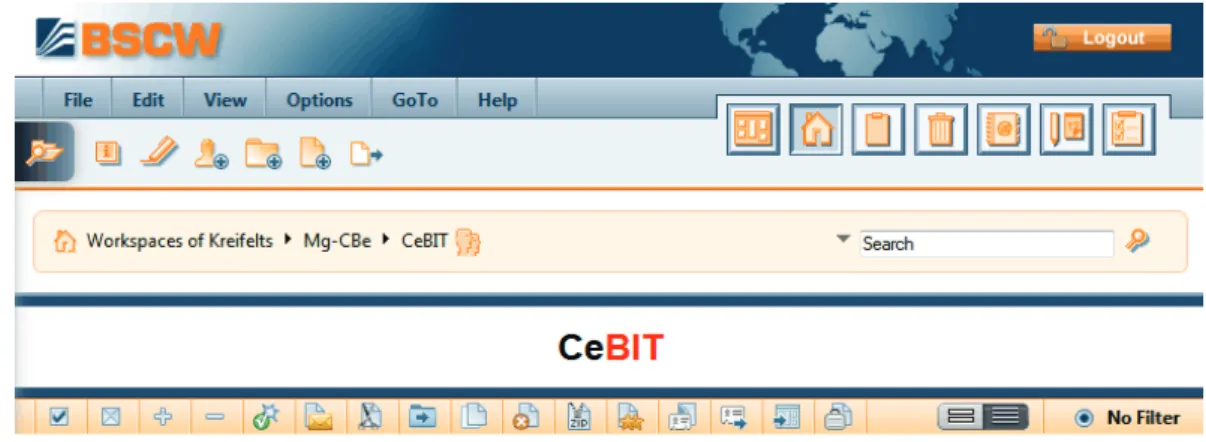
The banner
is empty by default; a banner consisting of text and graphics may be inserted individu-ally for each folder, if so desired (see 3.8.5 “Banners” on page 71).
The multi-selection toolbar
offers buttons for
• selecting or de-selecting all entries in the current page;
• enabling or disabling the display of subfolders, when the option View Fold-out is active;
• applying the actions listed to the objects selected (check-marked),
• toggling between details and content view and
The context menu
(an action button at the lower right-hand corner of the header section of the folder page) offers all actions that are applicable to the current folder. The context menu may also be invoked by a right mouse click anywhere on the title part of the folder listing (pressing the Ctrl key along with the right mouse click produces the original browser menu, e.g. for “Save target as…”).
Putting the cursor over the context menu icon displays often used actions (Change Properties, Cut, Copy) as a horizontal iconized context menu.
3.1.2 List of entries
The body of a folder page, search result page, etc. consists of a list of entries, each represent-ing an object contained in the folder, search folder etc. A folder page is by default displayed in the details view where an object entry normally consists of the following elements:
o Information icon
o Check box for selecting the object o Object type icon
o Name of the object
o Action menu button giving access to actions that may be performed on the object represented by the entry. Putting the cursor over the action menu icon displays often used actions (Change Properties, Cut, Copy, Delete) as a horizontal iconized action menu.
o Size of an entry is indicated in bytes, in case of a folder in number of objects con-tained.
o This may be followed by icons leading to additional information, e.g., in a folder page a members’ icon will take you to the members’ page of this folder.
Note, that you can actually configure the information displayed along with an entry via View Columns in the top menu.
Besides the details view described above, there is also a content view available. An object entry in the content view has the following elements:
o Check box for selecting the object
o Object icon: With documents, the object icon is a miniaturized preview, with contacts and users it is a picture, if available, and otherwise it is the object type icon.
o Info-box consisting of a header line with name, action menu, and if applicable, mem-bers icon, rating etc. and a domain with further details like size, document type, creator, creation date.
o Abstract of the object content (with folders, e.g., the names of the objects contained) o Description
o Author and date of the last modification
You activate the content view by selecting View Content in the top menu (see 3.8.4 “Views
on folders” on page 68).
Please note that entries in portal and calendar pages look and work a bit differently than described here for folder entries.
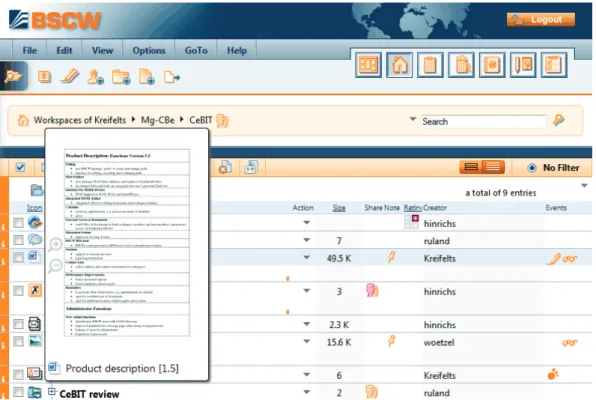
3.1.2.1 Opening documents and document preview
In order to display the contents of a document in a folder listing
• click the name of the respective object entry or
• use Open in its action menu.
The way documents are opened is dependent on your personal preferences (see below) as well as on browser, operating system, plug-ins installed and browser configuration. So you can, e.g., specify whether PDF documents should be opened in the browser (using a so-called PDF plug-in) or directly in the Adobe PDF reader.
If you want to open a document that your Web browser cannot displayed, you can download the corresponding file and open it on your local system using an appropriate application. Position your cursor over the object type icon of a document to display a miniaturized pre-view of the document, which you may additionally have enlarged (see Figure 8 for an ex-ample). For documents without a preview, a tooltip with the document type is shown. Text, HTML and PDF documents all have previews, with other document types it depends on whether your BSCW administrator has installed the respective PDF converters.