P
ROTEGÉ
®
616
Digital Hybrid Key System
Keyset User Guide with display
Mat Code 699050
Q
UICK
G
UIDE TO
F
EATURE
C
ODES
Feature
Code
AUTOANSWERON/OFF F6*
AUTOHOLDON/OFF F94 AUTOMATICLINESELECTION F95 TOCANCELLINESELECTION F*95 BACKGROUNDMUSICON/OFF F52
BARGEIN F72
BUSYRING F#2
CALLFORWARDON/OFF F2
CALLPARKON/OFF F73
CALLPICKUP(DIRECT) F53
CALLPICKUP (GROUP) F54
CALLWAITALLOWON/OFF F99
CALLBACK/CANCEL F*91
CAMPON/BUSYLINE F93
CAMPON/CANCEL F*93
CHECKFEATURESTATUS F#8 CONFERENCE(PROGRAMMABLE BUTTON) F60
DAY/NIGHTMODE F63
DISTINCTIVERINGING F#7
DONOTDISTURB(DND) ON/OFF F4 FEATUREKEYPROGRAMMING F#3
FLASH(INSERT) F3
HEADSETOPERATION/ON F9# HEADSETOPERATION/OFF F*9#
Feature
Code
HOLD(AUTOMATIC) ON/OFF F94 HOLD(EXCLUSIVE) FHOLD
HOLD(SYSTEM) HOLD
HOTDIALPADON/OFF F#6 LASTNUMBERREDIAL(LNR) F8 MESSAGES(DELETING) F*96* MESSAGES(PREMISES)/ON F90 MESSAGES(PREMISES)/OFF F*90
MUTEON/OFF F76
PAGING F50
ANSWERPAGING F59
RECEIVEPAGINGON/OFF F#9
PAUSE(INSERT) F70
PULSE TO TONE CONVERSION * REMINDERSERVICE/ON F92 REMINDERSERVICE/OFF F*92 SAVEDNUMBERREDIAL(SNR) F51
SERVICEMODE F#0
SPECIFICTRUNKACCESS F0+TRUNK SPEEDDIALPROGRAMMING F1
TRANSFER HOLD/XFR/CONF
TRANSFERBEEP F79
Q
UICK
G
UIDE TO
N
UMBERING
DEFAULTPROTEGÉ YOURCOMPANY’S
RESOURCE DIRECTORY NUMBERS DIRECTORY NUMBERS
Extension Numbers 10-25, 58-73 _______________
Extension Group Numbers 1-4 _______________
Line Numbers 1-6 _______________
Line Group Numbers 1-2 _______________
System Speed Dial Numbers 20-99 _______________ Individual Speed Dial Numbers 00-19 _______________
Voice Mail Access 82 _______________
I
NDIVIDUALS
PEEDD
IALN
UMBERSNUMBER ACTUAL DETAIL
00 ______ ____________________________________ 01 ______ ____________________________________ 02 ______ ____________________________________ 03 ______ ____________________________________ 04 ______ ____________________________________ 05 ______ ____________________________________ 06 ______ ____________________________________ 07 ______ ____________________________________ 08 ______ ____________________________________ 09 ______ ____________________________________ 10 ______ ____________________________________ 11 ______ ____________________________________ 12 ______ ____________________________________ 13 ______ ____________________________________ 14 ______ ____________________________________ 15 ______ ____________________________________ 16 ______ ____________________________________ 17 ______ ____________________________________ 18 ______ ____________________________________
Contents
1. How To Use This Guide . . . .1
2. Your Keyset’s Parts . . . .2
3. Understanding the Lights . . . .6
4. Understanding the Tones . . . .7
5. Care Of Your Keyset . . . .7
6. Your Protegé®Phone System . . . .8
1. Answering Calls . . . .9
2. Call Pickup . . . .10
3. Call Forward . . . .11
4. Avoiding Calls . . . .14
5. Busy Ring . . . .15
6. Retrieving “Parked” Calls . . . .16
1. Placing Intercom Calls . . . .17
2. Barge In . . . .19
3. Placing Outside Calls . . . .20
4. Redialing . . . .21
5. Dialing Speed Dial Numbers . . . .22
6. Special Dialing . . . .23
7. Callback . . . .24
8. Camp On . . . .26
1. Hold . . . .27
2. Transferring Calls . . . .29
3. Conference . . . .31
4. Call Wait . . . .33
1. Paging . . . .35
2. Message Waiting . . . .37
3. Premises Messages . . . .38
Answering Calls
chapter
2
Introduction
chapter
1
Making Calls
chapter
3
Call Handling
chapter
4
Paging And
Messaging
chapter
5
Contents
1. Mute . . . .41
2. Station Alarm Clock . . . .42
3. Speed Dial Numbers . . . .43
4. Service Mode . . . .45
5. Unanswered Call Table . . . .46
1. Two Features For Easier Dialing . . . .47
2. Three Features For Easier Answering . . . .49
3. Check Feature Status . . . .51
4. Setting The Feature Keys . . . .52
5. Headset Operation . . . .54
6. Background Music . . . .55
1. Voice Mail Features . . . .57
Glossary . . . .59
Index . . . .61
Voice Mail
Features
chapter
8
Convenience
Features
chapter
6
Customizing
Your Keyset
chapter
7
Notes
1. How To Use This Guide
Your Protegé®display keyset is the perfect tool for today's workplace. Thisguide shows you how to set and use your phone's many advanced and labor-saving features.
Getting Started
Read this chapter carefully; it contains some important safety instructions. Then, flip through the rest of the guide to become familiar with how informa-tion is organized. Study the features you will use on a daily basis. Keep this guide handy so you can quickly refer to it as you need.
How to locate information
If You Want Then Refer To
General information on using your keyset Chapter 1, Introduction To use a specific feature Index to point you to the page A definition of a telecommunications term Glossary
Information on taking and avoiding calls Chapter 2, Answering Calls Information on placing internal and Chapter 3, Making Calls outside calls
Information on holding and transferring Chapter 4, Call Handling calls, and on making conferences
Information on paging and messaging Chapter 5, Paging And Messaging Information on labor-saving features Chapter 6, Convenience Features such as programming speed dial numbers
Information on performing keyset-specific Chapter 7, Customizing Your functions Keyset
Information on using voice mail and Chapter 8, Voice Mail And Data data features Features
chapter
1 / Introduction
2. Your Keyset’s Parts
Xfr/Conf Key
Redial Key Clear Key
Function Key Headset Jack
Display (LCD)
Soft Keys
Feature Keys Speakerphone
Dial Pad
Pull Out Tray
Hold Key
Volume Keys Speaker Key and Light
Index
Station 60
System Administrator 60 System Hold 27
Time Reminder 42 Tone 60
Tones, Understanding 7 Transferring Calls 29 Transferring to Voice Mail 57 Trunk 60
Unanswered Call Table 46 Urgent Calls 26
Voice Call 49-50 Voice Mail 57-58
Voice to Ring Interchange 18 Volume Keys 5
Work Group - Pickup a Ringing Extension 10
Index
Night Service - See Service Mode On-Hook 59
Outside Line 59 Paging 35 Parked Calls 30 Pause 23, 43
Personal Message - Creating 39 Placing Outside Calls 20 Premises Messages 38 Preprogrammed Messages 38 Private Conversation 41 Private Talk 32
Programming Feature Keys 52 Pull Out Tray 2, 4
Pulse Dialing 23 Recall, Transfer 29 Redial Key 4, 21 Redialing 21
Reminder Service - See Alarm Clock Ring Cadences 49-50
Saved Number Redial 21 Screened Transfer 29 Service Mode 45, 60 Setting the Feature Keys 52 SNR - See Saved Number Redial Soft Keys 2, 4
Speaker Key and Light 2, 4 Speakerphone 2, 5 Hold 27
- Holding an Intercom Call 28 - Reminder 7
- System 27 Hold Key 2, 4 Hot Dial Pad 47 Idle State 59
Inserting Special Characters 23 Intercom 17, 27, 59
Intercom Key 9 Intrusion - See Barge In Keyset 2, 59
Last Number Redial 21 LCD 3, 59
LED 59
Lights, Understanding 6 Line Access 20
Line (Route) and Speed Dial Numbers 22
LNR - See Last Number Redial Messages 37
- Call Me Messages 37 - Deleting a Message 37 - Leaving a Message 3 - Premises 38
Message Waiting Indication 37 Music on Hold 24
Mute 41
1 / Introduction
Clear key
Press the Clear key to cancel any task you are in the middle of performing, and to terminate a call. Also use this key to conclude programming certain features. However, do not press the Clear key to complete a programming task if you are active on a call, as this will also disconnect you from your call.
Dial pad
Use the dial pad to dial telephone numbers, and to enter alphabetical letters for messages.
Display (LCD)
The LCD displays time, day, and date. It provides information on the status of your keyset, and prompts you when you are setting and canceling features. While you are on an outside call, the LCD will display a call duration timer. Messages on the display receive the following priority:
1. Database/Feature programming 7. Message Waiting Invoking 2. Call Wait Notification 8. Call Again Invoking 3. Alarm Clock Invoked 9. DND/CFW Indication 4. Current Operation 10. Advisory Message
5. Recall, Transfer, Incoming, 11. Time, Date & Advisory Mode Camp On Line Signaling
6. ICM Call Signaling Display in an idle state
Feature keys
These keys and their associated LEDs (Light Emitting Diode) give you speedy access to outside lines, internal resources such as extensions and extension groups, frequently used features, and speed dial numbers.
Each key can be one of the following:
◆ An outside line key. Allows direct access to a line or group of lines.
◆ A Direct Station Selection (DSS) key. Directly calls a specific internal resource, such as a specific keyset, hunt group, paging group or voice
Index
Dialing Speed Dial Numbers 22 Dialing Voice Mail 57Dial Pad 2, 3
Direct Call Forward 11 Directed Call Pickup 10 Directory Numbers 22, 43 Display 2, 3
Distinctive Ringing 49-50 Diversion - See Call Forward DND - See Do Not Disturb DND Override 18 Do Not Disturb 14 - Premises Message 38 - Voice Call 49
DSS 52, 59 Exclusive Hold 28
Extinguish Voice Mail Light 58 Feature Access 8
Feature Interaction 8 Feature Keys 2, 3 Feature Code Settings 51 Flash 23, 43
Forced Release 34 Forward 11
Forwarding to Voice Mail 58 Function Key 2, 3
Group Call Pickup 10 Group Page 35 Headset Operation 54 Headset Jack 4, 54 Abbreviated Numbers - See Speed
Dial Numbers Alarm Clock 42
Attendant, Calling the 17 Auto Answer 9, 49 Automatic Hold 9, 28
Automatic Line Selection 47, 48 Avoiding Calls 14
Background Music 55 Barge In 19
BGM - See Background Music Blind Transfer 29
Busy Call Forward 12 Busy Line (route) 19, 26 Busy Ring 15
Call Forward 11-13 - Voice Call Allow 49, 50 Call Me Messages 37 Call Park 30
Call Indication 9 Call Pickup 10 Call Wait 33 Callback 24
Calling an Extension 17 Camp On 26
Cancel A Call Forward 12 Check Key Status 51 Class of Service 17, 19, 59 Cleaning 7
Clear Key 2, 3, 8 Conference 31
Call Forward, Do Not Disturb or a Message Waiting.
◆ A speed dial number. Press the key to dial the stored number. At default your phone is programmed as follows:
Feature 1 - Line 1 Feature 6 - Ext. 12 Feature 11 - Voice Call Allow Feature 2 - Line 2 Feature 7 - Ext. 13 Feature 12 - Call Forward Feature 3 - Line 3 Feature 8 - Ext. 14 Feature 13 - Page
Feature 4 - Ext. 10 Feature 9 - Ext. 15 Feature 14 - Do Not Disturb Feature 5 - Ext. 11 Feature 10 - ICM Feature 15 - Mute
See page 6 for a guide to what the associated LEDs signify.
Function key
Most feature codes are set and cancelled by pressing this key followed by dial-ing one to four digits.
Headset jack
The headset jack enables you to connect a headset to your telephone.
Hold key
Press this key to place a call on hold. Also use this key to go back one level in programming certain features.
Pull out tray
The pull out tray contains a card for you to note frequently dialed numbers, or contents of feature keys.
Redial key
The Redial key is programmable. It is usually programmed to redial the last outside number dialed from the keyset.
Soft keys
Use these interactive buttons in conjunction with the LCD to access your key-set's features.
Glossary
Tone
The audible sound your keyset makes. There are many different tones: for example, dial tone, ring tone, busy tone, and error tone.
Trunk
A telephone line owned by the local telephone company that connects your office telephone system to the outside world. Also known as an "outside" line, or "c.o. line." Service Mode
The way calls are handled depending on the time of day. For example, your company's phone system may be configured so that in Day Service Mode all incoming calls are routed through the attendant. In Night Service Mode, incoming calls may be broadcast over a loud bell for anyone to answer.
Station
Another word for extension.
System Administrator The person responsible for your company's telephones. It may be an outside business, or a person or department at your company. Essentially, whoever you go to report problems with your phone or to request changes in your telephone service.
1 / Introduction
Speaker key and light
The speaker key turns your speakerphone on and off. Use it to disconnect a hands-free call. Your speakerphone is active when the light is lit.
Pressing the Speaker key will answer or release a call on the speakerphone. Switching from the handset to the speakerphone is easy. Press the Speaker key (it will light red) and then hang up the handset. To return to the handset, simply lift it up and the speaker will automatically turn off.
Speakerphone
The speakerphone enables you to make hands-free calls. If your company does not have external paging equipment, pages may be broadcast over keyset speakerphones.
Volume keys
Use the volume keys to regulate the volume of the ringer, the speaker, the handset, the headset, and of the group listen feature.
Xfer/Conf key
1 / Introduction
3. Understanding the Lights
The lights on your keyset indicate the status of lines, features, and other exten-sions.The table below describes what each light indicates. The lights are situated beside each Feature key. Line keys are feature keys programmed to access out-side lines. DSS keys are feature keys programmed to access other internal resources such as extensions or hunt groups. Feature keys are feature keys pro-grammed to activate specific features such as Do Not Disturb, Mute, and Call Forward.
Note:Some features will not cause an associated LED to light when activated.
Signal Description
Dark (Line) Line not in use (Feature) Feature not in use Solid Red (Line) Line (or line route) in use
(Feature) Feature activated
Slow Flash Red (Line) Line on hold by another extension (Extension) In Do Not Disturb
(Feature) You have a message waiting Fast Flash Red (Line) Incoming line call
(Feature) Incoming intercom call
(Line or Feature) You have a transferred or recalled call Twinkling Green (Line) You are on a line call
(Feature) You are on an intercom call Fast Flash Green (Line) Line exclusively held by you
Glossary
Keyset
Another name for telephone. Specifically, a phone with a number of push buttons or "keys."
LCD
Liquid Crystal Display. The display screen of your telephone, which pro-vides information on the status of your keyset.
LED
Light Emitting Diode. The lights next to the feature keys. Depending on the model, your keyset has a number of single- or dual-colored LEDs. Each provides information on the status of the associated feature key.
Off-Hook
When you lift the handset you are "going off-hook." Early telephones had a metal hook on which the hand-set hung. The modern technology of the Protegé system means you can now also go off-hook and on-hook by pressing the Speaker key.
On-Hook
When the phone handset is resting in the cradle. See Off-Hook.
Outside Line See Trunk. Class of Service
Your level of access to certain fea-tures. Your company's phone system may assign a different class of serv-ice to particular extensions, to restrict access to certain features. See also Extension Group.
DSS
Direct Station Selection. Press a DSS key to call or transfer to an internal resource without dialing manually. The internal resource can be a single extension, or a group of extensions such as a hunt group or paging group. In a Protegé system, a DSS key is a specially programmed fea-ture key.
Extension Group
Extension Groups are a way of grouping groups of extensions in a Protegé phone system. For example, if several companies in a building share a common phone system, each company's extensions would form an Extension Group. See also class of service.
Idle state
The condition of your keyset when it is not in use.
Intercom
8 / Voice Mail Features
F2
F1/F2/F3
Forwarding to Voice Mail
1. Keyset is in idle state.
2. Press the Function key and then dial 2. or
-Press the designated feature key.
3. Press appropriate soft key below the type of forward:
F1 for Direct or -F2 for Busy or
-F3 for No Answer
4. Dial 82 or press the Voice Mail feature key. 5. Press soft key F2 below the word "save" to
accept the Voice Mail Hunt Group number. 6. Choose whether to divert all calls (icm/co),
just intercom calls (icm), or just outside calls (co), by pressing the appropriate soft key (F1, F2, or F3).
7. Receive confirmation tone.
Retrieving Your Voice Mail
Messages
1. Keyset is in idle state.
2. Press the voice mail Message Waiting key (a designated feature key).
Extinguish Lit Voice Mail LED
1. Keyset is idle or in use on a call. 2. Press soft key F3 below the word “del.” 3. Receive confirmation tone.
2 8 FUNCTION
2
F1/F2/F3
1 / Introduction
4. Understanding the Tones
This table will help you distinguish between the different ring tones you hear on your keyset.Signal Description
Single ring Hold reminder tone Confirmation tone Two short rings (Once) Error tone (Twice) Callback Repeated single ring Incoming outside call
Line recall
Repeated double ring Incoming intercom call
Warning
To prevent fire or shock hazard, do not expose this telephone to rain or any type of excess moisture. If accidentally dropped in water, immediately unplug
this telephone from the wall outlet.
5. Care of Your Keyset
1 / Introduction
6. Your Protegé
®
Phone System
Access To Features
You may not be able to operate all the features in this guide exactly as written. If your company's telephone system uses an early version of software, some features may offer fewer or different options, others may not be available at all. Also, a particular feature option may be included in your company's system, but may not be programmed to operate at your extension.
If you attempt to use a feature that is not available to you, or make a mistake in using the feature, you will hear an error signal or see a visual display instruc-tion. See your telephone system administrator for further details regarding fea-ture access.
Feature Interaction
When you are setting a feature, please read the introductory paragraphs careful-ly. They describe what the feature does and, if applicable, how it interacts with other features.
Protegé® Flexibility
The Protegé 616 phone system is flexible and can be customized to fit many business needs. This guide has been written to accommodate the structure of most companies. Your system administrator can tell you the numbers assigned to resources such as extension groups and speed dial numbers. In this guide write any additional information that is relevant to your working environment.
Following the Instructions
The instructions in this guide often ask you to "press" a key. Throughout these instructions, the word "press" means press and release, not press and hold. You may be instructed to "dial" which means to press the desired numbers on the dial pad. You may be required to dial * (star) or # (pound) on the dial pad to access certain features.
Your LCD displays informative prompts while you are operating your keyset. Press soft key F1 to go back one digit or character. Press the Hold key to go back one level in feature setting, and press the Clear key to abandon a task. You should hear a confirmation tone when you have successfully set most fea-tures.
Dialing Voice Mail
1. Lift the handset.
2. Dial 82, the Voice Mail Hunt Group number. or
-Press the voice mail key. or
-Press the Function key and dial 64.
Transferring to Voice Mail
1. Keyset is active on a call. 2. Press the Xfer/Conf key.
3. Dial 82, the Voice Mail Hunt Group number. or
-Press the voice mail key. or
-Press the Function key and dial 64. 3. LCD prompts for the destination mailbox.
Enter the appropriate extension number. or
-Press an appropriate DSS key.
4. Conclude the transfer as appropriate to the transfer method you are using.
1. Voice Mail
If you use your voice mail system on a regular basis, we recommend you des-ignate a feature key as a voice mail “Message Waiting” key.
The voice mail Message Waiting key lights when you receive a voice mail message. Press the key to gain access to your personal mailbox so you can check your messages. For instructions on how to program a feature key, see page 52. The feature code for this is Function key, dial 64.
Your Protegé®616 phone system offers the Extinguish Lit Voice Mail LED
fea-ture that is used to manually turn off the LED associated with your voice mail Message Waiting key. Use this feature if your company’s phone and voice mail systems suffer some kind of connection interruption, and the LED fails to extinguish after you have checked all your voice mail messages.
chapter
eight
Voice Mail Features
FUNCTION 2 8
FUNCTION 2 8
x x
XFR/CONF 4 6
7 / Customizing Your Keyset
1. Answering Calls
Answering Internal and External CallsAnswering internal and outside calls is as easy as picking up the handset or pressing the Speaker key if you have the Auto Answer feature set to "on" (see page 49). Otherwise, to answer a call you will need to press a feature key appropriate to the type of call: a line or line group key for an outside call; an intercom key for an internal call.
Call Indication
Your LCD displays information about the caller: outside calls show the directo-ry number of the line cardirecto-rying the call. Internal calls show the identity (name or number) of the extension calling you. All transfers and forwards show their origin on the LCD.
Intercom Key
A feature key programmed as an intercom key (labeled "ICM") is useful for processing internal calls. If you do not have an ICM key already allocated, you can create one by following the directions for feature key programming. For more information on setting the feature keys, see page 52. Your ICM key flash-es when an internal party has "camped on" to your extension while you are on an outside call. Press this key to speak to the internal caller. Be sure to place the first call on hold if you do not have the Automatic Hold feature enabled at your keyset or you will disconnect the outside caller. See page 26 for more information on the Camp On feature, and page 28 for more information on the Automatic Hold feature.
chapter
2 / Answering Calls
Directed Call Pickup
1. Keyset is in idle state.
2. Press the Function key and then dial 53. or
-Press the designated feature key. 3. Dial the extension number ringing.
4. Call is connected. Pick up the handset or use the keyset speaker to talk to the caller.
Group Call Pickup
1. Keyset is in idle state.
2. Press the Function key and then dial 54. or
-Dial *.
3. Call is connected. Pick up the handset or use the keyset speaker to talk to the caller.
2. Call Pickup
Call Pickup helps you answer calls that are ringing at another location. Use Directed Call Pickup to answer a ringing extension. You specify ("direct") the ringing location by dialing the ringing extension's number.
Dial the Group Call Pickup number to pick up a ringing extension that is with-in your work group. Your system admwith-inistrator can tell you if your extension is part of a work group, and what number to dial to pick up calls.
FUNCTION 5
x x
3
FUNCTION
5 4
7 / Customizing Your Keyset
To activate
1. Press the Function key, and dial 52. 2. Music plays through your speakerphone.
To cancel
1. Press the Function key, and dial 52. 2. Press the Clear key.
6. Background Music
With the Background Music feature you can play background music over the speaker of your telephone while it is idle. You will normally hear the same music source that callers hear when they are placed on hold.
The music stops when you operate your telephone and resumes when you hang up. You still receive incoming intercom and outside calls, and can answer them by going off-hook with the handset or speaker key.
CLEAR FUNCTION
5 2
FUNCTION
7 / Customizing Your Keyset
Headset Function
To enable
1. Press the Function key and then dial 9 #. or
-Press the designated feature key.
To disable
1. Press the Function key and then dial ✻ 9 #. or
-Press the designated feature key.
5. Headset Operation
Simply plug a headset or headset amplifier directly into the headset jack. Enter the Headset Function feature code. While you have the Headset Function enabled, keep the handset in its cradle. Use the Speaker key to answer and end calls. The speaker key flashes when the headset is enabled. Pressing the speak-er key once takes the keyset off-hook and sends audio to the headset. Pressing the speaker key again enables the speakerphone so it transmits and receives calls. Pressing the speaker key a third time enables the headset again. Pressing the Clear key returns the keyset to its idle state.
The headset function (Function 9 #) can be programmed under a feature key. When programmed under the feature key, the function acts as a toggle. Press once and the headset is enabled. Press again and the headset is disabled. For information on programming a feature key, turn to page 52.
Note that amplified headsets with their own power source disable the Mute fea-ture on the Protegé®keysets. Refer to your system administrator for more
infor-mation.
FUNCTION
FUNCTION
9 #
✻ 9 #
2 / Answering Calls
3. Call Forward
Call Forward, also known as Diversion, is a powerful and flexible feature that allows you to direct some or all of your calls to one or several locations. The three options available on the Protegé®616 system are Direct Call
Forward, Busy Call Forward and No Answer Call Forward.
Direct Call Forward diverts all calls immediately. Busy Call Forward diverts calls immediately when your extension is busy. No Answer Call Forward diverts calls which are unanswered upon the expiration of 14 seconds.
You can specify whether to forward all calls or to forward only internal or only external calls to another extension or voice mail group.
Direct Call Forward
To activate 1. Keyset is idle.
2. Press the Function key and then dial 2. or
-Press the designated feature key.
3. Press soft key F1 below the word "direct." 4. Enter the extension number to which you want
to forward calls, or press the corresponding DSS key or press the Voice Mail Feature key to forward to Voice Mail.
5. Press soft key F2 below the word "save" to accept the extension number.
6. Choose whether to divert all calls (icm/co), just intercom calls (icm), or just outside calls (co), by pressing the appropriate soft key (F1, F2, or F3).
7. Receive confirmation tone. To cancel
1. Keyset is idle or in use on a call. 2. Press the Function key and then dial 2.
or -FUNCTION
2
F1
F1/F2/F3
F2
x x
7 / Customizing Your Keyset
Programming a Line Group or
ICM Key
1. Keyset is idle.
2. Press the Function key and then dial # 3. 3. Press the feature key you wish to program. 4. Press soft key F3 below the word “chg.” 5. Press soft key F1 below the word “line.” 6. For a Line Group, dial 0 followed by the line
group number: 0 - any line group or
-1 - line group -1 or
-2 - line group -2 or
-3 - ICM
7. Press soft key F2 below the word “save” to save the selection.
8. Receive confirmation tone.
Programming a Line Key
1. Keyset is idle.
2. Press the Function key and then dial # 3. 3. Press the feature key you wish to program. 4. Press soft key F3 below the word “chg.” 5. Press soft key F1 below the word “line.” 6. For a Line, dial the line directory number:
1 - Line 1 4 - Line 4 2 - Line 2 5 - Line 5 3 - Line 3 6 - Line 6
7. Press soft key F2 below the word “save” to save the selection.
8. Receive confirmation tone. FUNCTION
# 3
F1 F3
F2
0 x
FUNCTION
# 3
F1 F3
F2
x
2 / Answering Calls
F2
No Answer Call Forward
To activate 1. Keyset is idle.
2. Press the Function key and then dial 2. or
-Press the designated feature key.
3. Press soft key F3 below the word “no/ans.” 4. Enter the extension number to which you want
to forward calls or press the corresponding DSS key, or press the Voice Mail key to forward to Voice Mail.
5. Press soft key F2 below the word “save” to accept the extension number.
6. Choose whether to route all calls (icm/co), just intercom calls (icm), or just outside calls (co) calls by pressing the appropriate soft key (F1, F2, or F3).
7. Receive confirmation tone.
To cancel 1. Keyset is idle.
2. Press the Function key and then dial 2. 3. Receive confirmation tone.
FUNCTION 2 FUNCTION
2
F3
x x
7 / Customizing Your Keyset
FUNCTION
# 3
FUNCTION
F3 F3
F2
Programming a Feature
1. Keyset is idle.
2. Press the Function key and then dial # 3. 3. Press the feature key you wish to program. 4. Press soft key F3 below the word “chg.” 5. Press soft key F3 below the word “feat.” 6. Press the Function key and then enter the
appropriate feature code number.
7. Press soft key F2 below the word “save” to save selection.
8. Receive confirmation tone.
Programming a DSS Key
1. Keyset is idle.
2. Press the Function key and then dial # 3. 3. Press the feature key you wish to program. 4. Press soft key F3 below the word “chg.” 5. Press soft key F2 below the word “ext.” 6. Enter the extension directory number. 7. Press soft key F2 below the word “save” to
save the selection.
4. Setting The Feature Keys
Your keyset has a number of feature keys that can be programmed to your requirements. You can program under a feature key any one of the following:◆ An outside line key
◆ A DSS key
◆ A feature such as Call Forward
When you program a speed dial number under a feature key, you will enter the speed dial feature code (Function 1) plus the two digit bin number. Do not enter the entire phone number.
FUNCTION
# 3
F2 F3
x x
2 / Answering Calls
F2
Busy Call Forward
To activate 1. Keyset is idle.
2. Press the Function key and then dial 2. or
-Press the designated feature key.
3. Press soft key F2 below the word “busy.” 4. Enter the extension number to which you want
to forward calls or press the corresponding DSS key, or press the Voice Mail key to forward to Voice Mail.
5. Press soft key F2 below the word “save” to accept the extension number.
6. Choose whether to route all calls (icm/co), just intercom calls (icm), or just outside calls (co) calls by pressing the appropriate soft key (F1, F2, or F3).
7. Receive confirmation tone.
To cancel 1. Keyset is idle.
2. Press the Function key and then dial 2. 3. Receive confirmation tone.
FUNCTION 2 FUNCTION
2
F2
x x
2 / Answering Calls
FUNCTION 4
4. Avoiding Calls
At times you may want to work at your desk without phone interruptions. In addition to Call Forward, you can choose to use Do Not Disturb.
Do Not Disturb (DND) will stop all outside calls from ringing your telephone. However, display phones will still show information about the incoming call on its LCD. All internal calls are blocked to your telephone. Your telephone appears to be busy to callers without display keysets. Internal callers with dis-play phones will see that your are in DND mode.
Some users, such as the Attendant, may have the authority to override DND and force calls through. When in DND, a call that is transferred to your exten-sion will revert to the transferring extenexten-sion and not the Attendant. Your system administrator can tell you if anyone has override authority.
You may turn on DND when a call is ringing directly into your station. The ringing stops immediately at your desk. However, the calling party continues to hear ringback. And, the call is not transferred to the Attendant.
When DND is enabled, you will hear interrupted dial tone when going off-hook.
You cannot enable DND and Call Forward at the same time.
FUNCTION 4
Do Not Disturb
To activate
1. Keyset is idle or in use on a call. 2. Press the Function key and then dial 4.
or
-Press a designated feature key. 3. Receive confirmation tone.
To cancel
1. Keyset is idle or in use on a call. 2. Press the Function key and then dial 4.
7 / Customizing Your Keyset
Check Feature Status
To check 1. Keyset is idle.
2. Press the Function key and then dial # 8. The last number dialed is displayed.
3. Press soft key F3 below "next". The contents of the saved number buffer are displayed. 4. Press soft key F3 below "next" to scroll
through the following feature settings: Last Number Redial, Saved Number Redial, Day Class of Service, Night Class of Service, Auto Hold, Auto Answer, Voice Call, Call Wait, Page Receive, Busy Ring, Transfer Beep. 5. Press the Clear key to exit.
3. Check Feature Status
Use the Check Keyset Feature Status feature to confirm which features you have operating at your keyset. This feature is particularly useful for trou-bleshooting. If your keyset seems to behave oddly, check your feature settings. You may find a particular feature is set differently from how you expect. Each of these features has an impact on the operation of your keyset.FUNCTION
# 8
7 / Customizing Your Keyset
Voice Call
To receive 1. Keyset is idle.
2. Press the Function key and then dial 98. To prevent
1. Keyset is idle.
2. Press the Function key and then dial 98.
Auto Answer
To activate
1. Keyset is in idle state.
2. Press the Function key and then dial 6 ✻. To cancel
1. Keyset is in idle state.
2. Press the Function key and then dial 6 ✻.
Distinctive Ringing
To change ring cadence 1. Keyset is in idle state.
2. Press the Function key and then dial # 7. 3. Press soft key F3 below the word “chg” to
lis-ten to each ring tone. Stop when you have made your selection.
4. Press the Clear key to exit when completed. FUNCTION
FUNCTION
9 8
FUNCTION
6 ✻
FUNCTION
6 ✻
FUNCTION
# 7
F3
CLEAR
9 8
2 / Answering Calls
5. Busy Ring
Busy Ring allows you to enable or disable the ringing associated with incom-ing line calls at your extension.
If your extension is busy, and you want your phone to ring to notify you of incoming line calls, then Busy Ring should be enabled. When disabled, no ringing occurs when you are on another call.
At default all extensions have Busy Ring enabled.
To enable Busy Ring at your extension 1. Keyset is idle.
2. Press the Function key and then dial # 2. or
-Press the designated feature key, if pro-grammed.
3. Receive confirmation tone.
To disable Busy Ring at your extension 1. Keyset is idle.
2. Press the Function key and then dial # 2. or
-Press the designated feature key, if pro-grammed.
3. Receive confirmation tone. 2
# FUNCTION
2 / Answering Calls
6. Retrieving “Parked” Calls
The Call Park feature, which is used with line calls only, offers you a way to retrieve a call placed on hold at another extension. You can pick up the call from any extension.Extensions that are members of a conference or has intruded into a call cannot retrieve a “parked” call.
Answering a Parked Call 1. Keyset is idle or in use on a call. 2. Press the Function key and then dial 73.
or
-Press the designated feature key.
3. Enter the extension number that parked the call.
or
-Press the Function key and then dial 73. Then dial 0 plus the line directory number.
x x
0 x
7 3
7 3
FUNCTION
FUNCTION
7 / Customizing Your Keyset
2. Three Features For Easier
Answering
Voice Call, Auto Answer, and Distinctive Ringing are three features that you can use to make answering calls easier and faster.
Voice Call
When you set your keyset to allow voice calls, intercom callers are connected immediately over the speakerphone, without requiring you to go off-hook. You will hear a single tone to alert you and the LCD will display the word "voice" and the calling extension number. Outside calls continue to ring at your exten-sion in the usual way, so too will blind transfer calls.
Note that when voice calls are allowed, no Call Forward instructions you have programmed for intercom calls will be followed. Do Not Disturb, however, will continue to operate.
Auto Answer
Use the Auto Answer feature to select how incoming calls will be answered. With Auto Answer set to "off" you must press an appropriate feature key to answer an incoming call. This can be one of the following:
◆ An ICM key (a feature key designated for intercom calls)
◆ A Line or Line Group key
◆ An Overflow key (a feature key designated for all additional outside lines).
With Auto Answer set to "on" you can answer ringing calls by lifting the hand-set or pressing the Speaker key.
Protegé®616 system observes the following priority call sequence:
1. Camped On Line Call 4. Incoming Line Call 2. Recalled Line Call 5. Intercom Callback Call 3. Transferring Line Call 6. Incoming Intercom Call
Distinctive Ringing
7 / Customizing Your Keyset
Automatic Line Selection
To activate 1. Keyset is idle.
2. Press the Function key and then dial 95. 3. Press soft key F3 below the word "chg" to
select either intercom, line or line group dial tone.
4. Press the Clear key to exit the feature.
To cancel 1. Keyset is idle.
2. Press the Function key and then dial ✻ 95. 3. Receive confirmation tone.
Note:Function 95 cannot be programmed under a function/feature key.
FUNCTION 9
✻ 9 5 5
FUNCTION
F3
Calling an Extension
1. Keyset is in idle state. 2. Dial the extension number.
or
-Press a designated DSS key.
Calling the Attendant
1. Keyset is in idle state. 2. Dial 0.
or
-Press the designated DSS key.
1. Placing Intercom Calls
You can reach any individual extension by dialing the appropriate directory number.Use the Voice to Ring Interchange feature to force an extension that is in Voice Call mode to ring. This is particularly useful in situations when the called extension is unattended, as it enables you to use any available messaging options, and to follow any No Answer Call Forwarding instructions that may have been set. See page 49 for more information on the Voice Call feature. If you call an extension that has enabled Do Not Disturb on the keyset, you may be able to use the DND Override feature to force your call to ring through. Your ability to use this feature depends on your class of service. Your LCD will show Override as an option if you are permitted to use this feature.
If your call to a specific extension goes unanswered, use the soft keys to choose a messaging option before hanging up. Press soft key F1 or F2 to leave a display message (see pages 24 and 38 for more information).
x x
chapter
three
Making Calls
3 / Making Calls
Voice to Ring Interchange (VRI)
1. Keyset is in idle state. 2. Dial the extension number.
or
-Press the designated DSS key.
3. Receive confirmation tone. LCD displays the word “voice.”
4. Dial *. Your call overrides the Voice Call set-ting and rings through to the extension.
Do Not Disturb Override
1. Keyset is in idle state.
2. Dial an extension. Receive busy tone. Display shows that the extension is in DND mode. 3. Press soft key F2 below the word “override.” 4. Your call overrides DND and rings through to
the extension.
x x
x x
✻
F2
Hot Dial Pad
To activate 1. Keyset is idle.
2. Press the Function key and then dial #6. 3. Receive confirmation tone.
To cancel 1. Keyset is idle.
2. Press the Function key and then dial #6. 3. Receive confirmation tone.
Customizing
Your Keyset
1. Two Features For Easier
Dialing
Hot Dial Pad and Automatic Line Selection are features you can use to make dialing easier and faster.
Hot Dial Pad
When you have the Hot Dial Pad feature enabled, you can dial an extension or outside line without lifting the handset or pressing the speaker key. The Protegé®616 system senses when any dial pad key is pressed, takes the
exten-sion off-hook, studies the digits dialed to determine whether the call is for intercom or line access, and routes it accordingly. At default, your keyset is programmed with Hot Dial Pad activated.
Automatic Line Selection
Automatic Line Selection allows you to choose which resource your keyset accesses when you go off-hook at your extension; intercom dial tone, a specific line, or a line route.
Note:If you program a specific line be advised that if a call is parked or held by anyone else on that line, when you go off-hook you will be connected to the call.
chapter
seven
FUNCTION
# 6
FUNCTION
6 / Convenience Features
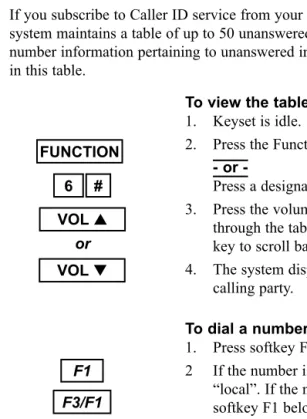
To view the table 1. Keyset is idle.
2. Press the Function key and then dial 6#. or
-Press a designated feature key.
3. Press the volume up key to scroll forward through the table or press the volume down key to scroll backward through the table. 4. The system displays the name/number of the
calling party.
To dial a number in the table 1. Press softkey F1, below “dial”.
2 If the number is local press softkey F3 below “local”. If the number is long distance press softkey F1 below “longd”.
3. The system accesses a specific line and dials the number.
To view more information on an entry 1. Press softkey F2 below “more” to scroll
through calling name, calling number, and time of call.
To delete an entry from the table 1. Press softkey F3 below “del”.
2. The entry is deleted and the next entry in the table is displayed.
5. Unanswered Call Table
If you subscribe to Caller ID service from your local telephone company the system maintains a table of up to 50 unanswered calls. The calling name/ number information pertaining to unanswered incoming calls will be stored in this table.FUNCTION
VOL▲
VOL▼
# 6
F2 F1
F3 F3/F1
3 / Making Calls
Intruding on a Busy Extension
1. Keyset is in idle state.
2. Dial an extension. Receive busy tone. 3. Press soft key F3 below the word “next.” 4. Press soft key F3 below the word “intru.” 5. You are connected to the call at the busy
extension.
Intruding on a Busy Line
1. Keyset is in idle state.
2. Dial a line directory number. Receive busy tone.
or
-Press a busy line key. Receive busy tone. 3. Press soft key F3 below the word “intru.” 4. You are connected to the call on the busy line.
2. Barge In
Your telephone system administrator can advise if the Barge In feature is avail-able to you. Use it when you want to interrupt a busy extension or line. Your ability to use this feature depends on your class of service and that of the extension on which you want to intrude. If you are not permitted to use this feature it will not appear as an option on your LCD.
F3 F3
x x
F3
x x
3 / Making Calls
Placing Outside Calls
1. Press an available line or line group key. or
-Dial 9.
2. Dial the number.
3. Placing Outside Calls
Consult your telephone system administrator for any restrictions in your ability to make outside calls.
x
9
6 / Convenience Features
To change service mode 1. Keyset is idle.
2. Press the Function key and then dial # 0. or
-Press a designated feature key.
3. Enter the password (see System Administrator for password).
4. Press softkey F2, "Show." The current service mode is displayed.
5. Press softkey F3, "Chg," to toggle between the three choices.
6. Press the Clear key to exit this feature.
4. Service Mode
Use the Service Mode feature as an alternative method of changing from Day Service to Night Service.
Choose from three service modes: Day, Night and Time. The Time service mode automatically changes between Day and Night according to the Night Switching programming in the database.
FUNCTION 0 #
x x x x
F2 F3
6 / Convenience Features
Programming a Speed Dial Bin
Number Under a Feature Key
1. Keyset is idle.
2. Press the Function key and then dial # 3. 3. Press the feature key you wish to program. 4. Press soft key F3 below the word “chg.” 5. Press soft key F3 below the word “feat.” 6. Press the Function key plus “1” and the speed
dial bin number (00 - 99).
7. Press soft key F2 below the word “save” to save selection.
8. Receive confirmation tone.
Deleting A Speed Dial Number
1. Keyset is in idle state.
2. Press the Function key and then dial 1. 3. Dial the speed dial bin number.
4. Press the softkey F3 below the word “chg.” 5. Press soft key F2 below the word “save.” 6. Receive confirmation tone.
7. Press the Clear key to exit. or
-Repeat the process (steps 3-6) to delete anoth-er speed dial numbanoth-er.
FUNCTION
CLEAR 1
F2
x x
FUNCTION
# 3
FUNCTION
F3 F3
F2 1
x x
3 / Making Calls
4. Redialing
Two redialing options are available to you: Last Number Redial and Saved Number Redial.
Last Number Redial (LNR) simply redials the last outside number dialed out from your keyset. By default, the Redial key is programmed for LNR. The Saved Number Redial (SNR) feature redials a telephone number, which you stored during an earlier call to that number. The saved number remains stored until you save another number in its place. This is useful for occasions when you need to make other outside calls between calls to a particular num-ber. Note that to store a telephone number using SNR, you must have initiated the call.
You can reprogram the Redial button with either of the redialing options, or program feature keys. For instructions, see Setting the Feature Keys (page 52).
8 FUNCTION
CLEAR
Last Number Redial (LNR)
To activate
1. Keyset is in idle state. 2. Press the Redial key.
or
-Press the Function key and then dial 8. To cancel
1. Press the Clear key.
Saved Number Redial (SNR)
To save a number
1. Keyset is in use on a call.
2. Press the Function key and then dial 51. or
-Press the designated feature key. To dial the saved number 1. Keyset is in idle state.
2. Press the Function key and then dial 51.
5 1
FUNCTION
5 1
3 / Making Calls
To Dial On A Specific Line Or Line Route 1. Keyset is in idle.
2. Dial the line or line route number. or
Press a specific line key.
3. Press the Function key and dial 1. 4. Dial the speed dial bin number.
5. Dialing Speed Dial Numbers
Any frequently dialed telephone number can be stored as a Speed DialNumber. Speed dial numbers are similar to the directory numbers you dial to access extensions or the voice mail group. When you entered a speed dial number, the Protegé®616 system dials out the corresponding telephone
number.
Many extension users share system speed dial numbers. Individual speed dial numbers are specific to your keyset. You can program speed dial numbers under feature keys. See Speed Dial Numbers (page 43) for instructions on how to store individual speed dial numbers, and Setting the Feature Keys (page 52) for how to program them under feature keys.
1 FUNCTION
x x
6 / Convenience Features
Storing a Speed Dial Number
1. Keyset is in idle state.
2. Press the Function key and then dial 1. 3. Enter a speed dial bin number to determine
where a speed dial number is stored. 4. Press soft key F2 below the word “show.” 5. Press soft key F3 below the word “chg.” 6. Enter the telephone number you wish to save. 7. Press soft key F2 below the word “save.” 8. Receive confirmation tone.
9. Press the Clear key to exit. or
-Repeat the process (steps 3-7) to enter another speed dial number.
3. Speed Dial Numbers
A Speed Dial Number stores an outside telephone number. You may store a maximum of 16 digits (including special dialing characters) in a single speed dial number. At default bins 00 - 19 are designated as private to your phone. You may program your frequently called numbers in these 20 bins.
When storing an outside telephone number you can specify the line or line route to be used. Refer to Special Dialing (page 23) if you need to include dial-ing characters such as pause and flash.
FUNCTION 1
F3 F2
F2
CLEAR x
6 / Convenience Features
To activate 1. Keyset is idle.
2. Press the Function key and then dial 92. 3. Press soft key F3 below the word “chg.” 4. Enter the time for the reminder in 24-hour
for-mat.
5. Press soft key F2 below the word “save.” 6. Press the soft key F2 below the word "next." 7. Enter the appropriate mode. Toggle between
"One" to activate the alarm once or "Always" to activate the alarm every day.
8. When programming is finished, press the Clear key.
To cancel
1. Keyset is idle or in use on a call.
2. Press the Function key and then dial ✻ 92.
To acknowledge a reminder call
1. Keyset rings. LCD displays “Alarm Reached.” 2. Press soft key F1 below the word “ack.”
2. Station Alarm Clock
The Alarm Clock can be used to remind yourself of appointments.
Use the 24 hour clock format to enter the time for the reminder. For example, 2:23 p.m. is entered as 1423.
When the reminder time is reached, your keyset will ring to alert you, even if you are active on a call.
FUNCTION
FUNCTION
9 2
F3
F2
F1
✻ 9 2
x x x x
F2
x
CLEAR
3 / Making Calls
Pulse to Tone Conversion
1. Access an outside line key. 2. Dial telephone number (in pulse). 3. Dial ✻.
4. Dial additional required digits (in tone).
Inserting Special Dial
Characters
To insert a pause
1. Press the Function key and then dial 70. or
-Press the designated feature key. 2. Dial the remaining digits.
To insert a flash
1. Press the Function key and then dial 3. or
-Press the designated feature key. 2. Dial the remaining digits.
6. Special Dialing
Your system administrator can confirm if your system uses pulse dialing, and whether you need to add any of the special dial characters (pause or flash). If your system uses pulse dialing for outside calls, you may need to use the Pulse to Tone Conversion feature to access remote equipment such as voice mail systems.
7 0
✻ x
x
x
x FUNCTION
3 / Making Calls
Placing a Callback to a Busy
or Unattended Extension
To activate
1. Dial the extension number. 2. Receive busy tone.
or
-Receive no answer.
3. Press soft key F1 below the word “cbck.” or
Press the Function key and dial 91. 4. Receive confirmation tone.
To delete all callbacks
1. Press the Function key and then dial ✻91. 2. Receive confirmation tone.
7. Callback
When you place an intercom call to a busy or unattended extension, you can request a callback and hang up. You then receive a callback when the busy extension becomes available, or when the unattended extension is next used (goes off-hook and back on-hook).
The callback signal is two double rings, and a callback notification on the LCD.
Several parties may activate the callback feature on the same extension, line or line route. Callers receive callbacks in the order in which they requested them.
FUNCTION FUNCTION
F1 or
✻ 9 1
x x
Convenience Features
To activate
1. Press the Function key and then dial 76. or
-Press the designated feature key.
To cancel
1. Press the Function key and then dial 76. or
-Press the designated feature key.
1. Mute
The Mute feature disables the handset transmitter and the speaker microphone. Use the mute feature to permit a private conversation while on a call.
If you have a feature key preprogrammed as a Mute key, the light will be lit while your keyset is muted.
The Mute feature is useful if you work in noisy environments when back-ground noise becomes amplified over the transmitter or microphone and impedes communications from the distant end.
FUNCTION
7 6
FUNCTION
7 6
chapter
six
5 / Paging and Messaging
Remove your message from display 1. Keyset idle or in use.
2. Press the Function key and then dial 90.
Deleting your message 1. Keyset idle or in use.
2. Press the Function key and then dial 90. 3. Press soft key F2 below the word “next” until
your private message is displayed. 4. Press soft key F3 below the word “chg.” 5. Type in a new personal message.
or
Leave blank to erase former message. 6. Press soft key F2 below the word “save.” 7. Press the Clear key to exit.
FUNCTION
9 0
9 0
FUNCTION
CLEAR
F2
F2 F3
3 / Making Calls
Responding to a Callback
To activate
1. Your extension rings. LCD alerts you to the extension callback.
2. Press soft key F2 below the word “reply.” or
-Lift handset or press Speaker key. 3. The call rings through to the extension.
To cancel
1. Press soft key F3 below the word “del.” 2. Receive confirmation tone.
F2
3 / Making Calls
To activate
1. Keyset is in idle state.
2. Call extension number. Receive busy tone. 3. Press soft key F3 below the word “next.” 4. Press soft key F1 below the word “camp.” 5. Background music plays until the called
exten-sion hangs up.
6. The call rings through. To cancel
1. Hang up while waiting for the extension. or
-Press the Clear key while ringing. To activate on a busy line 1. Dial the outside line number.
or
-Dial the line route number. 2. Receive busy tone.
3. Press soft key F1 below the word "camp." To respond
1. Extension rings. LCD displays the line. 2. Lift handset and dial your telephone number. To cancel on a busy line
1. Press the Function key and dial * 93. 2. Receive confirmation tone.
8. Camp On
When you call a busy extension, you can use the Camp On feature which allows you to remain off-hook, until the busy extension becomes available. You will hear music on hold while waiting if your system is equipped with a music source.
Only one extension can camp on to another at any one time. If you receive a "Camp On Failure" message on your keyset's LCD and hear a warning tone, another extension user has already camped on to the busy extension. Use the Callback feature, which will alert you when the line becomes free.
The Camp On feature also alerts you when busy lines become available. After you Camp On, hang up and the extension rings when the line is available. Camp On is a useful feature for urgent calls. If two parties are competing for the same busy extension, Camp On overrides Callback even if the Callback feature was activated first.
F3 F1
CLEAR
x x
F1
FUNCTION ✻ 9 3
5 / Paging and Messaging
Individual Premises Message
Creating your message 1. Keyset is idle.
2. Press the Function key and then dial 90. or
-Press the designated feature key.
3. Press soft key F2 below the word “next” until message 7 "Empty" is displayed.
4. Press soft key F3 below the word “chg.” 5. Using the dialpad enter the message you wish
(maximum 16 characters).
6. Press soft key F2 below the word "save." 7. Press soft key F1 below the word "store" to
display on the LCD.
4. Creating Personal Messages
The seventh Premises message is personal to your keyset. You can program and reprogram them as you wish. Each message is saved until you save another in its place.Use the table below as a guide to entering different letters.
Times to --- Key Pad Number
---Press 1 2 3 4 5 6 7 8 9 0 #
One , A D G J M P T W Q space Two - B E H K N R U X Z space Three & C F I L O S V Y . space Four 1 2 3 4 5 6 7 8 9 0 space
F3
F1 F2
F2
FUNCTION
5 / Paging and Messaging
Leaving a Premises Message
1. Keyset is idle.
2. Press the Function key and then dial 90. or
-Press the designated feature key.
3. Press soft key F2 below the word “next” to view other selections.
4. Press soft key F1 below the word “store” when your choice is displayed.
5. Receive confirmation tone.
Deleting a Premises Message
1. Press the Function key and then dial ✻ 90. or
-Press the designated feature key. 2. Receive confirmation tone.
3. Premises Messages
A Premises Message is a text message that you can display on your keyset LCD, and which will also appear on the LCD of any internal caller calling you from a display keyset.
When you use the premises message feature in conjunction with Do Not Disturb, the premises message will be displayed on the calling keyset's LCD. You may choose from seven messages. The first six are available system-wide, and can only be changed by your system administrator. However, the seventh message is specific to your keyset, and you can individually program and change it as often as you wish. You can program and reprogram them as you wish. Each message is saved until you save another in its place.
Note: Setting a Premises Message will cause your telephone to ring for inter-com calls.
FUNCTION 9
✻ 9 0 0
FUNCTION
F1
F2
System Hold
Placing a line call on system hold 1. Keyset in use on an active call. 2. Press the Hold key.
Retrieve
1. Press held outside line key (flashing green).
1. Hold
You can place a line call on hold and any extension keyset can retrieve the call. Protegé® 616 offers two methods for placing a call on hold. The first, System Hold, places intercom or line calls on hold by pressing the Hold key. The sec-ond method called Exclusive Hold places line calls on hold and it can only be retrieved by the extension placing it on hold. At other extensions the held line still appears busy. This prevents any other extension from inadvertently picking up that call and gives you a certain level of privacy on line calls. Calls placed on Exclusive Hold can be retrieved from a different extension after the Exclusive Hold timer expires. After expiration, the call reverts to System Hold status.
You can place several different calls on both types of hold. Calls are retrieved in the order in which they were placed on hold; the first call held is the first one retrieved.
The Protegé® 616 phone system generates a periodic tone over your keyset's speaker to remind you of a call you have placed on hold.
If you enable Automatic Hold on your keyset you can switch between calls, automatically placing the first call on System Hold. This method shortens the transfer process by allowing you to transfer an active line call to another exten-sion via a preprogrammed DSS key without first pressing the Hold key.
HOLD chapter
4 / Call Handling
Exclusive Hold
To place a line call on exclusive hold 1. Keyset in use on an active call.
2. Press the Function key followed by the Hold key.
To retrieve
1. Press the held outside line key (flashing green).
Holding an Intercom Call
1. Keyset is on an active call. 2. Press the Hold key. To retrieve
1. Hang up, and return to idle state. 2. Pick up the handset.
or
-Press the Speaker key.
Automatic Hold
To activate 1. Keyset is idle.
2. Press the Function key and then dial 94. 3. Receive confirmation tone.
To cancel 1. Keyset is idle.
2. Press the Function key and then dial 94. 3. Receive confirmation tone.
9 4
FUNCTION HOLD
HOLD
FUNCTION
9 4
FUNCTION
5 / Paging and Messaging
Leaving a Message at Another
Display Phone
Method 1 To activate
1. Dial the target extension number. 2. Press soft key F2 below the word “msg.” 3. Receive confirmation tone.
Method 2
1. Press the Function key and then dial 96. 2. Dial the target extension number. 3. Receive confirmation tone.
Deleting Messages
1. Press the Function key and then dial * 96 and the extension number
or
Press the Function key and dial * 96 * for all messages.
2. Dial the target extension number. 3. Receive confirmation tone.
Deleting Messages Left by
Other Extensions
1. Press soft key F3 below the word "del." 2. Receive confirmation tone.
2. Message Waiting
You can send a message to another extension when you get no answer or the extension is busy. A Call Me message leaves a "message waiting" indication for the called party indicating that a caller from a specified extension was trying to reach them. Recipients with display phones who have Call Me messages can respond by simply pressing a soft key.
Note:If you call an extension that has Voice Call allowed, press * to change to voice to ring interchange. Once you hear ring back, leave a message or call-back.
F2
x x
FUNCTION
9 6
F3
✻ 9 6 FUNCTION
5 / Paging and Messaging
Answer a Page
1. Press the Function key and then dial 59. or
-Press the designated feature key.
2. You are immediately connected to the exten-sion initiating the page.
Paging Receive Selection
To accept paging
1. Press the Function key and then dial #9.
To reject paging
1. Press the Function key and then dial #9. FUNCTION
5 9
FUNCTION
# 9
FUNCTION
# 9
4 / Call Handling
Transferring an Active Call - Method 1 1. Press the Xfr/Conf key.
2. Dial the destination extension. 3. Hang up to perform a blind transfer.
or
-Screen the transfer and then hang up. To cancel the transfer
1. Press the Xfr/Conf key.
Transferring an Active Call - Method 2 1. Press the Hold key.
2. Dial the extension number to which you wish to transfer the call.
or
-Press a designated DSS key.
3. Press the Xfr/Conf key for a blind transfer. or
-Wait for a response, announce the call, then press the Xfr/Conf key for a screened transfer.
2. Transferring Calls
There are two types of transfers. One, called a blind transfer, does not announce to the target any information prior to redirecting a call. The other, called a screened transfer, notifies the target extension about the call prior to redirecting it.
All transfers recall to your keyset automatically if they are unanswered. Perform a blind transfer when you do not wish to notify the target extension or extension group member prior to redirecting a call. A screened transfer is when you notify the target extension or extension group member prior to redirecting the call.
If you want confirmation that the transfer was successful, enable the Transfer Beep feature. Your phone will ring once when the call was successfully trans-ferred.
The Call Park feature, which is used with line calls only, offers you a way to park a call so another extension user can pick it up. The transferred call is placed on system hold. Calls can be parked on a valid extension number.
XFR/CONF
x x
XFR/CONF
x x