Mac OS X Server
Java Application
Server Administration
Mac OS X Server Java Application
Server Administration
For Version 10.3 or Later
Apple Computer, Inc. © 2003 Apple Computer, Inc. All rights reserved.
No part of this publication may be reproduced, stored in a retrieval system, or transmitted, in any form or by any means, mechanical, electronic, photocopying, recording, or otherwise, without prior written permission of Apple Computer, Inc., with the following exceptions: Any person is hereby authorized to store documentation on a single computer for personal use only and to print copies of documentation for personal use provided that the documentation contains Apple’s copyright notice. The Apple logo is a trademark of Apple Computer, Inc.
Use of the “keyboard” Apple logo (Option-Shift-K) for commercial purposes without the prior written consent of Apple may constitute trademark infringement and unfair competition in violation of federal and state laws.
No licenses, express or implied, are granted with respect to any of the technology described in this book. Apple retains all intellectual property rights associated with the technology described in this book. This book is intended to assist application developers to develop applications only for Apple-labeled or
Apple-licensed computers.
Every effort has been made to ensure that the information in this document is accurate. Apple is not responsible for typographical errors.
Apple Computer, Inc. 1 Infinite Loop Cupertino, CA 95014 408-996-1010
trademarks or registered trademarks of Sun Microsystems, Inc. in the U.S. and other countries.
Simultaneously published in the United States and Canada. Even though Apple has reviewed this manual, APPLE MAKES NO
WARRANTY OR REPRESENTATION, EITHER EXPRESS OR IMPLIED, WITH RESPECT TO THIS MANUAL, ITS QUALITY, ACCURACY,
MERCHANTABILITY, OR FITNESS FOR A PARTICULAR PURPOSE. AS A RESULT, THIS MANUAL IS SOLD “AS IS,” AND YOU, THE PURCHASER, ARE ASSUMING THE ENTIRE RISK AS TO ITS QUALITY AND ACCURACY.
IN NO EVENT WILL APPLE BE LIABLE FOR DIRECT, INDIRECT, SPECIAL, INCIDENTAL, OR CONSEQUENTIAL DAMAGES RESULTING FROM ANY DEFECT OR INACCURACY IN THIS MANUAL, even if advised of the possibility of such damages.
THE WARRANTY AND REMEDIES SET FORTH ABOVE ARE EXCLUSIVE AND IN LIEU OF ALL OTHERS, ORAL OR WRITTEN, EXPRESS OR IMPLIED. No Apple dealer, agent, or employee is authorized to make any modification, extension, or addition to this warranty.
Contents
Figures and Tables 7
Chapter 1
Introduction to Java Application Server Administration
9Chapter 2
Application Server Overview
11JBoss in Mac OS X Server 12
Three Deployment Configurations 13
Chapter 3
Configuring Applications
15Starting the Application Server 15
Configuring Your Application 18
Starting the JBoss Deployment Tool 18
Loading Your Application 18
Configuring Your Application’s Components 22
Saving a Configured Application 24
Deploying Your Application 25
Chapter 4
Configuring and Deploying Sun’s Pet Store
27Set Up the Environment 27
Configure the Pet Store Enterprise Application 29
Open the petstore.ear File in the Deployment Tool 29
Configure Application-Wide Settings 31
C O N T E N T S
Configure Module-Wide Settings 32
Configure the Account Enterprise Bean 35
Configure the Address Enterprise Bean 36
Configure the ContactInfo Enterprise Bean 36
Configure the CreditCard Enterprise Bean 36
Configure the Customer Enterprise Bean 37
Configure the Profile Enterprise Bean 37
Configure the PetStore Web Application 37
Configure the SignOn Module 38
Configure the User Enterprise Bean 38
Configure the Counter Enterprise Bean 39
Save the Application 39
Configure the Supplier Enterprise Application 39
Open the supplier.ear file in the Deployment Tool 40
Configure Application-Wide Settings 40
Configure the Supplier Module 40
Configure the Module Settings 40
Configure the Inventory Enterprise Bean 41
Configure the OrderFulfillmentFacade Enterprise Bean 41
Configure the SupplierOrder Message-Driven Bean 41
Configure the SupplierPurchaseOrder Module 42
Configure the Module Settings 42
Configure the Address Enterprise Bean 42
Configure the ContactInfo Enterprise Bean 43
Configure the LineItem Enterprise Bean 43
Configure the SupplierOrder Enterprise Bean 44
Configure the Supplier Web Application Module 44
Save the Application 44
C O N T E N T S
Starting and Stopping Services 57
Creating a Data Source 58
Creating a Topic or a Queue 59
Deploying Applications 59
Chapter 6
Balancing User Load and Replicating Sessions
61Distributable Applications 61
Load Balancing and Clustering 63
Enable Load Balancing in the Web Server 63
Enable Load Balancing in the Application Servers 66
Test the Configuration 67
Appendix A
Document Revision History
69Glossary
71Figures and Tables
Chapter 3
Configuring Applications
15Figure 3-1 The Load Application window of the deployment tool 19
Figure 3-2 The Loaded Application window 20
Figure 3-3 The deployment-tool main window 21
Figure 3-4 The Quick Config pane of a component’s configuration window 23
Figure 3-5 A module-settings window 24
Figure 3-6 The Save Application window of the deployment tool 25
Chapter 4
Configuring and Deploying Sun’s Pet Store
27Table 4-1 Relationship information for the Customer module 34
Chapter 5
Administering Application Servers
47Figure 5-1 The Configuration window of the management tool 52
Figure 5-2 The JBoss Management Console window 52
Figure 5-3 The JBoss Management Console window showing the Security Configuration pane of the log-in configuration service 53
Figure 5-4 The JBoss Management Console window showing the Statistics pane of the Pet Store ShoppingCart enterprise bean 54
Figure 5-5 The JBoss Management Console window showing one of the configuration panes for the JMS Directory Service 56
Figure 5-6 The JBoss Management Console window showing the statistics of the Deploy Service 57
F I G U R E S A N D T A B L E S
Chapter 6
Balancing User Load and Replicating Sessions
61Figure 6-1 The WebApp window of the petstore.ear archive 62
Figure 6-2 The workers.properties file in /etc/httpd 65
Appendix A
Document Revision History
69C H A P T E R 1
1
Introduction to Java Application
Server Administration
JBoss is a powerful Java-based open-source application server that is very popular among Java 2, Enterprise Edition (J2EE) application developers. This document describes how to configure and use the JBoss application server in Mac OS X Server, which lets you deploy J2EE applications easily and reliably.
This document is intended for system administrators, J2EE application assemblers, and developers. It assumes you have a solid background in system administration and J2EE technology. You must be familiar with Mac OS X Server, especially how to use Terminal to issue shell commands. Knowledge of database engines, such as MySQL, is helpful but not required.
This document has the following chapters:
■ “Application Server Overview” (page 11) provides an overview of JBoss for Mac
OS X Server.
■ “Configuring Applications” (page 15) explains how to perform certain tasks
with the deployment tool, such as opening, configuring, and saving application archives.
■ “Configuring and Deploying Sun’s Pet Store” (page 27) walks you through
configuring and deploying Sun’s Pet Store application in Mac OS X Server.
■ “Administering Application Servers” (page 47) teaches you how to manage
application servers, which are JBoss instances running on one or more computers.
■ “Balancing User Load and Replicating Sessions” (page 61) explains how to
enable an application to be distributable among cluster nodes and walks you through configuring HTTP load balancing for Pet Store using three computers.
C H A P T E R 1
Introduction to Java Application Server Administration
To use this document to its fullest, you should download its companion files, which are packaged in Application_Server_companion.zip, located in the same webpage
from which you obtained this document.
C H A P T E R 2
2
Application Server Overview
JBoss is an open-source highly popular Java-based application server. Based on the Java 2, Enterprise Edition (J2EE) platform, JBoss provides an affordable delivery system for enterprise applications. Applications that follow the J2EE standard can be deployed on other application servers, such as WebLogic, WebSphere, and JRun, with little or no modification. JBoss provides many useful features in addition those defined in the J2EE standard, including support for clustering, session replication, mail, and security.
Mac OS X Server includes two easy-to-use, HTML-based tools that facilitate the configuration of J2EE applications for deployment: The deployment tool and the management tool. The deployment tool allows you to open application or
component archives (EAR files, WAR files, JAR files, SAR files, and so on) without having to manually decompress the archives. The application lets you view or change the values of settings specified in the META-INF and WEB-INF directories of the
archives. See “Configuring Applications” (page 15) for more information.
The management tool allows you to manage application servers (JBoss instances) running on one or more computers. This application lets you start and stop services provided by individual application servers, configure services, and create data sources, queues, and topics. See “Administering Application Servers” (page 47) for details.
C H A P T E R 2
Application Server Overview
JBoss in Mac OS X Server
Mac OS X Server version 10.3 includes JBoss version 3.2.2RC2. To provide a high level of availability, Mac OS X Server includes a “watchdog” process that ensures that the application server is always running (if you turn on the application server in Server Admin). If the application server freezes or crashes, the daemon restarts it automatically.
In addition, Mac OS X Server offers load balancing and session failover through Apache and JBoss:
■ Apache, coupled with the mod_jk plug-in, provides HTTP load balancing with
session affinity (sticky sessions) and connects to JBoss instances through AJP connectors.
■ JBoss offers session failover through HTTP session state replication in the cluster
configuration.
■ JBoss also provides load balancing for enterprise beans, including failover for
stateful session beans, and support for session affinity.
In Mac OS X Server, JBoss is configured to use Tomcat (using the AJP connector) as its web server and servlet container. In addition, HTTP and HTTPS (through port
8443) are enabled by default.
You can manage the application server from the Server Admin application. This provides you with a simple way to start, stop, and monitor the application server. You can use the command line, if you prefer.
C H A P T E R 2
Application Server Overview
the database engine that meets your needs and not the one the developer used while developing the application. For details on the deployment tool, see “Configuring Applications” (page 15).
The management tool lets you administer the local (running on the computer you are logged in to) application server, and monitor local and remote (running on a computer in the local network) application servers. As part of administering an application server, you may start and stop services, configure services, deploy applications, and add data sources, queues, and topics. When monitoring an application server, the management tool lets you access the statistics provided by the resources and services running on it. For example, a service may indicate its name, its purpose, and when it was started. For more information on the management tool, see “Administering Application Servers” (page 47).
Three Deployment Configurations
In Mac OS X Server, all the JBoss configurable settings are set up for maximum J2EE compliance. There are three standard deployment configurations in JBoss for Mac OS X Server:
■ The development configuration offers increased logging and also consults
schema documents. As a result, an application is not deployed when the configuration files do not adhere to their respective schemas.
■ The standalone configuration is set up for high performance on a single server. ■ The cluster configuration is optimized for high performance on a cluster of
C H A P T E R 2
C H A P T E R 3
3
Configuring Applications
Before you can deploy an application on an application server, you have to start the application server and then configure or assemble the application. This is the process through which you specify data sources, database mappings, JNDI resources, and so on.
You configure J2EE applications by modifying XML files in META-INF and WEB-INF
directories in application archives. Performing this task manually is tedious and error prone. The JBoss deployment tool allows you to configure applications without having to unarchive EAR files, WAR files, or JAR files, as the tool lets you configure these files directly.
This chapter explains how to start the application server and configure and deploy your application.
Starting the Application Server
To configure an application using the deployment tool, you must connect to a running application server. Follow these steps to start the application server on a computer.
1. Launch Server Admin, located in /Applications/Server.
C H A P T E R 3
Configuring Applications
C H A P T E R 3
Configuring Applications
4. Click the Start Service toolbar button. After a few seconds the application server should be running. You can confirm that JBoss is running by accessing http:// localhost:8080 in your web browser. You should see a webpage titled Welcome
to JBoss/Tomcat.
You can also start JBoss in Terminal with the following command:
$ /Library/JBoss/3.2/bin/run.sh -c deploy-standalone
To get detailed information on JBoss activities, use the develop configuration. This
is useful when you need to make sure JBoss notices when you deploy or undeploy a module, or when you need to determine whether exceptions are thrown as JBoss starts a deployed application. The develop configuration produces a detailed log of
C H A P T E R 3
Configuring Applications
Configuring Your Application
The following sections teach you how to start the deployment tool and configure your application.
Starting the JBoss Deployment Tool
To start the deployment tool, double-click DeploymentTool.woa in /Library/JBoss/ Applications or enter the following command in Terminal:
$ /Library/JBoss/Applications/DeploymentTool.woa/DeploymentTool
After a moment, the Load Application window appears.
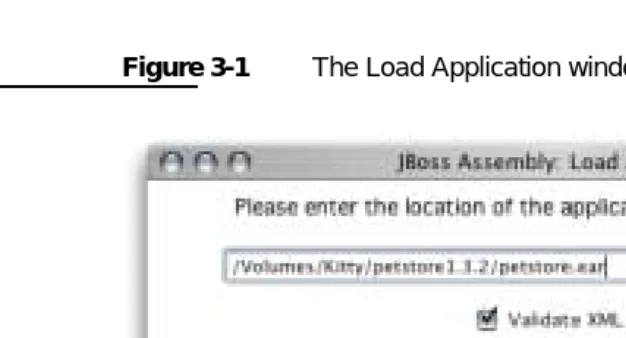
Loading Your Application
The Load Application window is where you specify the location of the application or component you want to configure. Although the window is titled Load
Application, you can also use the deployment tool to configure EAR files, WAR files, and JAR files.
Figure 3-1 shows the Load Application window.
C H A P T E R 3
Configuring Applications
Figure 3-1 The Load Application window of the deployment tool
1. Enter the full path to the file in the text field in the Load Application window, and click Load Application.
Normally, you cannot save an application with invalid XML files. That is, you have to configure all the elements that show up in red in the main window. You can override this by deselecting Validate XML Files in the Load Application window. However, you may not be able to reload an application that has been saved in this state.
After the deployment tool loads the application, it displays the Loaded Application window, shown in Figure 3-2.
C H A P T E R 3
Configuring Applications
Figure 3-2 The Loaded Application window
2. Click “Click here to continue” to move on.
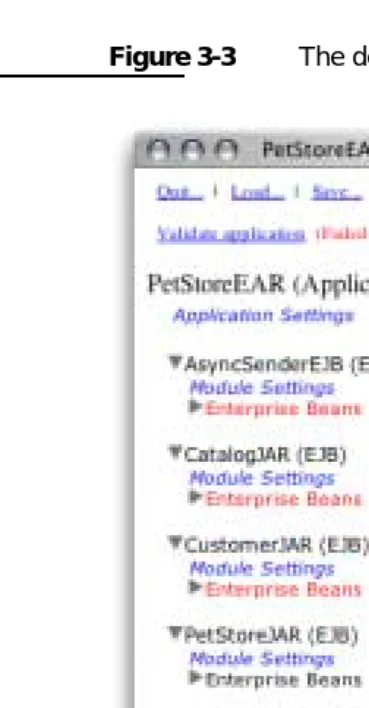
The deployment tool displays the main window (also known as the navigation window). The main window presents a hierarchy of components generated from the XML files present in the META-INF and WEB-INF directories of the
components contained in the archive you opened. For example, Figure 3-3 shows the components present in the petstore.ear file of Sun Microsystem’s Pet
Store application. You must configure the items in red to save the application.
C H A P T E R 3
Configuring Applications
Figure 3-3 The deployment-tool main window
Figure 3-3 shows the components of the petstore.ear archive. The following list
describes some of the items in the main window:
■ PetStoreEAR (Application) Represents the Pet Store enterprise-application
archive.
■ Application Settings Clicking this link allows you to configure settings that
C H A P T E R 3
Configuring Applications
■ AsyncSenderEJB (EJB) Represents the archive (JAR file) that contains the files
that define the AsyncSender enterprise bean (the asyncsender-ejb.jar file).
Clicking the Module Settings link lets you configure module-wide settings and set default values for some settings for all the enterprise beans defined in the module. See “Configure the Customer Module” (page 32) for an example.
■ PetStoreWAR (WebApp) Represents the archive (WAR file) that contains the
files that define the web module of the Pet Store enterprise application.
Configuring Your Application’s Components
C H A P T E R 3
Configuring Applications
Figure 3-4 The Quick Config pane of a component’s configuration window
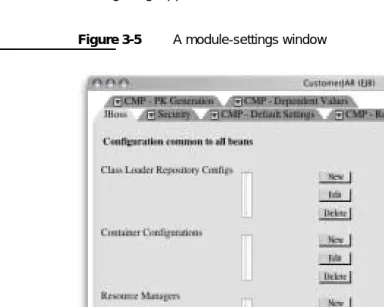
Some settings apply to an entire module, for example, security roles. In addition, some module settings serve as defaults for settings of individual components in the module. Figure 3-5 shows some of the module settings of the CustomerJAR module of the petstore.ear application. Configuring modules settings can help to speed up
the configuration of a module. See “Configure Module-Wide Settings” (page 32) for an example.
C H A P T E R 3
Configuring Applications
Figure 3-5 A module-settings window
After configuring the elements in a pane, you click Update to confirm the changes. Keep in mind that the changes are not saved until you save the application.
C H A P T E R 3
Configuring Applications
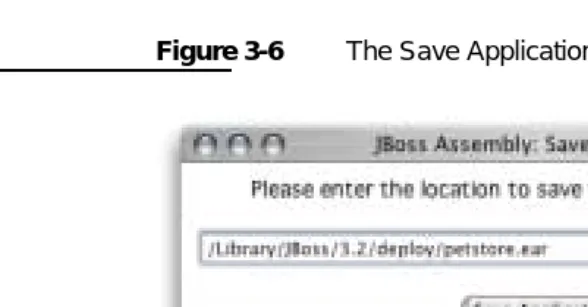
Figure 3-6 The Save Application window of the deployment tool
Enter the destination of the configured application in the text field of the Save Application window, and click Save Application.
Deploying Your Application
C H A P T E R 3
C H A P T E R 4
4
Configuring and Deploying Sun’s
Pet Store
Pet Store is a sample J2EE application from Sun Microsystems. Pet Store showcases the power and flexibility of the J2EE platform. This chapter provides a tutorial on the configuration of Sun’s Pet Store for deployment in Mac OS X Server.
Sun’s Pet Store is comprised of several applications. This tutorial uses the Pet Store enterprise application and the Supplier enterprise application.
In this tutorial you obtain the Pet Store files from Sun, prepare your Mac OS X Server system for a Pet Store deployment, and configure the Pet Store and Supplier applications for deployment on JBoss.
See http://developer.java.sun.com/developer/releases/petstore for more information on Sun’s Pet Store application.
Set Up the Environment
Before you can configure an enterprise application for deployment in Mac OS X Server, make sure that you have all the files you need. Then create any necessary tables in your database, and ensure that the appropriate processes are running:
Note: The companion files of this document include configured Pet Store archives that are ready for deployment using MySQL as the database engine. They’re at Application_Server_companion/Configured_Pet_Store_archives. You
need to perform only the steps listed in “Set Up the Environment” (page 27) and
C H A P T E R 4
Configuring and Deploying Sun’s Pet Store
1. Get Pet Store from Sun.
Download the Pet Store enterprise application from http://
developer.java.sun.com/developer/releases/petstore, and place the
petstore1.3.2 directory in your home directory. (Pet Store 1.3.2 is also included
as part of this document’s companion files.)
2. Configure MySQL:
a. Launch MySQL Manager, located in /Applications/Server.
b. Click the lock button, and authenticate as the system administrator.
c. Click Install and then click Start.
d. Quit MySQL Manager.
3. Create the Pet Store Tables:
a. In Terminal, run the mysql command-line tool.
b. Enter use test and press Return.
c. Copy the text in Application_Server_companion/Pet_Store_resources/ create_tables_sql.txt (in this document’s companion files) to the
Clipboard, and paste its contents into the mysql command-line tool.
d. Enter quit and press Return.
4. Deploy the petstore-destinations-service.xml file.
To prepare JBoss for running Pet Store, copy the Application_Server_companion/ Pet_Store_resources/petstore-destinations-service.xml file included in this
document’s companion files to /Library/JBoss/3.2/deploy.
5. Start the application server.
C H A P T E R 4
Configuring and Deploying Sun’s Pet Store
Configure the Pet Store Enterprise Application
This section guides you through the steps required to configure the petstore.ear
file so that it can be deployed in Mac OS X Server. This process involves specifying the data source that enterprise beans use to obtain a connection to the database, mapping the enterprise beans’ CMP fields to table columns, defining relationships among enterprise beans, and so on.
Open the petstore.ear File in the Deployment Tool
1. Launch the JBoss deployment tool. (See “Starting the JBoss Deployment Tool”
(page 18) for details.)
2. In the Load Application window, enter the full path to the petstore.ear file in
the text field, and click Load Application.
3. Click “Click here to continue.”
4. In the PetStoreEAR (Application) window (also known as the main window or the navigation window), click Connect.
C H A P T E R 4
C H A P T E R 4
Configuring and Deploying Sun’s Pet Store
Configure Application-Wide Settings
In this section you configure the settings that affect all the modules in the
petstore.ear archive.
1. Under PetStoreEAR (Application), click Application Settings.
2. In the PetStoreEAR window, click the JBoss tab.
3. Set J2EE Compliant Class Loading to no, and click Update.
4. Close the window.
Configure the AsyncSender Enterprise Bean
1. Under AsyncSenderEJB (EJB), click Enterprise Beans. Then click AsyncSenderEJB.
2. In the AsyncSenderEJB window, select jms/QueueConnectionFactory in the JBoss
Resource Refs list, and click Edit.
3. From the Jndi Name pop-up menu, choose java:/ConnectionFactory , and click
C H A P T E R 4
Configuring and Deploying Sun’s Pet Store
4. In the JBoss Resource Env Refs list, select jms/AsyncSenderQueue , and click Edit.
5. From the Jndi Name pop-up menu, choose /queue/supplier/ PurchaseOrderQueue, and click Update.
6. Click Update to finish configuring the AsyncSender enterprise bean, and close the window.
Configure the Catalog Enterprise Bean
1. Under CatalogJAR (EJB), click Enterprise Beans. Then click CatalogEJB.
2. In the JBoss Resource Refs list in the CatalogEJB window , select jdbc/CatalogDB,
and click Edit.
3. From the Jndi Name pop-up menu, choose java:MySqlDS , and click Update.
4. In the JBoss Resources Refs list in the CatalogEJB window, select url/ CatalogDAOSQLURL , and click Edit.
5. In the Resource URL text field, enter http://localhost:8080/petstore/ CatalogDAOSQL.xml, and click Update.
6. Click Update to finish configuring the Catalog enterprise bean, and close the window.
Configure the Customer Module
The following sections guide you through the configuration of the Customer module.
C H A P T E R 4
Configuring and Deploying Sun’s Pet Store
5. From the Entity Command Name pop-up menu, choose no-select-before-insert.
C H A P T E R 4
Configuring and Deploying Sun’s Pet Store
7. In the Unknown Pk Class text field, enter java.lang.Long.
8. In the Field Name text field, enter pk.
9. In the Column Name text field, enter pk.
10. Set Auto Increment to yes.
11. Click the CMP - Relationships tab.
12. Configure the relationships.
C H A P T E R 4
Configuring and Deploying Sun’s Pet Store
Perform the following steps to configure each relationship listed in Table 4-1.
a. In the Ejb Relations list, select the relationship to configure, and click Edit.
b. In the Relationship Roles list, click the corresponding relationship role.
c. Click New next to the Key Fields list.
d. In the Field Name text field, enter pk.
e. From the Column Name pop-up menu, choose the name of the appropriate column, and click Update.
f. Click Update to finish configuring the relationship role.
g. Click Update to finish configuring the relationship.
13. Click Update to finish configuring the Customer module settings, and close the window.
Configure the Account Enterprise Bean
1. Under CustomerJAR (EJB), click Enterprise Beans. Then click AccountEJB.
2. From the Table Name pop-up menu in the AccountEJB window, choose
PS_Account.
3. Map the CMP fields to the appropriate column names by selecting the field in the Cmp Fields list, clicking Edit, choosing the corresponding column name from the Column Name list, and clicking Update.
4. Click the CMP - Mapping tab. From the Entity Command Name pop-up menu, choose mysql-get-generated-keys.
5. Click Update to finish configuring the Account enterprise bean, and close the CustomerEJB-ProfileEJB Relationship ProfileEJB profile_fk
AccountEJB-ContactInfoEJB Relationship ContactInfoEJB contactInfo_fk
AccountEJB-CreditCardEJB Relationship CreditCardEJB creditCard_fk
Table 4-1 Relationship information for the Customer module
C H A P T E R 4
Configuring and Deploying Sun’s Pet Store
Configure the Address Enterprise Bean
1. Under Enterprise Beans under CustomerJAR (EJB), click AddressEJB.
2. From the Table Name pop-up menu in the AddressEJB window, choose
PS_Address.
3. Map the CMP fields to the appropriate column names by selecting the field in the Cmp Fields list, clicking Edit, choosing the corresponding column name from the Column Name list, and clicking Update.
4. Click the CMP - Mapping tab. From the Entity Command Name pop-up menu, choose mysql-get-generated-keys.
5. Click Update to finish configuring the Address enterprise bean, and close the window.
Configure the ContactInfo Enterprise Bean
1. Under Enterprise Beans under CustomerJAR (EJB), click ContactInfoEJB.
2. From the Table Name pop-up menu in the ContactInfoEJB window, choose
PS_ContactInfo.
3. Map the CMP fields to the appropriate column names by selecting the field in the Cmp Fields list, clicking Edit, choosing the corresponding column name from the Column Name list, and clicking Update.
4. Click the CMP - Mapping tab. From the Entity Command Name pop-up menu, choose mysql-get-generated-keys.
5. Click Update to finish configuring the ContactInfo enterprise bean, and close the window.
C H A P T E R 4
Configuring and Deploying Sun’s Pet Store
4. Click the CMP - Mapping tab. From the Entity Command Name pop-up menu, choose mysql-get-generated-keys.
5. Click Update to finish configuring the CreditCard enterprise bean, and close the window.
Configure the Customer Enterprise Bean
1. Under Enterprise Beans under CustomerJAR (EJB), click CustomerEJB.
2. From the Table Name pop-up menu in the CustomerEJB window, choose
PS_Customer.
3. Map the CMP fields to the appropriate column names by selecting the field in the Cmp Fields list, clicking Edit, choosing the corresponding column name from the Column Name list, and clicking Update.
4. Click Update to finish configuring the Customer enterprise bean, and close the window.
Configure the Profile Enterprise Bean
1. Under Enterprise Beans under CustomerJAR (EJB), click ProfileEJB.
2. From the Table Name pop-up menu in the ProfileEJB window, choose
PS_Profile.
3. Map the CMP fields to the appropriate column names by selecting the field in the Cmp Fields list, clicking Edit, choosing the corresponding column name from the Column Name list, and clicking Update.
4. Click the CMP - Mapping tab. From the Entity Command Name pop-up menu, choose mysql-get-generated-keys.
5. Click Update to finish configuring the Profile enterprise bean, and close the window.
Configure the PetStore Web Application
C H A P T E R 4
Configuring and Deploying Sun’s Pet Store
3. From the Jndi Name pop-up menu, choose java:/MySqlDS, and click Update.
4. In the JBoss Resource Refs list, select url/CatalogDAOSQLURL, and click Edit.
5. In the Resource URL text field, enter http://localhost:8080/petstore/ CatalogDAOSQL.xml, and click Update.
6. Click Update to finish configuring the PetStore web application, and close the window.
Configure the SignOn Module
1. Under SignOnJAR (EJB), click Module Settings.
2. In the SignOnJAR window, click the CMP - Default Settings tab.
3. From the Entity Command Name pop-up menu, choose no-select-before-insert, and click Update.
4. Close the window.
Configure the User Enterprise Bean
1. Under Enterprise Beans under SignOnJAR (EJB), click UserEJB.
2. From the Datasource pop-up menu in the UserEJB window, choose MySQL 4.0.14 (java:/MySqlDS).
3. From the Datasource Mapping pop-up menu, choose mySql.
4. From the Table Name pop-up menu, choose PS_User.
C H A P T E R 4
Configuring and Deploying Sun’s Pet Store
Configure the Counter Enterprise Bean
1. Under UniqueIdGeneratorJAR (EJB), click Enterprise Beans. Then click CounterEJB.
2. From the Datasource pop-up menu in the CounterEJB window, choose MySQL 4.0.14 (java:/MySqlDS).
3. From the Datasource Mapping pop-up menu, choose mySql.
4. From the Table Name pop-up menu, choose PS_Counter.
5. Map the CMP fields to the appropriate column names by selecting the field in the Cmp Fields list, clicking Edit, choosing the corresponding column name from the Column Name list, and clicking Update.
6. Click Update to finish configuring the Counter enterprise bean, and close the window.
Save the Application
To save the configured PetStore application, click Save in the navigation window and choose a location for it:
1. Using the Finder or Terminal, create a directory under /Library named
Configured_Apps.
2. In the main window, click Save.
3. In the text field in the Save Application window, enter /Library/ Configured_Apps/petstore.ear, and click Save Application.
4. Close the window.
Configure the Supplier Enterprise Application
C H A P T E R 4
Configuring and Deploying Sun’s Pet Store
Open the supplier.ear file in the Deployment Tool
1. In the PetStoreEAR window, click Load.
2. In the text field in the Load Application window, enter the path to the
supplier.ear file, and click Load Application or press Return.
3. In the navigation window, click Connect.
4. If the Connect to Server window indicates that you’re not connected to the application server, click Connect to Server.
5. Close the Connect to Server window.
Configure Application-Wide Settings
1. Under SupplierEAR (Application), click Application Settings.
2. In the SupplierEAR window, click the JBoss tab.
3. Set J2EE Compliant Class Loading to no, and click Update.
4. Close the window.
Configure the Supplier Module
The following sections explain how to configure the SupplierJAR module.
Configure the Module Settings
1. Under SupplierJAR (EJB), click Module Settings.
C H A P T E R 4
Configuring and Deploying Sun’s Pet Store
Configure the Inventory Enterprise Bean
1. Under SupplierJAR (EJB), click Enterprise Beans. Then click InventoryEJB.
2. From the Table Name pop-up menu, choose SUPP_Inventory.
3. Map the CMP fields to the appropriate column names by selecting the field in the Cmp Fields list, clicking Edit, choosing the corresponding column name from the Column Name list, and clicking Update.
4. Click Update to finish configuring the Inventory enterprise bean, and close the window.
Configure the OrderFulfillmentFacade Enterprise Bean
1. Under Enterprise Beans under SupplierJAR (EJB), click OrderFulfillmentFacade.
2. In the JBoss Resource Refs list in the OrderFulfillmentFacadeEJB window, select
url/EntityCatalogURL, and click Edit.
3. In the Res URL text field, enter http://localhost:8080/opc/EntityCatalog.jsp,
and click Update.
4. Click Update to finish configuring the OrderFulfillmentFacade enterprise bean, and close the window.
Configure the SupplierOrder Message-Driven Bean
1. Under Enterprise Beans under SupplierJAR (EJB), click SupplierOrderMDB.
2. In the JBoss Resource Refs list, select jms/QueueConnectionFactory, and click
Edit.
3. From the Jndi Name pop-up menu, choose /ConnectionFactory, and click
Update.
4. In the JBoss Resource Refs list, select jms/TopicConnectionFactory, and click
Edit.
5. From the Jndi Name pop-up menu, choose /ConnectionFactory, and click
Update.
C H A P T E R 4
Configuring and Deploying Sun’s Pet Store
7. From the Jndi Name pop-up menu, choose /topic/opc/InvoiceTopic, and click
Update.
8. Click Update to finish configuring the SupplierOrder message-driven bean, and close the window.
Configure the SupplierPurchaseOrder Module
These sections explain how to configure the SupplierPurchaseOrderJAR module.
Configure the Module Settings
1. Under SupplierPurchaseOrderJAR (EJB), click Module Settings.
2. In the SupplierPurchaseOrderJAR window, click the CMP - Default Settings tab.
3. From the Datasource pop-up menu, choose MySQL 4.0.14 (java:/MySqlDS).
4. From the Datasource mapping pop-up menu, choose mySql.
5. From the Entity Command Name pop-up menu, choose no-select-before-insert.
6. Click the CMP - PK Generation tab.
7. In the Unknown Pk Class text field, enter java.lang.Long.
8. In the Field Name text field, Enter pk.
9. In the Column Name text field, enter pk.
10. Set Auto Increment to yes, and click Update.
C H A P T E R 4
Configuring and Deploying Sun’s Pet Store
3. Map the CMP fields to the appropriate column names by selecting the field in the Cmp Fields list, clicking Edit, choosing the corresponding column name from the Column Name list, and clicking Update.
4. Click the CMP - Mapping tab. From the Entity Command Name pop-up menu, choose mysql-get-generated-keys.
5. Click Update to finish configuring the Address enterprise bean, and close the AddressEJB window.
Configure the ContactInfo Enterprise Bean
1. Under Enterprise Beans under SupplierPurchaseOrderJAR (EJB), click ContactInfoEJB.
2. From the Table Name pop-up menu in the ContactInfoEJB window, choose
PS_ContactInfo.
3. Map the CMP fields to the appropriate column names by selecting the field in the Cmp Fields list, clicking Edit, choosing the corresponding column name from the Column Name list, and clicking Update.
4. Click the CMP - Mapping tab. From the Entity Command Name pop-up menu, choose mysql-get-generated-keys.
5. Click Update to finish configuring the ContactInfo enterprise bean, and close the window.
Configure the LineItem Enterprise Bean
1. Under Enterprise Beans under SupplierPurchaseOrderJAR (EJB), click LineItemEJB.
2. From the Table Name pop-up menu in the LineItemEJB window, choose
SUPP_LineItem.
3. Map the CMP fields to the appropriate column names by selecting the field in the Cmp Fields list, clicking Edit, choosing the corresponding column name from the Column Name list, and clicking Update.
C H A P T E R 4
Configuring and Deploying Sun’s Pet Store
5. Click Update to finish configuring the LineItem enterprise bean, and close the window.
Configure the SupplierOrder Enterprise Bean
1. Under Enterprise Beans under SupplierPurchaseOrderJAR (EJB), click SupplierOrderEJB.
2. From the Table Name pop-up menu in the SupplierOrderEJB window, choose
SUPP_SupplierOrder.
3. Map the CMP fields to the appropriate column names by selecting the field in the Cmp Fields list, clicking Edit, choosing the corresponding column name from the Column Name list, and clicking Update.
4. Click the CMP - Mapping tab. From the Entity Command Name pop-up menu, choose mysql-get-generated-keys.
5. Click Update to finish configuring the SupplierOrder enterprise bean, and close the window.
Configure the Supplier Web Application Module
1. Under SupplierWAR (WebApp), click Module Settings.
2. In the JBoss Resource Env Refs list, select jms/opc/InvoiceTopic, and click Edit.
3. From the Jndi Name pop-up menu, choose /topic/opc/InvoiceTopic, and click
Update.
4. In the JBoss Resource Refs list, select jms/TopicConnectionFactory, and click
Edit.
C H A P T E R 4
Configuring and Deploying Sun’s Pet Store
2. In the text field in the Save Application window, enter /Library/ Configured_Apps/supplier.ear, and click Save Application.
3. Close the window.
Deploy and Test the Application
To deploy Pet Store in Mac OS X Server, copy the configured files to /Library/ JBoss/3.2/deploy. (You can also use the management tool to deploy the application.
See “Deploying Applications” (page 59) for details.) After about a minute, open
http://localhost:8080/petstore in your web browser. You could also have saved
the EAR files directly to the JBoss deploy directory. However, it’s generally safer to
configure application files of undeployed archives.
Follow these steps to test Pet Store:
1. Open http://localhost:8080/petstore in a web-browser window.
2. Click the link that takes you to the store.
3. In the Welcome to the BluePrints Petstore webpage, click Birds.
4. In the Items webpage, click Amazon Parrot.
5. In the Product webpage, click Add to Cart.
6. In the Cart webpage, click Check Out.
7. In the Sign On webpage, click Sign In.
8. In the Enter Order Information webpage, click Submit.
If you get an error page during the test, make sure JBoss is running and recheck the configuration settings described in “Configure the Pet Store Enterprise
Application” (page 29) and “Configure the Supplier Enterprise Application”
C H A P T E R 4
C H A P T E R 5
5
Administering Application
Servers
Application-server management involves configuring the services available in an application server, turning services on and off, deploying applications, and monitoring application-server resources. This chapter teaches how to manage application servers, which are JBoss instances running on one or more computers.
Logging In to the Management Tool
Before you can log in to the management tool, the tool must be running. You can launch the management tool by executing the following command:
$ /Library/JBoss/Applications/JBossManagement.woa/JBossManagement
C H A P T E R 5
Administering Application Servers
Alternatively, you can click Manage JBoss in the Settings pane in the Server Admin window.
To log in to the management tool you must enter the user name and password of an administrator of your computer or a user who is a member of the appserveradm
group or the appserverusr group.
There are two types of users with the authority to use the management tool: administrator users (which are members of the appserveradm group) and monitor
users (which are members of the appserverusr group). The user defined while
configuring Mac OS X Server for the first time is added to the appserveradm group.
C H A P T E R 5
Administering Application Servers
$ sudo /usr/bin/dscl . -create Groups/appserverusr GroupMembership <user_ID>
You can also use NetInfo Manager to add users to the appserveradm and appserverusr groups:
1. Launch NetInfo Manager, located in /Applications/Utilities.
2. If the lock in the bottom-left corner of the window is locked, click it and authenticate yourself and the server’s administrator.
3. In the “/” column, select “groups.” Then select the appropriate group in the “groups” column.
4. In the Properties list, select “users” and choose Directory > New Value.
C H A P T E R 5
Administering Application Servers
C H A P T E R 5
Administering Application Servers
Choosing a Task
After logging in to the management tool, the Configuration window appears. This window lets you choose the kind of activity you want to perform with the
management tool. There are three activities to choose from:
■ Managing: Allows you to start and stop services, configure services, observe
resource statistics, create data sources, create topics or queues, and deploy applications.
■ Configuring: Lets you start and stop services, create data sources, create topics
or queues, and deploy applications.
■ Monitoring: Allows you to observe resource statistics of application servers.
Managing Application Servers
To manage an application server, enter the JNDI port of the application server you want to manage (by default, 1099) in the Configuration window (shown in Figure
C H A P T E R 5
Administering Application Servers
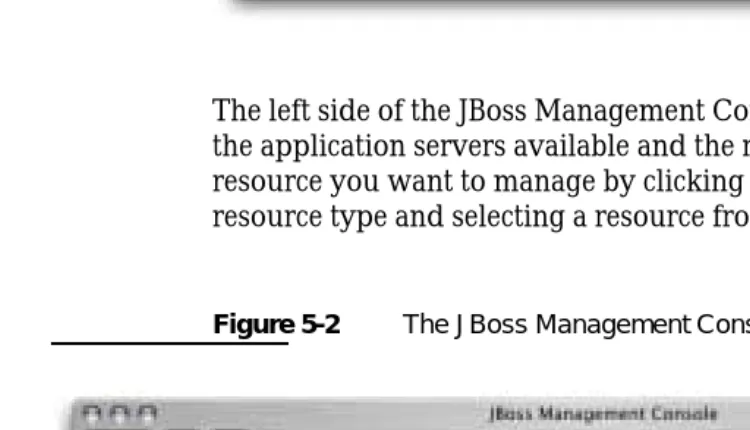
Figure 5-1 The Configuration window of the management tool
The left side of the JBoss Management Console window (shown in Figure 5-2) lists the application servers available and the resources they provide. You specify the resource you want to manage by clicking the triangle next to the appropriate resource type and selecting a resource from the list that appears.
C H A P T E R 5
Administering Application Servers
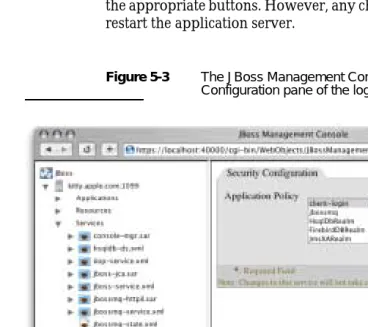
For example, to change an application server’s security configuration, click the triangle next to the Services resource group and select login-config.xml. After that,
the Security Configuration pane (shown in Figure 5-3) appears on the right side of the window, showing the application policy list, which you can modify by clicking the appropriate buttons. However, any changes you make take effect only after you restart the application server.
Figure 5-3 The JBoss Management Console window showing the Security Configuration pane of the log-in configuration service
C H A P T E R 5
Administering Application Servers
tool, choose to manage the application server from the Configuration window, and click local/ShoppingCartEJB under cart-ejb.jar under petstore.ear under the
Applications group in the application-server list, the JBoss Management Console window displays the Statistics pane with information on the performance of the ShoppingCart enterprise bean, as shown in Figure 5-4.
C H A P T E R 5
Administering Application Servers
When you’re done managing, click JBoss in the server list, and click Logout or Change Configuration.
Configuring Application Servers
To configure local application servers, choose the configuration you want to modify from the “Modify configuration” pop-up menu, and click “Modify configuration” in the Configuration page.
The JBoss Management Console window appears. This window allows you to select a service and change its configuration.
For example, to configure the transaction-connection factory service, select jms-ds.xml under services in the application-server list.
You can also configure the provider and the session pool of the transaction-connection factory service by clicking the triangle next to jms-ds.xml in the
C H A P T E R 5
Administering Application Servers
Figure 5-5 The JBoss Management Console window showing one of the configuration panes for the JMS Directory Service
Monitoring Application Servers
C H A P T E R 5
Administering Application Servers
Figure 5-6 The JBoss Management Console window showing the statistics of the Deploy Service
Starting and Stopping Services
C H A P T E R 5
Administering Application Servers
Figure 5-7 The JBoss Management Console window showing the Start or Stop Services pane
C H A P T E R 5
Administering Application Servers
Enter the appropriate information in the Local TX Datasource pane, and click Update.
The newly added data source appears under the Resources group in the application-server list.
Creating a Topic or a Queue
You can create a topic or a queue while managing or configuring an application server. Follow these steps to create a topic or a queue:
1. In the application server list, select the application server you want to add the topic or queue to.
2. From the Topic or Queue pop-up menu in the Create a Topic or Queue group in the Host Information pane, choose Topic or Queue.
3. In the Topic or Queue Name text field, enter the name of the topic or queue.
4. Enter the name of the file in which the topic or queue configuration is to be saved in the Filename text field.
Deploying Applications
You can deploy applications while managing or configuring application servers. Follow these steps to deploy an application:
1. Select the application server you want to deploy the application or service on in the application server list.
2. In the “Select an application to deploy” group in the Host Information pane,
C H A P T E R 5
Administering Application Servers
C H A P T E R 6
6
Balancing User Load and
Replicating Sessions
HTTP load balancing provides a way to distribute user load among a group of application servers. The application servers can be standalone or configured as a cluster, in which case they are know as nodes. Load balancing is better used with
sticky sessions. This means that once the load balancer (a web server) forwards a
client request to a particular application server, it sends all further requests from the client to the same application server.
Using load balancing across standalone application servers allows you to scale your deployment with little increase in request-processing overhead. However, when an application server fails, other application servers cannot pick up the failed-server’s load, which may provide an undesirable user experience: Users may have to log in to the application again or may lose the contents of their “shopping carts.”
Load balancing across clustered application servers (or nodes) provides session replication among the nodes, so that when a node fails, another node can take over its duties with little or no user impact. However, as you add nodes to the cluster, each request may take longer to process.
This chapter explains how to enable an application to be distributable among cluster nodes and walks you through configuring HTTP load balancing for Sun’s Pet Store using three computers: One serving only as the web server and load balancer, and the other two serving as application-server nodes.
C H A P T E R 6
Balancing User Load and Replicating Sessions
To make an application distributable set Distributable to yes in the Web-App pane of the application’s WebApp window. Figure 6-1 shows the WebApp window of the petstore.ear archive.
C H A P T E R 6
Balancing User Load and Replicating Sessions
Load Balancing and Clustering
Load balancing provides a way to distribute user load among application servers. Clustering enables session failover when a node in a cluster becomes unavailable. Load balancing can be used with a group of standalone application servers or with a cluster or application server or nodes. This section describes a simple, three-computer setup in which one three-computer runs the web server and balances user load among two application servers.
Start by stopping the Web service on the web-server computer and the application servers on the nodes. Then follow the steps described in the following sections.
Enable Load Balancing in the Web Server
Follow these steps to configure a computer as the web server and load balancer for a deployment:
1. Launch Server Admin, if it’s not already running.
2. Select Web in the Computers & Services list, and click Settings in the configuration pane.
3. Click the Modules tab and select “jk_module,” which is at the bottom of the modules list.
4. Click the Sites tab.
5. Double-click the appropriate site in the list (by default there’s only one), which should be enabled.
6. Click the Options tab, and deselect Performance Cache.
7. Click Save.
8. Open httpd.conf file, located in /etc/httpd, in a text editor.
9. Look for <IfModule mod_jk.c>.
C H A P T E R 6
Balancing User Load and Replicating Sessions
<IfModule mod_jk.c>
JKWorkersFile /etc/httpd/workers.properties
JKLogFile /var/log/httpd/mod_jk.log
JKLogLevel error
JKMount /*.jsp JBoss1
JKMount /servlet/* JBoss1
JKMount /examples/* JBoss1
JKMount /petstore/* loadbalancer
</IfModule>
11. Save the file.
12. Open the workers.properties file, which is also located in /etc/httpd, in a text
editor.
C H A P T E R 6
Balancing User Load and Replicating Sessions
Figure 6-2 The workers.properties file in /etc/httpd
C H A P T E R 6
Balancing User Load and Replicating Sessions
14. Change line 8 so that it references the first node. It should look similar to this:
worker.JBoss1.host=node1.mydomain.com
15. Change line 12 to:
worker.JBoss1.cachesize=10
16. Uncomment lines 26 through 28.
17. Change line 26 so that it looks like this:
worker.JBoss2.port=9007
18. Change line 27 so that it references the second node. It should look similar to this:
worker.JBoss2.host=node2.mydomain.com
19. Change line 31 to:
worker.JBoss2.cachesize=10
20. Add the following line to the file to enable sticky sessions:
worker.loadbalancer.sticky_session=1
21. Save the file.
Enable Load Balancing in the Application Servers
For load balancing to work, each application server has to report its existence to the web server. Follow these steps to configure the application-server so that they identify themselves to the web server:C H A P T E R 6
Balancing User Load and Replicating Sessions
<!--Connector className="org.apache.coyote.tomcat4.CoyoteConnector"
port="9007" minProcessors="5" maxProcessors="200" address="0.0.0.0"
enableLookups="false" acceptCount="50" debug="0"
connectionTimeout="20000"
protocolHandlerClassName="org.apache.jk.server.JkCoyoteHandler"/-->
5. Remove the !-- at the beginning of the first line and the -- and end of the last
line while making sure to leave the left angle bracket and the right angle bracket in place.
6. Save the file.
7. Repeat steps 1 through 6 for the second application server, but set jvmRoute to "JBoss2" in step 3.
Test the Configuration
Follow these steps to make sure that client requests are balanced among the application servers:
1. Start the Web service in the web-server computer.
2. Start the application server in each of the application-server computers and run the following commands on both:
$ cd /Library/JBoss/Logs
$ tail -f localhost_access<today’s_date_YYYY-MM-DD>.log
3. In the web-server computer, connect to http://<host_name>/petstore/ index.jsp. The first node should show a log entry similar to this:
17.203.255.255 - - [26/Sep/2003:15:56:58 -0800] "GET /petstore/index.jsp
HTTP/1.1" 200 2769
C H A P T E R 6
A P P E N D I X A
A
Document Revision History
Table A-1 describes the revisions to this document.
Table A-1 Document revision history
Date Notes
January 22, 2004
Changed document from preliminary draft to final. Added note per requiring a web browser to run the JBoss Deployment Tool.
October 22, 2003
A P P E N D I X A
7
Glossary
application server JBoss instance, which is started through Server Admin.
CMP (container-managed
persistence) Enterprise bean persistence model in which the J2EE container is responsible for persisting enterprise-bean instances to a data store and populating the fields of enterprise-bean instances when they are retrieved.
deployment tool HTML-based application through which J2EE application or
component archives can be configured or assembled in preparation for deployment in Mac OS X Server.
EJB (Enterprise JavaBeans) Specification that provides an infrastructure through which data-based components can be developed and deployed in a variety of platforms.
J2EE (Java 2, Enterprise
Edition) Specification that defines a platform for the development and
deployment of Web applications. It describes an environment under which enterprise beans, servlets, and JSP pages can share resources and work together.
JBoss Java-based open-source application server capable of deploying J2EE-based applications. JBoss provides many useful
features in addition those defined in the J2EE standard, including support for clustering, session replication, mail, and security.
JMS (Java Message Service) Java-based programming interface that implements an asynchronous message-exchange system. It facilitates the development of message-based applications. JMS is part of the J2EE platform.
management tool HTML-based
application through which an application-server configuration can be modified. It also allows for the viewing of statistics of resources and services deployed on application servers, starting and stopping services, and adding topics, queues, and data sources.
Pet Store Pet Store is a sample J2EE application from Sun Microsystems, which showcases the power and flexibility of the J2EE platform.
queue A queue is a JMS construct that allows for point-to-point messaging between applications. A message sent to a queue can be received by only one application. When several applications are subscribed to the queue, the messages are load balanced between the subscribers.
G L O S S A R Y
Index
A
AJP connector 12 application servers 11
administering 47–60 configuring 55
creating a data source 58 creating a queue 59 creating a topic 59 deploying applications 59 load balancing 12, 61, 63–67 logging activity 17
managing 48, 51–55 monitoring 48, 56 starting 15–17
starting and stopping services in 57 Application Settings hyperlink 21 applications
configuring 15, 18–25 deploying 25, 45
in clusters 25, 61 loading 18 saving 24 validating 19
appserveradm group 48–50
appserverusr group 48–50
C
CatalogEJB module 22 clusters 61
configuring 63–67
deploying applications in 25 distributable applications 61 companion files 10, 27, 28
petstore.ear 29–39
supplier.ear 39–45 CustomerJAR module 23
D
data sources, creating 58 deploying applications 25, 59, 61 deployment configurations
cluster 13
development 13, 17 standalone 13 deployment tool 11, 12
Application Settings hyperlink 21 Quick Config pane 22
starting the 18
E
EAR files 11
H
HTTP 12
HTTP sessions 13 httpd.conf file 63 HTTPS 12
I N D E X
JBoss 11, 12
JBoss Management Console window 55
L
load balancing 12, 61, 63–67
replication among stateful session beans 13 session replication 12
sticky sessions 12 logging activity 17
M
Mac OS X Server 12 management tool 11, 13
logging in 47
managing application servers 48, 51–55 META-INF directory 11, 15, 20
mod_jk plug-in 12
monitoring application servers 48, 56 MySQL
configuring 28
mysql command-line tool 28
N
NetInfo Manager 49
AddressEJB 36
application-wide settings 31 AsyncSenderEJB module 31 CatalogEJB module 32 ContactInfoEJB 36 CounterEJB 39 CreditCardEJB 36 CustomerEJB 37
CustomerJAR (EJB) module 32 database 33
data-source mapping 33 PetStoreWAR 37 ProfileEJB 37 relationships 34 SignOnJAR 38 UserEJB 38
petstore-destinations-service.xml file 28
Q
queues, creating 59
R
relationships 34
S
I N D E X
ContactInfoEJB 43 InventoryEJB 41 LineItemEJB 43
OrderFulfillmentFacade 41 SupplierEAR 40
SupplierJAR 40 SupplierOrderEJB 44 SupplierOrderMDB 41 SupplierPurchaseOrderJAR 42 SupplierWAR 44
T
Tomcat 12 topics, creating 59
W
WAR files 11 watchdog process 12 WEB-INF directory 11, 15, 20