GUIDELINES AND STANDARDS FOR
LABORATORY NOTEBOOKS
D
EPARTMENT
OF
E
LECTRICAL
AND
C
OMPUTER
E
NGINEERING
ROSE-HULMAN INSTITUTE OF
TECHNOLOGY
TERRE HAUTE, INDIANA
PREFACE
This document was prepared by the members of the Communications Committee of the Electrical and Computer Engineering Department during the 2004/05 academic year. It includes content previously contained in the writing guide previously published by the ECE department [1]. The intention of this document is to assist Electrical and Computer Engineering students in developing skills consistent with industry standards for capturing and documenting information while performing experiments in the laboratory and on projects.
The faculty of Electrical and Computer Engineering Department are in agreement with the standards presented in this document. They will enforce the standards for accepting and grading your laboratory notebooks.
--- Summer 2005
ECE Technical Communications Committee
TABLE OF CONTENTS
1 OVERVIEW OF LABORATORY NOTEBOOKS ... 1
1.1 The Substance of Laboratory Notebooks... 1
1.2 Attributes and Qualities of Good Laboratory Notebook Entries... 2
2 FORMAT OF LABORATORY NOTEBOOKS ... 2
2.1 Notebook Type... 2
2.2 Title Page and Table of Contents ... 2
2.3 Paper Size, Margins, and Page Orientation... 3
2.4 Page Numbering... 3
2.5 Page Use... 3
2.6 Use of Ink... 3
2.7 Use of Notebooks from Previous Courses ... 4
3 Composing Notebook Entries... 4
3.1 What Gets Recorded ... 4
3.2 General Techniques... 5
3.2.1 Summarizing Procedures ... 5
3.2.2 Collecting and Presenting Data ... 5
3.2.3 Verification of Data and Operation ... 6
3.3 Specific Suggestions ... 6
3.3.1 Answering Questions... 6
3.3.2 Annotating Entries... 7
3.3.3 Collecting, Tabulating, and Plotting Data ... 7
3.3.4 Graphics... 8
3.3.5 Recording Observations ... 8
3.3.6 Entering Instrument Screen Captures ... 9
3.3.7 Fastening Papers into Lab Notebook... 10
3.3.8 Conclusions ... 10
4 References ... 10
1 OVERVIEW OF LABORATORY NOTEBOOKS
One important aspect of the professional fields that is often learned late by practitioners is the need for thorough and effective record keeping. One type of record keeping of interest to the design engineer is the laboratory notebook or journal, which serves as the engineer’s log of daily activities as well as a place to record ideas and results for future reference. While in school, it is used as a record of laboratory and project work for grading and reporting.
Since much engineering work is performed by individuals operating singly or in teams in informal settings, record keeping can be lax. It is therefore important for the individual engineer to form good habits of record keeping early not only to keep track of the numbers and diagrams, but also of the insights and lessons learned that accompany the everyday testing, analysis, design, and meeting activities.
1.1 The Substance of Laboratory Notebooks
Laboratory notebooks serve a number of purposes, and understanding those purposes can help you to better prepare your own laboratory notebooks. First and foremost, the laboratory notebook is the primary record of your activities. Notes of all activities, hours worked, telephone calls, test data – all of these are good information to keep in a laboratory notebook. Having the data in several notebooks or on scraps of paper or in other forms for one project, multiplied by several projects, leads to failures in process. Having a notebook devoted to each project, or to all work if appropriate, is an effective way to keep organized. In the academic setting, accurate grading can only occur if the laboratory notebook is well prepared.
Laboratory notebooks can serve as a record of hours worked on specific projects. They can serve as documentation for legal use such as in patent application and legal disputes, but only if properly maintained. They provide a record of the work performed on a project for future reference, or to pass on to replacements. They may form an important part of a company’s project history, “lessons learned”, or even have historical significance!
Laboratory notebooks have the following characteristics:
• The notebook is typically considered property of the company performing the work (student) and is bound to the project, unless specifically designated otherwise by contract
• The notebook is maintained according to standards, often published by the employer.
• The notebook is hardbound with entries made in ink to provide a permanently bound set of entries.
1.2 Attributes and Qualities of Good Laboratory Notebook Entries
To write clear and effective entries, you should build upon the natural talents you have in communicating ideas to others. Keep in mind that the goal is communication, not a mindless exercise.
A good notebook entry has the following qualities:
• Each entry is prepared with the intention that the notebook will be picked up in the future and the work scrutinized (e.g. graded) and perhaps replicated from only the notebook entries
• The content is easily understood as to what was being recorded and why
• Follows appropriate standards such as units, terminology, etc. in reporting
• It is legible and organized well enough to be interpreted by another party
2 FORMAT OF LABORATORY NOTEBOOKS
This section of the document describes the standards pertaining to the format of
laboratory notebooks to be used in ECE courses at Rose-Hulman Institute of Technology.
2.1 Notebook Type
The laboratory notebook shall be a bound (sewn or glued, not spiral bound) notebook devoted to the course laboratory excercises or to the project. The pages shall be
numbered with preprinted numbers. Examples of acceptable notebook types available in the RHIT bookstore are shown in Figure 1. The instructor may dictate that one type is required in a particular course.
[image:5.612.168.440.471.613.2]
Figure 1 Two acceptable laboratory notebook styles, the composition book (left) and computation notebook (right).
2.2 Title Page and Table of Contents
• Name of the institution
• Name of the department
• Course title and section number or project name
• Reporting individual's name
The table of contents shall start on the next page (before the entries in the notebook). The heading for this page shall be Table of Contents, and it shall be centered. The actual table of contents shall consist of two columns. The first (left) column heading shall be
Laboratory Exercise (or equivalent), while the second (right) column heading shall be
Page. The table of contents of this document can be used as an example, although it might be a bit formal for lab notebook use.
2.3 Paper Size, Margins, and Page Orientation
The two types of lab notebooks normally used have page sizes roughly 10” x 8” (“composition book”) and 11 ¾” x 9 ¼” (“computation notebook”). Reasonable page margins shall be maintained throughout the lab notebook. A margin size of 1 inch is suggested. You may wish to annotate entries at a later time (appropriately dated, of course), and the margin provides a convenient place for such annotations.
The standard page orientation shall be portrait (vertical). However, if a page is used completely for a figure, then you may use landscape (horizontal) page orientation. In this case, the right side of the physical page will become the bottom reference and would carry the caption.
2.4 Page Numbering
Pages shall be numbered consecutively in the laboratory notebook, with no pages skipped. It is preferred that the notebook have preprinted page numbering, but hand numbering in ink prior to the use of the notebook is acceptable. The page number shall be entered in the upper corner of the page, left corner for the left-facing page, and right corner for right-facing page.
2.5 Page Use
Generally, entries shall be made on the right-hand page, leaving the left-hand page either clear or as a place to paste in figures. Pages shall never be torn out of the laboratory notebook. Should errors be discovered, simply cross out the error, make a reference to the location of the corrected work, and continue on with your work. Pages shall not be skipped. If this does occur, draw a single line diagonally through the page and write a note that the page is blank.
2.6 Use of Ink
may be altered, and thus are not acceptable. Larger felt-tip pens and other colors of ink are generally considered inappropriate for permanent records.
2.7 Use of Notebooks from Previous Courses
In general, it is important to inquire as to the standard practice regarding the reuse of laboratory notebooks. This applies here at Rose as well, so ask your instructor at the beginning of your class whether this is acceptable. Generally, while here at Rose, you may reuse laboratory notebooks in your lab courses provided there is clearly enough room to record all of the entries for the course in a single laboratory notebook.
3 Composing Notebook Entries
The purpose of this section is to provide you with some guidelines on how to prepare entries in your laboratory notebooks. The idea is to help you become adept at conveying the appropriate information without spending too much time writing in the lab notebook. These suggestions will help you focus your entries for maximum learning and
communication benefit.
For entries involving exposition, the techniques expressed in your writing instruction and the ECE Department Writing Guidelines are to be followed. These sections focus on entries made for laboratory courses, but apply as well for professional work.
3.1 What Gets Recorded
Your laboratory notebook is not just something that gets graded. It is a record of your work, proving what you did, when it was done, with whom and where, and why it was done. As such, it is good to be in a habit of good recording, similar to the habits of journalists.
On the first page of your notebook entry, include the lab number and title, the date, the room and lab station, and the names of the lab partners. Make sure you also make an entry in the lab notebook table of contents for this entry before you begin. If working on a project, similar information should be recorded, although a table of contents entry is not necessary.
From here, record anything that might possibly be significant. What does that mean? For some, it means recording everything they do and everything that happens. For others, it means only recording the things that bear on what they set out to accomplish. Generally, the more you record the less you will regret later, but there is a time balance issue.
So what a lab notebook entry look like? An example of an observation leading to the discovery of a new type of microwave oscillator (and something called negative
what is entered that is not data (such as the experimental diagram), the comments – these are features of a good notebook entry.
3.2 General Techniques
This section provides some guidelines for how to approach the process of keeping a laboratory notebook. Read this before you begin a course to familiarize yourself with the general mindset of good record-keeping.
3.2.1 Summarizing Procedures
In general, there is no need to repeat verbatim the laboratory procedures followed during a course laboratory – you have the printed laboratory directions already. Circuit
diagrams, of course, must be recorded for use during lab. Repeating procedures takes valuable time away from your learning in the lab anyway. This includes pasting lab procedures into the lab book – do this at a later time if it is important to you, as an appendix to the lab notebook entry. Remember, the main idea is to make it so that you can understand the work sometime in the future. The most important thing you can do to make that possible is to learn the material properly the first time!
A good experiment block diagram and circuit diagram annotated with a couple of lines of text can often record the important points of the procedures.Any special procedures or tricky points, or items that you customized to obtain your data might need to be spelled out in more detail. Learn how to use terminology properly so that your writing is concise and accurate.
3.2.2 Collecting and Presenting Data
Laboratory work is all about collecting data to verify theory or operation. Laboratory work is not about following procedures per se. If your data does not produce useful results, whether you followed procedures or not is meaningless. So, collecting and presenting data is a major part of the notebook’s purpose. This may be the only place the effect you monitor is recorded, so do a good job the first time!
Data should be written in appropriate forms while you are taking the data. Read through the procedure and decide whether a table is best for taking the data. Prepare a data table with the appropriate number of columns and write legibly. Make sure the cells in the table are large enough to enter and potentially correct an entry. Include columns for calculated values and comparison with theory. Be neat and use the lines on the pages – you have plenty of time. Include units.
Be sure to appropriately indicate your measured data. Don’t make the reader search for it! Create a small table to compare your data to theory or simulation results – this is a good way to focus attention on the results.
Here are a few points to remember:
• The data should be presented in a compact and legible form
• Tabular data is often more difficult to visualize than a plot
• Cross out bad data, with a note pointing to the location of replacement data
3.2.3 Verification of Data and Operation
Perhaps the most important purpose of the work you are doing is to verify the theory or simulations of your classwork preceding the labwork. Just performing the steps of the lab exercise is not the requirement – understanding and verifying the work is required. Therefore, each entry in your lab notebook should have as its purpose the verification of some principle. It might be that you are verifying correct circuit operation, or verifying the predictions of theory. But what does verification mean?
Many students think that as long as they see something that seems to be related to the concept, they understand the concept. Or, they simply record what they get, correct or not. What is really desired is that you prove to the instructor that you understand by provided legitimate verification of your understanding. Once you have collected the data, what is left to do? Verify the concept with it!
If you have collected a waveform, does the waveform match your expectations? Explain how the waveform displays the expected output behavior. If your power consumption is correct, explain how you know so, don’t just say it is. Verification means proving that the output you obtain is correct or expected, or explaining why it is incorrect.
Here are some ways to verify your data:
• Compare your numerical results with theory using percent error, angle difference, or dB difference, and include the + or - sign (do not always use percent error!)
• Annotate captured waveforms to point out features indicating correct operation
• Explain important deviations due to expected effects
Note: The error calculations are defined so that a positive error means that the measured value is larger than the theoretical value:
1. percent error: (M-Th)/Th
2. angle difference: Mdeg-Thdeg or Mrad-Thrad
3. dB difference: Mdb - Thdb
3.3 Specific Suggestions
The following sections contain some specific suggestions for making entries in your notebook more effective.
3.3.1 Answering Questions
3.3.2 Annotating Entries
It is tempting to simply draw in a block diagram or paste in a plot without any comment. Do not be led astray by such temptations! Many items in the lab notebook are best explained through the appropriate use of annotations (explanatory notes). These record the things in your mind while working, which will not be available later when reviewing the notebook.
3.3.3 Collecting, Tabulating, and Plotting Data
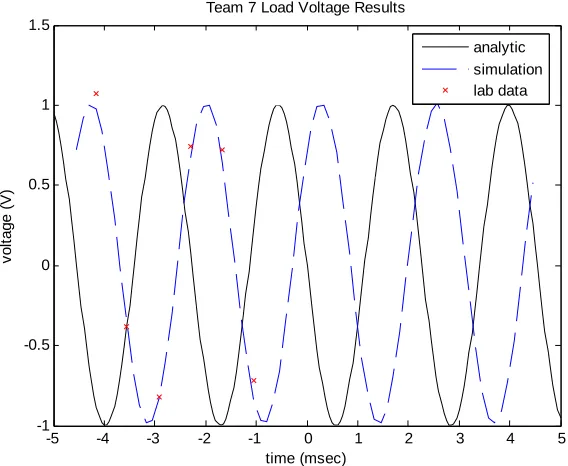
[image:10.612.153.462.287.567.2]There will be many instances where you will be required to collect data in a form that will lead to a plot of data. It will be helpful to think ahead about what data to collect and how to collect it. Create a table in your notebook with plenty of columns and rows for all of the data. Write small and legibly, so that there is enough room to enter all of the data. Do not neglect units and prefixes! An example of a good table entry is provided in Figure 2 [2].
Figure 2 A nicely prepared lab notebook table. Note the use of a caption and the inclusion of units.
• Every plot should have an informative title
• Each axis should have labels with units, and the axis type (linear or log) should be carefully considered
• Consider whether grids should be used to help interpret the plot data
• A legend should be provided with informative labels
• The use of line styles is important. A standard technique is to use a solid line for analytic data, dashed for simulation, and points for lab data. This works well when the number of lab data points is small. Be sure to include a legend.
• When a large number of data points is taken, using symbols for data points is cumbersome, and a different approach should be taken. In this case, different line styles or thicknesses should be used. Be sure to include a legend.
• The use of colors does not work for situations where the notebook is photocopied or viewed by someone with color blindness – avoid depending on color to
differentiate curves.
-5 -4 -3 -2 -1 0 1 2 3 4 5
-1 -0.5 0 0.5 1 1.5
time (msec)
v
o
lt
a
ge (V
)
Team 7 Load Voltage Results
[image:11.612.158.442.293.526.2]analytic simulation lab data
Figure 3 Proper form for a plot included in any document, inlcuding laboratory notebooks.
3.3.4 Graphics
Techniques for graphs and other graphics are presented in the writing guide [1]. Generally, when including any sort of graphics, be sure they are neat enough to be legible, understood, and that they convey the appropriate information. Know the difference between block diagrams, schematics, and wiring diagrams [4].
3.3.5 Recording Observations
Observations are an important part of the laboratory notebook – they are your personal contribution, and what makes the work unique from others’. Recording your
you with a chance to record the items of importance or interest. Also, it is the forum where you comment on your results and their validity. You might note that one particular result is noisy, or that you can connect a particular behavior to a design variable.
There are also some bad habits seen in student observation entries. Here are some things not to write:
• “This is as expected.” - It is? Even if it is incorrect? This is not a useful statement.
• “This is close to the expected value.” – What does “close” mean? Use accepted error analysis methods where appropriate. Be appropriately technical!
• “It is clear that our circuit is working” – The only way to demonstrate a working circuit is by verification, not by stating that it is working.
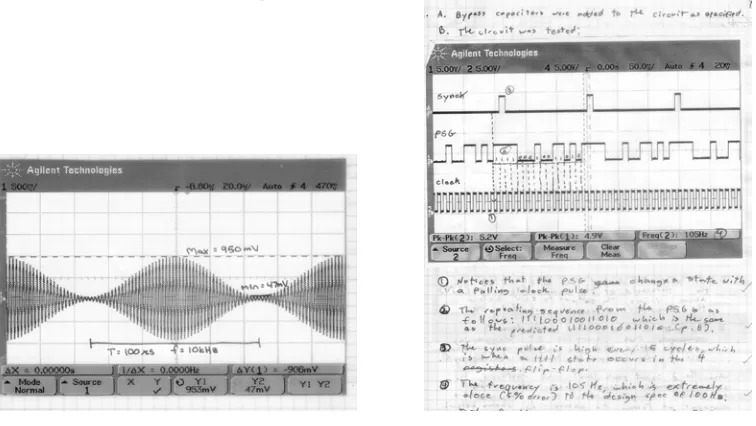
3.3.6 Entering Instrument Screen Captures
It is very convenient to download screen captures from scopes, logic analyzers, and spectrum analyzers to your laptop for printing and pasting into your lab notebook. (Be sure you follow appropriate page orientation and mounting guidelines – see below.) However, you must be sure the data you enter is correct, and so verification of the waveforms is required. Two techniques are available to verify the data on the screen captures.
One method is to annotate the screen capture with text and markings to indicate important features to be noted. This might include important amplitudes or time
[image:12.612.94.472.468.681.2]durations, synchronization events, or waveform features. Alternatively, a bulleted list of items beneath the figure in a notebook entry can explain the features verifying the correctness of the data. The idea is to do more than just show you took the data, but rather to show that you understood what to expect and how to show that what you obtained was correct. Examples of these techniques are given in Figure 4.
3.3.7 Fastening Papers into Lab Notebook
At times it will be appropriate to attach pages into the laboratory notebook. If this is required, the pages should be permanently attached to a page in the laboratory notebook. Tape or glue is appropriate, but use the glue sparingly. Loose pages are not appropriate. Fold the pages neatly if they extend beyond the boundaray of the notebook page size. This technique is illustrated in Figure 5. Be sure the pages attached are properly prepared and annotated.
Top
Tape Top
Tape Tape
[image:13.612.138.458.203.336.2]Fold Top
Figure 5 Appropriate technique for fastening pages into the laboratory notebook.
3.3.8 Conclusion Section
The conclusions section of the lab report is an brief summary of your thoughts regarding the lab. It should state your thoughts regarding the success of the lab in general, the accuracy of your results, any specific unresolved issues or suggestions for improvement, and achievements. Finally, have all lab partners sign and date the lab notebook.
(Signatures should be legible.)
4 References
[1] RHIT ECE Department, “Guidelines and Standards for Writing Assignments”, Nov. 2000
[2] Special thanks to Dr. Bruce Black and Dr. Bill Eccles for many good ideas on the proper keeping of a laboratory notebook.
[3] J. Voelcker, “The Gunn Effect”, IEEE Spectrum, vol. 26, p. 24, July 1989. [4] Schematics Guidelines, TBD
5 Appendices
This note ("noisy") marks the discovery of microwave oscillations later called the Gunn effect.
of the page