T RB
A E BLER
BORLAND
Turbo AssemblefID
Version 2.0
User's Guide
Copyright © 1988, 1990 by Borland International. All rights reserved. All Borland products are trademarks or registered trademarks of Borland International, Inc. Other brand and product names are trademarks or registered trademarks of their respective holders.
c
o
N
T
E
N
T
s
Introduction
1Ii ... "
...
28Hardware and software requirements .... 2
About the manuals ... 2
Ij ..•...•••••..•... . "
...
29Ikh ...
~..
~...
29The User's Guide ... 2
Iks ... " ...
30Notational conventions ... 3
II ...
30How to contact Borland ... 4 Ila ... 30
Chapter 1 Installing Turbo
Assembler
7 Files on disk ... 7Installing Turbo Assembler ... 8
1m ...
31Iml ...
31Imu ... 32
Imv# ... 32
Irnx. ...
32Chapter 2 Getting started with Turbo"
Assembler
9In ...
33Ip ...
33Writing your first Turbo Assembler program ... l l Assembling your first program ... 11
L' m mg your k' fir st program ... 13
Running your first program ... 14
What happened? ... 14
Modifying your first Turbo Assembler program ... ' .. 15
Sending output to a printer ... 17
Writing your second Turbo Assembler program .. " ... 18
Running REVERSE.ASM ... 19
Iq ...
34Ir ...
34Is ...
35It ...
~..
35Iv ... 35
Iw ...
36Ix ...
37Iz ...
37Izd ...
38Izi ...
38Indirect command files ... 39
The configuration file ... 39
Chapter 3 Command-line
reference
21Chapter 4 The nature of assembly
language
41 Starting Turbo Assembler from DOS .... 21Command-line options ... 24
la ...
25Ib ...
25Ic ...
26Id ... ...
26Ie ... "
...
27Ih
orI? ... ' ...
27The architecture of a computer ... 41
The making of assembly language .... 43
The 8088 and 8086 processors ... 46
The capabilities of the 8086 ... 47
Memory ... 47
Input and output ... 50
Registers ... 51
The general-purpose registers ... 54
The AX register ... 54
The BX register ... 55
The CX register ... 55
The DX register ... 56
The SI register ... 56
. The DI register ... 57
The BP register ... 58
The SP register ... 59
The instruction pointer ... 61
The segment registers ... 61
The CS register ... 65
The DS register ... 66
The ES register ... 66
The SS register ... 66
The 8086 instruction set ... 67
The IBM PC and XT ... 67
Input and output devices ... 68
Systems software for the IBM PC ... 68
DOS ... 69
Getting keystrokes ... 70
Displaying characters on the screen ... 71
Ending a program ... 72
The BIOS ... 73
Selecting display modes ... 73
Sometimes you absolutely need to go to the hard ware ... 74
Other resources ... 74
Chapter 5 The elements of an
assembler program
77 The components and structure of an assembler program ... 78Reserved words ... 79
The format of a line ... 81
Labels ... 82
Instruction mnemonics and directives. 85 The END directive ... 86
Operands ... 88
Register operands ... 89
Constant operands ... 90
Expressions ... 91
Label operands ... 92
Memory-addressing modes ... 93
Comments ... 101
Segment directives ... 103
Simplified segment directives ... 104
.STACK, .CODE,and .DATA ... 104
DOSSEG ... 108
.MODEL ... 108
Other simplified segment directives . . . 110
Standard segment directives ... 111
The SEGMENT directive ... 112
The ENDS directive ... 112
The ASSUME directive ... 112
Simplified versus standard segment directives . . . .. 115
Alloca ting data . . . 116
Bits, bytes, and bases ... 116
Decimal, binary, octal, and hexadecimal notation ... 119
Default radix selection ... 123
Initialized data ... 125
Initializing arrays ... 125
Initializing character strings ... 126
Initializing with expressions and labels ... 128
Uninitialized data ... 129
Named memory locations ... 130
Moving data ... 132
Selecting data size ... 133
Signed versus unsigned data ... 135
Converting between data sizes ... 136
Accessing segment registers ... ~ ... 138
Moving data to and from the stack ... 139
Exchanging data ... 139
I/O ... 140
Operations ... 141
Arithmetic operations . . . 141
Addition and subtraction ... 142
32-bit operands ... 142
Incrementing and decrementing . 144 Multiplication and division ... 145
Changing sign ... 147
Logicaloperations ... 148
Loops and jumps ... 153
Unconditional jumps ... 154
Conditional jumps ... 156
Looping ... 158
Subroutines ... 161
How subroutines work ... 162
Parameter passing ... 166
Returning values .... _ ... 166
Preserving registers ... 167
An example assembly language program ... 168
Chapter 6 More about programming in Turbo Assembler 173 Using equate substitutions ... 174
The EQU directive ... 174
The $ predefined symbol ... 178
The = directive ... 179
The string instructions ... " ... 180
Data movement string instructions ... 181
LODS ... 181
STOS ... 182
MOVS ... 183
Repeating a string instruction ... 184
String pointer overrun ... 185
Data scanning string instructions .... 185
SCAS ... 185
CMPS ... 188
Using operands with string instructions ... 189
Multimodule programs ... 190
The PUBLIC directive ... 193
The EXTRN directive ... 194
The GLOBAL directive ... 197
Include files . . . .. 198
The listing file ... 200
Annotated source code ... 201
Listing symbol tables ... 205
The table of labels ... 205
The table of groups and segments .. 206
The cross-reference table ... 207
Controlling the listing contents and format ... 210
The line-listing selection directives . 210 iii %LIST and %NOLIST ... 211
%CONDS and %NOCONDS .... 211
%INCL and %NOINCL ... 212
%MACS and %NOMACS ... 212
%CTLS and %NOCTLS ... 212
&UREF and %NOUREF ... 213
%SYMS and %NOSYMS ... 213
The listing format control directives ... 213
Field-width directives ... 214
%PUSHLCTL and %POPLCTL .. 215
Other listing control directives .... 215
Displaying a message during assembly . 215 Assembling source code conditionally .. 216
Conditional assembly directives ... 217
IF and IFE ... 217
IFDEF and IFNDEF ... 218
Other conditional assembly directives ... 220
ELSEIF family of directives ... 222
Conditional error directives ... 223
.ERR, .ERR1, and .ERR2 ... 223
.ERRE and .ERRNZ ... 224
.ERRDEF and .ERRNDEF ... 224
Other conditional error directives .. 225
Pitfalls in assembler programming ... 225
Forgetting to return to DOS ... 226
Forgetting a RET instruction ... 227
Generating the wrong type of return . 228 Reversing operands ... 230
Forgetting the stack or reserving a too small stack ... 230
Calling a subroutine that wipes out needed registers ... 231
Using the wrong sense for a conditional jump ... 234
Pitfalls with string instructions ... 235
Forgetting about REP string overrun ... 235
Relying on a zero CX to cover a whole segment ... ~. 237
Using the wrong sense for a t:epeated
string comparison ... 239
Forgetting about string segment defaults ... 240
Converting incorrectly from byte to word operations ... 241
Using multiple prefixes ... 242
Relying on the operand(s) to a string instruction ... 242
Forgetting about unusual side effects . 243 Wiping out a register with multiplication ... 244
Forgetting that string instructions alter several registers ... 245
Expecting certain instructions to alter the carry flag ... 245
Waiting too long to use flags ... 246
Confusing memory and immediate operands ... 246
Causing segment wraparound ... 249
Failing to preserve everything in an interrupt handler ... 251
Forgetting group overrides in operands and data tables ... 252
Chapter 7 Interfacing Turbo Assembler with Turbo
C
257 Using inline assembly in Turbo C ... 258How inline assembly works ... 260
How Turbo C knows to use inline assembly mode ... 264
Invoking Turbo Assembler for inline assembly ... 265
Where Turbo C assembles inline assembly ... 266
Use the -1 switch for 80186/80286 instructions ... 267
The format of inline assembly statements ... 268
Semicolons in inline assembly ... 268
Comments in inline assembly ... 268
Accessing structure/union elements ... 269
An example of inline assembly ... 270
Limitations of inline assembly ... 274
Memory and address operand limitations ... 274
Lack of default automatic variable sizing in inline assembly ... 276
The need to preserve registers ... 277
Preserving calling functions and register variables ... 277
Suppressing internal register variables ... 277
Disadvantages of inline assembly versus pureC ... 277
Reduced portability and maintainability ... 278
Slower compilation ... 278
Available with TCC only ... 278
Optimization loss ... 278
Error trace-back limitations ... 279
Debugging limitations ... 280
Develop in C and compile the final code with inline assembly ... 280
Calling Turbo Assembler functions from Turbo C ... 281
The framework ... 282
Memory models and segments .... 282
Simplified segment directives and TurboC ... 283
Old-style segment directives and TurboC ... 285
Segment defaults: When is it necessary to load segments? ... 287
Publics and externals ... 290
Underscores ... 290
The significance of uppercase and lowercase ... 291
Label types ... 292
Far externals .. : ... 293
Linker command line ... 294
Between Turbo Assembler and Turbo C ... 295
Parameter-passing ... 295
Preserving registers ... 302
Calling an assembler function from
C ... 304
Pascal calling conventions ... 307
Calling Turbo C from Turbo Assembler. 308 Link in the C startup code ... 308
Make sure you've got the right segment setup ... 309
Performing the call ... 309
Calling a Turbo C function from Turbo Assembler ... 311
Chapter 8 Interfacing Turbo
Assembler with Turbo
Pascal
315 The Turbo Pascal memory map ... 315The program segment prefix ... 316
Code segments ... 317
The global data segment ... 317
The stack ... 317
The heap ... 318
Register use in Turbo Pascal ... 318
Near or far? ... 319
Sharing information with Turbo Pascal . 319 The $1 compiler directive and external subprograms ... 319
The PUBLIC directive ... 320
The EXTRN directive ... 321
Restrictions on using EXTRN objects ... 323
Using segment fixups ... 324
Dead code elimination ... 325
Turbo Pascal parameter-passing conventions ... 325
Value parameters ... 325
Scalar types ... 326
Reals ... 326
Single, Double, Extended, and Comp: The 8087 types ... 326
Poin ters ... 326
Strings ... 327
Records and arrays ... 327
Sets ... 327
Variable parameters ... 327
v
Stack maintenance ... 328Accessing parameters ... 328
Using BP to address the stack ... 328
The ARG directive ... 329
.MODEL and Turbo Pascal ... 330
Using another base or index register ... 331
Function results in Turbo Pascal ... 331
Scalar function results ... 331
Real function results ... 332
8087 function results ... 332
String function restilts ... 332
Pointer function results ... 332
Allocating space for local data ... 332
Allocating private static storage .. ' ... 332
Allocating volatile storage ... 333
Assembly language routines for Turbo Pascal ... 334
General-purpose hex conversion routine . . . 334
Exchanging two variables ... 337
Scanning the DOS environment ... 340
Chapter 9 Advanced programming In
Turbo Assembler
345 Segment override prefixes ... 345An alternate form ... 347
When segment override prefixes don't work ... 000 ... 348
Accessing multiple segments ... 0 349 Locallabels ... 0 .... 0 ... 0 . 0 0 349 Automatic jump-sizing .. 0 .. 0 . 0 ... 353
Advantages and disadvantages of using
STRUC ... 377
Unique structure field names .... 378
Nesting structures ... 378
Initializing structures ... 379
The RECORD directive ... 380
Accessing records ... 382
The WIDTH operator ... 383
The MASK operator ... 384
. Why use records ... 385
The UNION directive ... 387
Segment directives ... 389
The SEGMENT directive ... 389
The name and align fields ... 390
The combine field ... 390
The use and class fields ... 392
Segment size, type, name, and nesting ... 392
Segment-ordering ... 393
The GROUP directive ... 395
The ASSUME directive ... 397
The simplified segment directives .... 400
A multisegment program ... 404
Chapter 10 The 80386 and other
processors
409 Switching processor types in assembler code ... 410The 80186 and 80188 ... 411
New instructions ... 411
PUSHAandPOPA ... 411
ENTER and LEAVE ... 412
BOUND ... 413
INSandOUTS ... 414
Extended 8086 instructions ... 415
Pushing immediate values ... 415
Shifting and rotating by immediate values .... ; ... 416
Multiplying by an immediate value ... 416
The80286 ... 417
Enabling 80286 assembly ... 418
The80386 ... 419
Selecting 80386 assembly mode ... 419
New segment types ... 420
Simplified segment directives and 80386 segment types ... 423
The FWORD 48-bit data type ... 424
New registers ... 425
The 32-bit general-purpose registers ... 426
The 32-bit flags register ... 428
The 32-bit instruction pointer ... 428
New segment registers ... 429
New addressing modes ... 431
New instructions ... 434
Testing bits ... 435
Scanning bits ... 436
Moving data with sign- or zero-extension ... 437
Converting to DWORD or QWORD data ... 437
Shifting across multiple words .... 438
Setting bytes conditionally ... 439
Loading SS, FS, and GS ... 440
Extended instructions ... 441
Special versions of MOV ... 441
32-bit versions of 8086 instructions . 442 New versions of LOOP and JCXZ ... 442
New versions of the string instructions ... 444
IRETD ... 444
PUSHFD and POPFD ... 445
PUSHAD and POP AD ... 445
New versions ofIMUL ... 445
Mixing 16-bit and 32-bit instructions and segments ... 446
An example 80386 function ... 449
The 80287 ... 453
The 80387 ... 453
Chapter 11 Turbo Assembler Ideal
Mode
455 What is Ideal mode? ... 456Why use Ideal mode? ... 456
Entering and leaving Ideal mode ... 457
Ideal mode tokens ... 459
Syr,nboltokens ... 459
Duplicate member names ... 460
Floating-point tokens ... 460
EQU and
=
directives ... 461Expressions and operands ... 461
Square brackets operator ... 461
Example operands ... 462
Operators ... 464
Periods in structure members ... 464
Pointers to structures ... 464
The SYM1YPE operator ... 465
The HIGH and LOW operators .... 465
The Optional PlR operator ... 466
The SIZE operator ... 466
Directives ... 467
Listing controls ... 467
Directives starting with a period (.) . 468 Reversed directive and symbol name ... 469
vii Quoted strings as arguments to directives ... 469
Segments and groups ... 470
Accessing data in a segment belonging to a group ... 470
Defining near or far code labels ... 472
External, public, and global symbols .473 Miscellaneous differences ... 474
Suppressed fixups ... 474
Operand for BOUND instruction .. 474
Comments inside macros ... 475
Local symbols ... 475
A comparison of MASM and Ideal mode programming ... 475
MASM mode sample program .. 476
Ideal mode sample program .... 477
An analysis of MASM And Ideal modes ... 479
References
Index
483
T
A
B
5.1: TASM reserved words ... 80 5.2: The operation of the 8086 AND, OR, and XOR logical instructions ... 148 5.3: Conditional jump instructions ... 157 6.1: Source and destination for the MUL and
IMUL instructions ... 244 7.1: Register settings when Turbo Centers
assembler ... 287 9.1: Default segments and types for tiny
memory model ... 401
L
E
s
9.2: Default segments and types for small memory model ... 401 9.3: Default segments and types for medium memory model ... 401 9.4: Default segments and types for compact memory model ... 401 9.5: Default segments and types for large or
huge memory model ... 402 9.6: Default segments and types for Turbo
F
G
u
2.1: The edit, assemble, link, and run
cycle ... 12
3.1: Turbo Assembler command line ... 22
4.1: Five subsystems ... 42
4.2: Memory address space of the 8086 ... 48
4.3: Separate memory and I/O address of 8086 ... 50
4.4: Registers of the 8086 ... 52
4.5: Flags register of the 8086 ... 53
4.6: AX, BX, SP, and the stack ... 60
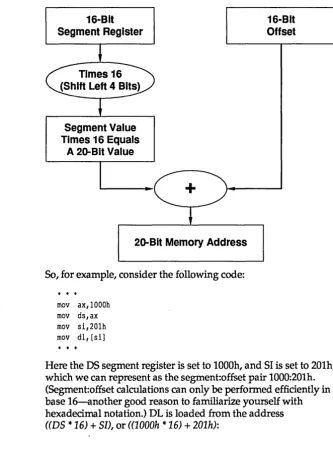
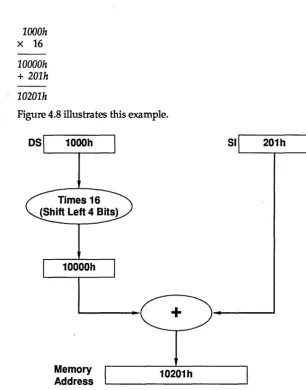
4.7: 20-bit memory addresses ... 62
4.8: Calculation of memory address by mov ... 63
4.9: DOS and BIOS systems software as a control and interface layer ... 69
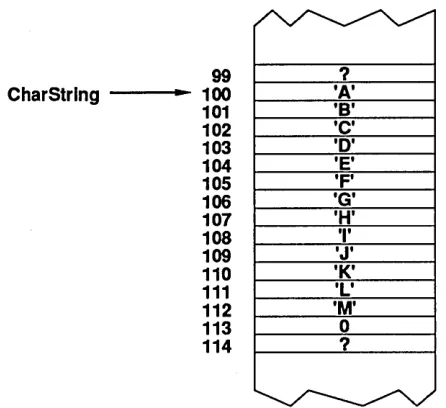
5.1: The memory location of the character string CharString ... 94
5.2: Addressing the character string CharString ... 95
5.3: Using BX to address CharString ... 96
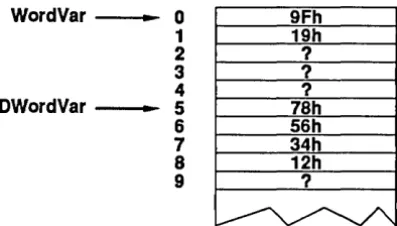
5.4: Storing WordVar and DwordVar .... 119
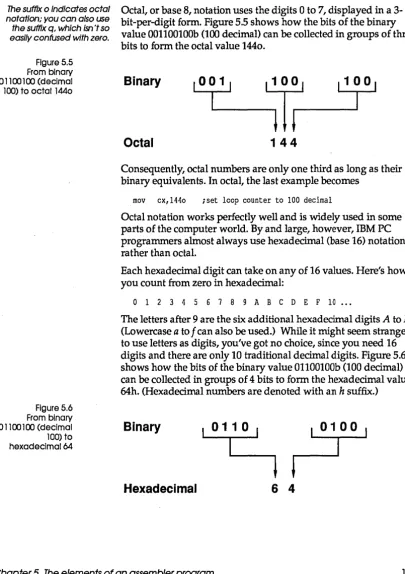
5.5: From binary 001100100 (decimal 1(0) to octal 1440 ... 121
5.6: From binary 01100100 (decimal 100) to hexadecimal64 ... 121
5.7: Example of five-entry array ... 126
5.8: Example of a shift left ... 150
5.9: Example of SAR (arithmetic right shift) ... 151
Ix
R
E
s
5.10: Example of ROR (rotate right) ... 1525.11: Example ofRCR (rotate right and carry) ... 153
5.12: Operation of a subroutine ... 162
6.1: Memory variables: offset vs. value .. 247
6.2: An example of segment wraparound ... 250
6.3: Three segments grouped into one segment group ... 252
7.1: Turbo C compile and link cycle .... 260
7.2: Turbo C compile, assembly, and link cycle ... 262
7.3: Compile, assemble, and link with Turbo C, Turbo Assembler, and TLINK ... 281
7.4: State of the stack just before executing Test's first instruction ... 296
7.5: State of the stack after PUSH and MOV ... 297
7.6: State of the stack after PUSH, MOV, and SUB ... 298
7.7: State of the stack immediately after MOV BP, SP ... 308
·8.1: Memory map of a Turbo Pascal 5.0 program ... 316
9.1: Locations and initial values of the fields in 1Rec ... 381
N
T
R
Introduction
o
Du
c
To
NWelcome to Borland's Turbo Assembler, a multi-pass assembler with forward-reference resolution, assembly speeds of up to 48,000 lines per minute (on an IBM PS/2 model 60), MASM compatibility, and an optional Ideal mode extended syntax. Whether you're a novice or an experienced programmer, you'll appreciate these features along with a number of others we've provided to make programming in assembly language easier. We'll mention just a few of the highlights here and describe them in detailla ter in the book:
• full 80386 support
• improved syntax type-checking • simplified segmentation directives • improved listing controls
• PUSH, POP extensions
• extended CALL statement with arguments and optional language parameter
• local labels
!!! local stack symbols and calling arguments in procedures • structures and unions
• nested directives
• Quirks mode
to emulate MASM• full source debugging output for Turbo Debugger • built-in cross-reference utility (TCREF)
• configura tion and command files
Turbo Assembler is set up to work with the 80x86 and 80x87 processor families. (For more information about the instruction sets of the 8Ox86/80x87 families, consult the Intel data books.)
Hardware and software requirements
Turbo Assembler runs on the IBM PC family of computers, including the XT, AT, and PS/2, along with all true compatibles. Turbo Assembler requires MS-DOS 2.0 or later, and at least 256K of memory.
Turbo Assembler generates instructions for the 8086, 80186, 80286, and 80386 processors. It also generates floating-point instructions for the 8087, 80287, and 80387 numeric coprocessors.
About the manuals
Turbo Assembler comes with two books and a quick-reference guide: Turbo Assembler User's Guide (this book), Turbo Assembler Reference Guide, and Turbo Assembler Quick-Reference Guide. The User's Guide provides basic instructions for using Turbo Assembler and a thorough examination of assembler programming. The Reference Guide describes the operators, predefined symbols, and directives Turbo Assembler uses. The Quick Reference is a handy guide to processor and coprocessor instructions.
Here's a more detailed look at what the User's Guide contains.
The User's Guide Chapter 1: Installing Turbo Assembler tells you about the files on your distribution disks and what you need to do to install Turbo Assembler on your system.
Chapter 2: Getting started In Turbo Assembler provides you with an introduction to programming in assembly language, and a few sample programs to make you comfortable using the command-line switches.
Chapter 4: The nature of assembly language leads you through a discussion of computers in general and the 8088 processor in particular.
Chapter 5: The elements of an assembler program describes the basic components of assembler, with some good solid information about directives, instructions, accessing memory, segments, and more.
Chapter 6: More about programming In Turbo Assembler goes one step further than Chapter 5, discussing some advanced aspects of Turbo Assembler-more about directives, string instructions, and so on. This chapter also covers some common pitfalls you may encounter as an assembly progralnmer.
Chapter 7: Interfacing Turbo Assembler with Turbo C describes how to use Turbo C, a high-level language, with assembly language. We detail how to link assembler modules to Turbo C and how to call Turbo Assembler functions from Turbo C.
Chapter 8: Interfacing Turbo Assembler with Turbo Pascal tells you how to interface your assembler code with your Turbo Pascal code; sample programs are also provided.
Chapter 9: Advanced programming In Turbo Assembler provides you with more details about everything we've touched on in earlier chapters, such as segment override prefixes, macros, segment directives, and so on.
Chapter 10: The 80386 and other processors covers programming with the 80386.
Chapter 11: Turbo Assembler Ideal mode tells you all about Ideal mode and why you'll want to use it.
References lists several useful books about assembly programming.
Notational conventions
Introduction
When we talk about IBM PCs or compatibles, we're referring to any computer that uses the 8088, 8086, 80186, 80286, and 80386 chips (all of these chips are commonly referred to as 80x86). When discussing PC-OOS, DOS, or MS-DOS, we're referring to version 2.0 or greater of the operating system.
All typefaces were produced by Borland's Sprint: The Professional Word Processor, output on a PostScript printer. The different typefaces displayed are used for the following purposes:
Italics
In text, italics represent labels, placeholders, variables, and arrays. In syntax expressions, placeholders are set in italics to indicate that they are user-defined.Boldface Boldface is used in text for directives, instructions, symbols, and operators, as well as for command-line options.
CAPITALS In text, capital letters are used to represent instructions, directives, registers, and operators.
Monospace Monospace type is used to display any sample code, text or code that appears on your screen, and any text that you must actually type to assemble, link, and run a program.
Keycaps In text, keycaps are used to indicate a key on your keyboard. It is often used when describing a key you must press to perform a particular function; for example, "Press Enter after typing your program name at the prompt."
How to contact Borland
If, after reading this manual and using Turbo Assembler, you would like to contact Borland with comments, questions, or suggestions, we suggest the following procedures:
• The best way is to log on to Borland's forum on CompuServe: Type GO BPROGB at the main CompuServe menu and follow the menus to Turbo Assembler. Leave your questions or comments here for the support staff to process .
• If you prefer, write a letter detailing your problem and send it to
Technical Support Department Borland International
Introduction
• You can also telephone our Technical Support department at (408) 438-5300. To help us handle your problem as quickly as possible, have these items handy before you call:
• product name and version number • product serial number
• computer make and model number • operating system and version number
If you're not familiar with Borland's No-Nonsense License
statement, now's the time to read the agreement at the front of this manual and mail in your completed product registration card.
c
HFiles on disk
A p
T
ER
1
Installing Turbo Assembler
Before we get you up to speed on programming in assembler, you'll need to get one thing out of the way. Take the Turbo Assembler disks and make copies (via DOS) of each one to create your "working" copies. Once you've done that, put the original disks away. (There's a fee to replace disks that you damage, so only use the originals to make backups and work copies.)
If you are going to use Turbo Assembler as a replacement for MASM, read Appendix B in the Reference Manual to see in which areas Turbo Assembler behaves differently from MASM.
Note: Be sure to read the README file before working with Turbo Assembler. This file contains the latest information about the program, as well as corrections and/or additions to the manuals.
• TASM.EXE: Turbo Assembler • TLINK.EXE: Turbo Linker
• MAKE.EXE: Command-line MAKE utility • TLIB.EXE: Turbo Librarian
• README.COM: Program to display README file
• README: Any last minute information about the software and documentation
• TCREF.EXE: A source file cross-reference utility • OBJXREF.COM: Object file cross-reference utility • GREP.COM: Grep utility
• TOUCH.COM: A file-update utility • INSTALL.EXE: Installation program
• MMACROS.ARC: An archived file of MASM mode macros
Installing Turbo Assembler
The INSTALL disk contains a program called INST ALL.EXE that will assist you with the installation of Turbo Assembler 1.0. There are two options for installation:
1. Hard Disk Users: This option allows you to pick the subdirectories where the files will be loaded.
2. Floppy Disk Users: This option will install the files necessary to use Turbo Assembler on a two-drive system. Be sure to have four fonnatted disks ready before you start.
To start the installation, change your current drive to the one that has the INSTALL program on it and type INSTALL. You will be given instructions for each prompt in a box at the bottom of the screen. For example, if you will be installing from drive A, type
INSTALL
Before you install Turbo Assembler, be sure to read the README file to get further infonnation about this release.
Note: If you will be running INSTALL on a laptop or any other system that uses an LCD display, you should set your system to black-and-white mode before running INSTALL. You can do this from DOS with the following command line:
mode bw80
You can also force INSTALL to come up in black-and-white mode by using the Ib switch:
c
H Ap
T
E
R
2
Getting staried with Turbo Assembler
If you've never programmed in assembly language before, this is the place to begin. You might have heard that assembly language programming is a black art suited only to hackers and wizards. Don't believe it! Assembly language is nothing more than a human form of the language of the computer itself and, as you'd expect, the computer's own language is highly logical. As you might also expect, assembly language is very powerful-in fact, assembly language is the only way to tap the full power of the Intel80x86 family, the processors at the heart of the IBM PC family and compatibles.
You can write whole programs in nothing but assembly language or you can, if you want, mix assembly language into programs written in Turbo C, Turbo Pascal, Turbo Prolog, Turbo Basic, and other languages. Either way, with assembly language, you can write small and blindingly fast programs. As important as speed is the assembly language code's ability to control every aspect of your computer's operation, down to the last tick of the system dock.
In this chapter, we'll introduce you to assembly language and explore the unique qualities of assembly language programming. You'll enter and run several working assembly language
programs, both to get a feel for the language and to get used to working with the assembler.
Chapter 5, "The elements of an assembler program," picks up where this chapter leaves off, covering the structure of ~n
assembly language program and fundamental program elements and summing up everything you've learned with a full-fledged example program.
Chapter 6, "More about programming in Turbo Assembler," continues to explore assembly language programming, and Chapter 9 , "Advanced programming in Turbo Assembler," progresses to memory models, macros, and other advanced topics.
Naturally, we can't make you expert assembly language programmers in the course of a few chapters; we're simply introducing you to assembly language and getting you started on the road to writing your own programs. We strongly suggest that you get one of the many excellent books devoted entirely to assembly language programming and PC architecture (see the references at the end of this book). In addition, you may find IBM's
DOS Technical Reference, BIOS Interface Technical Reference,
andPersonal Computer XT Technical Reference
manuals to be useful reference material; these manuals document the assemblylanguage programming interface to the systems software and hardware of IBM's personal computers.
Before you read further, you might want to read Chapter 3, "Command-line reference," to familiarize yourself with the command-line options. You should also install Turbo Assembler (make working copies of your Turbo Assembler disks or copy the files from your Turbo Assembler disks onto your hard disk) as described in Chapter 1, ''Installing Turbo Assembler," if you haven't already done so.
One final point: Assembly language is a complex topic, and there are many things you will need to know in order to write even a relatively simple assembly language program. Sometimes we'll have to use features in our examples that we haven't discussed yet, simply because we have to start
somewhere.
Bear with us; we'll explain everything in due course. If, at any time, you're curious about a specific feature, just look in Chapter 3, "Directives," in theReference Guide.
With that out of the way, and with Chapter 3 of the second volume close at hand, it's time to create your first assembly language program.
your fingertips. (Whatever your decision, the file names are provided at the beginning of each example for your convenience.
Writing your first Turbo Assembler program
Assembling your
first program
In the world of programming, the first program is traditionally a program that displays the message, "Hello, world" and that's as good a place as any for us to start.
Get into your text editor of choice (one that outputs ASCII files), and type in the following lines that make up the program HELLO.ASM:
.MODEL small .STACK 100h • DATA
HelloMessage DB 'Hello, world' ,13,10,'$' .CODE
mov ax,@data
mov ds,ax iset OS to point to the data segment mov ah,9 iDOS print string function
mov dx,OFFSET HelloMessage ipoint to "Hello, world" int 21h idisplay "Hello, world" mov ah,4ch iDOS terminate program function
int 21h iterminate the program END
As soon as you've entered HELLO.ASM, save it to disk.
If you're familiar with C or Pascal, you might be thinking that the assembler version of "Hello, world" seems a bit long. Well, yes, assembler programs do tend to be long because each assembler instruction by itself does less than a C or Pascal instruction. On the other hand, you've got complete freedom in combining those assembler instructions in any way you want. That means that, unlike C and Pascal, assembler lets you program the computer to do
anything
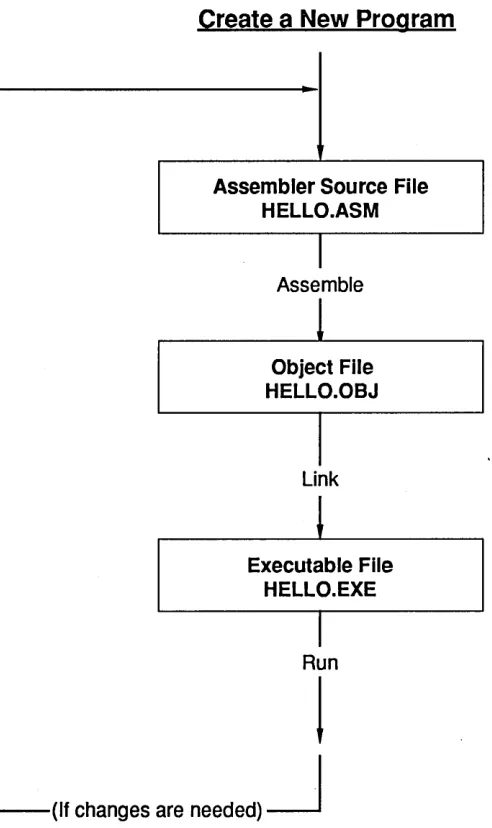
it's capable of-and that's often worth typing a few extra lines.Now that you've saved HELLO.ASM, you'll want to run it. Before you can run the program, though, you'll have to convert it into an executable (able to be run or executed) form. This requires two additional steps, assembling and linking, as shown in Figure 2.1,
Figure 2.1 The edit, assemble, link, and
run cycle
which depicts the complete edit, assemble, link, and run program development cycle.
Create a New Program
Assembler Source File HELLO.ASM
Assemble
!
Object File HELLO.OBJ
I
Link
l
Executable File HELLO.EXE
I
Run
!
(If changes are needed)
~
Linking your first
program
more object modules into an executable program. You can do your assembling and linking from the command line.
To assemble HELLO.ASM, type
TASM hello
Unless you specify another file name, HELLO.ASM will be assembled to HELLO.OBJ. (Note that you don't need to type in the file extension name; Turbo Assembler assumes .ASM in this case.) This is what you'll see onscreen:
Turbo Assembler Version 2.0 Copyright (c) 1988, 1990 by Borland International, Inc.
Assembling file: HELLO.ASM Error messages: None Warning messages: None Passes: 1
Remaining memory: 266K
You won't receive any warnings or errors if you typed HELLO.ASM exactly as shown. If you get warnings or errors, they'll appear onscreen, along with the line numbers to indicate where they occurred. If you get errors, check your code and make sure it's precisely the same as the code we've shown you, then assemble the program again.
After you've successfully assembled HELLO.ASM, you're only one step away from running your first assembler program. Once you've linked the just-assembled object code into an executable form, you can run the program.
To link the program, you'll use TLINK, the linker accompanying Turbo Assembler. At the command line, type
TLINK hello
Again, there's no need to enter the extension name; TLINK assumes it's .OBJ. When linking completes (again, after a few seconds at most), the linker automatically gives the .EXE file the same name as your object file, unless you've specified otherwise. When linking is successful, this message appears onscreen:
Turbo Link Version 3.0 Copyright (c) 1987, 1990 by Borland International, Inc.
Running your first
Errors can occur during the linking process, although that's unlikely with this example program. If you do receive any link errors (they'll appear onscreen), modify your code to exactly rna tch the code shown here, then assemble and link again.
program
Now you're ready to run your program. Type hello at the DOS prompt. The messageHello, world
will be displayed onscreen. And that's all there is to it-you've just created and run your first Turbo Assembler program!
What happened?
Now that you've gotten HELLO.ASM up and running, let's go back and figure out exactly what happened along the path from entering text to running the program.
When you first entered the assembler source code, the text was stored by your text editor in memory. If the computer had been turned off at this point, for whatever reason, the source code would have been lost; consequently, we suggest you save your source code early and often in order to avert possible tragedy. When you saved the source code to disk, a permanent copy of the text was stored in the file HELLO.ASM, where it would survive even if you shut off your computer. (HELLO.ASM might not survive a disk crash, however, so we also suggest that you back up your disks regularly.) HELLO.ASM is a standard ASCII text file; you can display it at the DOS prompt by typing
type hello.asm
and you can edit it with any text editor.
Next, when you linked HELLO.OB], TLINK converted it into the executable file HELLO.EXE. Finally, you ran HELLO.EXE when you typed hello at the prompt.
Now type
dir hello.*
to list the various HELLO files on your disk. You'll find HELLO.ASM, HELLO.OB], HELLO.EXE, and HELLO.MAP.
Modifying your first Turbo Assembler program
Now go back to your editor and modify your program to accept a bit of input from the outside world. (The outside world is you, typing at your keyboard.) Change the code to the following:
.MODEL small .STACK 100h • DATA
TimePrompt DB 'Is it after 12 noon (Y/N)?$' GoodMorningMessage LABEL BYTE
DB 13,10,'Good morning, world!',13,10,'$' GoodAfternoonMessage LABEL BYTE
DB 13,10,'Good afternoon, world!' ,13,10,'$' • CODE mov mov mov mov int mov ax,@data ds,ax
dx,OFFSET TimePrompt ah,9
21h ah,1
iset OS to point to data segment ;point to the time prompt ;DOS print string function # idisplay the time prompt ;DOS get character function #
int cmp jz 21h al,'y' IsAfternoon
;get a single-character response ityped lowercase y for after noon? iyes, it's after noon
cmp al,'Y' jnz IsMorning IsAfternoon:
ityped uppercase Y for after noon?
ino, it's before noon
mov dx,OFFSET GoodAfternoonMessage ;point to the afternoon ; greeting
jmp DisplayGreeting IsMorning:
mov dx,OFFSET GoodMorningMessage ;point to the before noon
i greeting DisplayGreeting:
mov ah,9 int 21h
Chapter 2, Getting started with Turbo Assembler
iDOS print string function # ;display the appropriate greeting
mov ah,4ch int 21h
END
;005 terminate program function t ;terminate the program
You've added two important new capabilities to your program: input and decision-making. This program asks you whether it's
after
noon, then accepts a single-character response from the keyboard. If the character typed is an uppercase or lowercase Y, the program displays a greeting appropriate for the afternoon; otherwise, it gives a morning greeting. All the essential elements of a useful program-input from the outside world, dataprocessing and decision-making, and output to the outside world-are present in this code.
Save the modified program to disk. (This replaces your original version of HELLO.ASM with the modified code, so the original version will be lost.) Then reassemble and relink the program just as you did in the previous examples. Run the program again by typing hello at. the DOS prompt. The message
Is it after 12 noon (YIN)?
is displayed, with the cursor blinking after the question mark, waiting for your response. Press Y. The program responds
Good afternoon, world!
HELLO.ASM is now an interactive, decision-making program.
In the course of your assembler programming, you will surely make a wide variety of mistakes in typing and in program syntax. Turbo Assembler ca tches many mistakes for you as it assembles your code, reporting all such errors. The mistakes reported fall into two categories: warnings and errors. Turbo Assembler displays a
warning
message if it detects something suspicious, but not necessarily wrong, in your code; sometimes warnings can be ignored, but it's always best to check them out and make sure you understand the problem. Turbo Assembler displays anerror
message if it encounters something clearly wrong in your code that makes it impossible to complete assembly and generate an object file.Sending output to
a printer
As with any programming language, Turbo Assembler can't catch logic errors for you. Turbo Assembler can tell you whether your code can be assembled, but it can't tell you whether the assembled code will perform as you intended it to-only you can be the judge of that.
Don't worry if the example code doesn't make much sense to you right now. Even programmers experienced in other languages take some time to become fluent in 8086 assembly language; there's really nothing quite like it under the sun. At this point, you're just getting a feel for what assembler programs look like. Later in this chapter, and in Chapter 5, "The elements of an assembler program," we'll cover each of the elements of the programs presented.
To list or send your program to a printer, consult your specific text editor's manual. Turbo Assembler source files are normal ASCII text files, so you can also print any assembler source file from the DOS prompt with the PRINT command.
The printer is a handy output device; not only will you sometimes want to send your program files to the printer, but you'll also want your programs to send output to the printer on occasion. The following is a version of the "Hello, world" program that displays its output on the printer rather than on the screen:
.MODEL small .STACK 100h • DATA
HelloMessage DB 'Hello, world' ,13,10,12 HELLO_MESSAGE_LENGTH EQU $ - HelloMessage
• CODE mov ax,@data mov ds,ax mov ah,40h
;set OS to point to the data segment ;DOS write to device function f mov bx,4
mov cx,HELLO_MESSAGE_LENGTH mov dx,OFFSET HelloMessage int 21h
mov ah,4ch int 21h END
;printer handle
;number of characters to print
i string to print iprint "Hello, world"
;DOS terminate program function f ;terminate the program
In this version of the "Hello, world" program, you've replaced the OOS function to print a string on the screen with a OOS function
that sends a string to a selected device or file-in this case, the printer. Enter and run the program, and see that a sheet con-taining the familiar ''Hello, world" message is printed. (Don't forget to save the program before running it. Again, this saves the modified code in HELLO.ASM, and the previous version of the program will be lost.)
You can modify this program to send output to the screen rather than to the printer, displaying "Hello, world" onscreen again, simply by changing
mov bx,4 ;printer handle to
mov bx,l ;standard output handle
Make this change, then reassemble and relink before running the program again. You'll note that when the output is displayed on the screen, the final character shown is the universal symbol for "female" (~). This is actually a
formfeed character,
which the program sent to the printer to force it to eject the sheet on which you'd printed "Hello, world." Since the screen doesn't have sheets, it doesn't know about formfeeds, so it simply displays the corresponding member of the PC's character set when told to print a formfeed character.Writing your second Turbo Assembler program
Now you're ready to enter and run a program that actually
does
something, REVERSE.ASM. Go back into your text editor and enter the following:.MODEL small .STACK 100h • DATA
MAXIMUM_STRING_LENGTH EQU 1000
StringToReverse DB MAXIMUM_STRING_LENGTH DUP(?) ReverseString DB MAXIMUM_STRING_LENGTH DUP(?)
• CODE mov ax,@data mov ds,ax mov ah,3fh mov bx,O
;set DS to point to the data segment ;DOS read from handle function f ;standard input handle
Running
mov dx,OFFSET StringToReverse istore the string here int 21h iget the string
and ax,ax iwere any characters read? jz Done ino, so you're done
mov cx,ax iPut string length in
ex,
wherei you can use it as a counter push cx isave the string length mov bx,OFFSET StringToReverse
mov .si,OFFSET ReverseString add si,cx
dec si ipoint to the end of the
i reverse string buffer ReverseLoop:
mov aI, [bx] mov [si],al inc bx dec si
loop ReverseLoop pop cx
mov ah,40h mov bx,l
iget the next character
istore the characters in reverse order ipoint to next character
ipoint to previous location
i in reverse buffer
imove next character, if any iget back the string length iDOS write from handle function f
mov dx,OFFSET ReverseString int 21h
istandard output handle iprint this string iprint the reversed string Done:
mov ah,4ch int 21h END
iDOS terminate program function f iterminate the program
You'll see what the program actually does in a moment; first, as always, you should save your work.
REVERSE.ASM
To run REVERSE.ASM, you must first assemble it; type TASM reversethen type
TLINK reverse
to create the executable file.
Type reverse at the prompt to run your program. If Turbo Assembler reports any errors or warnings, carefully check your code to see that it matches the code shown previously, then try running the program again.
After you run your program, the cursor will sit blinking onscreen. Apparently, the program is waiting for you to type something. Try typing
ABCDEFG
then press Enter. The program displays
GFEDCBA
and ends. Type reverse agam at the command line. This time, type
0123456789
and press Enter. The program displays
9876543210
Now it's clear what REVERSE.ASM does: It reverses whatever string of characters you type in. Speedy manipulation of characters and strings is one of the areas in which assembly language excels, as you'll see in the next few chapters.
Congratulations! You've entered, assembled, linked, and run several assembler programs, and you've seen the fundamentals of assembler programming-input, processing, and output-in action.
If you don't want an object file but you do want a listing file, or if
you want a cross-reference file but don't want a listing file or object file, you can specify the null device (NUL) as the file name. For example,
TASM FILE1"NUL,
assembles file FILEl.ASM to object file FILE1.0BJ, doesn't produce a listing file, and creates a cross-reference file FILEl.XRF.
c
H A pT
E
R3
Command-line reference
This chapter is dedicated to familiarizing you with Turbo Assembler's command-line options. We'll describe each of the command-line options you can use to alter the assembler's
behavior, then show how and when to use command files. Finally, we describe the configuration file.
Starting Turbo Assembler from DOS
Turbo Assembler has a very powerful and flexible command-line syntax. If you start Turbo Assembler without giving it any arguments, like this,
TASM
you'll get a screenful of help describing many of the command-line options and the syntax for specifying the files you want to assemble. Figure 3.1 shows you how this looks.
Figure 3.1 Turbo Assembler command
line
Turbo Assembler Version 2.0 Copyright (C) 1988, 1990 by Borland International, Inc.
Syntax: TASM [options] source [,object] [,listing] [,xref] /a,/s /c /dSYM[=VAL] /e,/r /h,/? /iPATH /jCMD /khl,/ksl /l,/la /ml,/mx,/mu /mvl /ml /n /p /q /t /wO,/wl,/w2 /w-xxx,/w+xxx /x /z /zi,/zd
Alphabetic or Source-code segment ordering Generate cross-reference in listing Define symbol SYM = 0, or = value VAL Emulated or Real floating-point instructions Display this help screen
Search PATH for include files
Jam in assembler directive CMD (eg. /jIDEAL) Hash table capacity I, String space capacity I
Generate listing: l=normal listing, la=expanded listing Case sensitivity on symbols: ml=all, mx=globals, mu=none Set maximum valid length for symbols
Allow I mUltiple passes to resolve forward references Suppress symbol tables in listing
Check for code segment overrides in protected mode Suppress OBJ records not needed for linking Suppress messages if successful assembly Set warning level: wO=none, w1=w2=warnings on Disable (-) or enable (+) warning xxx Include false conditionals in listing Display source line with error message Debug info: zi=full, zd=line numbers only
With the command-line options, you can specify the name of one or more files that you want to assemble, as well as any options that control how the files get assembled.
The general form of the command line looks like this:
TASM fileset [; fileset] ...
The semicolon (i) after the left bracket
(D
allows you to assemble multiple groups of files on one command line by separating the file groups. If you prefer, you can set different options for each set of filesi for example,TASM Ie FILE1; la FILE2
assembles FILE1.ASM with the Ie command-line option and assembles file FILE2.ASM with the la command-line option.
In the general form of the command line,
fileset
can be[option] ••• sourcefile [[+] sourcefile] ...
[, [objfile] [, [listfile] , [, [xreffile]]]]
want to assemble. A file name can be a single file name, or it can use the normal OOS wildcard characters If-and ? to specify
multiple files to assemble. If your file name does not have an extension, Turbo Assembler adds the .ASM extension. For example, to assemble all the .ASM files in the current directory, you would type
TASM
*
If you want to assemble multiple files, you can separate their names with the plus sign (+):
TASM MYFILEI + MYFlLE2
You can follow the file name you want to assemble by an optional object file name, listing file name, and a cross-reference file name. If you do not specify an object file or listing file, Turbo Assembler creates an object file with the same name as the source file and an extension of .OBJ.
A listing file is not generated unless you explicitly request one. To request one, place a comma after the object file name, followed by a listing file name. If you don't explicitly provide a listing file name, Turbo Assembler creates a listing file with the same name as the source file and the extension .LST. If you supply a listing file name without an extension, .LST is appended to it.
A cross-reference file is not generated unless you explicitly request one. To request one, place a comma after the listing file name, followed by a cross-reference file name. If you don't explicitly provide a cross-reference file name, Turbo Assembler creates a cross-reference file with the same name as the source file and the extension .XRF. If you supply a cross-reference file name without an extension,.XRF is appended to it. (TCREF, a cross-reference utility, is described Oil disk.)
If you want to accept the default object file name and also request a listing file, you must supply the comma that separates the object file name from the listing file name:
TASM FILEl" TEST
This assembles FILEl.ASM to FILE1.0BJ and creates a listing file named TEST.LST.
If you want to accept the default object and listing file names and also request a cross-reference file, you must supply the commas that separate the file names:
TASM MYFILE",MYXREF
This assembles file MYFILE.ASM to MYFILE.OBJ, with a listing in file MYFILE.LST and a cross-reference in MYXREF.XRF.
If you use wildcards to specify the source files to assemble, you can also use wildcards to indicate the object and listing file names. For example, if your current directory contains XXI.ASM and XX2.ASM, the command line
TASM XX*,YY*
assembles all the files that start with XX, generates object files that start with W, and derives the remainder of the name from the source file ·name. The resulting object files are therefore called YYI.OBJ and YY2.0BJ.
If you don't want an object file but you do want a listing file, or if
you want a cross-reference file but don't want a listing file or object file, you can specify the null device (NUL) as the file name. For example,
TASM FlLEl"NUL,
assembles file FILE1.ASM to object file FILE1.0BJ, doesn't produce a listing file, and creates a cross-reference file FILEI.XRF.
Command-line options
The command-line options let you control the behavior of the assembler, and how it outputs information to the screen, listing, and object file. Turbo Assembler provides you with some options that produce no action, but are accepted for compatibility with the current and previous versions of MASM:
Ib Sets buffer size
Iv Displays extra statistics
You can enter options using any combination of uppercase and lowercase letters. You can also enter your options in any order except where you have multiple II or Ij options; these are processed in sequence. When using the Id option, you must also be careful to define symbols before using them in subsequent Id options.
/a
/b
Figure 3.1 on page 22 summarizes the Turbo Assembler command-line options; here's a detailed description of each option.
Function Specifies alphabetical segment-ordering
Syntax fa
la
Remarks The la option tells Turbo Assembler to place segments in the object file in alphabetical order. This is the same as using the .ALPHA directive in your source file.
You usually only have to use this option if you want to assemble a source file that was written for very early versions of the IBM or Microsoft assemblers.
The Is option reverses the effect of this option by returning to the default sequential segment-ordering.
If you specify sequential segment-ordering with the .SEQ directive in your source file, it will override any la you provide on the command line.
Example TASM / a TEST!
This command line creates an object file, TEST1.0BJ, that has its segments in alphabetical order.
Syntax fb
Remarks The Ib option is included for compatibility. It performs no action and has no effect on the assembly.
Ie
Ie
Id
Function Enables cross-reference in listing file
Syntax Ie
Remarks The Ie option enables cross-reference information in the listing file. Turbo Assembler adds the cross-reference information to the symbol table at the end of the listing file. This means that, in order to see the cross-reference information, you must either explicitly specify a listing file on the command line or use the II option to enable the listing file.
For each symbol, the cross-reference shows the line on which it is defined and all lines that refer to it.
Example TASM /1 /e TEST!
This code creates a listing file that also has cross-reference information in the symbol table.
Function Defines a symbol
Syntax Idsymbol [=value or expression]
Remarks The Id option defines a symbol for your source file, exactly as if it were defined on the first line of your file with the
=
directive. You can use this option as many times as you want on the command line.You can only define a symbol as being equal to another symbol or a constant value. You can't use an expression with operators to the right of the equal sign (=). For example, IdX=9 and IdX= Yare allowed, but IdX= Y -4 is not allowed.
Example TASM /dMAX=lO /dMIN=2 TESTl
/e
Function Generates floating-point emulator instructions
Syntax Ie
Ie
Remarks The Ie option tells Turbo Assembler to generate floating-point instructions that will be executed by a software floating-point emulator. Use this option if your program contains a floating-point emulation library that mimics the functions of the 80x87 numeric coprocessor.
Normally, you would only use this option if your assembler module is part of a program written in a high-level language that uses a floating-point emulation library. (Turbo C, Turbo Pascal, Turbo Basic, and Turbo Prolog all support floating-point emulation.) You can't just link an assembler program with the emulation library, since the library expects to have been initialized by the compiler's startup code.
The Ir option reverses the effect of this option by enabling the assembly of real floating-point instructions that can only be executed by a numeric coprocessor.
If you use the NOEMUL directive in your source file, it will override the Ie option on the command line.
The Ie command-line option has the same effect as using the EMUL directive at the start of your source file, and is also the same as using the IjEMUL command-line option.
Example TASM / e SECANT
TCC -f TRIG.C SECANT.OBJ
The first command line assembles a module with emulated floating-point instructions. The second command line compiles a C source module with floating-point emulation and then links it with the object file from the assembler.
/h
or
/?
Function Displays a help screen
Syntax /h or /?
Remarks The Ih option tells Turbo Assembler to display a help screen that describes the command-line syntax. This includes a list of the options, as well as the various file names you can supply. The 11 option does the same thing.
Ih or I?
Ii
Example TASM /h
Function Sets an Include file path
Syntax /iPATH
Remarks The II option lets you tell Turbo Assembler where to look for files that are included in your source file by using the INCLUDE directive. You can place more than one II option on the command line (the number is only limited by RAM).
When Turbo Assembler encounters an INCLUDE directive, the location where it searches for the Include file is determined by whether the file name in the INCLUDE directive has a directory path or is just a simple file name.
If you supply a directory path as part of the file name, that path is tried first, then Turbo Assembler searches the directories specified by II
command-line options in the order they appear on the command line. It
then looks in any directories specified by II options in a configuration file.
If you don't supply a directory path as part of the file name, Turbo Assembler searches first in the directories specified by II command-line options, then it looks in any directories specified by II options in a configuration file, and finally it looks in the current directory.
Example TASM / i \ INCLUDE / iD: \INCLUDE TEST!
If the source file contains the statement
INCLUDE MYMACS.INC
Turbo Assembler will first look for \ INCLUDE \ MYMACS.INC, then it
will look for D:\INCLUDE\MYMACS.INC. If it still hasn't found the file,
it will look for MYMACS.INC in the current directory. If the statement in your source file had been
INCLUDE INCS\MYMACS.INC
Turbo Assembler would first look for INCS\MYMACS.INC and then it would look for \INCLUDE\MYMACS.INC, and finally for D:\
/j
/kh
Function Defines an assembler startup directive
Syntax /jdirective
Ij
Remarks The Ij option lets you specify a directive that will be assembled before the first line of the source file.
directive
can be any Turbo Assembler directive that does not take any arguments, such as .286, IDEAL, %MACS, INOJUMPS, and so on. See Chapter 3 in the
Reference Guide
for a complete description of all Turbo Assembler directives.You can put more than one Ij option on the command line; they are processed from left to right across the command line.
Example TASM /j .286 /jIDEAL TEST!
This code assembles the file TEST1.ASM with 80286 instructions enabled and Ideal mode expression-parsing enabled.
Function Sets the maximum number of symbols allowed
Syntax /khnsymbols
Remarks The Ikh option sets the maximum number of symbols that your program can contain. If you don't use this option, your program can only have a maximum of 8,192 symbols; using this option increases the number of symbols to
nsymbols,
up to a maximum of 32,768.Use this option if you get the Out of hash space message when assembling your program.
You can also use this option to reduce the total number of symbols below the default 8,192. This releases some memory that can be used when you are trying to assemble a program but don't have enough available memory.
Example TASM /khlOOOO BIGFILE
This command tells Turbo Assembler to reserve space for 10,000 symbols when assembling the file BIGFILE.
/ks
/ks
/1
/10
Function Sets the maximum size of Turbo Assembler's string space
Syntax /kskbytes
Remarks Usually the string size is determined automatically and does not need to be adjusted. However, if you have a source file that results in an Out of string space message, you might want to increase the string space size by using this option. Try starting with a value of 100, and increase it until your program assembles without error. The maximum allowable value for
kbytes
is 255.Example TASM Iksl50 SFILE
This tells Turbo Assembler to reserve 150K of string space.
Function Generates a listing file
Syntax Ii
Remarks The II option indicates that you want a listing file, even if you did not explicitly ~pecify it on the command line. The listing file will have the same name as the source file, with an extension of .LST.
Example TASM 11 TEST!
This command line requests a listing file that will be named TEST1.LST.
Function Shows high-level interface code in listing file
Syntax /la
Remarks The Iia option tells Turbo Assembler to show all generated code in the listing file, including the code that gets generated as a result of the high-level language interface .MODEL directive.
1m
Iml
Function
Syntax
Remarks
Sets the maximum number of assembly passes
Im[npasses]
1m
Normally, Turbo Assembler functions as a single-pass assembler. The 1m option allows you to specify the maximum number of passes that the assembler should make during the assembly process. T ASM automatically decides whether it can perform less than the number of passes specified. If
you don't specify npasses, a default of five is used.
Some modules contain constructions that assemble properly only when two passes are done. If multiple passes are not enabled, such a module will produce at least one "Pass-dependent construction encountered" warning. If the 1m option is enabled, Turbo Assembler will assemble this module correctly but will not optimize the code by removing NOPs, no matter how many passes are allowed. The warning IIModule is pass dependent-<:ompatibility pass was done" is displayed if this occurs.
Example TASM 1M2 TESTl
This tells Turbo Assembler to use up to two passes when assembling TESTl.
Function Treats symbols as case-sensitive
Syntax Iml
Remarks The Iml option tells Turbo Assembler to treat all symbol names as case-sensitive. Normally, uppercase and lowercase letters are considered equivalent so that the names ABCxyz, abcxyz, and ABCXYZ would all refer to the same symbol. If you specify the Iml option, these three symbols will be treated as distinct. Even when you specify Iml, you can still enter any assembler keyword in uppercase or lowercase. Keywords are the symbols built into the assembler that have special meanings, such as instruction mnemonics, directives, and operators.
Example TASM Iml TESTl
where TESTl.ASM contains the following statements:
abc OW 0
ABC OW 1 inot a duplicate symbol
/mu
/mu
/mv#
/mx
Mov Ax,!Bp] imixed case OK in keywords
Function Converts symbols to uppercase
Syntax /mu
Remarks The Imu option tells Turbo Assembler to ignore the case of all symbols. By default, Turbo Assembler specifies that any lowercase letters in symbols will be converted to uppercase unless you change it by using the Iml directive.
Example TASM /mu TEST!
makes sure that all symbols are converted to uppercase (which is the default):
EXTRN myfunc:NEAR
call myfunc idon't know if declared as
i MYFUNC, Myfunc, ••.
Function Sets the maximum length of symbols.
Syntax
tmv'
Remarks The Imv# option sets the maximum length of symbols that T ASM will distinguish between. For example, if you set Imv3, TASM will see ABCC
and ABCD as the same symbol, but not AB.
Function Makes public and external symbols case-sensitive
Syntax /rnx
In
Ip
/mx
You should use this directive when you call routines in other modules that were compiled or assembled so that case-sensitivity is preserved; for example, modules compiled by Turbo C.
Example TASM Irnx TEST1;
where TESTl.ASM contains the following source lines:
EXTRN Cfunc:NEAR rnyproc PROC NEAR call Cfunc
Function Suppresses symbol table in listing file
Syntax In
Remarks The In option indicates that you don't want the usual symbol table at the end of the listing file. Normally, a complete symbol table listing appears at the end of the file, showing all symbols, their types, and their values.
You must specify a listing file, either explicitly on the command line or by using the II option; otherwise, In has no effect.
Example TASM II In TEST!
This code generates a listing file showing the generated code only, and not the value of your symbols.
Function Checks for impure code in protected mode
Syntax Ip
Remarks The Ip option specifies that you want to be warned about any instructions that generate "impure" code in protected mode. Instructions that move data into memory by using a CS: override in protected mode are
considered impure because they might not work correctly unless you take special measures.
You only need to use this option if you are writing a program that runs on the 80286 or 80386 in protected mode.
Example TASM Ip TEST!
/p
/q
/r
where TEST1.ASM contains the following statements:
.286P CODE SEGMENT temp OW ?
mov CS:temp,O ;impure in protected mode
Function Suppresses .OBI records not needed for linking
Syntax /q
Remarks The Iq option removes the copyright and file dependency records from the resulting .OBI files, making it smaller. Don't use this option if you are using MAKE or a similar program that relies on the dependency records.
Function Generates real floating-point instructions
Syntax Ir
Remarks The Ir option tells Turbo Assembler to generate real floating-point instructions (instead of generating emulated floating-point instructions). Use this option if your program is going to run on machines equipped with an 8Ox87 numeric coprocessor.
The Ie option reverses the effect of thi