Best Practices When Deploying
Linux on HP ProLiant DL980 G7 Servers
Technical white paper
Table of contents
Introduction ... 2
Linux Hardware Overview ... 3
CPU Mappings ... 3
PCI Slot Mappings ... 3
Non-Uniform Memory Access (NUMA) Overview ... 4
Displaying Node Distances ... 4
Displaying Task Information ... 5
Displaying Memory Allocation Statistics ... 5
Controlling Task and Memory Placement ... 6
Moving Tasks to Other NUMA Nodes ... 6
Controlling Task and Memory Object Placement ... 6
Determining Task Memory Allocation Location ... 7
OS Support Matrix for the HP ProLiant DL980 G7 Server ... 7
Additional Recommended Software Components When Running Linux on the DL980 ... 8
HP ProLiant Support Pack (PSP) ... 8
HP System Management Homepage (SMH) ... 11
Hardware Best Practices ... 12
Boot Adapter Location ... 12
Power Consumption Settings ... 12
Virtualization Settings ... 14
RHEL 5.6 and SLES 10 SP4 Best Practices ... 15
Disable Hyper-threading to Reduce Scheduler Overhead ... 15
Disable x2APIC with Intel Xeon E-7 Series Processors ... 16
Verify 40-bit Mode before OS Installation ... 17
Use the NOOP I/O Scheduler ... 19
Increase Crash Kernel Size ... 19
Known Issues and Workarounds ... 19
RHEL 6.X and SLES 11 SP1 Best Practices ... 20
Disable Hyper-threading to Reduce Scheduler Overhead ... 20
Enable 44-bit System Address Mode with 1 TB or more Memory ... 21
Use the NOOP I/O Scheduler ... 23
Increase Crash Kernel Size ... 23
Oracle Database Best Practices ... 24
Enable Hyper-threading for CPU-intensive Workloads... 24
Use HugePages ... 24
Enable Oracle NUMA Optimizations ... 25
For More Information ... 26
Introduction
This purpose of this white paper is to facilitate the successful deployment and configuration of Linux operating systems on HP ProLiant DL980 G7 servers. It includes a description of additional recommended HP software components for the DL980, and best practices you can use when deploying Linux on the DL980. Topics include:
• Non-Uniform Memory Access (NUMA) overview
• Operating System (OS) support matrix
• Additional recommended software components
• Hardware best practices
• Red Hat Enterprise Linux 5.6 and SUSE Linux Enterprise Server 10 SP3 best practices
• Red Hat Enterprise Linux 6.X and SUSE Linux Enterprise Server 11 SP1 best practices
• Oracle Database best practices
The HP ProLiant DL980 G7 server is HP’s latest 8 socket, x86-based, 64-bit scale up platform. Available in 4-, 6-, 8-, and 10-core configurations, it can support up to 160 logical processors (with 8 Intel®Xeon®
E-7 series processors x 10 cores x 2 threads per core, with Intel’s Hyper-threading enabled), 2 TB of physical memory (RAM), and up to 16 PCIe/PCI-X I/O cards. In addition, the DL980 utilizes Non-Uniform Memory Architecture (NUMA) and Intel QuickPath Interconnect (QPI) technology.
For a general overview of the technical specifications for this server, see the HP ProLiant DL980 G7 Server Data Sheet at:
For detailed technical specifications, see the server QuickSpecs at:
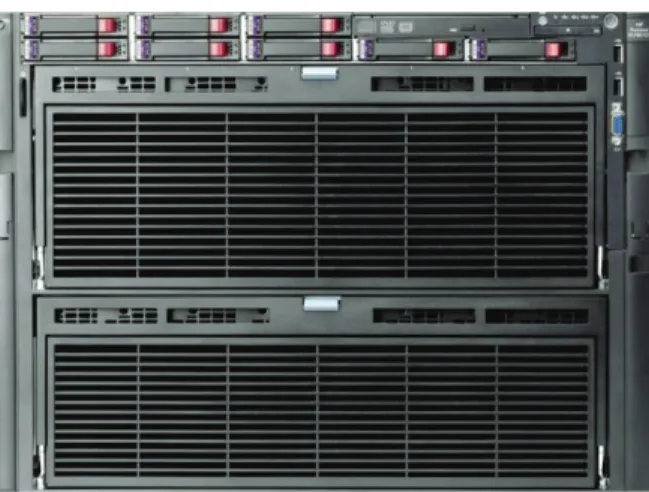
Figure 1: Front view of the DL980 G7 server
The HP ProLiant DL980 uses HP PREMA architecture which incorporates a new node controller design with Smart CPU caching and redundant system fabric. Combined with the Linux Operating System, these features provide a solution that is fully capable of supporting the most demanding, data-intensive
workloads, with the reliability, availability, and efficiency needed to run all of your business-critical applications with confidence.
For a detailed discussion of the HP PREMA architecture, see the technical overview at:
Linux Hardware Overview
CPU Mappings
Linux enumerates logical processors as follows, using the /proc/cpuinfo file:
Logical
Processor
Physical
ID
Core
ID
APIC
ID
Processor
Logical
Physical
ID
Core
ID
APIC
ID
0 0 0 0 64 0 0 1 1 0 1 2 65 0 1 3 2 0 2 4 66 0 2 5 3 0 3 6 67 0 3 7 4 0 8 16 68 0 8 17 5 0 9 18 69 0 9 19 6 0 10 20 70 0 10 21 7 0 11 22 71 0 11 23 8 1 0 32 72 1 0 33 9 1 1 34 73 1 1 35 10 1 2 36 74 1 2 37 11 1 3 38 75 1 3 39 12 1 8 48 76 1 8 49 13 1 9 50 77 1 9 51 14 1 10 52 78 1 10 53 15 1 11 54 79 1 11 55
The above table shows the logical processor assignments for the first two processors from a 64-core DL980 (8 processors with 8 cores per processor) with Hyper-threading enabled. The Physical ID is the physical processor socket. Core ID is the processing core on a particular physical processor. Thus, logical processor numbers 0 and 64 are the two threads on the first core on the first physical processor. Refer to this table when using the numactl or taskset commands for process and memory object placement (discussed later in this document).
PCI Slot Mappings
PCI slot bus numbers are documented in the HP ProLiant DL980 G7 QuickSpecs and can be used to map a particular I/O slot to PCI device listed by lspci.
0b:00.0 Fibre Channel: QLogic Corp. ISP2532-based 8Gb Fibre Channel to PCI Express HBA (rev 02) 0b:00.1 Fibre Channel: QLogic Corp. ISP2532-based 8Gb Fibre Channel to PCI Express HBA (rev 02) 11:00.0 Fibre Channel: QLogic Corp. ISP2532-based 8Gb Fibre Channel to PCI Express HBA (rev 02) 11:00.1 Fibre Channel: QLogic Corp. ISP2532-based 8Gb Fibre Channel to PCI Express HBA (rev 02)
This example shows a dual-port Fibre Channel HBA using bus 0x0b and 0x11, which maps to slots 9 and 11, respectively.
Non-Uniform Memory Access (NUMA) Overview
The latest Intel Xeon processors include embedded memory controllers which access memory DIMMS connected to the socket, also called Socket Local Memory. The processor cores (and threads, if Hyper-threading is enabled) plus the attached memory make up a NUMA node in a Linux system. Each node can be thought of as a separate SMP (Symmetric Multi-Processing) system where all accesses to the Socket Local Memory have the same latency, or Uniform Memory Access (UMA). Memory access from the processor in one node to the physical memory or processor cache in another node will have greater latencies and are thus NUMA.
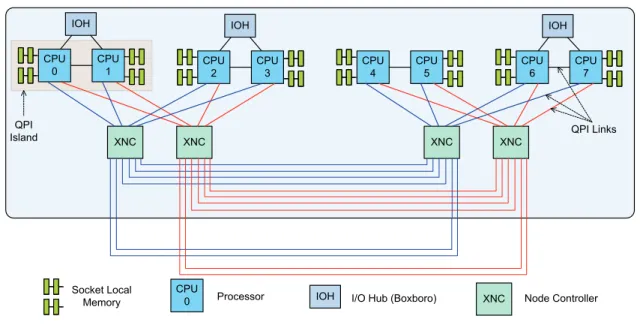
Figure 2 illustrates a simplified view of the DL980 G7 architecture. Each pair of processor sockets, such as 0 and 1, has a dedicated QPI (Quick Path Interconnect) link between them and comprises a QPI island. The node controllers (XNC) are the system-interconnect “glue” that connects these QPI islands together.
Figure 2: DL980 G7 server architecture
XNC IOH CPU 0 CPU1 IOH CPU 2 CPU3 IOH CPU
4 CPU5 CPU6 CPU7
XNC XNC XNC
IOH XNC
Socket Local
Memory I/O Hub (Boxboro) Node Controller
QPI
Island QPI Links
CPU
0 Processor
Displaying Node Distances
The farther away a remote node, the higher the memory access latencies are. Use the numactl
command to display node memory statistics and relative distances among nodes:
[root@tux]# numactl –hardware available: 8 nodes (0-7) node 0 size: 64594 MB node 0 free: 38673 MB node 1 size: 64640 MB node 1 free: 40587 MB node 2 size: 64640 MB node 2 free: 40901 MB node 3 size: 64640 MB node 3 free: 40937 MB node 4 size: 64640 MB node 4 free: 40799 MB node 5 size: 64640 MB node 5 free: 40934 MB node 6 size: 64640 MB node 6 free: 40933 MB
node 7 size: 64640 MB node 7 free: 40784 MB node distances: node 0 1 2 3 4 5 6 7 0: 10 14 23 23 27 27 27 27 1: 14 10 23 23 27 27 27 27 2: 23 23 10 14 27 27 27 27 3: 23 23 14 10 27 27 27 27 4: 27 27 27 27 10 14 23 23 5: 27 27 27 27 14 10 23 23 6: 27 27 27 27 23 23 10 14 7: 27 27 27 27 23 23 14 10
Local accesses, such as node 0 to node 0, have the shortest distance; then nodes sharing the same QPI island, such as nodes 0 and 1; then nodes on the same side of the node controller (XNC), such as between nodes 0–1 and 2–3; and finally all other nodes on the other side of the XNC, such as between nodes 0–1 and 4–7.
Displaying Task Information
You can also use numactl to display the memory allocation policy and processor affinity for the current shell. Unfortunately, the --show option does not allow specification of a particular process for viewing. The following shows the default NUMA policy and CPU bindings:
[root@tux ~]# numactl --show policy: default
preferred node: current
physcpubind: 0 1 2 3 4 5 6 7 8 9 10 11 12 13 14 15 16 17 18 19 20 21 22 23 24 25 26 27 28 29 30 31 32 33 34 35 36 37 38 39 40 41 42 43 44 45 46 47 48 49 50 51 52 53 54 55 56 57 58 59 60 61 62 63 cpubind: 0 1 2 3 4 5 6 7 nodebind: 0 1 2 3 4 5 6 7 membind: 0 1 2 3 4 5 6 7
Displaying Memory Allocation Statistics
Use the numastat command to display memory allocation statistics per NUMA node: [root@tux ~]# numastat
node0 node1 node2 node3 numa_hit 72906006 61424717 60127482 43804361 numa_miss 0 0 0 0 numa_foreign 0 0 0 0 interleave_hit 3962072 3960669 3962517 3960688 local_node 69431708 57426131 56144944 39824458 other_node 3474298 3998586 3982538 3979903 node4 node5 node6 node7 numa_hit 39135067 30389110 16815956 9464732 numa_miss 0 0 0 0 numa_foreign 0 0 0 0 interleave_hit 3962009 3960766 3961914 3960446 local_node 35667858 26395324 14450038 6775752 other_node 3467209 3993786 2365918 2688980 Where:
• numa_hit — a task wanted to allocate memory from this node and succeeded
• numa_miss — a task wanted to allocate memory from this node but ended up with memory from
• numa_foreign — a task wanted to allocate on another node but ended up with memory from this one.
• local_node — a task ran on this node and got memory from it.
• other_node — a task ran on this node and got memory from another node
• interleave_hit — interleaving wanted to allocate from this node and succeeded
Controlling Task and Memory Placement
Best performance is obtained when tasks and their associated memory objects are close together, preferably in the same node. Use the numactl command to control placement of memory objects and task threads launched via the command invocation. For example, to use numactl --show to bind the process and memory objects to node 1, enter the following:
[root@tux ~]# numactl --membind=1 --cpunodebind=1 numactl --show policy: bind preferred node: 1 physcpubind: 8 9 10 11 12 13 14 15 cpubind: 1 nodebind: 1 membind: 1
numactl uses the NUMA policy library (libnuma) interface for policy retrieval and control. Please see
the man pages numactl(8) and numa(3) for more information. The original A NUMA API for Linux
whitepaper is found here:
Moving Tasks to Other NUMA Nodes
Use the standard taskset command to move a task from one NUMA node to another by changing the CPU affinity. taskset changes the CPU affinity only. It does not move the physical memory pages allocated by the task. Use the migratepages command to move the physical pages to the new NUMA node:
[root@tux ~]# taskset -p 6371
pid 6371's current affinity mask: ffffffffffffffff [root@tux ~]# taskset -pc 8-15 6371
pid 6371's current affinity list: 0-63 pid 6371's new affinity list: 8-15 [root@tux ~]# migratepages 6371 0 1
Controlling Task and Memory Object Placement
Use cpusets to control task and memory object placement. The original implementation on RHEL 5 and
SLES 10 called for the cpuset pseudo file system. Once mounted, on say /dev/cpusets, create subdirectories to partition system resources. These subdirectories, or cpusets, contain pseudo-files and are used to specify resources such as logical CPUs allowed and memory nodes.
[root@tux ~]# ls /dev/cpusets/mycpuset
cpu_exclusive memory_pressure mems
cpus memory_pressure_enabled notify_on_release
mem_exclusive memory_spread_page sched_relax_domain_level memory_migrate memory_spread_slab tasks
These pseudo-files are read and written using standard commands (such as echo) or programmatically. See the cpuset(7) manpage for more details.
RHEL 6 and SLES 11 introduced Linux Control Groups or cgroups, which includes cpusets as a client subsystem. Please see the RHEL 6 Resource Management Guide for more information:
Determining Task Memory Allocation Location
Examine the /proc/<pid>/numa_maps file to determine a task’s memory allocation location. This file displays each memory object for a particular task. Here are just the entries for a current shell’s heap and stack:
[root@tux ~]# cat /proc/$$/numa_maps
0245f000 default heap anon=65 dirty=65 active=60 N1=65 7fff23318000 default stack anon=7 dirty=7 N1=7
The first column is the start of the Virtual Memory Address (VMA) range. The second column is the memory allocation policy. The third column is the path to the mapped file, shared memory segment, or type. The anon= and dirty= show the number of pages. The N<node>= shows the number of pages allocated from each <node>.
OS Support Matrix for the HP ProLiant DL980 G7 Server
To run Linux and Linux applications optimally, you must understand how to leverage the capabilities and resources of the DL980 server. A good starting point is to review the following OS Support Matrix.
HP ProLiant DL980 G7 Linux Operating System Support Matrix
Operating System Max CPUs HP-supported/ OS Limit Max Memory (RAM) HP-supported/ OS Limit Notes Red Hat Enterprise Linux 5.6
x86-64 (RHEL 5.6 or later) 160 / 255 1 / 1 TB No x2APIC support Red Hat Enterprise Linux 6.X
x86-64 (RHEL6.0 or later) 160 / 4096 2 / 64 TB 44 bit physical address space SUSE® Linux Enterprise Server 10
Service Pack 4 x86-64
(SLES10 SP4 or later) 160 / 32* 1 / 1 TB No x2APIC support SUSE® Linux Enterprise Server 11
Service Pack 1 x86-64
(SLES11 SP1 or later) 160 / 4096 2 / 16 TB 44 bit physical address space * SLES10 sp4 is certified on DL980 with 160 CPUs
The matrix shows that Red Hat Enterprise Linux 6.0 or SUSE Linux Enterprise Server 11 Service Pack 1 is necessary to make full use of the DL980 G7’s maximum processors and memory. See the following documents for more
information:
•
•
Additional Recommended Software Components When
Running Linux on the DL980
The HP Smart Start CD (with ProLiant Support Pack minimum recommended version 8.70) is an essential single-server deployment tool that simplifies ProLiant (DL, ML, and BL) server setup and provides a reliable and consistent method for deploying ProLiant servers. It also comes with HP’s ProLiant Support Pack and System Management Homepage components for Linux, which ensure optimal performance, availability, and manageability of the solution on the HP ProLiant DL980 G7.
To download these components, along with other drivers and software, go to the HP DL980 G7 Support
web page:
to deploy. Then look in the section marked “Software – Support Pack” for the HP ProLiant Support Pack package, and in the section marked “Software – System Management” for the HP System Management Homepage for Linux package.
Note
Make sure to download and install the latest HP ProLiant Support Pack and the HP System Management Homepage for Linux on DL980 for optimal operations.
HP ProLiant Support Pack (PSP)
HP PSPs are operating system-specific bundles of drivers, utilities, and management agents optimized for HP ProLiant systems. Each PSP is a predefined and tested bundle that includes setup and software maintenance tools designed to help efficiently install, upgrade, and manage system software.
PSPs include tools for Linux server environments that enable deployment of software updates from a central software repository to local or remote server systems. HP Smart Update Manager (HP SUM) enables you to deploy Linux components locally on a single server, or remotely to multiple servers (up to 29 concurrently). HP SUM can also deploy to target servers running different versions and operating system distributions. In addition, the local system and remote servers to be updated do not have to run the same version of the operating system. A separate PSP is
provided for each major operating system release and for each architecture (such as x86 and x86_64 versions). For more information about PSPs and to download the latest PSPs, see the PSP website:
Note
Information about deployment of previous PSPs is found in the HP ProLiant Support Pack User Guides located on the Smart Start Manuals website:
PSP Benefits
ProLiant Support Packs simplify software maintenance by: • Increasing server manageability
• Enabling administrators to update systems remotely • Reducing server maintenance costs
• Saving time
• Providing self-installable components with easy-to-understand software update descriptions • Providing components that you can install individually, or as part of a support pack
• Including installation logic and version control that automatically verifies hardware, software, and operating system dependencies. Only the correct software updates and latest drivers for optimal system configuration (excluding RPMs) are installed.
• Including silent command-line options and return codes that enable scripting and enhanced PSP integration with HP Systems Insight Manager and the HP SmartStart Scripting Toolkit
• Integrating with preconfigured server script files as part of the Rapid Deployment Pack
• Creating common log files that provide easy access to a consolidated view of the software installation history on host servers
PSP Minimum Requirements for Installation on Linux Servers
The following RPMs are required for PSP installation on Linux servers:
• glibc 2.2.4-26 or later • gawk 3.1.0-3 or later • sed 3.02-10 or later • pciutils-2.1.8-25.i386.rpm or later • rpm 4.0.4 or later • rpm-build 4.0.4 or later • rpm-devel 4.0.4 or later
In addition, starting with Linux HP ProLiant Support Pack 8.40 and later (and to support many HP value-add software deliverables included in the Linux PSP) you must install the following platform-specific compatibility libraries.
For Red Hat Enterprise Linux servers:
• compat-libstdc++-296-2.96-132.7.2.i386 or later
• lm_sensors-2.8.7-2.x86_64 or later
• net-snmp-5.3.1-14.el5.x86_64 or later
• perl (required to provide the libperl.so)
• libnl (required for QLogic and Emulex drivers) For SUSE Linux Enterprise Server 10 servers:
• compat-2006.1.25-11.2.x86_64 or later
• compat-32bit-2006.1.25-11.2.x86_64 or later
• compat-libstdc++-5.0.7-22.2. x86_64 or later
• perl (required to provide the libperl.so)
• libnl (required for QLogic and Emulex drivers)
• e2fsprogs-32bit
For SUSE Linux Enterprise Server 11 servers:
• glib-1.2.10-15.i386 or later
• libstdc++33-32bit-3.3.3-11.9 or later
• perl-SNMP-5.4.2.1-6.3.x86_64 or later
• net-snmp-5.4.2.1-6.3.x86_64 or later
• libnl (required for QLogic and Emulex drivers)
The minimum recommended PSP versions for each OS are as follows:
• RHEL 6 — PSP version 8.72
• SLES 10 — PSP version 8.71
• SLES 11 — PSP version 8.70
PSP Installation Methods for Linux
Installing PSP using autorun:
You can install the PSP using autorun if it is configured on the target Linux server. Red Hat distributions include autorun. If autorun is not installed, install and configure it properly before beginning.
Autorun typically mounts the CD-ROM on /media/cdrom for RHEL- and SUSE-based distributions.
Note
Red Hat Enterprise Linux and SUSE LINUX Enterprise Server automount the CD with the noexec property set. In order to run Autorun, the CD must first be unmounted and then manually remounted. For other distributions, several autorun utilities are available for download from various Internet sites. These distributions typically mount the CD-ROM on /media/cdrom.
Installing PSP using the SmartStart CD:
1. Log into the console as root.
2. Insert the SmartStart CD. If autorun is activated, omit step 3.
3. Manually mount the CD and execute the autorun script (for example: /mnt/mnt/autorun). 4. In the autorun End User License Agreement screen of, select Agree.
5. Select the Software tab.
6. Select the Install the HP ProLiant Support Pack option to install the desired Linux PSP.
Installing PSP Manually:
In these instructions, the CD mount directory is /mnt/mnt, so you should replace that string with your actual mount point. If your CD-ROM mount point is not defined in /etc/fstab, then a complete mount command is required.
1. Log into the console as root. 2. Insert the SmartStart CD.
3. Mount the CD (for example: mount /mnt/mnt or
mount -t iso9660 /dev/cdrom /mnt/mnt).
4. Change to the /compaq/csp/linux directory. 5. Execute the /hpsum command to install the Linux PSP.
Installing PSP using HP SUM:
1. In the Source Selection screen, verify that the directory path listed in the Directory field is the correct location of the PSP smart components, and then select Start Inventory. HP SUM inventories the available updates and checks the local system’s installed hardware and software. When the inventory/discovery process finishes, the Select Installation Hosts screen displays. 2. Select either the local host, or one (or more) remote hosts for PSP deployment. The Select Bundle
Filter screen displays the PSP bundle information.
3. Select the bundle and appropriate filter options. For remote deployments, additional screens let you update information on a per-host basis.
4. After selecting the bundle for all hosts being updated, access the Select Items to be Installed screen and complete the following tasks:
a. Select the components to be installed.
b. Review failed dependencies before installation. c. Review the revision history of the components.
5. Click Install to start the installation. When finished, the Installation Results screen displays. 6. For any components that did not install successfully, complete the following steps:
a. Review the installation logs for information about the failures. b. Exit HP SUM.
c. Reinstall the PSP after addressing any issues described in the installation logs. For more information, see the HP Smart Update Manager User Guide
For more information, see the HP ProLiant Support Pack User Guide
HP System Management Homepage (SMH)
HP System Management Homepage (SMH) is a web-based interface that consolidates and simplifies single system management for HP servers running Linux operating systems. Use it to view in-depth hardware configuration and status data, performance metrics, system thresholds, diagnostics, and software version control information using a single intuitive interface. HP SMH aggregates and displays data from Web Agents and other HP Web-enabled systems management software, including:
• HP Insight Diagnostics
• Array Configuration Utility
• HP Software Version Control Agents
HP SMH Features
HP SMH provides streamlined operations for HP servers running Linux operating systems with the following security enhancements and features:
• Browser access using secure OS-based, Secure Sockets Layer (SSL) authentication
• Common HTTP and HTTPS service for HP Insight Management Agents and utilities, for reduced complexity and system resource requirements
• Simplified architecture for implementing HTTP security and HP management updates
• Access control through Network Interface Card (NIC) binding and advanced configuration features for individuals and user groups
• Broad OS and browser support
• A command line interface (smhconfig) provides those with administrator rights the ability to set values using the command line
Note
For more information, see the HP System Management Homepage Installation Guide on the HP Technical Documentation Web site:
Hardware Best Practices
This section describes hardware recommendations for optimal performance when running Linux on the HP ProLiant DL980 G7 server.
Boot Adapter Location
On the DL980 G7, slots 11 through 7 are the first ones scanned during the boot phase. Therefore, the boot adapter must be installed in one of these slots in order for it to be enumerated first. Once that is accomplished, the boot order is prioritized by the BIOS settings, as usual.
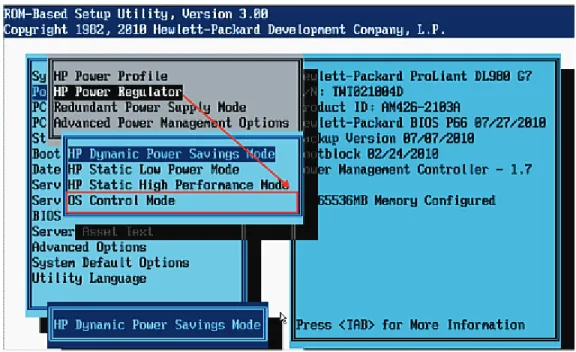
Power Consumption Settings
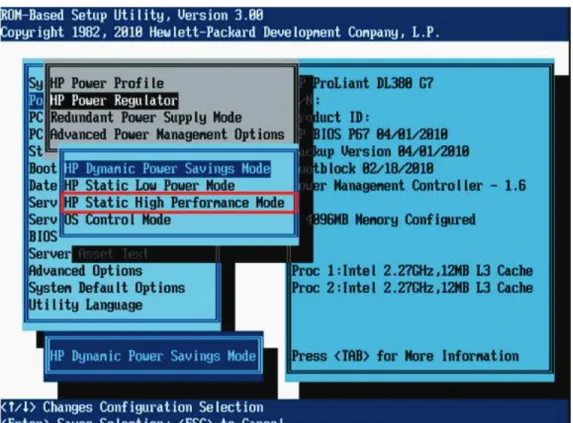
To obtain maximum performance by disabling all power saving modes, follow these steps:
1. During system boot, press F9 to run the ROM-Based Setup Utility (RBSU). 2. Select Power Management Options.
3. Select HP Power Regulator.
Figure 4: Enabling HP Static High Performance Mode using RBSU
5. Exit all RBSU menu screens using the Esc key.
6. Press the F10 key to confirm your changes and reboot the system.
To take advantage of the Linux operating system’s ability to adjust server power consumption (and reduce costs) based on workload, follow these steps:
1. During system boot, press F9 to run the ROM-Based Setup Utility (RBSU). 2. Select Power Management Options.
3. Select HP Power Regulator.
Figure 5: Enabling OS Control Mode using RBSU
5. Exit all RBSU menu screens using the Esc key.
6. Press the F10 key to confirm your changes and reboot the system.
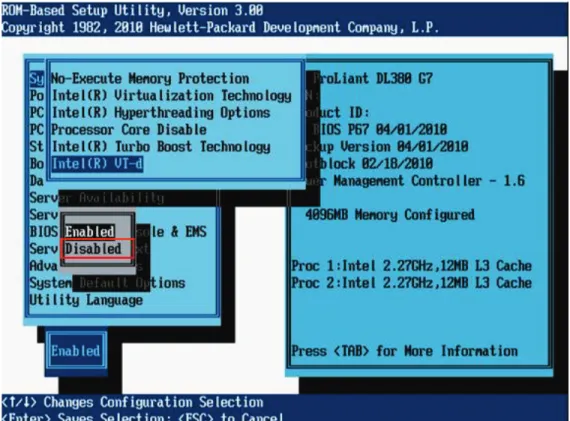
Virtualization Settings
Note
This section applies only if the system will not be deployed to host virtual guest machines.
To maximize I/O performance by disabling Intel® Virtualization Technology for Directed I/O, follow these
steps:
1. During system boot, press F9 to run the ROM-Based Setup Utility (RBSU). 2. Select System Options.
3. Select Processor Options. 4. Select Intel® VT-d (see Figure 6).
Figure 6: Disabling Intel Virtualization Technology for Directed I/O (VT-d) using RBSU
5. Select Disabled to turn Intel® Virtualization Technology for Directed I/O (VT-d) OFF. 6. Exit all RBSU menu screens using the Esc key.
7. Press the F10 key to confirm your changes and reboot the system.
RHEL 5.6 and SLES 10 SP4 Best Practices
When running RHEL 5.6 (or later) or SLES 10 SP4 (or later) on the HP ProLiant DL980 G7 Server, there are several recommended best practices that are fully explained in this section:
• Disable Hyper-threading to reduce scheduler overhead
• Disable x2APIC with Intel®Xeon®E-7 series processors (codename: Westmere) • Verify 40-bit mode before OS installation
• Use the NOOP I/O scheduler
• Increase crash kernel size
• Known issues and workarounds
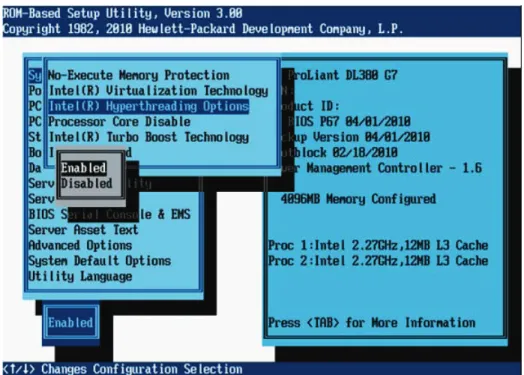
Disable Hyper-threading to Reduce Scheduler Overhead
Hyper-threading (HT) refers to Intel’s proprietary technology for increasing parallel computational power (processor multi-tasking) by allowing the OS to see and address each physical processor core as if it were 2 virtual processors. It also enables the OS and applications to share work between those 2 virtual processors whenever possible, thereby making use of resources that would otherwise sit idle.
While RHEL 5.6 and SUSE LES 10 SP4 can support over 160 logical processors, they are not optimized for these high logical processor counts. This can result in increased kernel CPU consumption when attempting to schedule tasks across the available logical processors. Unless your workload is proven to benefit demonstrably from Hyper-threading, HT should be disabled in order to reduce this system overhead. HT can always be enabled later if additional CPU capacity is required.
Hyper-threading is controlled by the system BIOS and is enabled by default on the DL980 G7. To disable it, follow these steps:
1. During system boot, press F9 to run the ROM-Based Setup Utility (RBSU). 2. Select System Options.
3. Select Processor Options.
4. Select Intel® Hyperthreading Options (see Figure 7).
Figure 7: Disabling Hyper-threading (HT) using RBSU
5. Select Disabled to turn Hyper-threading OFF. 6. Exit all RBSU menu screens using the Esc key.
7. Press the F10 key to confirm your changes and reboot the system.
For more information about HP’s RBSU, see the HP ROM-Based Setup Utility User Guide:
Disable x2APIC with Intel Xeon E-7 Series Processors
As noted in the OS Support Matrix, RHEL 5.X and SLES 10 do not support the new Intel x2APIC architecture. Systems with Intel®Xeon®E-7 series processors (codename: Westmere) require disablement of x2APIC support prior to the installation. By default, x2APIC is disabled on the DL980.
x2APIC support is controlled by the system BIOS. Follow these steps to access the x2APIC settings and verify disablement:
1. During system boot, press F9 to run the ROM-Based Setup Utility (RBSU).
2. Select Advanced Options.
3. Select System ROM Options.
4. Select x2APIC (see Figure 8).
Figure 8: Disabling x2APIC using RBSU
5. If necessary, select Disabled to turn x2APIC OFF.
6. Exit all RBSU menu screens using the Esc key.
7. Press the F10 key to confirm your changes and reboot the system.
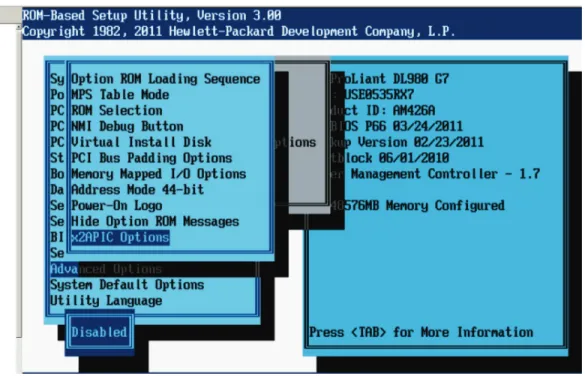
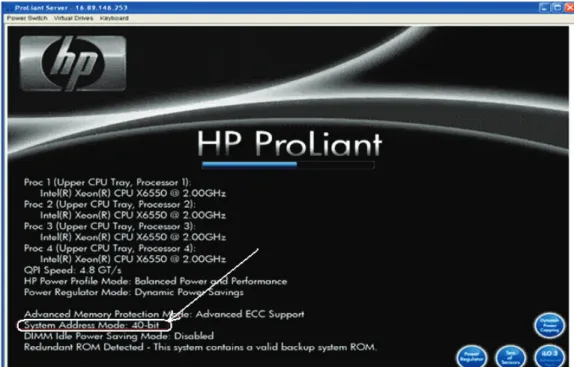
Verify 40-bit Mode before OS Installation
The default RBSU method for addressing memory on the DL980 G7 is 40-bit mode. However, this should always be verified before installing RHEL 5.X or SLES 10, since they do not support 44-bit address mode. During the boot process, confirm that the system is in the default 40-bit mode by looking at the RBSU splash screen (see Figure 9).
Figure 9: Confirming System Address Mode reported by RBSU
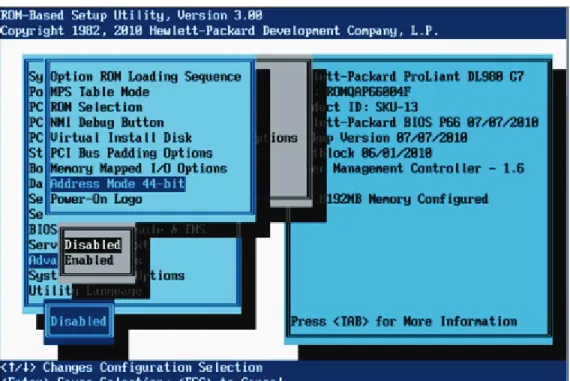
If the System Address Mode is set to 44-bit, follow these steps to reset it to 40-bit mode: 1. During system boot, press F9 to run the ROM-Based Setup Utility (RBSU). 2. Select Advanced Options.
3. Select Advanced System ROM Options. 4. Select Address Mode 44-bit (see Figure 10).
Figure 10: Disabling 44-bit System Address Mode using RBSU
5. Select Disabled to turn 44- bit memory addressing OFF. 6. Exit all RBSU menu screens using the Esc key.
7. Press the F10 key to confirm your changes and reboot the system.
8. Confirm the new 40-bit System Address Mode by looking at the RBSU splash screen during system boot, as shown in Figure 9.
Use the NOOP I/O Scheduler
The default I/O scheduler is Completely Fair Queuing (CFQ), which attempts to balance throughput and latency. Today’s intelligent storage subsystems usually perform best by disabling all I/O scheduling operations using NOOP. This I/O scheduler may be configured system-wide using the kernel boot option ‘elevator=noop’ or on a per-device basis using:
‘echo noop > /sys/block/<sdx>/queue/scheduler’.
Increase Crash Kernel Size
The ProLiant DL 980 G7 running RHEL 5.X or SLES 10 supports up to 1 TB of memory, so you should use the kernel boot option ‘crashkernel’ to adjust the crash kernel size accordingly. Keep in mind that the Linux kernel has a maximum limit of 896 MB for crash kernel size.
Known Issues and Workarounds
SUSE Linux Enterprise Server 10 SP3 Stops Responding under High Utilization
To ensure that SUSE Linux Enterprise Server 10 SP3 does not stop responding under high utilization, upgrade to SUSE Linux Enterprise Server 11 SP1 if possible. SUSE Linux Enterprise Server 11 SP1 has passed all vendor certifications. As a workaround, reduce the number of logical processors on the HP ProLiant DL980 G7 by disabling Hyper-threading, to prevent the server from halting.
Installation Hangs with SLES 10 SP3 + Netxen Driver
Installation of SLES10 SP3 with a Netxen driver sometimes hangs, due to a non-functional LAN-on-Motherboard (LOM). The workaround here is to add ”brokenmodules=netxen_nic” to the kernel boot parameters and then use the driver DVD to manually load the correct version of the driver.
RHEL 6.X and SLES 11 SP1 Best Practices
When running RHEL 6.X or SLES 11 SP1 on the HP ProLiant DL980 G7 Server there are several recommended best practices that are fully explained in this section:
• Disable Hyper-threading to reduce scheduler overhead
• Enable 44-bit System Address Mode if 1 TB or more memory is installed; HP only supports 44-bit address length for RHEL6 and SLES11 OS versions
• Use NOOP I/O scheduler
• Increase crash kernel size
Disable Hyper-threading to Reduce Scheduler Overhead
Hyper-threading (HT) refers to Intel’s proprietary technology for increasing parallel computational power (processor multi-tasking) by allowing the OS to see and address each physical processor core as if it were 2 virtual processors. It also enables the OS and applications to share work between those 2 virtual processors whenever possible, thereby making use of resources that would otherwise sit idle.
As noted in the OS Matrix, RHEL 6.X and SLES 11 SP1 support up to 4096 logical processors and the supplied kernels include improved scheduling functionality. But there is still system overhead associated with managing high logical processor counts. Unless your workload is proven to benefit demonstrably from Hyper-threading, HT should be disabled in order to reduce this system overhead. HT can always be enabled later if additional CPU capacity is required.
Hyper-threading is controlled by the system BIOS and is enabled by default on the DL980 G7. To disable it, follow these steps:
1. During system boot, press F9 to run the ROM-Based Setup Utility (RBSU). 2. Select System Options.
3. Select Processor Options.
Figure 11: Disabling Hyper-threading using RBSU
5. Select Disabled to turn Hyper-threading OFF. 6. Exit all RBSU menu screens using the Esc key.
7. Press the F10 key to confirm your changes and reboot the system.
For more information about HP’s RBSU, see the HP ROM-Based Setup Utility User Guide:
Enable 44-bit System Address Mode with 1 TB or more Memory
The default RBSU method for addressing memory on the DL980 G7 is 40-bit mode. However, this should be changed if 1 TB or more physical memory is installed in the system.
To enable the 44-bit System Address Mode, follow these steps:
1. During the boot process, confirm that the system is in the default 40-bit mode by looking at the RBSU splash screen. It indicates a System Address Mode of 40-bit (see Figure 12).
Figure 12: Confirming System Address Mode reported by RBSU
2. Press F9 to run the ROM-Based Setup Utility (RBSU). 3. Select Advanced Options.
4. Select Advanced System ROM Options. 5. Select Address Mode 44-bit (see Figure 13).
Figure 13: Enabling 44-bit System Address Mode using RBSU
6. Ignore the Warning message: Caution: Enabling 44-bit Address Mode may cause problems with an operating system if it does not support 44-bit memory addressing.
7. Select Enabled to turn 44- bit memory addressing ON. 8. Exit all RBSU menu screens using the Esc key.
9. Press the F10 key to confirm your changes and reboot the system.
10. Confirm the new 44-bit System Address Mode by looking at the RBSU splash screen during system boot, as described in Step 1.
Use the NOOP I/O Scheduler
The default I/O scheduler is Completely Fair Queuing (CFQ), which attempts to balance throughput and latency. Today’s intelligent storage subsystems usually perform best by disabling all I/O scheduling operations using NOOP. This I/O scheduler may be configured system-wide using the kernel boot option ‘elevator=noop’ or on a per-device basis using:
‘echo noop > /sys/block/<sdx>/queue/scheduler’.
Increase Crash Kernel Size
The ProLiant DL 980 G7 supports up to 2 TB of memory so you should use the kernel boot option ‘crashkernel’ to adjust the crash kernel size accordingly. Keep in mind that the Linux kernel has a maximum limit of 896 MB for crash kernel size.
Oracle Database Best Practices
When running Oracle 11gR2 (11.2.0.2) on the HP ProLiant DL980 G7 Server, there are several recommended best practices that are explained in this section:
• Enable Hyper-threading for CPU-intensive workloads
• Use HugePages
• Enable Oracle NUMA optimizations
Enable Hyper-threading for CPU-intensive Workloads
CPU-intensive Oracle database workloads typically perform better with Hyper-threading (HT) enabled, while I/O-bound workloads may not. Hyper-threading is controlled by the system BIOS and is enabled by default on the DL980 G7. Unless the Oracle workload has been proven to benefit demonstrably from Hyper-threading, HT should be disabled in order to reduce system overhead. HT can always be enabled later if additional CPU capacity is required.
Use HugePages
HugePages allow a processor to translate a virtual address range spanning multiple “base pages” with a single Translation Look-aside Buffer (TLB) entry. Using HugePages can reduce TLB miss faults and the more costly page faults, improving application performance for some workloads. The base page size on the x86_64 architecture is 4 KB and the HugePage size is 2 MB or 512 base pages. HugePages can also reduce kernel page table overhead by requiring fewer page table entries to map the same address space.
Because HugePages must be physically contiguous and aligned on the HugePage size boundary, they can be difficult to allocate after the system has been running for some time and memory has become fragmented. Therefore, Linux supports a pool of pre-allocated or “persistent” HugePages. You can populate the pool at boot time when available HugePages are likely to be numerous, using the boot command line parameter hugepages=<nr_huge_pages>. You can adjust the size of the pool at run time, subject to availability, using the sysctl command to modify the kernel parameter vm.nr_hugepages.
System-wide HugePages statistics are found at /proc/meminfo: [root@tux ~]# grep Huge /proc/meminfo HugePages_Total: 32768
HugePages_Free: 31350 HugePages_Rsvd: 19063 Hugepagesize: 2048 kB
Per-node HugePages statistics are found at /sys/devices/system/node/<node>/meminfo: [root@tux ~]# grep Huge /sys/devices/system/node/node*/meminfo
/sys/devices/system/node/node0/meminfo:Node 0 HugePages_Total: 4096 /sys/devices/system/node/node0/meminfo:Node 0 HugePages_Free: 3891 /sys/devices/system/node/node1/meminfo:Node 1 HugePages_Total: 4096 /sys/devices/system/node/node1/meminfo:Node 1 HugePages_Free: 3823 /sys/devices/system/node/node2/meminfo:Node 2 HugePages_Total: 4096 /sys/devices/system/node/node2/meminfo:Node 2 HugePages_Free: 3953 /sys/devices/system/node/node3/meminfo:Node 3 HugePages_Total: 4096 /sys/devices/system/node/node3/meminfo:Node 3 HugePages_Free: 3925 /sys/devices/system/node/node4/meminfo:Node 4 HugePages_Total: 4096 /sys/devices/system/node/node4/meminfo:Node 4 HugePages_Free: 3947 /sys/devices/system/node/node5/meminfo:Node 5 HugePages_Total: 4096 /sys/devices/system/node/node5/meminfo:Node 5 HugePages_Free: 3948 /sys/devices/system/node/node6/meminfo:Node 6 HugePages_Total: 4096 /sys/devices/system/node/node6/meminfo:Node 6 HugePages_Free: 3938 /sys/devices/system/node/node7/meminfo:Node 7 HugePages_Total: 4096 /sys/devices/system/node/node7/meminfo:Node 7 HugePages_Free: 3925
Oracle’s Automatic Memory Management (AMM) feature must be disabled for Oracle to make use of HugePages. Disabling AMM requires setting the Oracle initialization parameter MEMORY_TARGET to zero and SGA_TARGET to the desired Shared Global Area (SGA) size.
An Oracle database instance can be configured to use HugePages at startup by setting the initialization parameter use_large_pages=ONLY. If sufficient HugePages are not available, the instance will not start and Oracle will return the error: ORA-27102: out of memory.
Oracle must also have sufficient privileges to lock the entire SGA in order to use HugePages: [root@tux ~]# grep memlock /etc/security/limits.conf
# memlock - max locked-in-memory address space (KB) oracle soft memlock unlimited
oracle hard memlock unlimited
The Linux kernel shared memory parameters should also be adjusted for the largest SGA: [root@tux ~]# grep shm /etc/sysctl.conf
kernel.shmall = <total size of all SGAs in 4KB pages> kernel.shmmax = <largest SGA size in bytes>
More details on HugePages and Oracle can be found in Oracle Article ID 361323.1:
Enable Oracle NUMA Optimizations
Oracle Article ID 864633.1 states the following:Oracle will not by default detect if the hardware and operating system are NUMA capable and enable Oracle NUMA support.
The solution here is to specifically enable Oracle NUMA optimizations by setting the following Oracle initialization parameter:
For More Information
For an overview of the HP Proliant DL980 G7 server:
For more information about the HP DL980 G7 server with HP PREMA Architecture:
To download the recommended components described in this document, along with other drivers and software, visit the HP DL980 G7 Support web page:
For a complete library of all documentation supporting the DL980 G7 server:
(click on the link, “HP ProLiant DL980 G7 Server series”) For more information on the Intel Xeon 7500 processor series:
For more information on the Intel Xeon E-7 processor series:
Documentation Feedback
HP welcomes your feedback. To make comments and suggestions about product documentation, send a message to: docsfeedback@hp.com. Include the document title, part number, and filename found at the end of the URL string (for example: c02861709.pdf). All submissions become the property of HP.
© Copyright 2011 Hewlett-Packard Development Company, L.P. The information contained herein is subject to change without notice. The only warranties for HP products and services are set forth in the express warranty statements accompanying such products and services. Nothing herein should be construed as constituting an additional warranty. HP shall not be liable for technical or editorial errors or omissions contained herein.
Linux is a trademark of Linus Torvalds.
Intel and Xeon are U.S. trademarks of Intel Corporation. Oracle is a U.S. trademark of Oracle Corporation. 4AA3-6556ENW, Created September 2011