SSL VPN User’s Guide for the Windows®
Platform
MENT MAY BE REPRODUCED OR TRANSMITTED IN ANY FORM OR BY ANY MEANS OR USED TO MAKE DERIVATIVE WORK (SUCH AS TRANSLATION, TRANSFORMA-TION, OR ADAPTATION) WITHOUT THE EXPRESS WRITTEN PERMISSION OF CITRIX SYSTEMS, INC.
ALTHOUGH THE MATERIAL PRESENTED IN THIS DOCUMENT IS BELIEVED TO BE AC-CURATE, IT IS PRESENTED WITHOUT WARRANTY OF ANY KIND, EXPRESS OR IM-PLIED. USERS MUST TAKE ALL RESPONSIBILITY FOR THE USE OR APPLICATION OF THE PRODUCT(S) DESCRIBED IN THIS MANUAL.
CITRIX SYSTEMS, INC. OR ITS SUPPLIERS DO NOT ASSUME ANY LIABILITY THAT MAY OCCUR DUE TO THE USE OR APPLICATION OF THE PRODUCT(S) DESCRIBED IN THIS DOCUMENT. INFORMATION IN THIS DOCUMENT IS SUBJECT TO CHANGE WITH-OUT NOTICE. COMPANIES, NAMES, AND DATA USED IN EXAMPLES ARE FICTITIOUS UNLESS OTHERWISE NOTED.
The following information is for FCC compliance of Class A devices: This equipment has been test-ed and found to comply with the limits for a Class A digital device, pursuant to part 15 of the FCC rules. These limits are designed to provide reasonable protection against harmful interference when the equipment is operated in a commercial environment. This equipment generates, uses, and can radiate radio-frequency energy and, if not installed and used in accordance with the instruction man-ual, may cause harmful interference to radio communications. Operation of this equipment in a res-idential area is likely to cause harmful interference, in which case users will be required to correct the interference at their own expense.
Modifying the equipment without Citrix' written authorization may result in the equipment no longer complying with FCC requirements for Class A digital devices. In that event, your right to use the equipment may be limited by FCC regulations, and you may be required to correct any interference to radio or television communications at your own expense.
You can determine whether your equipment is causing interference by turning it off. If the interfer-ence stops, it was probably caused by the NetScaler Request Switch™ 9000 Series equipment. If the NetScaler equipment causes interference, try to correct the interference by using one or more of the following measures:
Move the NetScaler equipment to one side or the other of your equipment. Move the NetScaler equipment farther away from your equipment.
Plug the NetScaler equipment into an outlet on a different circuit from your equipment. (Make sure the NetScaler equipment and your equipment are on circuits controlled by different circuit breakers or fuses.)
Modifications to this product not authorized by Citrix Systems, Inc., could void the FCC approval and negate your authority to operate the product.
er Request Switch are trademarks of Citrix Systems, Inc. Linux is a registered trademark of Linus Torvalds. Internet Explorer, Microsoft, PowerPoint, Windows and Windows product names such as Windows NT are trademarks or registered trademarks of the Microsoft Corporation. NetScape is a registered trademark of Netscape Communications Corporation. Red Hat is a trademark of Red Hat, Inc. Sun and Sun Microsystems are registered trademarks of Sun Microsystems, Inc. Other brand and product names may be registered trademarks or trademarks of their respective holders. Software covered by the following third party copyrights may be included with this product and will also be subject to the software license agreement: Copyright 1998 © Carnegie Mellon University. All rights reserved. Copyright © David L. Mills 1993, 1994. Copyright © 1992, 1993, 1994, 1997 Henry Spencer. Copyright © Jean-loup Gailly and Mark Adler. Copyright © 1999, 2000 by Jef Pos-kanzer. All rights reserved. Copyright © Markus Friedl, Theo de Raadt, Niels Provos, Dug Song, Aaron Campbell, Damien Miller, Kevin Steves. All rights reserved. Copyright © 1982, 1985, 1986, 1988-1991, 1993 Regents of the University of California. All rights reserved. Copyright © 1995 Tatu Ylonen, Espoo, Finland. All rights reserved. Copyright © UNIX System Laboratories, Inc. Copyright © 2001 Mark R V Murray. Copyright 1995-1998 © Eric Young. Copyright ©
1995,1996,1997,1998. Lars Fenneberg. Copyright © 1992. Livingston Enterprises, Inc. Copyright © 1992, 1993, 1994, 1995. The Regents of the University of Michigan and Merit Network, Inc. Copyright © 1991-2, RSA Data Security, Inc. Created 1991. Copyright © 1998 Juniper Networks, Inc. All rights reserved. Copyright © 2001, 2002 Networks Associates Technology, Inc. All rights reserved. Copyright (c) 2002 Networks Associates Technology, Inc. Copyright 1999-2001© The Open LDAP Foundation. All Rights Reserved. Copyright © 1999 Andrzej Bialecki. All rights re-served. Copyright © 2000 The Apache Software Foundation. All rights rere-served. Copyright (C) 2001-2003 Robert A. van Engelen, Genivia inc. All Rights Reserved. Copyright (c) 1997-2004 Uni-versity of Cambridge. All rights reserved. Copyright (c) 1995. David Greenman. Copyright (c) 2001 Jonathan Lemon. All rights reserved. Copyright (c) 1997, 1998, 1999. Bill Paul. All rights reserved. Copyright (c) 1994-1997 Matt Thomas. All rights reserved. Copyright © 2000 Jason L. Wright. Copyright © 2000 Theo de Raadt. Copyright © 2001 Patrik Lindergren. All rights re-served.
Part No. VPN-UG-AX-70-0806 Last Updated: August 2006
Contents
Chapter 1 - SSL VPN Overview. . . 1-1
1.1 SSL VPN : Architecture . . . 1-1
Chapter 2 - Getting Started . . . 2-1
2.1 System Requirements . . . 2-1 2.2 Using the SSL VPN Browser Plug-in . . . 2-1 2.3 Using the SSL VPN Agent . . . 2-6 2.4 Terminating the SSL VPN Session. . . .2-10 2.4.1 Terminating the Session for the Agent . . . .2-11 2.4.2 Terminating the Session for the Browser Plug-in . . . .2-13 2.5 Understanding the Cleanup Process . . . .2-13 2.5.1 Understanding the Data Sets . . . .2-13 2.5.2 Cleanup Level . . . .2-16 2.5.3 Cleanup Logs . . . .2-16
Chapter 3 - Using the SSL VPN Portal . . . 3-1
3.1 Using Portal Tools. . . 3-2 3.1.1 Home . . . 3-2 3.1.2 File Transfer . . . 3-4 3.1.3 Themes . . . 3-8
Chapter 4 - Configuring the SSL VPN Client. . . 4-1
4.1 Configuring Login Settings. . . 4-1 4.1.1 Using Native Login. . . 4-1 4.1.2 Configuring Native Login . . . 4-3
4.2.3 Managing Domain Conflicts . . . .4-11 4.2.4 Managing Network Conflicts . . . .4-13 4.2.5 Local LAN Access When Split Tunneling is Disabled . . . .4-14
Chapter 5 - Troubleshooting the SSL VPN Client . . . 5-1
5.1 Debugging the SSL VPN Client . . . 5-1 5.2 SSL VPN Session Error Codes. . . 5-2 5.3 Compression Statistics . . . .5-10 5.4 Connection Logs. . . .5-11
Chapter 6 - FAQs . . . 6-1 Appendix A - Uninstalling the SSL VPN Clients . . . A-1
A.1 Uninstalling the Browser Plug-in. . . A-1 A.2 Uninstalling the Agent. . . A-3
SSL VPN Overview
SSL VPN is a secure remote access solution that provides point-to-point com-munication between remote users, such as mobile employees, partners, or resellers, and a private enterprise network. It does so by creating a secure SSL-based tunnel between a user's computer and the SSL VPN gateway. This allows authorized remote users to gain access to critical business resources such as corporate intranets, shared file systems, native client/server applica-tions, and terminal services.
1.1
SSL VPN : Architecture
To log on to a remote network, you need to log on to the SSL VPN gateway. To do this, you typically need to use a client provided by the service provider. For instance, if you are trying to log on to your office network, you will first need to install a VPN client on your home PC or laptop and then use it to log on. Alternately, some service providers allow you to log on to the remote network via an Internet portal. Once logged on, an SSL VPN plug-in is installed on your computer. This plug-in then establishes a secure tunnel between your com-puter and the SSL VPN gateway.
The agent is installed on your computer when you log on for the first time. You can configure it to log on directly to the gateway, without having to log on via the Web portal. This is known as the native login mode. Alternately, you can also log on to the gateway via the SSL VPN login page.
The SSL VPN browser plug-in is an ActiveX control. While the feature set sup-ported by the plug-in is identical to that supsup-ported by the agent, it does not support native login.
When either version of the SSL VPN client is downloaded on to your computer and permitted to execute, it creates a secure channel of communication between the local system and the SSL VPN gateway, and allows you to access resources on the intranet that you are authorized to use. When a TCP or a UDP application, like Telnet or Microsoft Outlook, tries to connect to a server in the intranet, the client intercepts the connection, secures it using SSL encryption, and redirects it to the server through the secure SSL VPN tunnel.This behavior extends to several applications such as FTP clients, Web browsers, soft
phones, e-mail clients, etc. You can also use ping and traceroute. This behav-ior may vary based on the Split Tunneling configuration. For details, refer to the Configuring Split Tunneling section.
NoteBy default, the TDI interception mechanism is used. When it fails, the client uses the Winsock interception mechanism. This is also applicable for scenarios where you do not have administrative privileges on the computer. As a result, TCP com-pression, UDP interception, NetBios interception, HTTP delta, etc., will not be supported.
The SSL VPN client supports both SSL 2.0, SSL 3.0, and TLS 1.0 protocols. Based on the cipher settings on the SSL VPN gateway, the client can perform up to 2048 bit encryption. In addition, the SSL VPN administrator can also configure the client to ensure that certain personal firewalls and AntiVirus applications are running on your computer. You can configure the client to delete cached Internet files, generated on your computer during the SSL VPN session, after the session ends.
Getting Started
The preceding chapter covered the architectural details of the SSL VPN client. In this chapter you will learn to use both versions of the SSL VPN client and log on to the gateway and access intranet resources.
2.1
System Requirements
The system requirements for the SSL VPN client are:
Operating system: Microsoft Windows 98, Windows 2000, Windows NT, Win-dows XP, or WinWin-dows 2003 Server.
Web browser: Internet Explorer, Firefox, Mozilla, NetScape, and Opera.
NoteWhen accessing the SSL VPN on Linux or Mac OS, your computer will automati-cally download and install the multi-platform version of the plug-in. For details on accessing the SSL VPN on these platforms, refer to the SSL VPN Users Guide for Windows, LINUX, Mac OS, and UNIX Platforms.
2.2
Using the SSL VPN Browser Plug-in
SSL VPN allows you to access authorized resources, on a remote intranet, over a secure connection. To establish the secure connection, you must first log on to the SSL VPN via the login page. Contact your SSL VPN administrator for the URL and the login credentials. The typical format of such a URL is as follows: https://companyname.com. The following procedure lists the steps to initiate an SSL VPN session via the browser plug-in.
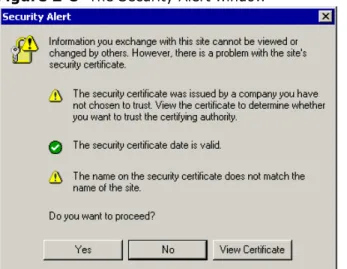
1. Type the URL of the SSL VPN login page in the browser window. If the SSL VPN administrator has not configured a trusted SSL certificate that identi-fies the server, the browser will prompt you with a security alert asking
Figure 2-1 Security Alert window
The security alert indicates that there might be discrepancies in the certificate. The possible issues are:
• The certificate has expired.
• The domain name in the certificate does not match the domain name of the server.
• The certificate is not trusted.
Click No and contact your SSL VPN administrator. If the SSL VPN administrator instructs you to click Yes, this alert is again displayed after you log on as shown in Figure 2-5.
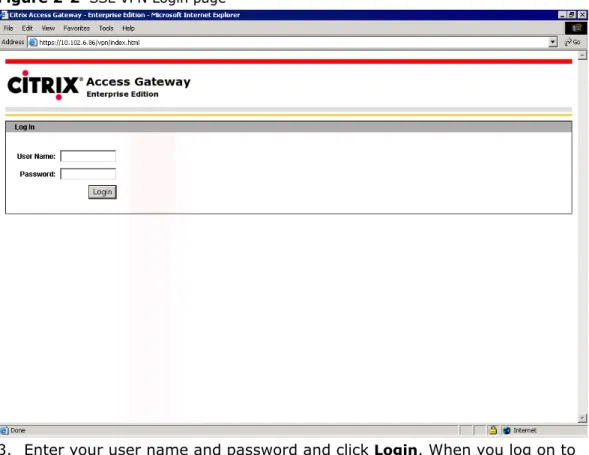
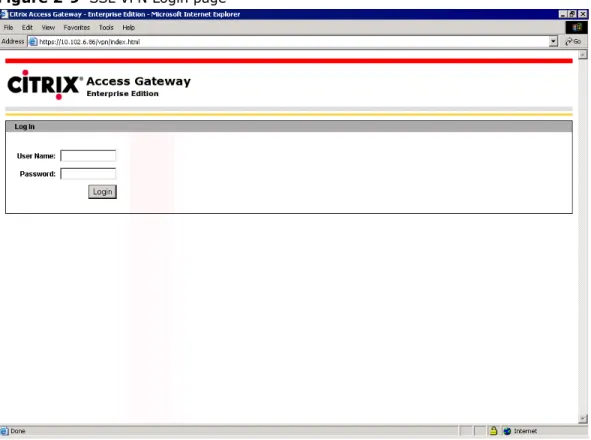
Figure 2-2 SSL VPN Login page
3. Enter your user name and password and click Login. When you log on to the SSL VPN gateway for the first time, a security warning is displayed as shown in the following figure. This warning prompts you to download the browser plug-in.
NoteOn a Windows XP-based system, the following dialog box is displayed.
Figure 2-4 Security warning on a Windows XP-based computer
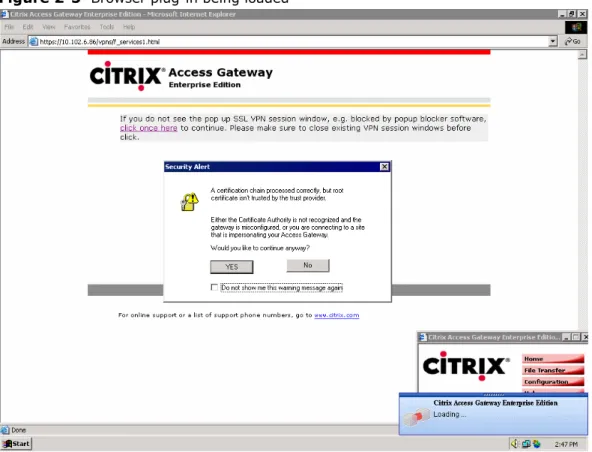
4. Click Yes. The Secure Remote Access Session window is displayed as shown in the following figure, and the plug-in begins to download. A "Load-ing..." message is also displayed in this window.
5. When the download has completed, the Secure Remote Access Session window displays the following message: "Closing this window will exit SSL VPN Session". This indicates that the SSL VPN session is now active. The portal page configured by the SSL VPN administrator is displayed in the main browser window, as shown in the following figure.
Figure 2-6 Session window with the portal page in the background
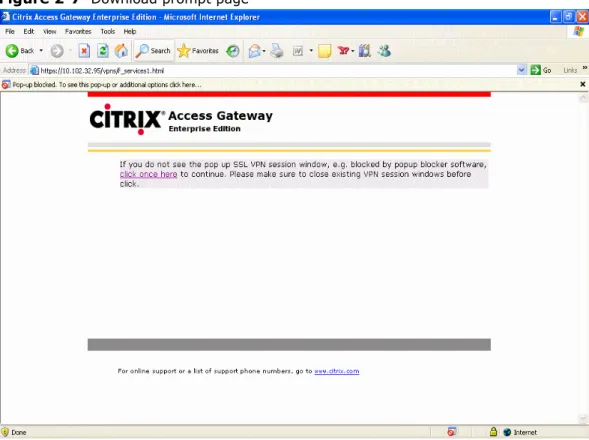
NoteIf you are not automatically prompted to download the plug-in after successfully logging in, click the "Click here" hyperlink in the alternative page that is dis-played. This alternative page is shown in the following figure.
Figure 2-7 Download prompt page
NoteFor details on working with a pop-up blocker, especially for a computer running Windows XP with SP2, consult the SSL VPN administrator.
You can now access resources on the remote site. For example, if you have logged on to your office network, you can launch your e-mail client and access your messages.
2.3
Using the SSL VPN Agent
SSL VPN allows you to access authorized resources, on a remote intranet, over a secure connection. To establish the secure connection, you must first log on to the SSL VPN via the login page. Contact the SSL VPN administrator for the URL and the login credentials. The typical format of such a URL is as follows: https://companyname.com. The following procedure lists the steps to initiate an SSL VPN session via the agent.
1. Type the URL of the SSL VPN login page in the browser window. If the SSL VPN administrator has not configured a trusted SSL certificate that identi-fies the server, the browser will prompt you with a security alert asking your permission to access the login page.
Figure 2-8 The Security Alert window
The security alert indicates that there might be discrepancies in the certificate. The possible issues are:
• The certificate has expired.
• The domain name in the certificate does not match the domain name of the server.
• The certificate is not trusted.
Click No and contact the SSL VPN administrator. If the SSL VPN administrator instructs you to click Yes, this alert is again displayed after you log on as shown in Figure 2-5.
Figure 2-9 SSL VPN Login page
3. Enter your user name and password and click Login. When you log on for the first time, the following download page is displayed. Click the link to download and install the agent.
Figure 2-10 Download page
4. When the agent is successfully installed, a security alert is displayed as shown in the following figure.
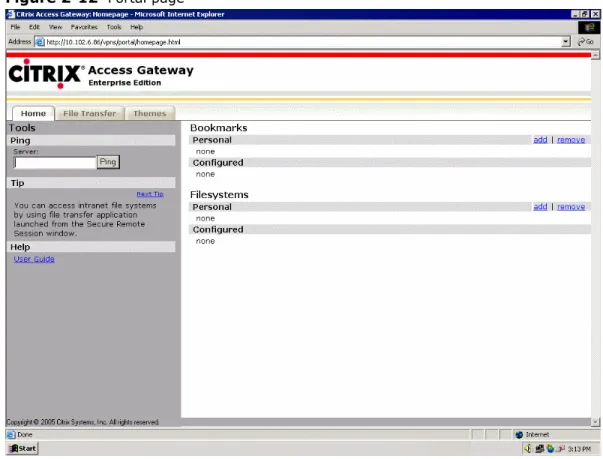
5. Click Yes. The portal page configured by the SSL VPN administrator is dis-played in the main browser window with the agent disdis-played in the system tray, as shown in the following figure.
Figure 2-12 Portal page
You can now access resources on the remote site. For example, if you have logged on to your office network, you can launch your e-mail client and access your messages.
2.4
Terminating the SSL VPN Session
You can choose to terminate the SSL VPN session by either logging out or by closing the client application. If you are using the browser plug-in, you can close the plug-in window to terminate the session.
The temporary files generated on the client computer during an SSL VPN ses-sion could pose a security threat. These files can be misused to obtain confi-dential information. To eliminate this threat, the client supports the cleanup of the files after the session is closed. This feature, however, needs to be enabled by the SSL VPN administrator. The following procedures list the steps to
termi-nate an SSL VPN session.
2.4.1
Terminating the Session for the Agent
The following procedure covers the steps to terminate the session for the agent.
1. Check the Windows system tray for the icon. This indicates that the agent is active and that you are currently logged on. Right-click the icon and select Logout from the short-cut menu. A message box is displayed as shown in the following figure.
Figure 2-13 Confirmation message box
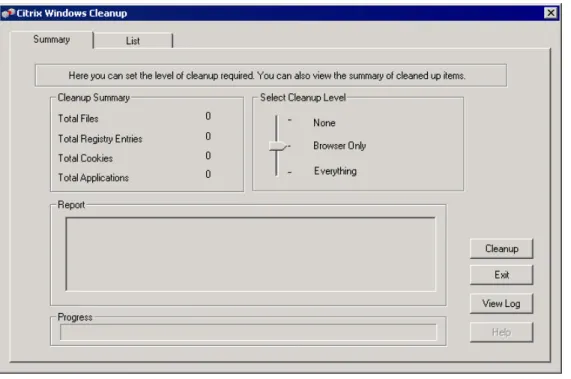
2. Click Yes. The Citrix Windows Cleanup dialog box is displayed as shown in the following figure.
3. Select a cleanup option from the Select Cleanup Level box and click
Cleanup. The cleanup process is initiated and the status is displayed on the dialog box as shown in the following figure.
Figure 2-15 Cleanup dialog box with details
4. Once the cleanup process is completed successfully, click Exit. The follow-ing message is displayed and the icon changes to in the Windows sys-tem tray.
2.4.2
Terminating the Session for the Browser Plug-in
The following procedure covers the steps to terminate the session for the agent.
1. Click Logout on the plug-in window. The following message box is dis-played.
Figure 2-17 Confirmation message box
2. Click OK. The Citrix Windows Cleanup dialog box is displayed as shown in Figure 2-14.
3. Select a cleanup option from the Select Cleanup Level box and click
Cleanup. The cleanup process is initiated and the status is displayed on the dialog box as shown in Figure 2-15.
4. Once the cleanup process is completed successfully, click Exit.
2.5
Understanding the Cleanup Process
The administrator of the SSL VPN gateway controls the cleanup process. As a result, the cleanup dialog box is displayed only if the SSL VPN administrator has configured the gateway to do so. In addition, the SSL VPN administrator can also configure the gateway to delete specific data sets, from your com-puter, when you exit the session. The options corresponding to these data sets are disabled on the List pane of the Citrix Windows Cleanup dialog box. The remaining options are either grayed out or activated based on the cleanup level that you have chosen.
Figure 2-18 List pane
The Cleanup list consists of check boxes that allow you to select the data types that need to be deleted when you log off. Based on the configuration on the gateway, and the cleanup level that you have chosen, some of the options might appear disabled. This is explained as follows.
This check box indicates that you have selected the data set for deletion. The white background indicates that the option can be modified. This implies that you can deselect the check box to prevent the data set from being deleted when you exit.
This check box indicates that the SSL VPN administrator has selected the data set for deletion. The grey background indicates that the option cannot be modified. This implies that the data set will be deleted irrespective of whether you run the cleanup process or not before you exit.
This check box indicates that the data set cannot be chosen for deletion as it is not part of the cleanup level that you have set.
The cleanup list consists of the following data sets: • NetScaler agent and activex browser plug-in • Client authentication certificate
• Applications that have accessed SSLVPN services • Application data
• Passwords and autocomplete data stored by browser • History and URLs typed in the address bar
• Browser cache cookies and temporary files
NetScaler agent and activex browser plug-in
When you select this option and initiate the cleanup process, all versions of the client are uninstalled from your computer.
Client authentication certificate
When you select this option and initiate the cleanup process, all residual certif-icates stored on your system by the SSL authentication process are deleted.
Applications that have accessed SSLVPN services
When you select this option and initiate the cleanup process, the client closes certain processes. These processes correspond to the applications that
accessed the SSL VPN. This will prevent the leakage of sensitive information buffered by the applications.
Application data
When you select this option and initiate the cleanup process, all non-roaming (not stored on an external server) application data generated by Internet Explorer such as user preferences, temporary files, application state informa-tion, etc. is deleted.
Passwords and autocomplete data stored by browser
When you select this option and initiate the cleanup process, all autocomplete data and passwords, stored by Internet Explorer, are deleted.
NoteThe SSL VPN client only cleans the cookies that were saved by the default browser. The default browser is the one that you used to log on. However, when you enable native login, the cookies saved by Internet Explorer are cleaned.
Browser cache cookies and temporary files
When you select this option and initiate the cleanup process, the client selects data that is stored in the browser for deletion. The client deletes all cached files regardless of whether they were cached from the remote network or the Internet. The client also supports the cleanup of temporary files and cookies.
NoteThis is restricted to Internet Explorer and Firefox only.
2.5.2
Cleanup Level
You can configure the client to delete some or all the data sets when you log out. However, you might want to retain some of the data such as Auto Com-plete data, stored passwords, and history, especially if it is your personal com-puter that nobody else is likely to use. As a result, the data is categorized into three groups to help you selectively delete data. The groups are:
• None
• Browser Only • Everything
None: When this level is selected, none of the data sets are deleted.
Browser Only: When this level is selected, you can set the client to delete one or more of the following data sets:
• Passwords and autocomplete data stored by browser • History and URLs typed in the address bar
• Browser cache cookies and temporary files
Everything: When this level is selected, you can set the client to delete all temporary data that was generated by your computer.
2.5.3
Cleanup Logs
The client logs all the cleanup activity in a file that is stored on your hard disk. This file lists the action performed and the files that were deleted. To view the log file, click the View Log button on the Summary pane of the Citrix Windows Cleanup dialog box.
Using the SSL VPN Portal
The default Portal page is created based on the data configured by the SSL VPN administrator. The Portal page is shown in the following figure. This page lists the most commonly accessed intranet Web sites and file systems. the SSL VPN administrator configures the links visible under the ‘Configured’ sections on this page. You can create your own bookmarks to appear under the ‘Per-sonal’ bookmark sections. This chapter covers the various configuration tasks that you can perform on the portal page.
NoteYour VPN administrator may have customized the Portal page. So the appear-ance of the page may vary from what is shown in this guide.
3.1
Using Portal Tools
The Portal page has several built in tools to assist you in using the SSL VPN. These tools include a ping interface for checking the accessibility of network hosts, tips, online help, the SSL VPN file transfer utility, and the SSL VPN themes utility.
These tools have been placed under the home, file transfer, and themes tabs on the SSL VPN portal page.
3.1.1
Home
The tools under this tab help you navigate your way through the SSL VPN. This page can be customized by the SSL VPN administrator by providing themes that VPN users can apply for themselves. The individual tools are described below
Ping Pane
The ping pane allows you to check the accessibility of other computers on your intranet and on the Internet. This feature can help you troubleshoot connectiv-ity issues if any, with your SSL VPN session in addition to determining avail-ability of a server hosting a resource on the network.
Enter the IP address, host name, or domain name of the computer you wish to ping and click the Ping button. The result of the ping query is displayed on this pane.
Figure 3-2 Ping pane
Tip and Help Pane
The Tip pane offers helpful hints on using the SSL VPN and its various fea-tures. The Help tool is used to access the SSL VPN User’s Guide. The User’s Guide includes not only instructions on using the SSL VPN but also lists error code explanations and provides other troubleshooting assistance.
Bookmarks Pane
The SSL VPN Portal allows you to create your own set of links to commonly accessed resources. These bookmarks may be links to either intranet or Inter-net Web sites or Inter-network accessible file systems on the intraInter-net.
To create these bookmarks, click on the ‘add’ links on the right side of the page. The following figure shows the New Bookmark page.
In the ‘Name’ field, enter the label to be used for your new link. In the ‘Address Field’ enter either the uniform resource locator (URL) of the website or the network path to the file server. In the ‘Description’ field, enter a short description for the created link. Once done, select the ‘Add’ button to apply the new link or ‘Cancel’ to exit the window without making any changes.
Figure 3-3 Add Bookmark Page
The bookmark added here will be listed under the personal bookmarks on the SSL VPN home page.
NoteThe system automatically differentiates between website addresses (URLs) and network file system paths based on the format in which they are entered. Hence you do not need to specify which type of resource your link is for when you cre-ate it.
Figure 3-4 Remove bookmark page
NoteYou can remove only bookmarks listed under the ‘Personal’ column and not those under the configured column.
3.1.2
File Transfer
This page allows you to log on to the intranet and access shared resources. The following figure displays this page.
Figure 3-5 File Transfer page.
The following sections cover the various components of the File Transfer page.
Top Panel
The top panel of the browser window displays a number of buttons that will allow you to perform various tasks, pertaining to the storage and transfer of files.
Click this button to log on to the corporate network or a specific com-puter on that network.
Click this button to navigate to the preceding folder in the folder tree. Click this button to refresh the contents of the active folder.
Click this button to upload the selected file from the local client com-puter to a folder in the remote file server.
Click this button to delete the selected file from the remote machine. Click this button to change the name of a file or folder, which is selected.
Click this button to disconnect from the remote server.
Left Panel
The servers, their directories, and the directory structure are displayed in a tree format in the left panel as shown in the following figure. Click the + icon to view a subfolder.
Figure 3-6 Left panel
Right Panel
The right panel displays the Login Server window. Use this window to log on to the file system on the intranet or an appropriate file server. To access the file system, leave the Login Server field blank or click the Network Neighborhood link in the left panel.
To log on to a file server
1. Enter the IP address or the name of the server in the Address field.
NoteIf you leave this field blank, you will be logged on to the intranet and not any specific server.
2. Enter your Login ID in the Login field.
3. Enter your password in the Password field. If the remote server does not require a password, leave this field blank.
4. Enter a valid domain name. If the remote server has not been assigned a specific domain, leave the field blank.
The right panel now displays the subfolders and files as shown in the following figure. The location of the active folder is displayed in the Address field.
NoteAuthorization policies, configured by the SSL VPN administrator on the gateway, are not applied to this operation since it bypasses the gateway. As a result, on a Windows-based computer, it is advised that you access shared resources via Windows Explorer instead of the File Transfer window.
3. Click the Save button. The Save As dialog box is displayed.
4. Navigate to the appropriate folder, and click the Save button to save the file.
To upload a file to the remote server
1. Select the file on the local machine.
2. Click to upload the file to the remote server.
To remove a folder, subfolder, or file
1. Select the file, folder, or subfolder.
2. Click the Delete icon. The file is deleted from the remote machine.
NoteA parent folder that contains subfolders cannot be removed. To delete a parent folder with sub folders, you need to delete the sub folders first and then delete the parent folder.
3.1.3
Themes
You can select themes that have been made available by the SSL VPN admin-istrator for use with your SSL VPN session. The theme selected will be applied across all pages on the SSL VPN portal.
If there are no themes configured by the VPN administrator then, on the ‘Themes’ tab of the portal page, an error message is displayed as shown in the figure below.
Figure 3-8 No themes configured
Selecting a theme for the SSL VPN session
Under the ‘Themes’ tab on the SSL VPN portal, you can see the themes that the VPN administrator has made available for use. Click on the ‘Select’ button next to the theme name for the theme to be applied for your current VPN ses-sion and all further VPN sesses-sions.
Customizing your theme
You can click on the customize button next to the theme name and change individual parameters used in the theme. The changes made are stored in a theme called ‘Current Custom Theme’ and applied to the current theme.
Figure 3-9 Customize your theme
Select the colors you want for each item on the SSL VPN portal page, the font style and size and then click the ‘Save Preferences’ button. The customized theme will now replace the old theme on the portal page.
NoteYou can restore the default theme for the portal page by clicking on the ‘Reset to site defaults’ button on the ‘Themes’ tab.
Configuring the SSL VPN Client
The client supports a minimal set of configuration tasks, based on the policies configured on the gateway. The following chapter covers all the tasks that you can perform on the client.
4.1
Configuring Login Settings
You can configure several login-related settings such as the login mode, gate-way, proxy server, etc. Some of these configurations are possible only on the agent. This section covers all the login-related settings that can be configured on the client.
4.1.1
Using Native Login
Once installed on your computer, you can use the agent to directly log on to the SSL VPN gateway. This is also known as Native Login. To use this function-ality, you first need to initialize the agent and then access it from the Windows system tray. The following procedure lists the steps to activate the client and then use it to log on to the SSL VPN gateway.
NoteThis mode is restricted to the agent and is not available via the plug-in.
1. Check the Windows system tray for the icon. This indicates that the agent is idle and that you are currently logged out. If the icon is absent, click Start > Programs > Citrix Access Gateway Enterprise Edition > Launch SSL VPN client. The icon is displayed in the system tray.
2. Right-click the icon and select Login from the short-cut menu. The Citrix Access Gateway Enterprise Edition dialog box is displayed as shown in the following figure.
Figure 4-1 Gateway Enterprise Edition dialog box
Enter the appropriate password in the Password field and click Connect. A security alert is displayed as shown in the following figure. The security alert indicates that there might be discrepancies in the certificate. The possible issues are:
• The certificate has expired.
• The domain name in the certificate does not match the domain name of the server.
• The certificate is not trusted.
Click No and contact your SSL VPN administrator. You can configure the client to not display this alert again. For details, refer to the Configuring Security Settings section.
Figure 4-2 Security alert
3. Click Yes. The agent logs on to the SSL VPN gateway and the portal page is displayed.
4.1.2
Configuring Native Login
If you typically use the SSL VPN for non-Web browser related activities such as using an e-mail client, downloading files via FTP, etc., you might prefer the Native Login mode. When this mode is enabled, you can log on to the SSL VPN without having to launch a Web browser. However, based on the configuration on the SSL VPN gateway, the portal page might be displayed. The following procedure lists the steps to configure Native Login on the agent.
NoteThis setting is restricted to the agent and is not available via the plug-in. 1. Right-click the agent in the Windows system tray and select Configuration
from the short-cut menu. The Configuration dialog box is displayed in the following figure.
Figure 4-3 Configuration dialog box
Figure 4-4 Change Profile dialog box
4. Click the Options tab. The Options pane is displayed.
5. Select the Use native login window for next time login option and click
OK. The updated configuration details of the profile are displayed.
4.1.3
Setting the SSL VPN Gateway
When configured to function in the Native Login mode, the client uses the pre-configured IP address of the gateway to connect to it. You can configure the client to connect to another gateway. This procedure lists the steps to specify the SSL VPN gateway that the client needs to connect to.
NoteThis setting is restricted to the agent and is not available via the plug-in. 1. Check the Windows system tray for the icon. This indicates that the
agent is idle and that you are currently logged out. If the icon is absent, click Start > Programs > Citrix Access Gateway Enterprise Edition > Launch SSL VPN client. The icon is displayed in the system tray.
2. Right-click the icon and select Login from the short-cut menu. The Citrix Access Gateway Enterprise Edition dialog box is displayed as shown in Figure 4-1.
3. Right-click Right-click for advanced options and select Advanced Options from the short-cut menu. The Citrix Access Gateway Options dia-log box is displayed as shown in the following figure.
5. Enter the login credentials for the new gateway and click Connect.
4.1.4
Configuring Proxy Settings
You can configure the client to connect to the SSL VPN gateway via a proxy server. The following procedure lists the steps to configure the proxy server settings on the client.
NoteThis mode is restricted to the agent and is not available via the plug-in.
1. Check the Windows system tray for the icon. This indicates that the agent is idle and that you are currently logged out. If the icon is absent, click Start > Programs > Citrix Access Gateway Enterprise Edition > Launch SSL VPN client. The icon is displayed in the system tray.
2. Right-click the icon and select Login from the short-cut menu. The Citrix Access Gateway Enterprise Edition dialog box is displayed as shown in Figure 4-1.
3. Right-click Right-click for advanced options and select Advanced Options from the short-cut menu. The Citrix Access Gateway Options
dialog box is displayed as shown in Figure 4-6.
4. Select the Use Proxy Host option and enter the IP address and Port details of the proxy server in the Proxy Address: and Proxy Port fields respec-tively.
5. Click OK. The Gateway Enterprise Edition dialog box is displayed.
6. Enter your login credentials and click Connect. The client now connects to the remote network through the forward proxy.
Often, administrators might choose to implement authentication on the for-ward proxy. When the client connects to the forfor-ward proxy, it displays an authentication dialog box where you can enter your credentials.
4.1.5
Configuring Security Settings
If the SSL VPN administrator has not configured a trusted SSL certificate that identifies the server, the browser will prompt you with a security alert asking your permission to access the login page. The security alert indicates that there might be discrepancies in the certificate. The possible issues are: • The certificate has expired.
• The domain name in the certificate does not match the domain name of the server.
• The certificate is not trusted.
1. Check the Windows system tray for the icon. This indicates that the agent is idle and that you are currently logged out. If the icon is absent, click Start > Programs > Citrix Access Gateway Enterprise Edition > Launch SSL VPN client. The icon is displayed in the system tray.
2. Right-click the icon and select Login from the short-cut menu. The Citrix Access Gateway Enterprise Edition dialog box is displayed as shown in Figure 4-1.
3. Right-click Right-click for advanced options and select Advanced Options from the short-cut menu. The Citrix Access Gateway Options
dialog box is displayed as shown in Figure 4-6.
4. Select the Disable security certificate warnings option and click OK. You can also configure these settings after you have logged on. The following procedure illustrates this.
1. Log on to the SSL VPN gateway.
2. Right-click the agent in the Windows system tray and select Configuration
from the short-cut menu. The Configuration dialog box is displayed as shown in Figure 4-3.
If you are using the plug-in, click Configuration in the plug-in window. The Configuration dialog box is displayed as shown in Figure 4-3.
3. Click the Profile tab. The Profile pane is displayed. This pane displays all the configuration details of the profile such as the IP address of the SSL VPN gateway, the split tunneling settings, the build number of the system software on the gateway, etc.
4. Click Change Profile to modify the configuration details of the profile. The Change Profile dialog box is displayed as shown in Figure 4-4.
5. Click the Options tab. The Options pane is displayed.
6. Select the Disable SSL warning message option and click OK. The updated configuration details of the profile are displayed.
4.1.6
Configuring a Secondary Password
2. Right-click the icon and select Login from the short-cut menu. The Citrix Access Gateway Enterprise Edition dialog box is displayed as shown in Figure 4-6.
3. Right-click Right-click for advanced options and select Show Secondary Password from the short-cut menu. An additional password field is added as shown in the following figure.
Figure 4-7 Secondary password field
4.2
Configuring Interception Settings
As mentioned in the first chapter, when a TCP or a UDP application, like Telnet or Microsoft Outlook, connects to a server in remote network, the client inter-cepts the connection, secures it using SSL encryption, and redirects it to the server through the secure SSL VPN tunnel. However, you might need to change these settings. For instance, if you need to visit a Web site on the Internet, you do not need to access resources on the remote intranet. Instead, requests from your Web browser need to be diverted directly to the Internet. To do this, you need to enable Split Tunneling. This feature allows the client to divert requests, not meant for the remote network, to another appropriate network. The following sections cover Split Tunneling and several other inter-ception-related settings on the client.
4.2.1
Configuring Split Tunneling
Split tunneling is one of the most basic interception mechanisms used by the client. When it is enabled, the client filters traffic on the basis of the IP address of the destination network. the SSL VPN administrator can also configure the client to filter traffic based on the destination port and the name of the appli-cation that is attempting to connect to the remote network. Traffic meant for the remote network is sent through the secure SSL VPN tunnel, and the rest of
the traffic is sent to the local LAN or the Internet. You can view the list of IP addresses, ports, and applications in the Profile pane of the Configuration dia-log box as shown in the following figure.
Figure 4-8 List of IP addresses, ports, and applications
Consider a scenario where you have logged on to the SSL VPN and you need to download a file from a computer on the local LAN. With split tunneling enabled, you can directly connect to the computer via Windows Explorer and download the file. This is because, the client intercepts your download request and learns the destination IP address. As the IP address belongs to a computer in the local LAN, the client does not send the request to the remote network via the SSL VPN tunnel. Instead, it sends it directly to the local computer.
When Split Tunneling is disabled, all traffic is sent through the secure SSL VPN tunnel thus bypassing the local LAN and the Internet. In fact, all DNS lookups are sent to the DNS server on the remote network. As a result, you will not be able to access resources on your local LAN.
For you to use this feature, the SSL VPN administrator first needs to configure and enable it on the gateway. As part of the configuration process, the SSL VPN administrator needs to specify ranges of IP addresses, ports, and
applica-• ON: When you choose this option, Split Tunneling is enabled. The client compares the destination IP address, or port, or application name of the packets against the values configured by the SSL VPN administrator on the gateway. If one of the values match, the packets are send to the remote network via the SSL VPN tunnel. Else they are diverted to the local LAN. • OFF: When you choose this option, Split Tunneling is disabled and the
cli-ent sends all traffic to the remote network via the SSL VPN tunnel.
• Reverse: When you choose this option, Reverse Split Tunneling is enabled. The client compares the destination IP address, or port, or application name of the packets against the values configured by the SSL VPN admin-istrator on the gateway. If one of the values match, the client diverts the packets to the local LAN and sends the others to the remote network via the SSL VPN tunnel. This is the reverse of ON.
If Split Tunneling is disabled on the gateway, the corresponding controls on the client are disabled and you will not be able to control it. As a result, all traffic is routed through the SSL VPN tunnel. This is similar to disabling the feature on the client.
The following section covers the procedure to configure split tunneling.
1. Right-click the agent in the Windows system tray and select Configuration
from the short-cut menu. The Configuration dialog box is displayed as shown in Figure 4-3.
If you are using the plug-in, click Configuration on the plug-in window. The Configuration dialog box is displayed as shown in Figure 4-3.
2. Click the Profile tab. The Profile pane is displayed. This pane displays all the configuration details of the profile such as the IP address of the SSL VPN gateway, the split tunneling setting, the build number of the system software on the gateway, etc.
3. Click Change Profile to modify the configuration details of the profile. The Change Profile dialog box is displayed as shown in Figure 4-4.
4. In the Split Tunneling group box, select OFF and click OK. The updated configuration details of the profile are displayed.
When similar subnets (or computers with identical IP addresses) exist on both the local LAN and the remote intranet, network conflicts can occur when split tunneling is enabled. This can be avoided by configuring the client appropri-ately. For details, refer section 4.2.4, “Managing Network Conflicts”.
4.2.2
Configuring Split DNS
You can configure the agent to route DNS lookups (Address records only) to either local DNS servers or remote DNS servers. This setting is applicable only
when Split Tunneling is enabled. This setting has three options; Local, Remote, and Both.
• Local: When you choose the Local option, all DNS lookups are sent to the DNS server on your local LAN. If you are connected to the Internet, the lookups are sent to your ISP’s DNS server.
• Remote: When you choose the Remote option, all DNS lookups are sent to the remote DNS server via the SSL VPN tunnel.
• Both: Finally, when you choose Both, the lookups are sent to both the local and remote DNS servers simultaneously. This could result in domain name conflicts. Such conflicts can be resolved by using the settings described in 4.2.3, “Managing Domain Conflicts”.
The following procedure lists the steps to configure split DNS. In this example, Split DNS is set to Both.
1. Right-click the agent in the Windows system tray and select Configuration
from the short-cut menu. The Configuration dialog box is displayed as shown in Figure 4-3.
If you are using the plug-in, click Configuration on the plug-in window. The Configuration dialog box is displayed as shown in Figure 4-3.
2. Click the Profile tab. The Profile pane is displayed. This pane displays all the configuration details of the profile such as the IP address of the SSL VPN gateway, the split tunneling setting, the build number of the system software on the gateway, etc.
3. Click Change Profile to modify the configuration details of the profile. The Change Profile dialog box is displayed as shown in Figure 4-4.
4. In the DNS /WINS Lookup group box, select Both and click OK. The updated configuration details of the profile are displayed.
4.2.3
Managing Domain Conflicts
The previous section covered the concept of Split DNS. In addition, it also explained the Both setting. When Split DNS is configured in the Both mode, the DNS lookups are simultaneously sent to both local and remote DNS serv-ers. As a result, there are chances of domain name conflicts if domains with the same names exist on both the remote and local networks. This can be
local and remote networks. As the domain exists on both networks, a domain conflict occurs.
Figure 4-9 Domain conflicts caused by identical domains
NoteWhen split tunneling is disabled, the local domain is not included during the lookup and the Domain/IP Conflict pane is disabled.
The following procedure lists the steps to configure the client for the scenario illustrated in Figure 4-9. In this procedure, you will configure the client to send the lookup to the remote network every time you try to access ABC.example. 1. Right-click the agent in the Windows system tray and select Configuration
from the short-cut menu. The Configuration dialog box is displayed as shown in Figure 4-3.
If you are using the plug-in, click Configuration on the plug-in window. The Configuration dialog box is displayed as shown in Figure 4-3.
2. Click the Profile tab. The Profile pane is displayed. This pane displays all the configuration details of the profile such as the IP address of the SSL VPN gateway, the split tunneling setting, the build number of the system software on the gateway, etc.
3. Click Change Profile to modify the configuration details of the profile. The Change Profile dialog box is displayed as shown in Figure 4-4.
4. Click the Domain tab. The domain pane is displayed.
5. Type ABC.example in the text field and click Add. The domain is added to the list as shown in the following figure.
6. To ensure that the DNS lookups corresponding to the domain are sent to the remote DNS server, select the check box corresponding to the domain name.
NoteThe domain name appears selected by default. If you deselect it, the lookup is diverted to the local DNS server.
8. Click OK to exit the Configuration dialog box.
4.2.4
Managing Network Conflicts
As mentioned in the Configuring Split Tunneling section, a network conflict occurs when the client is unable to send traffic to a remote network as another network with an identical IP address range exists on the local LAN.
To resolve this issue, the SSL VPN administrator needs to configure the gate-way with all the IP ranges used in the remote network. When the client con-nects to the gateway, it extracts the list and displays it on the Profile pane of the Configuration dialog box as shown in the following figure.
Figure 4-10 List of networks on the remote intranet
You can then use this list to verify whether any of the IP addresses exist on your local network. If they do, you need set the client to route traffic, bound that range of IP addresses, to your local network.
Consider the following example. Your PC is a part of a local LAN consisting of a few PCs and a network printer. The PCs and the printer together use IP
Figure 4-11 Incorrect routing of traffic due to network conflicts
NoteWhen split tunneling is disabled, access to the local network is disabled. This group box is unavailable when split tunneling is disabled.
1. Right-click the agent in the Windows system tray and select Configuration
from the short-cut menu. The Configuration dialog box is displayed as shown in Figure 4-3.
If you are using the plug-in, click Configuration on the plug-in window. The Configuration dialog box is displayed as shown in Figure 4-3.
2. Click the Profile tab. The Profile pane is displayed. This pane displays all the configuration details of the profile such as the IP address of the SSL VPN gateway, the split tunneling setting, the build number of the system software on the gateway, etc.
3. Click Change Profile to modify the configuration details of the profile. The Change Profile dialog box is displayed as shown in Figure 4-4.
4. Click the Network pane. All the IP ranges on the remote network, config-ured by the SSL VPN administrator, are displayed in the Network pane. 5. To set the client to direct all requests from your PC to your local LAN,
dese-lect the check box corresponding to the 10.102.7.0 network.
6. Click OK to save the settings. The Configuration dialog box is displayed. 7. Click OK to exit the Configuration dialog box.
8. Now try accessing a shared folder on your local LAN. If your configuration succeeded, you should be directed to the correct computer.
4.2.5
Local LAN Access When Split Tunneling is Disabled
You can configure the client to not intercept traffic to the local LAN. As a result, even if Split Tunneling is disabled, certain requests can routed to the local LAN. For this feature to work, the SSL VPN administrator needs to enable it on the gateway. Once enabled on the gateway, you can enable or disable it.
The client is aware of your local LAN IP settings. When it intercepts traffic, it examines the destination IP address. It belongs to the local LAN, the client does not send it through the secure SSL VPN tunnel. Instead, it sends it to the local LAN.
For example, you have a printer on the local LAN and you wish to print from it even when Split Tunneling is disabled. When you execute the print command on your computer, the print request is intercepted by the agent and examined by the agent. As it is meant for the local LAN, the agent sends the request to the printer.
The following procedure lists the steps to configure Local LAN Access on the client.
1. Right-click the agent in the Windows system tray and select Configuration
from the short-cut menu. The Configuration dialog box is displayed as shown in Figure 4-3.
If you are using the plug-in, click Configuration on the plug-in window. The Configuration dialog box is displayed as shown in Figure 4-3.
2. Click the Profile tab. The Profile pane is displayed. This pane displays all the configuration details of the profile such as the IP address of the SSL VPN gateway, the split tunneling setting, the build number of the system software on the gateway, etc.
3. Click Change Profile to modify the configuration details of the profile. The Change Profile dialog box is displayed.
4. In the Local LAN Access group box, select Enable and click OK. The updated configuration details of the profile are displayed.
Troubleshooting the SSL VPN Client
This chapter covers the troubleshooting of the SSL VPN browser plug-in and the agent. The following topics are described in this chapter:
• Debugging the SSL VPN Client • SSL VPN Session Error Codes • Compression Statistics • Connection Logs
5.1
Debugging the SSL VPN Client
You can configure the client to run in debug trace mode. In this mode, the SSL VPN browser plug-in logs all of its major activities into an ASCII file. These ASCII files, also known as log files, are stored in the file system.
On Windows 95/98/ME, you need to specify the names of these files in the fol-lowing format:
• hooklog<num>.txt • nssslvpn.txt
Use the hooklog<num>.txt file for debugging the interception messages gen-erated by the client and the nssslvpn.txt file for debugging the client. You can also send these files to the Citrix customer support department for assistance.
NoteYou need to periodically delete the hooklog<num>.txt file.
On Windows NT/2000/XP/2003, you can specify the file name. The default file-name is c:\nssslvpn.txt.
from one of four levels of detail as shown in the following figure.
Figure 5-1 Trace Tab
5.2
SSL VPN Session Error Codes
The error codes, displayed by the SSL VPN session window, are displayed in the following table.
Table 5-1 Error codes
NoteAll the 2xxx and 3xxx error messages are displayed in black.
The following table lists the specific error codes displayed by the SSL VPN ses-sion. It also provides a description of these error codes.
Error Code Description 0001-1000 Normal operation 1001-2000 Internal error
2001-3000 SSL VPN client errors 3001-4000 Browser errors
Table 5-2 Specific error codes displayed by the SSL VPN session
Codes Message Explanation Action
0001 "Loading ..." This message indicates that the plug-in is loading the configuration and the interception software before the SSL VPN session is ready to tunnel connections/data.
None
0002 “Closing this window will exit the SSL VPN session"
This message indicates that the plug-in is functioning and it is ready to tunnel connections/data to the system.
None
0003 "Exiting ..." This message is displayed when the user clicks the Logout button in the Secure Session window. The message indicates that the plug-in has begun to close the SSL VPN session.
None
0004 "You are not logged in" Or
"Session timed out, you are not logged in"
This message indicates that the you have not logged on yet (agent is inactive in the Task Bar), or that the your session has been timed out by the gateway.
Log on to the gateway
0005 "Session forced to be timed out in <number> seconds"
the SSL VPN administrator has configured a forced time-out and this is a countdown message that indicates how many seconds are left for the session to time-out.
1001 "Internal Error, please report to admin"
This message indicates that the plug-in has failed to open the interception file. It could also mean that the cleanup program is running while trying to establish the session.
If the cleanup program is running, exit it and retry. If you still see this error, Reboot your computer, and log on to the windows account, which has administrative privileges. 1003 "Internal Error,
please report to admin"
This message indicates that the plug-in failed to allocate memory.
Log off from the SSL VPN session and login again. Report this problem to Support.
1004 "Internal Error, please report to admin"
This message indicates that the plug-in is unable to call the windows library function successfully.
Report this problem to support.
1005 "Internal Error, please report to admin"
This message indicates that the plug-in failed to create the temporary interception file. This error occurs when the user does not possess Write permission in the Windows system directory.
Ensure that the windows account has been
configured with the write permissions in the Windows System Directory, which is c:\windows\system32 or c:\windows\system. Contact the the SSL VPN administrator.
1006 "Internal Error, please report to admin"
This message indicates that the plug-in failed to obtain the list of running
applications when it tried to check whether a specific application was running.
Contact the the SSL VPN administrator.
1007 "Internal Error, please report to admin"
This message indicates that the plug-in in failed to check whether a particular security service was running. The security service could be a personal firewall or an anti-virus services.
Ensure that the security service is running.
1008 "Internal Error, please report to admin"
This message indicates that the SSL VPN client has a socket-handling problem.
Log off from the SSL VPN session and login again. Contact the SSL VPN administrator if error persists.
1010 "Login failed (num)."
The client failed to log on to the SSL VPN. This error can be reported by the
standalone client or the pocketpc client. The 'num' value displays further error indicators.
Make sure the correct user name/password is provided. If forward proxy is
configured, check forward proxy settings and credentials supplied. The connection Log will have more details on why the login failed (example, kernel returned "No intranetip available", OR "User clicked Cancel when prompted for Transfer Login")
1011 "Failed to download configuration"
This error is displayed when the plug-in fails to download the configuration form the VPN gateway after trying three times.
Make sure network is up and that the plug-in has the same version as kernel. Refer to Appendix A at the end of this guide for instructions on manually uninstalling the plug-in. Uninstalling the plug-in will force the correct plug-in version to be downloaded from the VPN gateway on next login.
1012 "Failed to initialize plug-in (num)."
The plug-in failed to initialize. The ‘num’ value displays further error indicators.
Close other unneeded applications. If the error persists, contact your VPN administrator.
1013 1013(2 ) 1013(3 ) 1013(4 ) “Failed to parse configuration(n um)” The configuration
downloaded by the client from the kernel is incorrect. The 'num' value displays further error indicators.
Contact the SSL VPN administrator.
1015 "SSL connection failure"
SSL handshake failed while talking to the gateway, either because the user clicked "No" to the security warning, or because of other reasons. Contact the SSL VPN administrator. 2001 "SSL VPN session has been timed out"
This message indicates that your SSL VPN session has timed out.
Click the Logout button on the Secure Remote Access Session window to log off from the SSL VPN session and login again. For standalone client, logout happens automatically. 2002 "Please install
dsclient.exe" This message indicates that the plug-in has not been able to detect dsclient.exe on the client machine. This software, from Microsoft Corp., enables SSL encryption/decryption for some Windows platforms.
Contact the SSL VPN administrator to download and install dsclient.exe on your Windows 98 or Windows 95 client computer. 2003 "SSLVPN configuration issue"
This message indicates that the CLI has not been configured correctly for -clientsecurity parameter. Contact the SSL VPN administrator to configure SSL VPN correctly. 2004 "Need to install endpoint security software"
This message indicates that at least one of the required endpoint security software packages is not installed.
Contact the SSL VPN administrator to install the required security software.
2005 "Need to upgrade endpoint security software"
This message indicates that endpoint security software has not been upgraded.
Contact the SSL VPN administrator to upgrade the required security software.
2006 "Required security software is not activated"
This message indicates that the an endpoint security software has not been activated.
Run the required security software.
2007 "Hook doesn't match plug-in version"
This message indicates that the interception code does not match the version of the plug-in.
Logout and login again. If it persists, reboot and login with administrative privileges.
2008 "Plug-in version mismatch"
This message indicates that the plug-in, which was downloaded, does not match the version of the kernel.
Please log off from the Web site, remove the plug-in manually, and login again. Go to \Tools\Internet Options\Settings\View Objects\ and delete the "nsload Control" icon. 2009 "Proxy requires
unsupported authentication"
This message indicates that the plug-in has received an unsupported authentication method.
Report the problem to Support.
2010 "Proxy
authentication failed, need to relogin."
This message indicates that you clicked the Cancel button for proxy authentication.
Log off and log on again.
2011 "Failed to validate SSL Certificate."
The plug-in failed to
validate the SSL Certificate. The incorrect SSL certificate is bound on the VPN gateway.
2013 "Failed to parse forward proxy setting."
The plug-in failed to parse the Internet Explorer or Firefox forward proxy setting.
Correct the Internet Explorer configuration under Tools -> Internet Options -> Connections ' LAN Settings. Ensure that the correct configuration is in place. If using Firefox, check Firefox forward proxy settings and ensure it is correctly configured. 2014 “Need to stop software "XYZ"“ OR "Incorrect OS Version"
The client security check detected that a disallowed software process is running, or that the OS required by the SSL VPN administrator is not installed. In the error message, the actual name of the detected software is displayed in place of 'XYZ'.
Stop the detected software process before logging in to the SSL VPN again. If the message is "Incorrect OS version", login from an OS that is permitted by the SSL VPN administrator.
2015 "Login exceeds maximum allowed users”
The number of users permitted by the license is exceeded. Contact the SSL VPN administrator. 2016 "SSL VPN server is not reachable.”
The connectivity between the client and the gateway is disrupted. This could be a temporary glitch and the client will keep polling the gateway to check if it comes back up. Once the gateway is back up, this error will not be displayed anymore.
None
2017 "You are in a quarantine group. Certain applications will be unavailable" OR “Custom message configured by the SSL VPN administrator through -clientsecuritym essage option.”
The end point checks conducted by the gateway on the client system did not succeed. Therefore the client has been placed in a quarantine group and will have limited access to the SSL VPN tunnel and intranet.
Upgrade end point security software so as to pass the end point check.
3001 "You are already logged into the SSL VPN "
This message indicates that the system has detected another session already running in the same client machine. The SSL VPN supports only one session per machine.
Close the other SSL VPN session and log on again.
3002 "You are not logged into the SSL VPN"
This message indicates that you have to provide
authentication details to connect to the SSL VPN. This error message is displayed when you try to bypass the login process and directly access the plug-in.
Log on with authenticated account.
3003 "The SSL VPN supports Microsoft IE4 and later"
This message indicates that the system has not been able to detect the presence of Internet Explorer on the
Upgrade Internet Explorer and Login again.
5.3
Compression Statistics
The compression tab displays statistics about the current SSL VPN session’s TCP traffic compression rates, broken down by individual connections. The col-umns on this tab include the following statistics.
• Port: The port number the connection is communicating on. • UncmpDataSize: Size of the data before compression is applied. • CmpDataSize: The data size after compression is applied.
• Bandwidth Saving: The approximate bandwidth savings by the use of com-pression, expressed as a percentage. This is calculated by the compressed data size subtracted from the actual size, all divided by the actual data size.
• CmpRatio: The compression ratio based on actual data size versus the compressed data size.
NoteBandwidth savings may occasionally show as a negative value. This happens most frequently with applications such as Telnet where transmitted data is sent in very small pieces and other applications where data is precompressed . 3004 “Failed to load
plug-in, contact VPN admin “
This error message indicates that the plug-in could not load. The error may be due to any one of several reasons including settings on your PC or insufficient user privileges
Check your user privileges on your computer as well as your PC’s network
configuration. Contact your VPN administrator if the problem persists.
3005 "Invalid user name or password"
This message indicates that user name and password entered are incorrect. Another possible reason is the back-end authentication server may not be available at login time.
Verify that the entered user name and password are correct and re-enter them.
4001 "Internal Error" This message indicates that the plug-in did not forward cleanup information to the client software.
None
Figure 5-2 Compression Tab
5.4
Connection Logs
You can use the connection logs to troubleshoot connection-related issues. The following procedure lists the steps to access the connection logs.
1. Check the Windows system tray for the icon. This indicates that the agent is active and that you are currently logged on. Right-click the icon and select Show Connection Log from the short-cut menu. The connection log is displayed as shown in the following figure. BLACK is used to indicate status messages, RED to indicate errors, and BLUE to indicate acceleration messages.
Figure 5-3 Connection log
If you are using the browser plug-in, use the following procedure.
1. Click Configuration in the plug-in window. The Configuration dialog box is displayed.
2. Click the Trace tab. The Trace pane is displayed.
3. Click Show Connection Log to view the log. The connection log window is displayed as shown in Figure 5-3.