Apache Web
Server Hardening
Solutions in this chapter:
■
Understanding Common Vulnerabilities
With Apache Web Server
■
Patching and Securing the OS
■Hardening the Apache Application
■Monitoring the Web Server for Secure
Operation
Appendix D
Understanding Common Vulnerabilities
Within Apache Web Server
As we discussed in the previous appendix, all software systems have four general types of vul-nerability. Apache is no different and can be negatively affected by any one of the following problems:
■ Poor application configuration ■ Unsecured Web-based code ■ Inherent Apache security flaws ■ Foundational OS vulnerabilities
We’ll investigate these four types in detail through the remaining sections of this appendix.
Poor Application Configuration
Like the Microsoft IIS Web server, Apache has many default settings that require modifica-tion for secure operamodifica-tion. Nearly all configuramodifica-tion informamodifica-tion for Apache Web server exists within the httpd.conf file and associated Includefiles. Because many configuration options exist within these files, it can be easy to make configuration errors that expose the applica-tion to attack.
Unsecured Web-Based Code
The second manner in which vulnerabilities are exposed is via poorly implemented code on the Apache server. Often, Web developers are far more concerned with business function-ality than the security of their code. For instance, poorly written dynamic Web pages can be easy DoS targets for attackers, should coded limitations be absent from backend database queries. Simply publishing confidential or potentially harmful information without authenti-cation can provide enemies with ammunition for attack. For these reasons, you must review and understand not only the Apache application but the information and functionality being delivered via the system.
Inherent Apache Security Flaws
Like the IIS server, vulnerabilities can exist within the Apache application code itself.There are many means by which hackers can breech or disable an Apache system, such as:
■ Denial of service ■ Buffer overflow attacks ■ Attacks on vulnerable scripts ■ URL manipulation
Occasionally, Apache security flaws are discovered and announced by Apache or by various security groups.The Apache development team is typically quick to respond and distribute patches in response to such events. For this reason, it is critical that you remain vigilant in your attention to security newsgroups and to Apache’s security advisory site at
http://httpd.apache.org/security_report.html.
Foundational OS Vulnerabilities
Another source of vulnerability within an Apache Web server could occur as a result of foundational security flaws in the OS on which Apache is installed. Apache can be run on just about any OS.You should be very familiar with the specific security vulnerabilities for any OS on which you run Apache.This brings us to the next section, in which we discuss the merits of patching and securing the Microsoft OS.
Patching and Securing the OS
As we discussed in the previous sections and chapters of this book, code deficiencies can exist in OSs and lead to OS and application vulnerabilities. It is therefore imperative that you fully patch newly deployed systems and remain current with all released functional and secu-rity patches. At regular intervals, thoroughly review the published vulnerabilities at your OS manufacturer’s Web site.
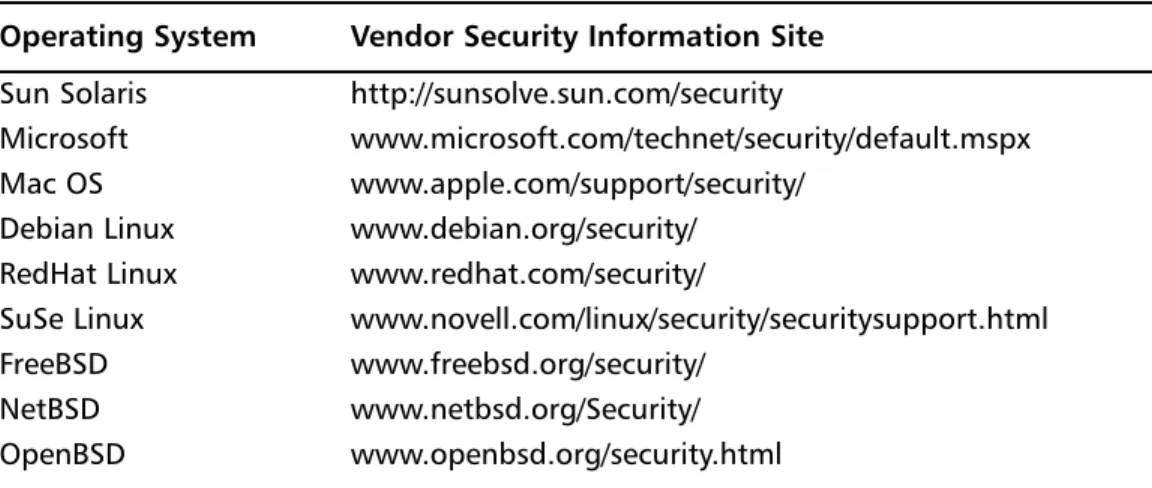
Some popular OSs and their respective security sites are listed in Table D.1.
Table D.1
Popular Operating Systems and Their Security Sites Operating System Vendor Security Information Site Sun Solaris http://sunsolve.sun.com/securityMicrosoft www.microsoft.com/technet/security/default.mspx
Mac OS www.apple.com/support/security/
Debian Linux www.debian.org/security/ RedHat Linux www.redhat.com/security/
SuSe Linux www.novell.com/linux/security/securitysupport.html
FreeBSD www.freebsd.org/security/
NetBSD www.netbsd.org/Security/
OpenBSD www.openbsd.org/security.html
It might be a good idea to subscribe to your OS vendor’s security mailing list to receive security-related updates and to monitor security newsgroups for 0-day exploits.
Patching Unix, Linux,
and BSD Operating Systems
Because Apache is so often run on various Unix, Linux, and BSD distributions, we include patching steps so that you can confidently deploy your Apache Web server on a well-hard-ened foundational OS.The steps required to patch specific Unix, Linux, and BSD OS are included in “Implementation:The Quick and Dirty Details” of Chapter 3, “UNIX DMZ Design.” Refer to these sections for more detailed information.
In general, however, each vendor provides a full suite of tools and information designed to help you remain current of their released software updates. Become familiar with each of your vendor’s OS patching methodologies and software tools. As the security administrator, you should reserve predetermined time periods for maintenance windows during episodes of low customer activity. However, the discovery of serious OS vulnerabilities could necessitate emergency downtime while patches are applied.
Configuring a Secure Operating System
Like patching, all systems used to provide services such as HTTP and HTTPS to customers should be thoroughly hardened beforethey are placed in a production environment.
Hardening includes many steps such as the following: ■ Setting file permissions
■ Locking down accounts
■ Establishing proper OS security policies ■ Configuring host-based firewalls ■ Disabling vulnerable services
These are just a few examples of the general tasks required to initially secure your OS. For the detailed steps required to secure specific Unix, Linux, and BSD OS, refer to “Implementation:The Quick and Dirty Details” of Chapter3, “UNIX DMZ Design.” For specific information about hardening Microsoft Windows OS, refer to Appendix A, “IIS Web Server Hardening.”
Now that we have a solid, secure OS, let’s move on to discuss how to properly install and securely configure the Apache Web server.
Hardening the Apache Application
The Apache Web server is a powerful application through which you can deliver critical business functionality to customers. With this power comes the possibility of misuse and attack.To ensure that your Apache server is running securely, we have compiled a series of steps to harden the Apache application.You might also want to read additional information
or review other Apache security checklist documents before deploying your Apache server. Two excellent reference guides are the CIS Apache Benchmarkdocument available at the Center for Internet Security (www.cisecurity.org) and the NIST Apache Benchmark docu-ment available at http://csrc.nist.gov/checklists/repository/1043.html.
You should follow three general steps when securing the Apache Web server as follows: ■ Prepare the OS for Apache Web server
■ Acquire, compile, and install the Apache Web server software ■ Configure the httpd.conf file
Within these general tasks there are many steps, which we cover in the following sections.
Prepare the OS for Apache Web Server
After you’d patched and hardened your OS, you’ll need to accomplish a couple quick tasks prior to obtaining, compiling, and installing the Apache software. A critical part of installing Apache is to provide a user account and group that will run the Web server. It is important that the user and group you select be unique and unprivileged to avoid reduce exposure to attack.
W
ARNINGDo not run your Apache Web server as the user Nobody. Although this is often a system administrator favorite and seemingly unprivileged account for running Apache and other services, the Nobody account has historically been used for root-like operations in some OSs and should be avoided.
Choose and configure a user and group account using the following Unix OS steps. In this example, we will use wwwusrand wwwgrpas the Apache username and group, respectively.
1. As root from the command line, type groupadd wwwgrpto add a group. 2. Type useradd –d /usr/local/apache/htdocs –g wwwgrp –c “Apache
Account” –m wwwusrto add the user.
The second step creates the user account but also creates a home directory for the user in /usr/local/apache/htdocs.
After creating the user and group accounts, you’ll need to lock down the wwwusr user account for use with Apache. By locking the account and providing an unusable shell, this action ensures that no one can actually log into the Web server using the Apache account: 1. As rootfrom the command line, type passwd –l wwwusrto lock the Apache
2. Type usermod –s /bin/false wwwusrto configure an unusable shell account for the Apache account.
Now you’re ready to get the Apache software and begin installation.
Acquire, Compile, and Install
Apache Web Server Software
Because Apache is open-source software, you can freely download the binaries or source code and get going with your installation. Although there are many locations from which you could download the software, it is always best to obtain the Apache software directly from an approved Apache Foundation mirror listed at http://httpd.apache.org/download.cgi.
You’ll need to decide whether to install the server using precompiled binaries or to compile the source code yourself. From a security and functionality perspective, it is usually better to obtain the source code and compile the software, since doing so permits fine-tuning of security features and business functionality. In this section, we’ll discuss compiling the Apache server from source code.
To download the source code, point your browser at the URL listed previously, select a mirror, and select the latest Apache source code distribution. While you’re on the Apache mirror site, also download the MD5 checksum, which should be available in the same direc-tory as the source code.The checksum file will look identical to the source code tarball but will have an .md5 file extension. We’ll use this checksum to verify the integrity of our Apache source code.
Verify Source Code Integrity
To verify the checksum, you’ll need additional software called md5sumthat might be part of your OS distribution. If it’s not, you can download the software as part of GNU Textutils available at www.gnu.org/software/textutils/textutils.html.To verify the Apache checksum, perform the following steps. In this example, we’ll use Apache version 2.2.3:
1. As rootfrom the command line, change directories to where you downloaded the Apache source code tarball and checksum file.
2. Type cat httpd-2.2.3.tar.gz.md5to see the exact md5 checksum string.You should see something like f72ffb176e2dc7b322be16508c09f63c httpd-2.2.3.tar.gz.
3. From the same directory, type md5sum httpd-2.2.3.tar.gz.md5to obtain the checksum from the tarball.You should see the identical string shown in Step 2. If you do, the software you downloaded is authentic.
Compile the Source Code
After downloading and verifying the Apache source code, you’ll need to do some research to understand what options you want to compile into your Web server.There are many mod-ules, such as mod_access and mod_ssl, that can be added into your server to provide addi-tional funcaddi-tionality and security. A full list of Apache Foundation-provided modules can be found at http://httpd.apache.org/docs/2.0/mod/. When choosing modules, be sure you select only what you need. Compiling extra, unnecessary modules will only result in a less secure, slower Web server.
W
ARNINGUse caution in enabling and disabling services at compile time. Before you do so, determine the dependencies of your Web server code. For instance, do you need CGI functionality on your site? Failure to understand what services you require to operate could result in loss of critical functionality. It might be pru-dent to test your configuration in a lab environment before disabling services on a production server.
Once you’ve decided which modules and configurations to use, you should accomplish one final task before building your software: Obscure the Apache version information located in the ap_release.hfile located in the ${ApacheSrcDir}/include directory.To do so, vi the file and alter the following lines to change the Software Vendor (Apache Software Foundation) information:
#define AP_SERVER_BASEVENDOR "Apache Software Foundation" #define AP_SERVER_BASEPRODUCT "Apache"
In general, you’ll need to perform three steps to compile and install your Apache Web server, as follows:
1. From the ${ApacheSrcDir}directory, run ./configure. 2. After configuring source, run ./make to compile the software.
3. After compiling the software, run ./make installto install the Apache Web server.
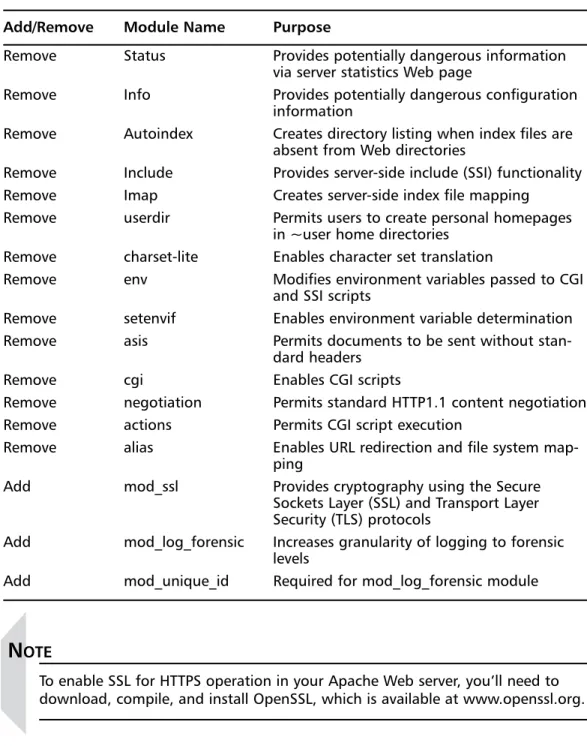
During the first step, you’ll decide what is added to the Apache server at compile time. Table D.2 includes a list of modules you may consider adding and removing from your con-figuration:
Table D.2
Modules You Can Add or Remove Add/Remove Module Name PurposeRemove Status Provides potentially dangerous information via server statistics Web page
Remove Info Provides potentially dangerous configuration
information
Remove Autoindex Creates directory listing when index files are absent from Web directories
Remove Include Provides server-side include (SSI) functionality
Remove Imap Creates server-side index file mapping
Remove userdir Permits users to create personal homepages
in ~user home directories Remove charset-lite Enables character set translation
Remove env Modifies environment variables passed to CGI
and SSI scripts
Remove setenvif Enables environment variable determination
Remove asis Permits documents to be sent without
stan-dard headers
Remove cgi Enables CGI scripts
Remove negotiation Permits standard HTTP1.1 content negotiation
Remove actions Permits CGI script execution
Remove alias Enables URL redirection and file system
map-ping
Add mod_ssl Provides cryptography using the Secure
Sockets Layer (SSL) and Transport Layer Security (TLS) protocols
Add mod_log_forensic Increases granularity of logging to forensic levels
Add mod_unique_id Required for mod_log_forensic module
N
OTETo enable SSL for HTTPS operation in your Apache Web server, you’ll need to download, compile, and install OpenSSL, which is available at www.openssl.org.
Mod_security
mod_security, a third-party Apache module available from www.modsecurity.org/, provides application firewall intrusion protection and prevention.To enable mod_security, you must download and compile the software into the Apache Web server. Adding mod_security
increases the secure operation of your Apache Web server and adds functionality including, but not limited to, the following:
■ HTTP protocol awareness
■ Anti-evasion technique prevention such as URL encoding validation and URL decoding
■ Enhanced audit logging ■ Built-in chrootfunctionality ■ Buffer overflow protection ■ HTTPS filtering
We’ll enable mod_securityin our example because it adds so many security features to our system. Once you have downloaded the mod_securitysource from www.modsecurity.org/ download/index.html, perform the following steps as root:
cd ${modsecuritySrcDir}/apache2
mkdir -r ${ApacheSrcDir}/modules/security
cp mod_security.c Makefile.in config.m4 \ ${ApacheSrcDir}/modules/security cd ${ApacheSrcDir}
./buildconf
Now mod_securityappears like other Apache modules. When we compile Apache, we’ll enable it using the command –enable-security. Using the previous listed configurations, your configurestatement would look something like the following:
./configure –-prefix=/usr/local/apache \ --enable-so \ --enable-ssl \ --enable-security \ --enable-unique-id \ --enable-log-forensic \ --disable-info \ --disable-status \ --disable-autoindex \ --disable-imap \ --disable-include \ --disable-userdir \ --disable-auth \
--disable-charset-lite \ --disable-env \ --disable-setenvif \ --disable-asis \ --disable-cgi \ --disable-negotiation \ --disable-actions \ --disable-alias
The command configures the Apache software to be installed in /usr/local/apacheand to be built with our module options.There are many options to consider in configuring the Apache source code for compilation.To view a list of options, issue the command ./configure –helpfrom the ${ApacheSrcDir} directory.
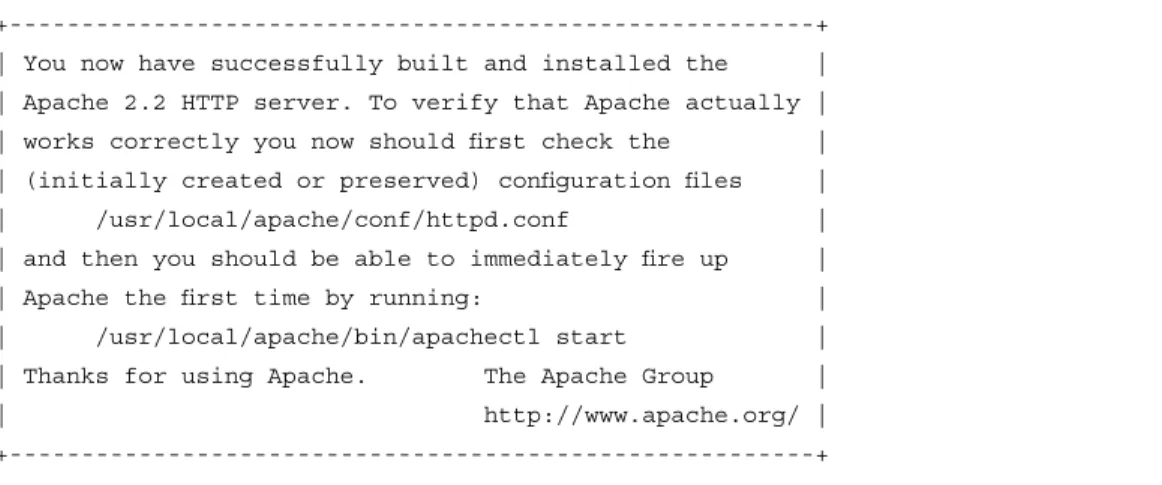
After successfully configuring the source code, proceed with Steps 2 and 3. On suc-cessful completion, you should see a message similar to the one shown in Figure D.1.
Figure D.1
Successful Completion Message+---+ | You now have successfully built and installed the | | Apache 2.2 HTTP server. To verify that Apache actually | | works correctly you now should first check the | | (initially created or preserved) configuration files | | /usr/local/apache/conf/httpd.conf | | and then you should be able to immediately fire up | | Apache the first time by running: | | /usr/local/apache/bin/apachectl start | | Thanks for using Apache. The Apache Group | | http://www.apache.org/ | +---+
Now that we’ve successfully installed the Apache Web server software, let’s proceed to the next step: configuring the httpd.conffile for secure operation.
Configure the httpd.conf File
The Apache Web server stores all its configuration data in the httpd.conffile located in the ${ApacheServerRoot} directory, which is, in our example,/usr/local/apache.The httpd.conffile includes many directives that can be categorized into the following sections:
■ Server Directives ■ User Directives
■ Performance/Denial of Service (DoS) Directives ■ Server Software Obfuscation Directives
■ Access Control Directives ■ Authentication Mechanisms ■ Directory Functionality Directives ■ Logging Directives
Not all directives play a significant role with regard to security. In the following sections, we’ll discuss the directives that impact the security of your Apache server. Furthermore, because we disabled a lot of functionality at compile time, some directives that would nor-mally be dangerous don’t need to be removed, since they weren’t added into the compiled Apache binaries.There may also be other configuration files, called Includefiles, associated with the httpd.conffile. Since we have enabled mod_security, there is a long list of potential configurations to make in an Includefile called modsecurity.conf, which is usually located in the ${ApacheServerRoot}/conf directory.
In this section, we’ve included the Modsecurity.com-recommended mod_security config-uration. For more information about configuring this file, refer to the mod_security documen-tation found at www.modsecurity.org/documendocumen-tation/.
Recommended
modsecurity.conf
File
# Turn ModSecurity On SecFilterEngine On
# Reject requests with status 403
SecFilterDefaultAction "deny,log,status:403" # Some sane defaults
SecFilterScanPOST On
SecFilterCheckURLEncoding On SecFilterCheckUnicodeEncoding Off # Accept almost all byte values SecFilterForceByteRange 1 255 # Server masking is optional # SecServerSignature "OurServer" SecUploadDir /tmp
# Only record the interesting stuff SecAuditEngine RelevantOnly
SecAuditLog logs/audit_log
# You normally won't need debug logging SecFilterDebugLevel 0
SecFilterDebugLog logs/modsec_debug_log
# Only accept request encodings we know how to handle
# we exclude GET requests from this because some (automated) # clients supply "text/html" as Content-Type
SecFilterSelective REQUEST_METHOD "!^(GET|HEAD)$" chain SecFilterSelective HTTP_Content-Type \
"!(^application/x-www-form-urlencoded$|^multipart/form-data;)" # Do not accept GET or HEAD requests with bodies
SecFilterSelective REQUEST_METHOD "^(GET|HEAD)$" chain SecFilterSelective HTTP_Content-Length "!^$"
# Require Content-Length to be provided with # every POST request
SecFilterSelective REQUEST_METHOD "^POST$" chain SecFilterSelective HTTP_Content-Length "^$"
# Don't accept transfer encodings we know we don't handle SecFilterSelective HTTP_Transfer-Encoding "!^$"
User Directives
There are a couple directives you must configure in the httpd.conffile to ensure that the Apache Web server runs using the unprivileged user account we established earlier, among other things. Inspect your httpd.conffile to verify that the following statements appear as shown in the following. Recall that we decided to run Apache as wwwusr:wwwgrp.
User wwwusr Group wwwgrp
Also, configure the ServerAdmindirective with a valid alias e-mail address such as the following:
ServerAdmin [email protected]
This will provide a point of contact for your customers, should they experience prob-lems with your site.
Performance/Denial-of-Service (DoS) Directives
There are a number of performance-tuning directives in the Apache httpd.conffile. As a security professional, you should interpret these directives as DoS prevention statements, since they control resource allocation for users of the Apache server.The following directives control the performance of an Apache server:
■ Timeout Configures the time Apache waits to receive GET requests, the time between TCP packets for POST or PUT requests, or the time between TCP ACK statements in responses.The Apache default is 300 seconds (5 minutes), but you might want to consider reducing this timer to 60 seconds to mitigate DoS attacks. ■ KeepAlive Configures HTTP1.1-compliant persistency for all Web requests. By
default, this is set to On and should remain as such to streamline Web communica-tion.
■ KeepAliveTimeout Determines the maximum time to wait before closing an inactive, persistent connection. Let’s keep this value at the default of 15 seconds, since raising it can cause performance problems on busy servers and expose you to DoS attacks.
■ StartServers Designates the number of child processes to start when Apache starts. Setting this value higher than the default of 5 can increase server perfor-mance, but use care not to set the value too high, because doing so could saturate system resources.
■ MinSpareServers This setting, like the MaxSpareServers setting, allows for dynamic adjustment of Apache child processes. MinSpareServers instructs Apache to maintain the specified number of idle processes for new connections.This number should be relatively low except on very busy servers.
■ MaxSpareServers Maintains Apache idle processes at the specified number. Like MinSpareServers, this value should be low, except for busy sites.
■ MaxClients As its name implies, this setting determines the maximum number of concurrent requests to the Apache server. We’ll leave this at the default value of 256.
Once you’ve finished editing this section of your httpd.conffile, you should see some-thing similar to the following:
Timeout 60 KeepAlive On KeepAliveTimeout 15 StartServers 5 MinSpareServers 10 MaxSpareServers 20 MaxClients 256
Server Software Obfuscation Directives
By default, Apache informs Web users of its version number when delivering a 404 (page not found) error. Since it is good practice to limit the information you provide to would-be hackers, we’ll disable this feature. Recall that we already altered the Apache server signature and that we installed mod_security. Both of these actions should be enough to obfuscate our server because they both alter the default behavior. If you would like to turn off server sig-natures completely, you can always set the ServerSignature directive to Offand the ServerTokensto Prod.This will disable Apache signatures entirely.
Access Control Directives
The Apache Web server includes mechanisms to control access to server pages and function-ality.The statement syntax is part of the <Directory>directive and is fairly straightforward; you specify a directory structure, whether default access is permitted or denied, and the parameters that enable access to the directory if access is denied by default.There are many options for fine-grained control that you should learn by reading
http://httpd.apache.org/docs/2.0/mod/core.html#directory.
Regardless of the access you provide to your customers, you should secure the root file system using access control before placing your server into a production environment. In your httpd.conffile, you should create a statement in the access control directives area as follows:
<Directory />
Order Deny, Allow deny from all </Directory>
This statement will deny access to the root file system should someone intentionally or accidentally create a symlink to /.
Authentication Mechanisms
Apache also includes several ways in which you can authenticate customers using your Web server such as LDAP, SecureID, and basic .htaccess, to name a few examples.To use authenti-cation mechanisms beyond basic .htaccess, you must compile additional functionality when you’re building Apache. Like access control, authentication mechanisms are specified as part of the <Directory>directive.
The two steps to enabling basic .htaccess user authentication are: 1. Creating an htpasswd file to store user credentials.
2. Adding a <Directory>directive to the httpd.conffile to protect a directory structure.
Let’s use an example to demonstrate how easy it can be to add authentication. In our example, we’ll secure a directory called /secureand permit only customers Elise and Margot access to the files in that directory.
First, let’s create an htpasswd file somewhere notin the Web server document root by issuing the following command:
htpasswd -c /usr/local/apache/passwdfile elise New password: *****
Re-type new password: ***** Adding password for user elise
Next, we’ll add Margot to the list as well.This time we don’t need to use the –c argu-ment, since our htpasswd file already exists:
htpasswd /usr/local/apache/passwdfile margot New password: *****
Re-type new password: ***** Adding password for user margot
Now that we’ve established our customer accounts, we’ll finish by adding a
<Directory>directive to the httpd.conffile to protect the /securedirectory as follows:
<Directory /usr/local/apache/htdocs/secure> AuthType Basic
AuthName "Access for authenticated customers only" AuthUserFile /usr/local/apache/passwdfile
Require user margot elise </Directory>
Now, when anyone attempts to access the /securedirectory, they’ll be prompted for a username and password. Because we specifically require only Margot and Elise, only they will be permitted to use the directory structure, if they authenticate properly.
Let’s move on to discuss a couple other security-related <Directory>directives.
Directory Functionality Directives
Within the <Directory>directive is a subdirective called Optionsthat controls functionality for the directory structures specified in the <Directory> directive.The available options are listed in Table D.3.
Table D.3
Directory OptionsOption Functionality
All Default setting; includes all options except MultiViews ExecCGI Permits CGI script execution through mod_cgi
Table D.3 continued
Directory OptionsOption Functionality
FollowSymLinks Allows Apache to follow OS file system symlinks
Includes Permits SSI through mod_include
IncludesNOEXEC Permits SSI but denies exec and exec cgi
Indexes Allows autoindexing using mod_autoindex if no config-ured index file is present
MultiViews Permits content negotiation using mod_negotiation SimLinksIfOwnerMatch Allows Apache to follow OS file system symlinks but only
if the link and target file have the same owner
Many of the listed options are not relevant to our installation, since we disabled Includes and CGIduring compile time. Regardless, a good default <Directory>directive disabling most options is shown her:
<Directory "/usr/local/apache/htdocs"> Order allow,deny
Allow from all
Options –FollowSymLinks –ExecCGI –Includes –Indexes \ -MultiViews
AllowOverride None </Directory>
At this point, your Apache server should be relatively secure. Let’s discuss some Apache logging directives so that we can better monitor our server.
Logging Directives
There are many reasons to configure logging on your Apache server. Whether helping you see top page hits, hours of typical high volume traffic, or simply understanding who’s using your system, logging plays an important part of any installation. More important, logging can provide a near-real-time and historic forensic toolkit during or after security events. In this section, we examine some logging configuration best practices.
To ensure that your logging directives are set up correctly, we’ll provide an example of the Logging options in the Apache Web server. Apache has many options with which you should familiarize yourself by reading http://httpd.apache.org/docs/2.0/mod/mod_log_ config.html#logformat.This will help you understand the best output data to record in logs. Also, recall that we compiled Apache with mod_log_forensic, which provides enhanced granu-larity and logging before and after each successful page request.
An example logging configuration is shown here:
ErrorLog /var/log/apache/error.log LogLevel info
LogFormat "%h %l %u %t \"%r\" %>s %b \"%{Referer}i\" \"%{User-Agent}i\" \"%{forensic-id}n\" %T %v" full
CustomLog /var/log/apache/access.log combined ForensicLog /var/log/apache/forensic.log
This example provides a customized logging format that includes detailed output and places all the log files in the /var/log/apachedirectory.
T
IPIt is good practice to archive your system and Apache log files to backup loca-tion. This prevents loss of critical forensic data due to accidental deletion or malicious activity.
Remove Default/Unneeded Apache Files
After you’ve installed and configured your Apache server, you’ll need to do some quick cleanup of files that could represent a security threat. In general, you should not leave the source code you used to compile Apache on the file system. It’s a good idea to tar the files up and move them to a secure server. Once you’ve done so, remove the source code from the Apache Web server.
You’ll also want to remove some of the default directories and files installed by the Apache Web server.To do so, execute the following commands on your Web server. If you have added content into your document root directory, you’ll want to avoid the first command:
rm –fr /usr/local/apache/htdocs/* rm –fr /usr/local/apache/cgi-bin rm –fr /usr/local/apache/icons
After removing files, let’s ensure that our Apache files have proper ownership and per-missions before starting our server.
Update Ownership/Permissions
As we discussed previously, the Apache Web server should be run as an unprivileged and unique account. In our example, we used the user wwwusr and the group wwwgrp to run our server. Let’s make sure our permissions are properly set by running the following commands:
chown –R root:wwwgrp /usr/local/apache/bin chmod –R 550 /usr/local/apache/bin
chown –R root:wwwgrp /usr/local/apache/conf chmod –R 660 /usr/local/apache/conf
chown –R root:wwwgrp /usr/local/apache/logs chmod –R 664 /usr/local/apache/logs
chown –R root /usr/local/apache/htdocs chmod –R 664 /usr/local/apache/htdocs
Monitoring the Server
for Secure Operation
Even with the best defenses and secure configurations, breeches in your systems and applica-tions could occur. Therefore, you cannot simply set up a hardened Apache Web server and walk away thinking that everything will be just fine. Robust and comprehensive monitoring is perhaps the most important part of securely operating servers and applications on the Internet.
Throughout this book, we have discussed myriad techniques to ensure your IT security. You must leverage all these secure DMZ functions in your job. With regard to Apache, there are several things to consider that will help you identify and react to potential threats.
Your primary source of data will be through Apache and OS logs. Even with small Web sites, however, sifting through this information can be a challenge. One of the first things to consider is integrating your Apache logs with other tools to help organize and identify the potential incident “needles” in your log file “haystack.” Many open-source and commercial products are available to aid you in securing your site. Once such open-source tool is called Webalizer, available at www.mrunix.net/webalizer, which features graphical representation of your Apache log file contents.
SNMP polling and graphing constitute another methodology commonly employed for secure monitoring. Often, it is extremely difficult to gauge the severity or magnitude of an event without visualization of data from logs or SNMP counters. One tool you might con-sider using is a module called mod_apache_snmp, available at
http://mod-apache-snmp.sourceforge.net/.The module can provide real-time monitoring of various metrics including, but not limited to:
■ Load average ■ Server uptime ■ Number of errors
■ Number of bytes and requests served
You might consider other commercial SNMP-based solutions, especially for enterprise-scale deployments.These tools help expedite monitoring deployment and usually include enhanced functionality to automatically alert you when important thresholds, such as Web site concurrent connections, are crossed.