Securing Your
Amazon Web Services
Account Using
Identity and Access Management
Table of Contents
Introduction………....3
Setting up your AWS account to use IAM for the first time…….………...3
Activating IAM user access to Billing Information…………....………...3
Customizing your AWS Management Console signin link….………..4
Creating an Administrative IAM Group…….………....4
Administrator Policy………...…..5
Creating an Administrative IAM User………5
Logging in as an IAM User……….………..…..6
Creating IAM Groups for the rest of your users……….…..6
Power User Policy………..…..7
Billing Policy………..…8
Set Own Password Policy………...8
Manage Own Access Keys Policy………...………..9
Manage Own MFA Policy………..10
Creating IAM Users for the rest of your team………...……….11
Other Resources……….13
Introduction
Your application can only ever be as secure as the processes around how you manage access to the environment that it resides in. With Amazon Web Services (AWS), understanding and properly utilizing Identity and Access Management (IAM) is crucial to securing your entire AWS deployment.Setting up your AWS account to use IAM for the first time
When you first signup for your AWS account, root account credentials are automatically created for you. These login credentials allows full access to all resources in the AWS account, and there's no ability to restrict those privileges in any way. Due to the power of this account, it's best to only use it for the initial setup and creation of IAM users, and then lock the credentials away in a safe place for emergency use only.Activating IAM user access to Billing Information
As a first step, you may want to grant access to the Billing & Cost Management section to IAM Users. By default, only the root account can access this section. If you enable it for IAM Users, beware that any full access policies you create will then have access to your billing information, including the last four digits of and contact information for your payment card, and the ability to edit or delete payment methods. While you can restrict access to this information using IAM Policies (e.g. see our Power User policy below), if the user has access to the IAM APIs (e.g. see our Administrator policy below), they would be able to modify their own privileges and give themselves access to the Billing & Cost Management section anyway.To enable Billing & Cost Management for IAM Users, login to the AWS Management Console with your root account credentials, and from the account dropdown menu in the top right select Billing & Cost Management > Account Settings, scroll down to the IAM User Access to Billing Information section and click Edit. Check the box beside Activate IAM Access and click Update (see fig. 1). You should now see a message that IAM user access to billing information is activated.
Figure 1. Enabling IAM access to Billing & Cost Management
Customizing your AWS Management Console signin link
At this time you may want to customize the signin link for your AWS Management Console. By default it starts with your 12digit account ID. You may want something more memorable like your company name (Note: this name is unique across all AWS accounts, so your first choice may not be available).To customize your signin link, select the IAM link from the Services dropdown menu in the topleft (it's nested under both All AWS Services and Deployment & Management). At the top of the Dashboard you will see your current IAM users signin link, and can click Customize to the right of it to change it to something more desirable.
Creating an Administrative IAM Group
The last action you want to take before locking away your root account credentials is to create yourself an IAM User with administrative privileges. We recommend that you never attach policies directly to a user, but always create descriptive groups to attach policies to, and assign users to those groups. This allows you to easily see who has access to what at a glance. In the IAM section, click on Groups, then the Create New Group button. Type a descriptive group name (e.g. "Administrators") and click Next Step. For this group, you can Select theAdministrator Access policy from the Select Policy Template section provided or, Select Custom Policy and copy and paste the policy below into the Policy Document text area and give it a Policy Name like "AllowAll" or similar. This is a very basic policy that simply allows access to all
resources.
Administrator Policy
{ "Version" : "20121017", "Statement" : [ { "Sid" : "AllowAll", "Effect" : "Allow", "Action" : "*", "Resource" : "*" } ] }Note: We're using the unique Statement ID (Sid) as a form of comments in our policies.
Creating an Administrative IAM User
Click on the Users option in the lefthand menu while in the IAM section of the AWS Management Console and click on the Create New Users button. Enter a username for your new IAM User in a format of your choice (e.g. your company email address). Unfortunately the IAM Create User wizard has the "Generate an access key for each user" option checked by default, which we don't recommend doing. If you want to allow specific users to have access keys, we
recommend adding them to a second group that allows them to do so, which we'll cover in a later section. Uncheck this checkbox and click Create.
Click on your new user you just created in the Users section and click Add User to Groups. Select the administrative group you just created, and click Add to Groups.
To be able to login as your new IAM User, you'll need to click Manage Password under the Security Credentials >Sign-in Credentials section. Assign a custom or autogenerated password and click Apply. We recommend storing it in a safe password manager (e.g. LastPass). We also recommend enabling MultiFactor Authentication (MFA) (e.g. Google Authenticator) at this time by following the steps in the Manage MFA Device wizard.
Logging in as an IAM User
The login page for your root account is different than that for your IAM Users. Go to the URL you created in the section Customizing your AWS Management Console signin link and make sure that your customized account name is listed in the Account field, then fill in the User Name and Password you just created. If you enabled MFA, check the box next to I have an MFA Token and enter a code from your MFA device in the MFA Code field and click Sign In. You are now logged in to the AWS Management Console as an IAM User instead of the root account.
Creating IAM Groups for the rest of your users
Before creating IAM Users for the rest of your team members, you may want to customize your AWS account password policy. In the IAM section, click on Password Policy in the lefthand menu. As well as setting a sufficiently complex policy as to force your users to set and maintain strong passwords, one setting here you may want to check is Allow users to change their own password. If you don't want all users to be able to set their own passwords, you can leave this unchecked and use a Set Own Password Policy to allow users to set their own passwords on a casebycase basis. Figure 2. An example of a strong password policy.
Next you'll want to create the IAM Groups required for the new users you'll want to create. Following the steps in the earlier section Creating an Administrative IAM Group we'll create a group for Power Users (which you may choose to use for the majority of your trusted, senior resources) as well as some secondary groups that will be used for augmenting privileges of other primary groups (e.g. granting Billing access to some Power Users, but not others).
Power User Policy
The following IAM Policy allows users access to everything except the IAM section (so they can not create or modify users or their privileges) and the Billing & Cost Management section.
{ "Version" : "20121017", "Statement" : [ { "Sid" : "AllowAll", "Effect" : "Allow", "Action" : "*", "Resource" : "*" }, { "Sid" : "DenyAwsPortalIam", "Effect" : "Deny", "Action" : [ "awsportal:*", "iam:*" ], "Resource" : "*" } ] }
Billing Policy
The following IAM Policy will allow any user access to the Billing & Cost Management section. If you attach this to a secondary Billing group, you can then assign access to the Billing section on a casebycase basis, regardless of the user's other privileges. { "Version" : "20121017", "Statement" : [ { "Sid" : "AllowViewBilling", "Effect" : "Allow", "Action" : [ "awsportal:ViewBilling" ], "Resource" : [ "*" ] } ] }
Set Own Password Policy
If you leave the Allow users to change their own password setting disabled in the account's
Password Policy, you'll need to create a group with the below policy for nonAdministrators to be able to change their passwords. This is especially important if you create users with the Require user to create a new password at next sign-in option checked, or have a Password Policy
with password expiration enabled. { "Version" : "20121017", "Statement" : [ { "Sid" : "AllowChangeOwnPassword", "Effect" : "Allow", "Action" : [ "iam:ChangePassword" ], "Resource" : [ "arn:aws:iam::ACCOUNTIDWITHOUTHYPHENS:user/${aws:username}"
] }, { "Sid" : "AllowGetAccountPasswordPolicy", "Effect" : "Allow", "Action" : [ "iam:GetAccountPasswordPolicy" ], "Resource" : [ "*" ] } ] }
Manage Own Access Keys Policy
If you want to allow specific users to create their own Access Keys, we recommend creating a secondary group for this with the IAM Policy below. { "Version" : "20121017", "Statement" : [ { "Sid" : "AllowListUsers", "Effect" : "Allow", "Action" : [ "iam:ListUsers" ], "Resource" : [ "arn:aws:iam::ACCOUNTIDWITHOUTHYPHENS:user/*" ] }, { "Sid" : "AllowListCreateUpdateDeleteOwnAccessKeys", "Effect" : "Allow", "Action" : [ "iam:ListAccessKeys","iam:CreateAccessKey", "iam:UpdateAccessKey", "iam:DeleteAccessKey" ], "Resource" : [ "arn:aws:iam::ACCOUNTIDWITHOUTHYPHENS:user/${aws:username}" ] } ] }
Note: You will have to replace ACCOUNT-ID-WITHOUT-HYPHENS with your 12digit AWS account ID in the policy above.
Although it can be handy for developers to have Access Keys to use the AWS Command Line Interface (CLI), you should never embed these keys in production code or store them on EC2 instancesyou should utilize IAM Roles for Amazon EC2 for most purposes.
If you need to provide Access Keys to thirdparty services (e.g. to grant access to an S3 bucket) you should create new, separate IAM Users specifically for that purpose, with very restricted IAM Policies, and generate Access Keys (but not passwords) for those users for use on such services. Give these users a descriptive name so you know what purpose they serve.
Manage Own MFA Policy
The following IAM Policy allows user to manage their own MFA devices through the AWS Management Console. { "Version" : "20121017", "Statement" : [ { "Sid" : "AllowUsersToCreateDeleteTheirOwnVirtualMFADevices", "Effect" : "Allow", "Action" : ["iam:*VirtualMFADevice"], "Resource" : ["arn:aws:iam::ACCOUNTIDWITHOUTHYPHENS:mfa/${aws:username}"]}, { "Sid" : "AllowUsersToEnableSyncDisableTheirOwnMFADevices", "Effect" : "Allow", "Action" : [ "iam:DeactivateMFADevice", "iam:EnableMFADevice", "iam:ListMFADevices", "iam:ResyncMFADevice" ], "Resource" : ["arn:aws:iam::ACCOUNTIDWITHOUTHYPHENS:user/${aws:username}"] }, { "Sid" : "AllowUsersToListVirtualMFADevices", "Effect" : "Allow", "Action" : ["iam:ListVirtualMFADevices"], "Resource" : ["arn:aws:iam::ACCOUNTIDWITHOUTHYPHENS:mfa/*"] }, { "Sid" : "AllowUsersToListUsersInConsole", "Effect" : "Allow", "Action" : ["iam:ListUsers"], "Resource" : ["arn:aws:iam::ACCOUNTIDWITHOUTHYPHENS:user/*"] } ] }
Creating IAM Users for the rest of your team
Once all your groups and policies are created, you can start creating IAM Users for the rest of your team members. It's good practice to require MFA for your users (although this currently hasto be manually enforced), and the Manage Own MFA Policy comes in handy for securely letting users create this on their own before granting them full access to the Management Console. Create a new user and assign them a password, as outlined in Creating an Administrative IAM User, except when creating the password make sure to check the Require user to create a new password at next sign-in box and only add them to the "Manage Own MFA" group for starters.
Send your team member their user name and password and ask them to reset their passwords and activate an MFA device. Once that's complete and their IAM Users are secured you can then add them to their intended group (e.g. Power Users).
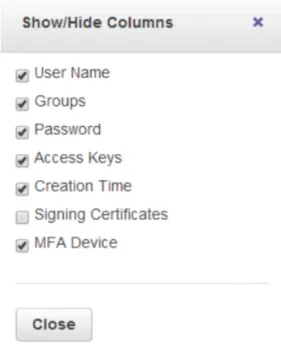
You can easily tell which users have MFA devices activated by clicking the settings icon in the top right of the Users section, and ensuring MFA Device is checked in the Show/Hide Columns dialogs (see fig. 3).
Figure 3. Show the MFA Device column.