Indoor CPE Self-Installation Guide
Thank you for choosing CCI Wireless as your high-speed Internet Service Provider. This guide will help you set up your new Indoor CPE device for use with our network CCI Wireless offers two models of CPE devices for self-installation:
! Motorola CPEi 35750 Indoor Unit!! ! (Red and black box)
! Motorola CPEi 35775 Indoor Unit with WiFi! (Yellow and black box)
Both models have very similar setup procedures. A “Quick Start” guide is included with your unit to help you find the best location for your device and attach all cables required to both connect the unit to your computer and provide it with power.
For your convenience, the “Quick Start” guide is reproduced in this document.
In order to provide the best possible experience with our service, we fully support the following operating systems:
! PC - Microsoft Windows XP
! PC - Microsoft Windows Vista
! PC - Microsoft Windows 7
! Mac - Apple OS X 10.5 Leopard
! Mac - Apple OS X 10.6 Snow Leopard
If you are using an earlier version of Microsoft Windows or Mac OS X, we highly recommend upgrading to one of the above-listed supported operating systems.
If you are using an alternative operating system, such as a flavour of Linux, we cannot offer troubleshooting assistance, technical support, or guarantee that your setup will work properly with our service. In our experience, however, Linux-based systems generally have no problems when configured using settings similar to those for other operating systems.
Please note that if you have any questions whatsoever, please call us at 1-888-240-2224 and select option 1 (Technical Support) when prompted. One of our support representatives will be pleased to assist you.
This guide is broken down into three sections:
Section 1 - WiMAX CPE Device Wiring (p.3)
! ! This section guides you through physically connecting the CPE device to
! ! your computer
Section 2 - Computer Configuration (pp.4-19)
! ! This section guides you through configuring your computer to use our
! ! service
! ! ! Microsoft Windows XP (pp.4-6)
! ! ! Microsoft Windows Vista (pp.7-11)
! ! ! Microsoft Windows 7 - (pp.12-17)
! ! ! Apple Mac OSX 10.5 / 10.6 (pp.18-19)
Section 3 - WiMAX CPE Device Activation (pp.20-22)
! ! This section lets you know how to call CCI Wireless to activate your
! ! CPE device and perform basic connectivity tests to ensure the service
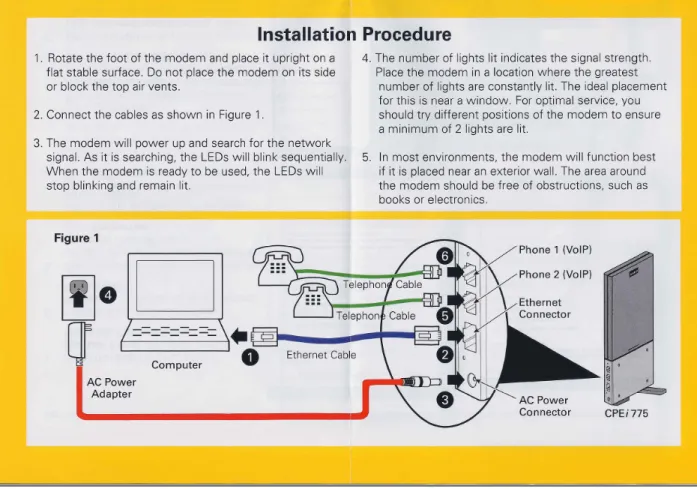
WiMAX CPE Device Wiring
! Please follow the instructions included with your unit; for your convenience, this
! information is reproduced in Figure 1 below.
! If your unitʼs setup guide contains information about telephony or VoIP, please
! disregard any instructions pertaining to those topics. When CCI Wireless is ready
! to offer VoIP services, additional information will be made available to make your
! experience as enjoyable as possible.
Computer Configuration
PC - Microsoft Windows XP
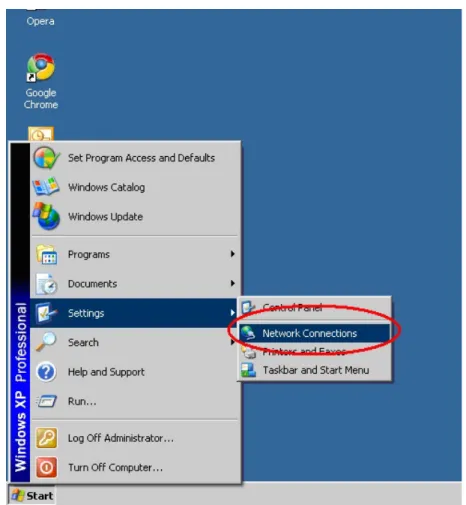
1.
Click the “Start” button at the bottom-left-hand corner of your desktop2.
Select “Settings” by highlighting it with your cursor3.
Click on “Network Connections” (figure 2)If your computer is connected to the CPE device via a physical cable, often referred to as an “Ethernet cable” or “Cat-5 cable”, which looks like an oversized version of the cable that connects your phones to wall-jacks, do the following:
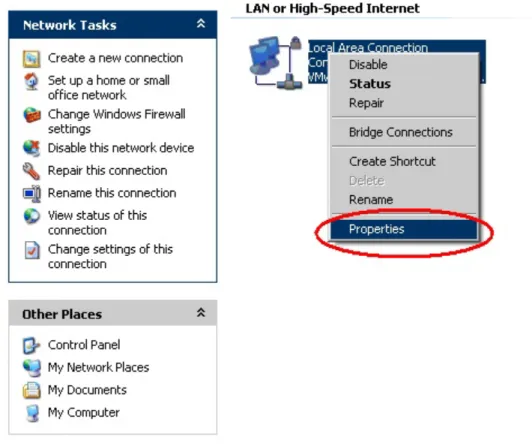
4.
Right-click on “Local Area Connection”5.
Find and click on “Properties” at the bottom of the menu (figure 3)If you purchased a CPE device that supports WiFi (these have yellow and black boxes, model CPEi 35775) and you have a computer or laptop with WiFi
support, you can connect wirelessly. In this case, do the following:
4.
Right-click “Wireless Network Connection” instead of “Local AreaConnection”
5.
Find and click on “Properties” at the bottom of the menu (figure 3)6.
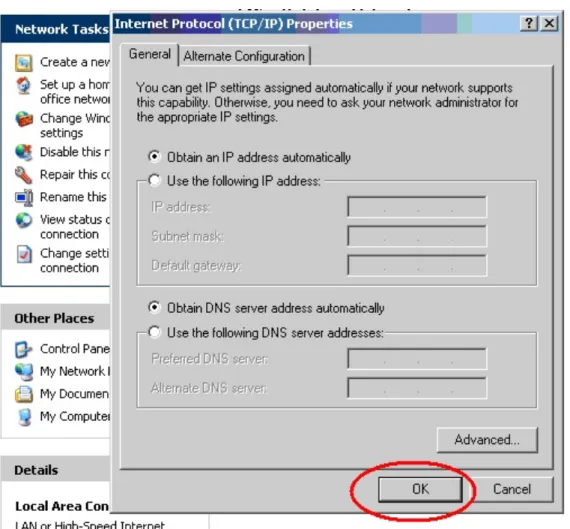
Make sure that the “Obtain an IP address automatically” and “Obtain DNS server address automatically” options are selected! ! Note: These should be selected by default.
7.
Click “OK” (figure 4)! PC - Microsoft Windows Vista
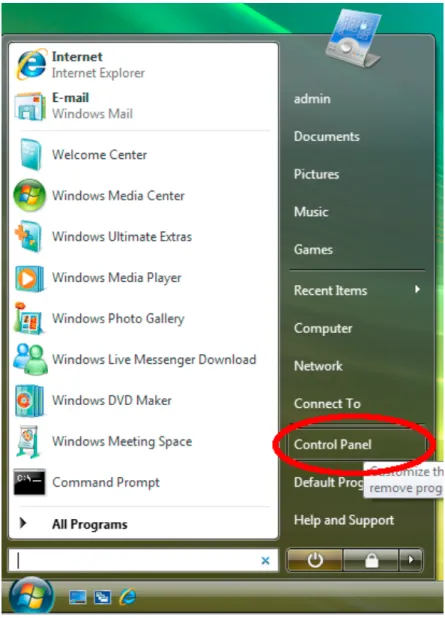
1.
Click the round “Windows” button at the bottom-left-hand corner of your desktop2.
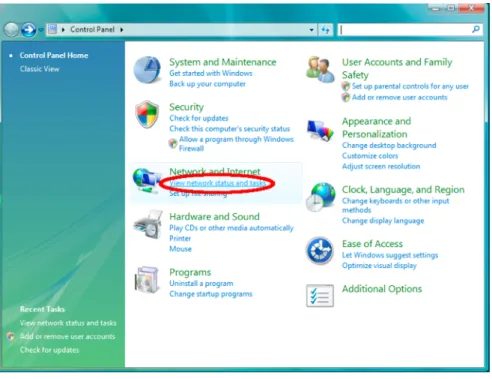
Click on “Control Panel” (figure 5)3.
Click on “View network status and tasks” (figure 6)Figure 6 : View network status and tasks
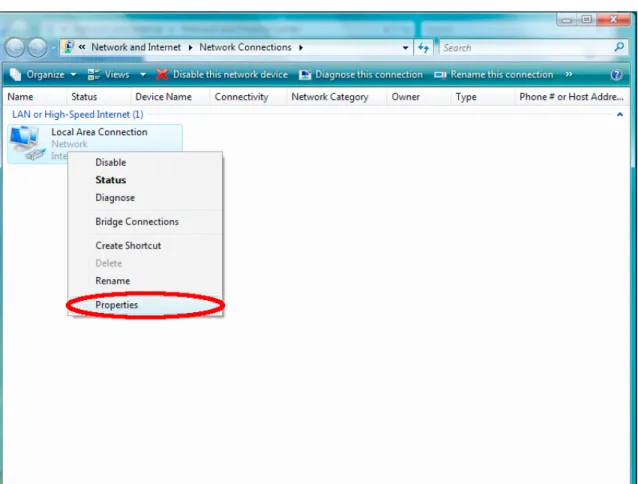
If your computer is connected to the CPE device via a physical cable, often referred to as an “Ethernet cable” or “Cat-5 cable”, which looks like an oversized version of the cable that connects your phones to wall-jacks, do the following:
5.
Right-click on “Local Area Connection”6.
Find and click on “Properties” at the bottom of the menu (figure 8)If you purchased a CPE device that supports WiFi (these have yellow and black boxes, model CPEi 35775) and you have a computer or laptop with WiFi support, you can connect wirelessly. In this case, do the following:
5.
Right-click “Wireless Network Connection” instead of “Local Area Connection”6.
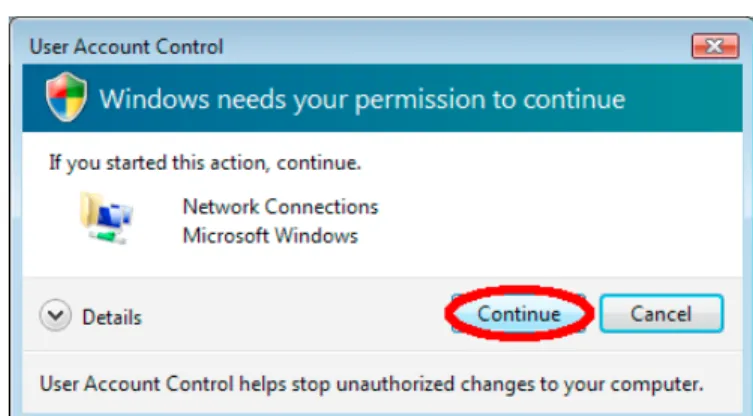
Find and click on “Properties” at the bottom of the menu (figure 8)7.
Microsoft Windows Vista will ask you to give it permission to access your network properties; click “Continue” (figure 9)Figure 9 : Microsoft User Access Control
8.
Select “Internet Protocol Version 4 (TCP/IPv4)” and click “Properties” (figure 10)9.
Make sure that the “Obtain an IP address automatically” and “Obtain DNS server address automatically” options are selected! ! Note: These should be selected by default.
10. Click “OK” (
figure 11)PC - Microsoft Windows 7
1.
Click the round “Windows” button at the bottom-left-hand corner of your desktop2.
Click on “Control Panel” (figure 12)3.
Click on “Network and Internet” (figure 13)Figure 13 : Network and Internet
4.
Click on “Network and Sharing Center” (figure 14)If your computer is connected to the CPE device via a physical cable, often referred to as an “Ethernet cable” or “Cat-5 cable”, which looks like an oversized version of the cable that connects your phones to wall-jacks, do the following:
5.
Click on “Local Area Connection” (figure 8)If you purchased a CPE device that supports WiFi (these have yellow and black boxes, model CPEi 35775) and you have a computer or laptop with WiFi support, you can connect wirelessly. In this case, do the following:
5.
Click on “Wireless Network Connection” instead of “Local Area Connection” (figure 8)6.
Click on “Properties” (figure 16)7.
Click on “Internet Protocol Version 4 (TCP/IPv4)”8.
Click on “Properties” (figure 17)9.
Make sure that the “Obtain an IP address automatically” and “Obtain DNS server address automatically” options are selected10. Click “OK” (
figure 18)! Apple Macintosh - OSX 10.5 or OSX 10.6
1.
Open “System Preferences” by clicking on it in the dock (figure 19)Figure 19 : OS X dock
2.
Click on “Network” (figure 20)If your computer is connected to the CPE device via a physical cable, often referred to as an “Ethernet cable” or “Cat-5 cable”, which looks like an oversized version of the cable that connects your phones to wall-jacks, do the following:
3.
Click “Ethernet” on the left side of the “Network” windowIf you purchased a CPE device that supports WiFi (these have yellow and black boxes, model CPEi 35775) and you have a computer or laptop with WiFi support, you can connect wirelessly. In this case, do the following:
3.
Click “AirPort” on the left side of the “Network” window4.
Beside “Configure IPv4”, select “Using DHCP” from the drop-down menu5.
Click “Apply” (figure 21)CPE Activation
Before calling us, which you must do to complete the self-install process and connect to the Internet, please have the MAC address and serial number of your CPE device handy. These can be found on the outside of the box that contained your CPE device.
If you have an indoor, non-WiFi device, your box will have a red outer sleeve
(figure 22) and its MAC address and serial number may be found on the inner
white box (figure 23).
Figure 23 : Indoor, non-WiFi CPE details
If you have an indoor WiFi device, your box will have a yellow outer sleeve
(figure 24) and its MAC address and serial number may be found on the inner
white box (figure 25).
Figure 24 : Indoor, WiFi CPE sleeve
Once you have finished going through the processes of wiring your CPE device and configuring your computer, and you have located both the CPE deviceʼs WiMAX MAC address and serial number, call CCI Wireless at 1-888-240-2224 and select option 1 (Technical Support). Until you have called us, your CPE device will not be able to connect to the Internet.
During the activation process, the status lights on your CPE device will go from following a strobe pattern to a constant solid state. The number of lights that remain solid indicate how strong the signal connection is to the nearest CCI Wireless tower.
Once the lights have gone solid, you should be able to access the Internet; open your favourite Web browser (Mozilla Firefox, Apple Safari, Microsoft Internet Explorer) and visit our website, http://www.cciwireless.ca/. If the page loads, your setup is working perfectly.
At this point, all that remains is to find out just how fast your connection really is. Go to http://speedtest.cciwireless.ca/ and click “Begin Test” after the page has finished loading. Wait a couple of minutes while data is exchanged between your computer and our servers in Calgary, Alberta.
Once the test has finished, you will see your upload and download speed displayed in the lower right corner of the test interface. The values displayed should be approximately equal to those associated with the CCI Wireless plan to which you are subscribed.
Please note, though, that some minor variance may occur due to overhead required to actually transport data across the Internet, server congestion, and environmental interference.
If the values are off by more than a few percent of what you expected to see, run the test again by clicking “Restart” (the factors that could influence your speed often change very quickly). If the values are consistently lower than they should be, please call us at 1-888-240-2224 and select option 1 (Technical Support).