www.netiq.com/documentation
Installation Guide
SecureLogin 8.1
November, 2015
Legal Notice
For information about NetIQ legal notices, disclaimers, warranties, export and other use restrictions, U.S. Government restricted rights, patent policy, and FIPS compliance, see https://www.netiq.com/company/legal/.
© 2015 NetIQ Corporation. All Rights Reserved.
For information about NetIQ trademarks, see https://www.netiq.com/company/legal/. All third-party trademarks are the property of their respective owners.
Contents 3
Contents
About This Guide 7
1 Getting Started 9
1.1 Prerequisites . . . 9
1.2 Setting Up a Passphrase . . . 9
2 Introduction 11 2.1 Features of SecureLogin Installer . . . 11
2.2 Installation Overview . . . 11
2.3 Logging Event Messages . . . 13
2.3.1 Disabling Logging to Windows Event Log By Using Installation Wizard . . . 13
2.3.2 Disabling Logging to Windows Event Log After the Installation. . . 14
2.4 Logging of Syslog Audit Messages . . . 14
2.4.1 Installing and Configuring Syslog Auditing . . . 14
2.4.2 Enabling Logging to Syslog . . . 16
2.5 Managing Log Settings for SecureLogin Components. . . 17
2.5.1 Understanding the NSLLogManager Functionality . . . 17
2.5.2 Using NSLLogManager . . . 17
3 Installing and Configuring in Active Directory Environment 19 3.1 Before You Begin . . . 19
3.1.1 Prerequisites . . . 19
3.1.2 Requirements for Microsoft Windows Server 2003 and 2008 . . . 20
3.1.3 Support on Microsoft Windows Vista . . . 21
3.1.4 Installation Overview . . . 21
3.1.5 Microsoft Active Directory . . . 22
3.2 Configuring . . . 22
3.2.1 Extending the Active Directory Schema and Assigning Rights . . . 22
3.2.2 Configuring a User’s Environment . . . 25
3.2.3 Configuring Roaming Profiles . . . 26
3.3 Installing . . . 26
3.3.1 Installing on Administrator Workstations . . . 27
3.3.2 Installing on a User Workstation . . . 27
3.3.3 Installing for Mobile Users and Notebook Users . . . 27
3.4 Deploying . . . 27
4 Configuring, Installing, and Deploying In Active Directory LightWeight Directory Services 29 4.1 Prerequisites . . . 29
4.2 Language Support . . . 30
4.3 Supported Platforms. . . 30
4.4 ADAMconfig.exe and LDIFDE.exe . . . 30
4.5 Configuring . . . 32
4.5.1 Creating a Network Service Account and Assigning Permissions . . . 32
4.5.2 Configuring ADAM Schema . . . 33
4.5.4 Extending the Schema by Using ADAM Configuration Wizard . . . 35
4.6 Installing . . . 39
4.6.1 Prerequisites . . . 39
4.6.2 Installing on Administrator Workstations . . . 39
4.6.3 Installing SecureLogin on a User Workstation . . . 40
4.6.4 Installing for Mobile Users and Notebooks . . . 40
4.7 Deploying . . . 40
4.7.1 Configuring a User’s Environment . . . 40
4.7.2 Administering SecureLogin In an ADAM Environment . . . 41
4.7.3 Setting Up a Passphrase . . . . 41
5 Installing, Configuring, and Deploying in an eDirectory Environment 43 5.1 Installing SecureLogin . . . 43
5.1.1 Prerequisite . . . 43
5.1.2 Installation Procedure . . . 43
5.2 Configuring and Deploying . . . 44
5.2.1 Extending the eDirectory Schema . . . 44
5.2.2 Using the SecretStore Client for Enhanced Security . . . 45
5.2.3 Deploying SecureLogin on Shared Workstations . . . 45
5.3 LDAP Credential Provider for Microsoft Windows Vista . . . 46
6 Installing, Configuring, and Deploying in an LDAP Environment 47 6.1 Prerequisites . . . 47
6.2 Installing . . . 48
6.2.1 Installing SecureLogin in LDAP Environment With eDirectory. . . 48
6.3 Configuring . . . 48
6.3.1 Extending the LDAP Directory Schema and Assigning Rights on the Server . . . 49
6.3.2 Using LDAP on eDirectory . . . 50
6.4 Deploying . . . 51
6.4.1 Distribution Options . . . 51
6.4.2 Configuring in a Non-eDirectory LDAP or Active Directory Environment. . . 51
6.4.3 Logging in to LDAP Directory . . . 52
6.4.4 Contextless Login . . . 53
6.4.5 Setting Up Passphrase . . . 54
7 Installing and Deploying On Standalone Environment 55 7.1 Getting Started . . . 55
7.1.1 Prerequisites . . . 55
7.1.2 New Installations . . . 55
7.1.3 Unsupported Features . . . 56
7.1.4 Installation Overview . . . 56
7.2 Installing . . . 56
7.2.1 Installing On a Standalone Workstation . . . 56
7.2.2 Upgrading from an Earlier Version. . . 57
7.2.3 Creating a New User Account . . . 58
8 Installing through the Command Line 59 8.1 Installation Overview . . . 59
Contents 5
8.2.5 Installing in Standalone Environment. . . 63
8.2.6 Command for Installing the Features . . . 63
8.2.7 Examples . . . 65
8.2.8 Silent Install . . . 65
8.2.9 Installing NSL Using response.ini File . . . 66
8.2.10 Example of a Response File . . . 66
8.3 Windows Installer Command Line Options . . . . 67
8.3.1 Switches Supported by SLProto.exe . . . 68
9 Installing, Configuring, and Deploying Desktop Automation Services 69 9.1 Installing Desktop Automation Services . . . 69
9.1.1 Overview . . . 69
9.1.2 Installing in an eDirectory Environment . . . 70
9.1.3 Installing in Other LDAP Environments . . . 71
9.1.4 Installing in Active Directory, ADAM, or Standalone Environments . . . 72
9.1.5 Installing by Using the Modify Option. . . 73
9.1.6 Accessing DAS . . . 74
9.1.7 Tips for Installing DAS . . . 75
9.2 Configuring . . . 76
9.2.1 Editing Environment Registry Keys . . . 76
9.2.2 Logging and Error Notification . . . 78
9.2.3 Managing the actions.xml File through eDirectory and iManager . . . 78
9.3 Deploying . . . 80
9.3.1 Best Practices . . . 80
9.3.2 Common Debug Issues . . . 80
10 Installing Secure Workstation 83 10.1 Overview . . . 83
10.2 Supported Platforms. . . 83
10.3 Installing Secure Workstation through the Modify Option . . . 84
11 Installing iManager Plug-Ins 85 11.1 Accessing iManager and Installing the iManager Plug-In . . . 85
11.1.1 Accessing iManager . . . 85
11.1.2 iManager Plug-In . . . 86
11.1.3 Installing the Plug-Ins for iManager . . . 86
11.1.4 Installing NMAS Server Method for Secure Workstation . . . 87
11.1.5 Configuring iManager for LDAP SSL Connection to eDirectory . . . 87
12 Modifying, Repairing, or Uninstalling 89 12.1 Using the Modify Option to Install Features . . . 89
12.2 Modify Option and Group Policy Objects Support . . . 89
13 Upgrading 91 13.1 Prerequisites . . . 91
13.2 Phased Upgrading . . . 91
13.2.1 Developing a Migration Plan . . . . 91
13.2.2 Example of a Migration Plan . . . . 92
13.3 Running SecureLogin in a Mixed Environment . . . 93
13.4 Upgrading SecureLogin . . . 94
13.4.1 Supported Upgrade Paths . . . 94
13.4.3 Upgrading Through The Command Line . . . 94 13.5 Upgrading Desktop Automation Services . . . 95
14 Uninstalling SecureLogin 97
About This Guide 7
About This Guide
This manual provides information on installing, deploying, and upgrading SecureLogin 8.1. This document contains the following sections:
Chapter 1, “Getting Started,” on page 9
Chapter 2, “Introduction,” on page 11
Chapter 3, “Installing and Configuring in Active Directory Environment,” on page 19
Chapter 4, “Configuring, Installing, and Deploying In Active Directory LightWeight Directory Services,” on page 29
Chapter 5, “Installing, Configuring, and Deploying in an eDirectory Environment,” on page 43
Chapter 6, “Installing, Configuring, and Deploying in an LDAP Environment,” on page 47
Chapter 7, “Installing and Deploying On Standalone Environment,” on page 55
Chapter 8, “Installing through the Command Line,” on page 59
Chapter 9, “Installing, Configuring, and Deploying Desktop Automation Services,” on page 69
Chapter 10, “Installing Secure Workstation,” on page 83
Chapter 11, “Installing iManager Plug-Ins,” on page 85
Chapter 12, “Modifying, Repairing, or Uninstalling,” on page 89
Chapter 13, “Upgrading,” on page 91
Chapter 14, “Uninstalling SecureLogin,” on page 97
Appendix A, “Extending OpenLDAP Schema to Support SecureLogin,” on page 99
Additional Documentation
For the latest version of SecureLogin guides, SecureLogin 8.1 Documentation (https:// www.netiq.com/documentation/securelogin/)
Contacting Sales Support
For questions about products, pricing, and capabilities, contact your local partner. If you cannot contact your partner, contact our Sales Support team.
Worldwide: www.netiq.com/about_netiq/officelocations.asp
United States and Canada: 1-888-323-6768
Email: [email protected]
Contacting Technical Support
For specific product issues, contact our Technical Support team.
Contacting Documentation Support
Our goal is to provide documentation that meets your needs. If you have suggestions for improvements, click Add Comment at the bottom of any page in the HTML versions of the documentation posted at www.netiq.com/documentation. You can also email [email protected]. We value your input and look forward to hearing from you.
Contacting the Online User Community
Qmunity, the NetIQ online community, is a collaborative network connecting you to your peers and NetIQ experts. By providing more immediate information, useful links to helpful resources, and access to NetIQ experts, Qmunity helps ensure you are mastering the knowledge you need to realize the full potential of IT investments upon which you rely. For more information, visit http://
community.netiq.com.
Worldwide: www.netiq.com/support/contactinfo.asp
North and South America: 1-713-418-5555 Europe, Middle East, and Africa: +353 (0) 91-782 677
Email: [email protected]
1
Getting Started 9
1
Getting Started
The section explains the prerequisites to be met before installing SecureLogin.
1.1
Prerequisites
For information about hardware and software configurations required for the successful installation and deployment of SecureLogin, see NetIQ SecureLogin Quick Start Guide.
1.2
Setting Up a Passphrase
A SecureLogin passphrase is a question and response combination used as an alternative form of identity verification. Passphrase functionality protects SecureLogin credentials from unauthorized access and enables users to access SecureLogin in offline mode. Passphrases can also be used as a substitute authentication mode if, for example, a user forgets his or her password. Depending on your preferences, SecureLogin passphrase questions can be generated by the administrator and, or the user.
During installation, the passphrase security is enabled to enforce passphrase setup during the initial login. You can disable the passphrase policy by deselecting Use Passphrase Policy option in the
Advanced Settings pane of the Administrative Management utility. If a passphrase has previously been configured, this dialog box does not display and the installation is complete.
On initial login to SecureLogin all users are requested to save a passphrase response. It is important that this response is easy to recall because it cannot be viewed by anyone.
WARNING: Remember the passphrase answer. You cannot access the answer if you forget it. To set up a passphrase:
1 Specify a question in the Enter a question field.
2 Specify an answer in the Enter the answer field.
3 Specify the answer again in the Confirm the answer field.
4 Click OK. Your passphrase is saved and SecureLogin is installed on the administration workstation.
2
Introduction 11
2
Introduction
NetIQ SecureLogin is a credential management tool developed to increase network security. It is an enterprise single sign-on product. It provides authentication solutions to Web, Windows, host, and legacy application-based single sign-on. NetIQ SecureLogin functions as an identity overseer for all the systems that users access.
It is a credential management tool developed to increase an organization’s network security while lowering support costs.
NetIQ SecureLogin securely manages and encrypts the authentication information in the directory. It stores usernames and passwords and automatically retrieves them for users, when required.
2.1
Features of SecureLogin Installer
Theme is changed: The theme color is blue, which matches with the theme color of other NetIQ products. The color of the SecureLogin icon has changed from purple to blue.
Evaluation build for 30-days trial: You can use the evaluation version that can be downloaded from the NetIQ Products page. Using the evaluation version you can try out all the features of SecureLogin on a 30-day trial mode, without buying licenses.
Upgrading to a license model from the evaluation version is not supported. If you plan to buy the licenses of SecureLogin, uninstall the evaluation version and install the licensed version.
Audit log for Windows and Syslog messages : In the Custom Setup window the Auditing feature helps to configure syslog, and enable/ disable logging Windows event messages.
Configure Syslog Server during installation: The Syslog server is installed and configured during the installation of SecureLogin. The Syslog server can be configured by using the installation wizard, command line and by modifying the registry settings.
Option to Disable Logging of Windows Event Messages By Using the Installation Wizard: In NetIQ SecureLogin, logging of windows event messages are enabled by default. SecureLogin provides a facility to disable logging of Windows event messages during installation.
Using this option administrators can decide if workstation event messages should be logged for each workstation. For more information refer Section 2.3, “Logging Event Messages,” on page 13.
2.2
Installation Overview
Launch the SecureLogin executable.
Select the datastore. Valid datastore options are:
Microsoft Active Directory
Microsoft ADAM/AD LS
NetIQ eDirectory with Novell Client
LDAP v3 (non-eDirectory)
Standalone
If you select to install in NetIQ eDirectory with Novell Client or NetIQ eDirectory with LDAP
mode, then you can also choose to enable SecretStore.
Select the features you want to install from the Custom Setup screen. Click the feature and choose to install the feature.
If Novell Client is installed, the default account association is Novell Client.
If you select to install in an Active Directory or Active Directory Application Environment, the windows authentication credentials are used for Seamless signon.
Figure 2-1 Installing Features in an Active Directory environment
While installing in an LDAP mode, choose between the Credential Manager, Credential Provider and the Application mode.
Group Policy
Directory Administration
Tools
Active Directory Application Environment Active Directory
Seamless signon using Windows authentication
Installation completed
Introduction 13
Figure 2-2 Seamless Signon Using Novell Client or LDAP
2.3
Logging Event Messages
You can log events through Windows event log and view the events by using Event Viewer. In NetIQ SecureLogin, logging of windows event messages are enabled by default. If you require to send the events through Syslog, use one of the following options:
Forward to Syslog Server: Selecting this option allows only a single connection from a SecureLogin client to Syslog server and caches the events in EventLog. For example, on a citrix or a terminal server, where users are allowed to access a single service there will be a single connection to Syslog and all the events get cached to EventLog. This option is disabled by default.
Syslog Server: Selecting this option connects each SecureLogin client to Syslog server and the events gets cached only for an active SecureLogin session. This option is disabled by default. SecureLogin provides a facility to disable logging of Windows event messages during installation. Using this option administrators can decide if workstation event messages should be logged for each workstation.
2.3.1
Disabling Logging to Windows Event Log By Using
Installation Wizard
To disable logging of Windows event messages, perform the following:
1 Launch NetIQ SecureLogin installation wizard. Review and accept the license agreement.
2 Select the datastore.
3 In the Custom Setup screen, traverse to the Auditing menu option. Windows EventLog is enabled by default. Deselect the option to stop logging of windows event logs to the workstation.
eDirectory LDAP only Novell Client Novell Client
Novell client present but NSL in LDAP Mode
Credential Provider Credential Manager App Mode LDAP Authentication while authenticating to Windows. LDAP after
windows authentication using Novell Client
LDAP after windows authentication using windows credential Seamless signon using
Novell Client
Select features from the Custom Setup screen
Installation completed
NOTE: If you have disabled logging of Windows event messages using the Installation Wizard, you must run the installation wizard once again if you want to enable it.
Installing SecureLogin with the Windows EventLog option enabled, updates the registry and creates a registry entry named EnableWindowsEventLog. The details of this registry are as following:
This setting when used in conjunction with the Enable logging to Windows Event log preference helps to log Windows event messages for a specific user.
NOTE: SecureLogin preferences can be managed using administrative utilities like iManager or Slmanager. To ensure that the administrative utilities are installed, ensure that you select the
Directory Administration Tools option while installing SecureLogin.
2.3.2
Disabling Logging to Windows Event Log After the
Installation
1 Launch Administrative Utility.
2 Click Preferences > Auditing. The Enable logging to Windows EventLog option is enabled by default. To disable logging, deselect this option.
2.4
Logging of Syslog Audit Messages
SecureLogin includes a facility to log Syslog audit messages. During installation, NetIQ SecureLogin is configured on each host such as Citrix, terminal servers, and so on to connect and generate logs to a specific syslog service.
This enhances the auditing mechanism and removes the need of having another Security Information and Event Management (SIEM) solution.
2.4.1
Installing and Configuring Syslog Auditing
“Installing Syslog Auditing Feature Using the Windows Installer Wizard” on page 15
“Configuring Syslog Auditing Using the Windows Installer Command-Line Option” on page 15
“Modifying the Registry Settings” on page 16
Purpose Enable/Disable sending audit events to windows event logger
Location HKEY_LOCAL_MACHINE\Software\Protocom\Sec ureLogin
Type REG_DWORD
Value 1 - Enable
Introduction 15
Installing Syslog Auditing Feature Using the Windows Installer
Wizard
1 Select Syslog Server option under Auditing to enable the Syslog auditing feature.
If the Forward to Syslog Server option under Windows EventLog is also selected, duplicate events gets generated on the Syslog server. For more information about this option, refer
Section 2.3, “Logging Event Messages,” on page 13.
2 Specify the name of the server that is to be configured as the Syslog server. By default the Syslog server address is set to localhost and the supported protocols are UDP, TCP, and TLS. By default, the Syslog server listens to default ports for each protocol. Such as, for UDP the Syslog server listens to 514, for TCP there is no specific port, and for TLS the server listens to
6514.
3 Select the language in which the event message should be sent to Syslog server. The supported languages are:
German
English
Spanish
French
Japanese
Portuguese
Chinese (Traditional)
Polish
The default language is English.
4 Click Next to install the Syslog Auditing feature on the workstation.
Configuring Syslog Auditing Using the Windows Installer
Command-Line Option
To configure Syslog using command-line option, use the following command:
APPENDLOCAL=Syslog SYSLOGSERVERURI=protocol-type://
server-name:port-number:X_SYSLOGLANGUAGEID=<language-code>
Replace language-code with the code from the following supported languages:
1028 - Chinese (Traditional)
1031 - German
1033 - English (Default)
1034 - Spanish
1036 - French
1041 - Japanese
1045 - Polish
1046 - Portuguese
Modifying the Registry Settings
To enable/ disable Syslog audit messages, create the following registry entries:
EnableSysLog
SyslogServerUri
SyslogMessageLanguageId
2.4.2
Enabling Logging to Syslog
1 Launch an Administrative Utility.
2 Click Preferences > Auditing. The Enable logging to Syslog Server option is an administrator setting that is disabled by default. To enable logging of Syslog events on the user’s workstation, select this option and set it to .
Purpose Enable/Disable sending audit events to the syslog server
Location HKEY_LOCAL_MACHINE\Software\Protocom\Sec ureLogin
Type REG_DWORD
Value 1 - Enable
0 - Disable (Default)
Purpose Syslog server details in the form of URI
Location HKEY_LOCAL_MACHINE\Software\Protocom\Sec ureLogin
Type REG_SZ
Value
<protocol-type>://<server-name>:<port- number>:X_SYSLOGLANGUAGEID=<language-code>
For example: udp://
syslog.myserver.com:514:X_SYSLOGLANGUAGE ID=1033
Purpose Language that should be used in sending the event message to syslog server.
Location HKEY_LOCAL_MACHINE\SOFTWARE\Protocom\Sec ureLogin
Type REG_DWORD
Value Decimal value of the respective language as mentioned in section 1.3.1.2.
Introduction 17
2.5
Managing Log Settings for SecureLogin
Components
The NSL Log Manager tool is used for managing the log settings for SecureLogin components. This section explains the NSL Log Manager tool. To use this tool you require to download the
NSLLogManager.zip file from NSL Log Manager tool.
2.5.1
Understanding the NSLLogManager Functionality
The NSLLogManager tool can perform the following:
To configure the log settings for Novell SecureLogin components such as LDAP Client (NLdapAuth), and Secure Workstation.
To Provides support for additional components which are missing in SLLoggingManager tool shipped with Novell SecureLogin.
2.5.2
Using NSLLogManager
To use NSLLogManager perform the following steps:
1 Launch the NSLLogManager.exe file.
It displays the current status of log settings for SecureLogin components such as LDAP Client (NLdapAuth), and Secure Workstation.
2 From the Component list, select the component for which you want to enable the log.
3 From the drop-down list in the Log Settings column, select either Disabled or Enabled as per your requirement.
3
Installing and Configuring in Active Directory Environment 19
3
Installing and Configuring in Active
Directory Environment
This section provides information on installing, configuring, and deploying SecureLogin 8.1 in an Active Directory environment.
The examples in this section apply to Microsoft Windows 2003 and 2008 Active Directory environments with a directory server managed through an administrative workstation.
Section 3.1, “Before You Begin,” on page 19
Section 3.2, “Configuring,” on page 22
Section 3.3, “Installing,” on page 26
Section 3.4, “Deploying,” on page 27
3.1
Before You Begin
The following procedures apply to the standard configuration of a server managed through an administration workstation. It also applies if your configuration does not separate the server from the administration workstation.
In Active Directory’s MMC, the current datastore version (displayed in the Advanced Settings page) might not update immediately when the directory database version is changed. To update, click OK, then exit the MMC Properties dialog box.
Section 3.1.1, “Prerequisites,” on page 19
Section 3.1.2, “Requirements for Microsoft Windows Server 2003 and 2008,” on page 20
Section 3.1.3, “Support on Microsoft Windows Vista,” on page 21
Section 3.1.4, “Installation Overview,” on page 21
Section 3.1.5, “Microsoft Active Directory,” on page 22
3.1.1
Prerequisites
Ensure that you meet the hardware and software requirements listed in the NetIQ SecureLogin Quick Reference Guide (https://www.netiq.com/documentation/securelogin8/quick_start/data/ quick_start.html).
A minimum of 128 MB is required in the Windows directory. An additional 55 MB is required for temporary files, which is deleted after installation is complete.
You must have administrator-level access to the server and the administration workstations.
Ensure that the LDAP certificate file is saved in the default certificate location of the LDAP log, for example, securelogin\rootcert.der.
Back up the existing directory.
You must install JRE version 1.4 or later to enable single sign-on to Java applications or JavaScript logins on the workstation.
For multiple-directory environments:
Identify the domain controller to determine the directory where you will install SecureLogin and the order of replication.
Have access to the domain controller.
3.1.2
Requirements for Microsoft Windows Server 2003 and 2008
The following information applies to the configuration of a server in a Microsoft Windows Server 2003 or Windows Server 2008 operating system environment.
“Internet Explorer Enhanced Security” on page 20
“Enabling Single Sign-On for Internet Explorer” on page 20
Internet Explorer Enhanced Security
By default, Microsoft Windows Server 2003 and 2008 install the Internet Explorer Enhanced Security Configuration, which is designed to decrease the exposure of enterprise servers to potential attacks that might occur through the Web content and application scripts.
If you are using Internet Explorer, some Web sites might not display or perform as expected when SecureLogin is installed. Add-ons and Browser Help Objects (BHOs) such as single sign-on might not be fully functional.
For more information on enhanced security, see the Microsoft Support Web site (http://
support.microsoft.com/kb/815141) for knowledge base article 815141 (http://support.microsoft.com/ kb/815141/en-us).
Enabling Single Sign-On for Internet Explorer
To enable single sign-on for Internet Explorer, disable the Microsoft’s Internet Explorer Enhanced Security Configuration before deploying SecureLogin.
You can do this by:
“Enabling Web Browser Extensions” on page 20
“Enabling Browser Help Objects in Internet Explorer” on page 20
Enabling Web Browser Extensions
On both Windows Server 2003 and 2008: Go to Internet Options > Advanced > Browsing, then select the Enable Third party web browser extension (requires restart) option.
On Windows Server 2003: Go to Start > Control Panel > Add/Remove Windows Component.
On Windows Server 2008: Go to Start > Service Manager, Security Manager > Configure IE ESC.
Enabling Browser Help Objects in Internet Explorer
In Internet Explorer 8: Open Internet Explorer, go to Tools > Internet Options > Advanced > under Browsing section, select Enable third party web browser extensions option.
Installing and Configuring in Active Directory Environment 21
In Internet Explorer 7: Lauch Internet Explorer, go to Tools > Internet Options > Advanced > under Browsing section select Enable third party web browser extensions (requires restart)
option.
After SecureLogin is installed, open Internet Explorer, go to Tools > Manage Add-ons > Enable or Disable Add-ons and check if the IESSOObj Class entry is displayed as Enabled.
In Internet Explorer 6: Lauch Internet Explorer, go to Tools > Internet Options > Advanced > under Browsing section select Enable third party web browser extensions (requires restart)
option.
After SecureLogin is installed, open Internet Explorer, go to Tools > Manage Add-ons and from the Add-ons currently loaded in Internet Explorer, check if the IESSOObj Class entry is displayed as Enabled.
3.1.3
Support on Microsoft Windows Vista
NetIQ recognizes Microsoft Windows Vista as a Citrix or Terminal Services client. Citrix and Terminal Services support is always installed when SecureLogin is deployed to a Vista client or workstation and the Install Citrix and terminal services support option is not displayed.
Microsoft Windows Vista is not supported as a Citrix or Terminal Services server.
3.1.4
Installation Overview
1 Uninstall any SecureLogin version prior to 3.5.x.
2 Ensure that Microsoft Management Console (MMC) Active Directory plug-ins are installed on the administration workstation.
3 Extend the directory schemas for SecureLogin versions prior to 6.0.
4 If the application type is enabled for single sign-on, install Citrix or Terminal Services clients.
5 Install Sun Java Runtime Engine version 1.3 or later, or Oracle JInitiator 1.3.1 or later on the server and workstations, if single sign-on to Java applications is required.
NOTE: SecureLogin uses the pre-installed Oracle JInitiator or JRE to support Web enabled Oracle form applications. If any of these Java components is added in the machine after installing (or upgrading to) SecureLogin, you need to enable SecureLogin to use the newly added Java component. To enable support to the new Java component, run the repair option of the SecureLogin installer.
6 Install SecureLogin 8.1 on the administration workstation.
On Microsoft Windows Vista, write access requires administrator privileges.
7 Create test users on the administration workstations.
8 Define and configure the SecureLogin user environment, including enabling the required applications for single sign-on.
9 Copy the test users’ configuration to relevant objects.
10 Install the SecureLogin application on user workstations.
3.1.5
Microsoft Active Directory
“SecureLogin on Windows” on page 22
“LDAP Environment” on page 22
“ADAM” on page 22
SecureLogin on Windows
If an error appears during an attempted login immediately after you install SecureLogin on an Active Directory server, click OK in the error message, wait for a few minutes, then try again. This error occurs because Active Directory takes time to synchronize. If the error continues, you might need to restart the server.
LDAP Environment
SecureLogin supports Microsoft Active Directory operating in an LDAP environment. There are no additional installation or configuration requirements. The only variation to the install is that you select LDAP and not Microsoft Active Directory as the installation platform. For details, see Section 6.3.1, “Extending the LDAP Directory Schema and Assigning Rights on the Server,” on page 49
ADAM
SecureLogin supports deployment in an ADAM instance. For more information, see Part 4, “Configuring, Installing, and Deploying In Active Directory LightWeight Directory Services,” on page 29.
3.2
Configuring
SecureLogin uses the directory structure and administration tools to provide centralized management and deployment of users. In the Active Directory environment, SecureLogin installs an additional tab to the Active Directory Users and Computers User Properties dialog box. This dialog box provides administrative functionality in the same utility you currently use to manage your Active Directory users.
Before you install SecureLogin, you must first extend the Active Directory schema. You can also configure the user’s environment or create roaming profiles.
Section 3.2.1, “Extending the Active Directory Schema and Assigning Rights,” on page 22
Section 3.2.2, “Configuring a User’s Environment,” on page 25
Section 3.2.3, “Configuring Roaming Profiles,” on page 26
3.2.1
Extending the Active Directory Schema and Assigning
Rights
SecureLogin leverages the directory to store and manage SecureLogin data. SecureLogin extends the directory schema to add six SecureLogin schema attributes where SecureLogin data is stored.
Installing and Configuring in Active Directory Environment 23
The SecureLogin Microsoft Active Directory schema extension executable extends the schema on the server and enables you to assign user rights. You must determine which containers and organizational units need SecureLogin access, and you must know their distinguished name (DN), because you must assign rights to each container and organizational unit separately.
You can also extend the Microsoft Active Directory schema to the root of the domain and assign rights to each container and organizational unit below the root.
IMPORTANT: Keep the following information in mind as you extend the schema:
If SecureLogin version 3.5.x is installed, you do not need to extend the directory schema, because the attributes are the same. However, any new directory objects such as organizational units still require you to assign rights.
If the Microsoft Active Directory instance is deployed by copying and running the adsscheme.exe
file from another location, you must copy the entire folder containing the Microsoft Active Directory schema and configuration files to the new preferred location. The Microsoft Active Directory schema and configuration files must be located in the same folder in order for the Active Directory instance to successfully deploy.
“Extending the Schema” on page 23
“Assigning User Rights” on page 24
“Refreshing the Directory Schema” on page 25
Extending the Schema
The following instructions apply to the configuration of the Microsoft Active Directory instance stored and administered on a separate server from the Active Directory server domain controller.
1 Log in to the server as an administrator.
2 Click Schema Extension Tools > Active Directory Extension. or
If you are installing from the SecureLogin installer package, locate the Tools folder and double-click adsschema.exe.
The SecureLogin Active Directory Schema dialog box is displayed.
3 Select Extend Active Directory Schema.
4 Click OK.
The following SecureLogin attributes are added to the Directory schema:
Protocom-SSO-Auth-Data
Protocom-SSO-Entries
Protocom-SSO-Entries-Checksum
Protocom-SSO-SecurityPrefs
Protocom-SSO-Security-Prefs-Checksum A confirmation message is displayed.
IMPORTANT: If the Microsoft Active Directory instance is deployed by copying and running the
adsscheme.exe file from another location, you must copy the entire folder containing the
Microsoft Active Directory Schema and configuration files to the new preferred location. The Microsoft Active Directory Schema and configuration files must be located in the same folder in order for the Active Directory instance to successfully deploy.
5 Click OK to return to the Active Directory Schema dialog box.
Now that directory schema is extended, you must assign access rights to the relevant containers and organizational units.
If you have previosuly extended the schema, a message listing the existing schema appears. Ignore this message.
6 Click OK in the Active Directory Schema dialog box.
7 Continue with “Assigning User Rights” on page 24 to assign user access rights to the relevant containers and organizational units.
Assigning User Rights
You must assign permission to objects in the directory to store data against the new SecureLogin schema attributes. You assign rights to all objects that access SecureLogin, including user objects, containers, group policies, and organizational units.
When you assign rights to containers and organizational units, the rights filter down to all associated user objects, so unless you are required to do so, it is not necessary to assign rights at the individual user object level.
1 Run adsschema.exe, which is found in the Securelogin\Tools\Schema\ADS directory.
2 Select Assign User Rights, then click OK. The Assign Rights to This Object dialog box is displayed.
Installing and Configuring in Active Directory Environment 25
For example, if you assign rights to Users container, the User container definition is:
cn=users, dc=www, dc=training, dc=com
To assign rights to an organizational unit, such as Marketing, in the domain www.company.com, the definition is:
ou=marketing, dc=www, dc=company, dc=com
3 Specify your container or organizational unit definition in the Assign rights to this object field. The confirmation dialog box appears.
4 Click OK to return to the Active Directory Schema dialog box.
5 Repeat Step 2 to Step 4 to assign rights to all required user objects, containers and organizational units.
If you see an error message indicating Error opening specified object: - 2147016661, it means that rights have already been assigned to the object.
If you see an error message indicating Error opening specified object: -214716656, it means that you have attempted to assign rights to an object that does not exist in the directory. Check your punctuation, syntax, and spelling, and repeat the procedure.
6 After all required rights are successfully assigned, click OK to return to the Active Directory Schema dialog box.
7 Click Cancel.
NOTE: You can extend rights to objects at any time after the schema is extended. If you add organizational units, you need to rerun the adschema.exe tool and assign rights to the new object to permit SecureLogin data to write to the directory.
Refreshing the Directory Schema
1 Run the Microsoft Management Console (MMC) and display the Active Directory Schema plug-in.
2 Right-click Active Directory Schema, then select Reload the Schema.
3 On the Console menu, click Exit to close the MMC.
In a multiple-server environment, schema updates occur on server replication.
3.2.2
Configuring a User’s Environment
SecureLogin provides centralized management and deployment of user configuration by usingthe directory structure and administration tools. In Active Directory environment, SecureLogin installs an additional tab to the Active Directory Users and Computers User Properties dialog box. This dialog box provides SecureLogin administrative functionality in the same utility you currently use to manage your Active Directory users.
Configuring a user's SecureLogin environment includes:
Setting preferences.
Creating password policies (optional).
Enabling single sign-on to applications.
Creating passphrase questions for selection (optional).
The following table shows the options available for deploying and distributing the user configuration. For information on deploying and distributing configuration, see “Distributing Configurations”in the
NetIQ SecureLogin Administration Guide.
Table 3-1 Deployment and Distribution Options
3.2.3
Configuring Roaming Profiles
Enterprises often create roaming profiles for specific groups of users, defined by their organizational role or function, such as field engineers connecting from remote locations or accounting staff working at different locations. For these users, you can create a roaming profile and set the path to the target user’s profile.
For more information on creating roaming profiles in an Active Directory environment, see the
Microsoft Support Web site. (http://support.microsoft.com/kb/314478)
NOTE: During loading, SecureLogin loads the users profile, effectively locking that profile and preventing the users credential data from being copied to the roaming profile.
To prevent SecureLogin from causing problems with existing user roaming profiles, select the enable Roaming Profile feature.
This feature gets installed by default, if the workstation is a Citrix or Terminal Server. You can also set the registry setting ForceHKLMandNoDPAPI to 1 for Roaming Profile activation, if it was not initially installed.
3.3
Installing
After you have extended the Active Directory schema as described in “Extending the Schema” on page 23 and assigned permissions to the required directory objects as described in “Assigning User Rights” on page 24, you can install the SecureLogin application on the administration and user workstations.
Section 3.3.1, “Installing on Administrator Workstations,” on page 27
Section 3.3.2, “Installing on a User Workstation,” on page 27
Section 3.3.3, “Installing for Mobile Users and Notebook Users,” on page 27 User Configuration Options Description
Copy Settings Copies the SecureLogin configuration from one object in the same directory to another object
Export and import Distributes the configuration by using an XML file. Directory object inheritance Inherits the configuration from a higher level directory
object, such as a Group policy.
Corporate Configuration redirection Specifies a directory object from which the configuration is inherited.
Installing and Configuring in Active Directory Environment 27
3.3.1
Installing on Administrator Workstations
NOTE: The procedures for installing on administrator workstations and user workstations are the same.
The following procedure uses the Microsoft Windows Vista 64-bit installer.
1 Run the NetIQSecureLogin.exe file.
2 Accept the license agreement.Click Next. The License Agreement page is displayed.
3 Select Microsoft Active Directory. Click Install.
4 Click Next to view the Custom Setup screen.
This screen includes all the features. Select the required features.
5 SecureLogin is by default installed in C:\Program Files\NetIQ\SecureLogin folder. If you want to change the location, click Browse and specify a different location. Select the features you want to install and click Next.
3.3.2
Installing on a User Workstation
Installing SecureLogin on user workstations uses the same procedure as Chapter 3.3, “Installing,” on page 26. Use industry standard application distribution packages such as Microsoft IntelliMirror, System Management Server, or Novell ZENWorks to deploy and manage SecureLogin across large enterprises.
Prior to installing SecureLogin, ensure that the LDAP certificate file is saved in the default certificate location of the LDAP log, for example, securelogin\rootcert.der.
3.3.3
Installing for Mobile Users and Notebook Users
Installing SecureLogin for mobile and remote users uses the same procedure as
However, it is important to ensure that the cache is saved locally, or users cannot access applications when they are disconnected from the network. By default, the Enable cache file setting in the
Preferences in Preferences > General is set to Yes. You can set this at either the Organization Unit level or on a per-user basis.
3.4
Deploying
After you have successfully installed SecureLogin 8.1 on a user workstation, you can set up a passphrase for the user.
Refer to Chapter 1.2, “Setting Up a Passphrase,” on page 9 for detailed information on setting up a passphrase.
4
Configuring, Installing, and Deploying In Active Directory LightWeight Directory Services 29
4
Configuring, Installing, and Deploying In
Active Directory LightWeight Directory
Services
This section provides information on configuring, installing, and deploying SecureLogin 8.1 in Active Directory Lightweight Directory Services (ADAM).
The instructions and examples provided in this section apply to Microsoft Windows 2003 Active Directory environments with a directory server managed through an administration workstation. SecureLogin supports deployment in an ADAM instance. Active Directory is responsible for the network authentication while ADAM stores and provides SecureLogin configuration data, settings, policies, and application definition. For example, if a user logs in to the network and authenticates successfully to Active Directory, the user can then access ADAM for the user’s single sign-on data. For comprehensive information on ADAM, refer the Microsoft Web site. (http://msdn.microsoft.com/ en-us/library/bb897400.aspx)
Section 4.1, “Prerequisites,” on page 29
Section 4.2, “Language Support,” on page 30
Section 4.3, “Supported Platforms,” on page 30
Section 4.4, “ADAMconfig.exe and LDIFDE.exe,” on page 30
Section 4.5, “Configuring,” on page 32
Section 4.6, “Installing,” on page 39
Section 4.7, “Deploying,” on page 40
4.1
Prerequisites
Ensure that you meet the hardware and software requirements listed in the “NetIQ SecureLogin Quick Start Guide”.
Ensure that the Microsoft redistributable components are installed.
SecureLogin requires Microsoft Windows Installer 3.0 or later. Depending on the operating system and the level of patches and service packs applied to it, download the redistributables from the Microsoft Download Web site. (http://www.microsoft.com/downloads/
details.aspx?familyid=889482fc-5f56-4a38-b838-de776fd4138c&displaylang=en).
Microsoft Windows Installer 4.5 is available as a redistributable system component for Microsoft Windows Server 2003 SP2, Microsoft Windows Vista, Microsoft Windows Vista SP1, and Windows Server 2008 (64-bit). You can download these from the Microsoft Download Web site. (http://www.microsoft.com/downloads/details.aspx?FamilyId=5A58B56F-60B6-4412-95B9-54D056D6F9F4&displaylang=en).
Download and save the ADAM application.
You can download the ADAM application from Microsoft Download Center. (http:// www.microsoft.com/downloads/details.aspx?FamilyId=9688F8B9-1034-4EF6-A3E5-2A2A57B5C8E4&displaylang=en)
Assign permissions to a network service account.
Create an ADAM instance.
Back up the existing Active Directory server.
For multiple-directory environments:
Identify the domain controller to determine the directory where you will install SecureLogin and the order of replication.
Have access to the domain controller.
4.2
Language Support
Support for SecureLogin deployed in ADAM mode is provided in English only.
4.3
Supported Platforms
Microsoft Windows Vista SP1 (32-bit and 64-bit)
Microsoft Windows 8.1
Microsoft Windows 8
Microsoft Windows 7 (32-bit and 64-bit)
Microsoft Windows XP Professional SP3 (32-bit only)
Microsoft Windows Server 2003 (32-bit and 64-bit)
Microsoft Windows Server 2008 (32-bit and 64-bit)
Microsoft Windows Server 2012 (32-bit and 64-bit)
4.4
ADAMconfig.exe and LDIFDE.exe
ADAMconfig.exe relies on Microsoft’s LDAP Data Interchange Format Directory Extension
(ldifde.exe) to run properly. However Microsoft distributes two versions of this file, one for Active
Directory and another for ADAM. Only the version distributed with an ADAM installation is suitable for use with ADAMconfig.exe. You must be located in the same folder as ADAMconfig.exe unless you have edited the default system path.
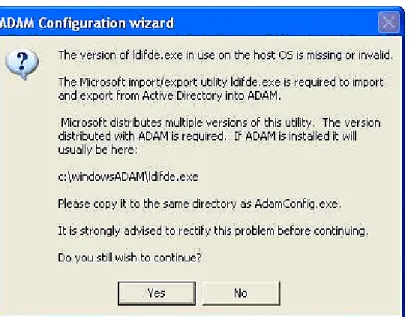
During the install process, SecureLogin checks for ldifde.exe file. If the required version is not found, the following warning is displayed.
Configuring, Installing, and Deploying In Active Directory LightWeight Directory Services 31
Figure 4-1 Warning message
If the correct version of ldifde.exe is installed in a customized file path, click Yes to continue. Otherwise, click No. It launches the ADAM configuration wizard.
4.5
Configuring
The instructions provided in this section apply to the configuration of the ADAM instance stored and administered on a separate server from the Active Directory server domain controller. Follow the same instructions even if your configuration does not separate the Active Directory server and the ADAM instance server.
Active Directory and ADAM
SecureLogin supports deployment in an ADAM (AD LDS) instance. Active Directory is responsible for network authentication, while ADAM is responsible for storing and providing the SecureLogin configuration data, setting, policies, and application definitions. For example, if a user logs in to the network and authenticates successfully to Active Directory, the user can then access ADAM for the user’s single sign-on data.
For more information on AD LDS, see Microsoft Web site.
For comprehensive information on ADAM, visit the Microsoft Web site. (http://www.microsoft.com/ windowsserver2003/adam/default.mspx)
You can download the ADAM application from the Microsoft Web site. (http://www.microsoft.com/ downloads/details.aspx?FamilyId=9688F8B9-1034-4EF6-A3E5-2A2A57B5C8E4&displaylang=en)
Also read the ADAM release notes from the ADAM Service Pack 1 available at the Microsoft Knowledge Base article KB902838. (http://support.microsoft.com/kb/902838)
Following are the tasks involved in configuring SecureLogin in an ADAM environment:
Section 4.5.1, “Creating a Network Service Account and Assigning Permissions,” on page 32
Section 4.5.2, “Configuring ADAM Schema,” on page 33
Section 4.5.3, “Creating an ADAM Instance,” on page 33
Section 4.5.4, “Extending the Schema by Using ADAM Configuration Wizard,” on page 35
4.5.1
Creating a Network Service Account and Assigning
Permissions
A service account is an user account that is created explicitly to provide a security context for services running on Microsoft Windows Server 2003. The application pools use service accounts to assign permissions to Web sites and applications running on Internet Information Services (IIS). You can manage service accounts individually to determine the level of access for each of the application pool in a distributed environment.
Creating a Network Service Account enables the ADAM instance. To create a Network Service Account:
1 Click Start > All Programs > Administrative Tools > Active Directory Users and Computers. The Active Directory Users and Computers page is displayed.
2 Select View > Advanced Features. The Advanced Features option is enabled by default.
3 Select the Domain Controllers folder and locate the Domain Controller of your single sign-on enabled domain.
Configuring, Installing, and Deploying In Active Directory LightWeight Directory Services 33
If the Network Service account is not on the list of Group or user names, add it.
6 Select the Network Service account.
7 In the Permissions for Administrators section, select Allow to Create All Child Objects.
8 In the Permissions for Administrators field, select Allow to Delete All Child Objects.
NOTE: Selecting Delete All Child Objects has no effect for SecureLogin, but allows the ADAM instance to be cleaned properly when it is uninstalled.
9 Click OK to close the [Domain] Properties dialog box.
4.5.2
Configuring ADAM Schema
SecureLogin leverages the directory to store and manage SecureLogin data. Six schema attributes are added to the directory schema. After the ADAM schema has been extended with these attributes the relevant containers, organizational units (ou) and user objects must be permitted to Read and Write SecureLogin data. The SecureLogin ADAM Configuration Wizard automatically extends the ADAM instance schema and assigns directory access permissions to selected objects.
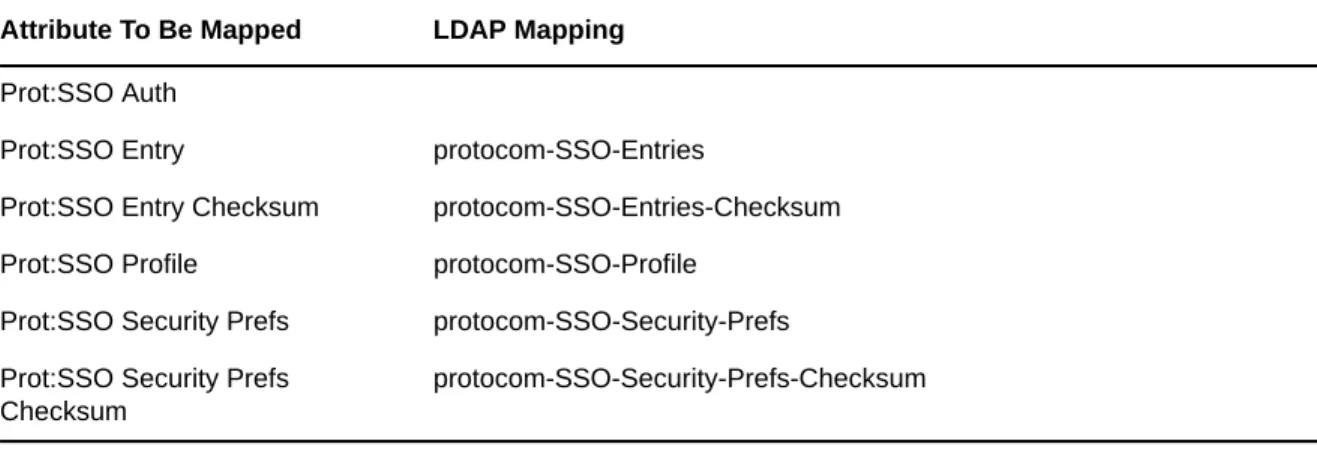
Following are the attributes added to the schema:
Protocom-SSO-Auth-Data
Protocom-SSO-Entries
Protocom-SSO-SecurityPrefs
Protocom-SSO-Profile
Protocom-SSO-Entries-Checksum
Protocom-SSO-Security-Prefs-Checksum
4.5.3
Creating an ADAM Instance
1 Browse to the ADAM set up file that you downloaded from the Microsoft Web site.
2 Double-click to run the ADAMredistX86.exe file. The Active Directory Application Environment Setup Wizard is displayed.
3 Click the Next button. The License Agreement dialog box is displayed.
4 Accept the license agreement, then click Next. The Installation Options dialog box is displayed.
5 Select the ADAM and ADAM administration tools option.
6 Click Next. The Setup Options dialog is displayed.
7 Select A unique instance. The Instance Name page is displayed.
8 In the Instance name field, specify a name for the ADAM instance.
9 Click Next. The Ports page is displayed.
10 In the LDAP port number field, specify the ADAM instance port number. In the SSL port number, specify the ADAM instance SSL port number.
NOTE: The default LDAP port number is 50000 and the SLL port number is 50001. However if Active Directory is not installed on your workstation, the default LDAP port number is 389. The default SSL port number is, 636.
IMPORTANT: Ensure to make a note of the LDAP port number and the SSL port number because this information is required for further configuration.
11 Click Next.The Application Partition Directory page is displayed.
12 Select No, do not create an application directory partition.
13 Click Next. The File Locations page is displayed.
14 Accept the default locations for ADAM files in the Data files and Data recovery files fields or click
Browse to select an alternate location.
15 Click Next. The Service Account Selection page is displayed.
16 Select the Network service account. or
Select This account and provide the credentials for the selected service account.
We recommend you to select Network service account. Nevertheless, you can specify an account with a static password.
NOTE: The selected service account must have permissions to register a Service Connection Point (SCP) and permission to install SecureLogin.
17 Click Next. The ADAM Administrators page is displayed.
18 Select the Currently logged on user: SECURELOGIN\Administrator option.
NOTE: The selected account must have administrator level permissions. In this example, the default is selected as the current user. So, the administrator administers this ADAM instance. or
If an alternative account or group is preferred, select This account and specify the account or group name and credentials.
19 Click Next. The Importing LDIF Files page is displayed.
20 Select Do not import LDIF files for the instance of ADAM.
21 Click Next. The Ready to Install page is displayed.
22 Review the setup options in the Selections window to confirm that the required options are selected.
23 Click Next to continue with the installation. or
Click Back to change selected options and continue the installation.
24 Click Next after confirming the ADAM instance creation settings.
25 Click Finish to create the ADAM instance. The Completing the Active Directory Application Environment Setup Wizard page is displayed after the ADAM instance is created.
If required, you can review the Windows Event log to ensure the ADAM instance is created without errors.
Configuring, Installing, and Deploying In Active Directory LightWeight Directory Services 35
Reviewing the Windows Event Log
1 From the Windows Start menu, select Programs > Administrative Tools > Event Viewer. The Windows Event Viewer displays with the ADAM (Instance#) displayed in the Event Viewer hierarchy.
2 Double-click ADAM (Instance#) to view the Event log.
If an error icon is displayed, double-click to view the error details.
After the ADAM instance is successfully created, execute the instructions provided Section 4.5.4, “Extending the Schema by Using ADAM Configuration Wizard,” on page 35 to automatically extend the ADAM instance schema and assign Read and Write Rights to directory user objects.
4.5.4
Extending the Schema by Using ADAM Configuration
Wizard
The SecureLogin ADAM configuration wizard extends the ADAM directory schema with SecureLogin attributes, creates ADAM partitions, and assigns selected directory objects read and write
permissions to the SecureLogin attributes. The wizards creates corresponding user proxy objects in Active Directory. This includes the directory hierarchy to the ADAM instance. This can be used to synchronize user object structure after the initial configuration of SecureLogin.
The ADAM schema can be extended manually at the command line using the MSUserProxy. LDF
and sso-adam-schema.LDF files. These files are located in the \SecureLogin\Tools\Schema\ADAM
folder of the SecureLogin installer package. We recommend that you perform this procedure with the assistance of our Technical Support.
Prerequisites
Before running the SecureLogin ADAM Configuration Wizard:
1. Download and install the Windows Support Tools for Microsoft Windows XP from the Microsoft Web site. (http://www.microsoft.com/downloads/details.aspx?FamilyID=49ae8576-9bb9-4126-9761-ba8011fabf38&displaylang=en)
or
Download and install the Windows Support Tools for Windows Server 2003 from the Microsoft Web site. (http://www.microsoft.com/downloads/details.aspx?FamilyId=6EC50B78-8BE1-4E81-B3BE-4E7AC4F0912D&displaylang=en)
Windows Support Tools for Windows include dsacls.exe, which is required by the ADAM Configuration Wizard.
This file is included in a default installation of Windows Server 2003.
2. Copy the AdamConfig.exe file found in \SecureLogin\Tools\Schema\ADAM to server or the administrator workstation.
3. Copy dsacls.exe from Windows Support Tools to the ADAM folder on the server or Administrator workstation.
Using the ADAM Configuration Wizard
The ADAM Configuration Wizard extends the ADAM directory schema with SecureLogin attributes, creates ADAM partitions, and assigns selected directory objects with read and write permissions to the SecureLogin attributes.
The wizard creates corresponding user proxy objects for user objects in Active Directory, including the directory hierarchy to the ADAM instance and can be used to synchronize user object structure after initial configuration of SecureLogin.
To run the ADAM configuration wizard:
1 Log in to the ADAM instance, server, or the administration workstation (if it is separate) as an administrator or an user with administrator permissions.
2 Browse to the AdamConfig.exe file, double-click to run it. The Welcome to the SecureLogin ADAM Configuration Wizard page is displayed.
Ensure that you have all the Active Directory and ADAM administrator account details required.
NOTE: The ADAM schema can be extended manually at the command line using the
MS-UserProxy.ldf and sso-adam-schema.ldf files. These files are located in the Tools folder of
the installer package.
3 Click Next.
4 Configure ADAM instance for NetIQ SecureLogin.
Select this option during the first instance of configuration. Although the ADAM configuration is required only once, selection of this option on subsequent executions does not have any adverse effects.
The ADAM configuration wizard copies across the selected Active Directory user data to the ADAM instance, including the directory hierarchy.
NOTE: Directory synchronization for a large number of users can adversely affect the network performance. You can delay the directory synchronization to a more convenient time.
You can run the ADAM configuration wizard at any time to synchronize the updated Active Directory user data.
5 Select the Configure Microsoft Active Directory synchronization option.
6 (Optional) Select Synchronize now option.
NOTE: Each time a new organizational unit or user object is created in Active Directory, the ADAM configuration wizard or the SyncAdam.cmd command file must be executed to synchronize with the ADAM instance and assigned read and write permissions.
The SyncAdam.cmd cannot be run before running the ADAM configuration wizard.
7 Click Next. The Microsoft Active Directory user account page is displayed.
8 Select Current Microsoft Active Directory, the click Next. or
Select Select Microsoft Active Directory user account and specify the account details in the
Configuring, Installing, and Deploying In Active Directory LightWeight Directory Services 37 NOTE: The account selected in this page is used to access and copy the Active Directory object data for synchronization with the ADAM instance, so it must have Read permission. This account must not have Write permission.
By default, the current account (that is, the one to which you are logged in) is selected. However, any user account that has Active Directory read permission is valid.
9 Click Next. The ADAM instance location page is displayed.
10 Accept the default values or specify the alternative Server and Port values as required, then click
Next.
The default server value is localhost. Select an alternate server if you are hosting your ADAM instance on another computer.
The default port value is 50000. Specify an alternate port number if this is not the ADAM instance server port.
11 Click Next. The Microsoft Active Directory containers/organizational units page is displayed. All containers and organizational units that include SecureLogin users are specified here, so you can assign SecureLogin rights and select for Microsoft Active Directory synchronization.
12 Click the Add.The Domain, Container or Organizational unit dialog box is displayed.
13 Specify the full distinguished name in the Enter distinguished name of domain, container or organizational unit field.
14 Click OK.
If the specified distinguished name of the domain, container, or organizational unit is invalid, an error message is displayed. In that case, click OK. You return to the dialog box. Specify the correct distinguished name of the domain, container, or organizational unit.
15 Click OK when the required objects are added to the list. The Configuration summary page is displayed.
Review the selected configuration options.
16 Click Back to change details or click Finish finish the configuration.
The SecureLogin ADAM Configuration - Termination dialog box is displayed if the configuration was not able to complete successfully. If this occurs, review the text box to investigate cause of termination. If a solution to the problem is determined, click Close and repeat execution of the SecureLogin ADAM Configuration Wizard.
After the configuration is complete, the SecureLogin ADAM configuration - Finished dialog box is displayed.
17 Click Close.
Viewing Objects Using the ADAM ADSI Edit Tool
The ADSI Edit Tool is a Microsoft Management Console (MMC) snap-in which you can use to view all objects in the directory, including the schema and configuration information, modify objects, and set access control lists on the objects.
You can use the ADSI Edit tool to check and review SecureLogin ADAM configuration. To do this:
1 Click Start > Programs > ADAM > ADAM ADSI Edit. The ADAM ADSI Edit tool is displayed.
2 Select ADAM ADSI Edit in the hierarchy pane to view the ADAM Instance details.
3 Select Connect to from the Action menu. The Connection Settings dialog box is displayed.
5 Specify the ADAM instance server name in the Server name field.
6 Specify the ADAM instance port name in the Port name field.
7 Select Distinguished name (DN) or naming context.
8 Specify the Distinguished Name in the Distinguished name (DN) or naming context field.
9 Select Connect using these credentials. This is the account through which you wish to connect to the ADAM instance.
In this example, The account of the currently logged on user is selected
10 Click OK. The ADSI Edit tool displays the selected ADAM instance.
11 Right-click on the Users container to display the context menu.
12 Select Properties. The CN=Users Properties dialog box is displayed.
To confirm if the schema attributes are added successfully or not, scroll down the Attributes table window and verify if the six attributes in Section 4.5.2, “Configuring ADAM Schema,” on page 33 are listed or not. Repeat this for each container and or organizational unit containing SecureLogin users. If the attributes are not displayed, run the ADAM configuration wizard again and ensure that you specify the correct container, organizational unit, and user objects.
Synchronizing Data from Active Directory to an ADAM Instance
The Active Directory to ADAM Synchronizer is a command-line tool that synchronizes data from Active Directory forest to a configuration set of an ADAM instance. You can use this to ensure that new users are added to Active Directory have objects representing their SecureLogin data created in the ADAM instance.
To synchronize data from Active Directory to an ADAM instance:
1 Navigate to SecureLogin\Tools of the SecureLogin 8.1 installation package.
2 Double-click the syncadam.cmd file.
After the synchronization is complete, you can look at the log file - SyncAdam.log, to ensure that the synchronization process is complete.
It is recommended that you synchronize regularly, when new organizational units are created or when Active Directory user are changed. You can add the process to the Windows Schedules Tasks. During the synchronization, the following processes are automatically synchronized:
A new container or organizational unit in Active Directory is created as a corresponding container in ADAM.
A new user in Active Directory is created as ADAM user proxy.
A renamed user object in Active Directory causes the corresponding user proxy to be renamed in ADAM.
A moved user object in Active Directory causes the corresponding user proxy to be moved in ADAM. This requires both user object source container and destination container in