Nidhi Chaudhary
Lucas Costi
Russell Dickenson
Sande Gilda
Vikram Goyal
Eamon Logue
Darrin Mison
Scott Mumford
David Ryan
JBoss Enterprise Application
Platform 6.2
Security Guide
For Use with Red Hat JBoss Enterprise Application Platform 6
Edition 1
For Use with Red Hat JBoss Enterprise Application Platform 6
Edition 1
Nidhi Chaudhary Lucas Costi Russell Dickenson Sande Gilda Vikram Goyal Eamon Logue Darrin Mison Scott Mumford David Ryan Misty Stanley-Jones Keerat Verma Tom WellsCopyright © 2014 Red Hat, Inc..
This document is licensed by Red Hat under the
Creative Commons Attribution-ShareAlike 3.0 Unported
License
. If you distribute this document, or a modified version of it, you must provide attribution to Red
Hat, Inc. and provide a link to the original. If the document is modified, all Red Hat trademarks must be
removed.
Red Hat, as the licensor of this document, waives the right to enforce, and agrees not to assert, Section
4d of CC-BY-SA to the fullest extent permitted by applicable law.
Red Hat, Red Hat Enterprise Linux, the Shadowman logo, JBoss, MetaMatrix, Fedora, the Infinity Logo,
and RHCE are trademarks of Red Hat, Inc., registered in the United States and other countries.
Linux ® is the registered trademark of Linus Torvalds in the United States and other countries.
Java ® is a registered trademark of Oracle and/or its affiliates.
XFS ® is a trademark of Silicon Graphics International Corp. or its subsidiaries in the United States
and/or other countries.
MySQL ® is a registered trademark of MySQL AB in the United States, the European Union and other
countries.
Node.js ® is an official trademark of Joyent. Red Hat Software Collections is not formally related to or
endorsed by the official Joyent Node.js open source or commercial project.
The OpenStack ® Word Mark and OpenStack Logo are either registered trademarks/service marks or
trademarks/service marks of the OpenStack Foundation, in the United States and other countries and
are used with the OpenStack Foundation's permission. We are not affiliated with, endorsed or sponsored
by the OpenStack Foundation, or the OpenStack community.
All other trademarks are the property of their respective owners.
Abstract
. . . .
. . . .
. . . .
. . . .
. . . .
. . . .
. . . .
. . . .
Table of Contents
Preface
1. Document Conventions
1.1. Typographic Conventions
1.2. Pull-quote Conventions
1.3. Notes and Warnings
2. Getting Help and Giving Feedback
2.1. Do You Need Help?
2.2. Give us Feedback
Part I. Security for Red Hat JBoss Enterprise Application Platform 6
Chapter 1. Introduction
1.1. About Red Hat JBoss Enterprise Application Platform 6 (JBoss EAP 6)
1.2. About Securing JBoss Enterprise Application Platform 6
Chapter 2. Security Overview
2.1. About Declarative Security
2.1.1. Java EE Declarative Security Overview
2.1.2. Security References
2.1.3. Security Identity
2.1.4. Security Roles
2.1.5. EJB Method Permissions
2.1.6. Enterprise Beans Security Annotations
2.1.7. Web Content Security Constraints
2.1.8. Enable Form-based Authentication
2.1.9. Enable Declarative Security
Chapter 3. Introduction to JAAS
3.1. About JAAS
3.2. JAAS Core Classes
3.3. Subject and Principal classes
3.4. Subject Authentication
Part II. Securing the Platform
Chapter 4. The Security Subsystem
4.1. About the Security Subsystem
4.2. About the Structure of the Security Subsystem
4.3. Configuring the Security Subsystem
4.3.1. Configure the Security Subsystem
4.3.2. Security Management
4.3.2.1. About Deep Copy Subject Mode
4.3.2.2. Enable Deep Copy Subject Mode
4.3.3. Security Domains
4.3.3.1. About Security Domains
4.3.3.2. About Picketbox
Chapter 5. PicketLink Identity Management
5.1. About Security Token Service (STS)
5.2. Configure PicketLink STS
5.3. About PicketLink STS Login Modules
5.4. Configure STSIssuingLoginModule
5.5. Configure STSValidatingLoginModule
7
7
7
8
9
9
9
10
11
12
12
12
13
13
13
13
14
17
17
23
23
26
27
28
28
28
28
29
33
34
34
34
35
35
36
36
36
37
37
38
39
39
40
42
43
44
. . . .
. . . .
. . . .
5.6. SAML Web Browser Based SSO
5.6.1. About SAML Web Browser Based SSO
5.6.2. Setup SAML v2 based Web SSO using HTTP/Redirect Binding
5.6.3. Configure Identity Provider
5.6.4. Configure Service Provider
5.6.5. Setup SAML v2 based Web SSO using HTTP/POST Binding
5.7. Configure SAML Global Logout Profile
5.8. Kerberos and SPNEGO Integration
5.8.1. About Kerberos and SPNEGO Integration
5.8.2. Desktop SSO using SPNEGO
5.8.3. Configure JBoss Negotiation for Microsoft Windows Domain
5.9. Authentication
5.9.1. About Authentication
5.9.2. Configure Authentication in a Security Domain
5.10. Java Authentication SPI for Containers (JASPI)
5.10.1. About Java Authentication SPI for Containers (JASPI) Security
5.10.2. Configure Java Authentication SPI for Containers (JASPI) Security
5.11. Authorization
5.11.1. About Authorization
5.11.2. Configure Authorization in a Security Domain
5.12. Java Authorization Contract for Containers (JACC)
5.12.1. About Java Authorization Contract for Containers (JACC)
5.12.2. Configure Java Authorization Contract for Containers (JACC) Security
5.12.3. Fine Grained Authorization Using XACML
5.12.3.1. About Fine Grained Authorization and XACML
5.12.3.2. Configure XACML for Fine Grained Authorization
5.13. Security Auditing
5.13.1. About Security Auditing
5.13.2. Configure Security Auditing
5.13.3. New Security Properties
5.14. Security Mapping
5.14.1. About Security Mapping
5.14.2. Configure Security Mapping in a Security Domain
5.15. Use a Security Domain in Your Application
Chapter 6. Java Security Manager
6.1. About the Java Security Manager
6.2. About Java Security Manager Policies
6.3. Write a Java Security Manager Policy
6.4. Java Security Policy Statements
6.5. Run JBoss EAP 6 Within the Java Security Manager
6.6. Debug Security Manager Policies
Chapter 7. Security Realms
7.1. About Security Realms
7.2. Add a New Security Realm
7.3. Add a User to a Security Realm
Chapter 8. Encryption
8.1. About Encryption
8.2. About SSL Encryption
45
45
45
46
48
50
51
51
51
52
55
56
56
56
57
57
58
58
58
58
59
60
60
61
61
62
71
71
71
72
73
73
73
74
77
77
77
77
78
79
80
82
82
82
83
84
84
84
. . . .
. . . .
. . . .
8.6.2. FIPS 140-2 Compliant Passwords
8.6.3. Enable FIPS 140-2 Cryptography for SSL on Red Hat Enterprise Linux 6
Chapter 9. Network Security
9.1. Secure the Management Interfaces
9.2. Specify Which Network Interface JBoss EAP 6 Uses
9.3. Configure Network Firewalls to Work with JBoss EAP 6
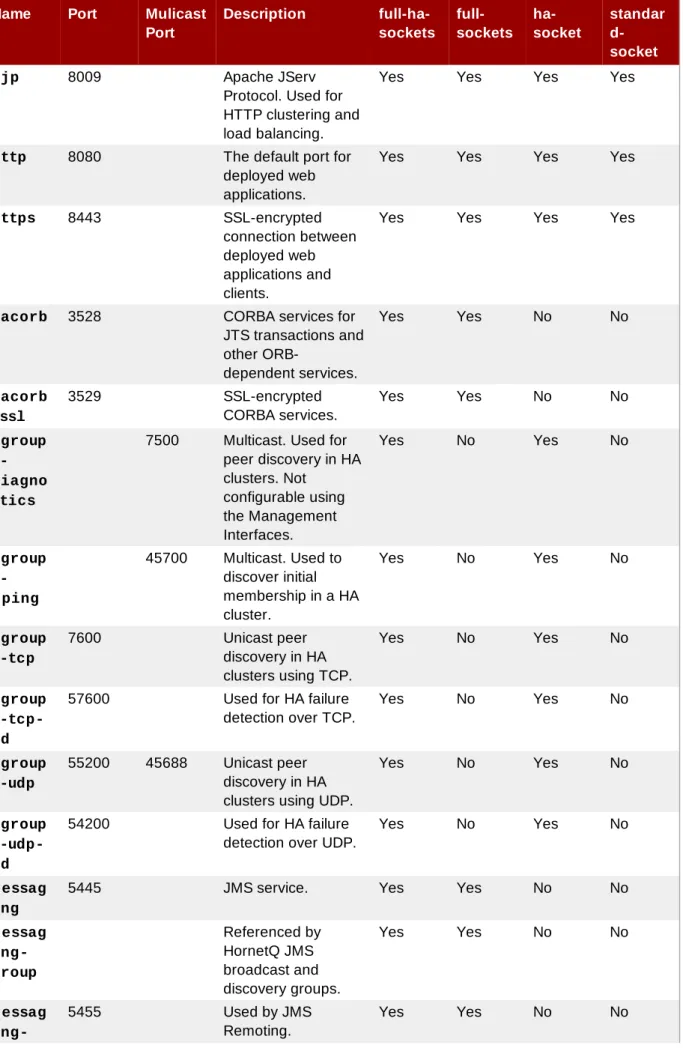
9.4. Network Ports Used By JBoss EAP 6
Chapter 10. Management Interface Security
10.1. Secure the Management Interfaces
10.2. Default User Security Configuration
10.3. Overview of Advanced Management Interface Configuration
10.4. Disable the HTTP Management Interface
10.5. Remove Silent Authentication from the Default Security Realm
10.6. Disable Remote Access to the JMX Subsystem
10.7. Configure Security Realms for the Management Interfaces
10.8. Configure the Management Console for HTTPS in Standalone mode
10.9. Configure the Management Console for HTTPS in Domain mode
10.10. Using 2-way SSL for the Management interface and the CLI
10.11. Password Vaults for Sensitive Strings
10.11.1. About Securing Sensitive Strings in Clear-Text Files
10.11.2. Create a Java Keystore to Store Sensitive Strings
10.11.3. Mask the Keystore Password and Initialize the Password Vault
10.11.4. Configure JBoss EAP 6 to Use the Password Vault
10.11.5. Store and Retrieve Encrypted Sensitive Strings in the Java Keystore
10.11.6. Store and Resolve Sensitive Strings In Your Applications
10.12. LDAP
10.12.1. About LDAP
10.12.2. Use LDAP to Authenticate to the Management Interfaces
Chapter 11. Securing the Management Interfaces with Role-Based Access Control
11.1. About Role-Based Access Control (RBAC)
11.2. Role-Based Access Control in the GUI and CLI
11.3. Supported Authentication Schemes
11.4. The Standard Roles
11.5. About Role Permissions
11.6. About Constraints
11.7. About JMX and Role-Based Access Control
11.8. Configuring Role-Based Access Control
11.8.1. Overview of RBAC Configuration Tasks
11.8.2. Enabling Role-Based Access Control
11.8.3. Changing the Permission Combination Policy
11.9. Managing Roles
11.9.1. About Role Membership
11.9.2. Configure User Role Assignment
11.9.3. Configure User Role Assignment using jboss-cli.sh
11.9.4. About Roles and User Groups
11.9.5. Configure Group Role Assignment
11.9.6. Configure Group Role Assignment with jboss-cli.sh
11.9.7. About Authorization and Group Loading with LDAP
username-to-dn
The Group Search
General Group Searching
11.9.8. About Scoped Roles
11.9.9. Creating Scoped Roles
91
92
95
95
95
96
98
101
101
101
102
103
104
106
106
107
108
109
110
110
111
113
114
115
118
120
120
121
126
126
126
127
127
128
129
130
130
130
131
132
133
133
133
137
140
140
144
147
148
149
151
153
154
. . . .
. . . .
. . . .
. . . .
. . . .
11.10. Configuring Constraints
11.10.1. Configure Sensitivity Constraints
11.10.2. Configure Application Resource Constraints
11.10.3. Configure the Vault Expression Constraint
11.11. Constraints Reference
11.11.1. Application Resource Constraints Reference
11.11.2. Sensitivity Constraints Reference
Chapter 12. Transaction Subsystem Configuration
12.1. JTS Transactions
12.1.1. Configure the ORB for JTS Transactions
12.1.2. JMS Configuration
12.1.2.1. Reference for HornetQ Configuration Attributes
Chapter 13. Web, HTTP Connectors, and HTTP Clustering
13.1. Configure a mod_cluster Worker Node
Chapter 14. Patch Installation
14.1. About Patches and Upgrades
14.2. About Patching Mechanisms
14.3. Subscribe to Patch Mailing Lists
14.4. Install Patches in Zip Form
14.4.1. The patch Command
14.4.2. Installing Patches in Zip Form Using the patch Command
14.4.3. Rollback the Application of a Patch in Zip Form Using the patch Command
14.5. Install Patches in RPM form
14.6. Severity and Impact Rating of JBoss Security Patches
14.7. Manage Security Updates for Dependencies Bundled Inside the Applications Deployed on
JBoss EAP
Part III. Securing Applications
Chapter 15. Application Security
15.1. About Application Security
15.2. Enabling/Disabling Descriptor Based Property Replacement
15.3. Datasource Security
15.3.1. About Datasource Security
15.4. EJB Application Security
15.4.1. Security Identity
15.4.1.1. About EJB Security Identity
15.4.1.2. Set the Security Identity of an EJB
15.4.2. EJB Method Permissions
15.4.2.1. About EJB Method Permissions
15.4.2.2. Use EJB Method Permissions
15.4.3. EJB Security Annotations
15.4.3.1. About EJB Security Annotations
15.4.3.2. Use EJB Security Annotations
15.4.4. Remote Access to EJBs
15.4.4.1. About Remote Method Access
15.4.4.2. About Remoting Callbacks
15.4.4.3. About Remoting Server Detection
158
158
160
161
162
162
164
174
174
174
175
175
179
179
183
183
183
183
184
184
185
186
187
188
190
191
192
192
192
193
193
194
194
194
194
195
195
196
200
200
200
201
201
202
203
. . . .
. . . .
. . . .
. . . .
. . . .
. . . .
15.5.1. Enable Role-Based Security for a RESTEasy JAX-RS Web Service
15.5.2. Secure a JAX-RS Web Service using Annotations
Chapter 16. Login Modules
16.1. Using Modules
16.1.1. LdapLoginModule
16.1.2. LdapExtLoginModule
16.1.3. Password Stacking
16.1.4. Password Hashing
16.1.5. Unauthenticated Identity
16.1.6. UsersRolesLoginModule
16.1.7. DatabaseServerLoginModule
16.1.8. BaseCertLoginModule
16.1.9. IdentityLoginModule
16.1.10. RunAsLoginModule
16.1.11. RunAsIdentity Creation
16.1.12. ClientLoginModule
16.1.13. SPNEGOLoginModule
16.1.14. RoleMappingLoginModule
16.2. Custom Modules
16.2.1. Subject Usage Pattern Support
16.2.2. Custom LoginModule Example
Chapter 17. Single Sign On (SSO)
17.1. About Single Sign On (SSO) for Web Applications
17.2. About Clustered Single Sign On (SSO) for Web Applications
17.3. Choose the Right SSO Implementation
17.4. Use Single Sign On (SSO) In A Web Application
17.5. About Kerberos
17.6. About SPNEGO
17.7. About Microsoft Active Directory
17.8. Configure Kerberos or Microsoft Active Directory Desktop SSO for Web Applications
Chapter 18. Role-Based Security in Applications
18.1. About the Security Extension Architecture
18.2. Java Authentication and Authorization Service (JAAS)
18.3. About Java Authentication and Authorization Service (JAAS)
18.4. Use a Security Domain in Your Application
18.5. Use Role-Based Security In Servlets
18.6. Use A Third-Party Authentication System In Your Application
Chapter 19. Migration
19.1. Configure Application Security Changes
Reference
A.1. Included Authentication Modules
A.2. Included Authorization Modules
A.3. Included Security Mapping Modules
A.4. Included Security Auditing Provider Modules
A.5. jboss-web.xml Configuration Reference
A.6. EJB Security Parameter Reference
Revision History
212
214
215
215
215
220
233
234
235
236
237
239
242
242
243
244
245
245
246
247
254
259
259
260
260
261
263
264
264
264
269
269
270
270
274
276
278
286
286
287
287
318
318
319
319
322
324
Preface
1. Document Conventions
This manual uses several conventions to highlight certain words and phrases and draw attention to specific pieces of information.
In PDF and paper editions, this manual uses typefaces drawn from the Liberation Fonts set. The
Liberation Fonts set is also used in HTML editions if the set is installed on your system. If not, alternative but equivalent typefaces are displayed. Note: Red Hat Enterprise Linux 5 and later include the Liberation Fonts set by default.
1.1. Typographic Conventions
Four typographic conventions are used to call attention to specific words and phrases. These conventions, and the circumstances they apply to, are as follows.
Mono-spaced Bold
Used to highlight system input, including shell commands, file names and paths. Also used to highlight keys and key combinations. For example:
To see the contents of the file m y_next_bestselling_novel in your current working directory, enter the cat m y_next_bestselling_novel command at the shell prompt and press Enter to execute the command.
The above includes a file name, a shell command and a key, all presented in mono-spaced bold and all distinguishable thanks to context.
Key combinations can be distinguished from an individual key by the plus sign that connects each part of a key combination. For example:
Press Enter to execute the command.
Press Ctrl+Alt+F2 to switch to a virtual terminal.
The first example highlights a particular key to press. The second example highlights a key combination: a set of three keys pressed simultaneously.
If source code is discussed, class names, methods, functions, variable names and returned values mentioned within a paragraph will be presented as above, in m ono-spaced bold. For example:
File-related classes include filesystem for file systems, file for files, and dir for directories. Each class has its own associated set of permissions.
Proportional Bold
This denotes words or phrases encountered on a system, including application names; dialog-box text; labeled buttons; check-box and radio-button labels; menu titles and submenu titles. For example:
Choose System → Preferences → Mouse from the main menu bar to launch Mouse Preferences. In the Buttons tab, select the Left-handed m ouse check box and click Close to switch the primary mouse button from the left to the right (making the mouse suitable for use in the left hand).
To insert a special character into a gedit file, choose Applications → Accessories → Character Map from the main menu bar. Next, choose Search → Find… from the Character Map menu bar, type the name of the character in the Search field and click Next. The character you sought will be highlighted in the Character T able. Double-click
this highlighted character to place it in the T ext to copy field and then click the Copy button. Now switch back to your document and choose Edit → Paste from the gedit menu bar.
The above text includes application names; system-wide menu names and items; application-specific menu names; and buttons and text found within a GUI interface, all presented in proportional bold and all distinguishable by context.
Mono-spaced Bold Italic or Proportional Bold Italic
Whether mono-spaced bold or proportional bold, the addition of italics indicates replaceable or variable text. Italics denotes text you do not input literally or displayed text that changes depending on
circumstance. For example:
To connect to a remote machine using ssh, type ssh username@ domain.name at a shell prompt. If the remote machine is exam ple.com and your username on that machine is john, type ssh john@ exam ple.com.
The m ount -o rem ount file-system command remounts the named file system. For example, to remount the /hom e file system, the command is m ount -o rem ount /hom e. To see the version of a currently installed package, use the rpm -q package command. It will return a result as follows: package-version-release.
Note the words in bold italics above: username, domain.name, file-system, package, version and release. Each word is a placeholder, either for text you enter when issuing a command or for text displayed by the system.
Aside from standard usage for presenting the title of a work, italics denotes the first use of a new and important term. For example:
Publican is a DocBook publishing system.
1.2. Pull-quote Conventions
Terminal output and source code listings are set off visually from the surrounding text. Output sent to a terminal is set in m ono-spaced rom an and presented thus:
books Desktop documentation drafts mss photos stuff svn books_tests Desktop1 downloads images notes scripts svgs
package org.jboss.book.jca.ex1; import javax.naming.InitialContext; public class ExClient
{
public static void main(String args[]) throws Exception
{
InitialContext iniCtx = new InitialContext(); Object ref = iniCtx.lookup("EchoBean"); EchoHome home = (EchoHome) ref;
Echo echo = home.create(); System.out.println("Created Echo");
System.out.println("Echo.echo('Hello') = " + echo.echo("Hello")); }
}
1.3. Notes and Warnings
Finally, we use three visual styles to draw attention to information that might otherwise be overlooked.
Note
Notes are tips, shortcuts or alternative approaches to the task at hand. Ignoring a note should have no negative consequences, but you might miss out on a trick that makes your life easier.
Important
Important boxes detail things that are easily missed: configuration changes that only apply to the current session, or services that need restarting before an update will apply. Ignoring a box labeled “Important” will not cause data loss but may cause irritation and frustration.
Warning
Warnings should not be ignored. Ignoring warnings will most likely cause data loss.
2. Getting Help and Giving Feedback
2.1. Do You Need Help?
If you experience difficulty with a procedure described in this documentation, visit the Red Hat Customer Portal at http://access.redhat.com. Through the customer portal, you can:
search or browse through a knowledgebase of technical support articles about Red Hat products. submit a support case to Red Hat Global Support Services (GSS).
access other product documentation.
Red Hat also hosts a large number of electronic mailing lists for discussion of Red Hat software and technology. You can find a list of publicly available mailing lists at
to access the list archives.
2.2. Give us Feedback
If you find a typographical error, or know how this guide can be improved, we would love to hear from you. Submit a report in Bugzilla against the product JBoss Enterprise Application Platform 6 and the component doc-Security_Guide. The following link will take you to a pre-filled bug report for this product: https://bugzilla.redhat.com/.
Fill out the following template in Bugzilla's Description field. Be as specific as possible when describing the issue; this will help ensure that we can fix it quickly.
Document URL:
Section Number and Name:
Describe the issue:
Suggestions for improvement:
Additional information:
Part I. Security for Red Hat JBoss Enterprise Application
Platform 6
Chapter 1. Introduction
1.1. About Red Hat JBoss Enterprise Application Platform 6
(JBoss EAP 6)
Red Hat JBoss Enterprise Application Platform 6 (JBoss EAP 6) is a fast, secure, powerful middleware platform built upon open standards, and compliant with the Java Enterprise Edition 6 specification. It integrates JBoss Application Server 7 with high-availability clustering, powerful messaging, distributed caching, and other technologies to create a stable and scalable platform.
The new modular structure allows for services to be enabled only when required, significantly increasing start up speed. The Management Console and Management Command Line Interface remove the need to edit XML configuration files by hand, adding the ability to script and automate tasks. In addition, it includes APIs and development frameworks that can be used to develop secure, powerful, and scalable Java EE applications quickly.
Report a bug
1.2. About Securing JBoss Enterprise Application Platform 6
Computer security is the all encompassing term given to the field of information technology that deals with securing the virtual environments that power the digital age. This can include data protection and integrity, application security, risk and vulnerability assessment and authentication and authorization protocols.
Computer data is an all important asset for most organizations. Data protection is vital and forms the core of most businesses. JBoss EAP 6 provides a multi-layered approach to security to take care of data at all stages.
Truly secure systems are the ones that are designed from the ground up with security as the main feature. Such systems use the principle of Security by Design. In such systems, malicious attacks and infiltration's are accepted as part and parcel of normal security apparatus and systems are designed to work around them.
Security can be applied at the operating system, middleware and application level. For more information about security at the operating system level as it applies to RHEL, refer to the Red Hat Enterprise Linux Security Guide.
In the coming chapters, you will read about the different levels and layers of security within JBoss EAP 6. These layers provides the infrastructure for all security functionality within the platform.
Chapter 2. Security Overview
2.1. About Declarative Security
Declarative security is a method to separate security concerns from your application code by using the container to manage security. The container provides an authorization system based on either file permissions or users, groups, and roles. This approach is usually superior to programmatic security, which gives the application itself all of the responsibility for security.
JBoss EAP 6 provides declarative security via security domains. Report a bug
2.1.1. Java EE Declarative Security Overview
The J2EE security model is declarative in that you describe the security roles and permissions in a standard XML descriptor rather than embedding security into your business component. This isolates security from business-level code because security tends to be more a function of where the component is deployed than an inherent aspect of the component's business logic. For example, consider an Automated Teller Machine (ATM) that is to be used to access a bank account. The security
requirements, roles and permissions will vary independent of how you access the bank account, based on what bank is managing the account, where the ATM is located, and so on.
Securing a J2EE application is based on the specification of the application security requirements via the standard J2EE deployment descriptors. You secure access to EJBs and web components in an
enterprise application by using the ejb-jar.xm l and web.xm l deployment descriptors. Report a bug
2.1.2. Security References
Both Enterprise Java Beans (EJBs) and servlets can declare one or more <security-role-ref> elements.
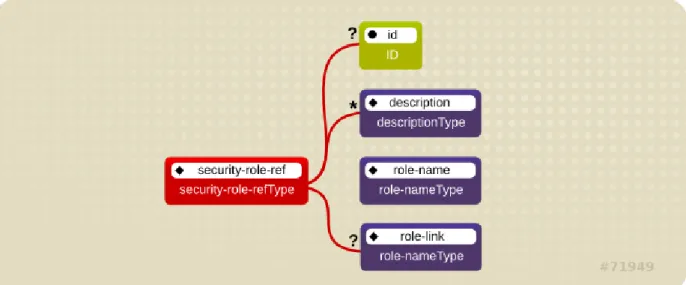
Figure 2.1. Security Roles Reference Model
This element declares that a component is using the <role-name> element's role-nam eT ype attribute value as an argument to the isCallerInRole(String) method. By using the isCallerInRole method, a component can verify whether the caller is in a role that has been declared with a <security-role-ref> or <role-name> element. The <role-name> element value must link to a <security-role> element through the <role-link> element. The typical use of isCallerInRole is to perform a security check that cannot be defined by using the role-based <method-permissions> elements.
Example 2.1. ejb-jar.xml descriptor fragment
<!-- A sample ejb-jar.xml fragment -->
<ejb-jar>
<enterprise-beans> <session>
<ejb-name>ASessionBean</ejb-name> ...
<security-role-ref>
<role-name>TheRoleICheck<role-name>
<role-link>TheApplicationRole</role-link> </security-role-ref> </session> </enterprise-beans> ... </ejb-jar>
Note
This fragment is an example only. In deployments, the elements in this section must contain role names and links relevant to the EJB deployment.
Example 2.2. web.xml descriptor fragment
<web-app> <servlet>
<servlet-name>AServlet</servlet-name> ...
<security-role-ref>
<role-name>TheServletRole</role-name> <role-link>TheApplicationRole</role-link> </security-role-ref> </servlet> ... </web-app> Report a bug
2.1.3. Security Identity
An Enterprise Java Bean (EJB) can specify the identity another EJB must use when it invokes methods on components using the <security-identity> element.
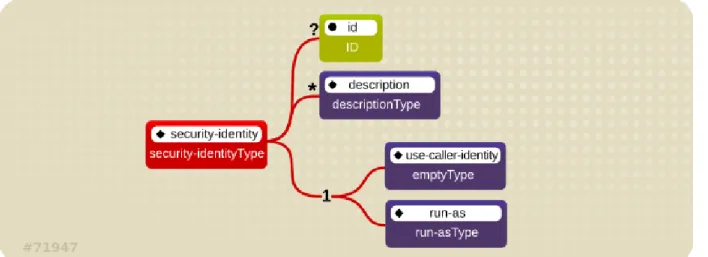
Figure 2.2. J2EE Security Identity Data Model
The invocation identity can be that of the current caller, or it can be a specific role. The application assembler uses the <security-identity> element with a <use-caller-identity> child element. This indicate that the current caller's identity should be propagated as the security identity for method invocations made by the EJB. Propagation of the caller's identity is the default used in the absence of an explicit <security-identity> element declaration.
Alternatively, the application assembler can use the <run-as> or <role-name> child element to specify that a specific security role supplied by the <role-name> element value must be used as the security identity for method invocations made by the EJB.
Note that this does not change the caller's identity as seen by the
EJBContext.getCallerPrincipal() method. Rather, the caller's security roles are set to the single role specified by the <run-as> or <role-name> element value.
One use case for the <run-as> element is to prevent external clients from accessing internal EJBs. You configure this behavior by assigning the internal EJB <method-permission> elements, which restrict access to a role never assigned to an external client. EJBs that must in turn use internal EJBs are then configured with a <run-as> or <role-name> equal to the restricted role. The following descriptor fragment describes an example<security-identity> element usage.
<ejb-jar>
<enterprise-beans> <session>
<ejb-name>ASessionBean</ejb-name> <!-- ... --> <security-identity> <use-caller-identity/> </security-identity> </session> <session>
<ejb-name>RunAsBean</ejb-name> <!-- ... -->
<security-identity> <run-as>
<description>A private internal role</description> <role-name>InternalRole</role-name>
</run-as> </security-identity> </session> </enterprise-beans> <!-- ... --> </ejb-jar>
When you use <run-as> to assign a specific role to outgoing calls, a principal named anonym ous is assigned to all outgoing calls. If you want another principal to be associated with the call, you must associate a <run-as-principal> with the bean in the jboss.xm l file. The following fragment associates a principal named internal with RunAsBean from the prior example.
<session>
<ejb-name>RunAsBean</ejb-name> <security-identity>
<run-as-principal>internal</run-as-principal> </security-identity>
</session>
The <run-as> element is also available in servlet definitions in a web.xm l file. The following example shows how to assign the role InternalRole to a servlet:
<servlet>
<servlet-name>AServlet</servlet-name> <!-- ... -->
<run-as>
<role-name>InternalRole</role-name> </run-as>
</servlet>
Calls from this servlet are associated with the anonymous principal. The <run-as-principal> element is available in the jboss-web.xm l file to assign a specific principal to go along with the run-as role. The following fragment shows how to associate a principal named internal to the servlet above.
<servlet>
<servlet-name>AServlet</servlet-name>
<run-as-principal>internal</run-as-principal> </servlet>
Report a bug
2.1.4. Security Roles
The security role name referenced by either the security-role-ref or security-identity element needs to map to one of the application's declared roles. An application assembler defines logical security roles by declaring security-role elements. The role-nam e value is a logical application role name like Administrator, Architect, SalesManager, etc.
The J2EE specifications note that it is important to keep in mind that the security roles in the deployment descriptor are used to define the logical security view of an application. Roles defined in the J2EE deployment descriptors should not be confused with the user groups, users, principals, and other concepts that exist in the target enterprise's operational environment. The deployment descriptor roles are application constructs with application domain-specific names. For example, a banking application might use role names such as BankManager, Teller, or Customer.
In JBoss EAP, a security-role element is only used to map security-role-ref/role-nam e values to the logical role that the component role references. The user's assigned roles are a dynamic function of the application's security manager. JBoss does not require the definition of security-role elements in order to declare method permissions. However, the specification of security-role elements is still a recommended practice to ensure portability across application servers and for deployment descriptor maintenance.
Example 2.3. An ejb-jar.xml descriptor fragment that illustrates the security-role element usage.
<!-- A sample ejb-jar.xml fragment -->
<ejb-jar>
<assembly-descriptor> <security-role>
<description>The single application role</description> <role-name>TheApplicationRole</role-name>
</security-role> </assembly-descriptor> </ejb-jar>
Example 2.4. An example web.xml descriptor fragment that illustrates the security-role element usage.
<!-- A sample web.xml fragment -->
<web-app>
<security-role>
<description>The single application role</description> <role-name>TheApplicationRole</role-name>
</security-role> </web-app>
Report a bug
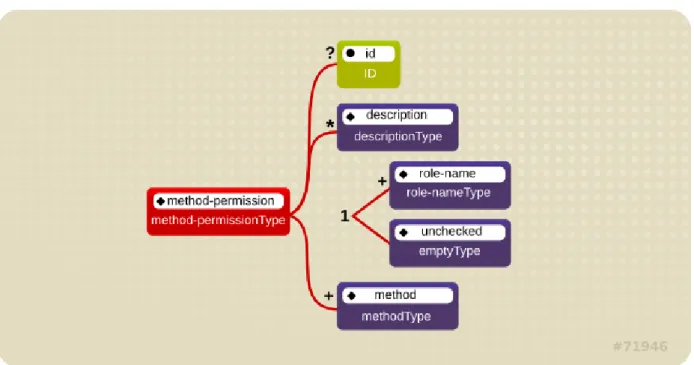
An application assembler can set the roles that are allowed to invoke an EJB's home and remote interface methods through method-permission element declarations.
Figure 2.3. J2EE Method Permissions Element
Each m ethod-perm ission element contains one or more role-name child elements that define the logical roles that are allowed to access the EJB methods as identified by method child elements. You can also specify an unchecked element instead of the role-nam e element to declare that any
authenticated user can access the methods identified by method child elements. In addition, you can declare that no one should have access to a method that has the exclude-list element. If an EJB has methods that have not been declared as accessible by a role using a m ethod-perm ission element, the EJB methods default to being excluded from use. This is equivalent to defaulting the methods into the exclude-list.
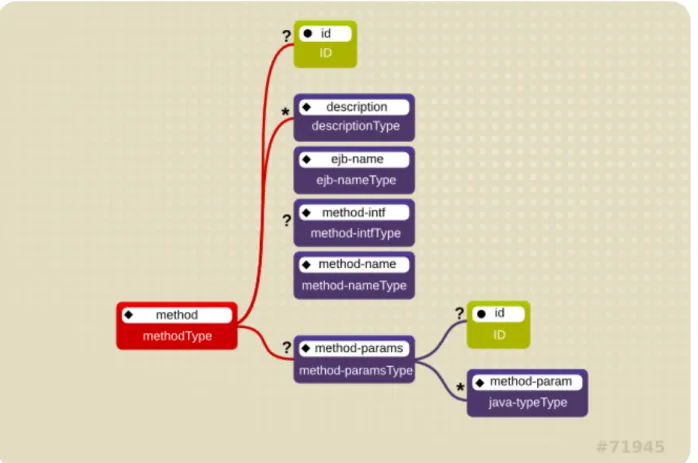
Figure 2.4. J2EE Method Element
There are three supported styles of method element declarations.
The first is used for referring to all the home and component interface methods of the named enterprise bean:
<method>
<ejb-name>EJBNAME</ejb-name> <method-name>*</method-name> </method>
The second style is used for referring to a specified method of the home or component interface of the named enterprise bean:
<method>
<ejb-name>EJBNAME</ejb-name> <method-name>METHOD</method-name> </method>
If there are multiple methods with the same overloaded name, this style refers to all of the overloaded methods.
<method>
<ejb-name>EJBNAME</ejb-name> <method-name>METHOD</method-name> <method-params>
<method-param>PARAMETER_1</method-param> <!-- ... -->
<method-param>PARAMETER_N</method-param> </method-params>
</method>
The method must be defined in the specified enterprise bean's home or remote interface. The method-param element values are the fully qualified name of the corresponding method method-parameter type. If there are multiple methods with the same overloaded signature, the permission applies to all of the matching overloaded methods.
The optional m ethod-intf element can be used to differentiate methods with the same name and signature that are defined in both the home and remote interfaces of an enterprise bean.
Example 2.5, “An ejb-jar.xml descriptor fragment that illustrates the method-permission element usage.” provides complete examples of the m ethod-perm ission element usage.
Example 2.5. An ejb-jar.xml descriptor fragment that illustrates the method-permission element usage.
<ejb-jar>
<assembly-descriptor> <method-permission>
<description>The employee and temp-employee roles may access any method of the EmployeeService bean </description>
<role-name>employee</role-name> <role-name>temp-employee</role-name> <method>
<ejb-name>EmployeeService</ejb-name> <method-name>*</method-name>
</method>
</method-permission> <method-permission>
<description>The employee role may access the findByPrimaryKey, getEmployeeInfo, and the updateEmployeeInfo(String) method of the AardvarkPayroll bean </description>
<role-name>employee</role-name> <method>
<ejb-name>AardvarkPayroll</ejb-name>
<method-name>findByPrimaryKey</method-name> </method>
<method>
<ejb-name>AardvarkPayroll</ejb-name>
<method-name>getEmployeeInfo</method-name> </method>
<method>
<ejb-name>AardvarkPayroll</ejb-name>
<method-name>updateEmployeeInfo</method-name> <method-params>
<method-param>java.lang.String</method-param> </method-params>
</method>
</method-permission> <method-permission>
<description>The admin role may access any method of the EmployeeServiceAdmin bean </description>
<role-name>admin</role-name> <method>
<ejb-name>EmployeeServiceAdmin</ejb-name> <method-name>*</method-name>
</method>
</method-permission> <method-permission>
<description>Any authenticated user may access any method of the EmployeeServiceHelp bean</description>
<unchecked/> <method>
<ejb-name>EmployeeServiceHelp</ejb-name> <method-name>*</method-name>
</method>
</method-permission> <exclude-list>
<description>No fireTheCTO methods of the EmployeeFiring bean may be
used in this deployment</description> <method>
<ejb-name>EmployeeFiring</ejb-name> <method-name>fireTheCTO</method-name>
Report a bug
2.1.6. Enterprise Beans Security Annotations
Enterprise beans use Annotations to pass information to the deployer about security and other aspects of the application. The deployer can set up the appropriate enterprise bean security policy for the application if specified in annotations, or the deployment descriptor.
Any method values explicitly specified in the deployment descriptor override annotation values. If a method value is not specified in the deployment descriptor, those values set using annotations are used. The overriding granularity is on a per-method basis
Those annotations that address security and can be used in an enterprise beans include the following: @DeclareRoles
Declares each security role declared in the code. For information about configuring roles, refer to the Java EE 5 Tutorial Declaring Security Roles Using Annotations.
@RolesAllowed, @PermitAll, and @DenyAll
Specifies method permissions for annotations. For information about configuring annotation method permissions, refer to the Java EE 5 Tutorial Specifying Method Permissions Using Annotations.
@RunAs
Configures the propagated security identity of a component. For information about configuring propagated security identities using annotations, refer to the Java EE 5 Tutorial Configuring a Component’s Propagated Security Identity.
Report a bug
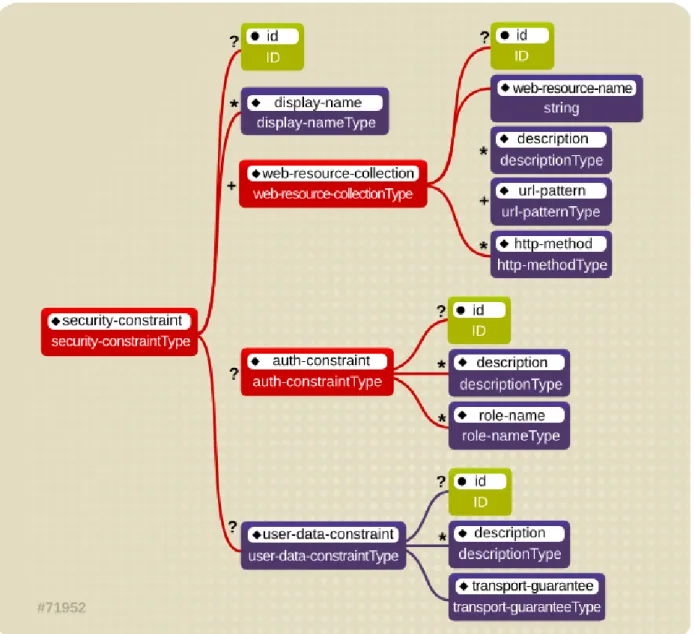
2.1.7. Web Content Security Constraints
In a web application, security is defined by the roles that are allowed access to content by a URL pattern that identifies the protected content. This set of information is declared by using the web.xm l security-constraint element.
Figure 2.5. Web Content Security Constraints
The content to be secured is declared using one or more <web-resource-collection> elements. Each <web-resource-collection> element contains an optional series of <url-pattern> elements followed by an optional series of <http-method> elements. The <url-pattern> element value specifies a URL pattern against which a request URL must match for the request to correspond to an attempt to access secured content. The <http-method> element value specifies a type of HTTP request to allow.
The optional <user-data-constraint> element specifies the requirements for the transport layer of the client to server connection. The requirement may be for content integrity (preventing data tampering in the communication process) or for confidentiality (preventing reading while in transit). The <transport-guarantee> element value specifies the degree to which communication between the client and server should be protected. Its values are NONE, INT EGRAL, and CONFIDENT IAL. A value of NONE means that the application does not require any transport guarantees. A value of INT EGRAL means that the
application requires the data sent between the client and server to be sent in such a way that it can not be changed in transit. A value of CONFIDENT IAL means that the application requires the data to be
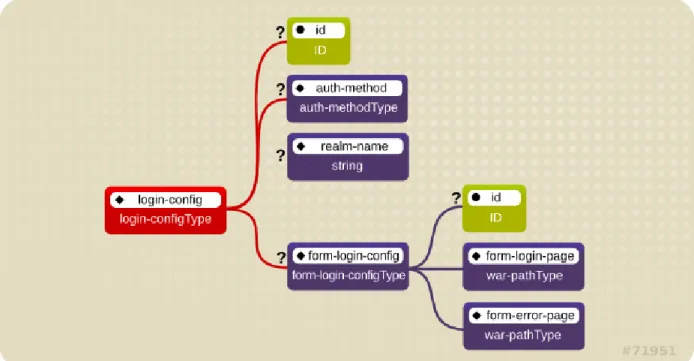
login mechanism.
Figure 2.6. Web Login Configuration
The <auth-method> child element specifies the authentication mechanism for the web application. As a prerequisite to gaining access to any web resources that are protected by an authorization constraint, a user must have authenticated using the configured mechanism. Legal <auth-method> values are BASIC, DIGEST, FORM, and CLIENT -CERT. The <realm-name> child element specifies the realm name to use in HTTP basic and digest authorization. The <form-login-config> child element specifies the log in as well as error pages that should be used in form-based log in. If the <auth-method> value is not FORM, then form -login-config and its child elements are ignored.
The following configuration example indicates that any URL lying under the web application's
/restricted path requires an AuthorizedUser role. There is no required transport guarantee and the authentication method used for obtaining the user identity is BASIC HTTP authentication.
Example 2.6. web.xml Descriptor Fragment
<web-app>
<security-constraint>
<web-resource-collection>
<web-resource-name>Secure Content</web-resource-name> <url-pattern>/restricted/*</url-pattern>
</web-resource-collection> <auth-constraint>
<role-name>AuthorizedUser</role-name> </auth-constraint>
<user-data-constraint>
<transport-guarantee>NONE</transport-guarantee> </user-data-constraint>
</security-constraint> <!-- ... -->
<login-config>
<auth-method>BASIC</auth-method>
<realm-name>The Restricted Zone</realm-name> </login-config>
<!-- ... -->
<security-role>
<description>The role required to access restricted content </description>
<role-name>AuthorizedUser</role-name> </security-role>
</web-app>
Report a bug
2.1.8. Enable Form-based Authentication
Form-based authentication provides flexibility in defining a custom JSP/HTML page for log in, and a separate page to which users are directed if an error occurs during login.
Form-based authentication is defined by including <auth-m ethod>FORM</auth-m ethod> in the <login-config> element of the deployment descriptor, web.xm l. The login and error pages are also defined in <login-config>, as follows:
<login-config> <auth-method>FORM</auth-method> <form-login-config> <form-login-page>/login.html</form-login-page> <form-error-page>/error.html</form-error-page> </form-login-config> </login-config>
When a web application with form-based authentication is deployed, the web container uses
Form Authenticator to direct users to the appropriate page. JBoss EAP maintains a session pool so that authentication information does not need to be present for each request. When
Form Authenticator receives a request, it queries org.apache.catalina.session.Manager for an existing session. If no session exists, a new session is created. Form Authenticator then verifies the credentials of the session.
Authentication Requests
Each session is identified by a session ID, a 16 byte string generated from random values. These values are retrieved from /dev/urandom (Linux) by default, and hashed with MD5. Checks are performed at session ID creation to ensure that the ID created is unique.
Once verified, the session ID is assigned as part of a cookie, and then returned to the client. This cookie is expected in subsequent client requests and is used to identify the user session.
The cookie passed to the client is a name value pair with several optional attributes. The identifier attribute is called JSESSIONID . Its value is a hex-string of the session ID. This cookie is configured to be non-persistent. This means that on the client side it will be deleted when the browser exits. On the server side, sessions expire after 60 seconds of inactivity, at which time session objects and their credential information are deleted.
Say a user attempts to access a web application that is protected with form-based authentication. Form Authenticator caches the request, creates a new session if necessary, and redirects the user to the login page defined in login-config. (In the previous example code, the login page is
login.htm l.) The user then enters their user name and password in the HTML form provided. User name and password are passed to Form Authenticator via the j_security_check form action. The Form Authenticator then authenticates the user name and password against the realm attached to the web application context. In JBoss Enterprise Application Platform, the realm is JBossWebRealm. When authentication is successful, Form Authenticator retrieves the saved request from the cache and redirects the user to their original request.
Note
The server recognizes form authentication requests only when the URI ends with
/j_security_check and at least the j_usernam e and j_password parameters exist. Report a bug
2.1.9. Enable Declarative Security
The Java EE security elements that have been covered so far describe the security requirements only from the application's perspective. Because Java EE security elements declare logical roles, the
application deployer maps the roles from the application domain onto the deployment environment. The Java EE specifications omit these application server-specific details.
To map application roles onto the deployment environment, you must specify a security manager that implements the Java EE security model using JBoss EAP-specific deployment descriptors. Refer to the custom login module example for details of this security configuration.
Chapter 3. Introduction to JAAS
3.1. About JAAS
The JBossSX framework is based on the JAAS API. You must understand the basic elements of the JAAS API before you can understand the implementation details of JBossSX. The following sections provide an introduction to JAAS to prepare you for the JBossSX architecture discussion later in this guide.
The JAAS 1.0 API consists of a set of Java packages designed for user authentication and authorization. The API implements a Java version of the standard Pluggable Authentication Modules (PAM) framework and extends the Java 2 Platform access control architecture to support user-based authorization. JAAS was first released as an extension package for JDK 1.3 and is bundled with JDK 1.5. Because the JBossSX framework only uses the authentication capabilities of JAAS to implement the declarative role-based J2EE security model, this introduction focuses on only that topic.
JAAS authentication is performed in a pluggable fashion. This permits Java applications to remain independent from underlying authentication technologies, and allows the JBossSX security manager to work in different security infrastructures. Integration with a security infrastructure is achievable without changing the JBossSX security manager implementation. You need only change the configuration of the authentication stack JAAS uses.
Report a bug
3.2. JAAS Core Classes
The JAAS core classes can be broken down into three categories: common, authentication, and
authorization. The following list presents only the common and authentication classes because these are the specific classes used to implement the functionality of JBossSX covered in this chapter.
These are the common classes:
Subject (javax.security.auth.Subject) These are the authentication classes:
Configuration (javax.security.auth.login.Configuration) LoginContext (javax.security.auth.login.LoginContext) These are the associated interfaces:
Principal (java.security.Principal)
Callback (javax.security.auth.callback.Callback)
CallbackHandler (javax.security.auth.callback.CallbackHandler) LoginModule (javax.security.auth.spi.LoginModule)
Report a bug
During the authentication process, a subject is populated with associated identities, or principals. A subject may have many principals. For example, a person may have a name principal (John Doe), a social security number principal (123-45-6789), and a user name principal (johnd), all of which help distinguish the subject from other subjects. To retrieve the principals associated with a subject, two methods are available:
public Set getPrincipals() {...}
public Set getPrincipals(Class c) {...}
getPrincipals() returns all principals contained in the subject. getPrincipals(Class c) returns only those principals that are instances of class c or one of its subclasses. An empty set is returned if the subject has no matching principals.
Note that the java.security.acl.Group interface is a sub-interface of
java.security.Principal, so an instance in the principals set may represent a logical grouping of other principals or groups of principals.
Report a bug
3.4. Subject Authentication
Subject Authentication requires a JAAS login. The login process consists of the following points: 1. An application instantiates a LoginContext and passes in the name of the login configuration
and a CallbackHandler to populate the Callback objects, as required by the configuration LoginModules.
2. The LoginContext consults a Configuration to load all the LoginModules included in the named login configuration. If no such named configuration exists the other configuration is used as a default.
3. The application invokes the LoginContext.login method.
4. The login method invokes all the loaded LoginModules. As each LoginModule attempts to authenticate the subject, it invokes the handle method on the associated CallbackHandler to obtain the information required for the authentication process. The required information is passed to the handle method in the form of an array of Callback objects. Upon success, the
LoginModules associate relevant principals and credentials with the subject.
5. The LoginContext returns the authentication status to the application. Success is represented by a return from the login method. Failure is represented through a LoginException being thrown by the login method.
6. If authentication succeeds, the application retrieves the authenticated subject using the LoginContext.getSubject method.
7. After the scope of the subject authentication is complete, all principals and related information associated with the subject by the login method can be removed by invoking the
LoginContext.logout method.
The LoginContext class provides the basic methods for authenticating subjects and offers a way to develop an application that is independent of the underlying authentication technology. The
LoginContext consults a Configuration to determine the authentication services configured for a particular application. LoginModule classes represent the authentication services. Therefore, you can plug different login modules into an application without changing the application itself. The following code shows the steps required by an application to authenticate a subject.
CallbackHandler handler = new MyHandler();
LoginContext lc = new LoginContext("some-config", handler); try {
lc.login();
Subject subject = lc.getSubject(); } catch(LoginException e) {
System.out.println("authentication failed"); e.printStackTrace();
}
// Perform work as authenticated Subject // ...
// Scope of work complete, logout to remove authentication info
try {
lc.logout();
} catch(LoginException e) {
System.out.println("logout failed"); e.printStackTrace();
}
// A sample MyHandler class
class MyHandler
implements CallbackHandler {
public void handle(Callback[] callbacks) throws IOException, UnsupportedCallbackException {
for (int i = 0; i < callbacks.length; i++) { if (callbacks[i] instanceof NameCallback) {
NameCallback nc = (NameCallback)callbacks[i]; nc.setName(username);
} else if (callbacks[i] instanceof PasswordCallback) { PasswordCallback pc = (PasswordCallback)callbacks[i]; pc.setPassword(password);
} else {
throw new UnsupportedCallbackException(callbacks[i],
"Unrecognized Callback"); }
} } }
Developers integrate with an authentication technology by creating an implementation of the
LoginModule interface. This allows an administrator to plug different authentication technologies into an application. You can chain together multiple LoginModules to allow for more than one
authentication technology to participate in the authentication process. For example, one LoginModule may perform user name/password-based authentication, while another may interface to hardware devices such as smart card readers or biometric authenticators.
The life cycle of a LoginModule is driven by the LoginContext object against which the client creates and issues the login method. The process consists of two phases. The steps of the process are as follows:
implementation might prompt the user for a user name and password and then verify the information against data stored in a naming service such as NIS or LDAP. Alternative implementations might interface to smart cards and biometric devices, or simply extract user information from the underlying operating system. The validation of user identity by each LoginModule is considered phase 1 of JAAS authentication. The signature of the login method is boolean login() throws LoginException . A LoginException indicates failure. A return value of true indicates that the method succeeded, whereas a return value of false indicates that the login module should be ignored.
If the LoginContext's overall authentication succeeds, com m it is invoked on each
LoginModule. If phase 1 succeeds for a LoginModule, then the commit method continues with phase 2 and associates the relevant principals, public credentials, and/or private credentials with the subject. If phase 1 fails for a LoginModule, then com m it removes any previously stored
authentication state, such as user names or passwords. The signature of the com m it method is: boolean com m it() throws LoginException . Failure to complete the commit phase is indicated by throwing a LoginException. A return of true indicates that the method succeeded, whereas a return of false indicates that the login module should be ignored.
If the LoginContext's overall authentication fails, then the abort method is invoked on each LoginModule. The abort method removes or destroys any authentication state created by the login or initialize methods. The signature of the abort method is boolean abort() throws LoginException . Failure to complete the abort phase is indicated by throwing a
LoginException. A return of true indicates that the method succeeded, whereas a return of false indicates that the login module should be ignored.
To remove the authentication state after a successful login, the application invokes logout on the LoginContext. This in turn results in a logout method invocation on each LoginModule. The logout method removes the principals and credentials originally associated with the subject during the com m it operation. Credentials should be destroyed upon removal. The signature of the logout method is: boolean logout() throws LoginException . Failure to complete the logout process is indicated by throwing a LoginException. A return of true indicates that the method succeeded, whereas a return of false indicates that the login module should be ignored.
When a LoginModule must communicate with the user to obtain authentication information, it uses a CallbackHandler object. Applications implement the CallbackHandler interface and pass it to the LoginContext, which send the authentication information directly to the underlying login modules. Login modules use the CallbackHandler both to gather input from users, such as a password or smart card PIN, and to supply information to users, such as status information. By allowing the
application to specify the CallbackHandler, underlying LoginModules remain independent from the different ways applications interact with users. For example, a CallbackHandler's implementation for a GUI application might display a window to solicit user input. On the other hand, a CallbackHandler implementation for a non-GUI environment, such as an application server, might simply obtain credential information by using an application server API. The CallbackHandler interface has one method to implement:
void handle(Callback[] callbacks) throws java.io.IOException,
UnsupportedCallbackException;
The Callback interface is the last authentication class we will look at. This is a tagging interface for which several default implementations are provided, including the Nam eCallback and
PasswordCallback used in an earlier example. A LoginModule uses a Callback to request information required by the authentication mechanism. LoginModules pass an array of Callbacks directly to the CallbackHandler.handle method during the authentication's login phase. If a callbackhandler does not understand how to use a Callback object passed into the handle method, it throws an UnsupportedCallbackException to abort the login call.
Chapter 4. The Security Subsystem
4.1. About the Security Subsystem
The security subsystem provides the infrastructure for all security functionality in JBoss EAP 6. Most configuration elements rarely need to be changed. The only configuration element which may need to be changed is whether to use deep-copy-subject-mode. In addition, you can configure system-wide security properties. Most of the configuration relates to security domains.
Deep Copy Mode
If deep copy subject mode is disabled (the default), copying a security data structure makes a reference to the original, rather than copying the entire data structure. This behavior is more efficient, but is prone to data corruption if multiple threads with the same identity clear the subject by means of a flush or logout operation.
Deep copy subject mode causes a complete copy of the data structure and all its associated data to be made, as long as they are marked cloneable. This is more thread-safe, but less efficient.
System-Wide Security Properties
You can set system-wide security properties, which are applied to java.security.Security class. Security Domain
A security domain is a set of Java Authentication and Authorization Service (JAAS) declarative security configurations which one or more applications use to control authentication, authorization, auditing, and mapping. Three security domains are included by default: jboss-ejb-policy, jboss-web-policy, and other. You can create as many security domains as you need to accommodate the needs of your applications.
Report a bug
4.2. About the Structure of the Security Subsystem
The security subsystem is configured in the managed domain or standalone configuration file. Most of the configuration elements can be configured using the web-based management console or the console-based management CLI. The following is the XML representing an example security subsystem.
Example 4.1. Example Security Subsystem Configuration <subsystem xmlns="urn:jboss:domain:security:1.2"> <security-management> ... </security-management> <security-domains>
<security-domain name="other" cache-type="default"> <authentication>
<login-module code="Remoting" flag="optional"> <module-option name="password-stacking"
value="useFirstPass"/>
</login-module>
<login-module code="RealmUsersRoles" flag="required"> <module-option name="usersProperties"
value="${jboss.domain.config.dir}/application-users.properties"/> <module-option name="rolesProperties"
value="${jboss.domain.config.dir}/application-roles.properties"/>
<module-option name="realm" value="ApplicationRealm"/> <module-option name="password-stacking"
value="useFirstPass"/>
</login-module> </authentication> </security-domain>
<security-domain name="jboss-web-policy" cache-type="default"> <authorization>
<policy-module code="Delegating" flag="required"/> </authorization>
</security-domain>
<security-domain name="jboss-ejb-policy" cache-type="default"> <authorization>
<policy-module code="Delegating" flag="required"/> </authorization> </security-domain> </security-domains> <vault> ... </vault> </subsystem>
The <security-m anagem ent>, <subject-factory> and <security-properties> elements are not present in the default configuration. The <subject-factory> and
<security-properties> elements have been deprecated in JBoss EAP 6.1 onwards. Report a bug
4.3. Configuring the Security Subsystem
4.3.1. Configure the Security Subsystem
You can configure the security subsystem using the Management CLI or web-based Management Console.
Each top-level element within the security subsystem contains information about a different aspect of the security configuration. Refer to Section 4.2, “About the Structure of the Security Subsystem” for an example of security subsystem configuration.
<security-management>
This section overrides high-level behaviors of the security subsystem. Each setting is optional. It is unusual to change any of these settings except for deep copy subject mode.
Option Description
deep-copy-subject-mode Specifies whether to copy or link to security tokens, for additional thread safety.
authentication-manager-class-name Specifies an alternate AuthenticationManager implementation class name to use.
authorization-manager-class-name Specifies an alternate AuthorizationManager implementation class name to use.
audit-manager-class-name Specifies an alternate AuditManager implementation class name to use.
identity-trust-manager-class-name Specifies an alternate IdentityTrustManager implementation class name to use.
mapping-manager-class-name Specifies the MappingManager implementation class name to use. <subject-factory>
The subject factory controls creation of subject instances. It may use the authentication manager to verify the caller. The main use of the subject factory is for JCA components to establish a subject.It is unusual to need to modify the subject factory.
<security-domains>
A container element which holds multiple security domains. A security domain may contain information about authentication, authorization, mapping, and auditing modules, as well as JASPI authentication and JSSE configuration. Your application would specify a security domain to manage its security information.
<security-properties>
Contains names and values of properties which are set on the java.security.Security class.
Report a bug
4.3.2. Security Management
4.3.2.1. About Deep Copy Subject Mode
If deep copy subject mode is disabled (the default), copying a security data structure makes a reference to the original, rather than copying the entire data structure. This behavior is more efficient, but is prone to data corruption if multiple threads with the same identity clear the subject by means of a flush or logout operation.
Deep copy subject mode causes a complete copy of the data structure and all its associated data to be made, as long as they are marked cloneable. This is more thread-safe, but less efficient.