CS 5413 Project Final Report
Analysis of performance of Intel DPDK on
Physical and Virtual Machines
Under the guidance of
Prof. Hakim Weatherspoon
Han Wang
Submitted by
Divyesh Darde (dsd96) & Vidhya Sankaran (vs444)
Cornell University
Contents
PROJECT OVERVIEW ... 3 INTRODUCTION ... 3 DESIGN ... 4 PHYSICAL MACHINE ... 4 VIRTUAL MACHINE ... 4 IMPLEMENTATION ... 5 PHYSICAL MACHINE ... 5INSTALLATION AND TROUBLESHOOTING OF INTEL DPDK ... 5
NETPERF INSTALLATION ... 7
SOURCE CODE CHANGES IN L2/L3FWDER ... 10
RESULTS AND GRAPHS ... 11
VIRTUAL MACHINE ... 12
INSTALLATION OF DPDK OVSWITCH- ... 12
DECIDING TO WORK WITH VirtualBox INSTEAD OF QEMU : ... 15
PERFORMANCE ANALYSIS GRAPHS ON VMS ... 18
MASTER COMPARISON GRAPH ... 18
PERFORMANCE ANALYSIS ... 19
Reasons for good performance on Physical machines- ... 19
Reasons for bad performance on VMs- ... 19
Improvements suggested- ... 19
CHALLENGES FACED AND RECOMMENDATIONS TO FUTURE TEAMS ... 19
PROJECT OVERVIEW
Intel DPDK (Data Plane Development Kit) is a set of libraries and drivers for fast
packet processing on x86 platforms. Intel DPDK provides a programming framework
that scales from Intel Atom processors to Intel Xeon processors and enables faster
development of high speed data packet networking applications.
In this project, we measured the performance of Intel DPDK on Physical and Virtual
machines. We also analysed and suggested possible improvements that can be done
to get better performance on VMs.
INTRODUCTION
This section gives a brief overview of the architecture of Intel Data Plane
Development Kit. The main goal of the Intel® DPDK is to provide a
simple,
complete framework for fast packet processing
in data plane applications.
The DPDK includes data plane libraries and has the below key modules-
A queue manager implemented with lockless queues
A buffer manager for pre-allocating fixed size buffers
A memory manager for allocating pools of objects in memory. It uses a ring
to store free objects; ensures that objects are spread equally on all DRAM
channels
Has poll modes drivers (PMD) that are designed to work without
asynchronous, reducing overhead.
All libraries are stored into the dpdk/lib/librte_* directories
DESIGN
PHYSICAL MACHINE
SETUP
We measured the performance of Intel DPDK on physical machine using the topology shown in figure-1. We used 3 fractus machines- compute28 , compute19 and compute20 for our project. Compute 28 had Intel DPDK installed, Compute 19 acted as the traffic generator and compute 20 ran tshark to capture the generated traffic. The traffic generator we used is PKTGEN and it allows us to configure the size and number of packets to be sent.
Figure 1
SERVER CONFIGURATION
32-Core Machine
vendor_id : GenuineIntel
Processor Model Name: Intel(R) Xeon(R) CPU E5-2690 0 @ 2.90GHz cpu MHz : 2899.767 (about)
cache size : 20480 KB
Intel 82599 Ethernet NIC- 2 Intel NICs were provided in the Compute 28 machine DPDK Version- V1.6 R0
VIRTUAL MACHINE
TEST ENVIRONMENT
The topology that was used for measuring performance in VMs is shown in the figure-2. The detailed explanation for this topology has been provided in the VM Installation and Setup section.
Figure 2
IMPLEMENTATION
PHYSICAL MACHINE
INSTALLATION AND TROUBLESHOOTING OF INTEL DPDK
This gives a brief documentation of our steps of installation of Intel DPDK as well as
NetPerf on the Fractus instance, the problems we faced and how we troubleshooted
them.
We first installed Intel DPDK 1.7.1, which is the newest version of Intel
DPDK. This seemed to give some compatibility problems with the Fractus
instance.
Hence we switched to a more stable version which is Intel DPDK 1.6.0r0.
We could successfully install this version. Following steps were involved in the
installation:
o
Once you unzip the dpdk1.6.0r0 tar ball, setup can be automated
step-by-step by
using the dpdk/tools/setup.sh file. Following command will
help in getting the installation started:
source setup.sh
o
Select the DPDK environment to be build. We selected
“x86_64-native-linuxapp-gcc”.
o
Next insert the IGB-UIO module onto the kernel.
o
Next Setup hugepage mappings for NUMA systems
o
Then bind Ethernet device (eth6/eth7) to the IGB/UIO module. Doing this will
run all your network activities on eth6 and eth7 over Intel DPDK.
o
We then tested whether the Ethernet device was successfully bound and
whether Intel DPDK was successfully installed using testpmd.
testpmd> stop
Telling cores to stop...
Waiting for lcores to finish...
--- Forward statistics for port 0
---RX-packets:3764045
RX-dropped: 0
RX-total:3764045
TX-packets:3763059
TX-dropped: 0
TX-total:3763059
--- Forward statistics for port 1 ---
---RX-packets:3763059
RX-dropped: 0
RX-total:3763059
TX-packets:3764045
TX-dropped: 0
TX-total:3764045
---+++++++++++++++ Accumulated forward statistics for all ports---+++++++++++++++
RX-packets:7527104
RX-dropped: 0
RX-total:7527104
TX-packets:7527104
TX-dropped: 0
TX-total:7527104
Done.
testpmd>
stop
Packet forwarding not started testpmd> start tx_first
io packet forwarding - CRC stripping disabled -
packets/burst=16 nb forwarding cores=1 - nb forwarding
ports=2
RX queues=1 - RX desc=128 - RX free threshold=0 RX threshold registers: pthresh=8 hthresh=8 wthresh=4 TX queues=1 - TX desc=512 - TX free threshold=0
TX threshold registers: pthresh=36 hthresh=0
wthresh=0 TX RS bit threshold=0 - TXQ
flags=0x0
testpmd> stop
Telling cores to
stop...
Waiting for lcores to finish...
--- Forward statistics for port 0
---RX-packets: 6683352
RX-dropped: 0
RX-total:6683352
TX-packets: 6683352
TX-dropped: 0
TX-total:6683352
--- Forward statistics for port 1
-
---RX-packets: 6683352
RX-dropped: 0
RX-total:6683352
TX-packets: 6683352
TX-dropped: 0
TX-total:6683352
---+++++++++++++++ Accumulated forward statistics for all
ports+++++++++++++++
RX-packets: 13366704
RX-dropped: 0
RX-total:13366704
TX-packets: 13366704
TX-dropped: 0
TX-total:13366704
Here is a list of the Ethernet devices of the Fractus instance after successful binding of Intel
DPDK to the module. The eth6 and eth7 to which Intel DPDK has been bounded have been
shown in bold:
Option:12
Network
devices
using
IGB_UIO
driver
====================================
0000:46:00.0 '82599EB 10-Gigabit SFI/SFP+ Network Connection' drv=igb_uio
unused=ixgbe 0000:46:00.1 '82599EB 10-Gigabit SFI/SFP+ Network Connection'
drv=igb_uio unused=ixgbe
Network
devices
using
kernel
driver
===================================
0000:01:00.0 'NetXtreme BCM5720 Gigabit Ethernet PCIe' if=eth0 drv=tg3 unused=
0000:01:00.1 'NetXtreme BCM5720 Gigabit Ethernet PCIe' if=eth1 drv=tg3 unused=
0000:02:00.0 'NetXtreme BCM5720 Gigabit Ethernet PCIe' if=eth2 drv=tg3 unused=
0000:02:00.1 'NetXtreme BCM5720 Gigabit Ethernet PCIe' if=eth3 drv=tg3 unused=
0000:43:00.0
'Myri-10G
Dual-Protocol
NIC'
if=eth4
drv=myri10ge
unused=
0000:44:00.0
'Myri-10G
Dual-Protocol
NIC' if=eth5 drv=myri10ge unused= Active
Other
network
devices
=====================
<none>
We were able to configure two ports and were able to forward packets through them. After
successfully installing Intel DPDK on our physical machine, we now installed Netperf to test
performance on Intel DPDK.
NETPERF INSTALLATION
Netperf is a benchmark tool that can be used to measure the performance of many different
types of networking. It provides tests for both unidirectional throughput, and end-to-end
latency. The environments currently measureable by netperf include:
TCP and UDP via BSD Sockets for both IPv4 and IPv6
DLPI
Unix Domain Sockets
SCTP for both IPv4 and IPv6
Installing Netperf
Download netperf.2.6.0.tar.gz
Follow following commands:
zcat netperf-2.6.0.tar.gz | tar
xf - cd netperf-2.6.0
sudo
./configure
sudo make
sudo make install
A Test Case using Netperf
We used the below commands to do testing using Netperf.
The following command helps you test the TCP REQUEST/RESPONSE traffic:
netperf -t TCP_RR -H 127.0.0.1 -v 2
The following command helps to test bulk TCP STREAM traffic
netperf -H localhost -- -m
64
Here –m indicates the packet size to be sent in bytes. There are many such flags which can
help us adjust the various network parameters.
The above command sends ‘m’ number of bytes to host ‘H’ for a default of 10 seconds and
gives you the throughput in Mbps. We observed that with increase in packet size, the
throughput goes on increasing in the absence of Intel DPDK for a physical machine.
Following is the script where we increased the packet size gradually from 64 bytes to 1015
bytes.
xxx@compute28:~$ netperf -H localhost -- -m 64
MIGRATED TCP STREAM TEST from 0.0.0.0 (0.0.0.0) port 0 AF_INET to localhost () port 0 AF_INET
Recv Send Send
Socket Socket Message Elapsed
Size Size Size Time Throughput bytes bytes bytes secs. 10^6bits/sec 87380 16384 64 10.00 548.68
xxx@compute28:~$ netperf -H localhost -- -m 128
MIGRATED TCP STREAM TEST from 0.0.0.0 (0.0.0.0) port 0 AF_INET to localhost () port 0 AF_INET Recv Send Send
Socket Socket Message Elapsed
Size Size Size Time Throughput bytes bytes bytes secs. 10^6bits/sec
87380 16384 128 10.00 1102.82
xxx@compute28:~$ netperf -H localhost -- -m 200
MIGRATED TCP STREAM TEST from 0.0.0.0 (0.0.0.0) port 0 AF_INET to localhost () port 0 AF_INET Recv Send Send
Socket Socket Message Elapsed
Size Size Size Time Throughput bytes bytes bytes secs. 10^6bits/sec
87380 16384 200 10.00 2440.54 xxx@compute28:~$ netperf -H localhost -- -m 256
MIGRATED TCP STREAM TEST from 0.0.0.0 (0.0.0.0) port 0 AF_INET to localhost () port 0 AF_INET Recv Send Send
Socket Socket Message Elapsed
Size Size Size Time Throughput bytes bytes bytes secs. 10^6bits/sec
87380 16384 256 10.00 2928.90 xxx@compute28:~$ netperf -H localhost -- -m 312
MIGRATED TCP STREAM TEST from 0.0.0.0 (0.0.0.0) port 0 AF_INET to localhost () port 0 AF_INET Recv Send Send
Socket Socket Message Elapsed
Size Size Size Time Throughput bytes bytes bytes secs. 10^6bits/sec
87380 16384 312 10.00 3569.43
xxx@compute28:~$ netperf -H localhost -- -m 384
MIGRATED TCP STREAM TEST from 0.0.0.0 (0.0.0.0) port 0 AF_INET to localhost () port 0 AF_INET Recv Send Send
Socket Socket Message Elapsed
Size Size Size Time Throughput bytes bytes bytes secs. 10^6bits/sec
87380 16384 384 10.00 4492.13
xxx@compute28:~$ netperf -H localhost -- -m 450
MIGRATED TCP STREAM TEST from 0.0.0.0 (0.0.0.0) port 0 AF_INET to localhost () port 0 AF_INET
Recv Send Send
Socket Socket Message Elapsed
Size Size Size Time Throughput bytes bytes bytes secs. 10^6bits/sec
87380 16384 450 10.00 4880.20
xxx@compute28:~$ netperf -H localhost -- -m 512
MIGRATED TCP STREAM TEST from 0.0.0.0 (0.0.0.0) port 0 AF_INET to localhost () port 0 AF_INET
Recv Send Send
Socket Socket Message Elapsed
Size Size Size Time Throughput bytes bytes bytes secs. 10^6bits/sec
87380 16384 512 10.00 5702.63
xxx@compute28:~$ netperf -H localhost -- -m 680
MIGRATED TCP STREAM TEST from 0.0.0.0 (0.0.0.0) port 0 AF_INET to localhost () port 0 AF_INET Recv Send Send
Size Size Size Time Throughput bytes bytes bytes secs. 10^6bits/sec
87380 16384 680 10.00 6888.47 xxx@compute28:~$ netperf -H localhost -- -m 800
MIGRATED TCP STREAM TEST from 0.0.0.0 (0.0.0.0) port 0 AF_INET to localhost () port 0 AF_INET Recv Send Send
Socket Socket Message Elapsed
Size Size Size Time Throughput bytes bytes bytes secs. 10^6bits/sec
87380 16384 800 10.00 7411.55
xxx@compute28:~$ netperf -H localhost -- -m 900
MIGRATED TCP STREAM TEST from 0.0.0.0 (0.0.0.0) port 0 AF_INET to localhost () port 0 AF_INET
Recv Send Send
Socket Socket Message Elapsed
Size Size Size Time Throughput bytes bytes bytes secs. 10^6bits/sec
87380 16384 900 10.00 8210.16
xxx@compute28:~$ netperf -H localhost -- -m 1024
MIGRATED TCP STREAM TEST from 0.0.0.0 (0.0.0.0) port 0 AF_INET to localhost () port 0 AF_INET Recv Send Send
Socket Socket Message Elapsed
Size Size Size Time Throughput bytes bytes bytes secs. 10^6bits/sec
87380 16384 1024 10.00 8747.67
xxx@compute28:~$ netperf -H localhost -- -m 2048
MIGRATED TCP STREAM TEST from 0.0.0.0 (0.0.0.0) port 0 AF_INET to localhost () port 0 AF_INET
Recv Send Send
Socket Socket Message Elapsed
Size Size Size Time Throughput bytes bytes bytes secs. 10^6bits/sec 87380 16384 2048 10.00 15380.98
SOURCE CODE CHANGES IN L2/L3FWDER
We used a simple layer-3 forwarder for testing. The forwarding function in the L3 fwder uses
a hash map for the flow classification stage. Hashing is used in combination with a flow table
to map each input packet to its flow at runtime. The hash lookup key is represented by a
5-tuple- the source IP, destination IP, source port, destination port and the protocol. The ID of
the output interface for the input packet is read from the identified flow table entry. The set of
flows used by the application is statically configured and loaded into the hash at initialization
time.
To get the l3 fwder working we need to hard-code MAC Address of compute28. We make
changes accordingly in the l3fwd main.c file:
RESULTS AND GRAPHS
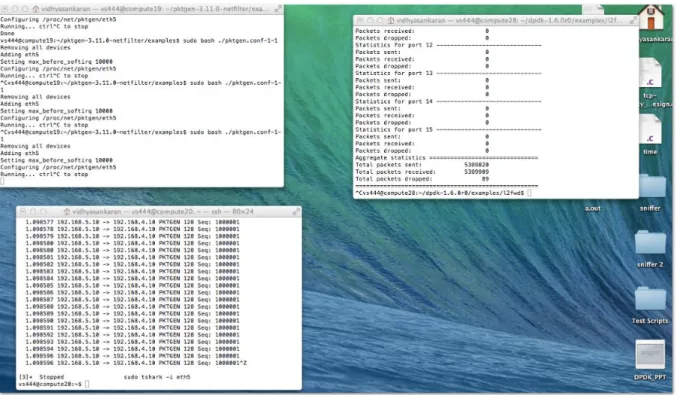
Figure 3- shows the screenshots taken during testing in Physical machines.It shows the pktgen and the L3fwder forwarding packets to the end machine with tshark capture.
Figure-3
Figure -4 shows the Intel DPDK throughput on Physical machines. We also performed the same set of tests with Intel 10 Gigabit XF LR server adapter in order to achieve better packet performance matching industry standards and Figure-5 shows the results for the same.
Figure-4
0 1 2 3 4 5 6 7 8 0 100 200 300 400 500 600 700 800 900 Th ro u gh p u t ( M p p s)Packet Size (Bytes)
Figure-5
VIRTUAL MACHINE
We started the VM setup with QEMU but had trouble with slowness. So we installed Virtual box in command line mode in compute28 and used RDesktop to install the DPDK driver and run the tests. The below section shows the installation procedure with both QEMU and Virtual BOX.
INSTALLATION OF DPDK OVSWITCH-
Software packages and versions
Host and Guest OS: Ubuntu 12.04 DPDK: 1.6.0r0
DPDK-OVS: Release 0.10.0 of Intel (r) DPDK vSwitch
Compilation of DPDK and DPDK-OVS DPDK compilation:
Update mk/target/generic/rte.vars.mk: +CFLAGS += $(TARGET_CFLAGS) -fPIC make install T=x86_64-*-linuxapp-gcc
DPDK-OVS compilation: cd $(OVS_DIR)/openvswitch ./boot.sh ./configure RTE_SDK=$(DPDK_DIR) make Customized Qemu cd $(OVS_DIR)/qemu
./configure --enable-kvm --dpdkdir=$(DPDK_DIR) --target-list=x86_64-softmmu --disable-pie Make 0 2 4 6 8 10 12 14 16 18 0 100 200 300 400 500 600 700 800 900 Th ro u gh p u t (Mp p s)
Packet Size (Bytes)
Following commands on this and the next page will setup the VMs on compute28, direct the traffic and design the flow table. After this we will generate traffic using SoNIC and measure performance of DPDK for VMs.
Host Env Prerequisites
Bind igb_uio driver to target NICs modprobe uio
insmod
$(DPDK_DIR)/x86_64-ivshmem-linuxapp-gcc/kmod/igb_uio.ko //replace with the pci id shown in your system $(DPDK_DIR)/tools/igb_uio_bind.py --bind=igb_uio 0000:82:00.0 $(DPDK_DIR)/tools/igb_uio_bind.py --bind=igb_uio 0000:82:00.1 $(DPDK_DIR)//tools/igb_uio_bind.py --status modprobe cuse cd $(OVS_DIR) insmod ./openvswitch/datapath/dpdk/fd_link/fd_link.ko rmmod vhost-net rm /dev/vhost-net Initial Switch Setup pkill -9 ovs rm -rf /usr/local/var/run/openvswitch/ rm -rf /usr/local/etc/openvswitch/ mkdir -p /usr/local/var/run/openvswitch/ mkdir -p /usr/local/etc/openvswitch/ rm -f /tmp/conf.db cd $(OVS_DIR)/openvswitch/ovsdb export OPENVSWITCH_DIR=$(OVS_DIR)/openvswitch ./ovsdb-tool create /usr/local/etc/openvswitch/conf.db $OPENVSWITCH_DIR/vswitchd/vswitch.ovssch ema ./ovsdb-server --remote=punix:/usr/local/var/run/openvswitch/db.sock -- remote=db:Open_vSwitch,Open_vSwitch,manager_options & cd $(OVS_DIR)/openvswitch/utilities
./ovs-vsctl --no-wait add-br br0 -- set Bridge br0 datapath_type=dpdk
./ovs-vsctl --no-wait add-port br0 ovsphy16 -- set Interface ovsphy16 type=dpdkphy ofport_request=16 option:port=1
./ovs-vsctl --no-wait add-port br0 ovsphy17 -- set Interface ovsphy17 type=dpdkphy ofport_request=17 option:port=2
./ovs-vsctl --no-wait add-port br0 ovsvhost80 -- set Interface ovsvhost80 type=dpdkvhost ofport_request=80
./ovs-vsctl --no-wait add-port br0 ovsvhost81 -- set Interface ovsvhost81 type=dpdkvhost ofport_request=81
./ovs-vsctl --no-wait add-port br0 ovsvhost82 -- set Interface ovsvhost82 type=dpdkvhost ofport_request=82
./ovs-vsctl --no-wait add-port br0 ovsvhost83 -- set Interface ovsvhost83 type=dpdkvhost ofport_request=83
Start ovs_dpdk & ovs-vswitchd:
$(OVS_DIR)/openvswitch/datapath/dpdk/build/ovs_dpdk -c 0x0F -n 4 --proc-type primary --socket-mem 2048,2048 -- -p 0x03 -n 2 -h 4 --stats=600 --vswitchd=0 --client_switching_core=1 --
config="(0,0,2),(1,0,3)"
$(OVS_DIR)/openvswitch/vswitchd/ovs-vswitchd -c 0x100 proc-type=secondary --pidfile=/tmp/vswitchd.pid
Flow Table Setup
$(OVS_DIR)/openvswitch/utilities/ovs-ofctl del-flows br0 $(OVS_DIR)/openvswitch/utilities/ovs-ofctl add-flow br0 in_port=16,dl_type=0x0800,nw_src=1.1.1.1,nw_dst=3.3.3.2,idle_timeout=0,action=outpu t:80 $(OVS_DIR)/openvswitch/utilities/ovs-ofctl add-flow br0 in_port=81,dl_type=0x0800,nw_src=1.1.1.1,nw_dst=3.3.3.2,idle_timeout=0,action=outpu t:82 $(OVS_DIR)/openvswitch/utilities/ovs-ofctl add-flow br0 in_port=84,dl_type=0x0800,nw_src=1.1.1.1,nw_dst=3.3.3.2,idle_timeout=0,action=outpu t:17 Guest Setup rm -rf /tmp/qemu_share mkdir -p /tmp/qemu_share chmod 777 /tmp/qemu_share mkdir -p /tmp/qemu_share/DPDK mkdir -p /tmp/qemu_share/ovs_client
cp -aL $(DPDK_DIR)/* /tmp/qemu_share/DPDK cp -aL $(OVS_DIR)/guest/ovs_client/*
/tmp/qemu_share/ovs_client mkdir -p /tmp/qemu_share/kni_client
cp -aL $(OVS_DIR)/guest/kni/* /tmp/qemu_share/kni_client
qemu start
This will start the VMs on compute28 export
QEMU_DIR=$(OVS_DIR)/qemu
$QEMU_DIR/x86_64-softmmu/qemu-system-x86_64 -c 0x30 --proc-type secondary -n 4 -- -cpu host boot c hda <PATH_TO_IMAGE>/ubuntu_12_04.img snapshot m 8192 smp 2 enablekvm -name "client 1" -nographic -serial stdio -vnc :1 -monitor unix:/tmp/vm1monitor,server,nowait -net none -no-reboot -mem-path /mnt/huge -mem-prealloc -netdev
type=tap,id=net1,script=no,downscript=no,ifname=ovsvhost80,vhost=on -device
virtio-net-pci,netdev=net1,mac=00:00:00:00:00:01,csum=off,gso=off,guest_tso4=off,guest_tso6=off,guest_ecn =off \ -netdev type=tap,id=net2,script=no,downscript=no,ifname=ovsvhost81,vhost=on -device
virtio-net-pci,netdev=net2,mac=00:00:00:00:00:02,csum=off,gso=off,guest_tso4=off,guest_tso6=off,guest_ecn =off -drive file=fat:rw:/tmp/qemu_share,snapshot=off
export QEMU_DIR=$(OVS_DIR)/qemu
$QEMU_DIR/x86_64-softmmu/qemu-system-x86_64 -c 0x30 --proc-type secondary -n 4 -- -cpu host - boot c -hda <PATH_TO_IMAGE>/ubuntu_12_04.img -snapshot -m 8192 -smp 2 --enable-kvm -name "client 2" -nographic -serial stdio -vnc :2 -monitor unix:/tmp/vm2monitor,server,nowait -net none -no-reboot -mem-path /mnt/huge -mem-prealloc -netdev
virtio-net-pci,netdev=net3,mac=00:00:00:00:00:03,csum=off,gso=off,guest_tso4=off,guest_tso6=off,guest_ecn =off \ -netdev type=tap,id=net4,script=no,downscript=no,ifname=ovsvhost83,vhost=on -device virtio-
net-pci,netdev=net4,mac=00:00:00:00:00:04,csum=off,gso=off,guest_tso4=off,guest_tso6=off,guest_ecn =off -drive file=fat:rw:/tmp/qemu_share,snapshot=off
Config on both guests
mkdir -p
/mnt/vhost_client
mount -o iocharset=utf8 /dev/sdb1
/mnt/vhost_client mkdir -p /root/vhost_client cp -aL /mnt/vhost_client/* /root/vhost_client cd /root/vhost_client/DPDK export CC=gcc export RTE_SDK=/root/vhost_client/DPDK export RTE_TARGET=x86_64-ivshmem-linuxapp-gcc make install T=x86_64-ivshmem-linuxapp-RTE_TARGET=x86_64-ivshmem-linuxapp-gcc modprobe uio
insmod x86_64-ivshmem-linuxapp-gcc/kmod/igb_uio.ko ./tools/igb_uio_bind.py -b igb_uio 0000:00:03.0
./tools/igb_uio_bind.py -b igb_uio 0000:00:04.0 ./tools/igb_uio_bind.py --status
Run testpmd on guests
cd /root/vhost_client/DPDK/app/test-pmd make clean
make
./testpmd -c 0x3 -n 4 --socket-mem 128 -- --burst=64 -i
Under testpmd prompt, issue the following commands: set fwd mac_retry
start
DECIDING TO WORK WITH VirtualBox INSTEAD OF QEMU :
Working and Installations with QEMU
1) We first tried installation of QEMU using the following commands: sudo apt-get install qemu-system-x86 qemu-utils
mkdir coreos; cd coreos
wget http://stable.release.core-os.net/amd64-usr/current/coreos_production_qemu.sh
wget http://stable.release.core-os.net/amd64-usr/current/coreos_production_qemu_image.img.bz2 -O - | bzcat > ubuntu_12.04.img
chmod +x coreos_production_qemu.sh Starting is as simple as:
./coreos_production_qemu.sh -nographic Or, with SSH Keys,
./coreos_production_qemu.sh -a ~/.ssh/authorized_keys -- -nographic Once the virtual machine has started you can log in via SSH:
ssh -l core -p 7780 localhost
We specified different port numbers for two VMs. Opened a VM on port 7780 and other on 7781. We did get the two virtual machines up and running. But it was not possible to install and conduct DPDK tests on these VMs due to the following reasons:
1) Extremely slow speed of QEMU VMs in spite of allocating enough memory.
2) Inability to install Intel DPDK on the VM raw image due to compatibility issues. Further, we also could not run 64 versions of Ubuntu on QEMU.
Hence, we tried installing VMs using Oracle Virtual box.
Working and Installations with VirtualBox
1) We installed two Ubuntu 14.04 Virtual Machines on Oracle VirtualBox. 2) Installed Pktgen 3.11.0 on the first machine (VM1).
3) Intel DPDK was installed and two virtual ports of VM2 were bounded to DPDK(VM2). 4) Ran Intel DPDK l2fwd/l3fwd on VM2
5) We transfered packets of different packet sizes starting from 64 bytes from VM1 to VM2.
6) We noted in the second VM, the number of packets when the l2fwd first started dropping packets. This denotes the maximum number of packets the ports could handle without dropping packets.
Following were some of the commands involved in the installation of VirtualBox, followed by the two VMs.
1) Install Oracle VirtualBox 4.3 using the following command:
sudo sh -c "echo 'deb http://download.virtualbox.org/virtualbox/debian '$(lsb_release -cs)' contrib non-free' > /etc/apt/sources.list.d/virtualbox.list" && wget -q http://download.virtualbox.org/virtualbox/debian/oracle_vbox.asc -O- | sudo apt-key add - && sudo apt-get update && sudo apt-get install virtualbox-4.3 dkms
2) Install VirtualBox Extension Pack. To download and install VirtualBox Extension Pack:
wget http://download.virtualbox.org/virtualbox/4.2.12/Oracle_VM_VirtualBox_Extension_Pack-4.2.12-84980.vbox-extpack
sudo VBoxManage extpack install ./Oracle_VM_VirtualBox_Extension_Pack-4.2.12-84980.vbox-extpack
3) Verify that the Extension Pack is successfully installed, by using the following command.
$ VBoxManage list extpacks Extension Packs: 1
Pack no. 0: Oracle VM VirtualBox Extension Pack Version: 4.2.12
Revision: 84980 Edition:
Description: USB 2.0 Host Controller, VirtualBox RDP, PXE ROM with E1000 support. VRDE Module: VBoxVRDP
Usable: true
4) Create a VirtualBox VM from the command line
First create a VM. We named the VM as "testvm". VBoxManage createvm --name "testvm" --register
5) Specify the hardware configurations of the VM (e.g., Ubuntu OS type, 1024MB memory, bridged networking, DVD booting).
VBoxManage modifyvm "testvm" memory 1024 acpi on boot1 dvd nic1 bridged --bridgeadapter1 eth0 --ostype Ubuntu
6) Create a disk image (with size of 10000 MB).
VBoxManage createvdi --filename ~/VirtualBox\ VMs/testvm/testvm-disk01.vdi --size 10000
7) Add an IDE controller to the VM.
VBoxManage storagectl "testvm" --name "IDE Controller" --add ide
8) Attach the previously created disk image as well as CD/DVD drive to the IDE controller. Ubuntu installation ISO image (found in /iso/ubuntu-12.04.1-server-i386.iso) is then inserted to the CD/DVD drive.
VBoxManage storageattach "testvm" storagectl "IDE Controller" port 0 device 0 type hdd --medium ~/VirtualBox\ VMs/testvm/testvm-disk01.vdi
VBoxManage storageattach "testvm" --storagectl "IDE Controller" --port 1 --device 0 --type dvddrive --medium /iso/ubuntu-12.04.1-server-i386.iso
We installed the Ubuntu 14.04 image instead of the one mentioned in this example. 9) Start VirtualBox VM from the command line
VBoxHeadless --startvm "testvm" &
The above command will launch the VM, as well as VRDE remote desktop server. The remote desktop server is needed to access the headless VM's console.It should get started as shown below-
By default, the VRDE server is listening on TCP port 3389.
Once a VM is launched with remote desktop support, we can access the VM's console via any remote desktop client (e.g., rdesktop).
10) To install rdesktop on Ubuntu we used:
$ sudo apt-get install rdesktop
If you use a custom port number for a remote desktop server, run the following instead. $ rdesktop -a 16 128.84.139.24:3389
Once rdesktop is successfully connected to the VM via remote desktop, you will see the initial installation screen.
PERFORMANCE ANALYSIS GRAPHS ON VMS
Figure-6
MASTER COMPARISON GRAPH
The graph below shows the difference in performance of Intel DPDK between VMs and Physical machine:
Figure-7
0 0.2 0.4 0.6 0.8 1 1.2 1.4 1.6 1.8 0 100 200 300 400 500 600 700 800 900 Th ro u gh p u t (Mp p s)Packet Size (bytes)
PERFORMANCE ANALYSIS
Reasons for good performance on Physical machines-
Some of the reasons for the good performance of Intel DPDK on physical machines are-
1) It puts/gets data directly to/from DMA to avoid data copies.
2) Works in poll mode. The hardware do not need to generate interrupt for packet reception. Interrupt also cause context switch.
3) Provides faster inter process communication facility built upon shared memory and user space locking.
4) Uses big pages to hold the packet data to avoid the minor page faults.
Reasons for bad performance on VMs-
Inter VM communication will still require additional copy of data between the VMs. Overheads caused by inter-core communication and context switching.
Improvements suggested-
Can use a shared memory framework that provides zero copy delivery to VMs and between VMs.
Support for high-speed inter-VM communication through shared huge pages
CHALLENGES FACED AND RECOMMENDATIONS TO FUTURE TEAMS
1. Installation compatibility issues of Intel DPDK due to lack of a stable release:
Intel DPDK is still under development towards perfection, which is evident from its unstable latest releases.
We chose to use DPDK 1.6.0r0 as it was most compatible with the fractus machine.
This was after trying installations of DPDK 1.7.1 which was incompatible with the fractus machine. Intel DPDK is expected to be stable and compatible with as many platforms as possible by DPDK version 10.
Moreover, one has to rebuild Intel DPDK every time he re-accesses the machine, which consumed a lot of time.
2. Unavailable dependencies:
The fractus instance is Ubuntu 12.04, for which a lot of dependencies of OpenVSwitch and DPDK vSwitch, QEMU are unavailable, which are only available in Ubuntu 14.04.
We recommend working with Ubuntu 14.04 while working with DPDK vSwitch.
3. Requiring application of numerous patches for installations of OpenVSwitch and QEMU:
After installtion of Intel DPDK "default linuxapp" target successfully, installation of "ivshmem linuxapp" again faced issues and required few patches before it could be sucessfully installed.
Patches were also required for installing OpenVSwitch and QEMU. We had to edit a lot of C files to get the installations working.
Lack of a comprehensive guide or a proper mailing list for these patches can make the installation part slightly difficult.
4. Low speed/performance of QEMU Virtual Machines:
After all the installation is done, one might face problems with the speed and performance of QEMU Virtual Machines.
We recommend working with Virtual Box or VMWare when networking between virtual machines, which offer better control over the VMs
REFERENCES
1. Installing Netperf :
www.netperf.org/svn/netperf2/tags/netperf2.6.0/doc/netperf.html#Installing-Netperf
2. Intel DPDK vSwitch installation guide: http://jipanyang.wordpress.com/tag/dpdk/ 3. OpenVSwtich guidelines:
https://01.org/sites/default/files/page/intel_dpdk_vswitch_performance_figures_0.10.0_0. pdf 4. Step-By-Step Guide to Installation of Intel DPDK and L2Fwd:
http://www.slideshare.net/hisaki/intel-dpdk-step-by-step-instructions
5. Intel DPDK FAQ: http://dpdk.org/doc/intel/dpdk-release-notes-1.7.0.pdf 6. Intel DPDK Sample Applications User Guide:
http://www.intel.com/content/dam/www/public/us/en/documents/guides/intel-dpdk-sample-applications-user-guide.pdf
7. Release 3.11.0 PktGen: https://github.com/danieltt/pktgen/releases
8. CoreOS/QEMU Guidelines: https://coreos.com/docs/running-coreos/platforms/qemu/ 9. VirtualBox Installation on Ubuntu:
https://help.ubuntu.com/community/VirtualBox/Installation
11. Creation of VM in VirtualBox without GUI:
http://xmodulo.com/how-to-create-and-start-virtualbox-vm-without-gui.html