HP Service Manager
Software Version: 9.40
For the supported Windows® and Linux® operating systems
Server security help topics for printing
Document Release Date: December 2014 Software Release Date: December 2014
Legal Notices
Warranty
The only warranties for HP products and services are set forth in the express warranty statements accompanying such products and services. Nothing herein should be construed as constituting an additional warranty. HP shall not be liable for technical or editorial errors or omissions contained herein.
The information contained herein is subject to change without notice.
Restricted Rights Legend
Confidential computer software. Valid license from HP required for possession, use or copying. Consistent with FAR 12.211 and 12.212, Commercial Computer Software, Computer Software Documentation, and Technical Data for Commercial Items are licensed to the U.S. Government under vendor's standard commercial license.
Copyright Notice
© 1994-2014 Hewlett-Packard Development Company, L.P.
Trademark Notices
Adobe® is a trademark of Adobe Systems Incorporated.
Microsoft® and Windows® are U.S. registered trademarks of Microsoft Corporation. Oracle and Java are registered trademarks of Oracle and/or its affiliates. UNIX® is a registered trademark of The Open Group.
Linux® is the registered trademark of Linus Torvalds in the U.S. and other countries.
For a complete list of open source and third party acknowledgements, visit the HP Software Support Online web site and search for the product manual called HP Service Manager Open Source and Third Party License Agreements.
Documentation Updates
The title page of this document contains the following identifying information: l Software Version number, which indicates the software version. l Document Release Date, which changes each time the document is updated.
l Software Release Date, which indicates the release date of this version of the software.
To check for recent updates or to verify that you are using the most recent edition of a document, go to: https://softwaresupport.hp.com
This site requires that you register for an HP Passport and sign in. To register for an HP Passport ID, go to: http://h20229.www2.hp.com/passport-registration.html
Or click the New users - please register link on the HP Passport login page.
You will also receive updated or new editions if you subscribe to the appropriate product support service. Contact your HP sales representative for details.
Support
Visit the HP Software Support Online website at: https://softwaresupport.hp.com
This website provides contact information and details about the products, services, and support that HP Software offers.
HP Software online support provides customer self-solve capabilities. It provides a fast and efficient way to access interactive technical support tools needed to manage your business. As a valued support customer, you can benefit by using the support website to:
l Search for knowledge documents of interest
l Submit and track support cases and enhancement requests l Download software patches
l Manage support contracts l Look up HP support contacts
l Review information about available services l Enter into discussions with other software customers l Research and register for software training
Most of the support areas require that you register as an HP Passport user and sign in. Many also require a support contract. To register for an HP Passport ID, go to: http://h20229.www2.hp.com/passport-registration.html
To find more information about access levels, go to: http://h20230.www2.hp.com/new_access_levels.jsp
HP Software Solutions Now accesses the HPSW Solution and Integration Portal website. This site enables you to explore HP Product Solutions to meet your business needs, includes a full list of Integrations between HP Products, as well as a listing of ITIL Processes. The URL for this website is http://h20230.www2.hp.com/sc/solutions/index.jsp
About this PDF Version of Online Help
This document is a PDF version of the online help. This PDF file is provided so you can easily print multiple topics from the help information or read the online help in PDF format. Because this content was originally created to be viewed as online help in a web browser, some topics may not be formatted properly. Some interactive topics may not be present in this PDF version. Those topics can be successfully printed from within the online help.
Contents
System Security
7
Encryption of configuration file settings
9
Encrypt values in the Service Manager configuration file 9
Encryption of operator passwords
11
Encryption of client keystore passwords
12
Inactivity timer
15
Respond to the inactivity warning message 17
Lockout feature
19
Enable the user lockout feature 19
Lock out a user 20
Reset a locked out user 20
View a user’s lockout history 21
System quiesce: Login restrictions
22
Enable logging of user access 24
Enable login restrictions 24
Disable login restrictions 24
Enable tracking of operator times 25
Mandanten file security
26
Add a restricting query to a security group 27
Create a security group 28
Define the Mandant field for a security group 29
Enable Mandanten security on a file 30
Multicompany mode
32
Script utilities
33
Security tables
34
Secure Sockets Layer (SSL) encryption and server certificates
35
Secure Sockets Layer (SSL) configuration options 36
Requirements for optional SSL encryption 37
Example: Viewing the contents of a cacerts file 38
Enable SSL encryption for web clients 39
Enable SSL encryption for Windows clients 40
Update the cacerts keystore file 41
Requirements for required SSL encryption 41
Example: Enabling required SSL encryption 43
Example: Generating a server certificate with OpenSSL 44
Example: Viewing the contents of a cacerts file 48
Update the cacerts keystore file 49
Requirements for required SSL encryption and client authentication 49 Example: Enabling required SSL encryption and client authentication 52
Example: Generating a client certificate with OpenSSL 54
Example: Generating a server certificate with OpenSSL 57
Example: Viewing the contents of a cacerts file 60
Add a client certificate to the web tier 61
Add a client certificate to the Windows client 62
Update the cacerts keystore file 63
Use keytool to create a certificate request 63
Use keytool to create a private key 64
Requirements for required SSL encryption and trusted clients 65 Example: Enabling required SSL encryption and trusted clients 68
Example: Generating a client certificate with OpenSSL 71
Example: Generating a server certificate with OpenSSL 74
Example: Viewing the contents of a cacerts file 77
Add a client certificate to the web tier 78
Update the cacerts keystore file 79
Use keytool to create a certificate request 80
Use keytool to create a private key 80
Enable SSL encryption for external Web Services 81
Enable SSL encryption for published Web Services 83
What are PEM files? 84
Windows client error: No trusted certificate found 84
Trusted sign-on
86
Requirements for trusted sign-on 87
Example: Enabling trusted sign-on 88
Example: Generating a server certificate with OpenSSL 91
Example: Generating a client certificate with OpenSSL 95
Example: Configuring the web server for trusted sign-on 97
Example: Viewing the contents of a cacerts file 99
Update the cacerts keystore file 100
Use keytool to create a certificate request 101
Use keytool to create a private key 102
Common Access Card (CAC) sign-on
103
Requirements for CAC sign-on 107
Example: enabling CAC sign-on 109
FIPS mode
128
Configure FIPS mode in Service Manager 130
Server side 130
Client side 132
Tokenization
138
System Security
HP Service Manager includes a number of security options you can configure after installation. The following table lists the security options you can enable or configure from a new development environment installation.
Feature Description
Default state in new installations
"Encryption of configuration file settings" on page 9
A security option that protects values listed in the configuration file
Enabled
"Encryption of operator passwords" on page 11
A security option that protects the passwords listed in operator records
Enabled
"Lockout feature" on page 19
A security option that automatically disables a user account if the user fails to provide the correct password after a specified number of attempts
Disabled
"Mandanten file security" on page 26
A security option that filters the data that operators can see when they query specific files
Disabled
"Multicompany mode" on page 32
A security option that filters the company information that service desk technicians see when creating service desk interactions and opening incidents
Disabled
"Requirements for optional SSL encryption" on page 37
An implementation option that provides SSL encryption with a sample server certificate. Each Service Manager client can choose to enable or disable the SSL encryption.
Disabled
"Requirements for required SSL encryption" on page 41
An implementation option that requires SSL encryptions for all connections
Disabled
"Requirements for required SSL
encryption and client authentication" on page 49
An implementation option that requires SSL encryptions for all connections and validates the client's certificates
Feature Description
Default state in new installations
"Requirements for required SSL encryption and trusted clients" on page 65
An implementation option that requires SSL encryptions for all connections and restricts connections to a list of trusted clients
Disabled
"Script utilities" on page 33
A security option that enables checksum calculation for Service Manager binaries and data security deletion.
Disabled
"Secure Sockets Layer (SSL) encryption and server certificates" on page 35
An implementation option to encrypt communications between your Service Manager server and clients
Disabled
"Trusted sign-on" on page 86
An implementation option that enables HP Service Manager clients to automatically log on using the same authentication information as users entered when they logged onto their client workstation's operating system.
Disabled
"Common Access Card (CAC) sign-on" on page 103
An implementation option that enables HP Service Manager clients to automatically log on using authentication
information from the user's personal certificate stored in the user's CAC card.
Disabled
FIPS mode A security option that requires data be encrypted using the FIPS-compliant AES encryption algorithm.
Disabled
"Tokenization " on page 138
A security option that enables tokenization in the web client to safeguard sensitive data.
Encryption of configuration file settings
You can encrypt values within the HP Service Manager configuration file (sm.ini) to protect passwords and authentication information. The encryption scheme is ideal for connection parameters such as RDBMS or LDAP user names and passwords. Using a command line utility you can convert any value to an AES256-256-CBC encrypted value. You can then copy the encrypted value into the configuration file and add an asterisk to the beginning of the parameter name. The asterisk is a required element that indicates to the server that the parameter value is encrypted.
For example, the unencrypted value:
sqllogin:rdbmsuser/mypassword
Becomes the following value when encrypted:
*sqllogin:D51CB23B379C873CBA055FB9A3798375AC93D48BB8AE2CC773D7317E4715EAE7
After you have encrypted a configuration file value there is no way to convert it back to clear text. The Service Manager server decrypts the value for administrative purposes, but it does not save or store the decrypted value.
Note: Only use the encryption scheme to encrypt server parameters in the Service Manager configuration file (sm.ini). Do not encrypt other values in other files as this may damage your system or cause data loss.
Encrypt values in the Service Manager configuration
file
Applies to User Roles:
System Administrator
You can use the sm -encrypt command to encrypt parameter values in the sm.ini file. You must have administrative access to the server operating system to use this procedure.
To encrypt values in the Service Manager configuration file: 1. Open the HP Service Manager configuration file (sm.ini).
3. Open the operating system's command prompt.
For example, on Windows click Start > Programs > Accessories > Command Prompt. 4. Change directories to the RUN folder of your Service Manager installation.
For example:
cd C:\Program Files\HP\ Service Manager\Server\RUN
5. Type the following command:
sm -encrypt:<parameter name>:<parameter value>
If the string containing the <parameter name>:<parameter value> includes spaces, you must enclose the entire parameter name and value in quotation marks. For example:
sm -encrypt:"sqllogin:RDBMS user/my password"
Tip: The sqllogin credentials are automatically encrypted and added to the sm.ini file if you configure the credentials by running the Server Configuration Utility instead of running this command.
6. Press Enter.
Service Manager displays the new encrypted value. For example:
sqllogin:"RDBMS user/my password" is encrypted:
99E6136711576164187C6619C6DBA9DFFC89F7EDF186BC5827E3615BE8419CD4
7. Copy the new encrypted value.
8. Return to the Service Manager configuration file and add an asterisk to the beginning of the parameter name.
For example:
*sqllogin:
9. Replace the clear-text value with the encrypted value. For example:
*sqllogin:99E6136711576164187C6619C6DBA9DFFC89F7EDF186BC5827E3615BE8419CD4
Encryption of operator passwords
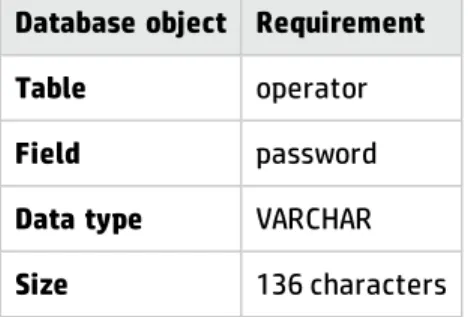
The HP Service Manager server encrypts all operator passwords stored on the database using a SHA512 one-way encryption process that cannot be decrypted. The server automatically encrypts existing passwords on your system the first time they are accessed. You can also do a mass update of the operator table to convert all passwords at once.
You need to update the SQL mapping for the password field to accept a larger character limit. The data policy settings are as follows.
Database object Requirement
Table operator
Field password
Data type VARCHAR
Size 136 characters
Automatic operator password encryption replaces the legacy data policy encryption option that was controlled by the encryptionkey parameter. To convert to the automatic operator password encryption scheme in legacy systems, you must first turn off the existing data policy encryption. The server updates the password encryption the next time it reads the operator record.
Service Manager clients use a two-way encryption process (PBE with MD5, DES in non-FIPS mode, and AES in FIPS mode) to secure operator passwords when communicating with the server. The server decrypts the password sent from the client and then one-way encrypts it to compare the results to the encrypted value stored in the database. The server never stores the operator password in an
unencrypted form.
If your Service Manager implementation uses LDAP authentication, the server must still send an unencrypted operator password to the directory service because LDAP servers are unaware of Service Manager's encryption scheme. If you require encryption between Service Manager and the LDAP server, you can configure OpenSSL or another standard encryption scheme between the two servers.
Encryption of client keystore passwords
Service Manager supports encryption of keystore passwords in the Windows and web clients.
Windows client
The Windows client keystore password that you enter in Window > Preferences > HP Service Manager >
Security is automatically encrypted and stored in the following file: <Your user workspace dir
>\ServiceManager\workspace\.metadata\.plugins\org.eclipse.core.runtime\.settingssettings\com.hp.ov .sm.client.eclipse.base.prefs
Known issue
If you have installed one or multiple instances of the Windows client earlier than version 9.34.p2 on the same host, after you install the SM 9.40 Windows client on the same host and put all the instances into alternate use, you may have problems with the Use SSL Encryption option or the Use Trusted Sign-on
connection option. Therefore, we strongly recommend you to uninstall all other Windows client
instances before you install the Service Manager9.40 Windows client. If you still have problems with the
Use SSL Encryption option or the Use Trusted Sign-on connection option after you upgrade your Windows client (for example, you may roll back to an earlier version and then upgrade Service Manager to version 9.40), you need to update the com.hp.ov.sm.client.eclipse.base.prefs file. To do so, follow these steps:
1. Open the following preference file with a text editior: <your home folder
>\ServiceManager\workspace\.metadata\.plugins\org.eclipse.core.runtime\.settingssettings\com. hp.ov.sm.client.eclipse.base.prefs
For example, your home folder can be C:\Users\<your username>.
2. Modify the value of the safePassword parameter from true to false, or delete this parameter. 3. Save and close the file.
5. Navigate to Window > Preferences > HP Service Manager > Security, and re-enter the client keystore password.
Web client
The keystorePassword parameter has been removed from the web tier configuration file (web.xml) since version 9.34p2, and you must enter your web client keystore password in a webtier.properties file that is located in the following folder:
<Customize-Folder>/config/webtier.properties (where, <Customize-Folder> is the folder specified in the
customize-folder parameter in the web.xml file.)
Tip: You can use the <Webtier>/WEB-INF/webtier.properties file as a template for your < Customize-Folder>/config/webtier.properties file.
When the web application server is started, Service Manager changes this value to an encrypted string. The following steps describe how you set a new or update an existing web client keystore password. To set a web client keystore password using the <Customize-Folder>, follow these steps:
1. Make sure the customize-folder parameter is configured in the web tier configuration file (web.xml).
2. Create a webtier.properties file in the <Customize-Folder>/config directory.
Note: Make sure the web application server has read/write access to this directory.
3. Open the file in a text editor, and add the following line to the file:
keystorePassword=< your keystore password in clear text format> 4. Save and close the file.
5. Restart the web application server.
The password you entered is now encrypted. In the meantime, Service Manager adds the following line to the webtier.properties file:
safePassword=true
To update an existing keystore password of the web client, follow these steps:
Server security help topics for printing Encryption of client keystore passwords
1. Stop the web application server.
2. Open the webtier.properties file with a text editior.
3. Modify the value of the safePassword parameter from true to false, or delete this parameter. 4. Modify the value of the keystorePassword parameter to a new password.
5. Save and close the file.
Inactivity timer
The inactivity timer functionality closes user sessions that have been idle for a specified period of time. To use the inactivity timer, system administrators must configure required settings and start the inactivity timer.
Note: You need the SysAdmin capability word to configure and start/stop the inactivity timer.
Configure inactivity timer settings
Administrators can configure required settings at a system level and if needed, also an operator level, as described in the following table.
Note: In a horizontal/vertical scaling environment, you need to configure the inactivity timer settings only once (that is, only on any one of your server nodes).
Configuration
Level Settings Notes
Operator Level
l Warning Time
l Allowed Inactive Time
l To configure the settings, click the Security tab in an
operator record.
l Operator level settings take precedence over system
level settings; if an operator record has empty inactivity timer settings, the system level settings are used for the operator.
l An allowed inactive time of zero (0) means inactivity
session timeout will never happen to the operator. l A zero or empty warning time means no warning
Configuration
Level Settings Notes
System Level l Number of minutes to allow idle user
("allowed inactive time" )
l Warn user within <x> minutes of termination
("warning time" ) l DO NOT
terminate these users ("exception list")
Click System Administration > Ongoing Maintenance >
System > Start Inactive Timer > Start Inact.
The following table is an explanation of the settings described above.
Setting Description
Allowed inactive time
This is a time limit that users can remain inactive until the inactivity timer closes their user session.
Warning time
This is an amount of time between the appearance of a warning message and the termination of the session.
Caution: The warning time should be no greater than the allowed inactive time. Exception
list
This is a list of operators that the inactivity timer ignores. This list should include all operators that should not be logged out regardless of the type of license (Named or Floating license).
When the inactivity timer settings take effect
Operator level settings take effect the next time the user logs in, while system level settings take effect for all new user sessions.
Note: Internet Explorer on a Windows Server operating system that does not support audio cannot display the warning messages. The messages are blocked together with the notification sound.
Start the inactivity timer
Note: Starting with SM9.32, the inactive.startup background process has been obsoleted. You no longer need to start this process in order for the inactivity timer functionality to work.
To enable the inactivity timer functionality for users, start the inactivity timer as follows: 1. Click System Administration > Ongoing Maintenance > System > Start Inactivity Timer.
The inactive.setup.g form opens.
2. Type or select the inactivity timer record information. See "Configure inactivity timer settings" on page 15.
3. Click Start Inact.
If you want to disable the inactivity timer functionality for all users, you can stop it as follows. 1. Click System Administration > Ongoing Maintenance > System > Start Inactivity Timer.
The inactive.setup.g form opens. 2. Click Stop Inact.
The Start Inact button is displayed.
After modifying your system level inactivity timer settings, you need to restart the inactivity timer as follows.
1. Click System Administration > Ongoing Maintenance > System > Start Inactivity Timer. The inactive.setup.g form opens.
2. Modify the settings as needed.
3. Click Save. Service Manager displays the message: The inactive process has been set up to look for users idle after <n> minutes.
Respond to the inactivity warning message
Applies to User Roles:
Server security help topics for printing Inactivity timer
All users
You may receive an inactivity warning message depending on the inactivity timer settings your administrator has configured. When this happens, you can respond as needed to either time out or extend your session.
The following table describes your actions in the Windows/web client and the corresponding inactivity timer behavior.
Client Warning Message Action
Web A warning message displays in a pop-up window.
Click OK: Your session extends and the inactivity timer restarts counting.
Click Cancel, press ESC, or make no response: The inactivity timer continues the counting and terminates your session in the end.
Windows A warning message displays in the toolbar.
Perform any operation: Your session extends and the inactivity timer restarts counting.
Make no response: The inactivity timer continues the counting and terminates your session in the end.
Lockout feature
The lockout feature automatically disables a user account if the user fails to provide the correct password after a specified number of attempts. Your user profile must include the system administration capability word to use this feature.
Enable the user lockout feature
Applies to User Roles:
System Administrator
The user lockout feature automatically disables a user account if the user fails to provide the correct password after a specified number of attempts.
Note: Enabling the user lockout feature is the only way to restrict access from the Windows client. The
Attempts Per Login Session settings does not affect Windows clients because the Windows client creates a new session for each login attempt.
To enable the user lockout feature:
1. Click System Administration > Base System Configuration > Miscellaneous > System Information Record.
2. Click the Logon Info tab.
3. In the Use User Lockout section, select Use User Lockout.
4. In the Attempts Until Lockout field, type the number of login attempts the user has until HP Service Manager locks out the account.
5. Select one of the following options:
n Complete Lockout — select this option to deny the user access to Service Manager until a
system administrator resets the lockout.
n Lock Out Time Period — select this option to deny the user access to Service Manager for a
specified period of time.
Type the time period in the following format: Dayshours:minutes:seconds. For example, 4 03:02:01 locks out the user for 4 days, 3 hours, 2 minutes, and 1 second.
Lock out a user
Applies to User Roles:
System Administrator To lock out a user:
1. Click System Administration > Ongoing Maintenance > Operators. 2. Type or select optional search criteria.
3. Click Search.
4. Select the operator to lock out. 5. Click the Security tab.
6. Select the Administrative Lockout option 7. Click Save.
Reset a locked out user
Applies to User Roles:
System Administrator To reset a locked out user:
1. Click System Administration > Ongoing Maintenance > Operators. 2. Type or select optional search criteria.
3. Click Search.
4. Select the operator record. 5. Click the Security tab.
7. Click Save.
HP Service Manager unlocks the user’s operator record and clears the Failed Login Count, Locked Until, and User has been Locked? fields.
View a user’s lockout history
Applies to User Roles:
System Administrator
To view a user's lockout history
1. Click System Administration > Ongoing Maintenance > Operators. 2. Click Search.
3. Select the operator record to view. 4. Click the Security tab.
Server security help topics for printing Lockout feature
and wait for existing users to gracefully log off before starting system maintenance or testing tailoring activities.
There are three levels of login restrictions. Quiesce level 1 restricts all users, except System
Administrators, from logging on to Service Manager processes. Quiesce level 2 restricts all users from logging on to Service Manager processes. Quiesce level 0 (zero) sets Service Manager processes to allow user logins. In the vertical scaled or horizontal scaled environment, Service Manager load balancer does not forward any client connection requests to Service Manager processes that are in quiesce level 1 or 2. If System Administrators want to connect to a Service Manager process in quiesce level 1, they must connect directly to the Service Manager process without connecting through Service Manager load balancer.
Quiesce mode information is stored in the shared memory. When a Service Manager process sets a quiesce level in the shared memory, all other Service Manager processes that read from the same shared memory have the same quiesce level. So if one Service Manager process sets a quiesce level on a host, all Service Manager processes have the same level of quiesce on that host. In a horizontal scaled environment, the "host:<host name or IP>" or "group" option can be used with the "sm
-quiesce:<quiesce level>" command. The "sm -quiesce:<1 or 2 or 0> -group" command sets the quiesce level to all Service Manager processes on all hosts within the horizontal scaled group.
In a vertical scaled environment when Service Manager processes are running and you issue the "sm -quiesce:1" or "sm -quiesce:2" command, all Service Manager processes on the local host are set to quiesce level 1 or quiesce level 2, respectively. The Service Manager load balancer stops forwarding any new client connection requests to the Service Manager processes, since they are quiesced. If any user tries to connect to Service Manager load balancer at this point, the user receives a message that states "max session exceed" from the load balancer, as there are no available Service Manager processes. Existing users on the system are not affected. However, once existing users log off, they cannot log back on until after the System Administrator changes the quiesce level back to 0 (zero). Once all users have logged off the system, the System Administrator can perform system maintenance. When system maintenance is complete, the System Administrator can issue the "sm -quiesce:0" command to set the quiesce level back to 0, so there are no login restrictions to all Service Manager processes. All Service Manager processes now accept user logins and Service Manager load balancer forwards client connection requests to these Service Manager processes.
In a horizontal scaled environment, assume there are two hosts in the horizontal scaled group, Host A and Host B. While the system is running, System Administrators can quiesce Host A for maintenance and
keep Host B running by issuing the command "sm -quiesce:<1 or 2> -host:<Host A name or IP address>" on either Host A or Host B. Service Manager load balancer then forwards all client requests to Host B, as all Service Manager processes on Host A are quiesced. Existing users on Host A are not affected until they log off. If users try to log back on, Service Manager load balancer redirects their connection requests to Host B. After maintenance is complete on Host A, the System Administrator issues the command "sm -quiesce:0 -host:<Host A name or IP address>" to bring Host A back to service. This way the System Administrator can maintain one of the hosts in a horizontal scaled group and avoid down time. The System Administrator can also quiesce all Service Manager processes in the group by issuing the "sm -quiesce:<1 or 2> -group" command. When the maintenance is complete, the System
Administrator can then set all Service Manager processes in the group back to non-quiesce mode by issuing the "sm -quiesce:0 -group" command.
A System Administrator can restrict logins to Service Manager using the system.quiesce application. System maintenance tasks include the following:
l Upgrading from one version of Service Manager to another
l Tailoring forms, tables, or format controls
The system.quiesce application provides three levels of login restrictions:
Restriction
level Description
Level 0 Service Manager has no login restrictions and accepts all logins normally.
Level 1 Service Manager restricts login to operators who have the SysAdmin capability word. Service Manager denies login to all other operators and displays the message:
System quiesced, you cannot login at this time.
When you issue sm -quiesce:1 -group on a primary or secondary host, all Service Manager processes (except Service Manager load balancer) are set to quiesce mode 1. Service Manager load balancer updates its available node list to 0. If users try to connect to Service Manager load balancer at this time, they receive the following message, since there are no available Service Manager processes.
Max session exceeded.
Level 2 Service Manager denies login to all operators and displays the message:
System quiesced, login restricted at this time.
Note: A quiesced system restricts new login attempts only. Currently logged on users can continue working until they log off.
Server security help topics for printing System quiesce: Login restrictions
Enable logging of user access
Applies to User Roles:
System Administrator
If you enable system logging of user access, HP Service Manager records the time and user ID each time an operator logs on or logs off.
To enable logging of user access:
1. Click System Administration > Base System Configuration > Miscellaneous > System Information Record.
2. On the General tab, select the Syslog Audit option. 3. Click Save.
Enable login restrictions
Applies to User Roles:
System Administrator To enable login restrictions:
1. Click System Administration > Ongoing Maintenance > System > Connection Restrictions. 2. Click one of the following options:
n Set Level 0 — No login restrictions
n Set Level 1 — Only system administrators can log in
n Set Level 2 — No operators can login
HP Service Manager displays the current access level.
Disable login restrictions
Applies to User Roles:
System Administrator To disable login restrictions:
1. Click System Administration > Ongoing Maintenance > System > Connection Restrictions. 2. Click Set Level 0.
Enable tracking of operator times
Applies to User Roles:
System Administrator
You can track how long each operator edits an Incident record by enabling a tracking option in the Incident Management environment.
To enable tracking of operator times:
1. Click System Administration > Ongoing Maintenance > Environment Records > Incident Management Environment.
2. Select the Track Operator Times? checkbox. 3. Click Save.
Server security help topics for printing System quiesce: Login restrictions
a security group see only the records that meet the specific filtering criteria of their group. The system administrator defines the filtering conditions when creating a security group. The system administrator decides which operators belong to particular security groups and can assign operators to any number of security groups. Operators who are members of multiple security groups see only the records that match all their separate filtering conditions.
At login, HP Service Manager reads the operator record to determine the security groups of which the operator is a member and uses this information to determine the files to which the operator has limited access. When an operator queries a restricted file, Service Manager reads the security group records to determine the filtering conditions to apply to the query. Service Manager then returns only those records that match the filtering conditions in the security group records.
Unlike Format Control, which provides security at the application layer, Mandanten secures files at the database layer. Any file that a system administrator restricts from an operator with Mandanten always uses the filtering conditions regardless of the operator’s user role and application profile. Only
operators who are not members of any security group can have unrestricted access to files protected by Mandanten.
Typically, a system administrator enables Mandanten file security in a multi-company environment where each company wants to ensure that only their users see the data relevant to their business. However, system administrators can also use Mandanten to conceal department records selectively within an organization. For example, a system administrator could create two filtering conditions for an operations and finance department that allow the operations personnel to see their own Incident records and devices but not those belonging to the finance department.
Setting filtering conditions
To enable Mandanten file security, a system administrator must create records in two files:
l scsecuritygroup — The system administrator uses this file to define the security group name and
the field values to be used as the filtering condition.
l scmandant — The system administrator uses this file to define the Service Manager file to be
protected and the field to be read for the filtering condition. The field defined in this file is referred to as the Mandant field. You can only define one Mandant field for each file you want to protect,
although the Mandant field can contain an array of values. The Mandant field you chose must be defined either in the file you want to protect or by a virtual join in another file.
System administrators can define additional filtering conditions on fields other than the Mandant field. These additional filtering conditions are referred to as restricting queries because they further restrict the data that an operator can access. To define a restricting query, a system administrator must create a record in the scaccess file.
Restrictions
You cannot enable Mandanten file protection on the following shared system files: l code
l datadict
l dbdict
l environment
l format
l formatctrl
l link
l menu
l operator
l tzfile
Add a restricting query to a security group
Applies to User Roles:
System Administrator
You must have the SysAdmin capability word to use this procedure.
You can add a restricting query to a security group to further limit the data that operators can see when they query a Mandanten protected file.
Server security help topics for printing Mandanten file security
To add a restricting query to a security group: 1. Click Tailoring > Database Manager.
The Database Manager form (format.prompt.db.g) opens. 2. In the Form field, type scaccess.
3. Click Search.
The Mandanten Restricting Query form (scaccess.g) opens.
4. In the File Name field, type or select the name of the Mandanten protected file you want to further restrict.
5. In the Security Group ID field, type the name of the security group that you want to further restrict.
6. In the Restricting Query field, type the SQL query you want to use to further restrict the data operators can access
Note: Typically, this query is of the format field="value". 7. Click Add.
HP Service Manager displays the message: scaccess record added.
Create a security group
Applies to User Roles:
System Administrator
You must have the SysAdmin capability word to use this procedure.
You must create a security group to enable the Mandanten file security feature. To create a security group:
1. Click Tailoring > Database Manager.
The Database Manager form (format.prompt.db.g) opens. 2. In the Form field, type scsecurity.
3. Click Search.
4. In the Security ID field, type the name of your new security group.
5. In the Include Value List array, type the Mandanten field values that you want to use to grant access to the security group.
6. In the Exclude Value List array, type the Mandanten field values that you want to use to deny access to the security group.
7. Click Add.
Service Manager displays the message: scsecuritygroup record added.
Define the Mandant field for a security group
Applies to User Roles:
System Administrator
You must have the SysAdmin capability word to use this procedure.
You must define the Mandant field to enable the Mandanten file security feature. To define the Mandant field for a security group:
1. Click Tailoring > Database Manager.
The Database Manager form (format.prompt.db.g) opens. 2. In the Form field, type scmandant.g.
3. Click Search.
The Mandanten Field Restriction form (scmandant.g) opens.
4. In the File Name field, type or select the name of the file you want to protect.
5. In the Mandant Field Name field, type the name of the field you want HP Service Manager to read when it checks whether an operator meets the filtering conditions.
Note: This field must either be defined in the file you select or be defined in another file as a virtual join.
Server security help topics for printing Mandanten file security
6. If the Mandant field is a virtual join field, type the following additional information: n In the Linkage Field Name field, type the name of the field that stores the virtual join
reference.
n In the Source File Name field, type the name of the external file that contains the Mandant
field.
n In the Source Field Name field, type the name of the external field that stores the Mandant
field values you want Service Manager to read when it checks whether an operator meets the filtering conditions.
Note: If the source field contains an array of values, then Service Manager will search the array for valid filtering conditions. If any one of the filtering conditions is met, then the operator will have access to the file.
n In the Exclude Field field, type any values that you want Service Manager to exclude from
queries against the Mandant field. 7. Click Add.
Service Manager displays the message: scmandant record added.
Enable Mandanten security on a file
Applies to User Roles:
System Administrator
You must have the SysAdmin capability word to use this procedure. To enable Mandanten security on a file:
1. Create a security group to define the filtering conditions you want to use on the protected file. 2. Define the Mandant field that you want HP Service Manager to read when it checks whether an
operator meets the filtering conditions.
3. Add any restricting queries you want to add to the security group.
Restricting queries further restricts the data that operators in the security group can access. 4. Assign operators to security groups that match the data you want them to access.
Note: If the system administrator does not assign an operator to a security group, then that operator can see an unfiltered view of all the files to which the operator's user role and application profile permit access.
Server security help topics for printing Mandanten file security
desk technicians can see information about all the companies that the service desk supports. However, when a system administrator enables multi-company mode, service desk technicians only see
information relevant to the company they are currently supporting.
For additional data security, you can enable the Mandanten feature with multicompany mode to store each company's data in its own secure database.
Enable multicompany mode
Applies to User Roles:
System Administrator
You must have the SysAdmin capability word to use this procedure. To enable multicompany mode:
1. Click System Administration > Base System Configuration > Miscellaneous > System Information Record.
2. On the General tab, select the Run in Multi-Company Mode option. 3. Click Save.
HP Service Manager displays the message: Information record updated.
Script utilities
Service Manager includes two new scripts: l smfsdel.bat
Provides a mechanism to securely delete files from the file system on which you have installed Service Manager.
l smfchecksum.bat
Provides a mechanism to verify the Service Manager binaries.
These scripts were created to meet the Federal Service for Technical and Export Control (FSTEC) certification as per the government regulations of Russia. These two scripts are packaged together with Service Manager. Most customers will have no reason to run these scripts but you can run them freely as you like.
For more information about these two scripts and how to use them, see Scripts for FSTEC Certification on Service Manager.
Secure Sockets Layer (SSL) encryption and
server certificates
HP Service Manager supports Secure Hypertext Transfer Protocol (HTTPS), which encrypts and decrypts message requests and responses. Service Manager uses Secure Sockets Layer (SSL) for encryption only and relies on the server to authenticate each operator's user name and password. Service Manager supports SSL for the following connections:
l SSL on the Service Manager server to encrypt all communications between clients and the server.
l SSL on Service Manager clients to verify the client's identity and limit server connections to these
identified clients
Enabling SSL on the Service Manager server
The primary reason to enable SSL on the Service Manager server is to protect operator user names and passwords that Service Manager clients send with each request as part of an HTTP Basic Authorization header. You can enable SSL on the Service Manager server but not require each client to present an individual client certificate. When you enable SSL on the server only, clients connect to the server using anonymous SSL.
Enabling SSL on Service Manager clients
The primary reason to enable SSL on Service Manager clients is to restrict access to the server to only those clients known and identified by the server. Enabling client-side SSL requires creating or
purchasing signed certificates for each Service Manager client. The Service Manager Web Tier can share a single signed certificate for all Web Client connections. If you enable client-side SSL, HP recommends you also enable server-SSL to encrypt all communications between clients and the server.
The client/server SSL handshake process
During the client/server handshake process, the client looks at the server certificate, determines which certificate authority signed the certificate, and compares the certificate signature to a list of trusted certificate authorities identified in the cacerts file. Service Manager includes a sample server
certificate signed by a fictitious certificate authority and also includes a modified cacerts file that includes the certificate for the fictitious certificate authority.
The client also compares the IP address or host name of the server to the address encrypted in the server certificate. If they do not match, an alert appears and the user can stop the connection. When you start a new installation of Service Manager, it suppresses the alerts. To ensure a secure
environment, remove the sample server certificate, install an actual certificate, and modify the
cacerts file to list the appropriate certificate authority.
Secure Sockets Layer (SSL) configuration options
HP Service Manager supports several different Secure Sockets Layer (SSL) configurations that you can use to protect communications between the server and clients. The following is a list of the most common SSL configurations in order of increasing security and setup required:
Configuration Type
SSL encryption? Server credentials authenticated? Client credentials authenticated?
Client can bypass login screen? Additional certificates required Optional SSL
encryption
Optional Set from client
No No No None
Required SSL encryption
Required Set from server
Yes No No • Certificate
authority certificate • Server certificate
Required SSL encryption and client authentication
Required Set from server
Yes Yes No • Certificate
authority certificate • Server certificate • Web tier certificate • Windows client certificates
Configuration Type SSL encryption? Server credentials authenticated? Client credentials authenticated?
Client can bypass login screen? Additional certificates required Required SSL
encryption and trusted clients
Required Set from server
Yes Yes No • Certificate
authority certificate • Server certificate • Web tier certificate • Windows client certificates
Requirements for optional SSL encryption
This configuration is intended for customers who:
l Do not want to create and maintain their own certificates
l Do not want to take additional measures to protect against complex SSL-related attacks
l Want to choose whether to enable SSL encryption from the client
Tip: Administrators can automatically enable the SSL encryption option for all web clients from the
web.xml file, and from all Windows clients by deploying a customized client.
Certificates required
No additional certificates are required. HP Service Manager provides the following certificates for SSL encryption out-of-the-box.
l Keystore containing the certificate authority certificate – the default keystore is located in
<Windows client installation path>\plugins\com.hp.ov.sm.client.common_x.xx
l Service Manager server certificate – the default certificate is located in <HP Service Manager
server installation folder>\RUN\smsrv.keystore
Private keys required
No additional private keys are required. HP Service Manager provides the following private key for SSL encryption out-of-the-box.
Server security help topics for printing
l HP Service Manager server Private key – the default private key is located in <Service Manager
server installation folder>\RUN\smsrv.keystore
Parameters required in the server configuration file (sm.ini)
l No additional initialization parameters are required when using optional SSL encryption.
l Optional SSL encryption does not require enabling SSL:1.
Note: If you are using optional SSL encryption, no additional initialization parameters are required. Once you enable SSL encryption, it is no longer optional.
Parameters required in the web tier configuration file (web.xml)
You can set the following web parameter to enable SSL encryption for web clients. l ssl – true
Windows client preferences required
You can set the following preference from the Connections > Advanced menu.
l Use SSL Encryption – Encrypts communications from Windows client using the server's
certificate
If you enable SSL encryption, then you must set the following preference from the Window >
Preferences > HP Service Manager > Security menu.
l CA certificates file – identify the keystore containing the server's certificate authority
certificate. The default keystore file is located in <Windows client installation path>\plugins\com.hp.ov.sm.client.common_x.xx
Other requirements
None
Example: Viewing the contents of a cacerts file
To view the entries in a cacerts file, you can use the keytool utility provided with Sun J2SDK versions 1.4 or later. The following example uses the -list command to display the CA certificates in the
cacerts file.
C:\j2sdk1.4.2_04\jre\bin>keytool -list -keystore ./cacerts Enter keystore password: changeit
Keystore type: jks Keystore provider: SUN
Your keystore contains 15 entries
thawtepersonalfreemailca, Feb 12, 1999, trustedCertEntry,
Certificate fingerprint (MD5): 1E:74:C3:86:3C:0C:35:C5:3E:C2:7F:EF:3C:AA:3C:D9 thawtepersonalbasicca, Feb 12, 1999, trustedCertEntry,
Certificate fingerprint (MD5): E6:0B:D2:C9:CA:2D:88:DB:1A:71:0E:4B:78:EB:02:41 baltimorecodesigningca, May 10, 2002, trustedCertEntry,
Certificate fingerprint (MD5): 90:F5:28:49:56:D1:5D:2C:B0:53:D4:4B:EF:6F:90:22 verisignclass3ca, Jun 29, 1998, trustedCertEntry,
Certificate fingerprint (MD5): 78:2A:02:DF:DB:2E:14:D5:A7:5F:0A:DF:B6:8E:9C:5D gtecybertrustglobalca, May 10, 2002, trustedCertEntry,
Certificate fingerprint (MD5): CA:3D:D3:68:F1:03:5C:D0:32:FA:B8:2B:59:E8:5A:DB thawtepersonalpremiumca, Feb 12, 1999, trustedCertEntry,
Certificate fingerprint (MD5): 3A:B2:DE:22:9A:20:93:49:F9:ED:C8:D2:8A:E7:68:0D thawteserverca, Feb 12, 1999, trustedCertEntry,
Certificate fingerprint (MD5): C5:70:C4:A2:ED:53:78:0C:C8:10:53:81:64:CB:D0:1D verisignclass4ca, Jun 29, 1998, trustedCertEntry,
Certificate fingerprint (MD5): 1B:D1:AD:17:8B:7F:22:13:24:F5:26:E2:5D:4E:B9:10 baltimorecybertrustca, May 10, 2002, trustedCertEntry,
Certificate fingerprint (MD5): AC:B6:94:A5:9C:17:E0:D7:91:52:9B:B1:97:06:A6:E4 verisignclass1ca, Jun 29, 1998, trustedCertEntry,
Certificate fingerprint (MD5): 51:86:E8:1F:BC:B1:C3:71:B5:18:10:DB:5F:DC:F6:20 verisignserverca, Jun 29, 1998, trustedCertEntry,
Certificate fingerprint (MD5): 74:7B:82:03:43:F0:00:9E:6B:B3:EC:47:BF:85:A5:93 thawtepremiumserverca, Feb 12, 1999, trustedCertEntry,
Certificate fingerprint (MD5): 06:9F:69:79:16:66:90:02:1B:8C:8C:A2:C3:07:6F:3A gtecybertrustca, May 10, 2002, trustedCertEntry,
Certificate fingerprint (MD5): C4:D7:F0:B2:A3:C5:7D:61:67:F0:04:CD:43:D3:BA:58 gtecybertrust5ca, May 10, 2002, trustedCertEntry,
Certificate fingerprint (MD5): 7D:6C:86:E4:FC:4D:D1:0B:00:BA:22:BB:4E:7C:6A:8E verisignclass2ca, Jun 29, 1998, trustedCertEntry,
Certificate fingerprint (MD5): EC:40:7D:2B:76:52:67:05:2C:EA:F2:3A:4F:65:F0:D8
Enable SSL encryption for web clients
You can configure your web clients to use the HP Service Manager server's sample certificate for SSL encryption. If The HP Service Manager server requires SSL connections from clients, then this setting is unnecessary because all clients will use the server's signed certificate for SSL encryption. If SSL connections are optional however, then you can use these steps to enable SSL encryption between the client and server without installing an additional signed server certificate.
1. Log on to the web tier system.
2. Stop the web tier web application server.
Server security help topics for printing
3. Open the web configuration file (web.xml) in a text editor. 4. Set the ssl parameter to true.
5. Save your changes.
6. Restart your web tier Web application server.
Enable SSL encryption for Windows clients
You can configure your Windows clients to use the HP Service Manager server's certificate for SSL encryption. If The HP Service Manager server requires SSL connections from clients, then this setting is unnecessary because all clients will use the server's certificate for SSL encryption. If SSL connections are optional, then you can use these steps to enable SSL encryption between the client and server.
1. If you are managing a private certificate authority, import the certificate for your private certificate authority into the cacerts keystore.
If you are using the services of a certificate authority vendor, the cacerts file should already contain your vendor's certificate. Open the cacerts file and verify that your vendor's certificate is present.
2. Copy the updated cacerts keystore to one of two locations:
n <Windows client installation path>\plugins\com.hp.ov.sm.client.common_x.xx
folder
n A network share accessible to your Windows clients
3. Open the HP Service Manager Windows client.
4. Click Window > Preferences > HP Service Manager > Security. 5. Click Browse for the CA certificates file field.
6. Browse to the path of the cacerts keystore. 7. Click OK to accept the path.
8. Click OK to save your changes.
9. Use the Client Configuration Utility to save the custom SSL configuration of this Windows client and deploy the new Windows Client installer to your network.
Update the cacerts keystore file
Applies to User Roles:
System Administrator
If you use a private certificate authority to generate an SSL server certificate, you can add the private certificate authority to the list of trusted certificate authorities that exist in the Java cacerts keystore file. Sun distributes this file with JSSE and with JDK version 1.4.x and later releases. You can then distribute this updated cacerts file to your HP Service Manager clients so that they can validate the server's signed certificate.
Note: This procedure requires that you install a Java SDK of version 1.4.x or later on the server where you installed your private certificate authority.
To update the cacerts keystore file:
1. Log on to server where you installed your private certificate authority. 2. Open the operating systems command prompt.
3. Change directories to the Java SDK bin folder.
4. Type the following command to import your private certificate authority's certificate (for example,
cacert.pem) into the Java cacerts file that you publish to the rest of your network. Change the path and variables as necessary.
keytool -import -keystore ./cacerts -trustcacerts -file cacert.pem -storepass changeit
5. When keytool prompts you, type y to trust the private certificate authority's certificate.
Requirements for required SSL encryption
This configuration is intended for customers who: l Want to require SSL encryption for all connections
l Want to protect against complex SSL-related attacks
l Want to authenticate that the HP Service Manager server is a valid host
Certificates required
Server security help topics for printing
You must create or obtain the following certificates for SSL encryption. l Certificate authority certificate
l Keystore containing the certificate authority's certificate
l HP Service Manager server certificate
Private keys required
You must create or obtain the following private keys for SSL encryption. l Certificate authority's private key *
l HP Service Manager server private key
* This key is only necessary if you are managing your own private certificate authority.
Parameters required in the server configuration file (sm.ini)
l keystoreFile – identify the keystore file containing the HP Service Manager server's certificate
and private key
l keystorePass – identify the password to the keystore file containing the HP Service Manager
server's certificate and private key l ssl:1
l sslConnector:1
l truststoreFile – identify the keystore file containing the certificate authority's certificate
l truststorePass – identify the password to the keystore file containing the certificate authority's
certificate
Parameters required in the web tier configuration file (web.xml)
You must set the following web parameter.
l cacerts – identify the keystore file containing the certificate authority that signed the server's
certificate
Windows client preferences required
You must set the following preference from the Window > Preferences > HP Service Manager >
Security menu.
server's certificate
Other requirements
You must do the following additional steps to ensure that HP Service Manager can use your private certificates.
l Add your private certificate authority's certificate to a keystore that your web and Windows
clients can access
l Ensure that the HP Service Manager server's host name matches the common name (CN) listed
in the server's signed certificate
Example: Enabling required SSL encryption
The following example describes the following SSL configuration.l Requiring SSL encryption using the HP Service Manager server's signed certificate
Note: This example builds on information presented in the topic Example: Generating a server certificate with OpenSSL.
1. Generate a signed server certificate for the Service Manager server. 2. Install the server's signed certificate and supporting key.
Copy the following keystore files into the RUN folder of the Service Manager server. n servercert.keystore – This keystore file contains the Service Manager server's signed
certificate and private key
n cacerts – This keystore file contains the certificate and private key of the certificate authority
that signed the server's certificate 3. Stop the Service Manager server.
4. Open the Service Manager initialization file (sm.ini) with a text editor.
5. Add the following parameters to require SSL encryption using the Service Manager server's signed certificate.
n keystoreFile:servercert.keystore – identifies the keystore file containing the Service Manager
server's certificate and private key
n keystorePass:changeit – identifies the password to the keystore file containing the Service
Manager server's certificate and private key
Server security help topics for printing
n truststoreFile:cacerts – identifies the keystore file containing the certificate authority's
certificate
n truststorePass:changeit – identifies the password to the keystore file containing the certificate
authority's certificate
n ssl:1 – Requires SSL encryption using the server's signed certificate.
n sslConnector:1 – requires Service Manager clients to use an HTTPS port when communicating
with the server.
6. Save the Service Manager initialization file. 7. Restart the Service Manager server.
8. Stop the web application server running the web tier.
9. Install the certificate authority's certificate on your Service Manager clients.
Copy the cacerts keystore file into the WEB-INF folder of the Web application server running the Service Manager web tier. For example:
C:\apache-tomcat-5.5.17\webapps\sm\WEB-INF
10. Configure Service Manager web clients to validate the Service Manager server's signed certificate. Open the web configuration file (web.xml) in a text editor, and do the following:
n Set cacerts to the cacerts file you copied to the WEB-INF folder.
11. Configure Service Manager Windows clients to validate the Service Manager server's signed certificate.
Click Window > Preferences > Service Manager > Security, and do the following:
n Set CA Certificates File to the cacerts you copied to the <Windows client installation
path>\plugins\com.hp.ov.sm.client.common_x.xx folder.
Example: Generating a server certificate with OpenSSL
The following example describes how to create a signed server certificate using the OpenSSL toolkit as a private certificate authority. This example also uses the keytool utility available with the Sun
Microsystems™ standard Java Development Kit. You can use a server certificate to enable SSL encryption from the HP Service Manager server.
Note: The information contained in this example regarding OpenSSL technology is provided by HP as a courtesy to our customers and partners. This documentation does not replace an OpenSSL
reference, and HP encourages you to conduct additional research regarding OpenSSL technology by consulting with sources outside of this document. HP hereby disclaims all liability associated with the use and accuracy of this information. As OpenSSL technology evolves, HP may or may not update this reference.
1. Obtain and install a Java platform on the server you want to use as your private certificate authority. See the Sun Microsystems™ Java Technology site for the necessary software and documentation.
2. Obtain and install OpenSSL on the server you want to use as your private certificate authority. See the OpenSSL Web site for the necessary software and documentation.
Caution: HP strongly recommends that you do not install your private certificate authority on the same server as your Service Manager production server.
3. Create and configure an openssl.conf file in the bin folder of your OpenSSL installation. 4. Open the operating system's command prompt on the private certificate authority server. 5. Change directories to the OpenSSL bin folder.
6. Type the following command to create the private key for your private certificate authority:
openssl genrsa -des3 -out cakey.pem 2048
7. When OpenSSL prompts you, type the password phrase you want to use to protect your certificate authority's private key file (cakey.pem). For example, CAKeyPassword.
You must use the same password phrase each time you sign a certificate request with your private certificate authority. If you forget this password, you must repeat the steps to create another certificate authority private key.
8. Type the following command to create a public certificate for your private certificate authority:
openssl req -new -key cakey.pem -x509 -days 1095 -out mycacert.pem -config .\openssl.conf
9. Change directories to the Java platform's bin folder.
10. Type the following command to import your private certificate authority's certificate into the Java
cacerts file that you will publish to the rest of your network.
keytool -import -keystore ./cacerts -trustcacerts -file mycacert.pem -storepass changeit
Server security help topics for printing