Appointment Scheduling 1
Objectives
Upon completion, participants will be able to:
• Define IDX’s Patient Scheduling;
• Explain the two different types of Registration; • Describe the flow of Scheduling “Mini” Registration;
• Explain what a Appointment Type is and provide some examples; • Schedule an appointment using at least two search options; • XS Hospital Scheduling Action Code Process
• XX Hospital Scheduling Arrival Action Code Process • Schedule an appointment into a non-clinic slot; • Overbook a time slot in a provider’s schedule; • Add comments to a provider’s schedule; • Add time to the provider’s scheduler;
• Explain the purpose of the Appointment Data Form and know how to complete
it;
• Know how to schedule cyclical appointments;
• Know two ways to link patient appointments and schedule linked appointments; • Schedule a walk-in (same day) appointment;
• ER Appointment
• Schedule a reminder appointment;
• View patient appointments and provider schedules; • Edit patient appointments;
• Reschedule patients from the bump list; • Cancel and/or reschedule patient appointments; • Arrive and / or No-Show patient appointments; and • Custom Arrival Process
University of Miami: Clinical Enterprise Technologies 3
What is IDX Patient Scheduling?
The Patient Scheduling application enables the scheduler to enter appointments for patients.
University of Miami: Clinical Enterprise Technologies 5
Concepts and Definitions
The IDX Patient Scheduling application enables us to load our providers’ schedul-ing preferences into the system. In order to schedule an appointment with a pro-vider, the Master Scheduler has to have loaded that provider’s schedule into the IDX system.
Patient appointments are booked into the provider’s Daily Schedules. The following are the major components of the IDX Scheduling Application:
Dictionaries
Dictionaries are the building blocks of the IDX system that store and organize information the system uses to process data and produce reports. Dictionaries store data that would otherwise have to be reentered frequently into the system.
Scheduling Profile
The Scheduling Profile is a series of questions that UMMG needed to answer with the IDX Scheduling installation. Our responses enabled or disabled certain features on our system, and determined the default values for several prompts.
For Appointment Scheduling, the following scheduling profile questions were nec-essary:
• Allow appointment 365 days in the future. • Allow appointment 7 days in the past.
• Allow multiple appointments to start on different dates.
• Time range (around preferred time) to select a cyclical appt is 60 minutes. • Default appointment search option is “First Available.”
• Display the appointment location in first available search. • Enable cancel/no-show display in criteria screen.
• Display patient appointment status summary when scheduling an appointment. • Default “NO” to "Display patient's appointments?" in F11.
• Enable conflict checking.
• Enable cancellation reasons dictionary and comment with the reason being
• Do not display cancellation comment or reason in F2. • The default answer to the Reschedule: prompt is YES.
• Number of days to retain appointments on bump list for automated purge is 30
days.
• Prompt for wait list if appointment is after 30 days. • Retain provider daily schedules for 365 days.
• Appts wirh a PEN status will automatically be changed to a NOS status 8 days
after the appointment date.
Appointment Types
An Appointment type is the kind of appointment, such as a new patient Appoint-ment, physical, surgery, etc. that each provider has to see patients. Each provider has his or her own Appointment types.
Appointment types have a long name (i.e., Consultation), a short name or mne-monic (i.e., CON) and a number (i.e., 3).
Appointment Type durations have been customized for the individual providers. This allows the scheduler to search for a CON that may be 15 minutes for one pro-vider and 20 minutes for another propro-vider.
The duration of a Appointment type can be changed when the appointment is made to allow for individual patient needs.
There are many standardized Appointment types that allow for faster learning across departments.
To allow a certain degree of standardization and cross scheduling, the IDX design team tried to keep a manageable number of Appointment types for the schedulers.
Time Slots
University of Miami: Clinical Enterprise Technologies 7
When a provider sets up his/her schedule, there are certain requirements that the provider might have regarding the availability of his/her time that have been built into the master schedules, therefore the daily schedules as well. Master Schedules are created to allow each provider to design his/her own schedule for each day of the week. The Master Schedulers have set these up.
The Master Schedule designates Time Slots as available or non-available for patient appointments. The Master Schedule is the pattern after which Daily Sched-ules are created.
Daily Schedules
When Master Schedules are distributed, the system creates Daily Schedules. Because the Daily Schedule was created from the master, it takes into account the provider’s different types of Time Slots that are required.
Daily Schedules are the provider’s schedules used for booking appointments. Based on Master Schedules, Daily Schedules display all patient appointments or an individual day.
Sessions
A session is a period of time used to group appointments. Most providers use a morning session, an afternoon session, and/or an evening session for each day. (AM/PM/EVE)
Benefits of Patient Appointment
Scheduling
Patient Appointment Scheduling:
• reduces the burden on staff needing to memorize provider preferences and
rely-ing on manual processes in order to select an appointment time for a patient, that meets the provider’s needs and work flow preferences;
• increases patient satisfaction;
• reduces the training time for new staff who will not have to learn provider
• makes it easier for scheduling appointments across departments or locations.
The Relationship between Master and Daily Schedules A Master Schedule:
• defined the Time Slots within the provider’s schedule for a period of time and is
the basis for the Daily Schedules and allows each provider to design his/her own schedule for each day of the week;
• allows a provider to have several different schedules for each department or
clinic;once created, is distributed to create the Daily Schedule. This process creates the Daily Schedules where appointments are booked.
What results from creating a Master Schedule? …
Daily Schedules
Below is an example of the relationship between Master Schedules and Daily Schedules.
AM Session PM Session
Time Type Dur Booked Avail Time Type Dur Book
ed Avail 8:00 NPV 60 - 1 1:00 PHY 60 - 1 9:00 FUV 30 - 1 2:00 FUV 30 - 1 9:30 FUV 30 - 1 2:30 FUV 30 - 1 10:00 NPV 60 - 1 3:00 NPV 60 - 1 11:00 FUV 30 - 1 4:00 FUV 30 - 1 11:30 FUV 30 - 1 4:30 FUV 30 - 1
University of Miami: Clinical Enterprise Technologies 9
The Master Schedulers within each Scheduling Department creates the Daily Schedules.
Appointments are booked into these, the
Daily Schedules. D r . R o d r ig u e z M o n d a y , W e d n e s d a y , F rid a y J a n u a ry 1 , 1 9 9 8 - M a y 3 1 , 1 9 9 8 M O N D A Y D A IL Y S C H E D U L E J a n 0 5 , 1 9 9 8 J a n 1 2 , 1 9 9 8 J a n 1 9 , 1 9 9 8 J a n 2 6 , 1 9 9 8 F e b 0 2 , 1 9 9 8 W E D N E S D A Y D A IL Y S C H E D U L E J a n 0 7 , 1 9 9 8 J a n 1 4 , 1 9 9 8 J a n 2 1 , 1 9 9 8 J a n 2 8 , 1 9 9 8 F e b 0 4 , 1 9 9 8 F R ID A Y D A IL Y S C H E D U L E J a n 0 9 , 1 9 9 8 J a n 1 6 , 1 9 9 8 J a n 2 3 , 1 9 9 8 J a n 3 0 , 1 9 9 8 F e b 0 6 , 1 9 9 8 M A S T E R S C H E D U L E
Module Summary
• To schedule an appointment with a provider, a Master Scheduler created that
provider’s schedule.
• Master Schedules are a model from which Daily Schedules are created. • Master Schedules defines the time slots within the provider’s Daily Schedule
used to book appointments. They also allow each provider to design his/her own schedule for each of his/her clinics and allow a provider to have different schedules for different clinics.
• Appointment Scheduling uses both dictionaries and Appointment types that
University of Miami: Clinical Enterprise Technologies 11
Practice Exercise
1. Why are Appointment types important to scheduling an appointment?
2. What are some examples of Appointment types?
3. Which came first. . . the Master Schedule or the Daily Schedule?
Registration Activities
Registration is the process by which patients are added to the IDX patient database.
When a patient is registered, an account is created for that patient and appointments may be scheduled.
Only registered patients may be given an appointment.
There are two types of registration that may be used to register a patient into the IDX system:
1. Mini Registration (also known as Scheduling Registration) - contains less
information than the full registration form. This form allows the scheduler to collect just the most essential information that is needed in order to schedule an appointment.
University of Miami: Clinical Enterprise Technologies 13
Full Registration
Full Registration enables a user to enter demographic, guarantor, general comments and FSC information.
Scheduling “Mini” Registration
What is Mini Registration?
Mini registration is specific to the Patient Scheduling application and is used for the scheduler to collect enough registration information in order to schedule an appointment. The patient must then be fully registered after the appointment is scheduled.
Why Use Mini Registration?
The scheduler is usually the first contact for a patient and it is the schedulers’ duty to make sure that the patients get their appointments scheduled in a timely fashion. However, once the patient accepts the appointment, that patient must be fully regis-tered with all demographic and insurance information
University of Miami: Clinical Enterprise Technologies 15
Can I Edit Mini Registration Data?
• Yes, once mini-registration data is entered, it can be edited.
• As a matter of fact, once a patient has been registered on the system,
there may be times when this information needs to be changed.
• Editing mini registration information enables you to change the data that
is currently in the registration database.
• IDX will display the mini registration screen with the completed fields. • You may also edit Full Registration from appointment scheduling using
System Prompt: Your Response:
Select Function: Access the Appointment Scheduling (F1)
Patient: Identify the patient using one of the standard name lookups
Or enter a new patient in the system. Press <Enter>
[No Matches> Register New Patient?
Enter Y to register a new patient.
Enter N to return to the Patient: prompt to either try another patient lookup, or look up another patient.
Press <Enter>
Is this correct? This message appears if there was a patient found in the database, that matches the patient lookup criteria you entered.
Enter Y if the displayed patient is correct, then Press <Enter>.
Enter N if the displayed patient is not correct to return to the Patient: prompt to
University of Miami: Clinical Enterprise Technologies 17 Is this the one Y=>?
(Press <RETURN> to continue)
This message appears if there were more than one patient found in the database matching the patient lookup criteria you entered.
Enter the number of the correct patient you are looking for, or Press <Enter> to view more patients that match your criteria.
Edit registration data? NO=>
Enter Y to edit the patient’s registration data.
Enter N to not edit the patient’s registration data.
Press <Enter>
• Notice that Patient Registration
Com-ments appear above this prompt. The system displays five lines of comments at a time.
• The default has been set to NO, to
allow you to bypass the registration screen and go directly to the criteria screen to schedule an appointment.
Select: 1) Reg only, 2) FSCs only 3) Case only 4) All:
This appears when you register a new patient through (F1), Schedule an Appointment to determine the type of information that you want to add for this new patient.
This prompt determines the type of registration information the system will display.
1 Prompts you for patient demographic information.
2 Prompts you for patient insurance information.
3 Prompts you for patient case information. 4 Prompts you demographic, insurance &
case information.
Enter the number for the type of information that you want to add for this new patient Number combinations may be used. For example, if the patient needs to be registered and FSC’ed type 1,2 at the system prompt.
• The Mini Registration has been
custom-ized to meet the Enterprise’s scheduling registration needs.
• Unlike Full Registration, which allows
you several screens to work with, Mini Registration consists of only one screen.
University of Miami: Clinical Enterprise Technologies 19
Mini Registration Screen
What is the difference between Permanent and Local address?
• Permanent Address – This address is the location the patient can be contacted
for correspondence for the majority of the year. In other words, it indicates the address the patient resides when not at the local address. This may be domestic or international.
• Local Address -- The local address in this system is the address within the
United States that the patient can be reached if different from the permanent.
System Prompt: Your Response:
Name: Enter the name of the patient using the standard IDX name format:
LASTNAME,FIRSTNAME
AKA: Enter the name the patient may be “also
know as.”
SSN: Enter the patient's 9-digit social security number.
If you do not know the Social Security number use the following numbers:
Babies: 111111111
Unknown: 000000000
DOB: Enter the date of birth for the patient.
• You must use a date delimiter to separate
the month, day and year. (/ , - ).
Age: This field automatically calculates when
the date of birth is entered.
Sex: Enter the sex of the patient. The following are valid options in this field:
'M'ale, 'F'emale, 'I'ndeterminate.
Perm Add 1: Enter the first line of the patient’s address.
This is a free text field so you can enter information in any format up 30
Characters.
• You do not need to add punctuation to the street
addresses. For instance, 2121 SW 36 TERR is correct.
University of Miami: Clinical Enterprise Technologies 21 Perm Add 3: Enter the third line of the patient’s address.
This is most typically used for foreign patient addresses.
Perm Zip: Enter the 5-digit U.S. zip code of the patient.
• Notice the City and State automatically appears
when you enter the zip code.
Verify the City and State with the patient. If the city is not correct, you may override the city by using your up <××> arrow on your keyboard.
Perm CitySt: Enter the patient’s city and state with no spaces.
• This defaults when you enter the zip, but can be
accessed to change using your up/down arrow keys.
• To override the two letter format for a foreign
city, place an asterisk before the city (e.g., *TORONTO,ONTARIO)
Perm Home Telephone:
Enter the patient’s domestic permanent home telephone number including area code.
Country: Enter the country for the permanent address.
Foreign Zip: Enter the postal code for the patient’s mailing address outside the United States.
• This is free text field.
Telephone: Enter the patient’s foreign telephone number.
This field is a free text numerical field up to 15 digits.
Local Addr 1: 1. If the patient’s local address is the same as the permanent, then press <Enter> to go forward to the Employer Telephone: field. 2. If the patient’s local address is
different from their permanent, enter the first line of the patient’s local address.
• This is a free text field so you can enter
infor-mation in any format up 30 Characters.
Local Addr 2: Enter the patient’s second address line such as an apartment number, suite number, or building number.
University of Miami: Clinical Enterprise Technologies 23 Local Zip: Enter the 5-digit U.S. zip code of the
patient.
Notice the City and State automatically appears when you enter the zip code. Verify the City and State with the patient. If the city is not correct, you may override the city by using your up
<××> arrow on your keyboard.
Local CitySt: Enter the patient’s city and state with no spaces.
• This field will default when you have entered
the zip, but can be accessed to change by using your up and down arrow keys.
Required Field DayTel:
EveTel:
Enter the telephone number of the patient at this address using a 10-digit phone number (including area code).
• You do not need to use the hyphens.
OtherTel: Telephone:
Enter the 10-digit patient's work phone number plus Extention.
Ext: Enter the extension of the patient's work
telephone.
Email Address: Enter the Email address for this patient. This is an optional field.
Scheduling Comment:
Enter up to 62-characters free text comment for this patient.
PCP: Enter patient's primary care physician.
• It is easiest to type the provider’s last name or
the partial last name then press <Enter>.
Name: When your cursor returns to the name prompt, press <F10> to file this mini registration.
Registration Document:
Identify the registration document that you want to print.
• You may print a facesheet that is a summary of
the patient’s registration information by press-ing <F>.
If you do not want to print a Registration Document press <F10>.
Print a Registration Label/Facesheet?
Enter <Y> to print a registration label/ facesheet.
Enter <N> to not print a registration label/ facesheet.
University of Miami: Clinical Enterprise Technologies 25 Print
immediately? YES=>
Press <Enter>, to print the facesheet now.
Device: Enter the name of the printer to send the document.
Right Margin ## =>
Press <Enter> to accept the default.
Date: MM/DD/YY =>
Press <Enter> to accept the default.
Registration Document:
Press <F10>
Provider: Continue entering the appointment criteria for this patient’s desired appointment.
Module Summary
• There are two types of registrations in IDX. The first is Full Registration
and the second is Mini-Registration, also known as “Scheduling” regis-tration.
• All information captured in scheduling registration will default into the
full registration so that duplicate data entry is not necessary.
• When scheduling an appointment the registration that is accessed by the
scheduler is called scheduling registration.
• Schedulers can also edit scheduling information when they access
exist-ing patient accounts.
• There are required fields on the mini-registration screen.
• There are many ways to look up a patient so that you do not create a
duplicate account.
• Patients must be registered prior to being given an appointment. • Mini Registration information carries over to the Full Registration
University of Miami: Clinical Enterprise Technologies 27
Practice Exercise
1. What are the two types of registrations used to register a patient on IDX? What is the difference(s) between them? 2. Your instructor will provide you with three patients to register
using Scheduling registration.
•You will be using these patients in subsequent exercises so be sure
to enter the data as it was given to you.
3. How do you recall the last patient you were working with? 4. If you could not figure out how to spell a patient’s name, how
could you perform a lookup without asking the patient to spell his/her name?
Single Appointments (F1)
The Patient Scheduling application enables schedulers to schedule many types of appointments.
When you schedule an appointment for one patient, this is referred to as a single appointment. This is the most commonly scheduled appointment. This module describes how to schedule a single appointment and also describes other features that can be used when scheduling a single appointment.
You may schedule single appointments using any of the following search options:
• First Available Searches and First Available Detail Searches • Summary Searches
• Quick Summary Searches
Appointment Criteria
To schedule an appointment, IDX asks you for the appointment criteria.
Appointment criteria is the information given to the scheduler by the patient pertaining to their desired appointment. Once the
appointment criteria is entered, the system can search for available appointments by locating appointments in the provider’s schedule which match the information entered on the criteria screen.
• Criteria is collected from the patient and entered on the criteria screen
(below). The criteria screen is where the scheduler enters information in order to schedule an appointment.
First Available Search (FI)
Once the appointment criteria has been entered, the scheduler will have the system search for an appointment on the system which exactly matches the appointment criteria.
Appointment History - The system tracks all scheduled appointments for a patient. The appointment status summary notifies the scheduler of the appointment history for a patient.
System Prompt: Your Response:
Select Function: Access Function 1, Scheduling an Appointment (F1)
Patient: Enter the name of the patient who wants to schedule an appointment, using the standard IDX name format.
University of Miami: Clinical Enterprise Technologies 31 Provider: Enter the name of the provider for which
you wish to schedule an appointment. Press <?> to list the valid providers.
• You can enter his/her name,
mne-monic or number.
• This entry is a lookup into the
Sched-uling Providers Dictionary (302).
• There are times when a message may
appear when you select a provider; this message is called a provider pre-scheduling message. This message is used when a provider wants the sched-uler to convey important information
to the patient when an appointment is being scheduled with him or her.
Department: Enter the name of the department for which the patient wishes to schedule an appointment.
Press <?> to list the valid departments for the selected provider.
• If the provider belongs to only one
depart-ment, then the system defaults to that department.
• A provider may work in more than one
department, therefore make sure you schedule the appointment in the correct department. The department will get filled in automatically if the provider works in only one department.
• There are times when a departmental
pre-scheduling message for the patient may appear when you select a department.
University of Miami: Clinical Enterprise Technologies 33 Appointment
Type:
Enter the type of Appointment for which you are making the appointment. (You can enter the name, mnemonic or number of the Appointment type.) To display the list of available Appointment types enter a <?> for a list.
• If the patient is an HMO patient, a
Copay / Referral window may appear. The referral and / or Copay can be entered when the appointment is being booked.
• Appointment types define the type of
appointments a patient can schedule with a provider. Every provider is set up with at least one schedule; this schedule is made up of Appointment types which patient’s can schedule with this pro-vider.
• There are times when a Appointment
type pre-scheduling message appears when you select a Appointment type. The messages displays information to tell the patient.
From Date: Enter the date from which the patient would like to schedule his/her
appointment. This is the date that the system will begin searching for an available appointment.
• When the system searches for an
appointment, it uses this date as the first date to start looking for an appointment in the provider’s sched-ule.
Use the standard IDX date format
• The system defaults to tomorrow’s
date.
The date you enter has some
restrictions. You will not be allowed to schedule an appointment farther than 365 days in the future
University of Miami: Clinical Enterprise Technologies 35 APE/DOW: Enter the time and date preference of
the patient. If the patient has no preference, you can skip this by pressing <Enter> and accepting the default of SU,M,TU,W,TH, F, and SA. APE = AM, PM, EveningDOW = Day of Week
Examples:
To specify more then one session, separate each with a comma A,P
A , P
To specify more than one day of the week, separate each with a comma. M,W,F
To specify more than one session and days of the week separate each with a comma and the session and day of the week with a slash.
A,P/M,TU,F
To specify multiple APE/DOW entries, use a semicolon.
Location: Enter the location the patient wishes to make the appointment. Entering a location assures you that only available appointments for the selected location are displayed.
This field looks up to the Scheduling Locations Dictionary (331).
University of Miami: Clinical Enterprise Technologies 37 Search Option: Once the appointment criterion is
entered IDX searches for an appointment.
The criteria enables the system to locate an appointment in the provider’s schedule, which matches the
information, entered on the criteria screen. The Patient Scheduling Application uses search options to locate available appointments. There are three different types of searches:
First Available (FI), Summary (SU) or Quick Summary (QU).
A First Available search, searches the provider’s schedule for appointments that match the patient appointment criteria. This search option is the fastest way to search for an appointment.
Press <F10> to search for the first available appointment.
Appointment? Enter the appointment number for the appointment that you want or press <Enter> to display the next 5 available appointments, then enter the number of the appointment you wish to select.
The system displays the first appointment it finds in the provider’s schedule which exactly matches the patient’s appointment criteria and display it in the message area of the criteria screen.
The system displays the date, the day of the week, the time and the location of the appointment.
To go back to see previous or see future appointments, use the commands F for forward and B for backwards.
When you find the appointment the patients wants, enter the number, and then press <Enter>.
University of Miami: Clinical Enterprise Technologies 39
First Available Screen
Appointment Data Form (ADF)
Once an appointment has been selected, the system branches to another screen referred to as the Appointment Data Form.
• The Appointment Data Form (ADF) enables the scheduler to
capture additional appointment information for the patient. For example, if a provider referred a patient, we want to col-lect this information when scheduling the appointment
System Prompt: Your Response:
New to UMMG? Enter <Y> if this patient has never been seen by a UM provider.
University of Miami: Clinical Enterprise Technologies 41 Alt Ins Coverage: If this appointment will be covered by
another insurance such as Worker’s Compensation, Self Pay, ect.
• Enter <Y> if another insurance
will pay
• Enter <N> if the FSC will pay
ALT INS: Press <?> to list all alternate insurances
Prim Lang: Press <?> to list all primary languages
ApptContact #: Enter the patient’s contact number if it is different than the home, or work number. You may use the “?” to access the DayTel:, EveTel: and OtherTel:. You may use the @D for DayTel: or the @E for the EveTel: or the @O for the OtherTel.
Reason for Appointment:
This is a free text field, which describes why the patient is coming in for a Appointment.
Referring Physician:
Enter the name of the Referring Physician for this Appointment. This is a dictionary lookup.
• Note that you will not be required to enter
the provider’s UPIN number if the provider is in the dictionary.
Referring Physician Ftxt:
If the referring physician is not in the dictionary, then enter his/her name as free text.
• Another screen displays for you to enter the
referring physician information.
Referring Agency: Enter the name of the agency that referred this patient.
Comment: Enter a comment that pertains to the patient’s appointment.
• If your comment is too long to fit press the
<Page Down> key to access additional comment lines.
An example of a comment may be ‘Using xyz Transportation for this Appointment.’.
University of Miami: Clinical Enterprise Technologies 43 Insurance: Enter the patient’s insurance. This is a
free text entry to use if the patient has not been assigned a Financial Status yet.
‚This does not replace adding a FSC for the patient.
Send Notification to pt?:
Enter <Y> to send the patient an appointment confirmation letter. Enter <N> to not send the patient an appointment confirmation letter. This is a required Field.
Send In Spanish?: Enter <Y> to send patient appointment correspondence in Spanish.
All cyclical appt on one letter?:
Enter <Y> to have all cyclical
appointment confirmations printed on one letter.
Enter <N> to have cyclical
appointments confirmations printed on different letters.
Appt Confirmed?: Enter <Y> if this appointment has been confirmed. By editing appointments
• Leave this field blank if the appointment has
not yet been confirmed.
• This is used by Physician Referral Office
(PRO) in order to determine if the appoint-ment was confirmed
UMMG Referral #: Enter the UMMG generated referral number for this Appointment.
Enter <?> to lookup a referral entered in Open Referrals
Missing Referral Reason:
Enter the reason that this patient does not have an authorization.
Auth #: Enter the plan generated authorization number for this Appointment.
If the patient does not have the referral on IDX, then enter the number in this field
Copay Enter the copayment amount for this
University of Miami: Clinical Enterprise Technologies 45
Referring Physician Field in the Appointment Data Form
In order to capture and track referrals to our health system, the Referring Physician Field in the Appointment Data Form is a required field
Package#: Enter the package number. This refers to International patients.
Send to Perm or Local addr (P/L)
Enter <P> to send correspondence for this appointment to the permanent address or <L> to send to the local address
Scenario 1:
The doctor that referred the patient is in the Referring Physician
dictionary, follow the steps listed below: In the ‘Ref Phys’ field, type the referring physician’s last name and select theappropriate doctor from the dictionary
Scenario 2
The doctor that referred the patient is not in the Referring Physician dictionary, fol-low the steps listed befol-low:In the ‘Ref Phys’ field, enter REF PHY NOT FOUND
University of Miami: Clinical Enterprise Technologies 47
In the ‘Ref Phys Ftxt’ field, free text the doctor’s name. In an effort to keep the data standardized please use the following format when free texting the doctor’s name: Last name MD, First name. .
The system will then route you to the Referring Physician Free textscreen. All the fields in this screen must be populated.
Please Note: If the Referring Physician is not in the dictionary, you need to com-plete a
Referring Physician (Provider) Dictionary #123 Maintenance Form and email it to
mailto:[email protected] .The form can be obtained online at http:// cet.med.miami.edu/x96.xml.
Scenario 3
If the patient was self referred, select the Self Referred option from the Ref Phys: prompt
University of Miami: Clinical Enterprise Technologies 49
Appointment(for Hospital Scheduling only)
When a hospital physician orders an ancillary test, the scheduler must link that phy-sician on the ancillary appointment’s referring phyphy-sician ADF field. This ensures that the ancillary and physician Appointments are combined onto one bill for that date of service.
TABLE 1. Examples
Scenario Appointment ADF Referring Physician field
A Patient sees PCP, Dr. Jones Appointment with Dr. Jones No referring needed B Dr. Jones refers patient to Dr. Smiddy Appointment with Dr. Smiddy Dr. Jones C Dr. Smiddy wants patient to have an ancillary test Ancillary appoint-ment Dr. Smiddy
The table below indicates the step by step instructions on how to book a physician and ancillary linked appointment.
TABLE 2. Step by step booking a physician and ancillary linked appointment
Procedure Description
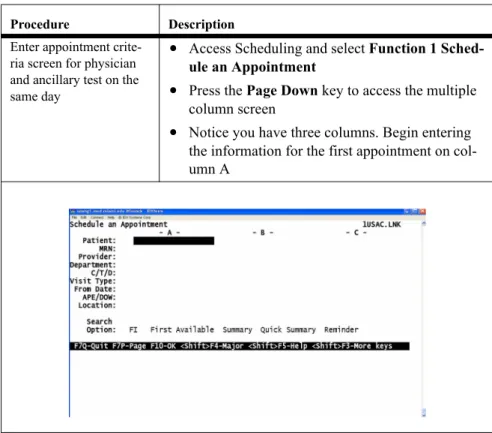
Enter appointment crite-ria screen for physician and ancillary test on the same day
• Access Scheduling and select Function 1
Sched-ule an Appointment
• Press the Page Down key to access the multiple
column screen
• Notice you have three columns. Begin entering
the information for the first appointment on col-umn A
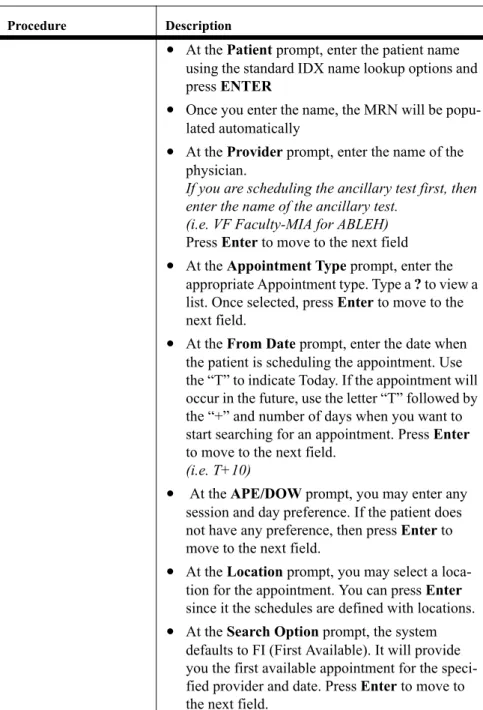
University of Miami: Clinical Enterprise Technologies 51 • At the Patient prompt, enter the patient name
using the standard IDX name lookup options and press ENTER
• Once you enter the name, the MRN will be
popu-lated automatically
• At the Provider prompt, enter the name of the
physician.
If you are scheduling the ancillary test first, then enter the name of the ancillary test.
(i.e. VF Faculty-MIA for ABLEH)
Press Enter to move to the next field
• At the Appointment Type prompt, enter the
appropriate Appointment type. Type a ? to view a list. Once selected, press Enter to move to the next field.
• At the From Date prompt, enter the date when
the patient is scheduling the appointment. Use the “T” to indicate Today. If the appointment will occur in the future, use the letter “T” followed by the “+” and number of days when you want to start searching for an appointment. Press Enter
to move to the next field.
(i.e. T+10)
• At the APE/DOW prompt, you may enter any
session and day preference. If the patient does not have any preference, then press Enter to move to the next field.
• At the Location prompt, you may select a
loca-tion for the appointment. You can press Enter
since it the schedules are defined with locations.
• At the Search Option prompt, the system
defaults to FI (First Available). It will provide you the first available appointment for the speci-fied provider and date. Press Enter to move to the next field.
TABLE 2. Step by step booking a physician and ancillary linked appointment
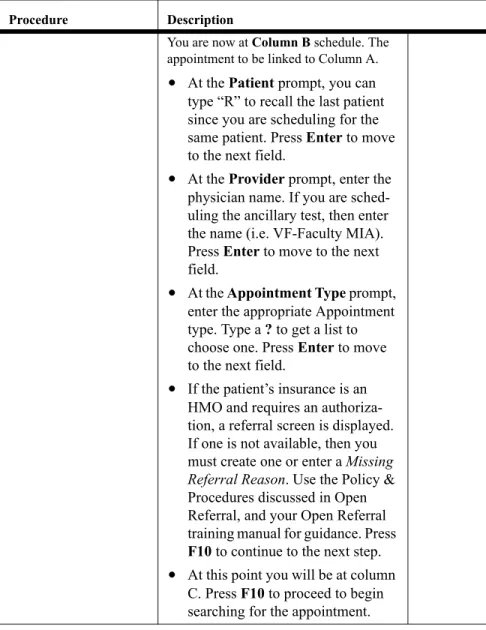
You are now at Column B schedule. The appointment to be linked to Column A.
• At the Patient prompt, you can
type “R” to recall the last patient since you are scheduling for the same patient. Press Enter to move to the next field.
• At the Provider prompt, enter the
physician name. If you are sched-uling the ancillary test, then enter the name (i.e. VF-Faculty MIA). Press Enter to move to the next field.
• At the Appointment Type prompt,
enter the appropriate Appointment type. Type a ? to get a list to choose one. Press Enter to move to the next field.
• If the patient’s insurance is an
HMO and requires an authoriza-tion, a referral screen is displayed. If one is not available, then you must create one or enter a Missing Referral Reason. Use the Policy & Procedures discussed in Open Referral, and your Open Referral training manual for guidance. Press
F10 to continue to the next step.
• At this point you will be at column
C. Press F10 to proceed to begin searching for the appointment.
TABLE 2. Step by step booking a physician and ancillary linked appointment
University of Miami: Clinical Enterprise Technologies 53
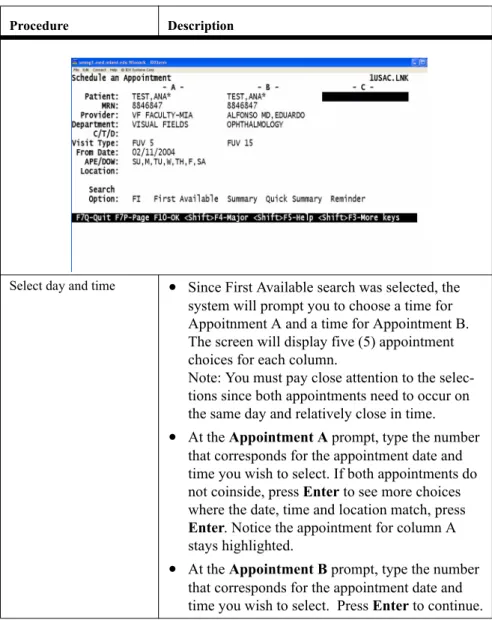
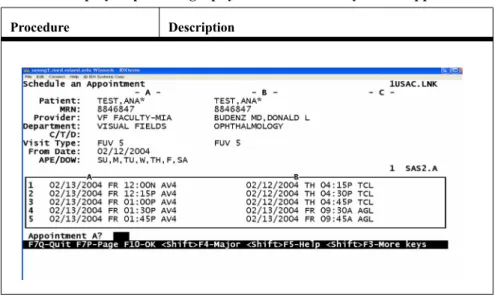
Select day and time • Since First Available search was selected, the
system will prompt you to choose a time for Appoitnment A and a time for Appointment B. The screen will display five (5) appointment choices for each column.
Note: You must pay close attention to the selec-tions since both appointments need to occur on the same day and relatively close in time.
• At the Appointment A prompt, type the number
that corresponds for the appointment date and time you wish to select. If both appointments do not coinside, press Enter to see more choices where the date, time and location match, press
Enter. Notice the appointment for column A stays highlighted.
• At the Appointment B prompt, type the number
that corresponds for the appointment date and time you wish to select. Press Enter to continue.
TABLE 2. Step by step booking a physician and ancillary linked appointment
TABLE 2. Step by step booking a physician and ancillary linked appointment
University of Miami: Clinical Enterprise Technologies 55
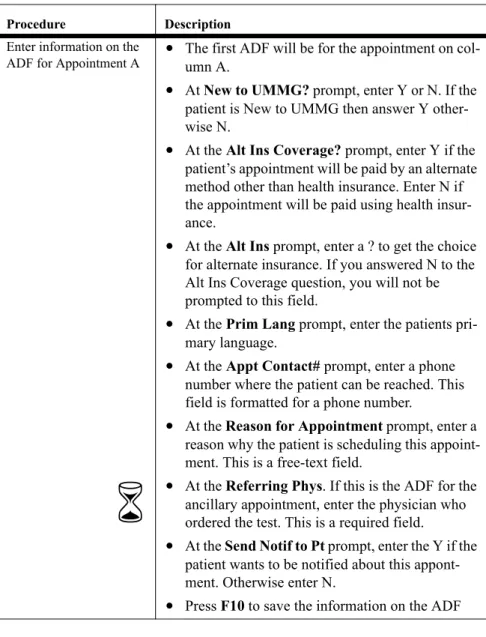
Enter information on the ADF for Appointment A
• The first ADF will be for the appointment on
col-umn A.
• At New to UMMG? prompt, enter Y or N. If the
patient is New to UMMG then answer Y other-wise N.
• At the Alt Ins Coverage? prompt, enter Y if the
patient’s appointment will be paid by an alternate method other than health insurance. Enter N if the appointment will be paid using health insur-ance.
• At the Alt Ins prompt, enter a ? to get the choice
for alternate insurance. If you answered N to the Alt Ins Coverage question, you will not be prompted to this field.
• At the Prim Lang prompt, enter the patients
pri-mary language.
• At the Appt Contact# prompt, enter a phone
number where the patient can be reached. This field is formatted for a phone number.
• At the Reason for Appointment prompt, enter a
reason why the patient is scheduling this appoint-ment. This is a free-text field.
• At the Referring Phys. If this is the ADF for the
ancillary appointment, enter the physician who ordered the test. This is a required field.
• At the Send Notif to Pt prompt, enter the Y if the
patient wants to be notified about this appont-ment. Otherwise enter N.
• Press F10 to save the information on the ADF
TABLE 2. Step by step booking a physician and ancillary linked appointment
Appointment Re-Cap
screen for Appointment A • The appointment re-cap screen is displayed with the information entered on the ADF. Press Enter
to continue.
VM/HPA Visit creation for Appointment A
If the appointment is within 14 days, the system will take you throught the process of creating a Appointment. You will see Registration, Plans, Hold Bills and Demand Form. Press F10 at each screen.
Press Enter to continue.
TABLE 2. Step by step booking a physician and ancillary linked appointment
University of Miami: Clinical Enterprise Technologies 57
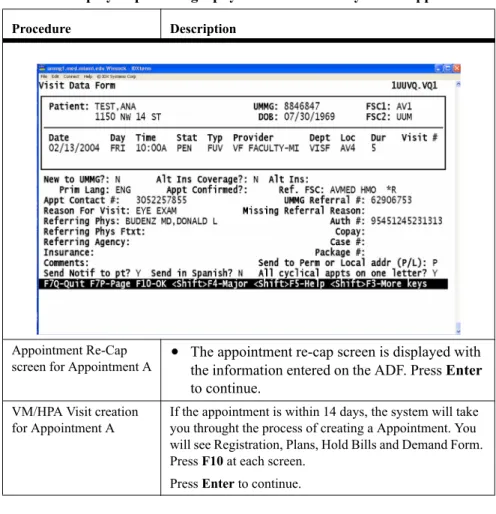
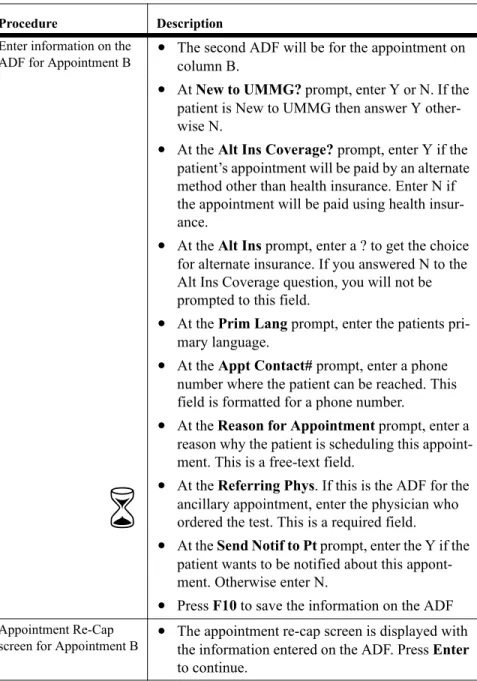
Enter information on the ADF for Appointment B
• The second ADF will be for the appointment on
column B.
• At New to UMMG? prompt, enter Y or N. If the
patient is New to UMMG then answer Y other-wise N.
• At the Alt Ins Coverage? prompt, enter Y if the
patient’s appointment will be paid by an alternate method other than health insurance. Enter N if the appointment will be paid using health insur-ance.
• At the Alt Ins prompt, enter a ? to get the choice
for alternate insurance. If you answered N to the Alt Ins Coverage question, you will not be prompted to this field.
• At the Prim Lang prompt, enter the patients
pri-mary language.
• At the Appt Contact# prompt, enter a phone
number where the patient can be reached. This field is formatted for a phone number.
• At the Reason for Appointment prompt, enter a
reason why the patient is scheduling this appoint-ment. This is a free-text field.
• At the Referring Phys. If this is the ADF for the
ancillary appointment, enter the physician who ordered the test. This is a required field.
• At the Send Notif to Pt prompt, enter the Y if the
patient wants to be notified about this appont-ment. Otherwise enter N.
• Press F10 to save the information on the ADF
Appointment Re-Cap
screen for Appointment B • The appointment re-cap screen is displayed with the information entered on the ADF. Press Enter
to continue.
TABLE 2. Step by step booking a physician and ancillary linked appointment
VM/HPA Visit creation for Appointment B
If the appointment is within 14 days, then the system will take you throught the process of creating a Appointment. You will see Registration, Plans, Hold Bills and Demand Form. Press F10 at each screen.
The system to take you back to the Schedule an Appointment screen
TABLE 2. Step by step booking a physician and ancillary linked appointment
University of Miami: Clinical Enterprise Technologies 59
Appointment Re-Cap Screen
When you Press <F10> to exit the Appointment Data Form, you are brought to the appointment re-cap screen.
System Prompt: Your Response: Ok to file the appointment? YES=>
This prompt enables the scheduler to file the appointment and take an appointment slot in the provider’s schedule.
• Press <Enter> to accept this default of
Yes, and file the patient’s appointment.
• Press <N> if you do not want to file this
appointment. Appointment#:
###
When you file the appointment, the system assigns a Appointment number to the appointment.
The Appointment number is used in Billing and Accounts Receivables (BAR) during charge entry; the Appointment number can be used to default
appointment information.
Messages Provider, Department, and Appointment Type Post-Scheduling Message may appear after you file the appointment. The post scheduling messages are used when a provider and/or clinic want the scheduler
University of Miami: Clinical Enterprise Technologies 61
For appointments scheduled for hospital Appointments and the appointment date is within the next 14 day, a Visit will be created in VM/HPA as soon as the appointment is filed <F10>.
Appointment Re-Cap Screen and VM Action Codes
If the appointment is not for a hospital Appointment or if the appointment is for a date more than 14 days in the future (even if it is a hospital Appointment), these screens will not display.
The end result of the special screens is that a VM/HPA Visit will be created auto-matically by the Sched Link.
XS is the Pre-Admit through the Sched Link Action Code Process that is automati-cally executed.
Patient: This prompt enables the scheduler to return to the criteria screen so you can schedule another appointment.
TABLE 3. XS - Pre-Admit through the Sched Link Action Code Process
Action Code Definition What To Do
RE Registration Verify the patient’s demographic data IV Assign Plans to the Visit The system will automatically assign the Plans based on the Registration FSCs or Alternate Insurance if it is indicated in the ADF.
HB Hold Bill Work all the Hold Bills that you can. DF Demand Form Select appropiate forms to be printed.
Category / Team / Department
Searches
Use this type of search when a new patient calls for an appointment and does not want to see a specific provider, but just needs an appointment within a scheduling department.
University of Miami: Clinical Enterprise Technologies 63 Patient: Enter the name of the patient who wants to
schedule an appointment, using the standard IDX format.
Provider: Press <Enter> to bypass this prompt.
Department: Enter the name of the department for which the patient wishes to schedule an appointment.
Press <?> to list the valid scheduling departments.
• This field is a lookup into the
Schedul-ing Departments Dictionary. This dic-tionary describes the medical
specialties within a department; for example, Pedi Associates. There are times when a message may appear when you select a department; this mes-sage is called a department schedul-ing message. The department pre-scheduling message is used when a scheduling department wants the sched-uler to convey information to the patient being scheduled.
C/T/D: Enter a <D> to search for a provider within a department.
Enter <C> to search for a provider within a certain category.
• When the system performs a
depart-ment search, available appointdepart-ments are displayed in time order and then alpha-betically by the provider name.
Continue to complete the appointment criteria screen and proceed as you would with a regular appointment.
University of Miami: Clinical Enterprise Technologies 65
First Available Detail Search
A detail search allows you to view the provider’s schedule while scheduling the appointment.
• A first available detail search enables the scheduler to view the
pro-vider’s schedule prior to scheduling an appointment.
• A first available detail search enables the scheduler to obtain more information about the provider’s schedule before booking the appoint-ment into a session.
• A first available detail search enables the scheduler to perform other
tasks while scheduling an appointment.
• First Available Detail enables you to:
• Schedule an appointment into a time slot that is not an exact match; for
example, you can schedule a New Patient Appointment appointment in a time slot defined for a Consultation.
• Schedule an appointment into a non-clinic slot.
• Overbook by scheduling an appointment into a time slot that is already
full.
• Overbooking on IDX means exceeding the allocation that was entered
in the provider’s master schedule. For example, the provider schedule is set up so two New Patient Appointments can be scheduled at 9:00 a.m. the scheduler overbooks when he/she schedules more than two at this time.
System Prompt: Your Response:
Select Function: Access Function 1, Scheduling an Appointment (F1).
Enter the criteria as explained in the earlier lesson.
University of Miami: Clinical Enterprise Technologies 67 Search Option: Press <F10> to search for the first
available appointment.
• Remember, searching for an
appoint-ment enables the system to locate an appointment in the schedule which matches the information entered on the criteria screen.
Appointment? You may either view the detail for the first appointment “1)” or press <Enter> to display the next five appointments. You can display appointment detail by entering a command at the
Appointment?: prompt.
You enter D# (the sequence number of the appointment.)
Display detail for which session?
Here is where you specify the session for which to view appointment detail.
² You can enter A or 1 to see the detail of the morning session of the
provider’s schedule.
² Enter P or 2 to see the detail of the afternoon session of the provider’s schedule.
² Enter E or 3 to see the detail of the evening session of the provider’s schedule.
The system displays the first available appointment that exactly matches the Appointment type on the criteria screen. Use your up arrow to scroll up until the time slot that you wish to book the appointment is highlighted.
• To choose a time slot from First
Avail-able Detail, you move the highlighted bar with the up and down arrow keys to the time slot you want to schedule and Press <Enter> to select the appoint-ment time.
• Notice how the system displays a
dia-mond next to the selected appointment. This lets you know you have selected the time slot.
Press <F10> and the system will display the Appointment Data Form for you to continue to schedule the appointment. Overbook Slot? Enter Y to overbook the slot that you
selected.
Enter N to not overbook the slot and return to the detail screen to select another time slot option.
University of Miami: Clinical Enterprise Technologies 69
First Available Detail Screen
System Display: Definition:
Time Lists the time the appointment slot
begins.
Typ Lists the Appointment types booked
into the time slot.
“XXX” appears in the Typ column if the appointment time was added to the schedule.
Dur Lists the duration, or length of the time
slot of the Appointment type booked into this time slot.
Bk List the number of appointments
currently booked into this time slot. The Bk column contains a tilde (~) if there are more patients booked into this slot than the slot is set up to hold..
Av List the number of slots that are still available to be booked for
appointments.
• If this slot is highlighted, it means it
is an exact match of the Appointment type entered on the criteria screen. A hyphen (-) appears before the patient name in this column indicating that there are no more available appointment in these time slot.
Name, MRN, Age, Telephone
This list information regarding the patient booked into each time slot.
University of Miami: Clinical Enterprise Technologies 71
First Available Detail Action Codes
Action codes are a one-letter codes that appear at the bottom of screens. Action codes appear in a menu in the message area of the screen and vary by IDX applications, functions and activities.
Action Code: Definition: E - Add, Edit
Commentx
Adds a comment to a provider’s schedule while you are scheduling an appointment. Select the time slot you wish to edit by using your up and down arrow keys, then press <E> to add/edit the time slot comments.
You can enter up to 22 character of free text or edit an existing comment by typing over it, or you can delete it by press <F1>.
• This comment will appear whenever
you display the session containing this time slot.
When you are finished editing the comments, press <F10>.
O – View Resources
Displays the resources for the Appointment types.
R - Registration Press <R> to select the Registration action code.
System Prompt Your response: Select: 1) Reg
only, 2) FSCs only, 3) Case only, 4) All:
Select the areas of registration you wish to edit, then press
<Enter>.
When you have finished making the changes in registration, Press <F10> to file the
changes and return to the First Available Detail Screen.
University of Miami: Clinical Enterprise Technologies 73 Select: 1) Reg
only, 2) FSCs only, 3) Case only, 4) All:
Select the areas of registration you wish to edit, then press
<Enter>.
When you have finished making the changes in registration, Press <F10> to file the
changes and return to the First Available Detail Screen.
X - Add Time Allows you to add time to the provider’s schedule while scheduling an appointment. Enter the time you wish the appointment to begin, Press <Enter> then Press <F10>
The system will display the message Time slot XX:XX added and then display the prompt Non-clinic comment for slot just added: Enter a free-text comment describing the time slot that was just added.
• When you use this action code, you are
creating a time slot that does not currently exist in the provider’s schedule, not over-booking a time slot. When you use add time on the fly, the system checks the fol-lowing:
Duplicate Slot: if there is another slot at the same time then the “Duplicate Slot” message will display and the time will not be added
Overlapping Slot: if there is an existing slot that overlaps the requested time the “Overlapping Slot” message will displays and the slot is not added Time Slot is in Next Session: if the time already exists in the next session, the “Time Slot in next session” will display.
University of Miami: Clinical Enterprise Technologies 75
Summary Searches (SU)
The Summary Search option enables you to view a provider’s schedule before selecting a time slot for an appointment.
• Remember, we viewed the provider’s schedule when we
scheduled an appointment using First Available Detail. First Available Detail displays one session where as a Summary Search will display three sessions.
• Summary search has some options that do not exist in First
Available Detail.
Use a Summary Search to:
• Schedule an appointment.
• Display the next session of a provider’s schedule.
• Change the session of the provider’s schedule from the
Sum-mary screen.
• See more than one session of a provider’s schedule. • Overbook a provider’s schedule.
System Prompt: Your Response:
Select Function: Access function 1, Schedule an Appointment.
Patient: Enter the criteria for the appointment as you did in first available.
Summary Search Screen
Search Option: Enter SU to have the system perform a Summary Search.
Press <F10> to search for the first available appointment.
Once the appointment criterion has been entered, the system searches for an appointment.
University of Miami: Clinical Enterprise Technologies 77 <Ï> and <Ð>
Arrow Keys
Moves you to the different time slots in the session
<Enter> Selects a time slot that you wish to book an appointment
A diamond is displayed next to selected
appointments
<F10> Moves forward to the Appointment Data Form to continue. Action / Action Code: / : A – Appointments
This action code branches to the patient
appointment screen to view the patient’s existing appointments.
B – Back This action codes goes back to see the previous three sessions back until the date you entered at the From Date:.
• Use this code when you about to select an available
time, but the patient asks if there is another appointment available on another date and session.
D - Detail Summary
This code resembles the First Available Detail Screen.
E - Add, Edit Comment
This action adds a comment to the provider’s time slot that will appear whenever you display the time slot’s session.
Select the time you wish to edit by using your up and down arrow keys, then press <E> to add/edit the time slot comments. You may enter up to 22 characters of free text.
When you are finished editing the comments, press <F10>, and continue to make the patient appoinmtment.
N- Next Displays the next three sessions of the provider schedule that match the appointment criteria. R-
Registration
Press <R> to select the Registraion action code. Select: 1) Reg only, 2)FSCs only, 3)Case only, 4)All 1=>
Select the areas of registration you wish to edit, then press <Enter>.
When you have finished making the changes in registration, Press <F10> to file the changes and return to the Summary Screen.
University of Miami: Clinical Enterprise Technologies 79 S - Change
Date, Session
This action code displays another date or session. Your black selector bar must be in the session that you wish to change.
Press <F10> to redisplay the action codes. New Date, Session: Enter the new date and session you want the system to display in the following format: MM/DD/YYS_ followed by the session initial (A, P, E). (Ex., 6/3/98SA) O- Resources This action code displays any resources attached to
the appointment such as Radiology.
X – Add Time This action code allows you to add time to the provider’s schedule that does not currently exist. This is different from overbooking a time slot. Enter the time you wish the appointment to begin, the Press <Enter>, then press <F10>.
Time slot XX:XX added
This message appears when the slot has been added.
Non-clinic comment for slot just added:
Enter a free text comment describing the time slot that was added to the provider’s schedule.
+Duplicate Slot:
This message appears if there is another slot at the same time. If this message appears, the slot will not be added.
• Overbook the slot instead
Overlapping Slot
This message appears if there is an existing slot that overlaps the requested time.
The time will not be added.
• Overbook the slot instead.
Time Slot in next session
This message appears if the time slot is in the next session, in other words, the time already exists in the next session so move to the next session. Extend session end time? NO =>.
University of Miami: Clinical Enterprise Technologies 81
Quick Summary Search (QU)
The Quick Summary Search option also enables you to view a provider’s schedule before selecting a time slot for an appointment. We will see that we can do all of the things we did using First Available Detail when using a Summary Search.
Use Quick Summary to:
• Schedule an appointment
• Display the next session of a provider’s schedule
• Change the session of the provider’s schedule from the Summary
screen.
System Prompt: Your Response:
Select Function: Access function 1, Schedule an Appointment.
Patient: Enter the criteria for the appointment as you did in first available.
Search Option: Enter QU to have the system perform a Quick Summary.
Press <F10> to search for the first available appointment.
Once the appointment criterion has been entered, the system searches for an appointment.
University of Miami: Clinical Enterprise Technologies 83
Quick Summary Screen
Action Code: Description:
A - Appointments View patient appointments.
B - Back Displays the previous three sessions back until the date you entered at the From Date: prompt.
D - Detail Summary This code resembles the First Available Detail Screen.
N - Next Display the next three sessions of the provider’s schedule.
O - Resources Displays the resources for the time slot. R - Registration Press <R> to select the Registration action
code. S - Change Date,
Session
Displays another date or session of the active session box.
Press <F10> to redisplay the action codes. New Date, Session:
Enter the new date and session you want the system to display in the following format: MM/DD/YY,S followed by the session initial (A, P, E)
To scroll forward, type F#, B# to represent Forward or Back, followed by the number of days in either direction.
X – Add Time This action code allows you to add time to the provider’s schedule that does not currently exist in the provider’s schedule. Again, this is different from overbooking. Enter the time you wish the appointment to begin, the Press <Enter>, then press <F10>.