CP/M-86®
Operating System
[(ill
DIGITAL
RESEARCHTM
CP/M-86®
Operating System
COPYRIGHT
Copyright © 1981 by Digital Research. All rights reserved. No part of this publication may be reproduced, transmitted, transcribed, stored in a retrieval system, or translated into any· language or computer language, in any form or by any means, electronic, mechanical, magnetic, optical, chemical, manual or otherwise, without the prior written permission of Digital Research, Post Office Box 579, Pacific Grove, California, 93950.
DISCLAIMER
Digital Research makes no representations or warranties with respect to the contents hereof and specifically disclaims any implied warranties of merchantability or fitness for any particular purpose. Further, Digital Research reserves the right to revise this publication and to make changes from time to time in. the content hereof without obligation of Digital Research to notify any person of such revision or changes.
TRADEMARKS
CP 1M and CP IM-86 are registered trademarks of Digital Research. ASM-86 and DDT-86 are trademarks of Digital Research. Intel is a registered trademark of Intel Corporation. Z80 is a registered trademark of Zilog, Inc.
The CP/M-86 Operating System User's Guide was prepared using the Digital Research TEX Text Formatter and printed in the United States of America by Commercial Press/ Monterey.
Foreword
CP/M-86 is an operating system designed by Digital Research for the 8086 and 8088 sixteen bit microprocessor. CP/M-86 is distributed with its accompanying utility programs on two eight-inch single sided, single density floppy disks.
CP/M-86 file structure is compatible with the file structure of Digital Research's CP/M® operating system for computers based on the 8080 or Z80® microprocessor chips. This means that if the disk formats are the same, as in standard single density format, CP/M-86 can read the same data files as CP/M. The system calls are as close to CP/M as possible to provide a familiar assembly language programming envi-ronment. This allows application programs to be easily converted to execute under CP/M-86.
The minimum hardware requirement for CP/M-86 consists of a computer system based on an 8086 or 8088 microprocessor, 32K (kilobytes) of random access memory, a keyboard and a screen device, and generally, two eight-inch floppy disk drives with diskettes. The CP/M-86 operating system itself, excluding the utility programs supplied with it, uses approximately 12 kilobytes of memory. To run DDT-86@, you must have 48K of memory, and to run ASM-86@ and many of the application programs that run under CP/M-86, you must have 64K of memory.
If you expand your system beyond these minimums, you will appreciate that CP/M-86 supports many other features you can add to your computer. For example, CP/M-86 can support up to one megabyte of Random Access Memory (RAM), the maximum allowed by your 8086 or 8088 microprocessor. CP/M-86 can support up to sixteen logical disk drives of up to eight megabytes of storage each, allowing up to 128 megabytes of on-line storage.
This manual introduces you to CP/M-86 and tells you how to use it. The manual assumes your CP/M-86 system is up and running. (The interface between the hardware and the software must be configured in the Basic Input Output System (BIOS) according to the instructions in the CP/M-86 System Guide.) The manual also assumes you are familiar with the parts of your computer, how to set it up and turn it on, and how to handle, insert and store disks. However, it does not assume you have had a great deal of experience with computers.
you need to understand the command summary in Section 4. The command summary describes all of the user programs supplied with CP/M-86.
Section 5 tells you how to use ED, the CP/M-86 file editor. With ED you can create and edit program, text and data files.
Appendix A supplies an ASCII to Hexadecimal conversion table. Appendix B lists the filetypes associated with CP/M-86. Appendix C lists the CP/M-86 Control Char-acters. Appendix D lists the messages CP/M-86 displays when it encounters special conditions. If the condition requires correction, Appendix D can also tell you what actions you should take before you proceed. Appendix E provides a simple glossary of commonly used computer terms for the convenience of the user.
Table of Contents
1 Introduction
1.1 How to Get CP IM-86 Started ... 1
1.2 The Command Line ... 2
1. 3 CP 1M Line Editing Control Characters ... 4
1.4 Why You Should Back Up Your Files... ... 5
1.5 How to Make a Copy of Your CP IM-86 Disk ... 6
2 Files, Disks, Drives and Devices 2.1 What is a File? ... 9
2.2 How Are Files Created? ... 9
2.3 Naming Files-What's in a Name? ... 10
2.4 Accessing Files-Do You Have the Correct Drive? ... 11
2.5 Accessing More Than One File ... 12
2.6 How Can I Organize and Protect My Files? ... 13
2. 7 How Are Files Stored on a Disk? ... 15
2. 8 Changing Disks ... 15
2. 9 Changing the Default Drive ... 16
2.10 More CP IM-86 Drive Features ... 16
2.11 Other CP/M-86 Devices ... 17
3 CP IM-86 Command Concepts 3.1 Two Types of Commands ... 19
3.2 Built-in Commands ... 19
3.3 Transient Utility Commands ... 20
3.4 How CP IM-86 Searches for Commands ... 21
3.5 Control Character Commands ... . . . 23
4 Command Summary 4.1 Let's Get Past the Formalities ... 25
4.2 How Commands Are Described ... 26
4.3 The ASM-86 (Assembler) Command ... 30
4.4 The COPYDISK (Copy Disk) Command ... 32
4.5 The DDT-86 (Dynamic Debugging Tool) Command ... 34
4.6 The DIR (Directory) Built-in ...
0...
364.7 The ED (Character File Editor) Command ... 39
Table of Contents
(continued)
4.9 The GENCMD (Generate CMD File) Command... 46
4.10 The HELP (Help) Command ... 48
4.11 PIP (Peripheral Interchange Program-Copy File) Command ... 50
4. 11. 1 Single File Copy ... 50
4.11.2 Multiple File Copy ... 53
4.11.3 Combining Files ... 54
4.11.4 Copy Files to and from Auxiliary Devices ... 55
4.11.5 Multiple Command Mode ... 57
4.11.6 Using Options With PIP ... 58
4.12 The REN (Rename) Built-in . . . ... . . 62
4.13 The STAT (Status) Command . . .. . . ... . ... . . .... .. .... . .. . . 63
4.13.1 Set a Drive to Read-Only Status ... 64
4.13.2 Free Space on Disk ... 65
4.13.3 Files-Display Space Used and Access Mode ... 66
4.13.4 Set File Access Modes (Attributes) ... 69
4.13.5 Display Disk Status ... 70
4.13.6 Di~play User Numbers With Active Files ... 71
4.13.7 Display STAT Commands and Device Names ... 72
4.13.8 Display and Set Physical to Logical Device Assignments ... 72
4.14 The SUBMIT (Batch Processing) Command ... 73
4.15 The TOD (Display and Set Time of Day) Command ... 76
4.16 The TYPE (Display File) Built-in ... 78
4.17 The USER (Display and Set User Number) Built-in ... 79
5 ED, The CP IM-86 Editor 5.1 Introduction to ED ... 81
5.2 Starting ED ... 81
5.3 ED Operation ... ". ... . . ... .... . .. . .. .. . . . .. 82
5.3.1 Appending Text into the Buffer ... 84
5.3.2 ED Exit ... 85
5.4 Basic Editing Commands ... 86
5.4.1 Moving the Character Pointer ... 88
5.4.2 Displaying Memory Buffer Contents ... 90
5.4.3 Deleting Characters ... 91
5.4.4 Inserting Characters into the Memory Buffer ... 92
Table of Contents
(continued)
5.5 Combining ED Commands ... 95
5.5.1 Moving the Character Pointer ... 96
5.5.2 Displaying Text ... 96
5.5.3 Editing... 97
5.6 Advanced ED Commands ... 98
5.6.1 Moving the CP and Displaying Text ... 98
5.6.2 Finding and Replacing Character Strings ... 99
5.6.3 Moving Text Blocks ... 103
5.6.4 Saving or Abandoning Changes: ED Exit ... 105
5.7 ED Error Messages ... 107
Appendixes
A ASCII and Hexadecimal Conversions ... 111B CP/M-86 File Types ... 117
C CP/M-86 Control Characters ... 119
D CP/M-86 Error Messages ... 121
E User's Glossary 133
List of Tables
1-1 Control Character Commands ... 42-1 CP/M-86 Filetypes ... .. 11
2-2 CP IM-86 Logical Devices... . ... .. . . .. .. . . .... . . 17
3-1 Built-In Commands ... 19
3-2 CP IM-86 Utilities ... 20
Table of Contents
(continued)
4-1 DDT-86 Commands ... 34
4-2 ED Command Summary ... ... 39
4-3 PIP Options ... 58
5-1 Text Transfer Commands ... 84
5-2 Basic Editing Commands ... 87
5-3 CP IM-86 Line Editing Controls ... 93
5-4 ED Error Symbols ... 107
5-5 ED Disk File Error Messages ... 109
A-1 ASCII Symbols ... 111
A-2 ASCII Conversion Table ... 112
B-1 Filetypes. . . .. 117
C-1 CP/M-86 Control Characters ... 119
0-1 CP/M-86 Command Messages ... 121
Section 1
Introduction to
CP/M-86
This section discusses the fundamentals of your computer and CP/M-86. It describes
CP/M-86 start-up procedures and initial messages. Then it shows you how to enter a CP/M-86 command and make a back-up copy of your CP/M-86 distribution disk.
. CP/M-86 manages information stored magnetically on disks by grouping this
infor-/ mation into files of programs or data. CP/M-86 can copy files from a disk to your
computer's memory, or to a peripheral device such as a printer. CP/M-86 performs
these and other tasks by executing various programs according to commands you enter at your keyboard.
Once in memory, a program runs through a set of steps that instruct your computer to perform a certain task. You can use CP/M-86 to create your own CP/M-86 programs,
or you can choose from the wide variety of CP/M-86 application programs that
enter-tain, educate, and solve commercial and scientific problems.
1.1 How to Get
CP/M-86
Started
Starting or loading CP/M-86 means reading a copy of CP/M-86 from your CP/M-86 distribution system disk into your computer's memory.
After you have turned on the power, insert your CP/M-86 system disk into drive A,
generally a built-in drive on the right side of the computer unit. Close the drive door. Press the RESET or RESTART button. This automatically loads CP/M-86 into memory.
If power is on and you want to restart CP/M-86, first make sure your CP/M-86
system disk is in drive A and then press the RESET or RESTART button. This is called System Reset, or booting the system.
At System Reset, CP/M-86 is loaded into memory. The first thing CP/M-86 does
after it is loaded into memory is display the following message on your screen:
CP/M-8S Version V.V
1.1 How to Get CP/M-86 Started CP/M-86 User's Guide
The version number, represented above by V.V, tells you the major and minor revision level of the CP/M-86 version that you own. This display is followed by the two character
message:
A)
The A> symbol is the CP/M-86 system prompt. The system prompt tells you that CP/M-86 is ready to read a command from your keyboard. It also tells you that drive
A is your default drive. This means that until you tell CP/M-86 to do otherwise, it
looks for program and data files on the disk in drive A.
1.2 The Command Line
CP/M-86 performs certain tasks according to specific commands that you type at
your keyboard. A CP/M-86 command line is composed of a command keyword, an
optional command tail, and a carriage return keystroke. The carriage return key might be marked RETURN or CR on your particular terminal. The command keyword identifies a command (program) to be executed by the microprocessor. The command tail can contain extra information for the command such as a filename, option or parameter. To end the command line, you must press the RETURN key.
As you type characters at the keyboard, they appear on your screen and the cursor (position indicator) moves to the right. If you make a typing mistake, press the Back-space key if your terminal has one, or the CTRL-H characters if it does not, to move the cursor to the left and correct the error.
You can type the keyword and command tail in any combination of upper-case and lower-case letters. CP/M-86 treats all letters in the command line as upper-case.
Generally, you type a command line directly after the system prompt. However,
CP/M-86 does allow spaces between the prompt and the command keyword.
A command keyword identifies one of two different types of commands: Built-in commands and Transient Utility commands. Built-in commands reside in memory as a part of CP/M-86 and can be executed immediately. Transient Utility commands are
CP/M-86 User's Guide 1.2 The Command Line
For Transient Utilities, CP/M-86 checks only the command keyword. If you include a command tail, CP/M-86 passes it to the utility without checking it because many
utilities require unique command tails.
Let's use one Built-in command to demonstrate how CP/M-86 reads command lines.
The DIR command tells CP/M-86 to display the names of disk files on your screen.
Type the DIR keyword after the system prompt, omit the command tail, and press RETURN.
A)DIR
CP/M-86 responds to this command by writing the names of all the files that are stored
on the disk in drive A. For example, if you have your CP/M-86 system disk in drive A, these filenames, among others, appear on your screen:
COPYDISK CMD
PIP
CMD
STAT
CMD
CP/M-86 recognizes only correctly spelled command keywords. If you make a typing error and press RETURN before correcting your mistake, CP/M-86 echoes the
com-mand line with a question mark at the end. For example, if you accidently mistype the DIR command, CP/M-86 responds:
A)DJR
DJR?
to tell you that it can not find the command keyword.
DIR accepts a filename as a command tail. You can use DIR with a filename to see if a specific file is on the disk. For example, to check that the Transient Utility program COPYDISK.CMD is on your system disk, type:
A)DIR CDPYDISK,CMD
CP/M-86 performs this task by writing either the name of the file you specified or the
1.2 The Command Line CP/M-86 User's Guide
Be sure to type at least one space after DIR to separate the command keyword from the command tail. If you don't, CP/M-86 responds as shown below.
A>DIRCDPYDISK,CMD
DIRCOPYDISK.CMD?
1.3 CP/M-86
Line Editing Control Characters
You can correct typing mistakes with the Backspace key. However, CP/M-86
sup-ports the following control character commands to help you edit more efficiently. You can use these control characters to edit command lines or input lines to most programs. To type a control character, hold down the CONTROL key (sometimes labeled CTRL) and press the required letter key. Release both keys.
Command
CTRL-E
CTRL-H
CTRL-I
CTRL-J
CTRL-M
CTRL-R
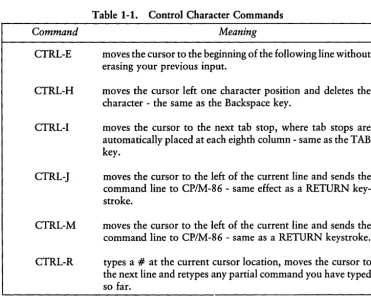
Table 1-1. Control Character Commands
Meaning
moves the cursor to the beginning of the following line without erasing your previous input.
moves the cursor left one character position and deletes the character - the same as the Backspace key.
moves the cursor to the next tab stop, where tab stops are automatically placed at each eighth column - same as the TAB key.
moves the cursor to the left of the current line and sends the command line to CP/M-86 - same effect as a RETURN
key-stroke.
moves the cursor to the left of the current line and sends the command line to CP/M-86 - same as a RETURN keystroke.
[image:13.479.34.405.246.550.2]CP/M-86 User's Guide 1.3 Line Editing Control Characters
Command
CTRL-U
CTRL-X
Table 1-1. (continued)
Meaning
discards all the characters in the command line that you've typed so far, types a # at the current cursor position and moves the cursor to the next command line.
discards all the characters in the command line that you've typed so far and moves the cursor back to the beginning of the current line.
You probably noticed that some control characters have the same meaning. For exam-ple, the CTRL-J and CTRL-M keystrokes have the same effect as pressing the RETURN key: all three send the command line to CP/M-86 for processing. Also, CTRL-H has
the same effect as pressing the backspace key.
1.4 Why You Should Back Up Your Files
Humans have faults, and so do computers. Human or computer errors sometimes destroy valuable programs or data files. By mistyping a command, for example, you could accidently erase a program that you just created. A similar disaster could result from an electronic component failure.
Data processing professionals avoid losing programs and data by making copies of valuable files. Always make a working copy of any new program you purchase and save the original. If the program is accidentally erased from the working copy, you can easily restore it from the original.
Professionals also make frequent copies of new programs or data files during the time they are being developed. The frequency of making copies varies with each pro-grammer, but as a general rule, make a copy at the point where it takes ten to twenty times longer to reenter the information than it takes to make the copy.
1.4 Why You Should Back Up Your Files CP/M-86 User's Guide
So far, we haven't discussed any commands that change information recorded on your CP/M-86 system disk. Before we do, let's make a few working copies of the
original disk.
1.5 How to Make a Copy of Your
CP/M-86 Disk
To back up your CP/M-86 disk, you will use one or more eight-inch floppy disks
for the back-ups, the COPYDISK Transient Utility program, and of course your
CP/M-86 disk.
The back-up disks can be factory-fresh or used. Some eight-inch disks come with a notch cut out of the lower right hand side. This notch prevents data from being written to the disk. It is called a write-protect notch. To copy data to these disks, you have to write-enable them by placing a small foil tab over the write-protect notch. These tabs are supplied with the disks.
You might want to format new or reformat used disks with the disk formatting program that should accompany your particular computer. If the disks are used, 'make sure they do not contain any information you might need again! COPYDISK copies everything from a source disk to a destination disk - including blank space - and writes over any information that might already be stored on the destination disk.
To make a copy of your CP/M-86 disk, use the COPYDISK utility. First make sure
that your system disk is in drive A and a formatted disk is inserted in drive B. Then enter the following command to the system prompt, terminated by a carriage return keystroke.
CP/M-86 User's Guide 1.5 How to Copy Your CP/M-86 Disk
CP/M-86 loads COPYDISK into memory and runs it. COPYDISK displays the
follow-ing messages on your screen:
CP/M-8S Full DisK COpy Utility Version 2.0
Enter Source DisK Drive
(A-P)
?A Destination DisK Drive(A-P)
?8Copyin~ DisK A: to DisK B:
Is this what yOU want to do
(YIN)
?Y
COpy started
Readin~ TracK 0 ••• COpy cOMPleted.
COpy another disK
(YIN)
?N COpy pro~raM exitin~A)
Now you have an exact copy of the original CP/M-86 disk in drive B. Remove the
original from drive A and store it in a safe place. If your original remains safe and unchanged, you can easily restore your CP/M-86 program files if something happens
to your working copy.
Remove the copy from drive B and insert it in drive A. Use it as your CP/M-86
system disk to make more back-ups, to try the examples shown in the rest of this manual and to start CP/M-86 the next time you power up your computer.
Section 2
Files, Disl{s, Drives and Devices
CP/M-86's most important task is to access and maintain files on your disks. It can create, read, write, copy and erase program and data files. This section tells you what a file is, how to create, name and access a file, and how files are stored on your disks.
It also tells how to indicate to CP/M-86 that you've changed disks or that. you want to change your default drive.
2.1 What is a File
A CP/M-86 file is a collection of related information stored on a disk. Every file must have a unique name because that name is used to access that file. A directory is also stored on each disk. The directory contains a list of the filenames stored on that disk and the locations of each file on the disk.
In general, there are two kinds of files: program files and data files. A program file is an executable file, a series of instructions the computer can follow step by step. A data file is usually a collection of information; a list of names and addresses, the inventory of a store, the accounting records of a business, the text of a document, or similar related information. For example, your computer cannot execute names and addresses, but it can execute a program that prints names and addresses on mailing labels.
A data file can also contain the source code for a program. Generally, a program source file must be processed by an assembler or compiler before it becomes an exe-cutable program file. In most cases, an executing program processes a data file. However, there are times when an executing program processes an executable program file. For example, the executable copy program PIP can copy one or more command program files.
2.2 How Are Files Created
2.3 Naming Files CP/M-86 User's Guide
is to use a text editor. The CP/M-86 text editor ED can create a file and assign it the name you specify. Finally, some programs such as ASM-86 create output files as they process input files.
2.3 Naming Files - What's in a Name?
CP/M-86 identifies every file by its unique file specification. A file specification (filespec) can have three parts:
d:
filename typ
drive specifier filename filetype
one character 1-8 characters 0-3 characters
optional
optional
We recommend that you create file specifications from letters and numbers. Because the CP/M-86 command processor recognizes the following special characters as delim-iters (separators), they must not be included within a filename or filetype.
<>.,;:=?*[]
A file specification can be simply a one to eight character filename, such as:
MYFILE
When you make up a filename, try to let the name tell you something about what the file contains. For example, if you have a list of customer names for your business, you could name the file
CUSTOMER
so that the name is eight or fewer characters and also gives you some idea of what's in the file.
As you begin to use your computer with CP/M-86, you'll find that fi.1es fall naturally into families. To keep file families separated, CP/M-86 allows you to add an optional one to three character family name, called a filetype, to the filename. When you add a filetype to the filename, separate the filetype from the filename with a period. Try to use three letters that tell something about the file's family. For example, you could add the following filetype to the file that contains a list of customer names:
CUSTOMER.NAM
CP/M-86 User's Guide 2.3 Naming Files
The executable program files that CP/M-86 loads into memory from a disk have
different filenames, but are in the family of 8086 or 8088 programs that run with
CP/M-86. The filetype CMD identifies this family of executable programs.
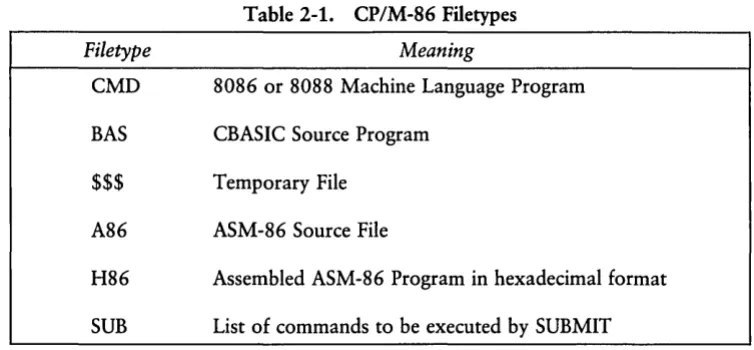
CP/M-86 has already established several file families. Here's a table of some of their
[image:20.469.53.430.151.326.2]filetypes with a short description of each family.
Table 2-1. CP/M-86 Filetypes
Filetype Meaning
CMD 8086 or 8088 Machine Language Program
BAS CBASIC Source Program
$$$ Temporary File
A86 ASM-86 Source File
H86 Assembled ASM-86 Program in hexadecimal format
SUB List of commands to be executed by SUBMIT
2.4 Accessing Files - Do You Have the Correct Drive?
When you type a file specification in a command tail, the Built-in or Transient Utility looks for the file on the disk in the drive named by the system prompt. For example, if you type the command
A>dir copydisk,cmd
CP/M-86 looks in the directory of the disk in drive A for COPYDISK.CMD. But if
you have another drive, B for example, you need a way to tell CP/M-86 to access the
disk in drive B instead. For this reason, CP/M-86 lets you to preceed a filename with
a drive specifier which is the drive letter followed by a colon. For example, in response to the command
A>dir b:myfile,lib
2.4 Accessing Files CP/M-86 User's Guide
You can also precede an executable program filename with a drive specifier, even if you are using the program filename as a command keyword. For example, if you type the following command
A)b:pip
CP/M-86 looks in the directory of the disk in the B drive for the file PIP.CMD. If CP/M-86 finds PIP on drive B, it loads PIP into memory and executes it.
Unlike the filename and filetype that are stored in the disk directory, the drive specifier for a file changes as you move the disk from one drive to another. Therefore a file has a different file specification when you change its disk from one drive to another.
2.5
Accessing More Than One File
Certain CP/M-86 Built-in and Transient Utilities can select and process several files
when special wildcard characters are included in the filename or filetype. A file spec-ification containing wildcards can refer to more than one file because it gives
CP/M-86 a pattern to match: CP/M-86 searches the disk directory and selects any file
whose filename or filetype matches the pattern.
The two wildcard characters are ?, which matches any single letter in the same position, and *, which matches any character at that position, and any other characters remaining in the filename or filetype. The rules for using wildcards are listed below.
• A ? matches any character in a name, including a space character.
• A * must be the last, or only, character in the filename or filetype. CP/M-86
internally replaces a
*
with ? characters to the end of the filename or filetype.• When the filename to match is shorter than eight characters, CP/M-86 treats
the name as if it ends with spaces.
• When the filetype to match is shorter than three characters, CP/M-86 treats the
filetype as if it ends with spaces.
Suppose, for example, you have a disk with the following six files:
CP/M-86 User's Guide 2.5 Accessing Multiple Files
Several cases are listed below where a name with wildcards matches all, or a portion of, these files:
* * is treated as ???????????
??????????? matches all six names
*.CMD is treated as ????????CMD
???? ??? ? . CMD matches the first four names
?CMD matches A.CMD and B.CMD
?* is treated as ????
???? matches A.CMD, B.CMD, A.A86, and B.A86
A?CMD matches A.CMD and AA.CMD
A*.CMD is treated as A???????CMD
A???????CMD matches A.CMD, AA.CMD, and AAA.CMD
Remember that CP/M-86 uses wildcard patterns only while searching a disk
direc-tory, and therefore wildcards are valid only in filenames and filetypes. You cannot use a wildcard in a drive specifier.
2.6 How Can I Organize and Protect My Files?
Under CP/M-86 you can organize your files into groups, protect your files from
accidental change, and specify how your files are displayed in response to a DIR command. CP/M-86 supports these features by assigning user numbers and attributes
to files and recording them in the disk's directory.
You can use user numbers to separate your files into 16 file groups. All files are identified by a user number which ranges from 0 to 15. CP/M-86 assigns a user number
2.6 File Organization and Protection CP/M-86 User's Guide
Most commands can access only those files that have the current user number. For example, if the current user number is 7, a DIR command displays only the files that were created under user number 7. The exception to this is the PIP command. With the [Gn] option, PIP can copy a file with one user number and give the copy another user number.
File attributes control how a file can be accessed. There are two kinds of file accessing attributes. The DIRISYS attribute can be set to either DIR (Directory) or SYS (System). When you create a file, it is automatically marked with the DIR attribute. The DIR command only displays files that are in the current user area, whether that is user number 0, 1, 2, 3 or 15.
You can use the STAT Transient Utility command to assign the SYS or DIR attrib-ute to a file. The DIR command does not display files that are marked with the SYS attribute. You must use the DIRS command to display SYS files. Remember that DIRS only displays the system files that are in the current user number. The STAT command also displays files marked with the SYS attribute. Again, STAT displays files from the current user number only.
It is very useful to assign the SYS attribute to files that are in user number
o.
They should be command files, files with a filetype of CMD. If you give a command file in user number 0 the SYS attribute, you can read and execute that file from any user number on the same drive. This feature gives you a convenient way to make your commonly used programs available under any user number, without having to maintain a copy of each command program in every user number.The RW/RO file accessing attribute can be set to either RW (Read-Write) or RO (Read-Only). A file with the RW attribute can be read or written to at any time unless the disk is write-protected, or the drive containing the disk is set to Read-Only. If a file is marked RO, any attempt to write data to that file produces a Read-Only error message. Therefore you can use the RO attribute to protect important files.
CP/M-86 User's Guide 2.7 How Are Files Stored on a Disk
2.7 How Are Files Stored on a Disk?
CP/M-86 records the filename, filetype, user number and attributes of each file in a
special area of the disk called the directory. In the directory, CP/M-86 also records
which disk sectors belong to which file. The directory is large enough to store this data for up to sixty-four files.
CP/M-86 allocates directory and storage space for a file as records are added to the
file. When you erase a file, CP/M-86 reclaims storage in two ways: it makes the file's
directory space available to catalog a different file, and frees the file's storage space for later use. It's this dynamic allocation feature that makes CP/M-86 powerful. You
don't have to tell CP/M-86 how big your file' will become because CP/M-86
auto-matically allocates more storage for a file as it is needed, and releases the storage for reallocation when the file is erased.
2.8 Changing Disks
CP/M-86 cannot, of course, do anything to a file unless the disk that holds the file
is inserted into a drive and the drive is in ready status. When a disk is in a drive, it is on-line and CP/M-86 can access its directory.
At some time, you'll have to take a disk out of a drive and insert another that contains different files. You can replace an on-line disk whenever you see the system prompt at your console. However, if you are going to write on the disk, you must tell
CP/M-86 that you have changed a disk by typing CTRL-C directly after the system
prompt. In response, CP/M-86 resets the drive for the new disk.
If you forget to type CTRL-C after you change a disk, CP/M-86 automatically protects the new disk. You can run a text editor or copy program and try to write to the new disk, but when you do, CP/M-86 notices that the original disk is no longer in
the drive and writes the message:
Bdos err on d: RO
2.9 Changing the Default Drive CP/M-86 User's Guide
2.9 Changing the Default Drive
At any given time during operation of CP/M-86, there is one drive called the default
drive. Unless you put a drive specifier in your command line, CP/M-86 and the utilities
look in the directory of the disk in the default drive for all program and data files. You can tell the default drive from the CP/M-86 system prompt. For example, the
message:
A>
tells you that the A drive is the default drive. When you give commands to CP/M-86,
you should remember which disk is the default drive. Then you will know which files an application program can access if you do not add a drive specifier.
Drive A is usually the default drive when you start CP/M-86. If you have more than one drive, you might want to change the default drive. Do this by typing the drive specifier of the desired default drive next to the system prompt and pressing the RETURN key.
A>B:
This command, for example, changes the default drive to B. Unless you change the default drive again, all system prompt messages appear as:
B>
The system prompt now indicates that CP/M-86 and its utilities will check in the
directory of the disk in drive B for any file that does not have a drive specifier included in the file specification.
2.10 More
CP/M-86
Drive Features
Under CP/M-86, drives can be marked RO just as files can be given the RO attribute.
The default state of a drive is RW, but CP/M-86 marks a drive RO whenever you
CP/M-86 User's Guide 2.11 Other CP/M-86 Devices
2.11 Other
CP/M-86 Devices
CP/M-86 manages all the peripheral devices attached to your computer. These can
include storage devices such as disk drives, input devices such as keyboards, or modems, and output devices such as printers, modems, and screens.
To keep track of input and output devices, CP/M-86 uses logical devices. The table
below shows CP/M-86 logical device names and indicates whether the device is input
or output.
Table 2-2. CP/M-86 Logical Devices
Device Name Device Type
CON: Console input and output
AXI: Auxiliary input
AXO: Auxiliary output
LST: List output
CP/M-86 associates physical devices with the logical device names. For example, the
default console input device is the keyboard and the default console output device is the screen. If you want CP/M-86 to manage an optional peripheral, you must use the
STAT command to assign an alternate peripheral to the logical device name. For example, a STAT command can change the console input device from the keyboard to a teletype. STAT can assign a printer to the LST: logical output device name.
A logical input device can be assigned only one physical device. A logical output device can be assigned only one physical device. See the description vi the STAT command in Section 4 for more detail.
Section 3
CP/M-86
Command Concepts
As we discussed in Section 1, a CP/M-86 command line consists of a command
keyword, an optional command tail, and a carriage return keystroke. This section describes the two different kinds of programs the command keyword can identify, and tells how CP/M-86 searches for command files on a disk. It also introduces the control
characters that direct CP/M-86 to perform various tasks.
3.1 Two Types of Commands
A command keyword identifies a program that resides either in memory as part of
CP/M-86, or on a disk as a program file. If a command keyword identifies a program in memory, it is called a Built-in command. If a command keyword identifies a program file on a disk, it is called a Transient Utility or simply a utility.
Six Built-in commands and sixteen Transient Utilities are included with CP/M-86.
You can add utilities to your system by purchasing various CP/M-86-compatible appli-cation programs. If you are an experienced programmer, you can also write your own utilities that operate with CP/M-86.
3.2 Built-In Commands
Built-in commands are part of CP/M-86 and are always available for your use
regardless of which disks you have in which drives. Built-in commands reside in memory as a part of CP/M-86 and therefore execute more quickly than the utilities. Section 4
gives you the operating details for the Built-in commands listed in the table below.
Command
DIR
DIRS
Table 3-1. Built-In Commands
Meaning
displays a list of filenames with the DIR attribute from a disk directory.
3.2 Built-In Commands CP/M-86 User's Guide
Command
ERA
REN
TYPE
[image:29.473.47.412.293.557.2]USER
Table 3-1. (continued)
Meaning
erases a filename from a disk directory and releases the storage occupied by the file.
lets you rename a file.
writes the content of a character file at your screen.
lets you change from one user number to another.
3.3 Transient Utility Commands
A program that executes a Transient Utility command comes into memory only when you request it. Section 5 gives you operating details for the standard CP/M-86 Utilities
listed in the table below.
Command
ASM86
COPYDISK
DDT86
ED
GENCMD
HELP
PIP
Table 3-2. CP/M-86 Utilities
Meaning
translates 8086 assembly language programs into machine code form.
creates a copy of a disk that can contain CP/M-86, program
files, and data files.
helps you check out your programs and interactively correct bugs and programming errors.
lets you create and alter character files for access by various programs.
uses the output of ASM-86 to produce an executable com-mand file.
displays information on how to use each CP/M-86 command.
CP/M-86 User's Guide
Command
STAT
SUBMIT
TOD
3.3 Transient Utility Commands
Table 3-2. (continued)
Meaning
lets you examine and alter file and disk status, and assign physical 110 devices to CP/M-86 logical devices.
sends a file of commands to CP/M-86 for execution.
sets and displays the system date and time.
3.4 How
CP/M-86 Searches for Commands
If a command keyword does not identify a Built-in command, CP/M-86 looks on
the default or specified drive for a program file. It looks for a filename equal to the keyword and a filetype of CMD. For example, suppose you type the command line:
A )ED M}'PRDG, BAS
CP/M-86 goes through these steps to execute the command:
1. CP/M-86 first finds that the keyword ED does not identify one of the
Built-in commands.
2. CP/M-86 searches for the utility program file ED.CMD in the directory of
the default drive. If it does not find the file under the current user number, it looks under user number 0 for ED.CMD with the SYS attribute.
3. When CP/M-86 locates ED.CMD, it copies the program to memory and passes
control to ED.
4. ED remains operational until you enter a command to exit ED.
5. CP/M-86 types the system prompt and waits for you to type another command
3.4 How CP/M-86 Searches for Commands CP/M-86 User's Guide
If CP/M-86 cannot find either a Built-in or a Transient Utility, it reports a keyword
error by repeating the command line you typed on your screen, followed by a question mark. This tells you that one of four errors has occurred:
• The keyword is not a Built-in command.
• No corresponding .CMD file appears under the current user number or with the SYS attribute under user O.
• No corresponding .CMD file appears under the current user number or with the SYS attribute under user 0 on the specified drive when you have included a drive specifier.
For example, suppose your default disk contains only standard CP/M-86 utilities and
you type the command line:
A)EDIT MYPROG.BAS
Here are the steps that CP/M-86 goes through to report the error:
1. CP/M-86 first examines the keyword EDIT and finds that it is not one of the Built-in commands.
2. CP/M-86 then searches the directory of the default disk, first under the current
user number for EDIT.CMD and then under user 0 for EDIT.CMD with the SYS attribute.
3. When the file cannot be found, CP/M-86 writes the message:
EDIT?
at the screen to tell you that the command cannot be executed.
4. CP/M-86 displays the system prompt and waits for you to type another
CP/M-86 User's Guide 3.5 Control Character Commands
3.5 Control Character Commands
You can direct CP/M-86 to perform certain functions just by striking a special key. Using the Control Character commands, you can tell CP/M-86 to start and stop screen scrolling, suspend current operations, or echo the screen display at the printer. The table below summarizes Control Character Commands.
Command
CTRL-C
CTRL-P
CTRL-S
Table 3-3. Control Character Commands
Meaning
ends the currently operating program, Of, if typed after the
system prompt, initializes the system and default drives and sets all drives to R W status.
echoes all console activity at the printer; a second CTRL-P ends printer echo. This only works if your system is connected to a printer.
toggles screen scrolling. If a display at your screen rolls by too quickly for you to read it, press CTRL-S. Press any key or CTRL-S again to continue the display.
Section
4
Command Summary
This section describes how we show the parts of a file specification in a command line. It also describes the notation used to indicate optional parts of a command line and other syntax notation. The remainder of the section provides a handy reference for all standard CP/M-86 commands.
Built-in and Transient Utility commands are intermixed in alphabetical order. Each command is listed, followed by a short explanation of its operation with examples. More complicated commands are described later in detail. For example, ED is described in Section 5 while ASM-86, DDT-86 and GENCMD are described in the CPIM-86 System Guide.
4.1 Let's Get Past the Formalities
You can see that there are several parts in a file specification that we must distinguish. To avoid confusion, we give each part a formal name that is used when we discuss command lines. The three parts of a file specification are:
• drive specifier - the optional disk drive, A, B, C, or D that contains the file or group of files to which you are referring. If a drive specifier is included in your command line, it must be followed by a colon.
• filename - the one-to-eight character first name of a file or group of files.
• filetype - the optional one-to-three character family name of a file or group of files. If the filetype is present, it must be separated from the filename by a period.
We use the following form to write the general form of a file specification:
d:filename.typ
4.1 Let's Get Past the Formalities CP/M-86 User's Guide
filetype. Valid combinations of the elements of a CP/M-86 file specification are shown
in the following list.
• filename • d:filename • filename. typ • d:filename.typ
If you do not include a drive specifier, CP/M-86 automatically supplies the default
drive. If you omit the period and the filetype, CP/M-86 automatically includes a filetype
of three blanks.
We call this general form a file specification. A file specification names a particular file or group of files in the directory of the on-line disk given by the drive specifier. For example,
B:MYFILE.AB8
is a file specification that indicates drive B:, filename MYFILE, and filetype A86. We abbreviate file specification as simply
filespec
in the command syntax statements.
Some CP/M-86 commands accept wildcards in the filename and filetype parts of the
command tail. For example,
is a file specification with drive-specifier B:, filename MY*, and filetype A?? This file specification might match several files in the directory.
CP/M-86 User's Guide 4.2 How Commands Are Described
4.2 How Commands Are Described
This section lists the Built-in and Transient Utility commands in alphabetical order. Each command description is given in a specific form.
• The description begins with the command keyword in upper-case. When appro-priate, an English phrase that is more descriptive of the command's purpose follows the keyword, in parentheses.
• The Syntax section gives you one or more general forms to follow when you compose the command line.
• The Type section tells you if the keyword is a Built-in or Transient Utility command. Built-in commands are always available for your use, while Transient Utility commands must be present on an on-line disk as a CMD program file.
• The Purpose section defines the general use of the command keyword.
• The Remarks section points out exceptions and special cases.
• The Examples section lists a number of valid command lines that use the com-mand keyword. To clarify examples of interactions between the user and the operating system, the characters entered by the user are shown in boldface. CP/M-86's responses are shown in normal type.
The notation in the syntax lines describes the general command form using these rules:
• Words in capital letters must be typed by you and spelled as shown, but you can use any combination of upper- or lower-case letters.
• A lower-case word in italics has a general meaning that is defined further in the text for that command. When you see the word option, for example, you can choose from a given list of options.
• You can substitute a number for n.
• The symbolic notation d:, filename, .typ and filespec have the general meanings described in the previous section.
4.2 How Commands Are Described CP/M-86 User's Guide
• Items enclosed within curly braces { } are optional. You can enter a command without the optional items. The optional items add effects to your command line.
• An ellipsis ( ... ) tells you that the previous item can be repeated any number of times.
• When you can enter one or more alternative items in the Syntax line, a vertical bar
I
separates the alternatives. Think of this vertical bar as the or bar. • An up-arrowt
or CTRL represents the Control Key on your keyboard.• All other punctuation must be included in the command line.
Let's look at some examples of syntax notation. The CP/M-86 Transient Utility
command STAT (status) displays the amount of free space in kilobytes for all on-line drives. It also displays the amount of space in kilobytes used by individual files. STAT can also assign the Read-Only (RO) or Read-Write (RW), and the System (SYS) or Directory (DIR) attributes to a file.
The Syntax section of the STAT command shows how the command line syntax notation is used:
Syntax:
STAT {filespec {RO: RW : OIR : SYS } } I .. I
---optional--- optional
---This tells you that the command tail following the command keyword STAT is optional. STAT alone is a valid command, but you can include a file specification in the command line. Therefore, STAT filespec is a valid command. Furthermore, the file specification can be followed by another optional value selected from one of the following:
CP/M-86 User's Guide 4.2 How Commands Are Described
Therefore,
STAT filespec RO
is a valid command.
Recall that in Section 3 you learned about wildcards in filenames and filetypes. The STAT command accepts wildcards in the file specification.
Using this syntax, we can construct several valid command lines:
STAT
STAT X.A88
STAT X.A88 RO
STAT X.A88 SYS
STAT *.A88
STAT *.* RW
STAT X.* DIR
The CP/M-86 command PIP (Peripheral Interchange Program) is the file copy
pro-gram. PIP can copy information from your screen to the disk or printer. PIP can combine two or more files into one longer file. PIP can also rename files after copying them. Let's look at one of the formats of the PIP command line for another example of how to use command line notation.
Syntax:
PIP dest-filespec
=
source-filespec {,filespec ... }For this example, dest-filespec is further defined as a destination file specification or peripheral device (printer, for example) that receives data. Similarly, source-filespec is a file specification or peripheral device (keyboard, for example) that transmits data. PIP accepts wildcards in the filename and filetype. (See the PIP command summary for details regarding other capabilities of PIP.) There are, of course, many valid command lines that come from this syntax. Some of them are shown below.
PIP NEWFILE.DAT
=
OLDFILE.DAT
PIP B:
=
A:THISFILE.DAT
PIP B:X.BAS
=
Y.BAS, Z.BAS
PIP X.BAS
=
A.BAS, B.BAS, C.BAS
PIP B:
=
A:*.BAK
4.3 The ASM-86 Command CP/M-86 User's Guide
4.3 The ASM-86 (Assembler) Command
Syntax:
ASM86 filespec { $parameter-list }
Transient Utility
Purpose:
The ASM-86 Utility converts 8088 and 8086 assembly language source statements into machine code form.
The operation of the ASM-86 assembler is described in detail in the CPIM-86 Pro-grammer's Guide.
Remarks:
The filespec names the character file that contains an 8086 assembly language pro-gram to translate. If you omit the filetype, a filetype of A86 is assumed. The assembler uses the drive specifier portion of the filespec as the destination drive for output' files unless you include a parameter in the command tail to override this default.
The three output files produced by the assembler are given the filetypes listed below.
LST contains the annotated source listing.
H86 contains the 8086 machine code in hex format.
SYM contains all programmer-defined symbols with their program relative addresses.
The assembler assigns the same filename as the source filename to the LST, H86 and SYM files.
CP/M-86 User's Guide 4.3 The ASM-86 Command
The parameter letters are A, H, P, S, and F. The device names are the letters A through P, corresponding to the drive letters. The letters X, Y, and Z have special meaning when used as device names:
X is the Screen.
Y is the Printer.
Z is Zero Output.
Use the A parameter letter to override the default drive specifier to obtain the source file. The valid parameters are AA through AP.
Use the H parameter letter to override the default drive specifier to receive the H86 file. Valid parameters are HA through HP, and HX, HY, and HZ.
Use the P parameter letter to override the default drive specifier to receive the LST file. Valid parameters are PA through PP, PX, PY, and PZ.
Use the S parameter letter to override the default drive specifier to receive the SYM file. Valid parameters are SA through SP, SX, SY, and SZ.
Use the F parameter letter to select the format of the hex output file. Valid parameters are FI and FD. The FI parameter selects Intel® format hex file output. The FD parameter selects Digital Research format hex file output. FD is assumed if neither FI nor FD appear as a parameter. Use FI when the program is going to be combined with a program generated by an Intel compiler or assembler.
When conflicting parameters appear on the command line, the rightmost parameter prevails.
Examples:
A)ASH86 X
The ASM86.CMD file must be on drive A. The source file X.A86 is read from drive A, and X.LST, X.H86, and X.SYM are written to drive A.
4.3 The ASM-86 Command CP/M-86 User's Guide
The ASM86.CMD file must be on drive B. The source file X.ASM is read from drive B. The listing is written to the screen, and the X.H86 and X.SYM files are placed on drive B.
A)ASM85 B:MYPRDG $PY He
The source file MYPROG.A86 is read from drive B, the listing is sent to the printer, the file MYPROG.H86 is written to drive C, and file MYPROG.SYM is placed on drive B.
A)B:ASM85 X $SZ
The ASM86.CMD file must be on drive B. The X.A86 file is read from drive A. The X.LST and X.H86 files are written to drive A. No X.SYM file is generated.
4.4
The
COPYDISK (Copy Disk) Command
Syntax:
COPYDISK
Transient Utility
Purpose:
The COPYDISK Utility copies all the information on one disk to another disk, including the CP/M-86 system tracks if they are present on the source disk.
Before copying to a brand-new disk, you might first have to prepare it with the disk formatting program that should accompany your computer. If you copy to a used disk, COPYDISK writes all the information from the source disk over the information on the destination disk, including blank space.
Remarks:
CP/M-86 User's Guide 4.4 The COPYDISK Command
To successfully copy from one disk to another, you must make sure that your destination disk is not write-protected. Check that there is a foil tab covering any existing write-protect notch on the edge of your disk before inserting the disk into the destination drive.
COPYDISK is an exact track-for-track, sector-for-sector copy utility, and is the fastest way to copy an entire disk. However, if many files have been created and erased on the source disk, the records belonging to a particular file might be randomly placed on the disk. In this case, it might be more efficient (although slower) to use PIP to copy the files and thus to put all the records in sequential order on the new disk.
Examples:
A>CDPYDISK
Invoke COPYDISK and it prompts you for the source and destination disk. In our next example, COPYDISK copies from your master disk (disk A:) to the new disk (disk B:). When invoked, COPYDISK displays the information in the first line of our example:
CP/M-8S Full Disk COpy Utility Version 2.0
Enter Source Disk Drive (A-D) ? A
Destination Disk Drive (A-D) ?
B
Copyin~ disk A: to disk B:
Is this what you want to do
(YIN)
?Y
COpy started
Readin~ track nn
Writin~ track nn
Verifyin~ track nn COpy cOMPleted.
(After read f new text appears)
(After write f next Messa~e is)
COpy another disk
(YIN)
? N COpy pro~raM exitin~4.5 The DDT-86 Command CP/M-86 User's Guide
4.5 The DDT-86 (Dynamic Debugging Tool) Command
Syntax:
DDT86 { filespec}
Transient Utility
Purpose:
The DDT-86 Utility allows you to monitor and test programs developed for the 8086 and the 8088 processors.
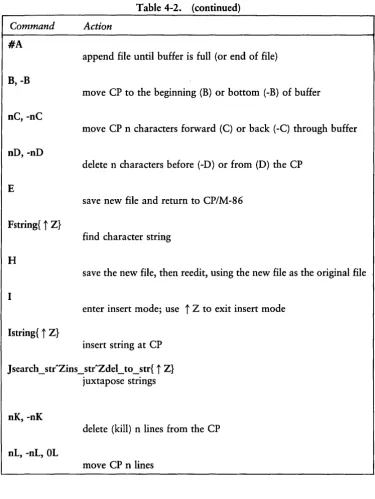
[image:43.473.35.408.317.535.2]The DDT-86 single letter commands, their parameters and options are described in Table 4-1. The actual command letter is printed in boldface. The parameters are in lower-case and follow the command letter. Optional items are in curly brackets. Replace the arguments with the appropriate values as described in the following list Table 4-1.
Table 4-1. DDT -86 Commands
Command Meaning
As (Assemble) Enter Assembly Language Statements
Bs,f,sl (Block Cmp) Compare Blocks of Memory
D{WHs{,f}} (Display) Display Memory in Hex and ASCII
Efilespec (Execution) Load Program for Execution
Fs,f,bc (Fill) Fill Memory Block - Byte
FWs,f,wc (Fill) Fill Memory Block - Word
G{sH,bl{,b2}} (Go) Begin Execution
CP/M-86 User's Guide 4.5 The DDT -86 Command Command Icommand tail L{s{,f}} Ms,f,d Rfilespec S{W}s T{n} TS{n} U{n} US{n} V Wfilespec{,s,f} X{r} Parameter bc b1 b2 d f n r s
sl
W weTable 4-1 (continued)
Meaning
(Input) Set Up Input Command Line
(List) List Memory in Mnemonic Form
(Move) Move Memory Block
(Read) Read Disk File to Memory
(Set) Set Memory Values
(Trace) Trace Program· Execution
(Trace) Trace and Show All Registers
(Untrace) Monitor Execution without Trace
(Untrace) Monitor and Show All Registers
(Verify) Show Memory Layout after Disk Read
(Write) Write Content of Block to Disk
(Examine) Examine and Modify CPU Registers
Replace with
byte constant breakpoint one breakpoint two destination for data final address
number of instructions to execute register or flag name
starting address second starting address word 16-bit
[image:44.470.59.430.65.519.2]4.5 The DDT-86 Command CP/M-86 User's Guide
The overall operation of DDT -86, along with each single letter command, is described in detail in the CPIM-86 Operating System Programmer's Guide.
Remarks:
If the file specification is not included, DDT-86 is loaded into User Memory without a test program. You must not use the DDT-86 commands G, T, or U until you have first loaded a test program. The test program is usually loaded using E command.
If the file specification is included, both DDT-86 and the test program file specified by filespec are loaded into User Memory. Use G, T, or U to begin execution of the test program under supervision of DDT-86.
If the filetype is omitted from the file specification, a filetype of CMD is assumed.
DDT-86 cannot directly load test programs in Hexadecimal (H86) format. You must first convert to command file form (CMD) using the GENCMD Utility.
Examples:
A>DDT88
The DDT-86 Utility is loaded from drive A to User Memory. DDT-86 displays the - prompt when it is ready to accept commands.
A>B:DDT88 TEST.CMD
The DDT-86 Utility is loaded from drive B to User Memory. The program file TEST.CMD is then loaded to User Memory from drive A. DDT-86 displays the address where the file was loaded and the - prompt.
4.6 The DIR (Directory) Built-in
Syntax:
DIR {d:} DIR {filespec}
CP/M-86 User's Guide 4.6 The DIR Command
Built-in
Purpose:
The DIR and DIRS Built-in commands display the names of files cataloged in the directory of an on-line disk. The DIR Built-in lists the names of files in the current user number that have the Directory (DIR) attribute. DIR accepts wildcards in the file specification.
The DIRS command displays the names of files in the current user number that have the System (SYS) attribute. Therefore, even though you can access System (SYS) files that are stored in user 0 from any other user number on the same drive, DIRS only displays those user 0 files if the current user number is O. DIRS accepts wildcards in the file specification.
Remarks:
If the drive and file specifications are omitted, the DIR command displays the names of all files with the DIR attribute on the disk in the default drive and current user number. Similarly, DIRS displays the SYS files.
If the drive specifier is included, but the filename and filetype are omitted, the DIR command displays the names of all DIR files in the current user on the disk in the specified drive. DIRS displays the SYS Jiles.
If the file specification contains wildcard characters, all filenames that satisfy the match are displayed on the screen.
If no filenames match the file specification, or if no files are cataloged in the directory of the disk in the named drive, the DIR command displays the message:
NO FILE
If system (SYS) files reside on the specified drive, DIR displays the message:
SYSTEM FILE(S) EXIST
If non-system (DIR) files reside on the specifed drive, DIRS displays the message:
4.6 The DIR Command CP/M-S6 User's Guide
You cannot use a wildcard character in a drive specifier.
Examples:
A)DIR
All DIR files cataloged in the current user number in the directory of the disk mounted in drive A are displayed on the screen.
A)DIR B:
All DIR files in the current user number on the disk in drive B are displayed on the screen.
A)OIR B:X,A85
If the file X.AS6 is present on the disk in drive B, the DIR command displays the name X.AS 6 on the screen.
A)OIR *,BAS
All DIR files with filetype BAS in the current user number on the disk in drive A are displayed on the screen.
B)OIR A:X*,C?D
All DIR files in the current user number on the disk in drive A whose filename begins with the letter X, and whose three character filetype contains the first character C and last character D are displayed on the screen.
A)OIRS
Displays all files in the current user number on drive A that have the system (SYS) attribute.
A)DIRS *,CHD
CP/M-86 User's Guide 4.7 The ED Command
4.7 The ED (Character File Editor) Command
Syntax:
ED input-filespec {d:
I
output-filespec}Transient Utility
Purpose:
The ED Utility lets you create and edit a disk file.
The ED Utility is a line-oriented and context editor. This means that you create and change character files line-by-line, or by referencing individual characters within a line.
The ED Utility lets you create or alter the file named in the file specification.
The ED Utility uses a portion of your User Memory as the active text Buffer where you add, delete, or alter the characters in the file. You use the A command to read all or a portion of the file into the Buffer. You use the W or E command to write all or a portion of the characters from the Buffer back to the file.
An imaginary character pointer, called CP, is at the beginning of the Buffer, between two characters in the Buffer, or at the end of the Buffer.
You interact with the ED Utility in either command or insert mode. ED displays the
*
prompt on the screen when ED is in command mode. When the*
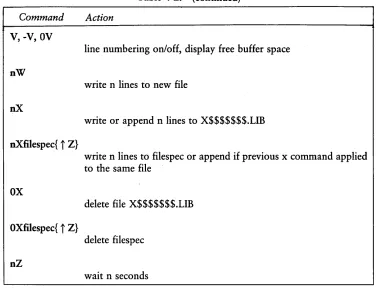
appears, you can enter the single letter command that reads text from the Buffer, moves the CP, or changes the ED mode of operation.Table 4-2. ED Command Summary
Command Action
nA
append n lines from original file to memory buffer
OA
4.7 The ED Command CP/M-86 User's Guide
Table 4-2. (continued)
Command Action
#A
append file until buffer is full (or end of file)
B, -B
move CP to the beginning (B) or bottom (-B) of buffer
nC, -nC
move CP n characters forward (C) or back (-C) through buffer
nD, -nD
delete n characters before (-D) or from (D) the CP
E
save new file and return to CP/M-86
Fstring{
t
Z}find character string
H
save the new file, then reedit, using the new file as the original file '
I
enter insert mode; use
t
Z to exit insert modeIstring{
t
Z}insert string at CP
J
search _ str"Zins _ str"Zdel_ to _ str{t
Z} juxtapose stringsnK, -nK
delete (kill) n lines from the CP
nL, -nL, OL