DORADO
MIDAS MANUAL
26 November
1979
by
Edward R. Fiala
Xerox Palo Alto Research Center
3333 Coyote Hill Rd.
Palo Alto, CA. 94304
Filed on: [Ivy]<DoradoDocs>DoradoMidas.press
Sources on: [Ivy]<DoradoSource>DoradoMidasManual.drn
This manual describes a largely machine-independent loader/debugger for microprocessors originally developed for the Maxc2 computer and since used for the Dorado, DO, and M68 microprocessors. This manual is specialized for the Dorado version of Midas.
Dorado Midas Manual Edward R. Fiala 26 November 1979 2
TABLE OF CONTENTS
1. Introduction . . . . . . . . . . . . . . . . . . .. 4
2. Storage Requirements. . . . . . . . . . . .. 4
3. Starting and Exiting from Midas. . . . . . . . . . . . . . .. 5
4. Midas Display and the Mouse. . . . . . . . . .. 6
5. Name-Value Menus. . . . . . . . . . . . . . . . . . . . .. 7
6. Command Menu . . . 9
7. Keyboard . . . 11
8. Command Files . . . 12
9. Syntax of Command-file Actions . . . 15
10. Registers and Memories Known to Midas . . . 17
11. The 1M Memory and Virtual Addresses. . . . . . . . .. 19
12. Registers and Memories that Contain Microinstructions. . .. 19
13. Task-Specific Registers. . . . . . . . . . . . . . . . . . . . . . . .. 22
14. BR Addressing Kludge . . . 22
15. STKX Kludge. . . . . . . . . . . . . . . . . 22
16. Memory System Registers and Memories. . . . . . . . .. 22
17. Memories and Registers Associated With the DMux ... 24
18. Interface Registers . . . : . . . . . .. 25
19. Config ... ~ . . . 25
20. SetClk... ... 25
21. Reset... ... 26
22. Loading Programs . . . . . . . . . . . . . . . . . ... 28
23. Dump and Cmpr . . . . . . . . . . . . . . . . . . . . . . . 29
24. Brk and Unbrk . . . . . . . . . . . . . . . . .. 29
25. Go, SS, Proceed,
as,
and Call. . . . . . . . . . . . . . . . . .. 3026. When Registers are Read/Written Restrictions on Continuing . . . 31
27. Hardware Failure Reporting . . . 33
28. Hardware Checkout Facilities . . . 34
29. Parity-Error Scanning . . . 34
30. Testing Directly From Midas . . . 34
31. LDRtest . . . 37
32. Scope Loop Actions: Fields, RepGo, RepSS, RepT2 ... 37
33. H\-VChk . . . 38
34. DMux Consistency Checker . . . 38
35. Poking: Tl, T2, and T3 . . . . . . . . . . . . . . 40
36. Passive Mode . . . 40
37. MIRdebug Feature . . . 41
38. Failure Diagnosis . . . 41
39. Baseboard Microcomputer Stuff . . . 42
40. Command Files Used With "RdCmds" . . . 45
Dorado Midas Manual
Table 1:
Table 2: Table 3: Table 4: Table
5:
Table 6: Table7:
Table 8: Table 9: Table 10:Edward R. Fiala 26 November 1979
LIST OF TABLES
Command Menu Actions. . . . . . . . . . . . . .. 10
Command File Name-Value Actions. . . . . . . . . .. 14
Command File Command Actions. . . . . . . . . . . . 15
Memories . . . 17
Registers . . . . . . . . . . . . . . . . . . 18
Test Data Pattern Actions . . . . . . . 35
Test Items in the Name-Value Display . . . 36
Other Test Actions. . . . . . . . . . . . 37
Command Files . . . . . . . . . . . . . . . . . . . . 45
Control Section DMux Signals . . . 46
Table 11: BaseBoard DMux Signals. . . . . . . . . . . . . . .. 48
Table 12: Processor DMux Signals . . . '.' . . . . . . . . 49
Table 13: MemC DMux Signals . . . 52
Table 14: MemD DMux Signals . . . 54
Table 15: MemX DMux Signals . . . 56
Table 16: Disk Controller DMux Signals . . . 60
Table 17: Ethernet Controller DMux Signals . . . 61
Table 18: IFU DMux Signals . . . 62
Table 19: Display Controller DMux Signals . . . 64
Table 20: Other DMux Stuff . . . 65
Figure 1: Midas Display
Dorado Midas Manual Edward R. Fiala 26 November 1979
l. Introduction
Midas is a loader/debugger that runs on an Alto and controls its target machine remotely. It can load/dump microprograms assembled by Micro, examine and modify storage, and tcst hardware in an assortment of ways. V ersions e~ist for Maxc2, Dorado, DO, and M68 microprocessors.
Midas is coded about 95% in Bcpl and 5% in assembly· language. The Maxc2 version was implemented by E. R. Fiala and H. E. Sturgis. The Dorado, DO, and M68 versions consist of machine-independent modules implemented by E. Fiala (Overlay and LoadRAM packages implemented by L. Deutsch and Alto microcode by E. Taft are also used) and machine-dependent sections implemented by E. Fiala for Dorado; D. Swinehart and P. Baudelaire for M68; and D. Charnley, C. Thacker, B. Rosen, C. Hankins, and E. Fiala for DO.
An internal description of Midas is available to anyone interested in adapting Midas to a new hardware system (see [Ivy]<DoradoDocs)MidasInternal.Press).
2 S.torage
Requirements
Midas requires about 500 Alto disk pages, using the following files:
Midas.Run Midas.Syms Midas.Errors Midas.Programs Midas. UserPrograms *.Midas
*.mb
Midas.RunProg Midas.Dtach Midas.Fix Ups Midas.Compare
-350 pages -40 pages -8 pages -2 pages -2 pages - 2 pages each
-31 pages -31 pages -2 pages -2 pages
Error message strings for Midas swat calls (Discussed below)
(Discussed below)
Command files for "RunProg" and "RdCmds" actions Assorted micro-binary files loaded by command files Built by Midas/I
Built by Midas/I
Created by Midas/! (used when loading .MB files) Created by Midas/I, written when "Cmpr" action fails
Dorado Midas can be obtained by loading [Ivy]<Dorado)DoradoMidasRun.Dm and retrieving <Dorado)Midas.Programs with Ftp. You must do Midas/I to initialize Midas on your disk after retrieving these. Subsequently, new versions of Midas can be retrieved by executing the NewMidas.cm command ~le from the Alto Executive. Midas runs only under OS versions 17 or later.
To setup an Alto disk for use in Dorado microcode development or hardware debugging, you can install the Alto OS on a blank disk using the long installation dialog and erase the disk. When this finishes, fetch [Ivy]<Dorado)DoradoUnbugDisk.cm and execute this command file from the Alto Executive; it will retrieve Midas and a number of other files that are needed when using an Alto to control Dorado.
Dorado Midas Manual Edward R. Fiala 26 November 1979
3.
Starting and Exiting from Midas
Midas may be started from the Alto Executive in the following ways:
midas/i midas midas debug
initi.alizes (required when any Midas files move or change); simply fires up Midas;
starts Midas and immediately reads commands from the "Debug.Midas" command file
Dorado Midas may attach to any of up to 20 machines accessible through its Diablo Printer interfac:e. If only one machine is accessible, it immediately connects to it; if more than one machine is there, it first puts up a 1:r1enu of accessible serial numbers, and then connects to the one selected by the user. After connection, subsequent actions affect only the connected machine.
Midas will seize the hardware only if the connected machine is halted; if running, Midas waits for the machine to halt or for yoU' to execute "Abort" or "Dtach" actions. "Dtach", equivalent to exiting to the Executive and restarting Midas, also appears in the main command menu and in the submenu put up by "Go", so you can start a microprogram running with "Go" on one Dorado, then "Dtach", connect Midas to another machine, and do something else (However, if you Dtach and later reattach to a machine, you will have lost the display configuration and address symbols, which might be inconvenient).
Note that there are two different arrangements for the initial Midas display. For both arrangements the left-hand display column. shows the principal Dorado registers, and the middle column shows several other items. When you initially attach to a machine, the right-hand column will show voltage, temperature, and current readings collected by the baseboard microcomputer; after a "RunProg" action, the right-hand column will show items used by Midas hardware testing actions.
To exit from Midas type SHIFT -SWAT (Le., simultaneously depress the left-hand shift key and the right-most, lowest unmarked key); this will close any open output files prior to exit and disconnect the Alto from the Dorado it was controlling. Note that on "Dtach" or exit, if the Dorado was running, it will not be disturbed, but if halted, Midas first restores the hardware state as though it were about to continue, so it will be possible later to reattach and continue a program that was stopped at a breakpoint.
Dorado Midas Manual Edward R. Fiala
4.
Midas Display and the Mouse
The Midas display is arranged as follows:
Blank area at the top (unused);
20 lines x 3 columns of name-value menus; Blank line;
Program and elapsed time line; Blank line;
Two command comment lines; Blank line;
Three lines of command menu; Blank line;
Input text line;
Blank area a the bottom (unused).
26 November 1979
The program line will show the Midas release date or the name of the last program loaded. The right-most part of this line will show elapsed time during long-running actions such as "Go" or "Test"; it shows the execution time of Midas initialization, the last command file, or the last action at other times.
Midas uses the two comment lines to report results of actions that it executes.
When you move the niouse over a name-value menu or the command menu, the selected item (if
any) inverts black and white. Mouse actio'ns ef(ecute when you RELEASE all mouse buttons, so you can move the mouse with buttons depressed without causing damage. If the mouse has moved off of the menu that was selected when the first button went down, nothing will happen when the buttons are released.
Some menus have additional actions "underneath" the ones normally displayed which will appear when you depress appropriate button combinations, as discused below. In other words, when you DEPRESS buttons, the menu may change; when you RELEASE ALL BUTTONS the selected action will get executed. On Dorado Midas, only name-value menus have actions underneath the ones normally displayed.
Since you can neither depress a button combination simultaneously nor release the buttons simultaneously, Midas accumulates the union of all buttons that go down. This button-union governs the "underneath" menu displayed, if any, and is the argument passed to the action procedure when all buttons are finally released.
Dorado Midas Manual Edward R. Fiala 26 November 1979
5. Name-Value Menus
A name-value menu may contain a register or memory address in the name area and its contents in the value area. A memory address may be specified as the memory name and word number, or as the name of an address symbol define<! in a microprogram you have loaded. The address symbol may be followed by + 1- displacement. If a number (default radix 8) is examined, the memory name is defaulted to "VM," so examining "1234" will cause "VM 1234" to be displayed.
Name-value areas are of different sizes. Smaller menus on the left are already filled in when you fire-up Midas; others are empty. Any item can be put in any menu, but larger menus on the right are better for items with long names or v.alues. If an item overflows its menu, the right-most characters of its name get truncated, then the left-most characters of its value.
To display a new item, type its name (which will appear on the input text line), move the mouse over the name field in a name-value menu; and push-and-release the left (top) mouse button. Memory addresses in your microprogram may optionally be followed by a displacement" +n" or "-n"; " nIt is the same as "+ n". Midas will obtain the value of the item from the hardware and display it.
If the command line is empty, the selected menu will be cleared when the button is released.
The address and data items in a name-value menu are affected by the radix and display mode for the item, initially defaulted from a table indexed by the register or memory number. The address offset and value radices are always identical--Midas does not allow these to be independently specified. On Dorado, octal radix is used for everything except the microcomputer memories ($ABSOLUTE and $ABS), where hexadecimal is used. The user may change the radix with the actions discussed below.
The djsplay mode for a value may be either numeric, search, or symbolic.
Numeric mode shows the value as a sequence of numbers (in the chosen radix) separated by blanks; this is the default for almost all items.
Search mode shows tlle value as an address symbol plus offset; this is illegal except for registers or memories that normally contain pointers into some other memory (e.g., on Dorado, search mode for TPC, TLINK, etc. shows the nearest 1M address symbol less-than-or-equal to the value plus an offset; for MEMBASE, BR address symbols are shown; for TIOA, DEVICE address symbols are shown.). Search mode is not the default for any memory or register because it is slightly slower than numeric mode due to symbol table access and because more screen area is required to accommodate long address symbols; however, you may find search mode convenient for some of the items mentioned above.
Symbolic mode results in a special procedure being called to print the value for the item. Symbolic mode is illegal except for the MSTA T memory and the UPTIME and TGLITCH registers on Dorado; for these it is the default; special procedures do not exist for any other items.
Dorado Midas Manual Edward R. Fiala 26 November 1979
When Midas thinks that the value in a register may have changed, it reads its value from the hardware and updates the display; the times when Midas does this are discussed later. Names are sometimes preceded by *, indicating that the value has changed, or by -, indicating that Midas was unable to read the value for some reason (e.g., the machine was running). For an item marked with .... , the old value, which might be wrong, is displayed.
Once some register or memory address has been put into a name-value menu, various mouse button combinations over the name or value may be used to modify the way it is displayed, sequence through words in a memory, pretty-print the value on the comment lines, or show address equivalences. These are summarized in the table below:
Buttons Name-field Value-field
Left Examine Change value
Middle Alternate printout Pretty-print value on comment lines Right A+l, A-I menu Append value to input line
Left + Middle Radix menu Radix menu
Middle + Right Fill column menu Display mode menu
When a button combination selects an alternate menu, the alternate menu will replace the standard menu while the mouse buttons are depressed; if you release the buttons over an alternate menu item, it will be executed; if you are outside the menu when the buttons are released, the standard menu will be restored and nothing will happen.
The "A+l", "A-I" menu appears for memory addresses, but not for registers; these increment or decrement the memory address in the menu, displaying the successor or predecessor. The "FillC" menu allows you to examine successors '(A + 1,
A
+ 2, etc.) in the menus below the selected one; the whole column is filled with successors, if the input text line is blank; otherwise, the input text line is evaluated to a number N, and N lines are filled in with successors. The last address examined is left on the input text line, so you can iterate the examine and fill column actions to achieve scrolling.Releasing the left button over a value stores the value of the input text (or 0 if no text typed) in the selected register. For memories and registers whose values are displayed as several fields, the input text must also be divided into fields; omitted fields are zeroed. Each field may consist of numbers or memory addresses separated by + /-; expressions are evaluated using the radix for the item.
Note: On DO and Dorado, 1M memory words show an absolute address with each value; it is impossible to modify this address from Midas--the correspondence between virtual and absolute addresses can only be established by loading a microprogram. Several other items also have read-only fields that cannot be written, as discussed later.
Provision is made for special input evaluation based upon the register or memory; whenever the input text cannot be evaluated as a sequence of fields, the special input procedure (if any) is called. At the present time, special input procedures are implemented for registers and memories that contain microinstructions (MIR, IM, IMX, IMBD, and LDR on Dorado) and for 16-bit registers. These are discussed later.
Dorado Midas Manual Edward R. Fiala 26 November 1979
Releasing the middle button over a value pretty-prints the value on the command comment lines. The alternate for registers that nOlmally hold 1M addresses is the nearest 1M address tag less-equal to the value
+
offset. Registers and memories that contain microinstructions may also be printed symbolically. Other pretty-print information is detailed later.Releasing the right button over a value item appends the text of the value to the input text line. This is primarily used in command files to move values from one register to another or to display a memory address that is pointed to by the value in some other register.
6.
Command Menu
The command menu holds a list of actions that Midas can execute. The basic menu is modified under some conditions. For example, the "Dump" menu item only appears after you have done a "Ld". During execution, some actions show alternate menus.
For almost all actions in the command menu, mouse buttons are equivalent. On Dorado, the "Go" and "SS" actions are an exception; executing one of these with the right button is interpreted as "proceed," left button as "new go." The "DMux" action is also an exception.
Many common actions may alternatively be initated by keyboard command characters, as given in the action table below.
Dorado Midas Manual Edward R. Fiala 26 November 1979 10
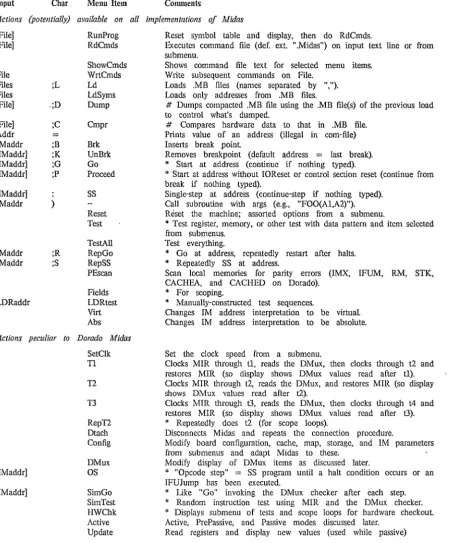
Table 1: Command Menu Actions
Input Char Menu Item Comments
Actions (potentially) available on all implementations of Midas
[File] [File] File Files Files [File] [File] Addr IMaddr [IMaddr] [IMaddr] [IMaddr] [IMaddr] IMaddr IMaddr IMaddr LDRaddr ;L .;D ;C = ;B ;K ;G ;P } ;R ;S RunProg RdCmds ShowCmds WrtCmds Ld LdSyms Dump Cmpr Brk UnBrk Go Proceed SS Reset Test TestAli Rep Go RepSS PEscan Fields LDRtest Virt Abs
Actions peculiar to Dorado Midas
SetClk [IMaddr] [IMaddr] T1 T2 T3 RepT2 Dtach Config DMux OS SimGo SimTest HWChk Active Update
Reset symbol table and display, then do RdCmds.
Executes command file (def. ext ".Midas") on input text line or from submenu.
Shows command file text for selected menu items. Write subsequent commands on File.
Loads .MB files (names separated by ", "). Loads only addresses from .MB files.
# Dumps compacted .MB file using the .MB file(s} of the previous load to control what's dumped.
# Compares hardware data to that in .MB file. Prints value of an address (illegal in com-file) Inserts break point
Removes breakpoint (default address = last break).
* Start at address (continue if nothing typed).
* Start at address without 10Reset or control section reset (continue from break if nothing typed).
Single-step at address (continue-step if nothing typed). Call subroutine with args (e.g., "FOO(Al,A2)"). Reset the machine; assorted options from a submenu.
* Test register, memory, or other test with data pattern and item selected from submenus.
Test everything.
* Go at address, repeatedly restart after halts.
* Repeatedly SS at address.
Scan local memories for parity errors (IMX, IFUM, RM, STK, CACHEA, and CACHED on Dorado).
* For scoping.
* Manually-constructed test sequences.
Changes 1M address interpretation to be virtual Changes 1M address interpretation to be absolute.
Set the clock speed from a submenu.
Clocks MIR through tl, reads the DMux, then clo.cks through t2 and restores MIR (so display shows DMux values read after tl).
Clocks MIR through 12, reads the DMux, and restores MIR (so display shows DMux values read after t2).
Clocks MIR through t3. reads the DMux, then clocks through t4 and restores MIR (so display shows DMux values read after t3).
* Repeatedly does t2 (for scope loops).
Disconnects Midas and repeats the connection procedure.
Modify board configuration, cache, map, storage, and 1M parameters from submenus and adapt Midas to these.
Modify display of DMux items as discussed later.
* "Opcode step" = SS program until a halt condition occurs or an IFUJump has been executed.
* Uke "Go" invoking the DMux checker after each step.
* Random instruction test using MIR and the DMux checker.
* Displays submenu of tests and scope loops for hardware checkout Active, PrePassive, and Passive modes discussed later.
Read registers and display new values (used while passive)
* = requires preceding "TimeOut" action in command file
# requires confirmation with <cr>, "Y", or (or by preceding "Confirm" command in com-file)
Dorado Midas Manual Edward R. Fiala 26 November 1979 II
Some actions in the preceding table are replaced with complementary actions after execution; these are ShowCmds by StopShow, WrtCmds by StopWrt, Virt by Abs. The Active, PrePassive, and Passive actions are in a "ring"; the current hardware mode is shown in the menu; bugging it will change to the next mode. The DMux action will be displayed as "DMux", "OldDMux", "DWrong" , or "DChk" according to which DMux table is currently displayed. All of these actions are discussed later.
General philosophy on mixing keyboard and mouse button control is that, when possible, a command involving some typing is carried out completely at the keyboard, whereas commands involving mouse buttons are carried out completely with the mouse.
For example, to start a microprogram at some address, you normally type an address; then you could bug "Go" in the command menu, but probably "address;G" is more convenient because you won't have to lift your hand from the keyboard; ";G" are the command characters equivalent to bugging "Go".
Many commands are executed in overlays. When these get executed, the register display will turn off (The code for overlays resides where the display bit buffers would otherwise be.). During loading or execution of command files, the display is turned off to make the machine run faster.
Long-running commands normally display an "Abort" menu item. When this is bugged or when control-C is typed, the action terminates.
7.
Keyboard
"=", "+", "-", "#", and "!" are legal symbol constituents in microprograms but will cause trouble for Midas if they appear in address symbols. " =" is an action character that will prettyprint the memory name and offset and the nearest address symbol less-than-or-equal to the value of the string on the input text line.
"+"
and "-" have their usual sum and difference meanings in evaluating input expressions. "# " (octal), "!" (decimal), and "%" (hexadecimal) may be inserted anywhere in a number to overrule the default radix; e.g., "#123" or "123#" will force the evaluation of the number "123" to be in octal. The default input/output radix for almost everything on Dorado Midas is 8 (octal).Exceptions are UPTIME and TGLITCH, which show hr:min:sec in decimal and the $ABS and $ABSOLUTE memories, which use hexadecimal for both the address and value.
Lower case typein is converted to upper case by Midas, so avoid lower case characters in microprogram address symbols. You should write microprograms with the shift-lock key depressed or assemble them with the convert-to-upper-case assembly switch.
Typing ahead is legal until the character you type would cause execution of an action. After that, Midas will flush input and blink at you until the current action finishes.
Dorado Midas Manual Edward R. Fiala 26 November 1979 12
Keyboard editing characters are as follows:
control-A backspace control-Q del
delete last character delete last character clear text line clear text line
Other special keyboard characters are as follows:
control-C control-Z escape return control-D controi-O shift-swat
abort the current action--equivalent to bugging the "Abort" command (only defined for actions that display "Abort")
abort a command file
repeat previous aclion (special for "Test" and "TestAll") special following "Test" or "TestAll"
turns on the display (used during command files) turns off the display (used during command files) exit cleanly from Midas
The interrupt characters above are ineffective during loading, dumping, or comparing, which typically take between 2 and 20 seconds. Indefinite duration commands, such as "Go", "Test", etc. always monitor the keyboard, so control-C can be used. to terminate them.
Control-Z, control-D, and control-O are intended for use during command files. However, these characters do not take effect until the command file executes a command such as "Go" which monitors the keyboard. There is no way to abort a command file and give control back to Midas safely except during a "Go" or other long-running commaI).d. This is not expected to be a problem because commands are 'executed quickly.
After interrupting a "Go" with control-C or control-Z, proceeding with ";P" or ";G" will succeed except when you have smashed the machine state by doing a "test", "reset", etc. action or have displayed a register that Midas cannot examine non-destructively (e.g., IFUM on Dorado can only be. examined destructively) or have interrupted an instruction from which continuation is impossible.
Although command menu items "SS", "Go", "Brk" , "UnBrk", "RepSS", and "RepGo" are provided, the keyboard character equivalent to these is usually more convenient.
8.
Command Files
Command files (default extension ".Midas") are normally executed either by typing "Midas filename" to the Executive or by bugging a file name in the subsidiary menus put up by "RunProg" or "RdCmds". Alternatively, you may type a file name fii'st, then bug one of these actions (If you type a file name after the subsidiary menu is put up and then bug "Abort", the command file will also be executed; it is not clear whether this is a bug or a feature.).
File names in these sub-menus are contained in the files Midas.Programs and Midas.UserPrograms, each of which has a list of file names separated by blanks, commas, or carriage-returns. Midas.Programs is part of the standard Midas release; Midas.UserPrograms is an optional file that a user of Midas can prepare with his own sluff. The names must be UPPER-CASE. These lists serve two purposes: building file FP's to speed OpenFile, and preparing the menu items for "RunProg" and "RdCmds".
Dorado Midas Manual Edward R. Fiala 26 November 1979
built unless the file exists, and the file name will not be put in the "RunProg" menu unless name.MIDAS exists).
If the name ends in "*", a quick OpenFile table entry is made for name.midas and the name
wiII appear in the "RdCmds" menu.
If the file name contains an extension, then it will be put in the quick OpenFile table, but won't appear in the "RunProg" or "RiiCmds" menus.
Since Midas builds a table of file FP's during its initialization, when you edit a command file or modify a .MB file, you should reinitialize Midas by typing "MidaS/I". When you add new command files or .MB files you should update the "Midas.UserPrograms" file appropriately and do "Midas/I".
13
"RdCmd~" executes the actions stored in the command file; it is frequently used to modify the display in various ways by executing command files that show collections of items that are of interest.
"RunProg" first clears the symbol table and restores the display to its initial arrangement; then it executes 'the actions in the selected command file; "RunProg" is used to completely change contexts--to run a new microprogram, for example.
Generally, there is one "RunProg" command file for each hardware diagnostic, with the same name as the diagnostic, e.g.:
dgbasic.mb dgbasic.midas
the diagnostic; the command file.
A command file following this convention loads the diagnostic into the microprocessor and displays various registers of interest when the micropro~ram is in use.
The command-file facility is actually an (awkward and limited) programming language. The collection of actions dIscussed below is being developed so that command files can monitor diagnostic microprograms, collect and report error information on an output file, or direct the sequence of diagnostic microprograms according to hardware failures that are observed.
For system microcode, command-files can be used to control auto-restart and failure diagnosis.
Command files can be nested with "RunProg" and "RdCmds" subject to the following RESTRICTIONS:
(1) [Maxc2 only] "AltIO" terminates command files (Le., upon return to Midas from AitlO the command file will not be continued).
Dorado Midas Manual Edward R. Fiala 26 November 1979 14
A number of commands that can never occur when Midas is run interactively are useful in command files. These, not given in the table earlier, are shown below. The first table is for actions that operate on name-value menus (AO ... C19); the second table for command menu (X) actions.
Text Arg Action
Address Addr
Value Val
A+l A-I
NCols FillC
Oct Dec Hex Num Sym Search
Value SkipE
Value SkipG
'value SkipL
Value SkipNE
Value SkipLE
Value SkipGE
Table 2: Command File Name-Value Actions
Comments
Button actions as discussed earlier. Button actions as discussed earlier.
Increment memory address, as discussed earlier. Decrement memory address, as discussed earlier.
Fill name-value menus beneath the one selected with consecutive addresses starting at the address contained in the selected menu.
Display address offset and value in octal. Display address offset and value in decimal. Display address offset and value in hexadecimal. Display value numerically.
Display value symbolically.
Display value as an address symbol plus offset in the appropriate memory. Skip the next command if the input text evaluates equal to the contents of the register or memory word displayed. The input text is evaluated exactly as though it were to be stored into the register displayed in that name-value menu, so if the value displayed has several fields, the input text must also have several fields. Skip if input text greater than the contents of the item in the name-value menu (unsigned compare).
Dorado Midas Manual
Text Arg
Octal no. . Tag Octal no. .Tag Octal no.
Octal no.
File name File name
[text]
text
text
File name
Action Skip Skip BackSkip BackSkip Return DisplayOn DisplayOff TimeOut Confirm OpenOutput AppendOutput CloseOutput WriteMessage WriteDT ShowError DumpDisplay PrettyPrint WriteS tate
Edward R. Fiala 26 November 1979 15
Table 3: Command File Command Actions
Comments
Skip N following commands, where N is the value of the input text. Skip following commands until one is encountered with the label ... Tag" .
Reset to byte 1 of the command file, then skip.
Return out of current command file, then skip ( ... Tag" form is illegal for Return.). Turn on the display, so that effects of subsequent commands can be observed. The display is initially off for a command file.
Turns off the display.
Input text is evaluated to a 32-bit octal number of msec at which to abort the immediately following command, if it has not finished by then. This is intended for use before "Go" and other commands which might hang indefinitely. If the timeout occurs, Midas will skip the comman.d after the "Go". TimeOut also turns on the display, necessary because the machinery which checks for timeout is only active with the display on. Note that TimeOut is required before the actions *'ed in the table
on page 4 and is illegal before other commands; Midas will complain if you do not
use TimeOut appropriately.
Supplies confi,rmation for the command which follows (which should be one of the commands requiring confirmation).
Opens an output file (default extension ".Report") on which text can be written. Append to an output file (default extension ".Report")
Closes the output file.
Writes the contents of the input text buffer on the output file. Note that if any text follows the WriteMessage, that text up to but not including the <cr> is what gets written. However, if <cr> immediately follows WriteMessage, then the contents of the input text buffer left by the previous command get written. "-" is translated into <cr> and .. ,.. into a blank.
Appends the current date and time to the output file.
Displays the text arg on the command line, turns on the display if it was off, and queries with "Abort" and "Continue" menu items.
Writes t\:le current display image on the output file.
Evaluates text to a memory address, register name, or memory name; writes this name on the output file; then pretty-prints the value on the output file exactly as it would be pretty-printed on the comment lines if the item were displayed in one of the name-value menus and middle-buttoned.
Used by Midas initialization to create the Midas.Dtach and Midas.RunProg files--users shouldn't use this action.
9.
Syntax of Command-file Actions
The syntax of a command-file action is as follows:
[ ... <tag>]$.. "]<buttons>$" "<menu>$" "<action>[$" "<text>][";"<comment>]<cr>
where the
"U"
denote that the ". tag" , input text, and ";comment" are optional. $"" denotes a sequence of one or more blanks and tabs.If the first character on the line is a ".", then the characters after that are a label or tag which may be used as the argument for the "Skip" or "BackSkip" actions given in .the table earlier.
Dorado Midas Manual Edward R. Fiala 26 November 1979
<menu> is the menu name in which the action is executed ("X" for the command menu, "AO" ... "A19", "BO" ... "B19", and "CO" ... "C19" for name-value menus).
<action> is the text name for one of the- actions (upper/lower case must match the definition).
<text> is the text typed on the command line, which may be anything except a n;n.
"." ,
Note that if a single blank tenninatcs <action> and if no input text argument is given, then input text
left-over from the preceding action will be used. This allows text from a right-button action left-over a value to be used in a following action (e.g., in WriteMessage or to store the value into another reigster). However, one or more extra blanks will reset the input text, so the action is executed with null input text
begins a comment, which may be omitted.
<cr> (carriage-return) terminates the action.
16
To find out what text .shquld be put in command files, you can bug "ShowCmds" in the command menu. This will cause .the command file text for each command to be displayed on the command comment line as the mouse selects it (You don't have to execute the command to see the equivalent text.). This text is complete except that the mouse button which executes the command isn't shown unless you depress the mouse button. To terminate "ShowCmds", bug "StopShow" (which appears only when "ShowCmds" is in progress.).
You can prepare a command file (default extension ".Midas") by typing a file name and bugging "WrtCmds". This causes text for subsequent commands to be put on the file. When you are done with this, bug "StopWrt" to close the file. ("StopWrt" is in the command menu only when a command file is being written.). Exiting from Midas also closes the output file.
You will probably want to edit out your goofs with Bravo after the command file is written.
In addition, you will have to insert "Confirm" before actions which require confirmation and modify the "TimeOut" stuff which Midas uses to surround actions which might ~lang indefinitely (See the table given earlier for the actions that require this.).
Here is a sample command file:
LX Ld dgl; L AO Addr TASK; LAO Val 0; L Al Addr RTEMP; L Al SkipEq\ FOO+3; L X ShowError RTEMP not
L A2 TLINK 0; L X TimeOut 2000; L X Go START; L X Skip 1;
LX ShowError START;G failed;
Equivalent to typing "dgl" and bugging "Ld" in the command menu Examine the "TASK" register in name-value menu AO
Change the value in TASK to 0
Examine the address "RTEivIP" in menu Al
Skip the next command if RTEMP contains the value FOO + 3 loaded correctly
Examine the Link register for task 0 in menu A2
Abort the following command if it hasn't finished in 1.024 sec. Begin microprogram execution at address "START"
Dorado Midas Manual Edward R. Fiala 26 November 1979 17
10.
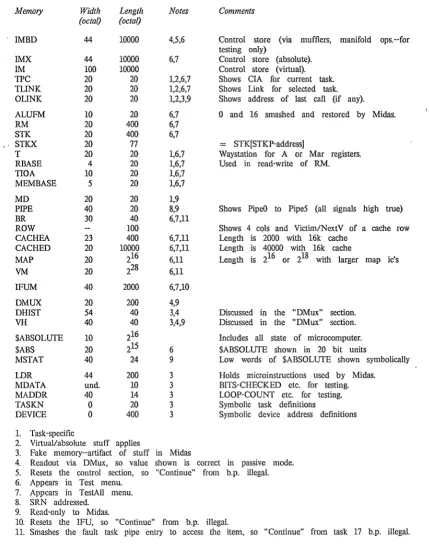
Registers and Memories Known to Midas
Memory Width
(octal)
!MBD 44
IMX 44
1M 100
TIC 20
TLINK 20
OLINK 20
. ALUFM 10
RM 20
STK 20
". STKX 20
T 20
RBASE 4
TIOA 10
MEMBASE S
MD 20
PIPE 40
BR 30
ROW
CACHEA 23
CACHED 20
MAP 20
~ 20
IFUM 40
DMUX 20
DRIST S4
VH 40
$ABSOLUTE 10
$ABS 20
MSTAT 40
LDR 44
MDATA und.
MADDR 40
TASKN 0
DEVICE 0
1. Task-specific
Length (octal) 10000 10000 10000 20 20 20 20 400 400 77 20 20 20 20 20 20 40 100 400 10000 216 228 2000 200 40 40 216 21S 24 200 10 14 20 400
2. VirtuaVabsolute stuff applies
Table 4: Memories
Notes 4,S,6 6,7 1,2,6,7 1,2,6,7 1,2,3,9 6,7 6,7 6,7 1,6,7 1,6,7 1,6,7 1,6,7 1,9 8,9 6,7,11 6,7,11 6,7,11 6,11 6,11 6,7.10 4,9 3,4 3,4,9 6 9 3 3 3 3 3 Comments
Control store (via mufflers, manifold ops.--for testing only)
Control store (absolute). Control store (virtual). Shows CIA for current task. Shows Link for selected task. Shows address of last call (if any).
o
and 16 smashed and restored by Midas.:::: STK[STKP-addressj
Waystation for A or Mar registers. Used in read-write of RM.
Shows PipeD to PipeS (all signals high true)
Shows 4 cols and Victim/NextV of a cache row Length is 2000 with 16k cache
Length is 40000 with 16k cache
Length is 216 or 218 with larger map ic's
Discussed in the "DMux" section. Discussed in the "DMux" section.
Includes all state of microcomputer. $ABSOLUTE shown in 20 bit units
Low words of $ABSOLUTE shown symbolically
Holds microinstructions used by Midas. BITS-CHECKED etc. for testing. LOOP-COUNT etc. for testing. Symbolic task definitions
Symbolic device address definitions
3. Fake memory--artifact of stuff in Midas
4. Readout via DMux, so value shown is correct in passive mode. S. Resets the control section, so "Continue" from b.p. illegal. 6. Appears in Test menu.
7. Appears in TestAll menu. 8. SRN addressed.
9. Read-only to Midas.
10. Resets the IFU, so "Continue" from b.p. illegal.
Dorado Midas Manual Edward R. Fiala 26 November 1979 18
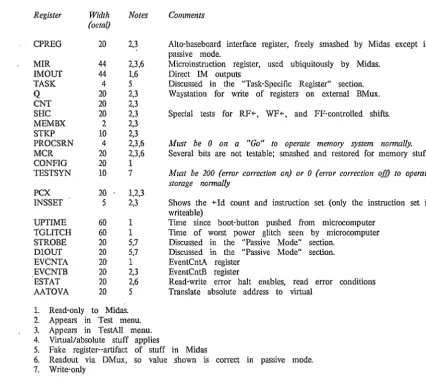
Table 5: Registers
Register Width Notes Comments (octal)
CPREG 20 2,3 Alto-baseboard interface register, freely smashed by Midas except in
MIR 44
IMOUT 44
TASK 4
Q 20
CNT 20
SHe 20
MEMBX 2
STKP 10
PROCSRN 4
MCR 20
CONFIG 20
TESTSYN 10
PCX 20
1NSSET 5
UPTIME 60
TGLITCH 60
STROBE 20
mOUT 20
EVCNTA 20·
EVCNTB 20
ESTAT 20
AATOVA 20
1. Read-only to Midas.
passive mode.
2,3,6 Microinstruction register, used ubiquitously by Midas. 1,6 Direct 1M outputs
5 Discussed in the "Task-Specific Register" section. 2,3 Waystation for write of registers on external BMux. 2,3
2,3 Special tests for RF(-, WF(-, and FF-controlled shifts. 2,3
2,3
2,3,6 Must be 0 on a "Go" to operate memory system normally.
2,3,6 Several bits are not testable; smashed and restored for memory stuff.
1
7 Must be 200 (error correction on) or 0 (error correction ofj) to operate storage normally
1,2,3
2,3 Shows the (-Id count and instruction set (only the instruction set is writeable)
1 Time since boot-button pushed from microcomputer 1 Time of worst power glitch seen by microcomputer 5,7 Discussed in the "Passive Mode" section.
5,7 Discussed in the "Passive Mode" section. 1 EventCntA register
2,3 EventCntB register
2,6 Read-write error halt enables, read error conditions 5 Translate absolute address to virtual
2. Appears in Test menu. 3. Appears in TestAlI menu. 4. Virtual/absolute stuff applies
5. Fake register--artifact of stuff in Midas
6. Readout via DMux, so value shown is correct in passive mode. 7. Write-only
Most registers and memories listed above correspond to ones discussed in the "Dorado Hardware Manual". Others are discussed in the sections which follow.
MDATA and MADDR memories contain words used to report or control the activity of the "Test" and "TestAll" actions discussed later. MADDR also contains DW ATCH (used to control the DMux address for scoping), MIR-PES (error-reporting), and COM-ERRS (error-reporting), which will be discussed later.
TASKN. and DEVICE are fake memories used to pass symbolic information from the assembler to Midas in the .mb file, as discussed in the "Dorado Microassembler" document. Their only purpose is to provide symbolic equivalents to task and device numbers for ease of debugging.
For approximately all registers and memories that contain 16-bit quantities, Midas will evaluate input of the form "m"n", storing the value of "m" into bits 0:7 of the word and the value of "n" into bits 8:15.
Dorado Midas Manual Edward R. Fiala 26 November 1979
19
11. The 1M Memory and Virtual Addresses
Because the placement transformations performed by MicroD make it difficult to correlate microstore locations with positions in microprogram source files, the Dorado and DO implementations of Midas use a map t~ transform virtual addresses produced by Micro into absolute microstore locations produced by MicroD.
Two memories, IMX and 1M, each show the microstore. IMX is absolutely addressed; 1M virtually addressed. When you fire up Midas, 1M is "empty"; when you load a microprogram, 1M is filled with consecutive instructions from your source file, irrespective of where MicroD decides to place these; the value displayed for an 1M address includes both the absolute address assigned to it, the microinstruction, and some other information discussed in the next section.
In other words. if your microprogram is 10 words 100ig. the meaningful part of 1M is only 10 words long. In this case. if you examine 1M addresses greater than 7. the printout will show an absolute address of 7777 and zeroes for the rest of the value.
'Midas will not allow you to modify the mapping between virtual and absolute addresses intcractively--you can only do this by loading a microprogram.
To facilitate dealing with virtual/absolute correspondences, Midas has a mode switch that controls the way in which registers and memories that normally contain microstore addresses are handled. When you fire up Midas, the display is in absolute mode and the "Abs" action appears in the command menu; when you lo.ad a microprogram, the display switches to virtual mode and the "Virt" action appears in the command menu. Test actions will switch to absolute mode. The
current mode always appears in the command menu.
In virtual mode, the display shows the virtual equivalent for the value in any register that normally contains a microstore address. When the value is outside the virtual memory, it prints as 7777. To find the absolute value in this case, you have to switch to absolute mode.
On Dorado the registers affected by this are CIA. ClAINC. TNlA. BNPC. TPC. TLINK. and OLINK.
A fake register called AATOV A converts absolute addresses to virtual. For example, copying the value in some RM word into AATOVA will show the virtual equivatent; this' is useful when return links are saved in RM words.
The general idea is that, if you suspect a hardware problem in the control section, you might work in absolute mode, but in all other situations when a program is loaded you will work in virtual mode, and the complications created by scrambled instruction placement will be concealed.
12.
Registers and Memories that Contain Microinstructions
The MIR and IMOUT registers and the IMBD, IMX, 1M, and LDR memories all contain microinstructions. A middle-button action over the value will print these symbolically on the comment lines.
The value for an 1M address is shown as five fields on the display:
Dorado M idas Manual Edward R. Fiala 26 November 1979
148-bit absolute address;
bits 0-218 of microinstruction (RSTK, ALUF, BSEL, LC, ASEL); bits 228-418 of microinstmction (BLOCK, FF, lCN).
20
A "I" in PE020 indicates a parity error in bits 08-208 of the value; a "I" in the second bit means PE in 218-418. Both bits "I" normally indicates a breakpoint. Midas will store the data with bad parity, if you request it. Note that these are parity-bad bits; on a write, Midas will compute correct parity for each half of the microinstruction and xor that with the parity-bad bit; on a read, Midas will determine whether or not the location has correct parity and report accordingly.
The "Under' bit is set when no absolute address is assigned to this virtual address--in this case the absolute address should print as 7777. The "Emu" bit tells the pretty-print routine to show the instmction as though it were being executed by the emulator (task 0).
IMX, IMBD, MIR, IMOUT, and LDR have a three-field printout in which the two PE bits are left-most followed by the left and right halves of the microinstruction.
IMX and IMBD each address the microstore absolutely and differ only in the way data is read and written. IMX is read and written by executing multi-cycle microinstructions that write the microstore from the BMux and read the data into Link. This requires that both ContA and ContB boards be present (plus ProcH and ProcL to compute parity). IMBD uses manifold operations to address and directly write the microstore and uses the muffler system to read out the microstore; this requires only ContB; however, the addressing method for IMBD makes continuation from a break impossible, so users should normally display IMX in preference to IMBD.
The IMOUT register contains the 448 DMux signals which are the direct outputs of the micros tore, as addressed by the complicated stuff in the control section. At a breakpoint
(to)
IMOUT shows the bits that will be loaded into MIR at t2, provided that the state of tlle branch condition does not change at t1.The LDR memory is an array in Alto core that ~ontains microinstructions used by Midas when operating the hardware; it should ordinarily be of no interest to users, although the "LDRtest" action allows use of instmctions stored in this memory for low-level hardware debugging.
Note that a bit pattern in LDR identical to one in IMX, 1M, or IMOUT in general is not the same instnlction because the ALUFM memory may contain different contents when the LDR instmction is executed. The pretty-print procedures account for this difference and show different stuff for these two cases. However, if you copy an LDR instruction into 1M or IMX, watch out! In debugging regular microcode (Le., any microcode that doesn't test ALUFM itselt), this incompatibility is usually avoided because ALUFM 0 and 16 are assembled with the "B" and "NOT A" alu operations, which are identical to the operations used by Midas.
Also note that the microinstruction pretty-print procedure does not have available all of the infonnation that the microassembler had when you assembled your program, so the printout is not always beautiful. The following are deficiencies you should be aware of:
Dorado M idas Manual Edward R. Fiala 26 November 1979
tasks, so Midas will disassemble this stuff correctly only when it is able to deduce the task that executes the microinstruction. Midas does have available the Emu bit for instructions in 1M, and if you pretty-print an 1M address or an IMX or IMBD address that also appears in 1M, Midas will be able to distinguish between. emulator and non-emulator instructions; however, Midas cannot distinguish fault task microinstructions from other non -emulator instructions, so fault-task memory references will be pretty-printed erroneously. However, Midas very cleverly deduces the task for microinstructions in MIR and IMOUT in most cases, so the pretty-print will usually be correct for these.
Midas is not clever enough to figure out what will be in RBASE when an instruction is executed, so RM addresses from your program are not nOlTIlally pretty-printed; Midas instead uses the generated names RO to R17 for RM references.
There are many possible assembler macros that you might use to generate constants to control the shifter; for an instruction that does this, Midas will pick one of the forms, probably not the one you used in the source file.
Midas sometimes pretty-prints control clauses differently from the assembler. IFUJump's and IM/TPC read-write clauses are the same; the decision to print Return or CoReturn, LocBr or LocCall, LongBr or LongCall, GBr or GCall is dependent upon Midas deducing the virtual location for the instruction being printed and finding .
+
1 in the virtual space at .+
1 in the absolute space, so this might be wrong sometimes. Conditional branches are always printed like "LocBr[addrl,addr2,BC)".21
Modifying 1M words in octal is inconvenient, so you will normally want to use the symbolic method below for patching 1M.
Writeable registers and memories that contain microinstructions (MIR, 1M, IMX, 1MBD, and LDR) evaluate a special form of input as follows: The first character on the input text line should be "(" to change the values of several fields in the instruction without clobbering other fields, or "[" to reconstruct the value beginning with a no-op microinstruction. This is followed by a number of clauses of the fooo "Field f-integer" separated by bianks and/or commas. The legal field names are RSTK, ALUF, BSEL, LC, ASEL, BLOCK, FF, JCN, PE020, PE2141, and EMUL. EMUL, the emulator mode bit affecting pretty-printing of the microinstruction is only defined for 1M.
Dorado Midas Manual Edward R. Fiala 26 November 1979 22
13.
Task-Specific Registers
Midas treats all task-specific registers (T, RBASE, TLINK, OLINK, TPC, TIOA, MEMBASE, and MD) as 20-word memories. In other words, "T 6" is the T-register for task 6.
In addition, a special kludge allows you to display the 21st word (Le., "T 20", "RBASE 20", etc.) and have that be interpreted as the register for the currently selected task. The currently selected task is the value in TASK; the TASK register is an artifact of Midas that is initialized to CTASK (Le., to the "current task") at breakpoints.
In other words, when a microprogram halts at a breakpoint or because of a mouse-abort, CT ASK is read from the DMux--suppose that it contains 6. This value is copied into TASK. If "T 20", "TLINK 20", etc. appear on the display, these will show values for task 6. The idea is that you can change the display for all eight task-specific registers by storing a new value into TASK. The task selected by TASK is also the one started by "00", "SS", etc. as discussed later.
The hardware's LINK register, suppressed by Midas, is shown as' the current task's TLINK word. The OLINK memory shows the absolute value in TLINK less 1. When microstore addresses are displayed in absolute mode, this is useless. However, in virtual mode OLINK will usually show the location that last did a CALL. This is useful in diagnostics which do BRANCH[ERROR], where ERROR is at a global call location. After one of these branches, OLINK shows the location that made the error branch, while TLINK shows an unrelated location.
14. BR Addressing Kludge
BR 40 is another addressing kludge used to represent the "currently selected" base register, or BR MEMBASE[T ASK) (Le., the BR location pointed at by MEMBASE for the currently selected task).
15. STKX Kludge
In debugging emulators, it is frequently desirable to view the STK entries relative to STKP rather than relative to STK 0 (Le., relative to the top-of-stack rather than the bottom-of-stack). To aid in this, Midas defines STKX as an alternate memory for STK. STKX[n) shows STK[STKP-n], where valid values for n are 0 to STKP-l; hence, tlle top stack entries are STKX 0, STKX 1, etc.
STKX does not allow you to view entries on the wrong side of the stack pointer, and the display will preface those names with "~", indicating unreadable, if they appear on the display.
16.
Memory System Registers and Memories
The cache, map, and storage arrangement may vary from one Dorado to another but Midas can deduce the configuration by reading the mufflers and looking at the CONFIO register; Midas does this automatically when you attach to a new machine or when you execute the "Config" action. Midas adjusts to the configuration by varying the lengths of its ROW, CACHEA, CACHED, and MAP memories and adapting its algorithms for reading and writing these.
Dorado Midas Manual Edward R. Fiala 26 November 1979
23
CACHEA, CACHED, MAP, and VM. Consequently, pipe entry 1 is smashed and (for CACHED and VM) MD is smashed, which may prevent continuing from a breakpoint, as discussed later.
ROW shows the cache flags and address bits in each of the four columns of a cache row and the victim and next-victim for the row on five consecutive lines of a display column. The length of the ROW memory is adjusted to the number of rows in the cache. Displaying an address in ROW is nOlmally the most convenient way to view the cache; you can prettyprint the cache flags and address bits for each column independently, and this also shows the 16 data words in the associated munch (if any).
CACHEA is a memory of length equal to 4 times the number of cache rows; it shows tl1e cache flags and address bits for a single entry in the cache. In a 100-row cache, the entries for the four columns in row i are CACHEA i, CACHEA H100, CACHEA i+200, and CACHEA i+300. CACHEA is intended primarily for the "Test" and "TestAll" actions; on the display, it will usually be more convenient to look at ROW.
CACHED is a memory containing all the data words in the cache; word m in the munch for row r and column c is at CACHED 208 *nrows*c
+
208 *r+
m. CACHED is intended primarily for "Test" and "TestAll".Addresses in the MAP memory are displayed with the MapPE and PgFault bits in a 2-bit field followed by wp, dirty, and ref bits in a 3-bit field followed by the 16-bit ra field on the display. When a MAP address is written, ref is zeroed and map parity is always written correctly; dirtyb (the copy of dirty) and MapParityare not readable (they appear in CONFIG in other situations). **Changes pending**
VM accesses the virtual memory using Fetch ~ and Store~ with the current contents of the map and cache; map and data error faults are not detected or indicated in any way, and the "RunRefresh" and "EnRefreshPeriod" clock enables must be true for storage to work properly. Midas sets the length of VM to the largest limit imposed by the map and cache geometries. Although VM appears in the "Test" menu, the user must setup the cache and map reasonably and select a suitably small sub-range of addresses in LOW-ADDR, HIGH-ADDR, and ADDR-INC before attempting to test VM.
In looking at VM, it is sometimes desirable to determine the MAP and ROW entries through which a VM word is accessed; if you middle-button any VM address, these will be displayed on the comment lines.
Midas does not provide any direct method of accessing storage; the user has to setup CACHEA and MAP with appropriate values and then use VM to do this.
Dorado Midas Manual Edward R. Fiala 26 November 1979
24
17.
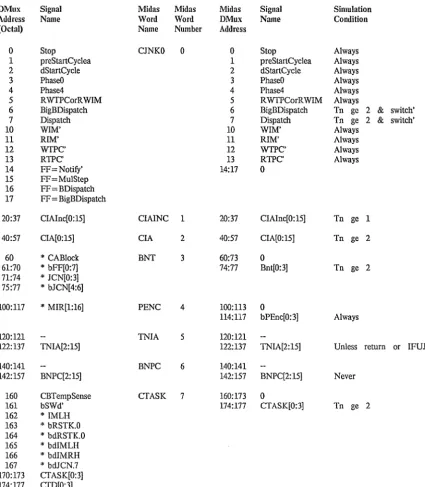
Memories and Registers Associated With the DMux
At those times discussed later, the 40008 DMux signals (or mufflers) are read from the hardware and stored in the first 2008 words of a table. These are arranged so that hardware DMux address
o
corresponds to bit 0 of word 0 in Midas' DMUX memory, hardware address 178 to bit 178 of word 0, .. , up to hardware address 37778 in bit 178 of word 1778. Then the value on the BMux and the error status, which can also be read passively, are appended to the table. Finally, table data is rearranged, so that the DMUX memory looks as shown in the tables later.Inside Midas associated with the DMUX memory are four separate tables. Regular DMux readout is stored in DMuxTab. The "SimGo" and "SimTest" discussed later use three other tables:
OldDMuxTab (previous DMux readout); DChk (signals checked by the simulator); DWrong (errors detected during simulation).
In other words, when one of these actions halts, OldDMuxTab holds the to DMux readout, DMuxTab the ~ readout, and DWrong the errors that were detected in DMuxTab. DChk is initialized by Midas to values that are reasonable for the boards that are plugged in, and the "Config" action also initializes DChk to reasonable values; the user may manually modify DChk, as discussed below, in order to disable checking of signals that are incorrectly simulated (This won't be partic~lar1y use~l after the simulator is thoroughly debugged).
Nonnally, DMux addresses and registers derived directly from DMux readout (Le., MIR, IMOUT, MCR, IMBD, DHIST, VH) show . values taken from DMuxTab. However, the user may execute the "DMux" action with various button combinations to view the other three tables; the name printed for this action in the command menu will be "DMux", "DWrong", "DChk", or "OldDTab" according to which table is currently viewed. When the action is executed with the right (bottom) mouse button, OldDMuxTab valu~s are viewed; both left and right buttons shows DChk; middle button shows DWrong. The symbolic names of the first 11 errors in DWrong will also be printed on the comment lines when the middle button is released.
DMUX prettyprinting (middle button over value) of regular (DMuxTab or OldDMuxTab) values works differently from DWrong and DChk pretty-printing. Regular printout of single-bit items shows symbolic names of "true" signals; "false" signals are not printed. In other words, low-true signals are printed when 0, high-hue when 1. Multi-bit items (e.g., foo.O, foo.l, foo.2) are always printed (e.g., foo = 3).
You should note that modified printout of DMUX also affects registers whose values are obtained by reading the DMux; this includes MIR, MCR, and IMOUT (but not IMBD). The DMUX memory itself and IMOUT are read-only except when DChk is being shown. MIR and MCR are writeable when DMuxTab is viewed but read-only when OldDMuxTab or DWrong is viewed; writing modifies DChk when DChk is viewed.
Dorado Midas Manual Edward R. Fiala 26 November 1979
25
problems. Each time the DMux is read the 408-bit data field of each word in DHIST is left-shifted 1 and the new value brought into the low bit
The VH memory provides another view of DHIST. Word 0 in VHIST shows the 408 DHIST signals at to' word 1 at t-l, word 2. at
t
2, etc.When it is done reading the mufflers or done with a manifold operation, Midas loads the DMux address register with the value contained in DW ATCH, an address in the MADDR memory. This means that during a "00" or when Midas is not reading the mufflers, a scope probe attached to the DMux data line on the backpanel will show the DMux signal selected by the low-order 11 bits of DWATCH. However, if DWATCH contains 0, Midas will be turning control of the muffler/manifold system over to the baseboard at regular intervals, and the microcomputer will smash the DMux address.
18. Interface Registers
CPREG is one of the central interface registers used by the Alto in loading information into Dorado. It can be tested, but should not otherwise be of interest except in passive mode. Midas freely smashes the value in this register.
MIR is also special. It is loaded directly from the Alto and read via the DMux; Midas faithfully restores MIR after executing instructions.
19. Config
Midas automatically determines· the hardware configuration when it connects to a particular dorado by means of DMux signals that it can read from each board. The configuration consists of the following parameters:
which boards are plugged in--debugging is frequently carried out with some boards disconnected; Map ic size;
stomge ic size;
cache size (4K words or 16K words);
whether the 16th bit in a cache entry is used as a parity bit or an address bit; number of stomge modules.
Midas automatically adjusts its length parameters for VM, CACHEA, CACHED, ROW, MAP, etc., enables and disables various tests in the Test and TestAll actions, and modifies the behavior of SimTest and SimOo according to which boards are plugged in.
The automatic determination of the hardware configuration should not fail, but if it does, the Con fig action can be executed to manually set the configuration by means of actions in a subsidiary menu. Manually controlling the configuration may also be useful when testing with SimTest or SimOo.
20. SetClk
Dorado Midas Manual Edward R. Fiala 26 November 1979 26
display.
The "SctClk" action allows the clock period of the mainframe to be specified from a subsidiary menu. You will probably be able to continue from a break after changing the clock speed, but Midas warns you that continuation is impossible.
21.
Reset
The "Reset" action shows an elaborate subsidiary menu with many options. The options are: run enables for different stuff; parity-error enables for the different data paths that are parity-checked; and initialization of memories.
The general ideas that determined exactly how "Reset" is implemented are as follows: First, memories and registers should be reset only if they have to be for some reason. For example, memories that are parity-checked, such as T, RM, and STK, have to be reset to prevent parity errors when you start nmning a program; TIOA has to be reset in case some io device has variant behavior when TIOA contains its device number (building an io device that did this would be a . poor idea); it is desirable to reset IMX and IFUM before loading a program, so that run-away branches and out-of-control programs will be trapped. However, other memories and registers such as RBASE, MEMBASE, Q, CNT, etc. need not be reset--your microprogram should contain code to initialize these, so Midas doesn't have to.
Next, memories that require a long time to initialize, such as MAP (9 seconds now, 35 or 140 seconds with larger ic's in the Map), should be optionally reset so that you won't have to wait for their initialization unnecessarily.
Also, memories loaded by a microprogram (1M, IFUM, RM, ALUFM, and STK) should be optionally reset, if at all; if they are optional, you will be able to reset other parts of the machine without smashing your program. However, there does not seem to be any advantage in initializing ALUFM, so this memory is never initialized.
Each option is of an on-off form. The current state of the option is shown on the comment lines, while the other state appears in the command menu. The options as originally chosen are reasonable for a total reset, such as you would carry out at the onset of a "RunProg" command file; you. may also ·want to turn on MAP initialization.
To carry out a reset, you bug the sequence of options you want, then bug the "Do-It" menu item.
When yo