Digital Solutions Division
DKT/IPT Telephone
User Guide
Publication Information
Toshiba America Information Systems, Inc., Digtal Solutions Division, reserves the right, without prior notice, to revise this information publication for any reason, including, but not limited to, utilization of new advances in the state of technical arts or to simply change the design of this document. Further, Toshiba America Information Systems, Inc., Digital Solutions Division, also reserves the right, without prior notice, to make such changes in equipment design or components as engineering or manufacturing methods may warrant.
CTX-UG-DKIPT-VC Version C.1, October 2004
Toshiba America Information Systems, Inc. Digital Solutions Division
All rights reserved. No part of this manual, covered by the copyrights hereon, may be reproduced in any form or by any means—graphic, electronic, or mechanical, including recording, taping, photocopying, or information retrieval systems—without express written permission of the publisher of this material.
Strata is a registered trademark of Toshiba Corporation. Stratagy is a registered trademark of Toshiba America Information Systems, Inc.
TOSHIBA AMERICA INFORMATION SYSTEMS, INC. (“TAIS”)
Digital Solutions Division License Agreement
IMPORTANT: THIS LICENSE AGREEMENT (“AGREEMENT”) IS A LEGAL AGREEMENT BETWEEN YOU (“YOU”) AND TAIS. CAREFULLY READ THIS LICENSE AGREEMENT. USE OF ANY SOFTWARE OR ANY RELATED INFORMATION (COLLECTIVELY, “SOFTWARE”) INSTALLED ON OR SHIPPED WITH A TAIS DIGITAL SOLUTIONS PRODUCT OR OTHERWISE MADE AVAILABLE TO YOU BY TAIS IN WHATEVER FORM OR MEDIA, WILL CONSTITUTE YOUR ACCEPTANCE OF THESE TERMS, UNLESS SEPARATE TERMS ARE PROVIDED BY THE SOFTWARE SUPPLIER. IF YOU DO NOT AGREE WITH THE TERMS OF THIS LICENSE AGREEMENT, DO NOT INSTALL, COPY OR USE THE SOFTWARE AND PROMPTLY RETURN IT TO THE LOCATION FROM WHICH YOU OBTAINED IT IN ACCORDANCE WITH APPLICABLE RETURN POLICIES. EXCEPT AS OTHERWISE AUTHORIZED IN WRITING BY TAIS, THIS SOFTWARE IS LICENSED FOR DISTRIBUTION ONLY TO END-USERS PURSUANT TO THIS LICENSE AGREEMENT.
1. License Grant. The Software is not sold; it is licensed upon payment of applicable charges. TAIS grants to you a personal, non-transferable and non-exclusive right to use the copy of the Software provided under this License Agreement. You agree you will not copy the Software except as necessary to use it on one TAIS system at a time at one location. Modifying, translating, renting, copying, distributing, transferring or assigning all or part of the Software, or any rights granted hereunder, to any other persons and removing any proprietary notices, labels or marks from the Software is strictly prohibited; You agree violation of such restrictions will cause irreparable harm to TAIS and provide grounds for injunctive relief, without notice, against You or any other person in possession of the Software. You and any other person whose possession of the software violates this License Agreement shall promptly surrender possession of the Software to TAIS, upon demand. Furthermore, you hereby agree not to create derivative works based on the Software. TAIS reserves the right to terminate this license and to immediately repossess the software in the event that You or any other person violates this License Agreement.
2. Intellectual Property. You acknowledge that no title to the intellectual property in the Software is transferred to you. You further acknowledge that title and full ownership rights to the Software will remain the exclusive property of TAIS and/or its suppliers, and you will not acquire any rights to the Software, except the license expressly set forth above. You will not remove or change any proprietary notices contained in or on the Software. The Software is protected under US patent, copyright, trade secret, and/or other proprietary laws, as well as international treaties. Any transfer, use, or copying of the software in violation of the License Agreement constitutes copyright infringement. You are hereby on notice that any transfer, use, or copying of the Software in violation of this License Agreement constitutes a willful infringement of copyright.
3. No Reverse Engineering. You agree that you will not attempt, and if you employ employees or engage contractors, you will use your best efforts to prevent your employees and contractors from attempting to reverse compile, reverse engineer, modify, translate or disassemble the Software in whole or in part. Any failure to comply with the above or any other terms and conditions contained herein will result in the automatic termination of this license and the reversion of the rights granted hereunder back to TAIS.
4. Limited Warranty. THE SOFTWARE IS PROVIDED “AS IS” WITHOUT WARRANTY OF ANY KIND. TO THE MAXIMUM EXTENT PERMITTED BY APPLICABLE LAW, TAIS AND ITS SUPPLIERS DISCLAIM ALL WARRANTIES WITH REGARD TO THE SOFTWARE, EITHER EXPRESS OR IMPLIED, INCLUDING, BUT NOT LIMITED TO, THE WARRANTY OF NON-INFRINGEMENT OF THIRD PARTY RIGHTS, THE WARRANTY OF YEAR 2000 COMPLIANCE, AND THE IMPLIED WARRANTIES OF MERCHANTABILITY AND FITNESS FOR A PARTICULAR PURPOSE. THE ENTIRE RISK AS TO THE QUALITY AND PERFORMANCE OF THE SOFTWARE IS WITH YOU. NEITHER TAIS NOR ITS SUPPLIERS WARRANT THAT THE FUNCTIONS CONTAINED IN THE SOFTWARE WILL MEET YOUR REQUIREMENTS OR THAT THE OPERATION OF THE SOFTWARE WILL BE UNINTERRUPTED OR ERROR-FREE. HOWEVER, TAIS WARRANTS THAT ANY MEDIA ON WHICH THE SOFTWARE IS FURNISHED IS FREE FROM DEFECTS IN MATERIAL AND WORKMANSHIP UNDER NORMAL USE FOR A PERIOD OF NINETY (90) DAYS FROM THE DATE OF DELIVERY TO YOU.
5. Limitation Of Liability. TAIS’ ENTIRE LIABILITY AND YOUR SOLE AND EXCLUSIVE REMEDY UNDER THIS LICENSE AGREEMENT SHALL BE AT TAIS’ OPTION REPLACEMENT OF THE MEDIA OR REFUND OF THE PRICE PAID. TO THE MAXIMUM EXTENT PERMITTED BY APPLICABLE LAW, IN NO EVENT SHALL TAIS OR ITS SUPPLIERS BE LIABLE TO YOU FOR ANY CONSEQUENTIAL, SPECIAL, INCIDENTAL OR INDIRECT DAMAGES FOR PERSONAL INJURY, LOSS OF BUSINESS PROFITS, BUSINESS INTERRUPTION, LOSS OF BUSINESS INFORMATION/DATA, OR ANY OTHER PECUNIARY LOSS OF ANY KIND ARISING OUT OF THE USE OR INABILITY TO USE THE SOFTWARE, EVEN IF TAIS OR ITS SUPPLIER HAS BEEN ADVISED OF THE POSSIBILITY OF SUCH DAMAGES. IN NO EVENT SHALL TAIS OR ITS SUPPLIERS BE LIABLE FOR ANY CLAIM BY A THIRD PARTY.
6. State/Jurisdiction Laws. SOME STATES/JURISDICTIONS DO NOT ALLOW THE EXCLUSION OF IMPLIED WARRANTIES OR LIMITATIONS ON HOW LONG AN IMPLIED WARRANTY MAY LAST, OR THE EXCLUSION OR LIMITATION OF INCIDENTAL OR CONSEQUENTIAL DAMAGES, SO SUCH LIMITATIONS OR EXCLUSIONS MAY NOT APPLY TO YOU. THIS LIMITED WARRANTY GIVES YOU SPECIFIC RIGHTS AND YOU MAY ALSO HAVE OTHER RIGHTS WHICH VARY FROM STATE/JURISDICTION TO STATE/JURISDICTION.
7. Export Laws. This License Agreement involves products and/or technical data that may be controlled under the United States Export Administration Regulations and may be subject to the approval of the United States Department of Commerce prior to export. Any export, directly or indirectly, in contravention of the United States Export Administration Regulations, or any other applicable law, regulation or order, is prohibited.
8. Governing Law. This License Agreement will be governed by the laws of the State of California, United States of America, excluding its conflict of law provisions.
9. United States Government Restricted Rights. The Software is provided with Restricted Rights. Use, duplication, or disclosure by the United States Government, its agencies and/or instrumentalities is subject to restrictions as set forth in subparagraph (c)(1)(ii) of The Rights in Technical Data and Computer Software Clause at DFARS 252.227-7013 (October 1988) or subparagraphs (c)(1) and (2) of the Commercial Computer Software - Restricted Rights at 48 CFR 52.227-19, as applicable.
10. Severability. If any provision of this License Agreement shall be held to be invalid, illegal or unenforceable, the validity, legality and enforceability of the remaining provisions hereof shall not in any way be affected or impaired.
11. No Waiver. No waiver of any breach of any provision of this License Agreement shall constitute a waiver of any prior, concurrent or subsequent breach of the same or any other provisions hereof, and no waiver shall be effective unless made in writing and signed by an authorized representative of the waiving party.
Toshiba America Information Systems, Inc.
Digital Solutions Division
Limited Warranty
Toshiba America Information Systems, Inc., (“TAIS”) warrants that this telephone equipment (except for fuses, lamps, and other consumables) will, upon delivery by TAIS or an authorized TAIS dealer to a retail customer in new condition, be free from defects in material and workmanship for twenty-four (24) months after delivery. This warranty is void (a) if the equipment is used under other than normal use and maintenance conditions, (b) if the equipment is modified or altered, unless the modification or alteration is expressly authorized by TAIS, (c) if the equipment is subject to abuse, neglect, lightning, electrical fault, or accident, (d) if the equipment is repaired by someone other than TAIS or an authorized TAIS dealer, (e) if the equipment’s serial number is defaced or missing, or (f) if the equipment is installed or used in combination or in assembly with products not supplied by TAIS and which are not compatible or are of inferior quality, design, or performance.
The sole obligation of TAIS or Toshiba Corporation under this warranty, or under any other legal obligation with respect to the equipment, is the repair or replacement by TAIS or its authorized dealer of such defective or missing parts as are causing the malfunction with new or refurbished parts (at their option). If TAIS or one of its authorized dealers does not replace or repair such parts, the retail customer’s sole remedy will be a refund of the price charged by TAIS to its dealers for such parts as are proven to be defective, and which are returned to TAIS through one of its authorized dealers within the warranty period and no later than thirty (30) days after such malfunction, whichever first occurs.
Under no circumstances will the retail customer or any user or dealer or other person be entitled to any direct, special, indirect, consequential, or exemplary damages, for breach of contract, tort, or otherwise. Under no circumstances will any such person be entitled to any sum greater than the purchase price paid for the item of equipment that is malfunctioning.
To obtain service under this warranty, the retail customer must bring the malfunction of the machine to the attention of one of TAIS’ authorized dealers within the twenty-four (24) month period and no later than thirty (30) days after such malfunction, whichever first occurs. Failure to bring the malfunction to the attention of an authorized TAIS dealer within the prescribed time results in the customer being not entitled to warranty service.
THERE ARE NO OTHER WARRANTIES FROM EITHER TOSHIBA AMERICA INFORMATION SYSTEMS, INC., OR TOSHIBA CORPORATION WHICH EXTEND BEYOND THE FACE OF THIS WARRANTY. ALL OTHER WARRANTIES, EXPRESS OR IMPLIED, INCLUDING THE WARRANTIES OF MERCHANTABILITY, FITNESS FOR A PARTICULAR PURPOSE, AND FITNESS FOR USE, ARE EXCLUDED.
Contents
Introduction
Organization...7
How to Use This Guide...8
Conventions ...8
Related Documents/Media...9
Chapter 1 – The Grand Tour
IPT2000-series Telephones...1Fixed Buttons...3
Flexible Buttons...3
Liquid Crystal Display...4
DKT3000-series Telephones ...5
DKT2000-series Telephones ...8
Fixed Buttons...9
Flexible Buttons...10
Liquid Crystal Display...10
Chapter 2 – The Basics
Important - Read First ...11What’s My Line? ...11
Which Outgoing/Incoming Call Features Do I Have? ...12
Chapter 3 – Advanced Operation
Answering a Call...14
Handset ...14
Speaker ...14
Handsfree Answerback ...14
Switching Between Handset and Speakerphone...14
Message Waiting...15
Responding to a Lit Msg LED...15
Turning On/Off MW LED on Another Extension...16
Microphone ...16
Call Transfer ...17
Conference Calls ...18
Adding Voice Mail to a Conference ...19
Connecting Two Outside Lines ...19
Conference Split/Join/Drop ...20
Hold...22
Exclusive Hold...22
Automatic Hold ...22
Consultation Hold ...22
Volume Control ...23
LCD Contrast Adjustments...23
Chapter 3 – Advanced Operation
Using Your LCD...25Soft Keys...26
Soft Key Example...27
Advisory Messages ...28
Account Code Calls ...29
Verified/Non-Verified Account Codes...29
Forced Account Codes...29
Voluntary Account Codes (Verified/Non-Verified) ...30
Automatic Busy Redial ...31
Automatic Callback ...32
Contents Chapter 3 – Advanced Operation
Station ...34
Station Call Forward Categories...35
Call Forward Settings ...35
Station Call Forward Procedures ...36
Call Forward Examples ...37
Call History ...41
Call Park Orbits...41
Call Pickup...42
Group Pickup ...42
Ringing, Page or Held Call Pickup...43
Call Waiting ...44
Direct Inward System Access (DISA) ...45
Direct Station Selection Buttons (Hotline) ...45
Distinctive Ringing ...46
Do Not Disturb...47
Setting DND for Another Extension...48
Door Lock(s) ...48
Door Phone(s) ...49
Echo Cancellation ...50
Emergency Call...50
Emergency Monitoring Station...50
Emergency Ringdown...51
Language Codes...51
Microphone Cut-Off ...51
Off-hook Call Announce...52
Override Calls ...53
Busy Override...53
Do Not Disturb Override ...53
Executive Override ...54
Destination Restriction/Traveling Class Override...54
Class of Service Override ...55
Chapter 4 – DKT3014 LCD Features
Emergency Page ...56
Privacy ...57
Redial ...57
Speed Dial ...58
Making a Call Using Speed Dial ...58
Accessing System SD and Personal SD Directories...59
Storing a System/Station Speed Dial Number ...59
Advanced Speed Dial Operation ...60
Tone/Pulse Dialing...61
Voice Mail Call Monitor...62
Voice Mail - Direct Transfer...63
Voice Mail Soft Keys...63
Call Recording ...68
Other Voice Mail Features...69
Chapter 4 – DKT3014 LCD Features
Directory and Speed Dial Listings ...72Direct Station Selection ...72
System Speed Dial and Personal Speed Dial...73
Internal Directory and External Directory ...73
Storing Personal Speed Dial Names ...74
Chapter 5 – User Programming
Programming Feature Buttons ...77User Programming Mode ...78
Flexible Button Codes...78
Setting/Changing a Flexible Button’s Function ...79
One Touch Buttons ...80
Changing a One Touch Button ...80
To Use a One Touch Button ...81
Setting/Changing a Personal Speed Dial Code...81
Feature Codes...82
Contents Appendix A – Centrex Application
ADM ...88
Buttons and LEDs...88
DSS Console ...89
DSS Buttons...89
Calling a Station ...90
Transferring to an Idle Station ...90
Call Transfer with Camp-on ...91
Call Answering (Outside Line)...91
Speed Dial...91
Paging ...92
Call Forward Override (DSS Override)...92
Night Transfer Button...92
Appendix A – Centrex Application
Flexible Directory Numbering ...93Centrex Feature Buttons ...93
Ringing Repeat...93
Delayed Ringing ...94
Appendix B – Button Labels
Appendix C – DKT3000 Settings
FB Buttons ...99Telephone Programming Mode ...101
Telephone Program Option Reset...101
Dial Pad and Button Beeps ...102
Speakerphone/Microphone Sensitivity Adjustment ...102
Call Waiting and Camp-on Ring Tone Over Handset/Headset Option ...103
Reset and Adjust the LCD Contrast...103
DKT2000 Mode On/Off ...104
Turn DKT2000 Mode On/Off ...104
Appendix D – IP Telephone Settings
Appendix D – IP Telephone Settings
FB Buttons ...108
Initializing the IP Telephone...109
IPT-to-IP Network Connection Instructions ...110
IP Telephone Start Up Sequence ...111
IP Telephone Function Settings ...112
Setting the IP Telephone Headset Transmit Volume...113
Viewing IP Telephone Terminal Information...113
Appendix E – Administrator Functions
Functions...115General Operation ...116
Administrator Mode...117
Introduction
This user guide describes how to use the Toshiba Strata series telephone products with Strata CTX28, CTX 100-S, CTX100, and CTX670 telephone systems:
• Strata IP telephone (IPT2010-SD and IPT2020-SD) • Strata DKT3000-series digital telephones
• Strata Digital Add-on Module (DADM) • Strata IP Add-on Module (IADM2020) • Strata Direct Station Selection (DSS) console
Organization
• Chapter 1 – The Grand Tour provides an overview of the IP and digital telephones.
• Chapter 2 – The Basics covers the basic telephone features that you need to know. • Chapter 3 – Advanced Operation includes an explanation of Soft Key
operations. Features are presented alphabetically and, when applicable, include LCD information.
• Chapter 5 – User Programming explains how to program Flexible Button features, set One Touch buttons, change Personal Speed Dial numbers, as well as other user programmable functions.
How to Use This Guide
• Appendix B – Button Labels lists the feature button designations of the 3000-series digital telephone models.
• Appendix C - DKT3000-series Telephone Settings explains how to enter data for this telephone if it wasn’t previously entered or if you need to change the settings. • Appendix D - IP Telephone Settings explains how to enter data for this telephone
if it wasn’t previously entered or if you need to change the settings.
• Appendix E - Administrator Functions contains some of the functions that can be perfomed using Administrator Mode..
How to Use This Guide
This guide provides in-depth instructions for the IPT1020-SD, IPT2000-series, DKT3000- and DKT2000-series telephones and their features. Most telephone users can use the “Strata CTX DKT/IPT Quick Reference Guide” instead of this guide.
Conventions
Conventions Description
Note
Elaborates specific items or references other information. Within some tables, general notes apply to the entire table and numbered notes apply to specific items.
Important! Calls attention to important instructions or information.
Extension Number
Press to answer a call to the Extension Number. Each station can have multiple extension buttons. Incoming calls ring the extension button(s) from the top down. For example, station 10’s extensions ring 10-1 first, then 10-2, 10-3, and 10-4. A station is considered busy when all extensions are being used.
Introduction Related Documents/Media
Related Documents/Media
Note Some documents listed here may appear in different versions on the
CD-ROM or in print. To find the most current version, check the version/date in the Publication Information on the back of the document’s title page.
Refer to the following for more information:
• Strata CTX DKT3001/2001 Digital Single Line Telephone User Guide • Strata CTX DKT/IPT Telephone Quick Reference Guide
• Strata CTX WinAdmin Application Software and CTX/DK/Partner Products Documentation Library CD-ROM
$ULDO%ROG Represents telephone buttons.
+
shows a multiple PC keyboard or telephone button entry. Entries without spaces between them show a simultaneous entry.
Example: Delete+Enter.
Entries with spaces between them show a sequential entry. Example: + .
Tilde (~) Means “through.” Example: 350~640 Hz frequency range.
See Figure 10
Grey words within the printed text denote cross-references. In the electronic version of this document (Library CD-ROM or FYI Internet download), cross-references appear in blue hypertext.
The Grand Tour
1
This chapter familiarizes you with the Digital Key Telephones (DKT) and Internet Protocol Telephones (IPTs) – the IPT2000-series, DKT3000- and DKT 2000-series telephones for the Strata CTX (model numbers appear on the bottom of your telephone).
Important! The IP telephones do not work with the CTX28. The DKT3007-SD is specifically designed to work with the CTX28.
IPT2000-series Telephones
The IPT2000-series models include:
• IPT2010-SD 10-button with two-line by 24-character LCD with full-duplex speakerphone.
• IPT2020-SD 20-button with two-line by 24-character LCD with full-duplex speakerphone.
Note The IP Telephony product family also includes a matching Add-on module IADM2020. This Add-on module functions like the DADM. For user instructions, refer to “ADM” on page 88.
IPT2000-series Telephones
For all IP Telephone user instructions, refer to IPT2020-SD instructions. Toshiba LCD telephones provide easy access to frequently-used features. Prompts guide you through specific tasks. They also provide Outside Line Identification, User Name/ Number, Call Duration, Date/Time of Day displays, and the ability to display names and telephone numbers of outside, incoming callers.
IPT2020-SD Telephone
7507
Dial Pad Handset
Fixed Buttons
LCD Display
LCD Control Buttons/ Soft Keys (SK)
Flexible Buttons (also known as Programmable Buttons - PB)
The Grand Tour IPT2000-series Telephones
Fixed Buttons
The fixed buttons on your dial pad enable you to perform standard functions quickly and easily. These buttons are described in Chapter 2 – The Basics.
Note The IPT Fixed Buttons work the same way as the DKT telephones, however on the IPTs, fixed buttons have been replaced with button icons.
Flexible Buttons
Your IPT can have 10 or 20 flexible buttons (shown in the illustration on the previous page) and the DKTs can have either 10, 14, or 20 flexible buttons that can be
programmed to do many button functions, including: • Line is used to access an outside line.
• Primary Extension is your extension button.
• Pooled Line Group enables you to access available outside lines from a group of lines appearing under one button.
• Feature Access Buttons enables you to store features onto a single button. • One Touch Buttons are used for storing Speed Dial numbers or feature access
code sequences onto a single button.
• Voice Mail Call Monitor lets you listen to a caller while the caller records a message in your voice mailbox.
7508
LEDs Hold (red button)
Cnf/Trn - Conference/Transfer (3 people - 2 people)
Redial (U-turn button) Volume Control (microphone)
Speed Dial (lightning buttons) Voice Mail
Mircrophone
IPT2000-series Telephones
Liquid Crystal Display
Your Liquid Crystal Display (LCD) (shown below) shows: • Desk Clock and Calendar in idle mode
• Call Duration during an outside call
• Operational, Advisory, and Notification messages
Note The IPT and DKT soft keys perform the same functions. This manual uses the IPT soft keys (SK) to refer to the soft keys on all telephones. For example, if an instruction references 6., this means use the first soft key (from left to right) on the IPT and use Mode on the DKT. 6., 6. and 6. equate to the second, third and fourth soft keys on the IPT or Page, Scroll and Feature on the DKT.
LCD Control Buttons/Soft Keys
There are two types of LCD button functions: LCD Control Buttons and Soft Keys. 6., 6., 6. and 6. represent the LCD soft keys in this manual.
When the Soft Key prompts appear on the LCD, the LCD Control Button just below the prompt offers access to that feature. See “Using Your LCD” on page 25 for more information.
• 6. is generally used as a Soft Key.
• Pressing 6. switches you from the Call Forward (CF) display to the User Name display.
• Pressing 6. advances you through information.
7499
AUG 08 MON 03:56 CF-ALL 202-203+
Mode Page Scroll Feature
7509
AUG 08 MON 03:56 CF-ALL 202-203+
SK1 SK2 SK3 SK4 (Mode) (Page) (Scroll) (Feature)
DKT & IPT1020-SD Telephone LCD IPT2010/2020-SD Telephone LCD
The Grand Tour DKT3000-series Telephones
DKT3000-series Telephones
The DKT3000-series models that can be connected to a Strata CTX include: • DKT3007-SD 7-button (shown on next page)
• DKT3010-S 10-button • DKT3020-S 20-button
• DKT3010-SD 10-button with two-line by 24-character LCD
• DKT3020-SD 20-button with two-line by 24-character LCD (shown on the next page)
• DKT3014-SDL (page 71) 14-button with eight-line by 24-character tilting LCD and 16 Soft Key buttons.
All of the DKT3000-series Toshiba speakerphones enable you to place and receive calls without lifting the handset.
Toshiba LCD telephones provide easy access to frequently-used features. Prompts guide you through specific tasks. They also provide Outside Line Identification, User Name/Number, Call Duration, Date/Time of Day displays, and the ability to display names and telephone numbers of outside, incoming callers.
DKT3000-series Telephones
DKT3007-SD Telephone
7156
Dial Pad Handset
Fixed Buttons
LCD Display
LCD Control Buttons/ Soft Keys
DKT3020-SD Telephone
6746
Page Scroll
Mode Feature
Msg
Mic Redial Spdial
Spkr Cnf/Trn Hold Vol Z Q
Dial Pad Handset
Fixed Buttons
LCD Display
LCD Control Buttons/ Soft Keys
Flexible Buttons (also known as Programmable Buttons - PB)
Microphone Location
DKT2000-series Telephones
DKT2000-series Telephones
The following speakerphone models belong to the 2000-series: • DKT2010-S 10-button speakerphone
• DKT2010-SD 10-button with LCD • DKT2020-S 20-button
• DKT2020-SD 20-button with LCD (shown below)
• DKT2020-FDSP 20-button with LCD and External Microphone jack
• DKT2001 (See the Strata CTX DKT3001/2001 Digital Single Line Telephone User
Guide).
The Grand Tour DKT2000-series Telephones
DKT2020-SD Telephone
Fixed Buttons
The fixed buttons on your telephone enable you to perform standard functions quickly and easily. These buttons are described in Chapter 2 – The Basics.
5972
Dial Pad Handset
Red/Green LED Indicators
LCD Display
LCD Control Buttons/ Soft Keys
Flexible Buttons
DKT2000-series Telephones
Flexible Buttons
All Flexible Buttons must be programmed for your telephone in system programming and vary for individual telephones. If a button does not appear on your display or telephone keystrip label, see your CTX System Administrator for button assignments.
Line Buttons
You may have buttons designated as /LQH and/or 3RROHG/LQH*US which enable you to directly access outside lines. 3RROHG/LQH*US enables you to access available CO Lines from a group of lines appearing under one button.
Liquid Crystal Display
Your Liquid Crystal Display (LCD) (shown right) shows:
• Desk Clock and Calendar in idle mode
• Call Duration during an outside call • Operational, Advisory, and
Notification messages
Important! The LCD width of the DKT2000-series telephones is shorter than the IPTs and DKT3000-series LCDs. This difference causes some features to display differently.
LCD Control Buttons
There are two types of LCD button functions: LCD Control Buttons and Soft Keys. The DKT2000-series LCD Control Buttons consist of 0RGH, 3DJH and 6FUROO. In this book these buttons are replaced with SK1, SK2 and SK3.
When the Soft Key prompts appear on the LCD, the LCD Control Button just below the prompt offers access to that feature. See “Using Your LCD” on page 25 for more information.
• 6. is generally used as a Soft Key. 6.
5909 Mode Page Scroll
LCD Control Buttons/Soft Keys
The Basics
2
This chapter shows you the basic operation of your IPT1020-SD, IPT2000-series, DKT3000- and DKT2000-series telephones, unless otherwise noted.
Important! The IP Telephones do not work with the Strata CTX28.
Important - Read First
Be sure to check with your CTX System Administrator and make sure you know which features are enabled on your system. Use the check boxes
S
throughout this book to mark which features you have.Note LEDs on your telephone flash at different speeds depending on the function performed. Flash rates can be found under “LED Indicator Details” on page 86.
What’s My Line?
Throughout this guide, the word “Line” is mentioned. For example, you will be instructed to “select a Line.” “Line” can be:
S
LinebuttonS
Pooled Line Group buttonS
Group Line buttonImportant - Read First
Which Outgoing/Incoming Call Features Do I Have?
Check mark here which outgoing/incoming features you have on your system.
S
Automatic Line Selection (ALS): When making outgoing calls, you have ALS if when you lift the handset or press 6SNU you hear dial tone and the Line Light Emitting Diode (LED) lights steady green. The LCD displays the station number and the seized outside line.S
Ringing Line Preference: You answer an incoming line ringing your station by lifting the handset or pressing 6SNU. You do not have to press an extension button to answer.S
Tone Signaling: Internal incoming call – you hear successive ring tones, then lift the handset or press 6SNU to answer the call.S
Voice First Signaling: Internal incoming call – your telephone does not ring; instead you hear a long tone, then the caller’s voice. Talk in the direction of your telephone, or answer the call as you normally would by lifting the handset or pressing 6SNU.S
Switching Signaling: Check with your CTX System Administrator to see if you have the ability to change between Tone and Voice Signaling on a call-by-call basis. If you do, you can press after dialing an internal telephone number to change the signaling.The Basics Making a Call
Making a Call
There are three ways to originate a call from your IP/digital telephone:
Hot Dialing
1. To make a call using Hot Dialing, dial the number.
When you start to dial, the extension button, Spkr and Mic LEDs light. Digits display as they are dialed. Call progress tones (Ringback Tone, Busy Tone, etc.) play through the speaker.
2. When connected, you can continue speakerphone operation or lift the handset and continue the conversation.
Spkr Button
1. To make a call, press 6SNU.
A line may be automatically selected or you can manually choose a line. Your extension or /LQH button lights (depending on system programming). Dial tone plays through the speaker. The Speaker and Microphone LEDs light.
2. Dial the number.
Digits display as they are dialed. Call progress tones (Ringback Tone, Busy Tone, etc.) play through the speaker.
3. When connected, you can continue to use the speakerphone or lift the handset and continue the conversation.
Handset
1. To make a call, lift the handset, then dial the number.
Answering a Call
Answering a Call
There are several ways to answer a call:
Handset
³If your telephone is programmed for Ringing Line Preference, pick up the handset and the telephone automatically answers the ringing line.
³If not, press the button associated with the ringing line (flashing green LED).
Speaker
³If your telephone is programmed for Ringing Line Preference, press 6SNU and the telephone automatically answers the ringing line.
³If not, press the button associated with the ringing line (flashing green LED). Once connected, you can continue on the speakerphone or lift the handset.
Handsfree Answerback
If you have a speakerphone, it may be programmed for Handsfree Answerback. You hear a single long tone, followed by the caller’s voice. The extension LED flashes green (incoming call). The Microphone LED lights steady red (microphone is active). The Speaker LED flashes red.
1. Do not lift the handset; speak toward the telephone in a normal voice.
2. Press 6SNU or take the handset off-hook before transferring the call or placing it on hold.
Switching Between Handset and Speakerphone
³Press 6SNU and place the handset on-hook to switch from handset to speakerphone mode.
The Basics Message Waiting
Message Waiting
Use your 0VJLED/button and LCD to see/retrieve message(s).
An extension can receive up to four simultaneous Message Waiting indications and LCD messages. One message is reserved for the Message Center.
Your telephone can be programmed to have up to four additional (flexible) Message Waiting buttons/LEDs. Check with your CTX System Administrator to see if these buttons have been programmed on your telephone. If so, substitute them when the 0VJ button/LED is mentioned in the following steps.
Responding to a Lit Msg LED
1. On an LCD telephone, if you see a “+,” press 6. to display additional messages; otherwise, go to Step 2. The “+” indicates additional messages. The LCD can show up to three station messages for your extension and three for each additional (phantom) extension that you may have.
2. Press 0VJ, then lift the handset. Your telephone rings the extension or voice mail device that sent the indication. The LED continues to flash red.
3. After answering the message(s), place the handset back on-hook.
4. If the Msg LED continues to flash, you have more messages; repeat Steps 1~3 above to retrieve them. Voice mail devices turn off the LED/LCD indications after a short delay, after you checked all messages.
Microphone
Turning On/Off MW LED on Another Extension
If you call an extension and it’s busy or there is no answer, you may be able to light that extension’s Message Waiting LED and enable that extension to call you back. The ability to perform this feature is set in system programming.
1. Dial an internal extension. You hear busy tone or there’s no answer.
2. Press 0VJ or . The Msg LED flashes red on the called telephone. At your telephone, the Msg LED lights steady red and the LCD shows the station number where you set a Message Waiting light. Example: “MW SET TO 3620.”
If you decide to cancel the Message Waiting light at this point, press 0VJ or again while ring-over tone is playing and the light will be cancelled.
3. Press 6SNU. Your Msg LED turns Off. The Msg LED on the called telephone flashes until the called party presses the flashing 0VJ button which calls you back. 4. To turn Off a Message LED that you have set on another extension, press plus the extension number that has the message light set. Then press 6SNU or hang up to release your telephone. Your LCD shows the extension and “MW CANCEL.” ...or dial the extension that you set the Message LED on, then press . Then press 6SNU or hang up to release your telephone.
Microphone
³To turn the Microphone On/Off when the speakerphone is active (Spkr LED is On), press 0LF.
When the Microphone is On, the Mic LED is On, steady red. When Mic is Off, the LED is Off and you cannot be heard through the microphone.
The microphone and its LED are always On when you receive a Voice-first internal call and Off when you receive a Ring-first call.
Each station’s microphone can be set in system programming to: • switch On/Off with one touch
The Basics Call Transfer
Call Transfer
1. While on a call, press &QI7UQ. Your Line LED flashes green and you hear internal dial tone.
2. Dial the extension where the call will be transferred. You can remain on the line and announce the call or immediately “blind transfer” the call.
Note If the privacy option has been disabled, then if you use a /LQH button when you transfer the call, the LED will flash red until the receiving party answers. While the LED is flashing, you can press /LQH button to return to the call. If the receiving party answers the call, the LED turns solid red and you cannot reconnect to the original caller.
During call transfer, you can connect all three parties by pressing your flashing extension button or &QI7UQ.
• If you get voice mail, you can leave a message or hang up and let the transferred caller leave a message.
• If you hear a long single tone, then announce the call over the called telephone’s speaker.
3. Transfer with Camp On: If the station to which you want to transfer the call is busy, you may hang up and the transferred trunk or station will be camped on to the busy destination.
³
To transfer a call directly to Voice Mail (VM)1. While on a call, press &QI7UQ. 2. Enter .
3. Enter the VM mailbox number (usually the same as the extension number) + . 4. Hang up and the caller is connected to the VM mailbox. This feature does a blind
transfer to VM.
³
To perform Call Transfer Immediate1. While on a call, press the TRNS Soft Key. The IPT2008-SDL and DKT3014 LCD shows “TRANSFER.”
Conference Calls
Conference Calls
You can conference together up to eight parties (including your own) - with up to six parties being external network lines. The actual number of conference parties with acceptable volume levels depends on the local and far end telephone line conditions. The person who initiates the conference call is the Master. If, after the conference is established and the Master exits the conference, the first station to have been added to the conference becomes the Master.
³
To conference calls1. While on a call, press &QI7UQ. You hear dial tone and your Line LED flashes green. 2. Call another station or outside line.
3. When the called party answers, press &QI7UQ. If you receive a busy tone or no answer, press &QI7UQ again to return to the original connection.
All parties are conferenced. If the second call was placed on a /LQH that appears on your telephone, the LED also flashes green.
4. Repeat the above steps to add lines to the conference. Keep in mind the maximum number of allowed conference parties.
Note When the “master” of the conference hangs up, the control is automatically transferred to the first internal station added to the conference call. If no other internal stations are included in the conference call, the call will be
disconnected.
³
To transfer conference control1. Do Steps 1 and 2 above to add the line to which you wish to transfer conference control. See previous Note.
2. Announce the call and hang up to transfer it. This station now becomes the conference “master” with the ability to add or delete parties.
³
To hold a conference callThe Basics Conference Calls
Adding Voice Mail to a Conference
The Conference Master can add voice mail to a conference. This feature enables participants in a conference to listen to or leave a voice mail message during one telephone call.
³
To add Voice Mail to a conference call (performed by Conference Master)1. Press &QI7UQ to place the current call on Consultation Hold.
2. Dial the voice mail (VM) extension number, then enter the VM mailbox and security code. This adds the voice mailbox to the conference.
3. Press &QI7UQ to reconnect to the original party. (You can continue to add conference members by pressing &QI7UQ and dialing another extension.) Now, all parties in the conference can listen to or record a message to this voice mailbox. Only the Master can control the VM with touchtones or Soft Keys.
Connecting Two Outside Lines
1. While talking on an outside call, press &QI7UQ. You hear dial tone. The extension LED flashes (conference rate).
2. Dial an outside line access code and outside telephone number.
3. After the party answers, press &QI7UQ. The extension LED flashes (in-use rate) and all parties are conferenced.
If you receive a busy tone or if the station does not answer, press the flashing extension button to return to the original connection, press &QI7UQ.
4. Hang up. The extension LED flashes (exclusive-hold rate) and the two lines are connected. The LED turns Off when the parties hang-up.
5. To supervise a tandem call, press the extension button. If the parties have finished, hang up...or if the parties are still talking, press &QI7UQ and hang-up. Both Line LEDs turn Off and the connection is released.
Conference Calls
Conference Split/Join/Drop
If you initiate a conference with two or more parties, you and another member of the conference can leave (Split) the conference for a private conversation. During this time, other conference members remain connected.
You can then Join both of you back into the conference, or you can Drop (disconnect) the member you are connected to. This feature is performed with Soft Keys if you have a LCD phone with a Split button created on one of your flexible buttons.
Important! DKT2000-series telephones don’t display the SPLT soft key, so you must
create a 6SOLW key using the feature key assignment method. (See“Setting/Changing a Flexible Button’s Function” on page 79.)
The Split feature requires Strata CTX R2.2. This feature also works for remote stations which are connected through Strata Net QSIG.
Important! You must be a conference master to perform the Split and Drop features. The conference master is the person that initiates the conference call. If that person drops from the conference, the first person added to the conference becomes the conference master.
³
To Split from a conference1. While in a conference call on a DKT3000 phone, press the SPLT (Split) soft key or Split button.
The telephone LCD shows first conference party member. Notice the number 1 preceeding extension 200 (1:200) shown right
2. Press the NEXT soft key until you see the extension number for the party that you want to Split out of the conference.
7032
EXIT CONF SPLT 200+202
SK1 SK2 SK3 SK4
7033
RTRN NEXT 1:200
Example, if you want to Split with extension 202, press the NEXT soft key until you see X:202 (X = any number). Then press X (in the example shown right 2:202, press on the dial pad to Split 202.)
3. You can return both yourself and the other Split party back into the conference by pressing JOIN.
RTRN terminates a feature operation and returns to the previously displayed state.
³
To Drop the Split party from a conference³ Press the DROP Soft Key. The party that you are talking to privately (the party which you have Split from the conference) will be disconnected (Dropped) and you will rejoin the conference.
If you are in a three-way conference and Split with one of the parties, the remaining party will essentially be “on hold” until you return to the conference.
7034
RTRN NEXT 2:202
SK1 SK2 SK3 SK4
7035
JOIN DROP 202
Hold
Hold
1. To place a call on hold, press +ROG. Your LCD shows the line on hold. The held Line’s LED flashes green while appearances of the line at other stations flash red. • To return to the held call, press the held /LQHbutton.
• If you do not return to the held call within a specified time, it rings back to your telephone. The call remains camped-on to your station indefinitely.
• If the held party hangs up, the call is released. 2. Repeat Step 1 to place additional lines on hold.
Note See the Call Pickup section to pick up a call on hold from another extension.
Exclusive Hold
This feature enables you to place a call on hold so that only you can retrieve it.
³While on a call, press +ROG twice. That line’s LED flashes green while appearances of the line at other stations are steady red (in use).
Automatic Hold
This featureenables you to place a call on hold by pressing another /LQH button – no need to press +ROG. Make sure this feature is programmed on your system; if not, existing calls will drop.
³While on a call, press another extension button to receive/originate a new call. The accessed line’s LED flashes (in-use). The first call is put on hold and your
extension’s LED flashes. You can also switch between calls without having to press +ROG.
Consultation Hold
1. While on a call, press &QI7UQ. The call goes on hold. 2. Dial another line.
The Basics Volume Control
Volume Control
³
To adjust the handset volume³Press the 9ROVto increase volume and 9ROW to decrease volume during the call. When you hang up, the volume returns to the default setting.
³
To adjust the speaker volume for internal/external calls and background music1. Press 6SNU.
2. Press an extension button - you hear dial tone.
3. Press the 9ROVto increase volume and 9ROW to decrease volume. This volume setting applies to all calls until changed.
³
To adjust Ring Tone, Handsfree Answerback and Speaker Off-hook Call Announce³Make sure the telephone is idle and the handset is on-hook. Press the 9ROVto increase volume and 9ROW to decrease volume. This adjusts volume for your telephone’s ring tone, Handsfree Answerback and Speaker Offhook Call Announce simultaneously.
³
To adjust handset Beep Tone1. With the handset off-hook, dial the Beep Tone Adjustment Code (default code). You hear busy tone.
2. Press 9ROV or W to reach the desired level.
LCD Contrast Adjustments
³Press and hold down the 0LF button, and press and release 9ROV or 9ROW repeatedly.
Advanced Operation
3
This chapter gives you more details about your IPT2000-series, DKT3000- and DKT2000-series telephone’s advanced functions.
Using Your LCD
If your telephone has an LCD, use this section to learn more about its functions. In its idle state, the LCD is a desk clock and calendar. When you are on an outside call, the call duration displays.
A “+” on the LCD readout (shown at right) indicates there is more data to display.
³Press 6. to advance through the information.
³Press 6. to switch from the Call Forward (CF) display to the User Name display.
5800
AUG 08 MON 03:56 CF-ALL 202-203+
SK1 SK2 SK3 SK4 LCD Control
Soft Keys
Soft Keys
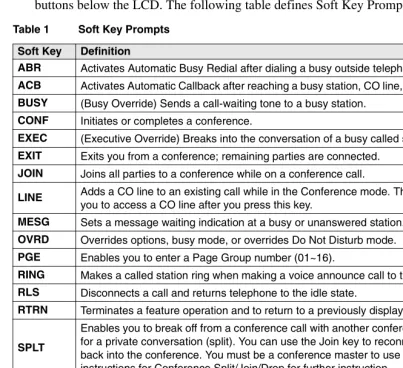
When Soft Keys are on, they replace the functions on the 6., 6., 6. and 6. buttons below the LCD. The following table defines Soft Key Prompts.
Table 1 Soft Key Prompts Soft Key Definition
ABR Activates Automatic Busy Redial after dialing a busy outside telephone number.
ACB Activates Automatic Callback after reaching a busy station, CO line, or CO Line group.
BUSY (Busy Override) Sends a call-waiting tone to a busy station.
CONF Initiates or completes a conference.
EXEC (Executive Override) Breaks into the conversation of a busy called station.
EXIT Exits you from a conference; remaining parties are connected.
JOIN Joins all parties to a conference while on a conference call.
LINE Adds a CO line to an existing call while in the Conference mode. The LCD prompts
you to access a CO line after you press this key.
MESG Sets a message waiting indication at a busy or unanswered station.
OVRD Overrides options, busy mode, or overrides Do Not Disturb mode.
PGE Enables you to enter a Page Group number (01~16).
RING Makes a called station ring when making a voice announce call to the station.
RLS Disconnects a call and returns telephone to the idle state.
RTRN Terminates a feature operation and to return to a previously displayed state.
SPLT
Enables you to break off from a conference call with another conference call member for a private conversation (split). You can use the Join key to reconnect both of you back into the conference. You must be a conference master to use this. See instructions for Conference Split/Join/Drop for further instruction.
STA. Adds a station to an existing call while in the Conference mode. The LCD prompts you
to dial a station number after you press this key.
TALK Makes a voice announcement to a called station that is ringing.
TRNS
Advanced Operation Soft Keys
Soft Key Example
When the Soft Key prompts appear on the LCD, the LCD Control Button just below the prompt offers access to that feature. Here’s an example of how Soft Keys work. 1. When an outside call is in
progress, the LCD appears as shown on the right.
ABR = Automatic Busy Redial
CONF = Conference
PAGE = Paging
2. If you select CONF (press 6.), the display changes as shown right.
LINE = Add an outside line to the conference
STA = Add another station
RTRN = Return to the original caller without making a conference
3. You will be prompted to dial the desired station. The RTRN Soft Key (press 6.) enables you to return to the original caller without making a conference.
Until the call is answered, you see the screen shown right.
When the call is answered, you see the screen shown right. TRNS = exit the call and transfer the first party to the second. JOIN = create a
6060
ABR CONF PGE 00:01:01
SK1 SK2 SK3 SK4 LCD Control
Buttons/Soft Keys Soft Key Prompts
7583
LINE STA. RTRN LINE OR STATION?
SK1 SK2 SK3 SK4
7584
RTRN DIAL STATION NO.
SK1 SK2 SK3 SK4
7585
200 CALLING
SK1 SK2 SK3 SK4
Advisory Messages
Advisory Messages
Advisory messaging enables you to store an informative message for LCD telephones that call your telephone. The messages can be up to 16 characters long. The Strata CTX provides a number of stored messages, shown in the table below. Message numbers 5~9 can be defined by your CTX System Administrator.
³
To set an advisory message1. Go off-hook or press your extension button or phantom directory number button to hear dial tone.
Note A phantom directory number button is similar to an extension button that is shared on other telephones.
2. Press + Message No. (see table) + any additional digits (such as time, etc.) 3. Go on-hook or press 6SNU to release the line.
³
To clear the registered message1. Go off-hook or press your extension button or phantom directory number button to hear dial tone.
2. Press .
Msg No. Characters Displayed Additional Digits
0 OUT TO LUNCH
1 IN A MEETING
2 CALL _____________ Directory Number 76345
3 BACK AT __________ Time (e.g., 1030)
4 RETURN ON________ Date (e.g., 10 20)
5
6
7
8
Advanced Operation Account Code Calls
Account Code Calls
Account Codes (Forced or Voluntary) can be used for a variety of reasons including billing, tracking, and line restriction applications. Account Codes are assigned in the system as a fixed length (default is six digits) and are recorded by the system, along with the details of the calls, which can be printed on a Station Message Detail Recording (SMDR) report.
Verified/Non-Verified Account Codes
If programmed for Verified Account Codes, the system checks the account code you entered against a list created by the CTX System Administrator. The code you enter must be on the list for the call to proceed. Non-verified account codes must be of a uniform length specified by the CTX System Administrator.
Forced Account Codes
Some applications require you to enter an Account Code. These Forced Account Codes may be verified or non-verified, depending upon the application, but in either case, the caller must enter a code before proceeding.
³
To dial using Forced Account Codes1. Place a call in the normal method.
If the call requires an Account Code, a burst of tone (Success Tone) is heard after dialing the telephone number alerting you to enter the Account Code.
2. Enter the account number.
When the number of digits designated for account codes has been entered, the number will be checked against the verified list, if chosen, and the call will continue as normal. If the number of digits entered for the account code is not reached or the verified code does not match, then re-order tone is heard and the call is rejected.
Account Code Calls
Voluntary Account Codes (Verified/Non-Verified)
Voluntary Account Codes are optional. They can be entered during a call and are used for tracking selected calls using Station Message Detail Report (SMDR) call detail recording option.
If the system is set for Verified Account Codes, station users must enter a specific code when entering the Voluntary Account Code(s) or the code is not validated for the SMDR call report. This does not affect the call.
There are two ways to dial using a Voluntary Account Code:
³
To dial using the Account Code button1. After accessing a CO line, press the $FFRXQW&RGH button. LCD telephones prompt you to “ENTER ACCOUNT CODE NOW.”
2. Enter the account code digits. The LCD prompt disappears upon entry of the first account code digit. After the account code is entered, the time indicator is restored in the LCD.
3. If your station is set for Verified Account Codes, you hear confirmation tone when the code is valid. If the code is invalid, you hear two short tones.
4. Enter the Account Code. Your conversation is not interrupted.
³
To enter an Account Code using access codesNote It’s a good idea to warn the other party that you will be disconnected
momentarily when you enter the access code. Once the code is entered, you will be connected again.
1. After accessing a CO line, press &QI7UQ. Once you press &QI7UQ, your call is interrupted; you and the other party cannot hear each other. You will hear feature dial tone.
2. Dial . LCD telephones prompt you to “ENTER ACCOUNT CODE NOW.” 3. Enter the account code digits. The prompt disappears upon entry of the first
Advanced Operation Automatic Busy Redial
Automatic Busy Redial
After reaching a busy outside number, you can activate Automatic Busy Redial so that the system automatically redials the number at regular intervals. The system repeats the redial until the destination is no longer busy. This feature may not be on some telephones on your system.
Automatic Busy Redial is not attempted while your station is busy, but continues to time-out. The system inserts a pause (P) on your LCD before redialing the number.
³
To activate Automatic Busy Redial1. When you reach a busy number, press $XWR%XV\5HGLDO or &QI7UQ + . The LED flashes red. You hear confirmation tone.
2. Hang up or press 6SNU. The system redials, up to five to 20 times, every 30 to 180 seconds (depending on system programming). Your telephone receives ring tone when Automatic Busy Redial dials the number and it is available. The extension and Spkr LEDs flash green.
3. Lift the handset or press 6SNU and wait for the party to answer. If you do not pick up the handset or press 6SNU within recall timeout (five to 60 seconds) after a connection is made, you hear a muted ring for another 30 seconds, then the call disconnects.
³
To cancel Automatic Busy RedialAutomatic Callback
Automatic Callback
When you reach a busy station, you can set Automatic Callback to have the system monitor the busy extension and notify you when it becomes idle.
Automatic Callback can also place you in queue for an available outside line, if you reach a line group in which all lines are busy. When a station or line becomes available, the system rings your telephone. Then when you answer, it automatically rings the intended destination. The amount of time the system will wait for an idle destination is set in system programming. Automatic Callback is also known as “CO Line Queuing.”
³
To set Automatic Callback1. If you hear busy tone after dialing an outside line access code or a station number, press $XWR&DOOEDFN or . Busy tone stops, followed by success tone, then busy tone resumes.
2. Hang up. You can make other calls while waiting.
3. When the called station or outside line becomes idle, your telephone rings with a fast LED.
• If you called a busy station, the extension LED flashes green (incoming call) and the called number displays.
• If you called a busy outside line, the extension LED flashes green (incoming call rate). The seized line’s number displays.
4. Answer within about three rings (five to 180 seconds, set in programming) to prevent the callback from being cancelled. After you answer, you hear success tone, and the LED flashes green (in-use).
If you hear a busy tone after answering a callback, the called party is already on another call or the line has already been seized or has received an incoming call. Your request is not cancelled. You will be called again the next time a line becomes idle.
If you were attempting to make an outside call, the telephone number is
automatically dialed, including the account code or override codes that were used.
Advanced Operation Background Music
Background Music
You can set background music over your telephone speaker or over external speakers. Up to 16 different music sources can be applied to the Strata CTX system: the first source is Quiet Tone, all others can be music or recorded information.
³
To enable background music on your telephone speaker ³Press %*0. LED turns on....or press an extension button + + n + , where n is the music source 1~15.
³
To cancel background music on your telephone speaker ³Press %*0. LED turns off.³...or press an extension button + .
³
To change the BGM source (1~15) assigned to the BGM buttonPress an extension button + + %*0 + n + %*0, where n is the music source 1~15.
³
To enable background music over your external paging speakersPress an extension button + + n + , where n is the music source 1~15.
³
To cancel background music over your external paging speakersCall Forward
Call Forward
There are two types of Call Forwarding that you can set. One is System Call Forward (set in system Programming) which automatically directs calls to a predefined location, such as Voice Mail. See your CTX System Administrator to determine or change your System Call Forward destination.
The other type is Station Call Forwarding. You can use Station Call Forwarding (CF) to replace your System CF destination with a custom CF setting made from your station.
System
System Call Forward directs calls to a destination preset by an Administrator for each telephone, commonly set to voice mail.
³To turn on System Call Forward for your telephone, press . Confirmation tone (three short tones) and “DATA PROGRAMMED” indicate the data is set.
³To turn off System Call Forward for your telephone, press . Confirmation tone (three short tones) and “DATA PROGRAMMED” indicate the data is set.
Station
Station Call Forward enables you to assign Call Forward destinations for each extension on your telephone that will override the telephone’s System CF settings. Each extension can be independently set Station Call Forward to a unique destination. You can set a Flexible Button to perform any Call Forward function - see
“Programming Feature Buttons” on page 77 for more details. Call Forward must be
set prior to receiving the call.
The following calls to your station can be forwarded: • Internal calls
• Auto Attendant calls
Advanced Operation Call Forward
Station Call Forward Categories
You can set Call Forward for the following categories of calls. Within these categories, you can use five different types of Call Forward Settings.
• Call Forward Any Call – Forwards any call, whether an internal call or incoming line call.
• Call Forward - Incoming Line – Forward incoming line calls only.
• Call Forward Any Call - Set for Another Station – Enables you set forwarding of all calls for another telephone within your telephone system.
• Call Forward - Incoming Line Set for Another Station– Enables you to set forwarding of incoming line calls for another telephone within your telephone system.
Notes
• Call Forward Any Call and CF-Incoming line can be set simultaneously on a telephone. This allows incoming lines calls to be forwarded to a different destination than all of the other types of calls.
• Call Forward destinations can be to internal destinations and outside telephone numbers.
• You can change your forwarding destination from outside the system using the DISA feature. See your CTX System Administrator for DISA telephone numbers and security code access.
Call Forward Settings
• Call Forward All Calls – Forwards all calls immediately.
• Call Forward Busy/Do Not Disturb – Forwards calls immediately when your extension is busy or in Do Not Disturb (DND) mode.
Call Forward
• Call Forward Busy/Do Not Disturb/No Answer – Forwards all calls to your station whenever you are busy, in the DND mode, or after ringing and you do not answer the call within a designated time (set by you when you enable the feature). • Call Forward Cancel – Cancels the set Call Forward feature. Notice that each
category of Call Forward has a different code for canceling.
Station Call Forward Procedures
Table 2, “Call Forward Procedure” contains Call Forward Button sequences. You can
do a Call Forward function by, one, entering the button sequence as described, or two, by programming a Flexible Button to perform the sequence. See “Programming
Feature Buttons” on page 77 for instructions on programming a Flexible Button.
³
To use the Call Forward button sequence³Follow the instructions in the following table, shown under “Button Sequence.” Some features require additional input, such as:
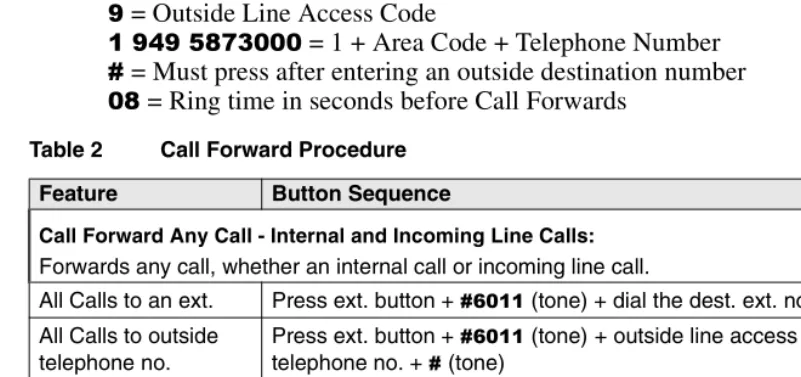
• Dest. Ext. or Telephone No. – CF destination numbers can be internal extension numbers or outside telephone numbers. If the destination is an outside number, enter the access code used for dialing out (such as ) + the telephone number + . The CTX accepts destination numbers of up to 32 digits. (See following examples).
• Timer – Enter the number of seconds (08~60) your telephone should ring before forwarding the call. (This is the CF-No Answer timer.)
• CF Pass Code – A four-digit Call Forward (CF) pass code established by system programming is required to allow one station to set CF for another station. This code is also used to allow DISA callers to set CF for another station. Users must enter the CF pass code for the station to be forwarded.
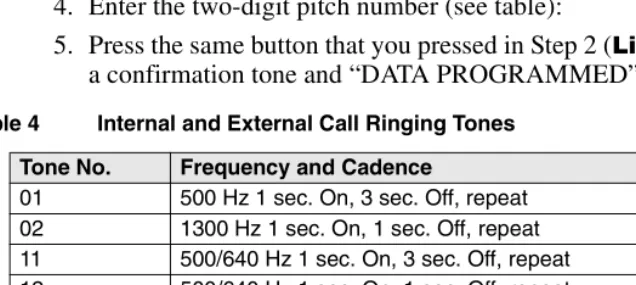
Note In Table 2, (tone) means that confirmation tone (three short tones) will play at
Advanced Operation Call Forward
Call Forward Examples
³
To set your telephone to CF Busy-No Answer to an internal extension number ³Press your extension button + + += Call Forward Access Code sequence = Internal Extension Number
= Ring time in seconds before Call Forwards
³
To set another telephone to CF Busy-No Answer to an outside destination number after a set time³Press your extension button + + + + + +
+ +
= CF Busy No Answer Access Code sequence = Other telephone’s extension number
= CF Passcode for other telephone+ = Outside Line Access Code
= 1 + Area Code + Telephone Number = Must press after entering an outside destination number = Ring time in seconds before Call Forwards
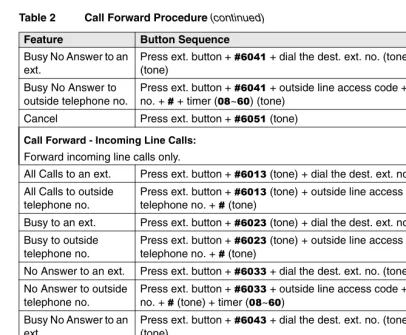
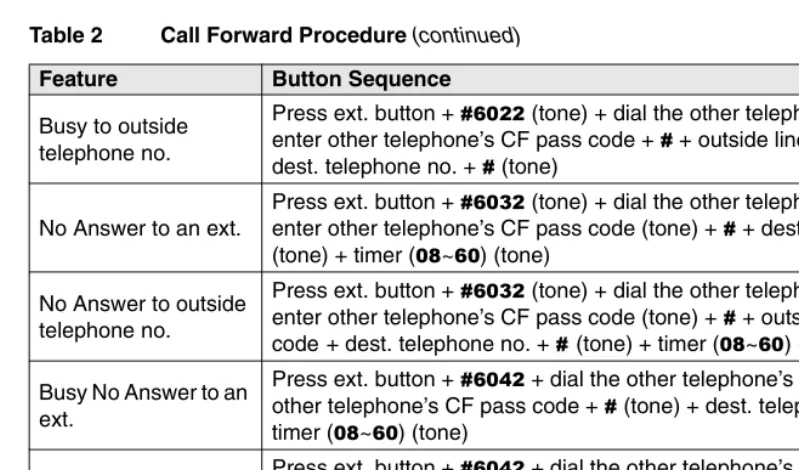
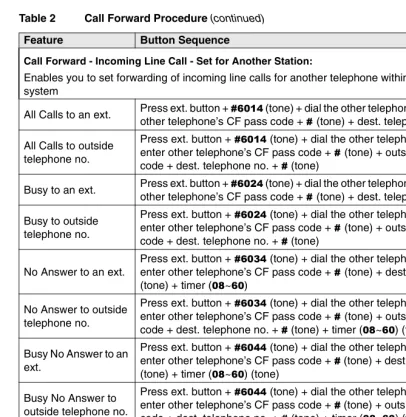
Table 2 Call Forward Procedure
Feature Button Sequence
Call Forward Any Call - Internal and Incoming Line Calls:
Forwards any call, whether an internal call or incoming line call.
All Calls to an ext. Press ext. button + (tone) + dial the dest. ext. no. (tone)
All Calls to outside telephone no.
Press ext. button + (tone)+ outside line access code + dest.
telephone no. + (tone)
Busy to an ext. Press ext. button + (tone)+ dial the dest. ext. no. (tone)
Busy to outside telephone no.
Press ext. button + (tone)+ outside line access code + dest.
telephone no. + (tone)
No Answer to an ext. Press ext. button + (tone)+ dial the dest. ext. no. + timer (~)
Call Forward
Busy No Answer to an ext.
Press ext. button + + dial the dest. ext. no. (tone)+ timer (~)
(tone)
Busy No Answer to outside telephone no.
Press ext. button + + outside line access code + dest. telephone
no. + + timer (~) (tone)
Cancel Press ext. button + (tone)
Call Forward - Incoming Line Calls:
Forward incoming line calls only.
All Calls to an ext. Press ext. button + (tone)+ dial the dest. ext. no. (tone)
All Calls to outside telephone no.
Press ext. button + (tone)+ outside line access code + dest.
telephone no. + (tone)
Busy to an ext. Press ext. button + (tone)+ dial the dest. ext. no. (tone)
Busy to outside telephone no.
Press ext. button + (tone)+ outside line access code+ dest.
telephone no. + (tone)
No Answer to an ext. Press ext. button + + dial the dest. ext. no. (tone) + timer (~)
No Answer to outside telephone no.
Press ext. button + + outside line access code + dest. telephone
no. + (tone) + timer (~)
Busy No Answer to an ext.
Press ext. button + + dial the dest. ext. no. (tone) + timer (~)
(tone)
Busy No Answer to outside telephone no.
Press ext. button + + outside line access code + dest. telephone
no. + (tone) + timer (~) (tone)
Cancel Press ext. button + (tone)
Call Forward Any Call - Set for Another Station:
Enables you to set call forwarding for another telephone within your telephone system. You will need the other telephone’s CF pass code in order to do this. CF Pass Codes are created in system programming.
All Calls to an ext. Press ext. button + (tone) + dial the other telephone’s ext. no. +
enter other telephone’s CF pass code + + dest. telephone no. (tone)
All Calls to outside telephone no.
Press ext. button + (tone) + dial the other telephone’s ext. no. +
enter other telephone’s CF pass code + + outside line access code+
dest. telephone no. + (tone)
Table 2 Call Forward Procedure (continued)