Signing and Publishing Android Application
Security Creating a signing certificate, Signing your applications for distribution, Publishing on Google Play, Monetization strategies, Application promotion strategies, Using Google Analytics
Ref
http://developer.android.com/tools/publishing/app-signing.html Professional Android 4:Application Development by Reto Meier,
Singing your Application
• Android requires that all apps be digitally signed with a certificate before they can be installed.
• Android uses this certificate to identify the author of an app, and the certificate does not need to be signed by a certificate authority.
• The app developer holds the certificate's private key.
• You can sign an app in debug or release mode. You sign your app in debug mode during development and in release mode when you are ready to distribute your app.
– The Android SDK generates a certificate to sign apps in debug mode.
Signing in Debug Mode
• In debug mode, you sign your app with a debug certificate generated by the Android SDK tools.
• This certificate has a private key with a known password, so you can run and debug your app without typing the password every time you make a change to your project.
• Android Studio signs your app in debug mode automatically when you run or debug your project from the IDE.
• You can run and debug an app signed in debug mode on the emulator and on devices connected to your development manchine through USB, but you
cannot distribute an app signed in debug mode.
Sign your app in release mode
• To sign your app in release mode in Android Studio, follow these steps: 1. On the menu bar, click Build > Generate Signed APK.
2. On the Generate Signed APK Wizard window, click Create new to create a new keystore. If you already have a keystore, go to step 4.
3. On the New Key Store window, provide the required information as shown in figure 1.
Sign your app in release mode...
Sign your app in release mode...
4. On the Generate Signed APK Wizard window, select a keystore, a private key, and enter the passwords for both. Then click Next.
Sign your app in release mode...
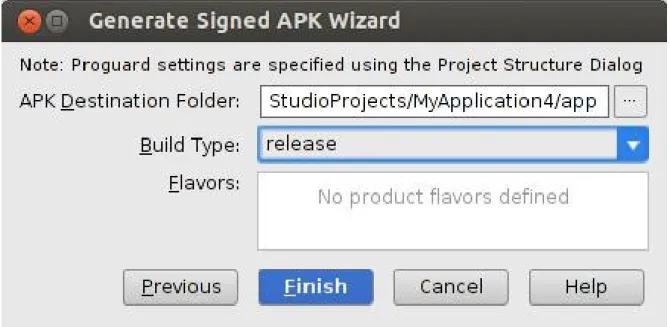
5. On the next window, select a destination for the signed APK and click Finish.
Signing Considerations
You should sign all of your apps with the same certificate throughout the expected lifespan of your applications. There are several reasons why you should do so:
• App upgrade: When the system is installing an update to an app, it
compares the certificate(s) in the new version with those in the existing version. The system allows the update if the certificates match. If you sign the new version with a different certificate, you must assign a different package name to the application—in this case, the user installs the new version as a completely new application.
• App modularity: Android allows apps signed by the same certificate to run in the same process, if the applications so requests, so that the system treats them as a single application. In this way you can deploy your app in modules, and users can update each of the modules independently.
Securing your private key
• Maintaining the security of your private key is of critical importance, both to you and to the user.
• If a third party should manage to take your key without your knowledge or permission, that person could sign and distribute apps that maliciously replace your authentic apps or corrupt them.
• Your private key is required for signing all future versions of your app. If you lose or misplace your key, you will not be able to publish updates to your existing appn. You cannot regenerate a previously generated key. • Your reputation as a developer entity depends on your securing your
private key properly, at all times, until the key is expired. Here are some tips for keeping your key secure:
– Select strong passwords for the keystore and key.
– Do not give or lend anyone your private key, and do not let unauthorized persons know your keystore and key passwords.
Expiry of the Debug Certificate
• The self-signed certificate used to sign your application in debug mode has an expiration date of 365 days from its creation date. When the certificate
expires, you will get a build error.
• To fix this problem, simply delete the debug.keystore file. The default
storage location is in ~/.android/ on OS X and Linux, in C:\Documents and Settings\<user>\.android\ on Windows XP, and
in C:\Users\<user>\.android\ on Windows Vista and Windows 7.
Signing Your App Manually
You do not need Android Studio to sign your app. You can sign your app from the command line using standard tools from the Android SDK and the JDK. To sign an app in release mode from the command line:
1. Generate a private key using keytool. For example:
$ keytool -genkey -v -keystore my-release-key.keystore
-alias alias_name -keyalg RSA -keysize 2048 -validity 10000
This example prompts you for passwords for the keystore and key, and to provide the Distinguished Name fields for your key. It then generates the keystore as a file called my-release-key.keystore. The keystore contains a single key, valid for 10000 days. The alias is a name that you will use later when signing your app.
2. Compile your app in release mode to obtain an unsigned APK. 3. Sign your app with your private key using jarsigner:
$ jarsigner -verbose -sigalg SHA1withRSA -digestalg SHA1 -keystore my-release-key.keystore my_application.apk alias_name
This example prompts you for passwords for the keystore and key. It then modifies the APK in-place to sign it. Note that you can sign an APK multiple times with
Signing Your App Manually
4. Verify that your APK is signed. For example:
• $ jarsigner -verify -verbose -certs my_application.apk
5. Align the final APK package using zipalign.
• $ zipalign -v 4 your_project_name-unaligned.apk
Get Started with Publishing
Start publishing on Google Play in minutes by:
• Registering for a Google Play publisher account
• Setting up a Google Wallet Merchant Account, if you will sell apps or in-app products.
Register for a publisher account
• Visit the Google Play Developer Console.
• Enter basic information about your developer identity — name, email address, and so on. You can modify this information later.
• Read and accept the Developer Distribution Agreement for your country or region. Note that apps and store listings that you publish on Google Play must comply with the Developer Program Policies and US export law.
• Pay a $25 USD registration fee using Google Wallet. If you don't have a Google Wallet account, you can quickly set one up during the process. • When your registration is verified, you’ll be notified at the email address
Register for a publisher account
Set Up a Google Wallet Merchant
Account
• If you want to sell priced apps, in-app products, or subscriptions, you’ll need a
Google Wallet Merchant Account. You can set one up at any time, but first review the list ofmerchant countries.
To set up a Google Wallet Merchant Account:
• Sign in to your Google Play Developer Console athttps://play.google.com/apps/publish/.
• Open Financial reports on the side navigation. • Click Setup a Merchant Account now.
Explore the Developer Console
Developer Console:Selling and
Pricing Your Products
• You have tools to set prices for your apps and in-app products. Your app can be free to download or priced, requiring payment before download.
• If you publish your app as free, it must remain free for the life of the app. Free apps can be downloaded by all users in Google Play.
• If you publish it as priced, you can later change it to free. Priced apps can be purchased and downloaded only by users who have registered a form of payment in Google Play.
Monetizing your APP
• If you choose to distribute and monetize your applications using Google Play, three options typically are available:
• Paid applications — Charge users an upfront fee before they download and install your application.
• Free applications with In-App Billing (IAB) — Make the download and installation of the application free, but charge within the application for virtual goods, upgrades, and other value-adds.
Monetizing through in-app
advertising
• You can also monetize your application using in-app advertising. The
specific process required to set up advertising within your application will vary depending on the ads provider you choose.
• however, the general process could be described as follows: 1. Create a publisher account.
2. Download and install the associated ads SDK.
3. Update your Fragment or Activity layouts to include an add banner. • It’s important to ensure that any ads included within your application are
as unobtrusive as possible and don’t detract significantly from the user experience of your application.
Application Marketing, Promotion
and Distribution Strategies
some of the most effective techniques to consider:• Offline cross promotion —
– If you have a significant offline presence (such as a stores or
branches), or a large media presence (such as within newspapers, magazines, or on TV), cross promoting your application through those channels can be a particularly effective way to increase awareness and help to ensure users trust the download.
– Traditional advertising techniques such as TV and newspaper advertisements can be extremely effective in raising awareness of your application.
• Online cross promotion —
– If you have a significant web presence, promoting your application
through direct links to Google Play can be an effective way to drive downloads.
– If your application provides a better user experience than your mobile website, you can detect browser visitors from Android devices and direct them to Google Play to download your
native app.
• Third-party promotion —
– Distributing a promotional video on YouTube and leveraging social networks, blogs, press releases, and online review sites can help provide positive word of mouth.
• Online advertising —
Finding Success on Google Play
Steps involved are
• Publishing on Google Play — using the Google Play Developer Console to distribute your app to over 1 billion Android users worldwide.
• Quality — The fundamentals of building a great app and an insight into the Google Play guidelines and policies.
• Discoverability & reach — Maximizing your app's discoverability and reaching the widest audience possible.
• Engagement & retention — Converting installations into active users and improving user retention.
• Monetization — Monetization strategies to generate ongoing, growing revenue streams.
• Measurement with Google Analytics — Understanding your users and improving your app experience, conversions, and marketing.
Analytics and Referral Tracking
• Mobile application analytics packages, such as Google Analytics and Flurry, can be effective tools for you to better understand who is using your
application and how they are using it.
• Understanding this information can help you make objective decisions on where to focus your development resources.
Tracking user Data
Broadly speaking, you can track three types of data within your application: • User analytics — Understand the geographic locations (and language
settings) of your users, as well as the speed of their Internet connections, their screen sizes and resolutions, and the orientation of their displays. Use this information to prioritize your translation efforts and optimize your layout and assets for different screen sizes and resolutions.
• Application usage patterns — The first step in integrating analytics is to record each Activity as you would a web site. This will help you understand the way your application is being used, and will help you to optimize your workflows in the same way you would a web site.
Using Google Analytics for Mobile
Applications
• Google provides an SDK for using Google Analytics on mobile devices. You can download the Google Analytics for Mobile Apps SDK from
http://code.google.com/apis/analytics/docs/mobile/download.html#Google_
Analytics_SDK_for_Android.
• After downloading the SDK, you need to copy the libGoogleAnalytics.jar into your application’s /lib folder and add it to the project’s build path. • The Google Analytics library requires access to the Internet and the network
state, so add the INTERNET and ACCESS_NETWORK_STATE permissions to
your manifest:
<uses-permission android:name=”android.permission.INTERNET” /> <uses-permission
• Each application uses a web property ID (a UA number) for tracking within Google Analytics. It’s generally good practice to use the Google account used to maintain your Google Play listing to control the related Google Analytics account.
• To create a new UA number for your application, create a new web property at google.com/analytics, using a dummy web site URL that represents your
application. It’s good practice to use your reversed package name (for
Google analytics
• The use of Google Analytics within your application is handled by the
GoogleAnalyticsTracker class. You can get an instance of this service using its getInstance method:
GoogleAnalyticsTracker tracker =
GoogleAnalyticsTracker.getInstance();
• To begin tracking, use the start method, passing in the UA number in the form UA-MY_CODE-[UA Code] (without the brackets) and the current context:
tracker.start(“UA-MY_CODE-XX”, this);
• For every action you want to track, use the trackPageView method, passing in a descriptive text string alias to represent it:
tracker.trackPageView(“/list_activity”);
• Note that the page names you’re tracking are totally arbitrary, letting you create a new page for every action you want to track.
Referral Tracking with Google
analytics
• It’s possible to use Google Analytics for Android to track application installation referrals using the referrer URL parameter in links to Google Play. You can track the source of each installation and associate future actions with it. This is particularly useful for evaluating the effectiveness of a particular marketing technique.
• To add referral tracking to your applications, create a new receiver tag in your manifest:
<receiver
android:name=”com.google.android.apps.analytics.AnalyticsRec eiver” android:exported=”true”>
<intent-filter>
<action android:name=”com.android.vending.INSTALL_REFERRER” / >
</intent-filter> </receiver>
Reference
• http://developer.android.com/tools/publishing/app-signing.html • Professional Android 4:Application Development by Reto Meier,