Crosstalk
for
Windows
Digital Communications Associates, Inc. ("DCA") has prepared this document for use by DCA personnel, licensees, and customers. The information contained herein is the property of DCA and shall not be copied, photocopied, translated or reduced to any electronic or machine readable form, either in whole or in part, without prior written approval from DCA.
DCA reserves the right to, without notice, modify or revise all or part of this document and/or change product features or specifications and shall not be responsible for any loss, cost, or damage, including consequential damage, caused by reliance on these materials. In all correspondence with Digital Communications Associates, Inc. regarding this publication, refer to part number 016589 October 1992.
© 1991, 1992 by Digital Communications Associates, Inc. All rights reserved.
Trademarks and registered names
Contents
Before You Begin ...xiii
Intended audience ... xiii
About this guide ...xiv
Documentation conventions ...xv
Common abbreviations ...xvi
Related publications ... ; ...xvii
1
Introducing Crosstalk ... 1-1What is Crosstalk? ... 1-2 Hardware and software requirements ... 1-5 How to use this guide ... 1-5 Using on-line help ... 1-6 Accessing Help from a dialog box ... 1-6 Accessing Help from a menu bar ... 1-6 Finding more information ... 1-7 Viewing Help and another window at the same time ... 1-7
2
Getting Started with Crosstalk ...2-1
Overview ...2-2 Planning the installation ...2-2 Installing Crosstalk ...2-3 Starting Crosstalk ...2-4 Start-up steps ...2-4 The configuration program ...2-4 The Open dialog box ...2-5 Getting connected quickly ...2-5 Connecting to an information service ...2-6 Connecting to the DCA Connection bulletin board ...2-7 Connecting to the Crosstalk Forum on CompuServe ...2-9 Creating custom profiles using NEW CALL ... 2-10
3
Disconnecting a session ... 2-11 Using workspace files ... 2-11 Saving a workspace file ... 2-11 Opening a workspace file ... 2-12 Exiting Crosstalk ... 2-12
Running a Communications Session ... 3-1
Basics of a communications session ... .3-2 Introducing session profiles ... .3-2 The default session profile ...3-2 Pre-defined session profiles ...3-3 Understanding the session window ...3-3 The menu bar ...3-4 The QuickBar ...3-5 The status bar ... .3-8 Creating and modifying custom session profiles ... 3-10 Using the Settings pull-down options ... 3-10 Choosing a connection type ... 3-10 Choosing a terminal emulator ... 3-13 Choosing a file transfer protocol ... 3-15 Changing session settings ... 3-17 Changing your system settings ... 3-19 Connecting to the host ... 3-21 Reviewing data during a communications session ... 3-22 What is the review buffer? ... 3-22 Adjusting the size of the review buffer ... 3-22 Transferring files ... 3-23 Sending a file ... 3-24 Receiving a file ... 3-25 Transferring files using Kermit ... 3-27 Using Kermit with KCP ... 3-27 Using Kermit without KCP ... 3-28 Monitoring a file transfer ... 3-28 Stopping a file transfer in progress ... 3-30 Transferring ASCII files without using a protocol ... 3-30 Taking a snapshot of ASCII screen data ... 3-31 Capturing ASCII screen data from the host ... 3-32 Disconnecting a communications session ... 3-33 Setting up your PC as a host ... 3-34 Using ANSWER.XWP ... 3-34 Selecting Answer mode ... 3-34
4
Running the ANSWER utility ... 3-35 Stopping the ANSWER utility ... 3-37
Using the Text Editor ...4-1
Introducing the Text Editor ... .4-2 The menu bar ... .4-3 The QuickBar ... .4-3 The status bar ...4-4 Creating and modifying text ... .4-5 Creating a new file ... .4-5 Opening an existing file ... .4-5 Using the editor ... .4-6 Entering text ... .4-6 Resizing the edit area ... .4-6 Displaying files as icons ...4-6 Editing text ... .4-7 Selecting text ... .4-7 Using the mouse ... .4-7 Using the keyboard ... .4-7 Reversing edit actions ... .4-8 Cutting text ... .4-8 Copying text ... .4-8 Pasting text ... .4-9 Clearing text ... .4-9 Selecting all of the text ... .4-9 Combining edit functions ...4-9 Duplicating text ... .4-9 Moving text within a file ... .4-10 Moving text to another file ... 4-10 Finding and replacing text ... .4-11 Finding a text string ... .4-11 Replacing a text string ... .4-12 Saving your files ... 4-13 Saving a new file ... 4-13 Saving an existing file ... .4-13 Saving an existing file under a new name ... .4-13 Printing your files ... 4-14 Choosing and configuring the printer ... 4-14 Printing a file ... 4-14 Exiting the Text Editor ... 4-15
5
Using Scripts ...5-1
6
What are scripts? ...5-2 Using the Learn facility ...5-2 Recording your keystrokes ...5-3 Running your Learn script ...5-4 Using the Script Editor ...5-6 Opening the Script Editor window ...5-6 The menu bar ...5-7 The QuickBar ...5-8 The status bar ...5-9 Creating a script ... 5-10 Compiling a script ... 5-10 From a session window ... 5-11 From a Script Editor window ... 5-12 Running a script ... 5-13 From a session window ... 5-13 From the Script Editor ... 5-13 Using a start-up script ... 5-14 Tracing a script ... 5-14 Exiting the Script Editor ... .5-15
USing the QulckPad ...
6-1
What is a QuickPad? ...6-2 Introducing QuickPad profiles ...6-2 Understanding the QuickPad Editor window ...6-3 The menu bar ...6-4 The QuickBar ...6-5 The status bar ...6-7 Using QuickPads during a session ...6-8 Displaying a QuickPad on the screen ...6-8 Editing the QuickPad during a session ...6-9 Hiding a QuickPad from view ...6-9 Redisplaying a hidden QuickPad ... 6-10 Removing a QuickPad from the screen ... 6-10 Creating a QuickPad ... 6-11 Creating a new QuickPad ... 6-11 Opening an existing QuickPad ... 6-11 Editing QuickPads ... 6-12 Placing an object on a QuickPad ... 6-12 Example 1: Placing a pushbutton on a QuickPad ... 6-12 Selecting QuickPad objects ... 6-14Copying objects ... 6-14 Making multiple copies ... 6-15 Moving objects ... 6-15 Resizing objects ... 6-15 Rearranging objects ... 6-16 Using the QuickPad grid ... 6-16 Deleting objects ... 6-17 Other customization features ... 6-17 Assigning functions to objects on a QuickPad ... 6-18 Assigning keystrokes to an object ... 6-18
Example 2: Assigning keystrolces to a pushbutton on a
QuickPad ... 6-19 Assigning a script to an object ... 6-19 Exiting the QuickPad Editor ... , ... 6-21
7
Remapping Your Keyboard ...7·1Overview ...7-2 Introducing keyboard profiles ...7-2 Understanding the Keyboard Editor window ...7-2 The menu bar ...7-3 The QuickBar ...7-4 The status bar ...7-5 Displaying a keyboard profile ...7-6 Displaying the working profile ...7-6 Displaying a new profile ...7-6 Displaying an existing profile ...7-6 Displaying the default profile ...7-7 Remapping keyboard functions ...7-7 Remapping modifier and combination keys ...7-7 Copying a function ...7-8 Deleting a function ...7-8 Assigning keystrokes or scripts to keys ...7-9 Assigning keystrokes to a key ...7-9 Assigning a script to a key ... 7-10 Using a keyboard map during a session ... 7-12 Exiting the Keyboard Editor ... 7-13
A
Connection Considerations ...A-1COimection overview ... A-2
NASI support ... A-lO Basic mode ... A-II Modem cables ... A-2 25-pin connectors ... A-2 9-pin connectors ... A-3 Connecting two systems directly (without a modem) ... A-4 Testing the connection ... A-5 Customizing your modem settings ... A-6 Specifying custom modem settings ... A-7 Network communications (INT14 and NASI) ... A-9 INT14 support ... A-9
Advanced mode ... A-12 Using serial ports ... A-15 Using the COM3 or COM4 port ... A-16
B
Terminal Emulation Considerations ... ...B-1Overview ... B-2 Changing fonts ... B-2 ADDS Viewpoint+ emulator ... B-2 ANSI PC emulator ... B-3 Using the keyboard ... B-3 Adjusting other emulator settings ... B-3 DEC emulators ... B-4
Changing fonts ... B-5 Using the keyboard ... B-5 Host-controlled printing ... , ... B-5 Character translation ... B-6 Adjusting other emulator settings ... B-7 FTTERM emulator ... B-7 Hazeltine 1500 emulator ... B-8 Hewlett-Packard 700/94 and 2392A emulators ... B-8 Using the keyboard ... B-8 IBM 3101 emulator ... B-9 Using the keyboard ... ,... B-9 PC TERM emulator ... B-9 Using the keyboard ... B-9 Televideo 910, 920, 925 emulators ... B-lO
VIDTEX emulator ... B-I0 Using the keyboard ...B-I0 WYSE 50+ and 60 emulators ...B-ll
C
Conversion Issues ... C·1Converting files ... C-2 From Crosstalk XVI ... C-2 From Crosstalk for Windows 1.x ... C-2 From Crosstalk Mark 4 ... C-2 From PROCOMM PLUS ... C-3
D
International Considerations ...0·1Choosing language support ... D-2
E
Product Support ... E·1Receiving technical support ...-... E-2 Bulletin boards and other services ... E-2 Updating or upgrading your software ... E-3
Index ... lndex·1
Figures
3-1. The session window ... .3-3 3-2. Connection Settings dialog box specifying a direct
connection ... 3-11 3-3. Connection Settings dialog box specifying a modem
connection ... 3-12 3-4. Terminal Settings dialog box ... 3-14 3-5. Sample File Transfer Settings dialog box ... 3-17 3-6. Session Settings dialog box with the general
settings displayed ... 3-18 3-7. Workstation Settings dialog box with the
general settings displayed ... 3-20 3-8. The file transfer status window ... 3-29
4-1 . The Text Editor window ... .4-2 4-2. Find dialog box ... .4-11 4-3. Replace dialog box ... 4-12 5-1 . Run Script dialog box ...5-5 5-2. Sample Script Editor window ...5-7 5-3. Compile Script dialog box ... 5-11 5-4. Script Compiler message box ... 5-12 6-1 . The QuickPad Editor window ...6-4 6-2. The MCI Mail QuickPad displayed during
a communications session ...6-8 6-3. Button Properties dialog box ... 6-13 6-4. Example of a pushbutton on a QuickPad ... 6-14
7-1. The Keyboard Editor window ...7-3 7-2. Key Properties dialog box ... 7-1O A-1. Custom Modem Settings dialog box ... A-8 A-2. Connection Settings dialog box specifying
INT14 Redirector support ... A-lO A-3. Connection Settings dialog box specifying
NASI-Basic support ... A-12 A-4. Connection Settings dialog box specifying
NASI-Advanced support ... A-13 A-5. Connection Settings dialog box listing the
available services on the network ... A-14
Tables
1-1. Crosstalk features ... 1-2 1-2. Help menu bar pull-downs ... 1-7 2 -1 . Pre-defined session profiles ...2-6 3-1. Session menu bar pull-downs ...3-4 3-2. QuickBar icons in a session window ...3-5 3-3. The status bar parameters in a session window ...3-9 3-4. Choosing a file transfer protocol ... 3-16 3-5. Determining whether your protocol requires host
preparation ... 3-23 3-6. Host menu options ... 3-35
3-7. ANSWER variables ... : ... 3-37
4-1 . Text Editor menu bar pull-downs ...4-3 4-2. QuickBar icons in a Text Editor window ... .4-4 4-3. Editing actions you can undo ... .4-8
5-1 . Script Editor menu bar pull-downs ...5-8
5-2.
QuickBar icons in a Script Editor window ...5-9 6-1. Pre-defmed QuickPad profIles ...6-2 6-2. QuickPad Editor menu bar pull-downs ...6-5 6-3. QuickBar icons in a QuickPad Editor window ...6-67 -1 . Keyboard Editor menu bar pull-downs ...7-4 7 -2. QuickBar icons in a Keyboard Editor window ...7-5
A-1 . 9-pin serial port connector modem signals ... A-3 A-2. DTE-to-DTE connection using 25-pin to 25-pin
serial ports ... A-4 A-3. DTE-to-DTE connection using 25-pin to 9-pin
serial ports ... A-5 A-4. DTE-to-DTE connection using 9-pin to 9-pin
serial ports ... A-5 A-5. Special characters for customizing your modem settings ... A-6
Before You Begin
This guide contains information you need to install, configure, and use Crosstalk® for Windows. It also provides instructions for running a communications session with a host.
Intended audience
This guide is written for the following readers:
• PC users who want to communicate with a host computer • Managers who want a basic understanding of Crosstalk and its
features
Before reading this guide, you should have a working knowledge of the following operating environments:
• Microsoft® Windows™ 3.1 • DOS 3.3 or newer
About this guide
This guide contains the following chapters:
Chapter 1, "Introducing Crosstalk," gives an overview of the features of Crosstalk, describes hardware and software requirements, and explains how to use Crosstalk's on-line help.
Chapter 2, "Getting Started with Crosstalk," covers the basics of using Crosstalk. It explains installation and configuration concepts and explains how to start and exit the program. This chapter also describes how to connect to bulletin boards, information services, and other host systems quickly.
Chapter 3, "Running a Communications Session," provides an overview of terminal emulation and explains how to use session profiles. It also includes guidelines for transferring and uploading files, taking screen snapshots and screen captures, and connecting and disconnecting a communications session with a host.
Chapter 4, "Using the Text Editor," describes how to create, modify, and save files using Crosstalk's built-in text editor. It also includes instructions for editing text, finding and replacing text strings, and printing files.
Chapter 5, "Using Scripts," describes how to record the keystrokes you enter for communications activities, such as logging on to the host, and explains how to create scripts using the Script Editor. It also provides information to help you compile, run, and trace scripts. Chapter 6, "Using the QuickPad," provides an overview of the QuickPad™ Editor and explains how to set up and use a QuickPad during a communications session. It also explains how to assign keystrokes or scripts to objects on a QuickPad.
Chapter 7, "Remapping Your Keyboard," explains how to use key board profiles to remap your keyboard. It also explains how to assign keystrokes or scripts to specific keys.
Appendix A, "Connection Considerations," explains how to configure and use a modem. It also explains how to connect your PC to another computer without using a modem.
Appendix B, "Terminal Emulation Considerations," provides information about the DEC®, IBM®, VIDTEX™, Hewlett-Packard®, WYSE®, ADDS® Viewpoint®+, Hazeltine, Televideo, Lear-Siegler, TTY (teletype), and FTTERM terminal emulators.
Appendix C, "Conversion Issues," explains how to use the Convert utility to translate files created with other Crosstalk products and PROCOMM PLUS® to Crosstalk for Windows files.
Appendix D, "International Considerations," describes the international character sets supported by Crosstalk.
Appendix E, "Product Support," explains how to contact DCA® Customer Support and what information you should be prepared to provide. It also includes information about the DCA Connection bulletin board system.
This guide also includes an index.
Documentation conventions
The following documentation conventions are used in this guide:
bold In command lines, bold represents information that
you should enter exactly as shown.
[ ] In command lines, square brackets indicate an option. To include an option, type only the infor mation inside the brackets. Do not type the brackets unless they appear in bold.
italics Italics represent variable information. In command lines, do not enter the words themselves in the com mand; enter the information they represent.
KEY This typeface represents a specific key on the keyboard. If you have remapped the function originally mapped to the key, substitute the new key or key combination for the original.
KEY1-KEY2 Keys displayed with a hyphen between them are called combination keystrokes. To enter combina tion keystrokes, press one key and hold it down while you press one or more other keys. Release all the keys at the same time.
Note: This signifies important additional information.
V
Caution:
This symbol means that a failure to follow therecommended procedure could result in a loss of data or damage to equipment or related products.
• This symbol indicates the end of a note or caution.
Common abbreviations
The following abbreviations are used in this guide. ACS Asynchronous communications server ANSI American National Standards Institute
ASCII American Standard Code for Information Interchange BBS Bulletin board system
CASL™ Crosstalk Application Script Language CD Carrier detect
CIS CompuServe Information Service CTS Clear to send
DCE Data communications equipment DDE Dynamic Data Exchange DSR Data set ready
DTE Data terminal equipment DTR Data temlinal ready INT14 Interrupt 14 IRQ Interrupt request
KB Kilobyte
KCP Kermit™ Command Processor LAN Local area network
MB Megabyte
MDI Multiple document interface
NASI NetWare® Asynchronous Server Interface
NACS Novell® NetWare Asynchronous Communications Server™
NCSI NetWare Communications Server Interface
Related
RAM Random access memory RD Receive data
RTS Ready to send TD Transmit data
TSR Terminate and stay resident
UART Universal asynchronous receiver transmitter VTM DEC VT series terminal
publications
For information on the Crosstalk Application Script Language, refer to the CASL Programmer's Guide.
For information on Crosstalk Mark 4, refer to the Crosstalk Mark 4 User's Guide.
For information on Crosstalk XVI, see the Crosstalk XVI User's Guide.
This guide does not attempt to provide a detailed explanation of the products, architectures, or standards developed by other companies or organizations. For information on Microsoft Windows 3.1, refer to the documentation provided by Microsoft. For information on DOS, refer to the documentation provided by your DOS vendor.
What is Crosstalk?
What is Crosstalk?
Crosstalk is a communications program that allows a PC running Microsoft Windows 3.1 to communicate with a host. The host can be any computer that Crosstalk is connecting to. A PC can connect to the host directly, through a modem attached to the PC, or through a modem shared on a LAN. The host does not have to be running Crosstalk in order for your PC to connect to it.
Crosstalk allows you to share information, computing power, and resources with other PCs, with bulletin boards and other on-line services, and with mainframe and minicomputer systems, such as IBM mainframes and DEC V AX® minicomputers.
Table 1-1 summarizes the features provided by Crosstalk. Each feature is covered in detail in later chapters.
Table 1-1. Crosstalk features
Feature Description
Multiple document intelface
You can view multiple windows concurrently, in either a cascaded or tiled format. You can re duce a window to an icon and close all windows simultaneously.
Terminal emulation You can use Crosstalk to emulate several terminals, including DEC, Hewlett-Packard, IBM, VIDTEX, TTY (teletype), WYSE, FTTERM, PC TERM, Hazeltine, Televideo, Lear-Siegler, and ADDS Viewpoint+ terminals. File transfer You can send and receive files to the host
computer using one of the following file trans fer protocols: X(Y)MODEM and variants, ZMODEM, Kermit, DART®, Crosstalk, IND$FILE, or CompuServe® B+.
continued
What is Crosstalk?
Table 1·1. Crosstalk features (cont.)
Feature Description
Scripts You can use the Learn facility to record and save a series of keystrokes to perfonn a task. You can also create, compile, and run scripts using the Script Editor.
QuickBar The QuickBar displays icons that initiate tasks, such as fIle transfers and screen captures. You can start these tasks quickly by clicking on the icons.
QuickPad During a communications session, you can execute commands using a QuickPad instead of your keyboard. A QuickPad is a small window that contains objects you click on to initiate host commands You can also assign functions to different objects on a QuickPad, such as running scripts and sending keystrokes to the host.
Keyboard mapping You can change the location of the characters and functions on your keyboard using the Keyboard Editor. You can also assign scripts and keystrokes to specific keys.
Screen caphlre During a communications session, you can copy the contents of the tenninal screen and save it in a file, or you can send it to a printer or to the Text Editor.
Uploading ASCII During a communications session, you can text fIles send an ASCII text file to the host computer. Snapshot You can copy the contents of your current
screen and save it in a fIle or you can send it to a printer or to the Text Editor using Snapshot. Text fIles You can create, edit, save, and print text files
using the Text Editor.
continued
[image:23.481.158.452.72.517.2]What is Crosstalk?
Table 1·1. Crosstalk features (cant.)
Feature Description
Session profiles A session profile contains the name, telephone number, and description of the host system. The profile also contains the communication speed, terminal emulation settings, and keyboard definitions. The software includes a default session profile (NORMAL.XWP) and several profiles that have already been
configured and are ready to use to connect to the host.
Workspace files You can specify a workspace file (*.xWW) from the Open dialog box. Workspace files contain references to all open windows and their current positions.
Screen customization You can customize your screen display, such as the character fonts and colors and audible sig nals, by modifying the terminal emulation set tings.
DDE support You can link Windows applications using a protocol called Dynamic Data Exchange. Using DDE, transfer data on a one-time basis, or establish an ongoing dialog with other applications.
Hardware and software requirements
Hardware and software requirements
Crosstalk requires the following hardware and software:
• A COMPAQ® 286/386, IBM PC/AT®, IBM PS/2® (except Model 30), or compatible PC
• 400 KB of free system RAM plus the memory needed to run Microsoft Windows
• 3 MB of free hard disk space
• Microsoft Windows 3.1, running in standard or enhanced mode • An asynchronous autodial modem (over 70 brands and models are
supported). The configuration program lists the types of modems Crosstalk supports.
• A mouse or compatible pointing device supported by Microsoft Windows 3.1
• A video adapter and monitor supported by Microsoft Windows 3.1
How to use this guide
This guide is designed for both novice and expert users and is organized to let you work at your own pace. Everyone should read this chapter and Chapter 2, "Getting Started with Crosstalk." These chapters start with the basics-those tasks you'll need to know to get started as quickly as possible. Once you understand the basics, you can skip around the rest of the guide as needed.
This chapter introduces Crosstalk and explains how to use the on-line help. It also lists the hardware and software requirements. Most of the information in this chapter is not available on line.
Once you have read this chapter, tum to Chapter 2, which covers how to install the software. Review this information before you begin the installation. After you have installed the software, you can start Crosstalk and configure your host connection. Instructions for configuring the software are in Chapter 2 and in the on-line help.
Using on-line help
Using on-line help
Accessing Help
from a dialog
box
Accessing Help
from the menu
bar
You can find most of the information you need about Crosstalk right on line. Whatever you are doing, you can ask for help. The on-line help provides detailed descriptions of dialog boxes and the choices you can make when completing them. For example, you can use on-line help when you have a question about specific dialog box items or need assistance in completing a task. Glossary terms are also provided. You can access on-line help from the Help pull-down on an action bar or by choosing the Help pushbutton in a dialog box.
Most dialog boxes contain a Help pushbutton. Choose this pushbutton to access specific information and instructions about the dialog box and the items in it.
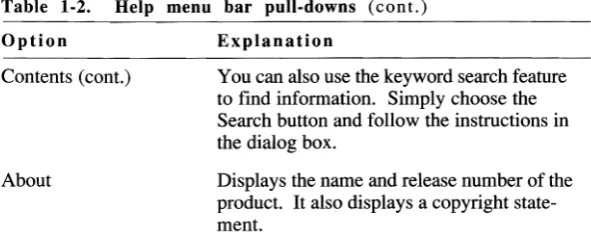
To see an overview of Crosstalk, choose the Help pull-down from the menu bar. Table 1-2 describes the Help pull-down options.
Table 1-2. Help menu bar pull-downs
Option Explanation
Help on Help Provides information about how to use Microsoft Windows Help.
Help for... Provides a general description of the currently active window.
Contents Explains the two types of on-line help topics in Crosstalk: procedure and reference. It also lets you jump to an alphabetical listing of help topics to help you find specific information.
continued
Using on-line help
Finding more
information
Viewing Help
and another
window at the
same time
Table 1-2. Help menu bar pull-downs (cont.)
Option Explanation
Contents (cont.) You can also use the keyword search feature to find information. Simply choose the Search button and follow the instructions in the dialog box.
About Displays the name and release number of the product. It also displays a copyright state ment.
Once you are in the Help system, you can display additional informa tion about some topics or go to related topics. Look for the distinctive color and highlighting. To access this information, click on a high lighted item. Additional details or step-by-step instructions are dis played. To return to Crosstalk, close the Help window.
You can view a window and its related Help instructions at the same time. This is useful if you want to view Help while you perform a task.
To do so, follow these steps:
1
Access Help by selecting the Help pushbutton in a dialog box or by selecting an option from the Help pull-down.2
If the Help window is full-screen size, reduce it by choosing the restore button in the upper-right comer of the Window.3 Resize the Help window, if necessary, by dragging the top, bottom, sides, and comers.
4 Move the Help window to the desired location by dragging the title bar.
5 Activate the other window by clicking on it.
6 Resize and reposition the window so that it does not overlap the Help Window. Do this by repeating steps 2 to 4.
For complete instructions on viewing on-line help, choose Using Windows Help from the Help pull-down.
[image:27.481.153.449.76.193.2]Overview
Overview
This chapter is designed to help you start using Crosstalk quickly. All the basic infonnation you need is provided here, as well as a quick method for starting a communications session. (For a more detailed discussion of communications sessions, refer to Chapter 3, "Running a Communications Session.")
The following topics are covered: • Planning the installation • Installing Crosstalk • Starting Crosstalk • Getting connected quickly • Disconnecting a session • Using workspace files • Exiting Crosstalk
Planning the installation
Before you begin the installation, make sure you do the following: • Install the required hardware and software.
• Detennine the type of connections you are using to communicate with a host: a direct connection (no modem required), a modem attached to your PC, or a modem shared on a LAN.
• If you're using a modem to connect to the host, note your communi cations port assignment. This is usually COM!, COM2, COM3, or COM4. You are prompted for this infonnation during the configura tion process. If you're not sure which port to use, choose the default port, COM!.
Installing Crosstalk
Installing Crosstalk
Once you have checked your hardware and software, you're ready to run the Setup program to install Crosstalk. Follow these steps:
1 Insert the diskette labeled Crosstalk for Windows Disk 1 in any available disk drive on your Pc.
2' Start Windows.
3 Choose Run from the Windows Program Manager File pull-down. 4 In the Command Line edit box, enter the diskette drive and the
program name as follows:
drive:\setup
The Crosstalk Setup dialog box is displayed.
5 Follow the instructions on the screen to install Crosstalk for the first time or to upgrade your software to the latest version. After you finish installing the software, the Setup program asks whether you want to display the README. TXT file after exiting the program. You should read this file for any last-minute changes or instructions.
6 Exit Windows, making sure you save your changes. 7 Restart Windows.
The Setup program performs the following tasks:
• Copies files from the installation diskettes to the specified drive and directory.
• Builds the Crosstalk group icon and application icon. • Automatically creates the XTALK.INI system file. For more
information on the XT ALK.INI file and other disk files, refer to the README.TXT file.
• Installs the *.FON and *.FOT font files used by Crosstalk.
Installing Crosstalk
• Updates the WIN.INI system file. The other system files (AUTOEXEC.BAT and CONFIG.SYS) are not modified during installation.
• Establishes file associations in the WIN.INI file for the following file extensions: .xWP, .XWQ, .xWK, .XWS, .xWW, and .xWC. For more information about file associations, see your Windows documentation.
Starting Crosstalk
Once you have installed Crosstalk, you are ready to start the software. This section explains how. It also describes the configuration program, which runs automatically when you start Crosstalk for the first time; the Open dialog box; and workspace files.
Start-up steps
To start Crosstalk from the Windows Program Manager, follow these steps:1 Double-click on the Crosstalk group icon in the Program Manager window. The Crosstalk application icon appears in the Crosstalk group window.
2 Double-click on the Crosstalk application icon.
If you are starting Crosstalk for the first time, a simple configura tion program nms automatically and prompts you for information about your PC and modem, as explained in the next section. If you have started Crosstalk before, the Open dialog box is displayed. This is the starting point for establishing connections, as explained in "The Open Dialog Box," later in this chapter.
The
When you start Crosstalk for the first time, a simple configurationconfiguration
program (CONFIG.xWS) begins running automatically. The configuration program prompts you for specific information about your PC and
program
modem; just follow the instructions on your screen. The configuration program sets up Crosstalk based on your responses to the prompts.
Starting Crosstalk
If you install a different modem later on or if you need to change your configuration information, simply run the configuration program again. You do not need to re-install Crosstalk.
Once the configuration program finishes, the Crosstalk main window is displayed. From here, you can choose New or Open from the File pull down to open a new or existing file.
The Open dialog
Typically, the first thing you see after starting Crosstalk is the Openbox
dialog box, which contains dialing directory entries. You can think ofthe Open dialog box as a type of phone book, or dialing directory. From here, you can initiate a connection to the host computer.
Note the list box called List Files of Type, located at the bottom of the Open dialog box. Use this list box to display a specific type of file in the Files list box. For example, if you want to see all the text files in your current directory, choose Text Files from the List Files of Type list box. A list of text files with the .TXT extension is displayed in the Files list box. Then choose a file from this list box and choose OK. The specified file is displayed.
Getting connected quickly
This section is designed to help you establish a host connection as quickly as possible. You'll learn the fastest way to connect to an information service, bulletin board, or any other host computer. (If you find that you need more detailed information, refer to Chapter 3, "Running a Communications Session. ")
Crosstalk comes with several session profiles that are configured and ready to use. These pre-defined profiles help simplify the process of connecting to a host system. They contain the parameters required for a communications session, such as the name, telephone number, and password for accessing the host.
Ifyou need to connect to a host for which there is no pre-defined session profile, you must create your own custom session profile. The fastest and simplest way to do this is to use the NEWCALL utility, which is described in "Creating Custom Profiles Using NEWCALL," later in this chapter.
Getting connected quickly
To learn how to use some of the session profiles that come with Crosstalk to connect to information services, continue with the next section.
Connecting to
Information services include electronic mail systems and news and infor mation retrieval services. Before you can connect to an infonnation seran information
vice, you must contact the service to register for an account. When you
service
register, you receive a telephone number, password, and user ID.
Crosstalk comes with several session profiles that are already defined and ready to use to connect to the following services. Table 2-1 lists these session profiles and describes their function.
Table 2-1. Pre-defined session profiles
This session profile ... Connects your PC to...
ATT.xWP AT&T Mail service
CSERVE.XWP Crosstalk Forum on CompuServe
DCABBS.xWP DCA Connection bulletin board
DELPHLXWP Delphi information service
DIALOG.xWP Dialog information service
DOWJONES.xWP Dow Jones NewslRetrieval service
GENIE.XWP General Electric Network for
Information Exchange service
LEXIS.xWP Mead Data LEXIS or NEXIS service
MCLXWP MCI Mail service
NEWSNET.xWP NewsNet service
OAG.xWP Official Airlines Guide
[image:34.481.141.440.252.502.2]Getting connected quickly
Connecting to
the DCA
Connection
bulletin board
To connect to an information service using one of the session profiles listed here, follow these steps:
1 Make sure your modem is connected properly, turned on, and ready to use.
2 Choose Open from the File pull-down. The Open dialog box is displayed.
3 Choose the session profile that corresponds with the service you want to connect to from the Files list box and choose OK. The specified profile is displayed. Then the Calling dialog box is displayed.
Note: If this is your first time accessing the service, a Script Dialog box appears in the session window and prompts you for your user ID and password.
After you enter this information, the last prompt asks whether you want to connect to the information service now. Choose OK .• 4 If you want to see the status of the connection in the Modem
Dialog area, select the Display Modem Dialog check box. If you receive a busy signal, Crosstalk redials the information service automatically.
Note: Ifyou need to reconnect a session that's been disconnected, choose Connection and then Connect from the Action pull-down .• To connect to an information service other than the ones listed in this section, you must create a custom session profile for each service you plan to communicate with on a regular basis. The simplest way to do this is to use the NEWCALL utility, as explained in "Creating Custom Profiles Using NEWCALL," later in this chapter.
Crosstalk lets your PC connect to bulletin boards such as the DCA Connection bulletin board. With the DCA bulletin board, you can find the latest information about Crosstalk and communicate with other DCA users. You can learn about product announcements, news, and technical specifications; private and public e-mail; technical support, technical tips, and product histories; and a private/public user's file exchange for sending files to and from DCA engineers and other users.
Getting connected quickly
To connect to the DCA Connection, you can use the pre-defined session profile DCABBS.xWP that comes with the software. Follow these steps:
1 Make sure your modem is connected properly, turned on, and ready to use.
2 Choose Open from the File pull-down. The Open dialog box is displayed.
3 Choose DCABBS.xWP from the Files list box and choose OK. The DCABBS.xWP session window is displayed. Then the Calling DCABBS.xWP dialog box is displayed.
Note: If this is your first time connecting to this bulletin board, a Script Dialog box appears in the DCABBS.XWP session window and prompts you for registration information, such as your user ill and password, and whether you're calling long distance. You are also prompted for configuration information, such as your communications port and modem speed. Most systems can safely use the default settings.
After you enter this information, the last prompt asks whether you want to connect to the bulletin board now. Choose Yes .• 4 If you want to see the status of the connection in the Modem
Dialog area, select the Display Modem Dialog check box. Note: If you receive an error message saying "hardware not present," your system is not configured properly. Run the configuration program (CONFIG.xWS) again and choose a different communications port. Then try connecting to the bulletin board again .•
If you receive a busy signal, Crosstalk redials the bulletin board automatically.
Once the connection is made, you are automatically logged on to the DCA Connection and an introductory screen is displayed. Follow the login instructions on your screen.
Note: If you need to reconnect a session that's been disconnected, choose Connection and then Connect from the Action pull-down .• To connect to bulletin boards other than the DCA Connection, you must create a custom session profile for each bulletin board you plan to communicate with on a regular basis. The simplest way to do this is to
Getting connected quickly
use the NEWCALL utility, which is explained in "Creating Custom Profiles Using NEWCALL," later in this chapter.
Connecting to
The Crosstalk Forum on CompuServe supports all DCA Crosstalk products. This forum serves as a central location for users to exchangethe Crosstalk
information, transfer files, and receive technical assistance from DCA
Forum on
engineers and other users.
CompuServe
To connect to the Crosstalk Forum, use the session profile CSERVE.xWP that comes with the software. The settings in this profile are already defmed and ready to use to connect with CompuServe. Follow these steps to connect to the Crosstalk Forum:
1 Make sure your modem is connected properly, turned on, and ready to use.
2 Choose Open from the File pull-down. The Open dialog box is displayed.
3
Choose the CSERVE.XWP profile from the Files list box and choose OK. The CompuServe session window is displayed. Then the Calling CSERVE.XWP dialog box is displayed.Note: If this is your first time connecting to CompuServe, a Script Dialog box appears in the session window and prompts you for the type of network you're on, the CompuServe telephone number, your user ID and password, and other configuration information.
After you enter this information, the last prompt asks whether you want to connect to CompuServe now. Choose Yes .•
4 If you want to see the status of the connection in the Modem Dialog area, select the Display Modem Dialog check box. If you receive a busy signal, Crosstalk redials the bulletin board automatically. Once the connection is made, you are logged on to CompuServe.
Getting connected quickly
Creating custom
profiles using
NEWCALL
5 Enter the following command at the CompuServe prompt (!): GO XTALK
Your screen displays instructions on how to join the forum. Data library 10 and message area 10 are reserved for Crosstalk for Windows users.
Note: If you need to reconnect a session that's been disconnected, choose Connection and then Connect from the Action pull-down .•
You may need to connect to a bulletin board or information service for which there is no session profile already configured and ready to use. If so, you must create your own custom session profile. The easiest way to do this is with the NEWCALL utility that comes with Crosstalk. NEWCALL prompts you for specific information about your PC and modem, creates a session profile based on your responses, and then allows you to connect to the host immediately-all in a few easy steps. To use NEWCALL, follow these steps:
1 From the File pull-down, choose Open. The Open dialog box is displayed.
2 Enter NEWCALL.XWP in the File Name edit box. Or you can choose NEWCALL.XWP from the Files list box.
3 Choose OK. NEWCALL prompts you for information, such as the host system's name, description, telephone number, and the terminal emulator and file transfer protocol that the host requires. You're also prompted to assign a name to the custom session profile you're creating.
4 The last prompt asks whether you want to connect to the host now. Choose Yes or No.
In the future, you can connect to the same host system again by using this session profile.
Note: You may fmd that you need to change some of the settings in the session profile you just created with NEWCALL. To do this, you need to use the options on the Settings pull-down. See Chapter 3, "Running a Communications Session," for more information .•
Disconnecting a session
Disconnecting a session
When you are ready to disconnect your communications session with the host, follow these steps:
1 Log off the host using the appropriate logoff procedure. 2 If this logoff procedure does not disconnect the session automati
cally, choose Connection and then Disconnect from the Action pull-down.
Using workspace files
Before proceeding with the rest of this guide, take a moment to learn how to use Crosstalk's Save Workspace feature. You can use this feature with any of the windows described in this guide.
The Save Workspace feature allows you to save all open windows in their current position to a single workspace file. When you open a workspace file in the future, all the windows are displayed in the same size and position in which they were saved. Workspace files have the file extension .XWW.
The fol1owing paragraphs explain how to save your windows to a workspace file and then open the workspace file.
Saving a
To save all currently opened windows to a workspace file, fol1ow these steps:workspace file
1 Choose Save Workspace from the File pull-down. The Save Workspace dialog box is displayed.
2 Type the name of the workspace file you are saving in the File Name edit box.
3 Choose OK.
Using workspace files
Opening
workspace
a
file
To open a workspace file, follow these steps:
1 Choose Open from the File pull-down. The Open dialog box is displayed.
2 Type the name of the workspace file you are opening in the File Name edit box. (You can also choose Workspace File (*.XWW) from the list box called List Files of Type at the bottom of the dialog box. A list of workspace files is displayed in the Files list box. Then choose a file from this list box.)
3 Choose OK. The windows are displayed in the same size and position that they were saved in.
Exiting Crosstalk
When you are ready to exit Crosstalk, choose Exit from the File pull down. You are prompted to save any changes you've made in each window before exiting the application.
V
Caution:
Before you tum off or reboot your PC, disconnect any active communications sessions and exit Crosstalk and Windows to prevent host connection problems or possible loss or corruption of data.•Basics of a communications session
Basics of a communications session
Introducing
session profiles
The default session profile
In Chapter 2, "Getting Started with Crosstalk," you learned a quick way to cOlmect to an information service or a bulletin board using pre-defined session profiles. This chapter describes session profiles in greater detail and covers more advanced communications features, such as file trans fers, text uploads, and screen captures. This chapter also explains how to set up your PC to operate as a host computer so other computers can connect to it.
The following sections provide a general overview of a communications session. Read these sections before establishing a communications ses sion with the host. Then start the communications session, as described in "Connecting to the Host," later in this chapter.
Session profiles are files that define how a communications session operates. You can simplify the host connection process by setting up a session profile for each computer you plan to communicate with on a regular basis.
A session profile (*.xWP) contains the parameters required for a com munications session, such as the name, telephone number, and descrip tion of the host system. The session profile also contains the connec tion, terminal emulation, and file transfer protocol settings. By adjust ing these parameters, you can instruct Crosstalk to operate using methods compatible with the host computer.
The following paragraphs describe the session profiles that come with Crosstalk-the default and the pre-defined.
Your default session profile is created during the configuration process, when you are prompted for information about your modem and Pc. The configuration program creates a default session profile,
NORMAL.xWP, based on your responses to these questions. When you create a new session profile, the default settings in NORMAL.XWP are automatically loaded and used as a basis for creating new session profiles.
Basics of a communications session
Pre-defined session profiles
Understanding
the session
window
Note: If you find yourself making the same changes to every session profile you create, you should modify the settings in the
NORMAL.XWP profile. The modified NORMAL.XWP settings will then apply to all new session profiles you create .•
Crosstalk comes with several pre-defined session profiles that are ready to use for a communications session. For instructions on how to use these session profiles to connect to bulletin boards, information ser vices, or any other host computer, refer back to Chapter 2, "Getting Started with Crosstalk."
When you open a session profile, the window shown in Figure 3-1 is displayed.
~I Crosstalk
File Edit Settings Action Script QuickPad Window Help
al
Session - MCI.XWP L~J_AI~~~ ~ I~I~I ~ ~
1e'Jltla.
~I@11-·
~11mIj..!.
r-I-;
I
ConnectedII
00:0102II
<W ModemII
CI TTYII
~ZmodemI
"I 1
Figure 3·1. The session window
The session window includes a menu bar, QuickBar, and status bar. The following paragraphs explain these items.
[image:43.481.158.447.258.475.2]Basics of a communications session
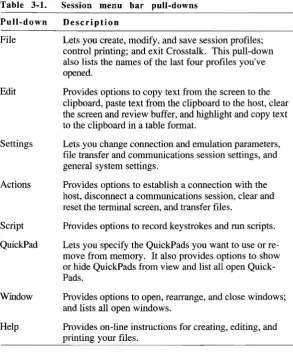
The menu bar Use the menu bar pull-downs, shown in Figure 3-1, to create and edit a session profile, access scripts and QuickPads, transfer files, capture and take snapshots of screen, upload text files, and connect and disconnect a communications session. You can also use the menu bar pull-downs to open, close, and rearrange your session windows, and access on-line help. Table 3-1 describes each pull-down.
Table 3-1.
Pull-down File Edit Settings Actions Script QuickPad Window Help
Session menu bar pull-downs
Description
Lets you create, modify, and save session profiles; control printing; and exit Crosstalk. This pull-down also lists the names of the last four profiles you've opened.
Provides options to copy text from the screen to the clipboard, paste text from the clipboard to the host, clear the screen and review buffer, and highlight and copy text to the clipboard in a table format.
Lets you change connection and emulation parameters, file transfer and communications session settings, and general system settings.
Provides options to establish a connection with the host, disconnect a communications session, clear and reset the terminal screen, and transfer files.
Provides options to record keystrokes and run scripts. Lets you specify the QuickPads you want to use or re move from memory. It also provides options to show or hide QuickPads from view and list all open Quick Pads.
Provides options to open, rearrange, and close windows; and lists all open windows.
Provides on-line instructions for creating, editing, and printing your files.
[image:44.481.137.431.160.515.2]Basics of a communications session
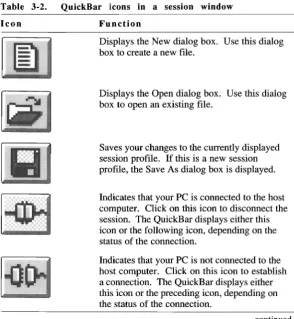
The QuickBar The QuickBar displays icons that initiate tasks, such as file transfers and screen captures. You can start these tasks quickly by clicking on the icons. Table 3-2 describes the QuickBar icons displayed when you use a session profile to connect to the host.
Table 3-2.
Icon
~
~
rIGfJ
L!!!J
...
..
:
~
..
-.:
.:.
QuickBar icons in a session window
Function
Displays the New dialog box. Use this dialog box to create a new file.
Displays the Open dialog box. Use this dialog box to open an existing file.
Saves your changes to the currently displayed session profile. If this is a new session profile, the Save As dialog box is displayed.
Indicates that your PC is connected to the host computer. Click on this icon to disconnect the session. The QuickBar displays either this icon or the following icon, depending on the status of the connection.
Indicates that your PC is not connected to the host computer. Click on this icon to establish a connection. The QuickBar displays either this icon or the preceding icon, depending on the status of the connection.
continued
[image:45.481.155.450.133.453.2]Basics of a communications session
Table 3-2. QuickBar icons in a session window (c 0 nt. )
Icon Function
Displays the Send Files dialog box. Use this dialog box to send a file to the host using the file transfer protocol specified for the currently displayed session profile.
Note: This icon is grayed if your PC is not connected to the host. •
Displays the Receive Files dialog box. Use this dialog box to receive a file from the host using the file transfer protocol specified for the currently displayed session profile.
Note: This icon is grayed if your PC is not connected to the host. •
Displays the Upload Text dialog box. Use this dialog box to upload an ASCII file to the host.
Note: This icon is grayed if your PC is not connected to the host. •
Displays the Run Script dialog box. Use this dialog box to specify the script you want to run. If you press this button while a script is running, the script will stop.
continued
Basics of a communications session
Table 3·2. QuickBar icons in a session window (cont.)
Icon Function
Captures the text on your terminal screen and sends it to the destination specified in the Session Settings dialog box.
Note: This icon is grayed if your PC is not connected to the host. •
I
Displays the screen snapshot settings in the Session Settings dialog box. Use this dialog box to specify the destination ofthe screen you're copy ing using Snapshot. You can send the screen data to a text file, printer, or the Text Editor. This icon is grayed if your PC is not connected to the host.Note: The icon to the right of the arrow varies, depending on the desti nation you have specified .•
Captures the text on your terminal screen. You can capture multiple screens continuously, including the text that has scrolled off your screen.
If Capture is already on, choosing this option again stops the screen capture. All the text received from the host is then sent to the destination specified in the Session Settings dialog box.
Note: The icon to the right of the arrow varies, depending on the destination you have specified .•
continued
Basics of a communications session
Table 3-2. QuickBar icons in a session window (cant.)
Icon Function
~
I
Displays the capture settings in the Session Settings dialog box. Use this dialog box to specify the destina tion of the screen you're capturing using the Capture tool. You can sendthe screen capture to a text file, print er, or the Text Editor. This icon is grayed if your PC is not connected to the host.
Note: The icon to the right of the arrow varies, depending on the desti nation you have specified .•
Hides any QuickPads associated with the currently displayed session profile. If the QuickPads are already hidden, choosing this icon displays them.
The status bar The status bar at the bottom of the screen contains information about the current communications session. You can quickly change many of the parameters on the status bar by double-clicking on the parameter. When you do this, the associated dialog box is displayed, allowing you to make changes to the parameter.
Table 3-3 describes the information in the status bar of a session profile.
Basics of a communications session
Table 3·3. The status bar parameters in a session window
Parameter Description
Message area Indicates the current status of a communica tions session. When you double-click on this area, the Session Settings dialog box appears. On-line timer Shows how long the current connection has
been active.
Connection setting Displays the type of communications device your PC is using to connect to the host. Your PC can use a serial port, modem, or an async server to connect to the host. When you double-click on this area, the Connection Set tings dialog box is displayed, allowing you to make changes to the communications paramo eters or specify a different connection type. Terminal type Displays the type of terminal you are emulat
ing. When you double-click on this area, the Terminal Settings dialog box is displayed, al lowing you to make changes to your terminal emulation screen or specify a different terminal emulator.
File transfer protocol Shows the file transfer protocol you are using. When you double-click on this area, the File Transfer dialog box is displayed, allowing you to make changes to the current protocol set tings or specify a different file transfer protocol.
[image:49.481.155.454.75.417.2]Creating and modifying custom session profiles
Creating and modifying custom session profiles
Using the
Settings pull
down options
Choosing a connection type
If you need to connect to a host for which there is no pre-defined session profile, you must create your own custom session profile. Crosstalk provides the following two methods for creating custom profiles: • Using the NEWCALL utility .
• Using the options under the Settings pull-down.
In Chapter 2, "Getting Started with Crosstalk," you learned how to create a custom session profile quickly using NEW CALL. For more information on NEWCALL, refer back to Chapter 2.
The options on the Settings pull-down give you more flexibility than NEWCALL. This section explains how to set up a custom session profile using the Settings pull-down options.
Note: Keep in mind that regardless of which method you use to create your custom profile, you must use the Settings pull-down options to modify it. •
When you create a custom profile using the options under the Settings pull-down, you have more choices and control over the settings in the profile than the NEWCALL utility allows.
All session profiles contain the following information: a connection type, a terminal emulator, a file transfer protocol, system settings, and session settings.
This section explains how to specify this information when you create or modify a custom session profile.
You can connect your PC to the host computer either directly or through a modem. This section explains both connection types.
Creating and modifying custom session profiles
Configuring a direct connection
To configure your PC to connect to the host directly, without using a modem, configure your custom profile for a direct connection. Follow these steps:
1 From the File pull-down, choose New. The New dialog box is displayed.
2 Choose the Session icon and choose OK. An untitled session window is displayed.
3 Choose Connection from the Settings pull-down. The Connection Settings dialog box is displayed.
4 Choose Local COM Port (Direct Connect) from the Connection list box. The default settings for a direct connection are displayed, as shown in Figure 3-2.
=1
Connection SettingsI;.onnection: I Local COld Port (Direct Connect) I f I I OK I
I Cancel I
!:!.elp
I I
PorI: Speed (Baud): Flow Control:
ICOld1 I f I 12400 I f I IBOTH I f I
Data Bits: Parity: Stop Bib:
18 I f I INONE I f I 11 I f I
Break Length: Xmit Buller Size: Recy Buller Size:
1500 If I 12k I f I 12k I f I
Direct·Connect Tool Version 1.0.0. Copyright @ 1892, Digital Communications Associates. Inc
Figure 3-2. Connection Settings dialog box specifying a direct connection
Creating and modifying custom session profiles
5 Modify the settings as needed. Most systems can use the default settings safely. Keep in mind that the settings you choose must match the host computer's communications parameters. See the on-line help for more details about these settings.
6 Choose OK.
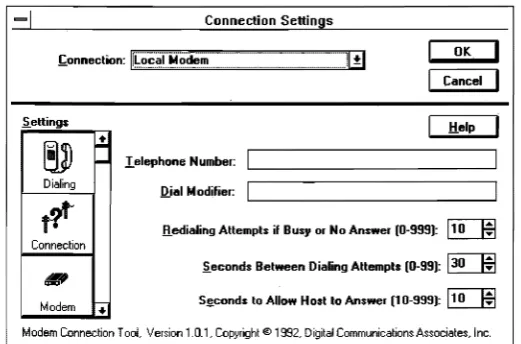
Configuring a modem connection
To configure your PC to connect to the host using a modem, configure your session profile for a modem connection. Follow these steps: 1 From the File pull-down, choose New. The New dialog box is
displayed.
2 Click on the Session icon and choose OK. An untitled session window is displayed.
3 Choose Connection from the Settings pull-down. The Connection Settings dialog box is displayed.
4 Choose Local Modem from the Connection list box. The default dialing settings are displayed, as shown in Figure 3-3.
Connection Settings
Settings Help
~
~
....
I.elephone Number:Dialing
Q.ial lot odifier:
tt
.!l.edialing Attempt. if Busy or No An.wer (0·999): 110 1$1Connection
ieconds Between Dialing Attempts (0-99): 130 1$1
..,
5jtcond. to Allow Host to An.wer (10-999): 110 1$1
Modem ~
Modem Connection TooL Version 1.0.1, Copyright @ 1992, Digital Communications Associates, inc.
Figure 3-3. Connection Settings dialog box specifying a modem connection
OK
Cancel
[image:52.481.158.419.346.518.2]Creating and modifying custom session profiles
Choosing a terminal emulator
5 Enter the telephone number of the host computer and modify the other dialing settings as needed.
6 If you need to modify the settings for your modem's connection, choose the Connection icon from the left side of the dialog box. 7 If you need to change the type of modem you are using, choose the
Modem icon from the left side of the dialog box. The list box displays the types of modems supported by Crosstalk.
8 If you need to modify general system settings, such as your local and long distance access numbers, choose the Workstation icon. 9 Choose OK.
You also need to specify the type of terminal your PC will emulate during the communications session. During emulation, your PC screen will look and operate like this tem1inal. Crosstalk emulates the following terminals:
ADDS Viewpoint+ ANSI PC
DEC VT52, VT100, VTl02, VT220, VT320 FTTERM (3270 Async)
Hazeltine 1500
Hewlett-Packard 700/94 and 2392A IBM 3101 Model 10
Lear-Siegler ADM3a PC TERM
Teletype (TTY)
Televideo 910, 920, 925 VIDTEX (CompuServe) WYSE 50, 50+ and 60
The terminal that Crosstalk is emulating must be supported by your host computer. If you are not sure which emulator the host requires. contact the host system administrator for assistance.
Creating and modifying custom session profiles
Specifying an emulator
To select the tenninal emulator you want to use, follow these steps: 1 With a session profile open, choose Tenninal from the Settings
pull-down. The Tenninal Settings dialog box, similar to the one shown in Figure 3-4, is displayed.
=1
Terminal SettingsOK lerminal:
I
TTY (Generic T elelype)IfI
I
I
I
Cancel.5.ettings
I
I
Screen Size .!:!.elp
I
- .!lows:
124
1$1
!;.ohJmns:lao
1$1
II
~
Terminal Emulation Cursor
~~~
o
Auto .linewrap O.!!.lockColors
o
Auto line!eed@ Jlnderline
~
o
Swap J!el & Backspace Fontf-TTY Emulator Version 1. O. O. Cop~right ® 1992. Digital Communications Associates. Inc.
Figure 3-4. Terminal Settings dialog box
2 Choose a tenninal emulator from the Tenninallist box. The current settings for the emulator you just selected are displayed.
3
Modify the settings as needed. Most systems can use the defaultsettings safely. (See the on-line help for more details.) 4 Choose OK.
[image:54.481.146.441.164.461.2]Choosing a file transfer protocol
Creating and modifying custom session profiles
Customizing your screen display
You can change the appearance of your tenninal screen by changing the settings in the Tenninal Settings dialog box. These settings detennine the characteristics of your screen display, such as the shape of the cursor and the color of the characters on the screen.
To access the Tenninal Settings dialog box (shown in Figure 3-4), follow the instructions in the previous section, "Specifying an Emulator."
The following instructions describe how to modify your screen display settings. Note that some of the tenninal emulators display additional icons, allowing you to customize other features of your screen display. If you need more infonnation about these icons, refer to the on-line help.
Once the Tenninal Settings dialog box is displayed, follow these steps: 1 To change the color of the characters on your screen, choose the
Colors icon from the left side of the dialog box. The default color settings are displayed. Modify these settings as needed.
2 To change the character font style, choose the Fonts icon. The default character font settings are displayed. Modify these settings
as needed.
3
Choose OK.You also need to tell Crosstalk which file transfer protocol your PC is using to transmit files to and from the host. A file transfer protocol is a standardized method of exchanging files between computers. The proto col manages the entire file transfer process and error checking. Error checking ensures that the file is not altered during the transmission. Note: File transfer protocol rules and conventions are compatible in most communications packages. The host does not have to run Cross talk in order to exchange files with your Pc. However, your PC and the host must use the same file transfer protocol to be able to exchange files. •
Each protocol is suited to a particular purpose or type of host system. If your host uses more than one file transfer protocol, contact your host
Creating and modifying custom session profiles
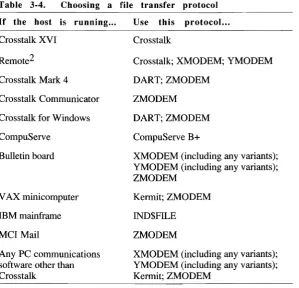
system administrator to see which protocol is best to use with Cross talk. Table 3-4 lists the available protocols and their corresponding hosts.
Table 3-4. Choosing a file transfer protocol
If the host is running ... Use this protocol...
Crosstalk XVI Crosstalk
Remote2 Crosstalk; XMODEM; YMODEM
Crosstalk Mark 4 DART; ZMODEM
Crosstalk Communicator ZMODEM Crosstalk for Windows DART; ZMODEM
CompuServe CompuServe B+
Bulletin board XMODEM (including any variants); YMODEM (including any variants); ZMODEM
V AX minicomputer Kermit; ZMODEM
IBM mainframe IND$FILE
Mcr
Mail ZMODEMAny PC communications software other than Crosstalk
XMODEM (including any variants); YMODEM (including any variants); Kem1it; ZMODEM
To choose a file transfer protocol, follow these steps:
1 With a session profile open, choose File Transfer from the Settings pull-down. The File Transfer Settings dialog box, similar to the one shown in Figure 3-5, is displayed.
[image:56.481.139.439.125.413.2]