Applications Manager
Version 8.0
User Guide
Applications Manager Version 8.0 Applications Manager User Guide By Jack Ireton
Document number: AM80USER-032009 UC4 Software, Inc. 2009
All Rights Reserved. Printed in USA Restricted Rights Legend
Use, duplication, or disclosure of the Programs is subject to restrictions stated in your contract with UC4 Software, Inc. Use, duplication, or disclosure of the Programs by Government is subject to restrictions for commercial computer software and the Programs shall be deemed to be licensed with Restricted Rights under Federal Law.
The information contained in this document is subject to change without notice. UC4 Software, Inc. does not warrant that this documentation is error-free.
If you find errors in this document, please contact Applications Manager Documentation. Applications Manager is an unregistered trademark of UC4 Software, Inc.
All other product names and services identified throughout this book are trademarks or registered trademarks of their respective companies.
Applications Manager Version 8.0 User Guide iii
Contents
About This Guide ...vi
Where to Go for More Information ...viii
What is New in Applications Manager 8.0 ...x
1. Applications Manager Operations ...1
1.1 Introduction to Applications Manager Operations... 2
1.2 Using the Applications Manager Desktop... 4
1.3 Working in the Applications Manager Windows ... 6
1.4 Editing General Desktop and ToolBar Settings ... 8
1.5 Setting Alerts ... 10
1.6 Setting the User Interface Font... 12
1.7 Viewing Operations Reports... 14
1.8 Customizing Tables ... 18
1.9 Changing Status Colors... 20
1.10 Viewing the About Applications Manager Window ... 22
1.11 Linking to Online Manuals and Applications Manager Web Sites ... 24
1.12 Launching the Applications Manager Client ... 26
1.13 Logging on to Applications Manager ... 28
1.14 Getting More with Applications Manager Add-on Products ... 30
2. Requesting Jobs and Process Flows ...35
2.1 Introduction to Requesting Jobs and Process Flows... 36
2.2 Requesting Jobs and Process Flows ... 38
2.3 Submitting Jobs and Process Flows... 40
3. Viewing and Printing Output ...45
3.1 Introduction to Viewing and Printing Output ... 46
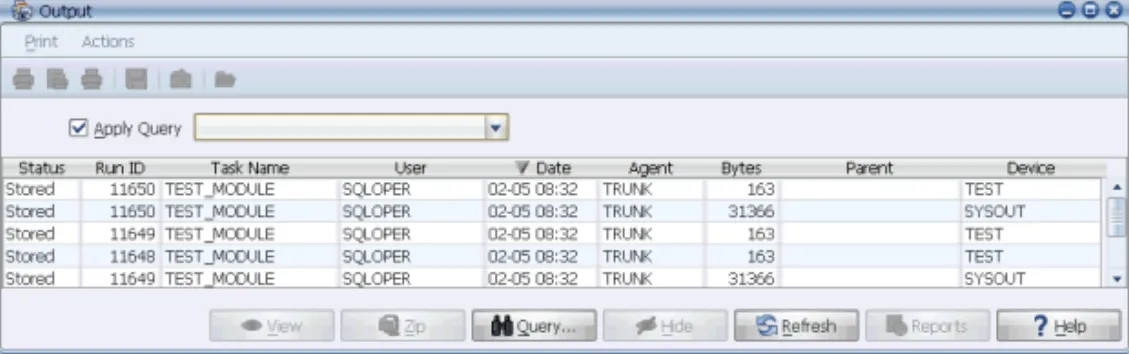
3.2 Working with the Output Window ... 48
3.3 Querying the Output Window ... 50
3.4 Viewing Output Files with the File Viewer ... 54
3.5 Printing, FTPing, and Emailing Output Files... 56
3.6 Opening Output Files with Other Applications... 58
3.7 Sharing File Associations with All Applications Manager Users... 60
4. Monitoring and Managing Tasks in Explorer ...63
4.1 Introduction to Monitoring and Managing Tasks... 64
4.2 Using the Explorer Window ... 66
4.3 Working with the Backlog ... 68
iv Contents
4.5 Backlog and History Column Descriptions ...72
4.6 Focusing the Backlog Display with Explorer ...74
4.7 Monitoring with the Status Bar and Object Icons ...76
4.8 Troubleshooting Failed Tasks ...78
4.9 Taking Actions on Tasks in the Backlog...80
4.9.1 Putting Tasks On Hold ...82
4.9.2 Killing Tasks ...84
4.9.3 Resetting Aborted and On Hold Tasks...86
4.9.4 Deleting Tasks ...88
4.9.5 Removing All Predecessors for Tasks ...90
4.10 Viewing and Editing Task Details ...92
4.10.1 General Task Details: Viewing and Editing ...94
4.10.2 Task Prompts: Viewing and Editing ...98
4.10.3 Pending Predecessor Links: Viewing and Removing...100
4.10.4 Successors in the Backlog: Viewing ...102
4.10.5 Task and Predecessors in a Flow Diagram: Viewing, Adding, and Editing...104
4.10.6 Task Conditions: Viewing and Editing...106
4.10.7 Task Documentation: Viewing...108
4.10.8 Task Output Files: Viewing ...110
4.10.9 Task Comments: Adding and Viewing ...112
4.11 Unsatisfying Tasks as External Predecessors in History ...114
4.12 Managing ZOS Tasks...116
4.13 Viewing History in a Gantt Chart ...120
4.13.1 Comparing Run Times in a Gantt Chart...122
4.14 How Applications Manager Handles System Failures...124
5. Querying and Filtering Explorer... 127
5.1 Introduction to Querying and Filtering Explorer...128
5.2 Querying for Tasks in History ...130
5.3 Filtering the Backlog and History...134
6. Staging Tasks in the Backlog... 139
6.1 Introduction to Staging Tasks in the Backlog ...140
6.2 Staging Tasks ...142
6.3 Managing Staged Tasks ...144
7. Working with Agents and Queues ... 147
7.1 Introduction to Monitoring and Managing Agents and Queues ...148
7.2 Monitoring Agents ...150
7.3 Managing Agents ...152
7.4 Viewing and Printing Automation Engine and Agent Logs ...154
7.5 Monitoring Queues ...156
7.6 Changing Queue Settings ...158
7.7 Administering Queues ...160
7.7.1 Defining Queues ...162
Applications Manager Version 8.0 User Guide v
7.8 Removing External Predecessors by Queue... 166
8. Viewing Forecasts and Monitoring System Performance ...169
8.1 Introduction to Viewing Forecasts and Monitoring System Performance ... 170
8.2 Viewing Forecasts ... 172
8.3 Viewing Graphical Forecasts... 174
8.4 Setting the FORECAST Job Parameters ... 176
8.5 Generating Production Schedules... 178
8.6 Monitoring System Performance with the Dashboard ... 180
8.7 Editing Dashboard Properties... 182
9. Monitoring and Managing Tasks with the Gantt View...185
9.1 Introduction to Monitoring and Managing Tasks with the Gantt View... 186
9.2 Reading the Gantt View Window... 188
9.3 Interpreting Adjusted Start and End Times... 190
9.4 Finding Tasks in the Gantt View Window ... 192
9.5 Setting the Gantt View Preferences ... 194
9.6 Printing from the Gantt View... 196
10. Monitoring Multiple Automation Engines and Agents with AppMaster ....199
10.1 Introduction to Monitoring with AppMaster ... 200
10.2 Monitoring AppMaster Views... 202
10.3 Viewing the Agent Summary or Properties for an Icon... 204
10.4 Monitoring Statuses with AppMaster ... 206
Appendices ...209
Appendix A: Automation Engine/Agent Status Values ... 210
Appendix B: Task Status Values ... 213
vi About This Guide
About This Guide
The User Guide is a comprehensive procedures manual for Applications Manager operators.
The User Guide is a comprehensive procedures manual that covers all aspects of Applications Manager operations.
Text Conventions
The following text conventions are used throughout this guide:
•User interface field names, menu items, and window names are written in bold. •File names and text within scripts are written in a bold arial font.
•Variable text is written <within brackets>. In the example below <run ID number> represents the actual run ID number of a requested job.
If you submit a large process flow, the message will read, ‘Task submission in progress: Run ID = <run ID number>’ until all components of the process flow have been placed into the Backlog.
Cross-Reference Conventions
Cross-references to topics within a manual list the topic name and number as shown in the following example: For information on task details in the Backlog, see topic 4.7 Viewing and Editing Task Details.
Cross-references to topics in other Applications Manager manuals list the manual name as shown in the following example: For information on external predecessors, see topic 5.5 Working with External Predecessors in the Development Guide.
Applications Manager Version 8.0 User Guide vii
Unique Format
The manual is written as a series of topics, with all but a few topics presented on two facing pages. Illustrations are always displayed within the topic. These features make it easy to find where a topic starts and ends, and eliminate flipping pages to find an illustration.
In some rare cases a topic cannot fit onto two pages. To draw attention to these exceptions, we have included a continuation symbol...
...in the lower right corner of the second page.
Each topic begins with a heading followed by a summary paragraph set off by horizontal rules. The summary paragraph states the key concepts presented in the topic. If a topic has a subtopic, the subtopic is also presented on two facing pages. The topic heading is carried over to the subtopics, and is displayed in smaller letters above the subtopic heading.
To get a quick overview of a chapter, read the summary paragraph for each topic and look at the figures and figure captions.
viii Where to Go for More Information
Where to Go for More Information
The most up-to-date Applications Manager documentation is available in the online manuals. You can access the manuals from the Help menu in the Applications Manager client. PDF manuals are also available, but may not be as current. The knowledge base on the UC4 Support site provides write-ups to address problems and frequently asked questions. Additionally, support technicians are available based on your support contract.
Online Manuals
Complete online versions of the Applications Manager manuals are accessible by selecting Applications ManagerManual from the Help menu on the Applications Manager desktop or by clicking the Help button in various client windows. If you select Help while defining an object, Applications Manager opens the corresponding help topic. Occasionally new
functionality is added to an Applications Manager version and bugs are fixed throughout each version's life cycle. The most recent edits to the manuals are included in the online help of each build.
PDFs on the Support Site
PDF files for Applications Manager, Operations Manager and Rapid Automation agents are available on the UC4 Support site:
http://support.uc4.com
PDF files are usually only generated when an application is first released. For the most up to date information, see the online help that ships with the application.
Knowledge Base
The knowledge base provides write-ups to address problems and frequently asked questions. It is searchable by error message, category, and text. The knowledge base is located on the UC4 Support site.
Applications Manager User Forum
The Applications Manager User Forum is a place where you can network with other
Applications Manager users to trade tricks, tips and best practices. Check on the latest product developments, find out about new service offerings, and make new friends and connections. The forum is located on the UC4 Support site.
Where to Go for More Information ix
Contacting UC4 Support
If you encounter problems with Applications Manager, you can solve most problems using: • The instructions provided in the Applications Manager manuals.
• The knowledge base available at the UC4 Support site.
You can access the UC4 Support site from the Applications Manager desktop by going to the Help menu and selecting Applications Manager Support.
If you are unable to resolve a problem, contact UC4 Technical Support. Except for emergencies, we suggest opening a support call from the UC4 Support site. All support calls received via the Web are reviewed within one business day.
UC4 Technical Support via phone is available from 6:00 A.M. to 5:00 P.M. Pacific Standard Time, Monday through Friday. Emergency (24 x 7) technical support is available. Contact your UC4 Account Manager if you are interested in purchasing emergency support.
You can contact UC4 Technical Support at:
Before you call UC4 Technical Support, please have the following information available: •Version number of Applications Manager you are running
•Operating system on which Applications Manager is running (e.g. Sun, Hewlett-Packard) •Operating system host name
•Operating system login information for the Applications Manager account(s) •Database login information for the Applications Manager account(s)
•Problem reference number if you are making a follow-up call on a previous problem If you are calling UC4 Technical Support for the first time, please be prepared to provide your name, company name, location, and phone number.
The UC4 Technical Support representative will give you a problem identification (PID) number. Please write down the number. If you call again about the same problem, the number will allow the representative to more quickly access the history of the problem.
United States Europe
Web: http://support.uc4.com Web: http://support.uc4.com Telephone: 1-877-277-9679 Telephone: +43 (2233) 7788-22
Email: [email protected] Email: [email protected]
x What is New in Applications Manager 8.0
What is New in Applications Manager 8.0
Applications Manager 8.0 includes several new features and enhancements from previous versions.
UC4 has always been known for their industry-leading and innovative capabilities in
scheduling applications across enterprises. UC4 continues this tradition with the Applications Manager Version 8.0 release, once again demonstrating why it is the most innovative task scheduling company today.
New Look and Feel
For version 8.0 of the UC4 Automation Suite, both Applications Manager and Operations Manager now use a new, improved common look and feel. Several Applications Manager screens have been improved for ease of use, including the Jobs definition window and the Submit window.
Rapid Automation Agents for SCT Banner and VMware and FTP
New agents are now available for the SCT Banner and VMware and FTP. Benefits of these solutions include:
•Automated remote deployment •No agent upgrades
•No more waiting for the next software version to upgrade •Jobs run faster than with scripting solutions
•No new processes are spawned
•Login connection pooling saves time and is more efficient
•Highly customizable agent and job tabs are integrated into the product •Solution version control
•All resources for a solution are located in a single file
New Replacement Values
Two new replacement values have been added. They are: •{job}: The job name rather than its alias
•{subflow_id}: The flow id of the individual flow rather than its top level parent
Several additional replacement values that used legacy terminology have also been copied and renamed. For a full list, see topic 7.6 Replacement Value Descriptions in the Development Guide.
Notifications, Output Scans, and Environment Variables for Process
Flow Components
Notifications, output scans, and environment variables can now be selected for process flow components. This was the most requested feature at the 2007 User Conference.
Applications Manager Version 8.0 User Guide xi
What Was New in Applications Manager 7.1
New Client Login ReportA new AW_CLIENT_LOGINS_REPORT report has been added to the already extensive list of actions audited in the Applications Manager environment. Applications Manager will keep track of the time each user logs into or out of the Applications Manager system. Monitoring logins is becoming one of the critical elements required to meet Sarbanes/Oxley compliance. For information on viewing reports, see topic 1.7 Viewing Operations Reports in the User Guide. Quick Searches for Tasks in the Backlog
You can type the first few letters of a task name from the Backlog’s Search field, and Applications Manager will find it.
Agent Groups and Machines Displayed in their Own Branches in the Explorer Window In the Explorer window, you can view agent groups in their own branch in the object tree. They are no longer part of the agents branch. Additionally, you can now view all the agents installed on each machine.
New Status Detail Information in Backlog Task Summaries
New status detail information in the Backlog Task Summaries shows why a task is not running. Tasks may not be eligible to run due to unsatisfied predecessors, queue status, agent status, automation engine status, conditions, or time settings. For more information on Backlog Task Summaries, see topic 4.5 Backlog and History Column Descriptions in the User Guide. Notifications, Output Scans and Environment Variables Shown in Task Details
A task’s notifications, output scans, and environment variables are now shown on the General tab of the task’s Task Details window in the Backlog and History. For more information, see topic 4.10.1 General Task Details: Viewing and Editing in the User Guide.
Re-Request from History
You can now re-request a single task listed in the History pane of the Explorer window. To do so, right-click the entry and select the Request option. Applications Manager lists the selected job or process flow on a tab on the Submit window.
When you re-request process flow components this way, they will run with the same prompt values as the selected entry in History. All other settings, including alias name, conditions, predecessors, output settings, and queues will use the settings in the job definition.
Send Email Attachments as PDF Files or in Zip Files
When you email an output file from the Task Details or Output windows, or using a notification, you can now attach the output files as PDF files on in Zip files. For more
information, see topics 3.5 Printing, FTPing, and Emailing Output Files in the User Guide and 2.6.2 Defining Notifications in the Development Guide.
View Output Files in Any Application You Define File Associations For
When viewing output files, you can now manually select an application when you want to view any output file if you have specified a file association for that application. For more information, see topic 3: Opening Output Files with Other Applications in the User Guide.
xii What is New in Applications Manager 8.0
Focus Output Scan on the End of a Long File
You can optionally specify to start the scanning a number lines from bottom of the file with output scans. This is so you can just scan the end of very long files. For more information, see topic 2.6.1 Defining Output Scans in the Development Guide.
Scan .zip and .pdf Output Files
Output scanning now supports .zip and .pdf files. Rename Email Attachments Sent with Notifications
A new option allows you to rename outputs when attached to email with a notification. For more information, see topic 2.6.2 Defining Notifications in the Development Guide.
Calculate Job and Process Flow Average Run Times Based on History
You can now calculate job and process flow average run times based on History using a calculate button on the General tab. For more information, see topics 2.6.5 Storing and Calculating Job Average Run Times and 3.14 Calculating Process Flow Average Run Times in the Development Guide.
Select Program Names for Jobs Using Agent Groups
You can now use the Select button next to the Program Name field on the General tab of the Jobs window to select a job’s program name when the job is assigned to an agent group. Create and Run ZOS Tasks
The new ZOS agent supports the full range of Applications Manager functions including launching tasks, tracking status, and capturing output. For more information, see chapter 2.14 Creating Jobs to Run on a ZOS Agent in the Development Guide.
New Formats for Prompts and ToolTips on the Submit Window
Prompts are now displayed in different formats on the Submit window when you make ad hoc requests. Prompt formats include radio buttons, check boxes, Select buttons, selectable dates from a calendar, and more. Prompt formats are selected when you define a prompt’s data type. You also have the ability to add ToolTips to prompt descriptions. For more information on prompts and data types, see chapter 6: Adding Prompts to Jobs and Process Flows in the Development Guide.
Environment Variables in Prompt Values
You can now include environment variables in prompt values. The environment variables must be enclosed in { } curly brackets. When an environment variable is used in a prompt’s value, its corresponding environment variable object must be assigned to the task via its agent,
application, program type, or job definition. For more information on prompt values, see topic 6.4 Adding, Updating, and Deleting Prompts in the Development Guide.
Comma Separated Prompt Values
A new setting for prompts allows you to select one or more values from a list and return them as a comma separated string. For more information, see topic 6.4 Adding, Updating, and Deleting Prompts in the Development Guide.
Applications Manager Version 8.0 User Guide xiii
New Agent Type Logins for Data Types
You can now use agent type logins to request information from an agent’s application. Agent type logins are written in { } brackets. For example you can select {RME} or {PSE} and Applications Manager will run that SQL statement using the API connection it has to
PeopleSoft or the remote automation engine. For more information, see topic 6.6 Defining Data Types in the Development Guide.
New File and Password Data Types
File data types allow you to select the files in a directory as a list of values. For more information, see topic 6.6.3 Using File Data Types in the Development Guide. Password data types allow you to enter passwords as prompt values. For more information, see topic 6.6.4 Using Password Data Types in the Development Guide.
New Predecessors from and to Sub Process Flows
Predecessors can now originate from and/or be assigned to components in sub process flows. For more information, see topic 5.5.1 Adding Internal Predecessor Links in Process Flows in the Development Guide.
New Active/Inactive Setting for Schedules
There is a new Active check box for job and process flow schedules. New Conditions Types
Three new condition types have been added to Applications Manager:
•CHECK FILE FTP: Allows you to check for a file on any remote host that has a specified host login object.
•CHECK CONNECTION: Checks whether a login connection exists or does not exist. When selecting the login, you can first pick a login type to filter the list.
•ALWAYS TRUE: Takes an action every time a task is run. This serves the same purpose as entering 1=1 for a USER DEFINED condition.
For more information on condition types, see topic 8.4.2 Selecting Condition Types in the Development Guide.
New FTP_JAVA and SFTP_JAVA Jobs
Two new jobs have been added for file transferring. They are:
•FTP_JAVA: This is an updated version of the FTP job. It includes several prompts and prompt options not available on the original FTP job, such as mget and mput commands. • SFTP_JAVA: This job uses secure FTP with SSH to transfer files.
For more information, see chapter 11: File Transferring in the Development Guide. Simplified Email Output Devices and Interfaces
Applications Manager now ships with an email output interface object and an output device, both named AW_EMAIL. You can use the AW_EMAIL output device to send email on any supported operating system. For more information, see topic 2.8 Emailing Output in the Administration Guide.
xiv What is New in Applications Manager 8.0
Assigning User Options to a User Group
User options can optionally be assigned to user groups. When user options are assigned to a user group, all users with that user group will have that user option set to true for them. You cannot add, edit, or delete user option objects like other Applications Manager objects. You can only assign them to user groups. For more information, see topic 3.2.1 Setting User Options in the Administration Guide.
New Export Format Prompt for Report Jobs
When jobs are created from reports, they now include an ‘Export Format’ prompt. Use this prompt to determine whether to separate entries in a row by spaces, commas, or tabs. It is useful if you will be exporting the report to another application. For more information, see topic 5.11 Creating Jobs from Reports in the Administration Guide.
Parsing Oracle Errors in Triggers and Procedures from the Database Browser
You can parse Oracle errors in triggers and procedures from the database browser. For more information, see topic 5.13.2 Parsing Oracle Errors in Triggers from the Database Browser in the Administration Guide.
Enhanced Event Logging
With the enhanced event logging capabilities, Applications Manager can log status changes for tasks, agents, and the automation engine. You can use a monitoring tool such as such as HP OpenView, SNMP, Patrol, Tivoli, or Unicenter to query the output files and report Applications Manager statuses. For more information, see chapter 6: Event Logging in the Administration Guide.
Run Tasks Remotely on Other Automation Engines
You can now define remote execution agents that allow you to initiate jobs and process flows on one automation engine and run them on another. For more information, see chapter 7: Running Tasks on Remote Automation Engines in the Administration Guide.
AgentService Can Use Any RMI Server for Database Connections
The AgentService process now looks for RMI servers in a database table and connects to all RMI servers it sees. If the automation engine RMI server (the one at master_ip_address) goes down, the AgentService will use one of the other RMI servers to make database calls. For more information, see topic 8.5 The AgentService Process in the Administration Guide. Automatic Log Rollover and Zip
When log files grow to approximately 50 megabytes, Applications Manager automatically rolls them over. When Applications Manager finishes writing to a log, it auto-zips it to save disc space. When the log directory reaches 500 megabytes, it is purged. Server logs are purged after 7 days. The rollover and purge settings are configurable. For more information, see topic 12.3.1 awenv.ini Replacement Values and Variables in the Administration Guide.
Customizable System Look and Feel or Theme
You can specify whether to use the system look and feel, or to set a theme. You might want to specify themes to differentiate your production automation engine from your development automation engine. For more information, see Appendix D: Specifying the Look and Feel and Theme for the Client in the Administration Guide.
Applications Manager Version 8.0 User Guide xv
Use Custom SSL Certificates for Connection Authentication
You can use a custom SSL certificate for connection authentication by creating user_keystore and user_keystore_config files. You can encrypt the password in the user_keystore_config file. For more information, see topic 2.10 Using Custom SSL Certificates for Connection
1
Applications Manager Operations
1.1.1 Introduction to Applications Manager Operations ... 2
1.2 Using the Applications Manager Desktop ... 4
1.3 Working in the Applications Manager Windows ... 6
1.4 Editing General Desktop and ToolBar Settings ... 8
1.5 Setting Alerts ... 10
1.6 Setting the User Interface Font ... 12
1.7 Viewing Operations Reports ... 14
1.8 Customizing Tables ... 18
1.9 Changing Status Colors ... 20
1.10 Viewing the About Applications Manager Window ... 22
1.11 Linking to Online Manuals and Applications Manager Web Sites ... 24
1.12 Launching the Applications Manager Client ... 26
1.13 Logging on to Applications Manager ... 28
2 Chapter 1: Applications Manager Operations
1.1 Introduction to Applications Manager Operations
As an operator, you will monitor tasks as they run through Applications Manager.
Applications Manager provides robust operations tools that make it easy for you to monitor and manage tasks as they execute. As an Applications Manager operator, you can:
Each of the areas of Applications Manager used by operators is described briefly below. Details for each are given in the remainder of this chapter and the chapters that follow.
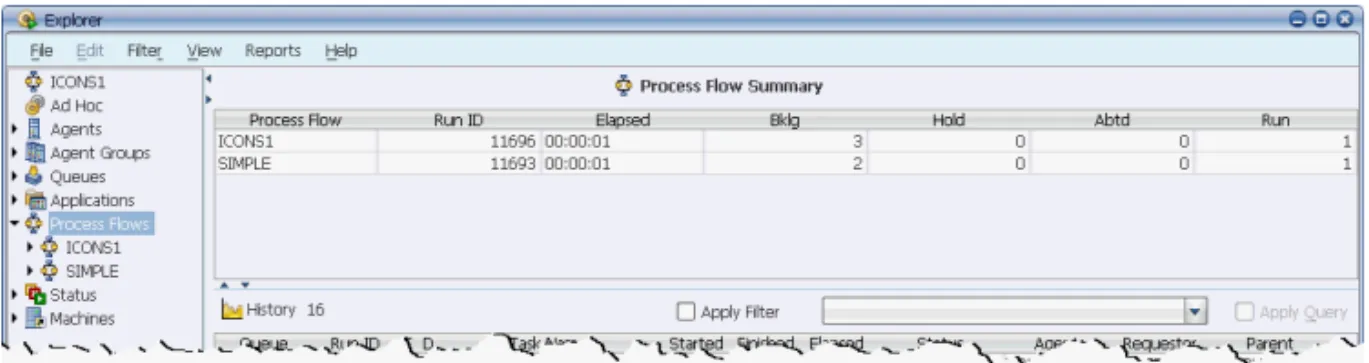
Using the Explorer Window
The Explorer window is the primary tool you use to monitor and manage agents, queues, and tasks. A sample Explorer window is shown in Figure A.
Viewing Forecasts
Using the forecast feature, you can view a list of scheduled jobs and process flows.
•Monitor the system. •Handle exceptions to normal processing. •Run tasks on an as-needed basis. •View and print task output.
•See what tasks will run during your shift. •Control load on the system. •Troubleshoot tasks. •Prevent tasks from launching. •Take actions on tasks. •Run tasks from the command line. •Stage tasks up to 48 hours ahead.
Applications Manager Version 8.0 User Guide 3
Requesting Jobs and Process Flows
There may be times when you want to run tasks outside of a set schedule. You can submit individual jobs and process flows from the Requests window. In Applications Manager, we refer to these as “ad hoc” requests.
Using the Graphical Analysis Package
Your license key determines whether the add-on features of the Graphical Analysis Package are included with your Applications Manager automation engine/agent instance. A license key with the Graphical Analysis Package gives you access to several windows including the following:
• Graphical Forecast: Displays scheduled jobs and process flows in a Gantt chart format. • Backlog Gantt View: Displays the contents of the Backlog in a real-time Gantt chart
format. You can take actions on tasks or view/edit their task details.
• History Gantt View: Displays in Gantt chart format how the components of a process flow in the History executed.
• Dashboard: Provides information about system performance.
For a complete list of Graphical Analysis Package features, see topic 1.14 Getting More with Applications Manager Add-on Products.
Viewing Operations Reports
Applications Manager comes with a set of predefined reports that provide information about your Applications Manager objects. If your product key includes the Graphical Analysis Package, you can also import an extensive set of Applications Manager History Analysis reports that you can use to review how tasks were processed. With the Graphical Analysis Package, you can also create your own custom reports.
4 Chapter 1: Applications Manager Operations
1.2 Using the Applications Manager Desktop
From the Applications Manager desktop you can access all Applications Manager features and options.
You can access all Applications Manager features and options from the Applications Manager desktop.
Note: If you are using a Windows client with 800x600 resolution, you will need to select the Windows auto hide taskbar option.
ToolTips
ToolTips provide a brief description of buttons, icons, and fields. To see a ToolTip, rest the mouse pointer over the button, icon, or field. A ToolTip appears after the mouse pointer has remained motionless for a second or two. In Figure A, the mouse pointer is resting on the Jobs icon in the toolbar. You can disable ToolTips by going to the View menu and unchecking the ToolTips option.
Applications Manager Version 8.0 User Guide 5
Toolbar and Menus
The toolbar consists of a row of icons running across the top of the screen. Click an icon to open its corresponding window. You can also access the windows in the toolbar from the Operations and Object Admin menu items.
Activities menu listings open windows where you can take actions such as opening Explorer or running ad hoc tasks with Requests.
Object Admin menu listings open selector windows where you can view, add, edit, or delete object definitions (depending on your user group access).
You can view or hide the toolbar by opening the View menu and checking the toolbar option. You can add or remove the icons displayed on the toolbar by selecting Settings from the Options menu. For instructions on editing desktop settings, see topic 1.4 Editing General Desktop and ToolBar Settings.
Taskbar
The taskbar is a graphic bar running across the bottom of the desktop that is used to select active windows. When you open an Applications Manager editing window, the window is represented by an icon in the taskbar. From the taskbar, you can right-click a window icon to:
• Restore a window to the desktop or minimize it to the taskbar. You can also display an active window by opening the View menu, selecting Windows, and choosing a window. • Maximize a window to fill the desktop.
• Move a window to the front of the desktop. • Close a window.
Selector windows are used when defining Applications Manager objects. They are not displayed on the taskbar because they do not contain unique information and are represented by icons on the toolbar.
Status Bar
The status bar is displayed across the bottom of the Explorer window. Its color alerts you to the status of the automation engine, agents, and tasks running in the Backlog. When the Explorer window is minimized it uses the same color scheme on the taskbar. For more information on the status bar, see topic 4.7 Monitoring with the Status Bar and Object Icons.
Closing All Windows or Selector Windows
To close all windows, go to the View menu and select Close all. To close only the selector windows, select Close selectors. For more information on selector windows, see topic 1.5 Adding, Editing, and Deleting Applications Manager Objects in the Development Guide.
6 Chapter 1: Applications Manager Operations
1.3 Working in the Applications Manager Windows
In many of the Applications Manager windows, the columns can be sorted and rearranged. Applications Manager conforms to most GUI standards, including keyboard navigation.
In most Applications Manager windows that include a table, you can sort the entries, and size and rearrange the columns.
Sorting Columns
You can display the items within a column in ascending or descending order. Click the header of a desired column to view its entries in descending order. Click a second time to view the entries in ascending order. Note that the arrow to the right of the column name reflects this change. Some columns can be clicked a third time to display the entries in their default order. The arrow may be displayed in a separate column, or not at all, when entries are in their default order. You can click the columns additional times to cycle through the options.
Copying Text from Rows
To copy text from a table in an Applications Manager window, click one or more rows and enter Ctrl-C. You must select the entire row. You can then paste the text into an email, word processor, or other application of your choice.
Temporarily Changing Column Order
To temporarily change the order of the columns, use the mouse to point to the heading of the column you want to move, hold down the mouse button, and drag the column to the new position (see Figure A). Note: These settings are not retained when you close the window. Many columns can be configured and saved. For more information, see topic 1.8 Customizing Tables.
Copying, Cutting, and Pasting
Text
You can right-click in a field to bring up a pop-up menu with copy, cut, and paste options.
Bringing Error Dialogs into View
If you minimize the Applications Manager desktop when an error message is displayed, the Applications Manager desktop may seem to lock up. This is because the Error dialog is out of
Figure A. You can change the order of the
Applications Manager Version 8.0 User Guide 7
view. To bring the error dialog back into view, hold down the Alt key and press the Tab key until you highlight the Java coffee cup icon
Keyboard Navigation
You can use the following keyboard navigation in Applications Manager:
• Ctrl-Up arrow key sets the focus on the current tab, then the right and left arrow keys will navigate to the other tabs. Ctrl-Down arrow key returns focus to the page.
• If a table has focus, then Ctrl-Tab will move the focus out of the table.
• When you are in a table, Enter and Tab are used for navigation within the table. • To alternately expand and collapse an object’s key, press Enter.
• To select a mnemonic key, click Alt+<the key>.
Assigning Options
.When required, you assign options and objects using the type of window shown in Figure B.
Assign objects by moving them from the Unassigned column to the Assigned column. The table below describes how to assign multiple options.
To: Do this:
Move a selected value between the two columns
Double-click the value.
-or-Select the value and click the single arrow button. Move all values between
the two columns Click on the double arrow button. Make multiple
contiguous selections Hold down the Shift key and click the first and last values. Make multiple
nonadjacent selections Hold down the Control key and click on each value.
Figure B. Double-click or use the arrow key to
8 Chapter 1: Applications Manager Operations
1.4 Editing General Desktop and ToolBar Settings
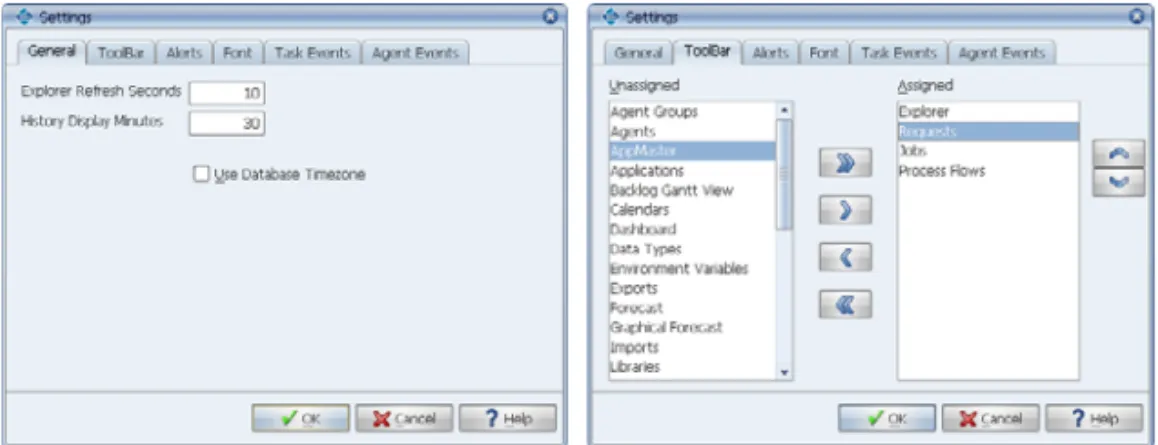
To edit general Applications Manager and ToolBar settings, select Settings from the Options menu.
You can edit and save general, toolbar, and alert desktop settings. These settings apply only to your workstation while you are logged in to an Applications Manager session.
Editing General and Toolbar Settings
To set the Applications Manager desktop settings: 1. From the Options menu, choose Settings.
Applications Manager displays the General tab of the Settings window shown on the left in Figure A. The settings are described in Table A.
2. You can customize the toolbar by adding and removing icons. To add or remove icons on the toolbar, select the Toolbar tab shown on the right in Figure A.
3. To move items between the Unassigned and Assigned columns, double-click or use the arrow keys.
For details on assigning and unassigning values, see topic 1.3 Working in the Applications Manager Windows.
4. You can set alerts in Applications Manager that are triggered by the status of tasks in the Backlog by selecting the Alerts tab. For example, you can play a sound whenever a task aborts. For more information, see topic 1.6 Setting the User Interface Font.
5. Applications Manager can log status changes for tasks, agents, and the automation engine. If you have the DBA user group, you can configure status logging options from the Task Events and Agent Events tabs of the Settings window. If you do not have the DBA user group, you will not see these tabs. For more information, see chapter 6: Event Logging in the Administration Guide.
6. To save the settings for the current session and future sessions, click OK.
Applications Manager Version 8.0 User Guide 9
Table A. Applications Manager Desktop Settings
What Are User Options?
User options are additional settings selected by your Applications Manager administrator. They control user access to Applications Manager features such as the Hide feature in the Output window. For more information on user options, see topic 3.2.1 Setting User Options in the Administration Guide.
Setting Description Explorer Refresh
Seconds You control the entering a number of seconds in this field. In Explorer window’s automatic refresh rate by Figure A, the refresh frequency is set to 10 seconds (the lowest number of seconds available). You can also manually refresh by entering Ctrl-R or by clicking the status bar on the Explorer window. History Display
Minutes You control how long records are displayed in History using the Previous minutes field. For example, if you set Previous minutes to 60, only tasks that have run within the last 60 minutes will be displayed.
Note: In some cases records will remain in History beyond this setting due to predecessor requirements.
In Figure A, the Previous minutes field is set to 30.
The amount of History displayed when you log in to the client is determined by the HistoryRetentionTime setting in the
Options.properties file. For more information on the
HistoryRetentionTime setting and the Options.properties file, see
topic 12.4 Options.properties File in the Administration Guide. Caution! The higher you set your Previous minutes, the more memory you will use. You can always run a History query to view older tasks in History. For more information on History queries, see 5.2 Querying for Tasks in History.
Use Database Time
Zone If this option is selected, times shown in the based on the time set for the Applications Manager database. If it Submit window are is not selected, then the times shown in the Submitwindow are local time based on the client machine. This is translated to database time for running the task.
Times shown in the Backlog, History, on the status bar, and in the lower right corner of the Explorer screen are always in database time.
10 Chapter 1: Applications Manager Operations
1.5 Setting Alerts
You can set alerts in Applications Manager that will be triggered by the status of tasks in the Backlog.
If the color change in the status bar is not a sufficient alert for your monitoring purposes, you can set additional alerts for specific statuses. For example, you might have a sound or voice message play when a task aborts. Alerts launch a program or script on the client machine while you are logged on. To set the alerts, use the Alerts tab on the Settings window shown in Figure A.
Statuses
You can define alerts for the following statuses:
•Aborted task: when a task completes with a non-FINISHED status such as ABORTED •Hold task: when a task goes into a HOLD status
•Agent trouble: when an agent goes into a status that requires operator intervention such as a BUSY or TROUBLE
•All clear: when all task/agent statuses are changed so that tasks are eligible to run again You can choose to trigger the alert when the first task or agent displays the status, or every time a new task or agent displays the status.
Local Windows Programs
An alert runs a local Windows program that you specify in the field next to the alert category. You must enter a command which includes the full path to the program file. In Figure A, commands like the following are used to play .wav files with the operating system’s default player:
cmd /c=”C:\Sounds\abort_task.wav” You may want to create custom scripts to run as alerts.
Figure A. You can set alerts for specific
Applications Manager Version 8.0 User Guide 11
Procedure
To set an alert:
1. Display the Settings window by opening the Options menu and choosing Settings. 2. Select the Alerts tab as shown in Figure A.
3. For each type of alert, enter a fully-pathed program name, or click the Select button and choose the program name.
Note: The program you choose must be an executable or Applications Manager will return an error message when the task/agent goes into the specified status.
4. To activate the alerts, click the Alerts on option. 5. Choose one of the frequency options:
• First time: The alert is executed the first time a task or agent shows the indicated status. The alert will not be executed again as long as that task or agent remains in the indicated status. For example, if three tasks abort at the same time, you will get only one alert.
• Every time: The alert is executed every time a task or agent shows the indicated status. For example, if three tasks abort at the same time, you will get three alerts. 6. To save the alert definitions, click OK.
Creating Notifications
Applications Manager notifications send messages and output files, based on task status, to any output device defined in Applications Manager. For information on defining notifications, see topic 2.6.2 Defining Notifications in the Development Guide.
Applications Manager can log status changes for tasks, agents, and the automation engine. If you have the DBA user group, you can configure status logging options from the Task Events and Agent Events tabs of the Settings window. If you do not have the DBA user group, you will not see these tabs. For more information, see chapter 6: Event Logging in the
12 Chapter 1: Applications Manager Operations
1.6 Setting the User Interface Font
You can adjust the size of the user interface font from the Font tab or the Settings window. You must entirely exit the Applications Manager client for the change to take effect.
To set the font size, use the Font tab on the Settings window shown in Figure A. After selecting a font size and clicking OK, you must close the Applications Manager client, re-open it, and log into a new session for the new font size to take effect. Re-logging in from the File menu will not make the change.
Figure A. After selecting a font size,
you must exit the client and re-open it to see the change..
14 Chapter 1: Applications Manager Operations
1.7 Viewing Operations Reports
To view reports for an object type, open that object’s selector window and click Reports.
Applications Manager comes with a set of reports that provide information about the
Applications Manager objects. If your product key includes the Graphical Analysis Package, you can also import an extensive set of Applications Manager History Analysis reports that allow you to review how tasks were processed. With the Graphical Analysis Package, you will also be able to create your own custom reports. A report that audits schedule changes is shown in Figure A. Additional reports may be created if users have the necessary user group access. For information on creating reports, see chapter 5: Creating Reports and Browsing the Database in the Administration Guide.
You can view reports for each of the operations windows and selector windows.
This opens the Reports window and selects the report type corresponding to the window you opened it from. In Figure B, the Reports button is selected on the JobsSelector window, opening the Reports window with the Jobs type highlighted.
To view reports for: Do this:
An object type Open that object’s selector window and clickReports.
An operations window Open the operations window and choose the report type from the Reports menu.
Applications Manager Version 8.0 User Guide 15
To view reports for another object type, select that object type from the Type box. If an object is not listed in the Type box, there are no reports for it. Once you select a report, click the Show button.
Enabling Audit Reports
To run auditing reports, your Applications Manager administrator must enable auditing for the automation engine. For more information, see topic 4.6 Enabling Applications Manager Auditing in the Administration Guide.
Prompt Values
Some reports require you to enter prompt values. If the report you select requires prompt values, you must respond to the prompts in the Report Parameters window shown in Figure C. Once prompt values are provided (if necessary), Applications Manager displays the report in its own window as shown in Figure A.
Changing the Lines per Page
You can specify the number of lines displayed on each page using the Lines per Page field. The new setting will go into effect when you click the Redisplay button. Doing so will update the time and date in the report header, but not the data displayed in the report.
Figure B. Select a report on the Reports window.
Figure C. Enter prompt values
16 Chapter 1: Applications Manager Operations
Running Applications Manager History Analysis Reports
With the purchase of the Graphical Analysis Package, you receive several pre-defined reports that analyze your task history. These reports are referred to as Applications Manager History Analysis or AHA reports. They include an AHA prefix designation in their names. For example, the AHA-FINISHED_JOBS_BY_STATUS_HR report returns completed tasks according to status by hour. Data relating to AHA reports is generated and loaded into Applications Manager by running the CALC_HISTORY_STATISTICS job. For more information, see topic 5.12 Retrieving Historical Data for Applications Manager Historical Analysis Reports in the Administration Guide.
18 Chapter 1: Applications Manager Operations
1.8 Customizing Tables
In many of the Applications Manager windows, you can choose the columns you want displayed. You can also change the order of the columns and change the column names.
Many of the Applications Manager windows display tables of information. In these windows, you can choose the columns displayed and their order using Setup windows.
The tables that you can customize are listed below: Menu Option Customizes
Backlog All views of the Backlog viewable from the Explorer window. History History on the Explorer window.
Output The Output window.
Agent Summary The Agent Summary on the Explorer window. Queue Summary The Queue Summary on the Explorer window. Process Flow
Summary The Process Flow Summary on the Explorer window. Status Summary The Status Summary on the Explorer window. Task Output
files
The Output files tab on the Task Details window. Agent Logs The Agent Logs window.
Gantt task
summary The information displayed in the pop-up table when you hover over a job or process flow in the Backlog Gantt view window and the Flow Diagram window.
Backlog task summary
The information displayed in the pop-up table when you hover over the Run ID column for tasks in the Backlog.
Figure A. A sample Setup window where you can
customize tables.
Figure A. A sample Setup window where you can
Applications Manager Version 8.0 User Guide 19
The steps for choosing columns and changing the column order are the same for all tables. To edit a table, open the Options menu, select Tables, then select the table you want to edit. The Setup window for the Queue Summary table is shown in Figure A.
The top of the window shows the table as it will be displayed in Applications Manager. The bottom of the window displays a list of the columns that can be displayed. For a description of all customizable columns, see Appendix C: Customizable Columns in the Administration Guide.
Making Changes
The table below describes how to customize Applications Manager tables.
Default Settings
Your Applications Manager administrator can set default settings for Applications Manager tables. If you customize tables, the default settings are overridden. For more information on setting table defaults, see topic 3.2.2 Customizing Applications Manager Defaults with DEFAULT_USER in the Administration Guide.
To: Do this:
Display a column Check the VISIBLE column.
All visible columns are brought to the top of the list. Newly checked columns are added to the far right side of the table. You can click the title of the column in the top display and drag it to a new location.
Change the name of a column
Edit the entry in the Name column. Control the width of
a column
Enter a number of pixels in the MAX_WIDTH and MIN_WIDTH columns. If you enter MIN_WIDTH settings, its possible that some columns will be pushed off the table. If this happens, select the Horizontal scrolling option described below.
Format date columns Select a date format from the FORMAT column. Control the margins
within a column In the to the left and right margins of the columnColumn margin field, enter a number of pixels to be added .
Allow scrolling By default, tables do not scroll. As you add columns, Applications Manager adjusts the width of the columns so they are all displayed in the table.
If the tables become to narrow to read the contents, you can select the Horizontal scrolling option. This maintains the default width of the columns and displays a scroll bar across the bottom of the table.
Change the order of
the columns Select the title of a column in the top window and drag it to a new location. Return the table to
20 Chapter 1: Applications Manager Operations
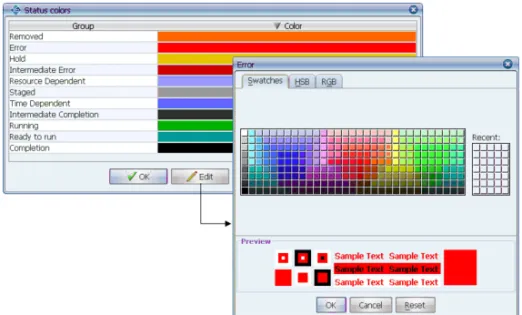
1.9 Changing Status Colors
You can change the colors used to indicate statuses for tasks, agents, and the automation engine in the Backlog and History.
In the Backlog and History on the Explorer window, Applications Manager displays a task’s status in the Status column. To provide visual cues, Applications Manager uses colors for the statuses. For example, green is RUNNING, yellow is HOLD, and red is ABORTED. If you wish, you can change the colors used for groups of statuses.
Procedure
To change the color for a group of statuses:
1. From the Options menu, select Status colors.
Applications Manager displays the Status colors window shown in Figure A. 2. Select the status group you want to change and click Edit.
Applications Manager displays the color selection window shown in Figure A. Statuses included in each group are listed in Table A.
3. Select a color and click OK.
Applications Manager Version 8.0 User Guide 21
Table A. Status Color Groups
Default Settings
Your Applications Manager administrator can set default values for status colors. If you customize status colors, they override the default settings. For more information on setting status color defaults, see topic 3.2.2 Customizing Applications Manager Defaults with DEFAULT_USER in the Administration Guide.
Group Statuses
Ready to run QUEUED Time
Dependent
DATE PENDING Resource
Dependent
SELF WAIT, QUEUE WAIT, CONDITN WAIT, UNAVAILABLE, AGENT WAIT, PRED WAIT
Intermediate Completion
STG SKIP, PW-SKIP, PW-DELETE
Hold HOLD PRED WT, HOLD
Staged STAGED HOLD, STG_PW HOLD, STAGED, STAGED_PW
Running LAUNCHED, STARTING, RUNNING
Completion FINISHED, SkipCond, CANCELLED, DELETED
Error DB ERROR, RESUMED, STARTED, STOPPED, ERRORS, EXPIRES, EXPIRED, IDLED, TROUBLE, BUSY, CHECK LOG, INACTIVE, BAD CONNECT,BAD MJN, BAD TYPE, BAD BATCH, BAD LIBR, BAD LOGIN, HOST FAILURE, BAD QUEUE, BAD DATE PRM, BAD SQL STMT, BAD MODULE, BAD_AGENT, FILE_ERROR, START_ERROR, START_FAILED, RECURSIVE, BAD CONDITN, DIED, ABORTED, KILLED, TIMEDOUT, LAUNCH ERROR
Intermediate Error
DEAD, ABORTD, KILL, TIME-OUT, KILL1, KILLING, LAUNCH ERR
22 Chapter 1: Applications Manager Operations
1.10 Viewing the About Applications Manager Window
To view the About Applications Manager window, open the Help menu and select About Applications Manager.
Use the About Applications Manager window to view details about your Applications Manager build. This information may be requested if you call UC4 Technical Support. When you select the About Applications Manager menu item from the Help menu, Applications Manager displays the About Applications Manager window shown in Figure A.
The About Applications Manager window includes: •The Applications Manager version and build number •Workstation Java VM information
•Server Java VM information •Java VM free memory information
•The DNS name and IP address of the computer you are using •The RMI host’s DNS name and IP address
•The RMI host’s port number
•The Oracle database version and details
To place the system information on your clipboard, click Copy.
To view copyrights for third party software used by Applications Manager, click Copyrights. Copyright information also exists in the copyrights directory on the Applications Manager automation engine.
Applications Manager Version 8.0 User Guide 23
Setting Debug from the Applications Manager Client
You can turn on debug for the Applications Manager client, the RMI server, or Oracle trace by selecting options in the Debug menu. For more information, see topic 10.4 Setting Client, Server, Oracle Trace, and All Agent Debug in the Administration Guide.
24 Chapter 1: Applications Manager Operations
1.11 Linking to Online Manuals and Applications Manager
Web Sites
The Applications Manager Help window includes all the Applications Manager manuals online. PDF manuals are available on the Applications Manager Support site. You can link to the Applications Manager Support site or the Applications Manager home page from the Help menu.
Use the Applications Manager Online Manuals option on the Help menu to view the Applications Manager manuals online. When you select the Applications Manager Online Manuals menu item, Applications Manager opens the Applications Manager Help window shown in Figure A.
Many of the Applications Manager windows include context sensitive Help buttons or menu items that link to a corresponding topic in the Applications Manager manuals.
The Applications Manager Help window includes table of contents, index and search tabs. This index is a combined index of all the Applications Manager manuals.
Applications Manager Version 8.0 User Guide 25
By default the Applications Manager Help window is displayed in the top left corner of the screen. Its default size is 800 by 600 pixels. Your Applications Manager administrator can change these settings for all users. For more information, see Appendix B: Changing the Default Size and Location of the Help Window in the Administration Guide.
PDF files for all Applications Manager manuals are available on the Applications Manager Support site. A new PDF file is generated each time its corresponding manual is printed. Occasionally new functionality is added to an Applications Manager version and bugs are fixed throughout each version's life cycle. Therefore, the most recent edits to the manuals are included in the online help of each Applications Manager build.
Connecting to the Applications Manager Web Sites
Use the Applications Manager Web Site item on the Help menu to access information about Applications Manager products and services. Use the Applications Manager Support item to open new support issues, check the status of open support issues, browse our Frequently Asked Questions, view announcements and holiday information, view release notes, browse our Knowledge Base, and read the current and back issues of our newsletters.
When you select the Applications Manager Web Site or Applications Manager Support menu items, Applications Manager launches a Web browser and opens the appropriate site.
Visiting the Applications Manager User Forum
The Applications Manager User Forum is a place where you can network with other
Applications Manager users to trade tricks, tips and best practices. Check on the latest product developments, find out about new service offerings, and make new friends and connections. To register, visit http://forum.appworx.com and fill out a short registration form. The forum content is available only to current Applications Manager customers.
26 Chapter 1: Applications Manager Operations
1.12 Launching the Applications Manager Client
To launch Applications Manager for the first time, enter the Applications Manager URL and select an option to either launch using Java Web Start or the Java Plugin.
You launch Applications Manager from the Introduction to Applications Manager page shown in Figure A. The location of the Introduction to Applications Manager page is http://<automation engine IP address>:<Apache port>/<automation engine name>/Intro.html. Note: If you are using Internet Explorer, this page will include a link to install Java2. With other browsers, you may automatically be prompted to install Java2 if you do not have it.
From this page you can launch the Applications Manager client in one of a few ways as described in the table below.
To open the Applications Manager client using:
Click the following link: Java WebStart without support for
loading Rapid Automation solutions or running Web Service solutions
Start the Applications Manager Client under the Java WebStart section.
Java WebStart with support for loading Rapid Automation solutions and running Web Service solutions
Start the Applications Manager Client (fully featured) under the Java WebStart section.
Applications Manager Version 8.0 User Guide 27
If you have the AppMaster add-on product, you can also open the AppMaster client from this page. For more information on AppMaster, see topic 1.14 Getting More with Applications Manager Add-on Products.
Creating Shortcuts
If you use Java WebStart, which is recommended, you can create desktop and start menu shortcuts by selecting an option on the Advanced tab of the Java Control Panel window. You access the Java Control Panel window by selecting Java from the Windows Control Panel.
The Applications Manager Signed Certificate
UC4 provides a signed security certificate with its Applications Manager Java client. By granting the certificate when you first launch the Applications Manager Java client, you can bypass the need to set up an individual Java security policy file for each user. This certificate guarantees that the Applications Manager applet code is tamper-free.
When you first launch Applications Manager, a Java Plug-in Security Warning window is displayed. You are asked to either grant or deny a signed certificate provided by UC4 Software, Inc., asserting that the Applications Manager application code is safe to download to your system.
The certificate also gives you access to clipboard functionality and user configuration files. If you choose to deny the certificate, you will have to modify the policy file permissions for each of your client users to use the clipboard for capturing information for support. Notice that the user can choose to grant the certificate for the current session only, or to grant it always. If the certificate is granted always, the user will not have to go through this security check each time an Applications Manager session is launched.
Launching Applications Manager from the Command Line
If you are running on a console or through an X-Windows enabled terminal, you can type appworxj (or in Motif, startso client) to launch Applications Manager. When you launch the client from the command line, you won’t be able to use hyperlinks in task documentation.
Accessing the Client Through a Firewall
If you will be accessing the Applications Manager client through a corporate firewall, you must open the appropriate ports, and specify those ports in the Options.properties file on the host machine. For details, see 2.2 Configuring the Applications Manager Client in the Installation Guide.
The Java Plugin without support for loading Rapid Automation solutions or running Web Service solutions
Start the Applications Manager Client under the Java Plugin section.
To open the Applications Manager client using:
28 Chapter 1: Applications Manager Operations
1.13 Logging on to Applications Manager
To log on to Applications Manager, enter your user name and password and select OK.
When you launch the Applications Manager client, it displays the Logon window shown in Figure A.
Logging On
To log on to the Applications Manager client:
1. At the Logon window, enter your Applications Manager user name and password, and select an automation engine from the drop-down list.
User names are not case sensitive, but passwords are.
Note:If you do not know your user name and password, check with your Applications Manager administrator.
2. To have Applications Manager remember your user name and automation engine, select the Remember logon button.
3. Select the automation engine you wish to log into. For information on adding additional automation engines to this drop-down list, see topic 1.5 Accessing Multiple Applications Manager Instances from One Client in the Administration Guide.
4. Select a language, or accept ‘User default’. For information on languages, see topic 1.6 Translating Languages in the Administration Guide.
5. To accept the entered information and log on to Applications Manager, click OK. Note: If you have a large number of output files or tasks in the Backlog, Applications Manager will display a message alerting you that the display has been truncated.
Applications Manager Version 8.0 User Guide 29
When you log out of Applications Manager, the following settings are remembered the next time you log back in:
• The size and position of Explorer and Backlog Gantt View and Dashboard windows. • The size and position of the main Applications Manager client window
• The content pane of the Explorer window (if open) • Whether a saved Backlog/History Filter was selected
Receiving RmiServer Error Broadcasts
If the Receive RmiServer Error Broadcasts user option is assigned to your Applications Manager user, the RmiServer Errors window might pop up with one or more errors when you log in.
When the Receive RmiServer Error
Broadcasts user option is assigned to a user, any RMI errors will be displayed in a pop-up window as they occur. Additionally, if any RMI errors
occurred since the last time the RMI server was started, the last ten errors will be displayed in a pop-up window each time the user logs on.
Note: If you have the DBA user group, you can clear the RMI errors without stopping the RMI server by selecting Clear RMI Errors from the View menu on the Applications Manager Desktop.
For more information on user options, see topic 3.2.1 Setting User Options in the Administration Guide.
Re-Logging on to Applications Manager
There may be times when you want to log on to Applications Manager under a different user name or connect to a different automation engine. To change your logon from the desktop, go to the File menu and select Re-Login. You will have to re-enter your password when you re-log in, unless the Disable clearing of login passwords on re-login automation engine option is checked. For more information on automation engine options, see topic 4.4 Setting Automation Engine Options in the Administration Guide.
Changing Your Password
You can change your password at any time. Your Applications Manager administrator can also set your password to expire after a certain period of time.
To change your Applications Manager password go to the Options menu on the Applications Manager desktop and click Change Password.