SAS
®
MDM 4.2
Administrator’s Guide
The correct bibliographic citation for this manual is as follows: SAS Institute Inc. 2015. SAS® MDM 4.2: Administrator's Guide. Cary, NC: SAS Institute Inc.
SAS® MDM 4.2: Administrator's Guide
Copyright © 2015, SAS Institute Inc., Cary, NC, USA All rights reserved. Produced in the United States of America.
For a hard-copy book: No part of this publication may be reproduced, stored in a retrieval system, or transmitted, in any form or by any means, electronic, mechanical, photocopying, or otherwise, without the prior written permission of the publisher, SAS Institute Inc. For a web download or e-book: Your use of this publication shall be governed by the terms established by the vendor at the time you acquire this publication.
The scanning, uploading, and distribution of this book via the Internet or any other means without the permission of the publisher is illegal and punishable by law. Please purchase only authorized electronic editions and do not participate in or encourage electronic piracy of copyrighted materials. Your support of others' rights is appreciated.
U.S. Government License Rights; Restricted Rights: The Software and its documentation is commercial computer software developed at private expense and is provided with RESTRICTED RIGHTS to the United States Government. Use, duplication or disclosure of the Software by the United States Government is subject to the license terms of this Agreement pursuant to, as applicable, FAR 12.212, DFAR
227.7202-1(a), DFAR 227.7202-3(a) and DFAR 227.7202-4 and, to the extent required under U.S. federal law, the minimum restricted rights as set out in FAR 52.227-19 (DEC 2007). If FAR 52.227-19 is applicable, this provision serves as notice under clause (c) thereof and no other notice is required to be affixed to the Software or documentation. The Government's rights in Software and documentation shall be only those set forth in this Agreement.
SAS Institute Inc., SAS Campus Drive, Cary, North Carolina 27513-2414. March 2015
SAS provides a complete selection of books and electronic products to help customers use SAS® software to its fullest potential. For more information about our offerings, visit support.sas.com/bookstore or call 1-800-727-3228.
SAS® and all other SAS Institute Inc. product or service names are registered trademarks or trademarks of SAS Institute Inc. in the USA and other countries. ® indicates USA registration.
Contents
Chapter 1 • Overview of SAS MDM . . . 1
About SAS MDM . . . 1
How SAS MDM Works . . . 2
Architecture . . . 2
Deployment Models . . . 7
Integrating Other Applications with SAS MDM . . . 7
Chapter 2 • Installing SAS MDM . . . 9
Installing the Software for the First Time . . . 9
SAS MDM Update Process . . . 11
System Requirements . . . 12
SAS MDM Content . . . 12
Chapter 3 • Configuring Databases . . . 15
Metadata and Instance Data . . . 15
Building the SAS MDM Repository . . . 15
DNS Resolution of Host Names . . . 19
Using Database Utilities . . . 20
Chapter 4 • Configuring SAS MDM . . . 21
Post-Installation Tasks for New Installations . . . 21
Post-Update Tasks for SAS MDM Updates . . . 26
Remediation Data Migration . . . 27
DataFlux Data Management Server Communication . . . 27
Setting SAS MDM Macros . . . 28
Security Considerations for SAS MDM . . . 31
SAS MDM Logging . . . 33
Chapter 5 • Localization Configuration . . . 35
Enabling QKB Support for Other Locales . . . 35
Bulk Loading Data for Other Locales . . . 35
Chapter 6 • Administrative Considerations . . . 37
Managing Database Growth . . . 37
Oracle Considerations . . . 38
SQL Server Considerations . . . 38
Role Design Considerations . . . 38
Diagnosing Problems . . . 39
Appendix 1 • Data Model . . . 41
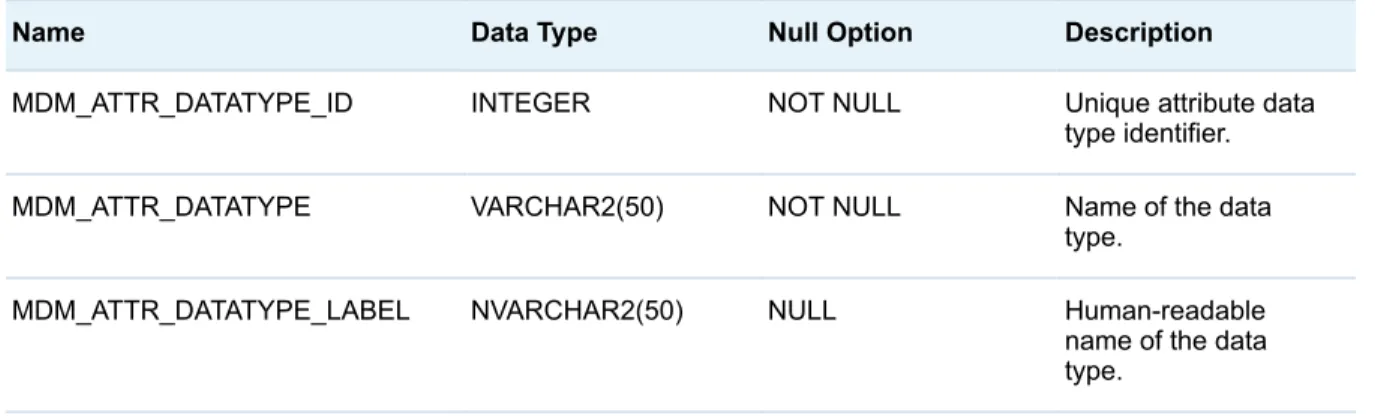
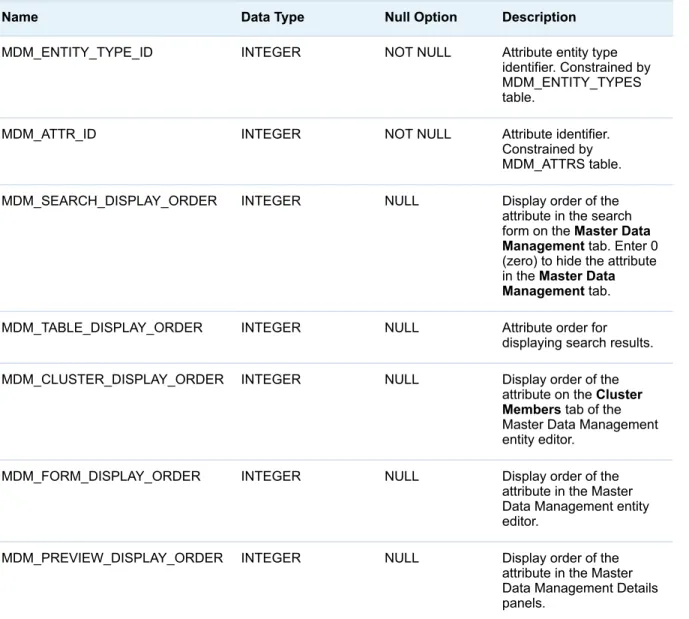
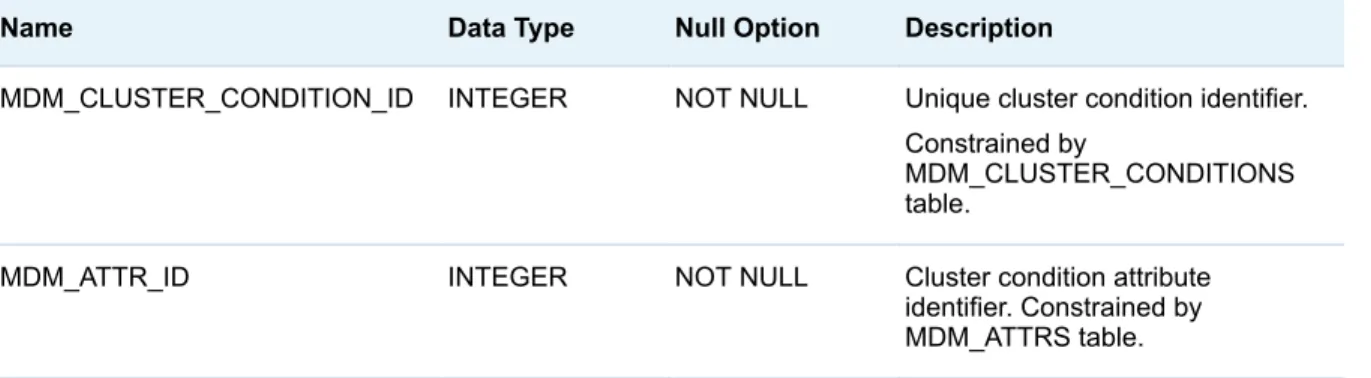
Database Tables and Columns . . . 42
Entity Tables . . . 65
Relationship Tables . . . 68
Bulk Load Tables . . . 69
Sample Views . . . 70
Data Model Diagrams . . . 70
Appendix 2 • Service Descriptions . . . 73
Required Services . . . 73
Schema Evolution Service . . . 78
Recommended Reading . . . 79
Index . . . 81 vi Contents
1
Overview of SAS MDM
About SAS MDM . . . 1
How SAS MDM Works . . . 2
Architecture . . . 2
Overview . . . 2
Development . . . 3
Run Time . . . 3
SAS MDM Components . . . 4
Deployment Models . . . 7
Integrating Other Applications with SAS MDM . . . 7
About SAS MDM
SAS MDM is a combination of software, templates, documentation, data models, and services that provide the functionality and processes necessary to build and maintain a master entity database. An entity can be a customer, product, patient, site, or any business data object that you define. You can also define attributes for each entity, as well as transformations that support data quality and identity management functionality.
The SAS MDM hub is a set of tables and table relationships that contain entity information and required entity keys and linking information. This hub provides end-users or other applications with a complete view of an entity and its relationships with other entities. In addition, the hub can be used as the single source for creating and maintaining survivor records that can be used in other applications or processes. The original source system IDs, which are important to other enterprise applications or data sources, are also maintained in the hub to facilitate linking activities with other data providers or consumers.
Note: SAS MDM is integrated with DataFlux Data Management Platform. Therefore, to use SAS MDM successfully, you must be familiar with DataFlux Data Management Platform.
SAS Data Remediation enables users to manage and correct issues triggered by business rules in SAS MDM batch jobs and real-time processes. These issues can also be triggered by external systems that communicate with data remediation through its REST-based web service application programming interface (API). Data remediation allows user- or role-based access to data exceptions, which are categorized by application and subject area. Once data remediation issues have been reviewed, they can be corrected through the same application, eliminating the need for another user to complete the
correction process. All data remediation issues can also be associated with workflow definitions that route the issues to the correct decision maker for approval or instructions for additional action.
SAS MDM includes the following features: n batch and real-time modes
n capability to register user-defined tools that operate on the data in the hub n entity matching, de-duplication, and survivor record creation
n entity linking through relationships
n data quality functionality such as address verification, standardization, and parsing
n the ability to search based on fields within the records
n capability of adding, modifying, and retiring SAS MDM entities
n workflow-based data remediation functionality to view and correct SAS MDM data errors
n metadata management for entities, attributes, and transformations n historical tracking, including changes saved for contributor records and
survivor records
n data access, data profiling, data monitoring, data quality, and data enrichment
How SAS MDM Works
SAS MDM performs the following functions:
n extracts business information from your data sources n validates and standardizes the data
n captures data errors through user-defined business rules and sequesters the data for review and correction
n consolidates the information into a single view of the information available from all the data sources
The organizational data that you provide can be customer data, product data, services data, or data for other entity types. SAS MDM applies a rigorous methodology to the problem of integrating disparate enterprise data.
Architecture
Overview
SAS MDM is built on a sophisticated data management platform that provides both development and run-time support for applications.
Development
During development, DataFlux Data Management Studio provides the ability to design and test processes (batch jobs) and real-time services (data jobs), which can then be deployed and run using the following:
n DataFlux Data Management Server n DataFlux Data Management Studio n scripting with a command line interface
The DataFlux Data Management Platform relies on the Quality Knowledge Base (QKB) for data quality processing. The QKB provides capabilities such as standardization of data and computation of match codes. The QKB is used both during development and at run time.
Run Time
At run time, a multi-tier architecture that consists of presentation, business, and data tiers is used.
n The presentation tier hosts the web interface in a Servlet 2.5-compliant container and includes a Java application server and a browser. Batch interfaces might be available for some operations such as bulk loads and updates.
n The business tier runs on a DataFlux Data Management Server and is implemented using DataFlux Data Management Studio processes (batch jobs) and real-time services (data jobs). It implements a Service Oriented Architecture (SOA) that enables any system to use its services through SOAP requests. Common web service standards are used to maintain simplicity when integrating with other systems. Authentication within the business tier runs on a SAS Metadata Server. This server can authorize user permissions for applications, assign roles and security restrictions, and define authentication parameters for accessing other systems, such as the database, for each user or group. The real-time or transactional component of SAS MDM interfaces with other applications through an SOA environment. Specifically, the ability to call business services hosted on DataFlux Data Management Server is accomplished through web services. Process jobs can also be used as business services that accept data on a record-by-record basis. This enables users to use SAS MDM data and services within an enterprise architecture.
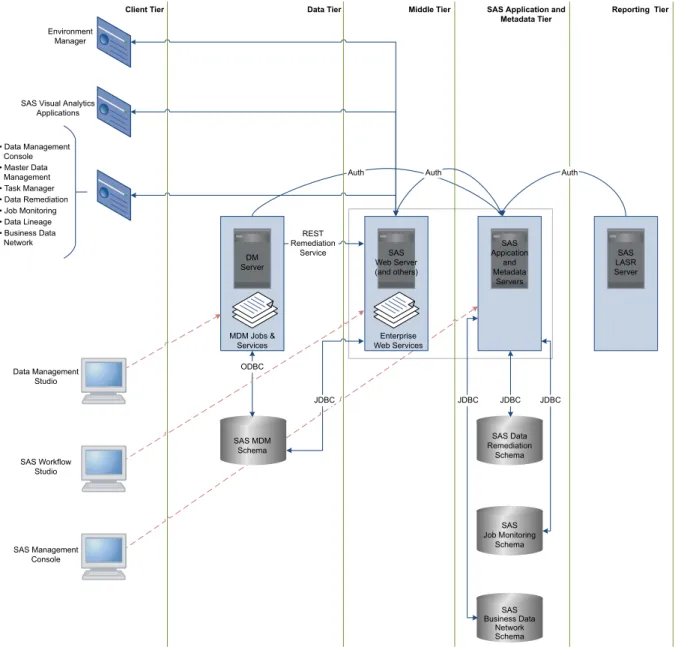
n The data tier hosts the supporting data and metadata for the system, which consists of a relational database such as Oracle or Microsoft SQL Server. The data model is documented and accessible to third-party tools and can also be accessed through DataFlux Data Management Studio jobs. The following display shows how the components fit together:
Figure 1.1 Architecture Diagram
• Data Management Console • Master Data Management • Task Manager • Data Remediation • Job Monitoring • Data Lineage • Business Data Network
SAS Visual Analytics Applications
Auth Auth Auth
MDM Jobs & Services
Enterprise Web Services ODBC
JDBC JDBC JDBC JDBC
SAS MDM Schema REST Remediation Service SAS Data Remediation Schema SAS Job Monitoring Schema SAS Business Data Network Schema DM Server SAS Web Server (and others) SAS Appication and Metadata Servers SAS LASR Server Environment Manager
Client Tier Data Tier Middle Tier SAS Application and Reporting Tier Metadata Tier Data Management Studio SAS Workflow Studio SAS Management Console
SAS MDM Components
DataFlux Data Management Studio
DataFlux Data Management Studio is a graphical user interface (GUI)-based application that provides access to other tools and services. You can use DataFlux Data Management Studio for job flow management and customization, to manage data source connections, to manage user accounts through SAS Metadata Server, to deploy and execute jobs on the DataFlux Data Management Server, and to run batch jobs and data services within a Windows environment. DataFlux Process Jobs and Real-time Business Services A DataFlux process job is a multi-step data management process that can be run from DataFlux Data Management Studio, from DataFlux Data Management 4 Chapter 1 / Overview of SAS MDM
Server, or from a command line interface or script. Real-time business services, also called data jobs, are deployed through DataFlux Data Management Server and are used by the SAS MDM web application to provide data to the application through SOAP calls.
Quality Knowledge Base
The Quality Knowledge Base (QKB) contains the files, file relationships, and metadata needed to correctly parse, match, standardize, and otherwise process data as required for SAS MDM. The QKB can be customized to meet an
organization's needs. The QKB can support different locales to support processing for many different languages.
DataFlux Data Management Server
The DataFlux Data Management Server (labeled as DM Server in Figure 1.1) enables data management and integration processes to be deployed across an entire IT environment. SAS MDM uses batch jobs and real-time services deployed through DataFlux Data Management Server to manage the master data hub and to provide data through the web interface and reports. DataFlux Data Management Server handles all aspects of database connectivity and service availability through SOAP calls.
Note: In many instances, you should have at least two DataFlux Data Management Servers working together through network load balancing or failover hardware or software, to achieve the desired results for performance and meet server uptime goals, particularly for real-time service processing. Databases
SAS MDM relies on access to a Database Management System (DBMS, labeled as SAS MDM Schema in Figure 1.1), such as Oracle or SQL Server, to act as a repository for metadata and data. The Master Data Management component of SAS MDM requires two database schemas for its operation.
SAS Data Management Console
The SAS Data Management Console is a central, web-based location for all master data management activities. This environment provides a launch location for all associated SAS MDM applications and SAS Visual Analytics reports, as well as other SAS applications.
The SAS MDM applications Master Data Manager, Data Remediation, and Task Manager enable you to perform the following functions:
n Master Data Manager o create and manage a hub
o define new entity types and their attributes o search for data within the hub
o create and update data within the hub n Data Remediation
o monitor and correct errors in data loaded into SAS MDM n Task Manager
o start, stop, view, and interact with active workflow instances n Data Lineage (not available in all SAS MDM product bundles)
o view relationships and perform impact analysis for selected objects stores in SAS metadata
n Business Data Network (not available in all SAS MDM product bundles) o define and manage metadata for business terms
Other applications might appear in your SAS Data Management Console depending on the SAS MDM offering.
Several of these web applications use SAS data server repositories to store application data. These are represented in Figure 1.1 as schemas in the SAS Application and Metadata Tier.
SAS Workflow Studio
This application is a drag-and-drop workflow designer. Users can modify existing MDM workflow templates or create new ones for use with other SAS MDM processes. Workflows can also be uploaded and activated in the SAS server environment and can be downloaded for additional editing.
SAS Visual Analytics Applications
If your SAS MDM product bundle includes reporting capabilities, business users and data stewards have several reporting applications available to them to design, view, and share reports for SAS MDM and SAS Data Remediation. See the documentation for SAS Visual Analytics for more information about
application capabilities. Environment Manager
This application enables an administrator to see in one location key operational metrics of all SAS servers and other technologies deployed with SAS MDM. This application also includes server configuration and management capabilities. SAS Web Server
This server handles web traffic and communication for all SAS web applications running in the mid-tier environment.
SAS Application Server
An application server hosts the SAS Data Management Console and other associated applications. This is installed and configured during the deployment process. No other third-party application servers are supported.
SAS Metadata Server
This server makes important system wide metadata available to SAS clients and other SAS servers. Interaction with this server is accomplished through SAS Management Console.
SAS LASR Analytic Server
If your SAS MDM product bundle includes reporting capabilities, then SAS LASR Analytic Server is present in your SAS MDM environment. You can load SAS MDM instance data to SAS LASR Analytic Server using SAS/ACCESS engines. This loads the data into memory making it available to SAS Visual Analytics applications.
Normal MDM functionality does not require an access engine. However, if your SAS MDM product bundle includes reporting capabilities delivered through SAS Visual Analytics, you must have the following installed on the computer that hosts SAS LASR Analytic Server:
n for the SAS MDM reports, either SAS/ACCESS to Oracle if your SAS MDM target database is Oracle or SAS/ACCESS to ODBC if your SAS MDM target database is Microsoft SQL Server
n for the SAS MDM reports, SAS/ACCESS to Postgres SAS Management Console
This application enables users to manage groups, users, and roles on the SAS Metadata Server for all SAS MDM web applications. It also is the location where various web application configuration parameters are set.
Deployment Models
The most common type of deployment for SAS MDM is the physical deployment model. This model assumes that all the information necessary to construct a complete survivor record for an entity is stored in the hub. Source system keys are also stored in the hub so that information used to identify and describe entities can be recorded. This supports the ability to link or reference source system data, provides traceability for the contributor records, and describes key relationships with the data as it exists in the hub.
With this approach, uniquely identifying information for entities is stored in the hub, along with other dependent attributes. You can access the survivor record by querying the hub by itself, without the need to refer to the systems of record. This approach simplifies the task of constructing the survivor record, but results in higher storage requirements.
The physical deployment model is the primary implementation, but SAS MDM also works in conjunction with other technologies to provide functionality that supports deployment styles such as hybrid MDM, registry-based MDM, reference-style MDM, and other integration scenarios.
Integrating Other Applications with SAS
MDM
You can integrate other end-user or enterprise applications, as well as other Extraction, Transformation, and Loading (ETL) software with SAS MDM. Two methods for integration are as follows:
n direct-database or flat-file access, running batch load, or batch update processes. In this case, the DataFlux Data Management Server can connect directly to data sources, transform the data, and load it into the hub.
n communicating with the DataFlux Data Management Server using web services. Any application or process that can make a web service call can send data to the hub through DataFlux Data Management Server and receive data from the hub in the same manner.
Both methods are typically used to interact with SAS MDM. In some cases it might make sense to communicate directly with DataFlux Data Management Server from an application integration layer of an enterprise application such as Siebel or SAP. In other cases, using an enterprise messaging mechanism such as TIBCO or webMethods might be more practical if that infrastructure has already been deployed within your organization.
You also have the option of making web service calls directly from a .NET or Java component or application that can use web services. This might be common in circumstances where internally designed and built operational or reporting processes need to interact with the DataFlux Data Management Server to access customer or service data inside the hub.
2
Installing SAS MDM
Installing the Software for the First Time . . . 9
Overview . . . 9
Pre-Installation . . . 10
Post-Installation . . . 11
SAS MDM Update Process . . . 11
Overview . . . 11
Prerequisites . . . 11
Migration . . . 11
Post-Update . . . 12
System Requirements . . . 12
SAS MDM Content . . . 12
Installing the Software for the First Time
Overview
SAS MDM is available through SAS delivery channels. For information about installing this product, see your SAS Software Order Email (SOE).
The following table lists default software locations: Description Default Path
Windows installation <SAS Home Directory>
\<product_instance_name>\<version>
UNIX installation <SAS Home Directory>/
<product_instance_name>/<version>
SAS MDM support files and the associated data management repository on client machines
C:\ProgramData\SAS\DataManagement \FileStorage\SASMDM
SAS mid-tier servers \SAS\<configuration_name>
Note: In the descriptions in this guide, <SAS MDM Install Directory> represents C:\ProgramData\SAS\DataManagement\FileStorage\.
SAS MDM installation and configuration is a multi-step process. Depending on your target host systems, the process might need to be repeated on multiple computers if required by your deployment plan.
Pre-Installation
Your SAS SOE directs you to the complete pre-installation checklist.
Outstanding SAS Notes about installation are available at the following location: http://support.sas.com/notes/index.html.
Here is the basic pre-installation information:
n Your plan file and sid file must be in a directory accessible to the SAS Deployment Wizard. Accept the SAS Deployment Wizard default configuration settings unless you are otherwise instructed.
n The SAS Data Management Console can be configured to give you access to SAS Visual Analytics through an application link. If you intend to use this feature, ensure that all prerequisites for the installation of SAS Visual Analytics have been met.
Note: The delayed deployment of SAS Visual Analytics Administration and Reporting is supported.
n JDBC drivers must be downloaded from the website of the database vendor before beginning the installation process. The SAS Deployment Wizard prompts you for the correct JDBC driver. The SAS MDM web application requires these files to connect to the SAS MDM target database
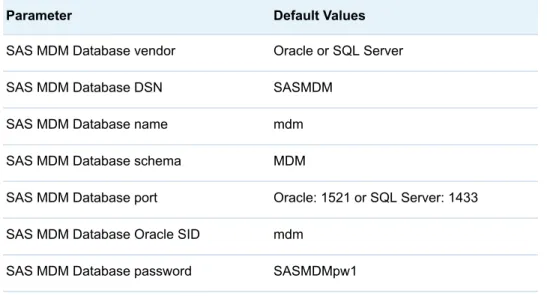
During the installation and configuration process, you are asked for information about your target SAS MDM database. The target database is the Oracle or SQL Server database into which your master data is loaded. DataFlux Data Management Studio and DataFlux Data Management Server must also connect to the SAS MDM target database. Have the following information available before you start the installation process:
Table 2.1 Database Parameters
Parameter Default Values
SAS MDM Database vendor Oracle or SQL Server SAS MDM Database DSN SASMDM
SAS MDM Database name mdm SAS MDM Database schema MDM
SAS MDM Database port Oracle: 1521 or SQL Server: 1433 SAS MDM Database Oracle SID mdm
SAS MDM Database password SASMDMpw1
SAS MDM Database host Host where the database is installed
For more information about how to define users, schemas, tablespaces, and other key features required for SAS MDM to deploy correctly, see Chapter 3, “Configuring Databases,” on page 15. At a minimum, you must supply database and user configuration information, or the application does not start successfully.
Post-Installation
For post-installation configuration instructions, see Chapter 4, “Configuring SAS MDM,” on page 21.
SAS MDM Update Process
Overview
If you already have SAS MDM installed, the installation and configuration process takes steps to upgrade your existing environment. This involves an MDM database schema evolution process, updates to web applications, and the delivery of updated or new MDM jobs in the DataFlux Data Management
Platform environment. Several manual post-installation steps are described in this guide, the most important of which is the MDM database schema evolution process.
Prerequisites
Prerequisites for the SAS MDM update process are as follows:
n Back up your SAS MDM database before beginning the update process. After you have run the automated installation process, you must manually upgrade the MDM database schema. See Step 4 on page 26 for details. n Back up your SAS Data Remediation database before beginning the update
process. This database is updated to the latest version.
n The automated installation process makes backups of your data
management repository file directories in a predetermined location for both DataFlux Data Management Studio and DataFlux Data Management Server. If you prefer to back up these directories to another location, you must copy them manually.
n Have SAS MDM database connection information available when you start the installation process. You might be prompted for DSN, schema, user name, and password information depending on your specific configuration.
Migration
Migration from DataFlux qMDM Solution to SAS MDM is not supported. For help with migration issues, contact SAS Information Management Consulting at the following locations:
http://www.sas.com/software/information-management/consulting.html and http://www.sas.com/reg/standard/corp/gendetail.
Post-Update
For post-update configuration instructions, see “Post-Update Tasks for SAS MDM Updates” on page 26.
System Requirements
You can review system requirements for SAS products at the following location: http://support.sas.com/documentation/installcenter/index.html
Select the release. A search window for that install center documentation appears. Search for your product name. A results page appears with links to the system requirements for your software.
SAS MDM Content
The SAS MDM installation process copies several directories and many files onto your systems. On DataFlux Data Management Studio, a repository named SASMDM is created for you. This repository contains all the files associated with SAS MDM, including data jobs that can be run on the client or on DataFlux Data Management Server, database scripts, sample workflow templates, and other files.
On DataFlux Data Management Server, this information is copied into sasmdm folders in the var directory.
On Windows, the directory structure looks like this:
C:\ProgramData\SAS\DataManagement
\DataStorage [Studio repository metadata] \FileStorage\batch_jobs\sasmdm [All batch data jobs for SAS MDM]
\data_services\sasmdm [All real-time data service jobs for SAS MDM] \process_services\sasmdm [All process server jobs for SAS MDM]
\SASMDM\archive [Location where artifacts from the data archiving process reside]
\data [Location for temporary data files]
\logs [Location for log files generated by certain SAS MDM processes like bulk loading]
\samples\data [Source data files for sample entities] \scripts [Script files associated with sample entities] \scripts [Database creation scripts and other metadata support files]
\workflows [Example workflow templates] C:\Program Files\SASHome\DataFluxDataManagementServer\2.6\var
\batch_jobs\sasmdm [All batch data jobs for SAS MDM]
\data_services\sasmdm [All real-time data service jobs for SAS MDM] \process_services\sasmdm [All process server jobs for SAS MDM]
\sasmdm\archive [Location where artifacts from the data archiving process reside] \data [Location for temporary data files]
\logs [Location for log files generated by certain SAS MDM processes like bulk loading]
\samples\data [Source data files for sample entities] \scripts [Script files associated with sample entities]
\scripts [Database creation scripts and other metadata support files] \workflows [Example workflow templates]
3
Configuring Databases
Metadata and Instance Data . . . 15
Building the SAS MDM Repository . . . 15
Overview . . . 15
Creating Databases and Tablespaces . . . 16
Setting Databases for Encryption . . . 17
Creating a Data Source . . . 18
Special Database Driver Considerations . . . 19
DNS Resolution of Host Names . . . 19
Using Database Utilities . . . 20
Metadata and Instance Data
SAS MDM builds a repository of metadata and instance data. This requires, at a minimum, either Oracle 11gR2, 12c, or SQL Server 2012. Ensure that the character set for the database supports your data requirements. For example, not all accented characters (such as the cedilla, umlaut, or circumflex
characters) or special-use characters (such as trademark, copyright, or Euro symbols) can be stored in all character sets. SAS recommends using a UTF character set to ensure maximum compatibility between the data and your database. SAS also recommends that databases be configured to ignore accents when performing character comparisons.
Building the SAS MDM Repository
Overview
This section explains the process of creating a new SAS MDM repository. You must have access to a relational database system and have read, write, and table creation permissions. This database system can be either local or on a network.
The first steps in creating a repository are as follows:
1 Create a user or schema named MDM defining common privileges (for example, table reads) as well as the following:
n create procedure
n create sequence n create table n create view n create trigger
2 (Optional) Grant extra tablespace to this schema, depending on your database configuration.
3 (Optional) Create a temporary user or schema for development activities that can add, modify, and drop database objects as needed in that schema.
Note: For Oracle installations, a separate schema must be created to manage encryption. The user name mdm_secure and table name mdm_secure_info must not be changed. Database limitations for encryption also apply.
Creating Databases and Tablespaces
Overview
The creation of databases should use the standards and best practices of your organization. The commands that follow are examples and can be modified to meet your requirements.
Oracle
For Oracle installations, you create tablespaces to hold data and indexes, modifying values as needed for your system. Note that the file
mdm_oracle_ddl.sql is hardcoded to use QMDM_DATA and QMDM_INDICES as tablespace names. If you are not using the same tablespace names, then the file mdm_oracle_ddl.sql must be modified to match the tablespace names that you use. For more information, see your database documentation.
As the sysdba, execute the following SQL statements after modifying them as required for your installation:
-- create new tablespace
create tablespace qmdm_data datafile
'C:\oracle\product\11.2.0\oradata\sas\qmdm_data.dbf' size 10M autoextend
on extent management local autoallocate; create tablespace qmdm_indices datafile
'C:\oracle\product\11.2.0\oradata\sas\qmdm_indices.dbf' size 10M autoextend
on extent management local autoallocate; -- create mdm user and grant privileges
create user MDM identified by SASMDMpw1 default tablespace
qmdm_data quota unlimited on qmdm_data quota unlimited on qmdm_indices; grant connect, resource, create table, create view, create procedure, create trigger, create session, create sequence to MDM;
SQL Server
For SQL Server installations, create a separate database for SAS MDM. Do not install it in the master database. For more information, see your database documentation.
As the sa user, execute the following SQL statements after modifying them as required for your installation:
--Create database and login create database mdm
create login mdm with password = 'SASMDMpw1',CHECK_POLICY=OFF; go
-- Create user use mdm;
create user mdm for login mdm with default_schema=mdm;
grant connect, create table, create view, create procedure, create schema,showplan to mdm; grant execute on schema::dbo to mdm;
go
--Create schema
create schema mdm authorization mdm; go
Setting Databases for Encryption
Overview
SAS MDM provides the ability to encrypt data being stored in the hub. This feature requires additional settings and grants for Oracle and SQL Server. Even if you do not use encryption, you must set your SAS MDM database
environment to support it. Oracle
For Oracle installations, you must create a separate user to manage encryption. The user name mdm_secure and table name mdm_secure_info must not be changed. Database limitations for encryption also apply.
To create the separate user, execute the following code:
-- create mdm_secure schema
create user mdm_secure identified by SASMDMpw1 default tablespace qmdm_data quota unlimited on qmdm_data quota unlimited on qmdm_indices; grant connect, resource, create table to mdm_secure;
grant execute on UTL_RAW to mdm_secure; -- create secure info table
create table mdm_secure.MDM_SECURE_INFO (
MDM_ENCRYPTION_KEY RAW(2000) )
tablespace QMDM_DATA;
-- Insert key into table
insert into mdm_secure.mdm_secure_info
select utl_raw.cast_to_raw('sasmdm') from dual; -- Grant privileges to MDM user
grant execute on DBMS_CRYPTO to MDM; grant execute on UTL_RAW to MDM;
grant select on mdm_secure.mdm_secure_info to MDM;
SQL Server
For SQL Server installations, you must create an encryption key and certificate. The key name qMDMKey and certificate name qMDMCer must not be changed. Database limitations for encryption also apply.
As the sa user, execute the following code
use mdm;
-- Create encryption certificate and key
create master key encryption by password='SASMDMpw1'; create certificate qMDMCer with subject='sasmdm';
create symmetric key qMDMKey with algorithm=triple_des encryption by certificate qMDMCer;
go
grant control on certificate :: [qMDMCer] to [mdm];
grant view definition on symmetric key :: [qMDMKey] to [mdm]; go
Creating a Data Source
SAS MDM accesses DataFlux services on DataFlux Data Management Server, and those services access the relational database that hosts the SAS MDM database. To access a database with DataFlux Data Management Studio, an Open Database Connectivity (ODBC) driver for the specified DBMS must be installed, and the database must be configured as an ODBC data source. When this has been completed successfully, the database name appears in the Data Connections folder on the DataFlux Data Management Studio riser.
The SAS MDM installation and configuration process creates the required data source names (DSNs) for you. DSNs are created using the DataFlux ODBC Wire Protocol drivers for either Oracle or SQL Server with the correct driver options set. These two drivers are the only ones supported for communicating with the SAS MDM target database from the DataFlux Data Management Platform.
If you enter incorrect information during the installation process for your SAS MDM target database, you can manually create DSNs as needed using the appropriate mechanism as documented in the ODBC Reference documentation that is available in every DataFlux Data Management Studio installation. In the DataFlux Data Management Studio Search riser, search for DSN, and then view the topics Adding ODBC Connections and Maintaining Data Connections for the Server.
Remember to use the saved connection functionality in DataFlux Data Management Server and DataFlux Data Management Studio once you have added or amended the SAS MDM database DSN settings.
Special Database Driver Considerations
Because SAS MDM uses stored procedures in the target database, you must enable these procedures using ODBC Connection Manager when configuring your database connections. These settings are applied for you during the SAS MDM installation and configuration process and are shown here for reference. For example, if you want to use the Oracle Wire Protocol Driver, you must enable the following settings:
Table 3.1 Driver Settings
Advanced Settings Performance Settings
Application Using Threads Use Current Schema for SQL Procedures Enable Procedure Returns Results Catalog Functions Include Synonyms Enable SQLDescribeParam Enable Scrollable Cursors
Describe at Prepare Wire Protocol Mode: 2 Enable N-Char Support
Note:
n The DSN must be configured in the mdm_macros.cfg file. The SAS MDM installer default DSN is SASMDM, but the DSN can be edited as needed. If you edit the DSN, ensure that the mdm_macros.cfg file is updated with the new name (including the copy on the DataFlux Data Management Server). n Additional driver settings can be configured for optimum performance. For
more information, see your database driver documentation.
DNS Resolution of Host Names
You might encounter slow response time with Domain Name System (DNS) resolution of host names for data sources. Consider using the IP Address in the ODBC DSN configuration to avoid DNS lookups. You can also modify the hosts file for your server to avoid DNS lookups. For Windows platforms, this file is typically C:\Windows\System32\drivers\etc\hosts. For UNIX platforms, the file is etc/hosts.
Using Database Utilities
Some SAS MDM batch jobs give you the option of using database utilities to improve software interactions with the database. For example, bulk load jobs can be set to use database utilities that might perform the operations more efficiently. Some of these job templates use calls to command-line applications that are specific to either Oracle or SQL Server. SAS MDM requires access to these applications.
Here are the database-specific applications: n Oracle
o SQL*Plus o SQL Loader n SQL Server
o sqlcmd o bcp
You are not typically required to use the database utilities. However, for bulk-loading operations, you might see large performance gains when bulk-loading your hub. See your database documentation for more information about the specific calls.
To use Oracle database utilities properly:
1 Do one of the following:
n On Windows, set the path to the Oracle bin directory in your system PATH variable.
n On UNIX, set the system variable ORACLE_HOME. Then export $ORACLE_HOME to the PATH.
2 Enter the database location description in the Oracle tnsnames.ora file. The following is a typical format:
ORCL =
(DESCRIPTION = (ADDRESS_LIST =
(ADDRESS = (PROTOCOL = TCP)(HOST = your_server_name)(PORT = 1521))
)
(CONNECT_DATA =
(SERVICE_NAME = orcl) )
)
4
Configuring SAS MDM
Post-Installation Tasks for New Installations . . . 21 Post-Update Tasks for SAS MDM Updates . . . 26 Remediation Data Migration . . . 27 DataFlux Data Management Server Communication . . . 27 Setting SAS MDM Macros . . . 28 Overview . . . 28 Database Values . . . 28 Macro Descriptions . . . 29 Security Considerations for SAS MDM . . . 31 Overview . . . 31 Setting Permissions . . . 31 Enabling IP Address-Based Security . . . 33 SAS MDM Logging . . . 33 Installation Log . . . 33 Database Script Logs . . . 33 Data Management Server and Studio Application Logs . . . 34 SAS MDM Logs . . . 34
Post-Installation Tasks for New
Installations
After the SAS Deployment Wizard has finished the installation, you can complete post-installation tasks.
Note: On Windows systems, you might need to modify file directory security options to display some of the locations where SAS MDM content is stored. Here are the post-installation tasks:
1 Verify that DSNs have been created for the SAS MDM target database. By default, these are set to SASMDM.
n For DataFlux Data Management Studio, open DataFlux Data Management Studio and verify through the Data riser that you have access to your database. Your data source should be listed under Data Connections.
n For DataFlux Data Management Server:
1 Add a server under the Data Management Servers riser.
2 Open the server and locate the Data Connections tab.
3 Open the Manage ODBC Connections dialog box. Your data source should be listed.
2 Ensure that the connections in DataFlux Data Management Studio are saved for both DataFlux Data Management Studio and for DataFlux Data
Management Server.
3 Verify that the mdm_macros.cfg file for DataFlux Data Management Studio and for DataFlux Data Management Server contains the correct information for the following macros: MDM_HUB_DB, MDM_DSN, MDM_SCHEMA, and MDM_PACKAGE. See “Setting SAS MDM Macros” on page 28 for details.
4 Because a SAS Quality Knowledge Base (QKB) was installed by the SAS Deployment Wizard, you must take the following actions:
a Verify that the mdm_macros.cfg file for DataFlux Data Management Studio and for DataFlux Data Management Server contains the correct QKB location information for the MDM_QKB macro. This was set during installation.
b If you do not want to use the latest QKB supplied by the SAS MDM installation process, you must manually change the MDM_QKB macros for DataFlux Data Management Studio and DataFlux Data Management Server and point to your original QKB location.
c If you edit the mdm_macros.cfg file, you must restart DataFlux Data Management Server.
If you need to download another version of the QKB, see this web page: http://support.sas.com/qkbdownload.
5 To use Data Remediation functionality for DataFlux Data Management Studio and for DataFlux Data Management Server, review the mdm_macros.cfg file and mdm_remediation_macros.cfg macro files. Ensure that the correct information has been set by the installation process for the following macros: MDM_REMEDIATION_URL, and MDM_REMEDIATION_LIBS.
See “Macro Descriptions” on page 29 for more information about macros.
6 (Optional) Download and install address verification data from http:// support.sas.com/downloads/browse.htm?fil=3&cat=16.
7 Start the DataFlux Data Management Server service or process from the machine on which it was installed.
8 Add an administrative user to the SAS Administrators group and add users to the default Data Management groups in the SAS Management Console. For setup and configuration, ensure that the user identity for administrative and configuration tasks is a member of the SAS Administrators and Data Management Administrators groups. See “Security Considerations for SAS MDM” on page 31 for complete information.
9 Log on to DataFlux Data Management Server from DataFlux Data
Management Studio as a member of the SAS Administrators group. Assign access privileges to other groups that need to access the Master Data 22 Chapter 4 / Configuring SAS MDM
Management application. See “Security Considerations for SAS MDM” on page 31 for complete information.
10(Optional) Configure Workflow as follows:
a As a system administrator, add the Data Management Administrators group to the ROLE_WORKFLOW_ADMINISTRATOR role using the SAS Web Administration Console. The default URL is http://<host>:<port>/ SASAdmin. The default port for Windows systems is 80. The default port for UNIX systems is 7980.
b Open SAS Workflow Studio and connect to the default SAS environment.
c Log on to the server as a member of the Data Management
Administrators group and upload MDM Tag and MDM Lifecycle workflows to the SAS Workflow server. Ensure that you activate the workflows. The workflow template files are located in the repository (<SAS MDM Install Directory>/workflows) created during installation.
d Enable email notifications through Preferences found on the top right side in the SAS Web Administration Console.
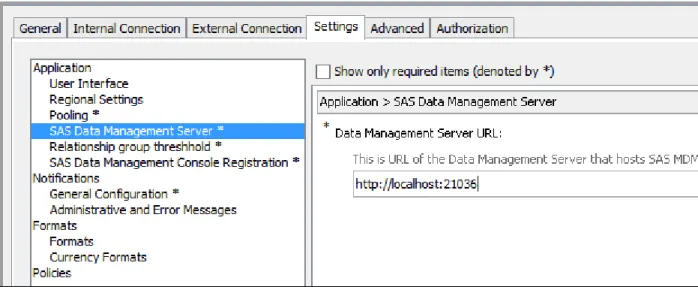
11If the SAS Deployment Wizard was not able to determine the location of the DataFlux Data Management Server instance that supports SAS MDM, you must set it in SAS Management Console. Navigate to Application
ManagementConfiguration ManagerSAS Application
Infrastructure and right-click MDM. Select PropertiesSettings
ApplicationSAS Data Management Server and enter the correct information.
Figure 4.1 SAS Management Console
Note: You might need to restart your application server for this change to take effect. If you have trouble getting the SAS MDM web application to connect to DataFlux Data Management Server, verify that DataFlux Data Management Server is accessible via the network. See “DataFlux Data Management Server Communication” on page 27 for more information.
12Verify the default connection information in the DataFlux Data Management Studio install_schema.djf job and modify it if necessary.
a Open this job with DataFlux Data Management Studio. The Inputs tab for the Echo node contains the defaults.
b Follow the instructions in install_schema.djf to make the necessary changes for Oracle and SQL Server. Other values, such as the database DSN and schema information, are taken from the appropriate, previously defined macro variables. See “Setting SAS MDM Macros” on page 28 for more information.
c After verifying the information, execute install_schema.djf to install the schema.
d If the scripts do not run, you might need to edit the command line used to call the database. Open install_schema.djf in DataFlux Data Management Studio and follow the instructions in the Expression nodes for your
specific database.
e If your DataFlux Data Management Studio installation does not have access to SQL*Plus or sqlcmd, you must install the schema without using DataFlux Data Management Studio. You can use a database
management tool such as PL/SQL Developer or SQL Developer. For example, if you are using an Oracle database, you can use SQL*Plus to execute the DDL for your database. If you do not have the correct database command-line access from your environment, an administrator using the correct user name or schema defined for SAS MDM must run the following scripts:
Table 4.1 Scripts
Database Scripts
Oracle mdm_oracle_ddl.sql mdm_oracle_procs.sql SQL Server mdm_sql_server_procs.sql
mdm_sql_server_ddl.sql
13Run the add_default_meta.djf job to install the metadata. This job is located in the <SAS MDM Install Directory>\batch_jobs\sasmdm directory.
14(Optional) Run the add_ui_language_meta_<locale>.djf job to install the translatable metadata. For example, to load the English metadata, use add_ui_language_meta_enusa.djf. These jobs are located in the <SAS MDM Install Directory>\batch_jobs\sasmdm directory.
15(Optional) If you want to load sample entities and data into your SAS MDM database, run the add_sample_meta.djf job. These jobs are located in the <SAS MDM Install Directory>\batch_jobs\sasmdm directory.
16(Optional) To load translatable metadata for the sample entity types, run the add_ui_language_sample_<locale>.djf job. For example, to load the English sample metadata, use add_ui_language_sample_enusa.djf. These jobs are located in the <SAS MDM Install Directory>\batch_jobs\sasmdm directory.
17To access SAS MDM and associated applications, open the SAS Data Management Console at http://<host>:<port>/SASDataManagement. The default port for Windows systems is 80. The default port for UNIX systems is 7980.
18(Optional) To generate jobs that you can use to load and interact with sample data, perform the following tasks:
Note: See the SAS MDM: User’s Guide for instructions about using the SAS MDM user interface.
a Open SAS Data Management Console.
b Click Data Model.
c On the Data Model tab, select the sample entity types into which you want to load data.
d Generate the associated jobs and services. Omit the generation of the _stnd jobs and mdm_extract_individual.ddf and
mdm_push_individual.ddf jobs as they exist already and contain pre-defined data quality transformations necessary to support the sample entities.
e On the Data Model tab, select all the relationship types.
f Generate the associated jobs and services.
g From the SAS Data Management Console, click Source Systems.
h On the Source Systems tab, expand a source system, select an entity, and then invoke the Add/Update tool for that entity.
19For multi-machine deployments to use SAS Data Remediation in conjunction with SAS MDM, you must copy several configuration files from your DataFlux Data Management Studio client computer to your DataFlux Data
Management Server computer. These files enable SAS MDM to SAS Data Remediation communication.
Table 4.2 File Locations
Files to be Copied Destination Location DMSTUDIOHOME\etc\macros
\mdm_remediation_macros.cfg
DMSERVERHOME\etc\macros \mdm_remediation_macros.cfg
DMSTUDIOHOME\lib\mdm
\sas.dm.mdm.dataremediation.xml
DMSERVERHOME\lib\mdm
\sas.dm.mdm.dataremediation.xml
DMSTUDIOHOME\lib\mdm
\sas.dm.mdm.migrateremediation. xml
DMSERVERHOME\lib\mdm
\sas.dm.mdm.migrateremediation. xml
Post-Update Tasks for SAS MDM Updates
To update from a previous version of SAS MDM:
1 Regenerate all jobs. You must manually move modifications that you have made to the standard generated output to the newly generated jobs. If the Remediation node is active in other SAS MDM jobs because of
customizations, those jobs must be manually modified as well. If the Remediation node is used, you must modify these jobs through the Advanced Properties settings of the Remediation node.
2 MDM system-level jobs are updated in your DataFlux Data Management Studio and DataFlux Data Management Server MDM repositories. Backup directories were created for you when you ran the automated installation process. Entity-specific MDM jobs are not automatically updated. After updating to a new SAS MDM version, regenerate entity-specific jobs using the Data Model component. Previous customizations must be manually migrated to the newly generated jobs.
3 Modifications to the workflow templates used by SAS MDM support the pass-through of URL data from SAS MDM. You must manually upload the
modified workflow templates to the workflow server using SAS Workflow Studio. See post-installation Step 10 on page 23 for more information about how to do this. If you made customizations to your workflow templates and have them in production, review the new MDM workflow templates to see whether you must manually edit your customized workflows to perform correctly with the newer SAS MDM functionality.
4 Run the evolve_schema_41m1.djf batch job to schema-evolve the previous SAS MDM 4.1m1 schema. This job appears in the batch_jobs/sasmdm folder. Modify the echo node at the top of the job according to the instructions in the job.
Note: Because of the addition of relationship type attributes, values in the MDM_REL_TYPE table must be sized to 23 characters or less to run the schema evolve process successfully. If you have values in the
MDM_REL_TYPE table larger than 23, change the column size before attempting to run the schema evolve script. Only the underscore special character is allowed. Remove any other special characters in the MDM_REL_TYP table before attempting to execute the schema evolve script.
5 (Optional) If you are upgrading to a newer QKB, you might need to increase the column lengths for standardize and match code columns in the hub. Review the documentation for both your current and the new QKB to see whether the definitions that you are using with your SAS MDM entity have changed. If the definitions have changed, perform the following steps:
a Modify the column lengths for standardize and match code columns in your entity tables.
b Update the columns length metadata for the affected entities in the Data Model component.
c Remember that customizations that you have added to generated jobs are not carried over to newly generated jobs. Back up the original
versions of any jobs affected by your changes and regenerate all affected entity type jobs. Add your customizations to the newly generated jobs.
Note: After the installation is upgraded, all users of the Data Management Console must clear their browser caches.
Remediation Data Migration
The mechanism for maintaining records for remediation has changed from a file-based method to a database method. If you want to maintain your existing remediation items after SAS MDM installation, any existing remediation data must be migrated into the database. SAS MDM provides a Java program to perform this migration. To use it, your classpath environment variable must include all of the JAR files in the directory identified by the
MDM_REMEDIATION_LIBS macro.
The program uses a configuration file to connect to the SAS Data Remediation database. The file,sas.dm.mdm.migrateremediation.xml, appears in the same directory as the required JAR files.
java -Dmigrateremediation.config=your_path\sas.dm.mdm.migrateremediation.xml com.sas.dm.mdm.dataremediation.MigrateRemediationFiles
You see the following changes after the program completes successfully: n Sas_rem_items for file-based remediation tasks contain an app_key if the
record had values for both the source system ID and the source system record ID.
n Sas_rem_items contain updated keys for file-based remediation tasks. These appear as record:///id from mdm_remediation_data.
n Mdm_remediation_data contains an entry for each of the records that has been migrated.
After verifying that the content has migrated successfully, you can remove the files for the remediation records.
DataFlux Data Management Server
Communication
Here are some additional considerations for setting the address value that allows communication with DataFlux Data Management Server:
n If your environment contains a host name that is associated with a single IP address, then host name and IP address can be used interchangeably on a client/server connection. You can use either for the DataFlux Data
Management Server setting in SAS Management Console.
n If your environment contains multiple IP addresses (at least one IPv4 and one IPv6) that are associated with a host name, then a host name on one end of the connection might not resolve to the correct IP address at the other
end of a connection. In these cases, you must set the following value in dmserver.cfg to a blank value: dmserver/soap/listen_host = [blank].
Setting SAS MDM Macros
Overview
SAS MDM jobs and services require certain values in the mdm_macros.cfg file on all clients and on the server. These values are automatically added during the SAS MDM installation. If you need to make changes to your mdm_macros.cfg file after the SAS MDM installation and configuration process, you can edit the mdm_macros.cfg file on your client computer using DataFlux Data Management Studio. Some of the paths used as values for the keys in this file must be modified for UNIX.
After making changes to the mdm_macros.cfg file, follow these steps:
1 If you change macro values through the DataFlux Data Management Studio interface, an mdm_macros.cfg file is also created in \Users
\<Your_User_ID>\AppData\Roaming\<Studio Install Directory> \<version>\etc\macros. You must combine those values with the values in the mdm_macros.cfg file in\Program Files\<Studio Install Directory>\<version>\etc\macros without duplicating key names.
2 After making these changes, you must copy the combined file to the macros directory on DataFlux Data Management Server. If your DataFlux Data Management Server system runs on another platform, ensure that the path delimiters are appropriate for the platform.
3 If you run SAS MDM services on a DataFlux Data Management Server as web services, you must ensure that DataFlux Data Management Server has access to the mdm_macros.cfg file.
For more information about the configured macros and their use, see the mdm_macros.cfg file.
Database Values
The SAS MDM installation process updates database connection values in your SAS MDM macro files. If you need to modify these after the installation process is completed, the values that you use for your database must be reflected in the mdm_macros.cfg file or files for your installation. For Oracle, the schema name must be in uppercase letters.
SQL Server does not use packages for stored procedures, nor does it necessarily separate logon information from schemas. Modify the mdm_macros.cfg file or files with the following values:
MDM_HUB_DB=SQL SERVER MDM_SCHEMA=mdm42 MDM_PACKAGE=
Macro Descriptions
The following table lists the macros for the mdm_macros.cfg file along with their default values and descriptions. When editing this file, do not set the macros MDM_CLUSTER_MEM, MDM_BRANCH_MEM, MDM_SORT_MEM, and MDM_SURVIVE_MEM to values lower than 4 MB or 4,194,304 bytes. In some cases, doing so can cause the various processes to stop and return memory-related errors.
Here are the macro default values and descriptions: Table 4.3 MDM Macros
Macro with Default Description
MDM_DEF_TIMESTAMP_FORMAT MM/DD/YYYY hh:mm:ss
Default timestamp format for the SAS MDM repository.
MDM_DEF_DATE_FORMAT MM/DD/YYYY
Default date format for the SAS MDM repository.
MDM_BRANCH_MEM 4194304
Branch memory limit.
MDM_SORT_MEM 16777216
Sort memory limit.
MDM_CLUSTER_MEM 16777216
Cluster memory limit.
MDM_SURVIVE_MEM 16
Survivorship memory limit (MB).
MDM_MAX_ROWS 0
File input limit (primarily bulk jobs). This macro is deprecated.
MDM_SORT_THREADS 8
Sort thread limit.
MDM_MAX_CLUSTERS 1000
Maximum number of entries returned by entity search.
MDM_QKB The fully qualified path to the QKB. MDM_ARCHIVE
C:\Program Files\SASHome
\DataFluxDataManagementServer\2.6\var\sasmdm\archive\
Output path from the archival job.
MDM_DATA
C:\Program Files\SASHome
\DataFluxDataManagementServer\2.6\var\sasmdm\data\
Output path for bulk jobs.
Macro with Default Description MDM_LOGS
C:\Program Files\SASHome
\DataFluxDataManagementServer\2.6\var\sasmdm\logs\
Output path for log files.
MDM_SCRIPTS
C:\Program Files\SASHome
\DataFluxDataManagementServer\2.6\var\sasmdm\scripts\
Path to the scripts and metadata directory.
MDM_SAMPLE_DATA C:\Program Files\SASHome
\DataFluxDataManagementServer\2.6\var\sasmdm\samples \data\
The sample data directory.
MDM_SAMPLE_SCRIPTS C:\Program Files\SASHome
\DataFluxDataManagementServer\2.6\var\sasmdm\samples \scripts\
The sample scripts directory.
MDM_HUB_DB ORACLE
The database type: ORACLE or SQL SERVER.
MDM_DSN DSN=SASMDM
The name of the DSN for the SAS MDM repository.
MDM_SCHEMA MDM
The schema to use within the SAS MDM repository. This value should be all uppercase for Oracle.
MDM_PACKAGE MD.
The package for the stored procedure. Leave this blank for SQL Server.
MDM_OS_DELIMITER ;
OS-specific delimiter. Use ; for Windows and : for UNIX platforms.
MDM_REMEDIATION_LIBS C:\Program Files\SASHome
\DataFluxDataManagementServer\2.6\lib\mdm\
The location of the data remediation Java application.
The following table lists the macro for the mdm_remediation_macros.cfg file along with its default value and description
Table 4.4 Remediation Macros
Macro with Default Description
MDM_REMEDIATION_URL
http://localhost:80/SASDataRemediation/rest/groups
The location of the SAS Data Remediation REST web service application.
Security Considerations for SAS MDM
Overview
SAS MDM requires that security be enabled on DataFlux Data Management Server. The SAS MDM installation creates the following system settings for you:
dmserver/secure = yes
dmserver/secure/grp_admin = SASAdministrators
The installation process also defines the following Data Management user groups for you:
n Data Management Administrators n Data Management Stewards n Data Management Business Users n Data Management Business Approvers n Data Management Power Users n Data Management Executives
Use SAS Management Console to add users and groups to these groups or to define new ones for use with SAS MDM. Because SAS Administrators is set as the default group for grp_admin, you must assign at least one of your users to SAS Administrators so that the assigned user can modify Access Control Lists and other permissions for your SAS MDM users.
Permissions consist of Group and User permissions and Access Control Lists (ACLs). Group and User permissions determine the actions that users are allowed to take on the server. ACLs control which users are allowed to access jobs on the servers. If Group permissions and ACLs are not configured, DataFlux Data Management Server provides defaults. DataFlux Data Management Studio is used to create permissions and ACLs for the groups, jobs, and services that are deployed on the DataFlux Data Management Server. The permissions that are used for the jobs depend on the roles and the groups that you have defined and on the needs of your business.
Note: Security checks are made by DataFlux Data Management Server when a SOAP request is received. When a job calls another job directly, DataFlux Data Management Server is not involved. When a job sends DataFlux Data
Management Server a SOAP request to run another job using the real-time service node, the security check is made only at the top-level service.
For more information about setting up security parameters for users and groups, see the DataFlux Data Management Server: Administrator's Guide.
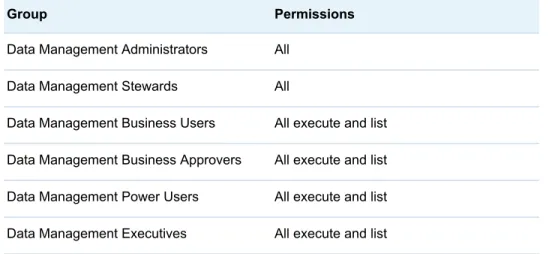
Setting Permissions
Group Permissions
On the Data Management Servers riser in DataFlux Data Management Studio, select the server to be configured. Use the Security tab to add groups to the server configuration, and modify the permissions appropriately.
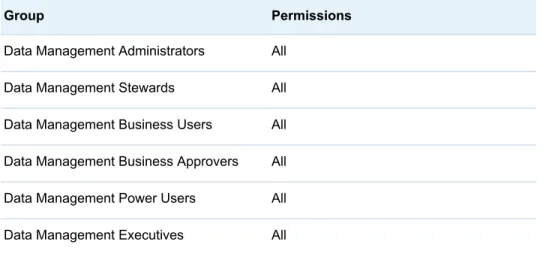
The following are initial recommendations and can be changed as required for your installation:
Table 4.5 Group Permissions
Group Permissions
Data Management Administrators All Data Management Stewards All
Data Management Business Users All execute and list Data Management Business Approvers All execute and list Data Management Power Users All execute and list Data Management Executives All execute and list
Access Control Lists
ACLs can be set up for each job or service to give access rights to individuals or groups. For example, assume that only a certain individual, or group of
individuals in an organization, is allowed to change records within SAS MDM. The user name or associated group can be given special access rights through an ACL. For sensitive services, an administrator might want to deny everyone access using the ACL and then explicitly allow some users or a group to access or run the job or service. For more information about setting up permission levels, see the DataFlux Data Management Server: Administrator's Guide. Batch Job Permissions
On the Data Management Servers riser in DataFlux Data Management Studio, select the server to be configured. Expand the Batch Jobs folder and establish the following ACLs in the SAS MDM folder.
Table 4.6 Batch Job Permissions
Group Permissions
Data Management Administrators All Data Management Stewards All Data Management Business Users None Data Management Business Approvers None Data Management Power Users None Data Management Executives None
Data Services Permissions
On the Data Management Servers riser in DataFlux Data Management Studio, select the server to be configured. Expand the Real-Time Data Services folder and establish the following ACLs in the SAS MDM folder.
Table 4.7 Data Services Permissions
Group Permissions
Data Management Administrators All Data Management Stewards All Data Management Business Users All Data Management Business Approvers All Data Management Power Users All Data Management Executives All
Note: You might want to make Data Management Stewards the owner of all SAS MDM jobs and services to facilitate maintenance activities.
Enabling IP Address-Based Security
SAS MDM must have access to DataFlux Data Management Server in order to function. Requests from users using SAS MDM to run jobs seem to originate from the application server, not from the computers of the users. Configuring DataFlux Data Management Server IP address-based security does not secure your system against web users. Instead, you can use request filters to block IP addresses from accessing your application server. For more information, see the DataFlux Data Management Server: Administrator's Guide and your application server documentation.
SAS MDM Logging
Installation Log
A log of the modifications made to your computer during installation is written to \<SAS Home Directory>\InstallMisc\InstallLogs.
Database Script Logs
The database scripts that install or modify the schema generate log files in <SAS MDM Install Directory>\sasmdm\logs, as defined by the MDM_LOGS macro. These log files can be useful in determining problems during the initial configuration of the repository.
Data Management Server and Studio Application
Logs
Log messages that document DataFlux Data Management Server activity or job statistics while running jobs and services locally through DataFlux Data
Management Studio or dfwfproc are recorded in log files specific to the software that you are running.
For more information about DataFlux Data Management Server and DataFlux Data Management Studio logging, see the DataFlux Data Management Studio: User’s Guide and the DataFlux Data Management Server: Administrator's Guide.
SAS MDM Logs
Logs for SAS MDM can be found on the application server that hosts them. They are typically found in a location similar to the following:
SAS MDM
..\Config\Lev1\Web\Logs\SASServer13_1\SASMDM.log SAS Data Management Console
..\Config\Lev1\Web\Logs\SASServer13_1\SASDataManagement.log Other logs that might be useful for troubleshooting might not be on the same system as SAS MDM. Examples are as follows:
SAS Workflow
..\Config\Lev1\Web\Logs
\SASServer1_1\SASWorkflowServicesx.x.log SAS Metadata Server
..\Config\Lev1\SASMeta\MetadataServer\Logs 34 Chapter 4 / Configuring SAS MDM
5
Localization Configuration
Enabling QKB Support for Other Locales . . . 35 Bulk Loading Data for Other Locales . . . 35
Enabling QKB Support for Other Locales
Each of the following services contains an embedded reference to the standardization job:
n mrm_add_<entity_type>.ddf n add_update_<entity_type>.ddf
n mdm_query_survivor_<entity_type>.ddf n mdm_query_relationship_<entity_type>.ddf
By default, the job supports ENUSA. To change to a single locale (for example, DEDEU), replace the references to the ENUSA locale with DEDEU. To support multiple locales simultaneously, add branches to the job for each locale. Ensure that the locales that you need are supported by the QKB and that the respective QKB licenses are correct. For more information, see the “Enabling Data Quality” section of the SAS MDM User's Guide.
Bulk Loading Data for Other Locales
If you load data for other locales into your hub using database bulk-load utilities, ensure that the encoding in the add_update_<entity_type>.ddf jobs matches the codepage for your database. If these values do not match, some of the data might be translated into the database's codepage incorrectly.
The add_update_<entity_type>.ddf jobs interact with the DBMS bulk-load utilities by writing a data file representing your entities, and then invoking the bulk-load utilities with that data file as input. To change the encoding of the data file, open the Properties dialog box for the Write to Staging File node at the bottom of the job, and set the Encoding to a value that matches your database. In addition to setting the output file encoding, you might find it necessary to change the control files used by the database utilities, which guide the interpretation of the file contents.
Table 5.1 Database Control Files
Database Relevant Files
Oracle Look for the characterset parameter in .ctl files. SQL Server bcp files have a column collation field.
For more information, see your database documentation. 36 Chapter 5 / Localization Configuration