Application Note AN1904 LogoLoader for Handsets
HA57 SDK, HA57 EVO and HA59
Table of Contents
0 History... 3
0.1 Related Documents... 3
1 Introduction... 4
2 Needed Components ... 5
3 Installation of the LogoLoader ... 6
4 Short Description ... 7
5 Usage Instructions ... 8
5.1 Preparation of the Handset ... 8
5.2 Starting the Program ... 8
5.3 Set-up of the Serial Connection ... 8
5.4 Infobox ... 9
5.5 Logo Upload to the Handset... 9
5.6 "Enable Logo" Function... 11
5.7 Choosing a Logo Option... 11
5.8 Closing the Program... 12
6 Properties of the Logo File... 13
6.1 Requirements HA57 and HA57 SDK... 13
6.2 Requirements HA59 and HA57 EVO ... 13
7 Creating the Logo File Using Adobe Photoshop ... 14
7.1 Creating an Image File ... 14
7.2 Copy the image into the picture and align it carefully ... 15
7.3 Saving the image ... 15
0 History
Date Revision Author Comments
May 2019 1.0 CS First Release Table 1: History
0.1 Related Documents
Nr. Name Remarks
1 AN1800 HA57 EVO User Manual Application Note 1800
2 AN1902 Description API HA57 EVO Application Note 1902
3 AN1903 AppLoader HA57 SDK & HA57 EVO Application Note 1903 Table 2: Related Documents
1 Introduction
This document describes the program LogoLoader HA57 – HA59 SDK und EVO. The LogoLoader HA57 – HA59 SDK und EVO is a Windows® program, which facilitates the upload of a logo file onto a pei tel handset HA57 SDK, HA57 EVO or HA59. This logo file can be displayed alternatively to the pei tel logo during the initialization period of the handset.
• • • • • •
2 Needed Components
The following components are needed to upload a logo file to a handset:
Installation file of the LogoLoader
Logo file (see also 6 Properties of the Logo File)
Windows® PC (OS Windows® 7 SP1 or higher) with free serial COM-port Alternatively to the COM-Port: USB-to-RS232-Convertor
Handset HA57 SDK, HA57 EVO or HA59
ECU (Eval Com Unit), which facilitates the connection between handset and PC and as well supplies power to the handset
1. 2.
3 Installation of the LogoLoader
About the USB-to-RS232-Convertor:
Please note, that the USB-to-RS232-convertor comes with a driver package, which needs to get installed on the PC. These drivers are provided by the manufacturer of the USB-to-RS232-convertor.
Installation:
Start the installation by running the setup.exe.
Enter the administrator password, when asked to do so and follow the instructions on screen.
Notice
The program needs .NET Framework 3.5 SP1, which is supplied by the installation package and installed automatically when needed.
4 Short Description
Figure 1: Active LogoLoader-Window
1 Serial Interface:
COM Port: COMx[1] port selection
Open: Opens the connection to the handset.
Close: Closes the connection to the handset.
2 Infobox:
Device: Handset type
SW Version: Handset firmware version
3 Customer Logo:
File: Opens a window for the logo file selection.
Upload: Sends the logo file to the handset.
☑ Enable Logo: The logo file is displayed in the handset's display during initialization.
4 Logo:
Customer Logo, Default Logo and No Logo: Use these buttons to select, which logo is displayed during the initialization period of the handset.
Current Logo shows the current selection.
[1] "COMx" stands for the COM port number, which is automatically assigned by the PC;
1. 2.
3.
1. 2.
5 Usage Instructions
5.1 Preparation of the Handset
Plug the handset into the RJ50-jack of the ECU. Setting-up the connection between PC and ECU:
a) Either connect the ECU to a free serial COM port of the PC, using a suitable serial cable.
b) Or connect the ECU using a USB-to-RS232-convertor. If necessary, add a USB cable for extension.
Connect the ECU to the power supply.
5.2 Starting the Program
Start the LogoLoader by selecting LogoLoader HA57 – HA59 SDK und EVO in the Windows® Start menu.
If all the preparation work was done correctly (see also 5.1 Preparation of the Handset), the LogoLoader window opens. Otherwise, an error message is generated.
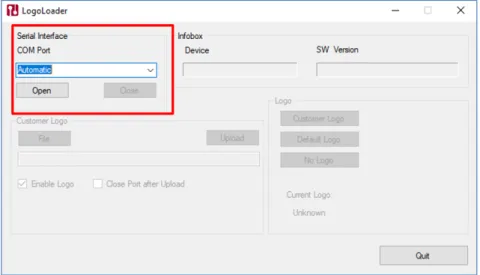
Figure 2: LogoLoader-Window after program start-up
5.3 Set-up of the Serial Connection
In the Serial Interface sector, select the correct COM port. Press Open.
Once the connection to the handset is established, all functions of the LogoLoader are available. The handset displays the writing "SERVICE".
Figure 3: LogoLoader-Window, all functions available
5.4 Infobox
The Infobox shows information read out of the handset.
Device: Handset type
SW Version: Handset firmware version
The software version of the LogoLoader program is shown in the title bar of the window.
5.5 Logo Upload to the Handset
For the preparation of the logo file see also 6 Properties of the Logo File.
Tip
Select Automatic to let the programsearch for the COM port automatically. During the search the program scrolls through all available COM ports.
Figure 4: LogoLoader-Window after selecting the path of the logo file
Step 1: Press File and select the required logo file. Step 2: Confirm the selection by pressing Open.
The program checks the data format of the logo file. If the file is ok, path and logo will be displayed in the program window. Otherwise, an error message will be generated.
Step 3: Press Upload.
The LogoLoader window displays a green progress bar.
Figure 5: Upload progress bar
Step 5: Press OK to close the confirmation window.
5.6 "Enable Logo" Function
☑ Check box checked The logo file is uploaded to the handset and displayed as start logo during initialization of the handset.
☐ Check box unchecked The logo file is only uploaded to the memory of the handset. It is not displayed as start logo during the initialization of the handset. Table 3: "Enable Logo"
5.7 Choosing a Logo Option
Select the logo option in the Logo section of the LogoLoader window. The following logo options determine which logo is displayed during the initialization of the handset.
Logo Option Description
Default Logo Logo of pei tel
Customer Logo Customer logo loaded onto the handset
No Logo No logo Table 4: Initialization logo options
5.8 Closing the Program
Pressing Quit closes the program and the handset initializes. During the initialization period, the chosen logo option is displayed in the handset's display.
6 Properties of the Logo File
Use the following parameters when creating a logo file with a graphic program.
Meeting these requirements is necessary; otherwise, an error message will be generated during the upload of the logo file to the handset.
6.1 Requirements HA57 and HA57 SDK
Parameters of the Logo ImageImage Width 128 Pixel
Image Height 160 Pixel
Layers 1
Color Depth Bits / Pixel 16
File Format BMP
Compression None
Table 5: Parameters of the image file (HA57 and HA57 SDK)
6.2 Requirements HA59 and HA57 EVO
Parameters of the Logo ImageImage Width 240 Pixel
Image Height 320 Pixel
Layers 1
Color Depth Bits / Pixel
16 (RGB 565)
• • • • • •
7 Creating the Logo File Using Adobe Photoshop
Program: Adobe Photoshop
Operating system: Windows or Mac OS
7.1 Creating an Image File
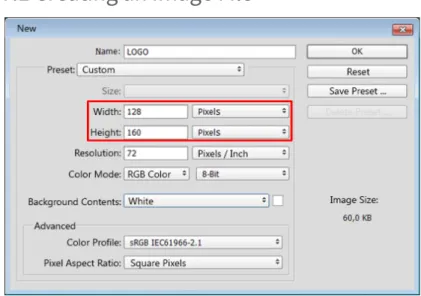
Figure 7: New image (example with values for HA57 and HA57 SDK) On your computer, start Photoshop.
Select File > New.
The New window opens. Enter width and height. You also might want to assign a name.
Do not touch any other settings! Confirm your choice with OK.
• • • • •
7.2 Copy the image into the picture and align it carefully
Figure 8: Logo on white background
7.3 Saving the image
In Photoshop, select File > Save as. Select a path for storage.
Assign a file name. Select file type BMP. Select Save.
Note
The image size equals the size of the display of the handset. We recommend aiming for a balanced arrangement.
•
• •
7.4 BMP Options Window
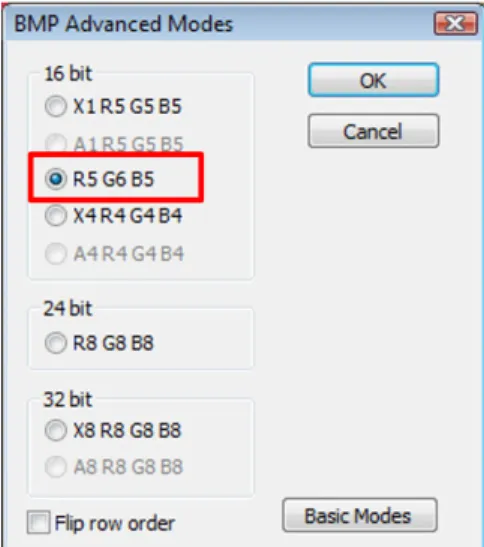
Figure 9: BMP Options
Select Advanced Modes.
Figure 10: BMP Advanced Modes
Select R5 G6 B5. Press OK.